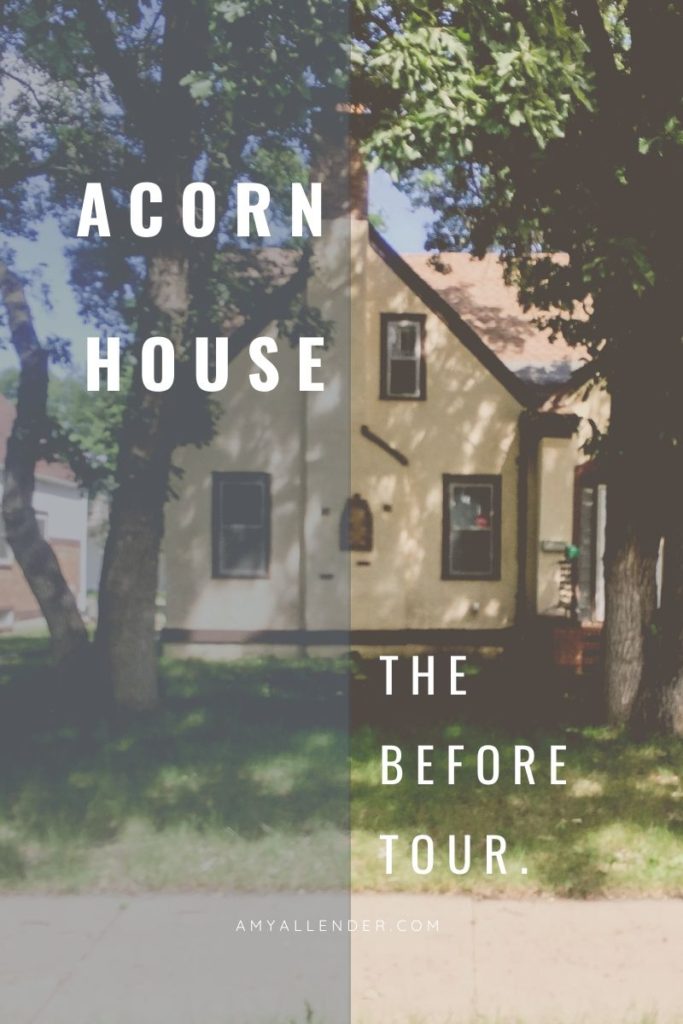
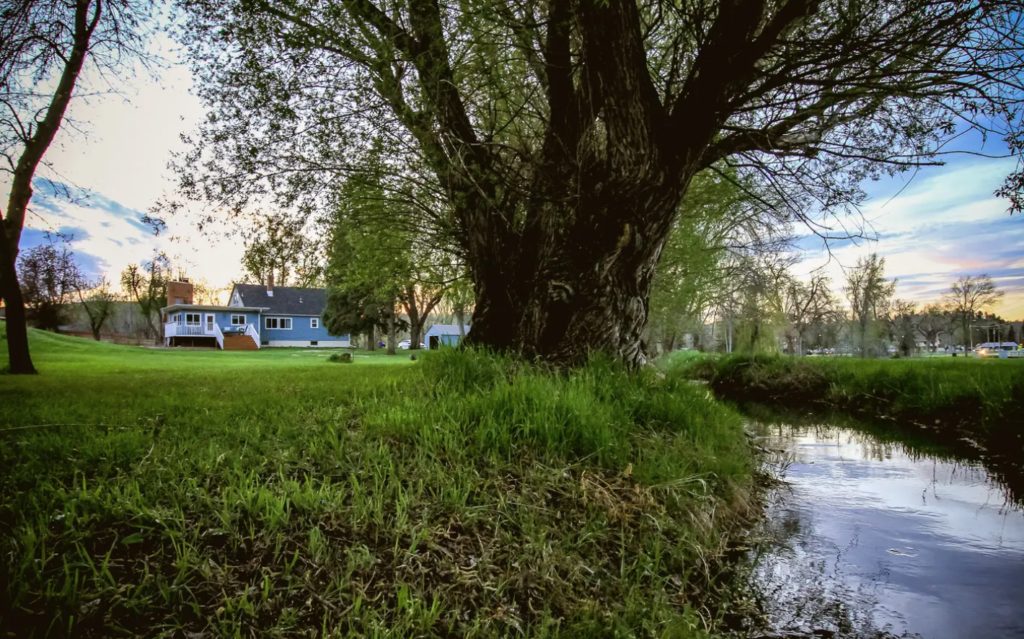
Well everybody. Today is the day. I’m bringing you a “Before Tour” of Acorn house. Yes, you read it right. I’ve named my house. Henceforth we’ll be calling it Acorn House. I thought it needed a name and the squirrel seems to be this house’s guardian. And nemesis. Rolled into one.
Not to mention, acorns rain down in the yard. I hauled off literally more than 400 lbs of acorns from the driveway and yard shortly after moving in. (No, that’s not an exaggeration.)
To be totally transparent, I have been wanting to get this posted for a while. I took these great, wide angle photographs of the house before we had closed. Then last week when I sat down to start sorting them into a tour for you, my external hard drive became inaccessible on my computer. The drive is now at the doctor (AKA data recovery place). Calling to check its progress really scares me. Imagining that all my photos are gone turns my blood to ice.
However, to get my mind off of the fact that all my gorgeous images from years past (that I never took the time to print or organize into books) may be gone–I took new photos. And organized them to share with you here.
Without further rambling, let’s just get to it. I didn’t number photos in collages, but any comments will be from top to bottom, left to right. Oh–and if you have Instagram, you should totally follow me there. I share stories from the house, things I find, and there is a video house tour saved to highlights. Let’s be friends!
The First Floor
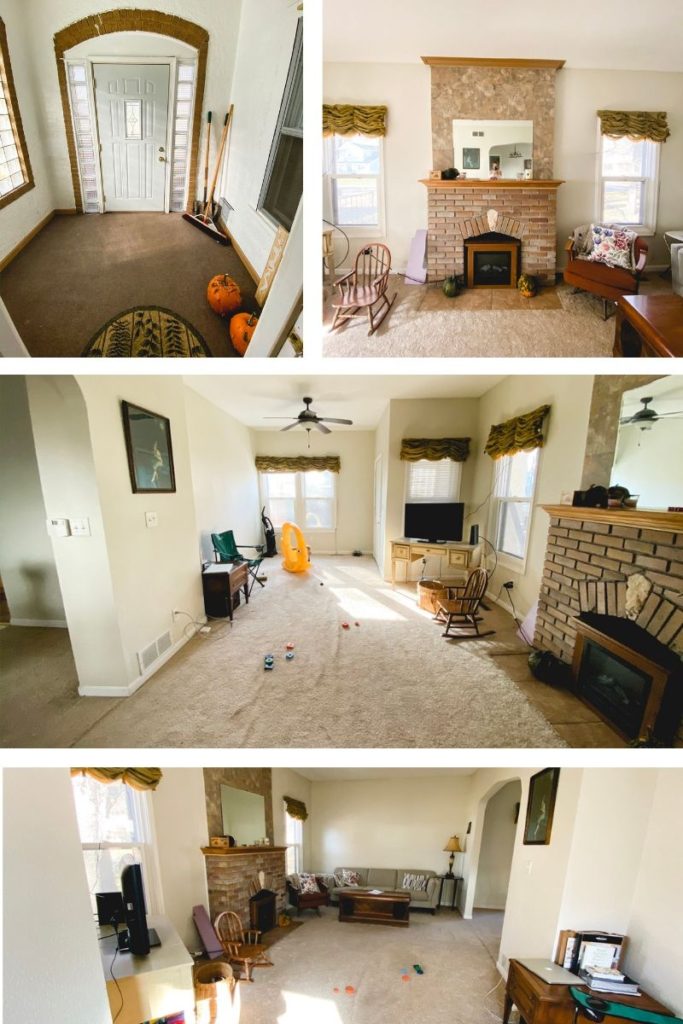
Living Room
The 2011 flood damaged the first floor. After the flood, the owner’s (an elderly woman) family was anxious to get her back into her house as quickly as possible. Repairs were made in haste–and in some cases were not made well. Everything here is builder-grade and inexpensive. That’s okay, though! I’d rather rework something that wasn’t done well, than overhaul good work done in poor taste.
Our goal is to reimagine the historic elements that probably once graced this house and make better use of its square footage. It’s an elegant house, but right now looks very dull.
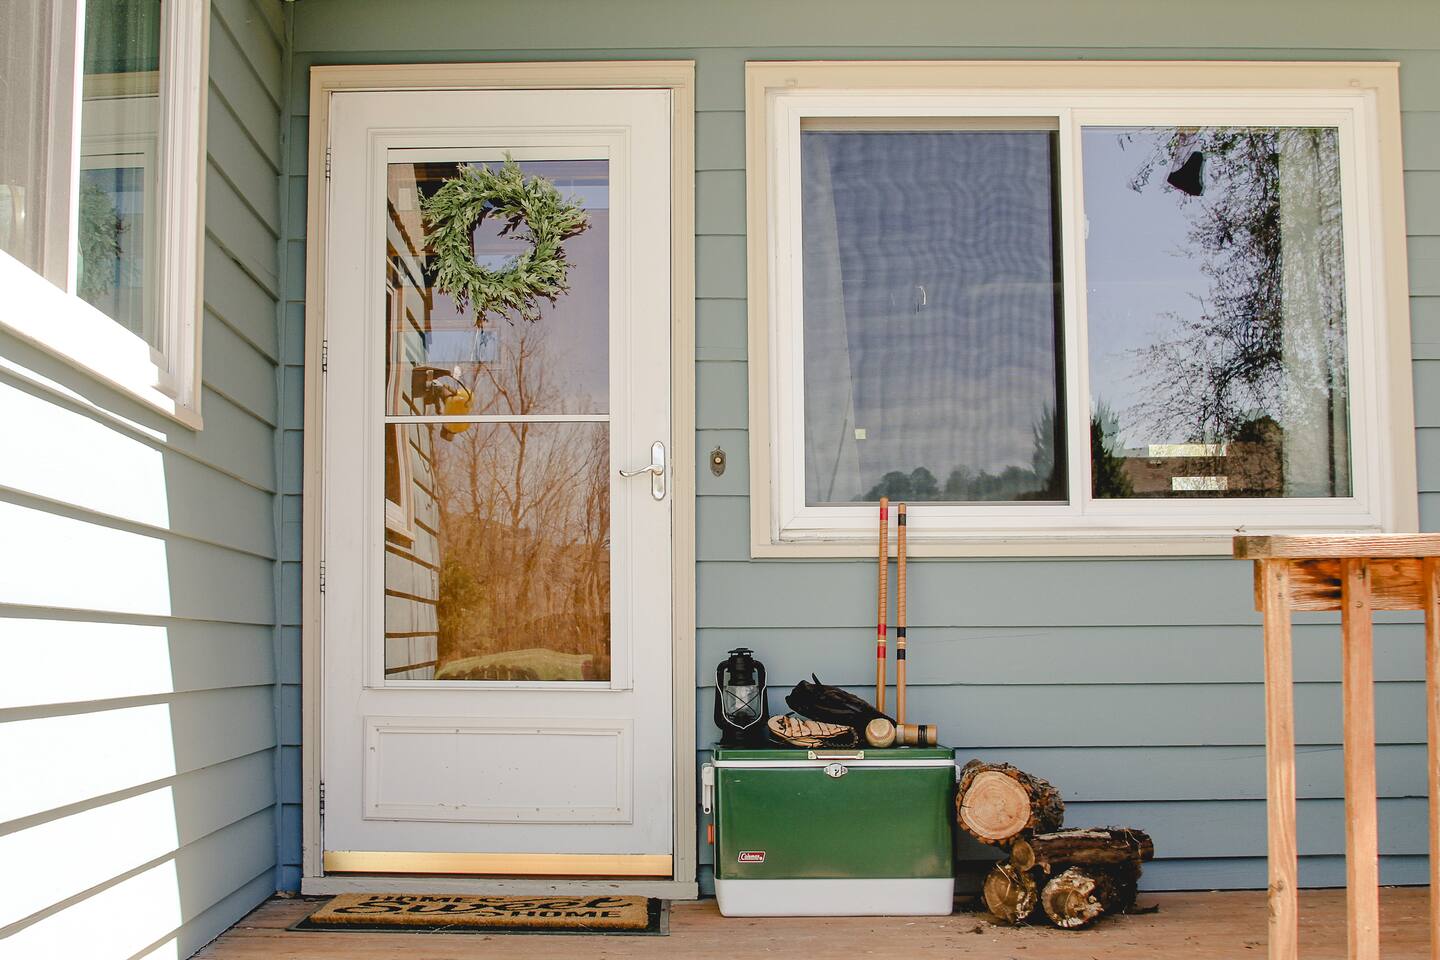
One of my favorite things about Acorn House is the HIGH ceilings. I have never lived in a house with such beautiful, tall rooms. The entryway is small, but lofty just like the rest of the rooms, and it features vintage privacy glass and original brickwork.
Inside the front entryway is a long, narrow living room. This is presenting some interesting challenges. The fireplace has been rebricked and currently houses an electric fireplace. Jury is out on whether the chimney is safe to use this winter. Oh, and did I mention I didn’t stage these photos. You’ll have to excuse the toys, and random bits. We live here.
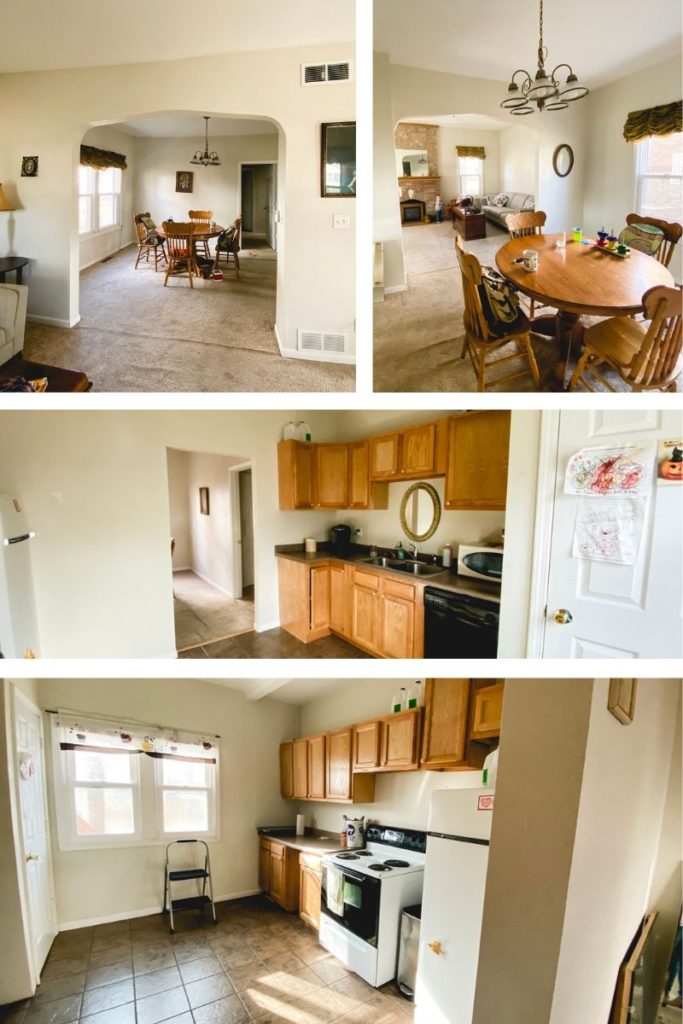
Dining Room and Kitchen
Beyond the living room, an arched wall opens to the dining area. From there a relativly small door opening goes into a very boxed-off kitchen. Another door leads back to the bathroom and first floor bedrooms.
The kitchen is a decent size, but the space is poorly used. Not to mention anyone in the kitchen is completely excluded from all the fun happening elsewhere on the first floor. We plan to make use of the high ceilings by adding floor to ceiling cabinets. And I have dreams (maybe I should use the word “schemes”) in my head for making the kitchen more inclusive and less trap-like.
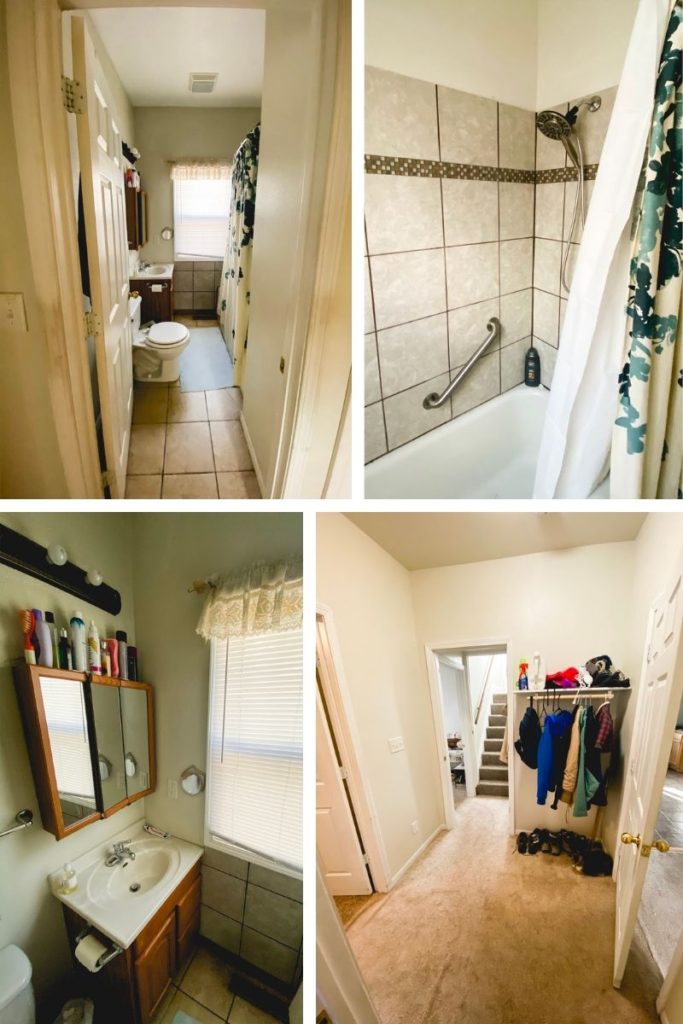
Bathroom and Hall
Currently we only have one functioning bathroom. This gem on the first floor. It was retiled after the flood. However, a lot of settling has happened and most of the floor tile is loose. A plumbing issue left the vanity moldy and warped. Needless to say that will be going away soon. I should also note that the vanity is unusually low. Like, so low my mom commented on it, and she is 5’1″.
Back by the bathroom there’s an awkward, wide hallway, and a linen closet (not pictured.) I’m still brainstorming how to give this an increase in functionality.
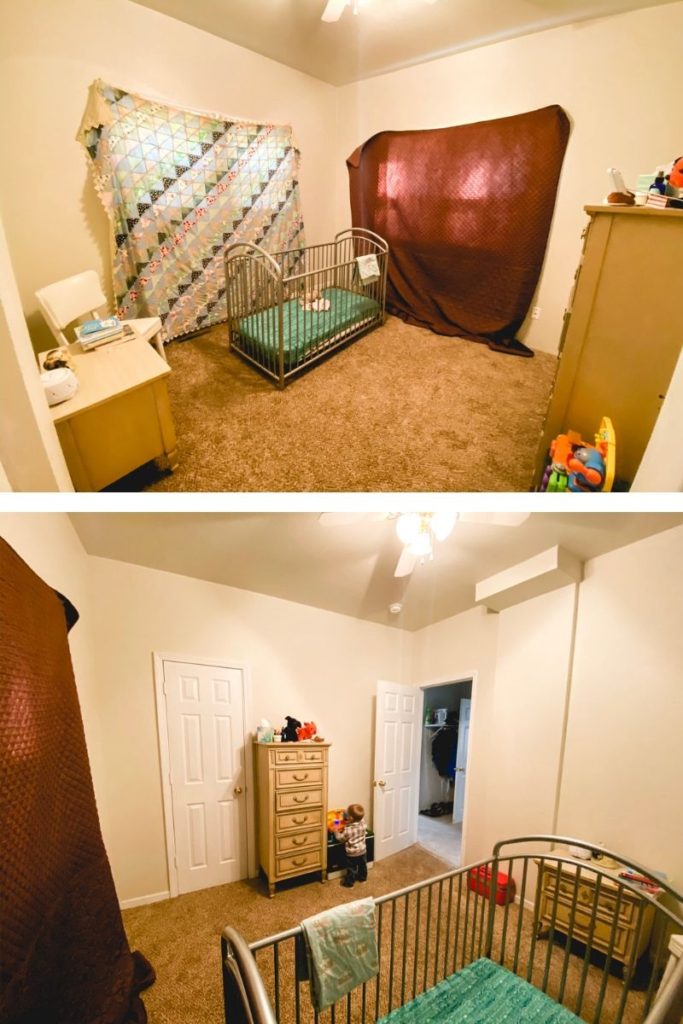
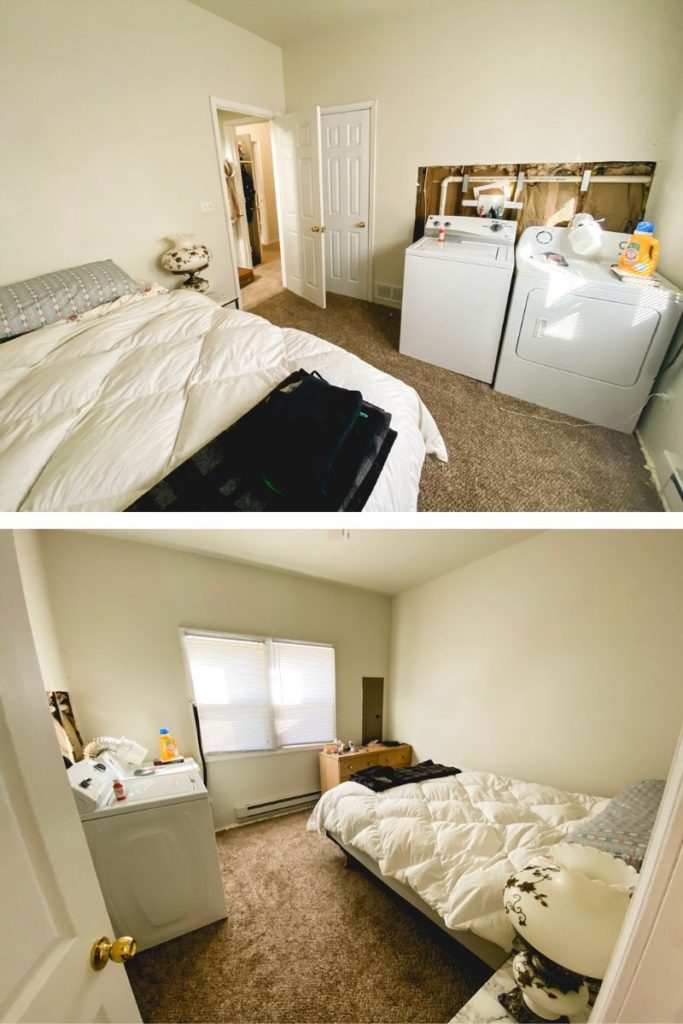
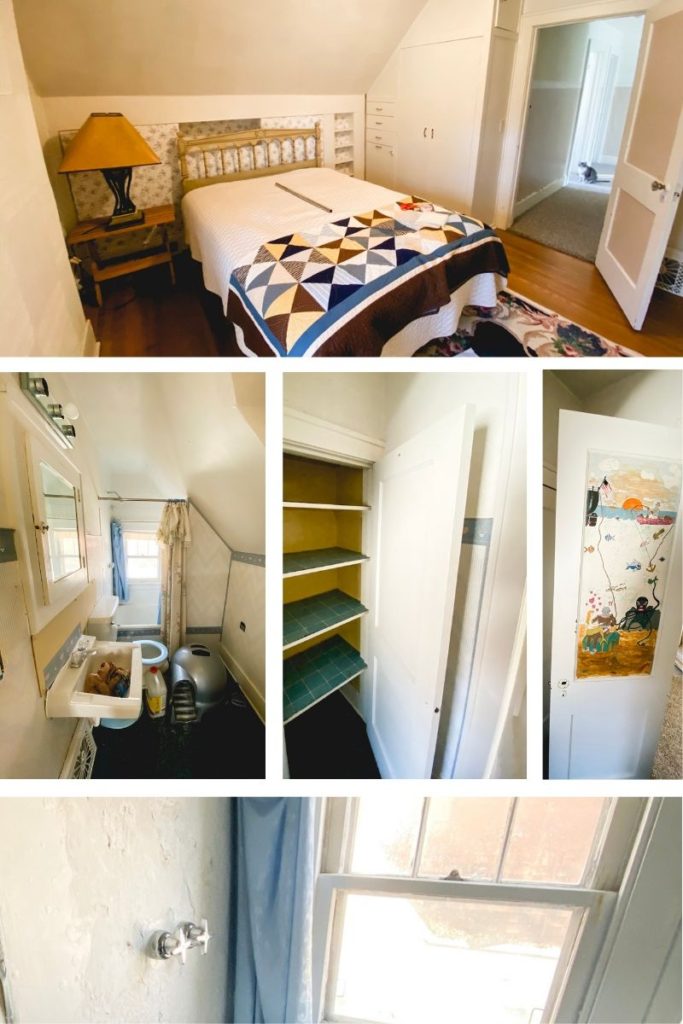
Bedrooms
The main floor has two bedrooms. Someday I’ll get blackout curtains, but until that day arrives, we’ve got these comforters (left behind in the house) hanging from nails (already there) over the windows. It was meant to be.
The current master bedroom doubles as a laundry room. At first I thought I’d hate this, but there are some perks. First, no need for a hamper because I just deposit dirty clothes right into the washer. Second, it smells really nice. Third, no trips up and down stairs with hampers.
On the not so nice side of things, these rooms are very drafty. And I do mean very. I spent a week and multiple cans of crack filler and caulk staunching the flow of icy air into our rooms. But I’ll have to tell you about that another time. Long story short, they’re getting better. Our next cold snap will be the real test!
The Second Floor
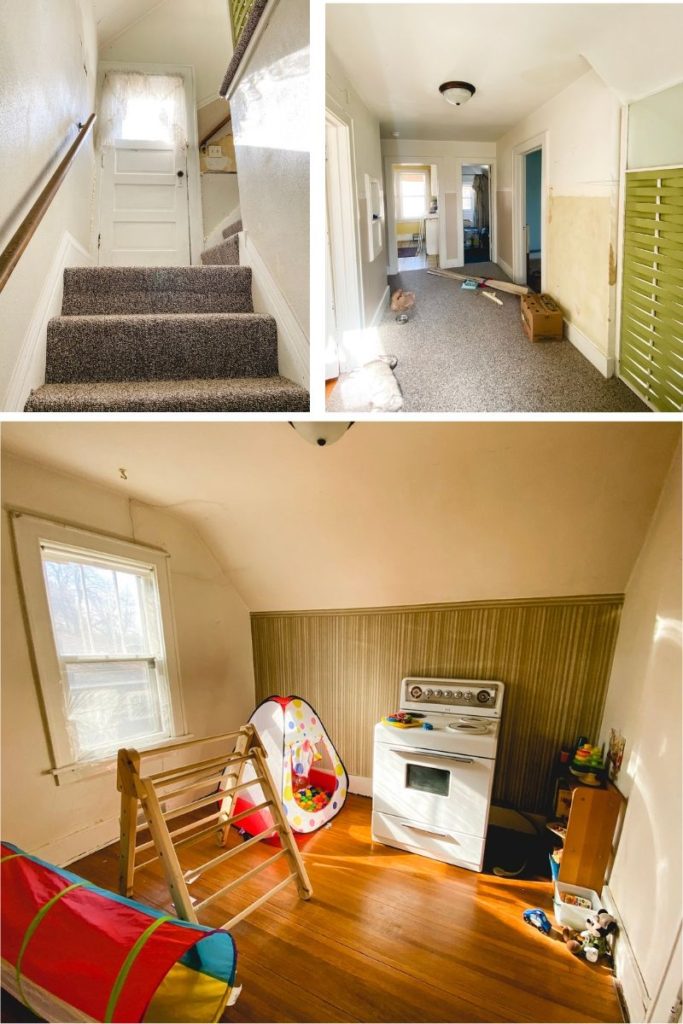
Stairs and Bedroom
The second floor of the house was converted into an apartment in the 50’s or 60’s. Lots of the original character is intact, and will serve as a starting point for restoring the first floor.
I love the light that comes in upstairs. It’s pretty any time of day. The wide hallway is unusual in an old house, and a great feature. We’ll be returning this to a single family home and have plans to create a master bedroom and very nice bathroom up here.
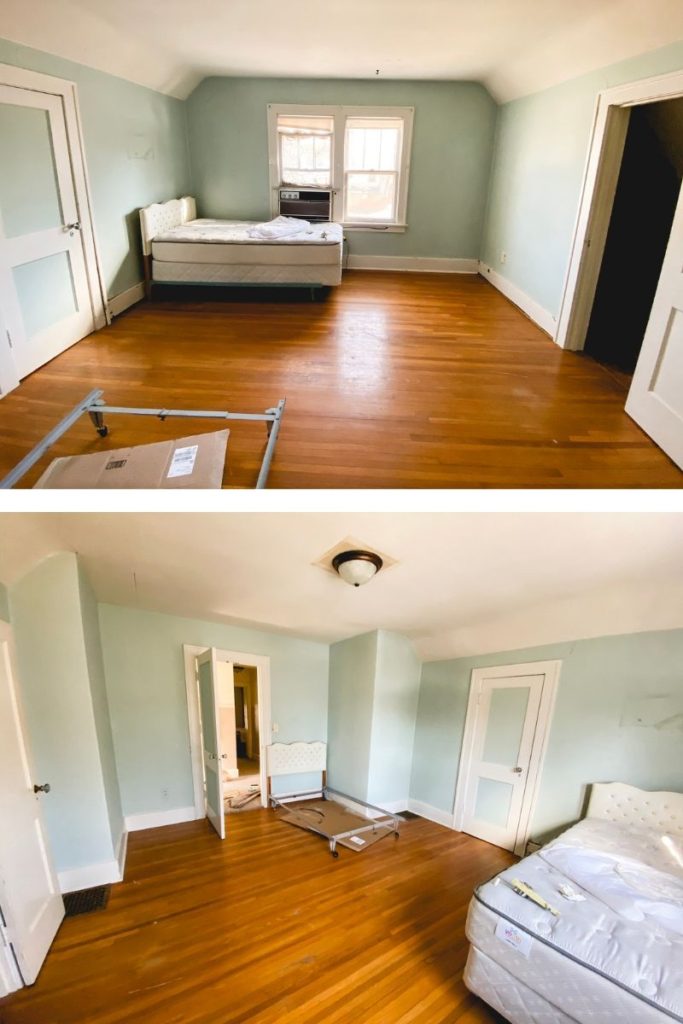
Future Master Bedroom
This room will likely become the master bedroom. It will require reworking to make a better closet and access to the bathroom.
Bedroom and Bathroom
The third bedroom upstairs has an adorable built in wardrobe, which we will keep. The wallpaper, which is stapled up, will go.
The bathroom upstairs is completely defunct. The water is completely off because the toilet is held together with tape and the sink is falling off the wall. The inside of the shower surround has been textured with drywall compound (don’t ask me why), and the tub is uniquely petite. This will all go.
The bathroom also houses one of the most greatest curiosities of Acorn House: a door mural. Many have come to marvel at the very odd, yet detailed scene on one panel of the door. Lots of people (who do not live here) are petitioning me to keep it. I smile and nod, but I’m making no promises.
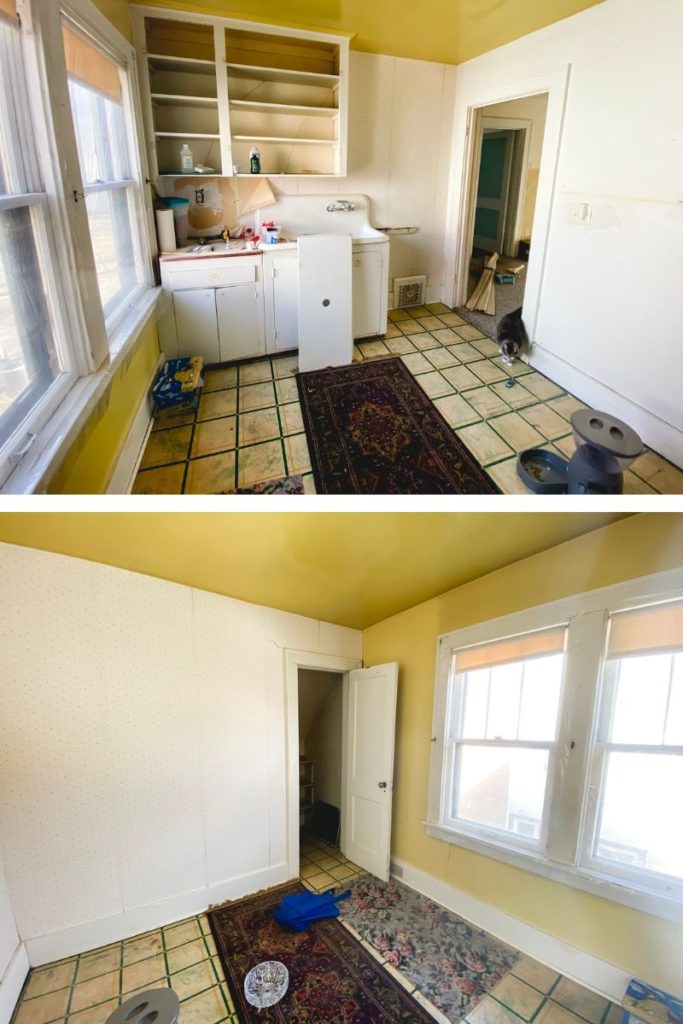
Kitchen
Lastly, we’ve got the second kitchen. If you follow on Instagram you know we wrangled the vintage appliances out of here in preparation for the second floor remodel. I’ve since started dismantling other items as well–in an effort to salvage any vintage hardware worth keeping and reusing.
Our plan is to live on the first floor, even though it isn’t particularly pretty, while we renovate the second floor. Then we’ll switch places.
I cannot wait to roll out some after photos, but we are still a long way off. First we need to address the less beautiful things. Things like the roof (don’t even get me started), the garage, drafts, cracks, and a vast array of exterior tidbits that need to be winterized.
I wish you could all come over for coffee and project time–but for now we’ll just have to settle for sharing photos and virtual lattes. Thanks for stopping by–more to come.
We’re in the red-hot center of a military move. I don’t often write about military life. Partly because there is so much confidential–I don’t want to write something that I shouldn’t, or compromise the safety of our troops in any way. A bigger part is that I often don’t understand military life, even though I’m smack dab in the middle of it.
There are so many pieces to this lifestyle that are always moving. And so many things about this life that cause me anxiety, stress and even things that trigger depression. I often don’t share because I am usually not in a positive headspace to share anything productive. (My words would probably just confuse anyone who read them!) But something is shifting. With this move things feel different. Even though this is maybe the craziest move of all, I have an uncanny calm. Today I’m going to harness that and write a little about our move.
Every move is different. If you know someone in the military (or married into it) I hope this will give you some insight. If you are in, or joining via marriage–I hope this will help you see that you aren’t alone. We’re all doing crazy things to make it work and get our families resettled. Even if it means flying cats across America and living out of a suitcase for months at a time.
So, without further ado, here’s what our move process has looked like this time around.
Like all moves, military or otherwise, our move started long before we packed up our bags and took one last family photo in the driveway. Because of the structure of Derek’s job, we knew a move was on the horizon quite a while ago. And, yes…the rumors are true…we made it known that we preferred to return to Minot. In this life you don’t always get your preference, but this time it worked out. And we praise God for that!
Now, you might know that I have a deep love for South Dakota and I’ve had a passionate affair with our house there. I didn’t write too much about it, but I loved it from the first moment I laid eyes on it. I knew it was special. Yes, I’m a house whisperer. No judgment please.
I’m always attached to my home, but this one was different. Derek and I have hopes of returning to Rapid City. And if we are going to return at some point, we’d like to come home. To our home. Canyon Lake Cottage.
And quite frankly, if we sold the Cottage–we couldn’t afford to buy it again now that it isn’t falling apart at the seams.
Loving a house is all well and good. But it does open a big can of confusing when it comes to moving across state lines. Since we want to keep our Rapid home, in hopes of coming back, that meant finding a way to make our house self-sustaining (read: we can’t pay two mortgages) while we’re away.
At first we thought Derek would be headed for a short term training assignment for his job in Minot in June/early July. If that was the case, Gideon and I would stay in Rapid City, find a renter to move in in the fall, and we’d all meet up in Minot, buy a house and have a nice, smooth move.
But things changed.
Derek’s training got pushed back to August, but he still needed to report to his new base at the end of June. Since we don’t like volunteering to spend time apart, unless we really need to–we decided we’d all move up to Minot in June.
And that’s what we did.
After lots of praying, we decided to open our house for the summer as a vacation rental via AirBnB. (I’ll be writing about that experience once the summer wraps up.) We moved furniture and personal items. We bought extra beds and dressers. I installed locks on closets to create “off limits” spaces. I decorated and photographed. Derek lined up (amazing) friends who would take care of turn over and lawn care. We asked for advice from everyone we could find with any experience in the short term rental game.
We listed and booked through Labor Day in three days. Praise God!
Things haven’t been without hiccups, but the summer has gone more smoothly than I could have imagined. It’s been so fun to share our favorite place with vacationers.
So that was one piece of our moving puzzle was taken care of.
With all moves (especially the military variety) there are many unknowns. When we were packing up to leave for the summer, we didn’t know what kind of house we would buy (a fixer or something move in ready.) We didn’t know if we’d end up renting for a while. Or how long we’d really be gone. Derek would be gone for training from August until November, but Gideon and I might be in Minot, Indiana, or come back to South Dakota.
It was so stressful deciding what to pack and how much to bring. We have two cars and a small trailer, and at the time, very little idea of how long we’d be gone. (I’ll also be writing on that later.)
After marathon days of planning, packing, praying, and good-byes we loaded up the cars. Derek drove with Panda cat and the trailer. I drove with Gideon.
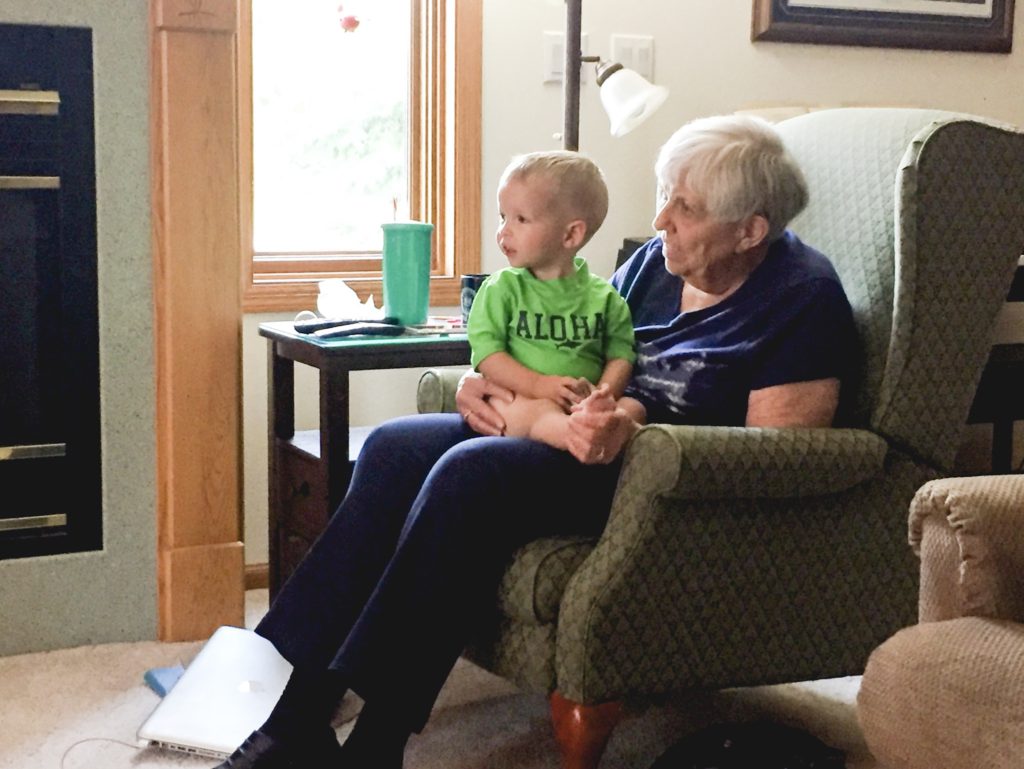
When we got to Minot, we spent about 10 days living in a hotel. Then we moved in with a friend from church. She’s an older woman, and one of our favorite people on the planet. She has been kind enough to provide us with bedrooms and a kitchen and company and game nights and all the comforts of home until we close on our house. Gideon adores her, and is quite smitten with the retirement living lifestyle.
If you follow me on Instagram, you know we’ve house hunted and despite our preconceived ideas of finding a place that needed minimal work, we are in the process of purchasing the biggest project of our lives. (More on that to come.)
I have trepidations, but we’ve earnestly sought God in this whole process and this is where we find ourselves. I’d like to say I can imagine the adventure to come, but I don’t think I can even begin to comprehend the ride in store for us.
So here we are. Derek is in yet another state for training. Panda cat is being fostered by our lovely, kind friends. Gideon and I are taking bids from contractors. The process of getting “settled” has been so long and drawn out, but every day we get a little closer. Here are the “steps” we have left until we are officially fully transitioned back to life in Practically Canada.
Get the house appraised.
Gideon and I are headed to Indiana to visit family. Why not since we are homeless and already living out of suitcases?
Find a long term renter for the Cottage in Rapid City–it’s available at the end of September if you know anyone looking!
Go to South Dakota, supervise the movers as they pack up all our worldly possessions.
Come back to Minot, close on the house.
Get our cat and all move into the “new” house.
Get moving on major “must do” projects before the Big Freeze settles in.
Welcome Derek home in November.
See we’re basically done.
And now that I’ve written this big update my mind feels free to write about all the other things buzzing around in my head! Like how to pick a fixer-upper. How to live out of a suitcase for months at a time. How to find contractors. And of course, plenty of posts on how to love life in Minot!
Today I’m excited to be sharing how to make a DIY busy board along with 50 busy board ideas!
I really like making toys for kids. Before Gideon was born I had a little more disposable time and was able to make some super cool things for the little in my life. Now, I’m a little more pressed for time, but I still really like making things for my guy to enjoy.
Hopefully in the near future I’ll sit down and make him something really fun and elaborate. But that hasn’t happened quite yet.
One of the most-used and most-loved homemade toys I’ve created for him has been his busy board. It’s really nothing too exciting to look at, but I’m sharing it here because it is ever-evolving (it has grown with him), cheap, fun to make, and super fast to put together.
I started this busy board for Gideon when he was about 4 months old. At that time we were working on tummy time. This was something he could look at and play with on the floor, or could be in front of him while propped up on the Boppy. He loved it then. He loves it now. And a friend’s 3-year-old was recently here and she exclaimed, “I want one of these for my birthday.” It’s truly a gem for all ages, and it’s easy to make and update!
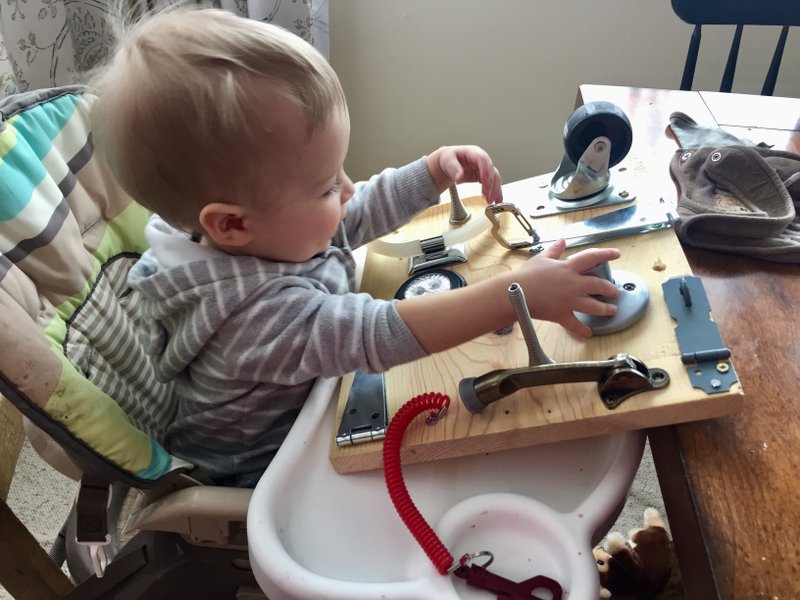
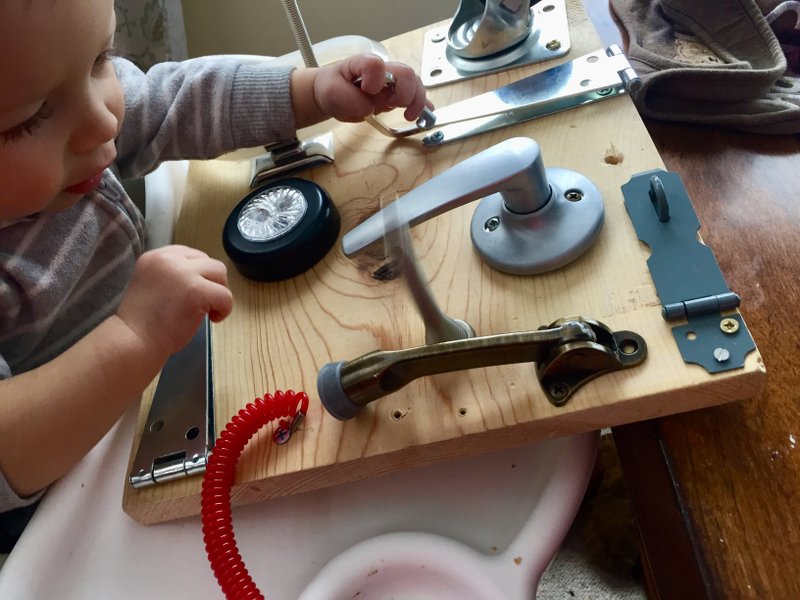
I often put the board on his high chair tray while I’m getting his meal prepped. This gives him something to do and buys me a couple extra minutes.
Build A DIY Busy Board
Here’s what you’ll need to create a busy board of your own.
Scrap of wood
Hardware knick knacks
That’s it! Honestly, you probably have everything you need already laying around the house.
I used a scrap of 1″ pine we had in the basement left over from our Master Bedroom Remodel. A quick sanding and wipe with a damp rag made it clean and clear of any splinters.
Then I gathered up mismatched hardware pieces and screwed them in. For the very first version of the board I attached several cabinet handles with interesting shapes, a piece of sandpaper, a chain, etc. Mostly just things to feel and see since his motor skills were very basic. Bang! Done.
Now, if you look at Pinterest you can easily become overwhelmed by elaborate busy boards. Those are great and super cute–but your baby isn’t going to care much about the boards aesthetics. At least, not when they are still learning to hold their head up, crawl, and walk.
Here is the most beautiful part of a very simple board like this: you can easily change and modify it as frequently as you like! Since it is just a scrap piece of wood, you can take things off and make new holes and have no regrets.
How To Update A DIY Busy Board
Here is my busy board “work flow.”
After a couple months your child will make it pretty obvious which items he is still loving and which items he is over. I remove items that have lost their luster and replace them with new things we’ve picked up at Menard’s or the Habitat ReStore. I try to reuse screw holes if I can. If not, I try to place the new item over the existing hole just to cover it up. If that doesn’t work, I simply give the old hole a quick sand to smooth out splinters and drill a new hole.
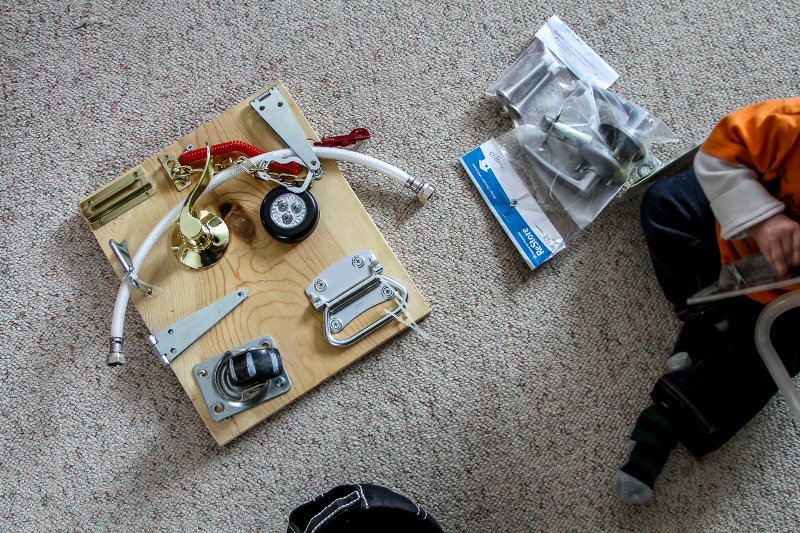
To give you an idea of how gradually I change the board, here is a photo prior to our most recent update. The board included a slide lock, stretchy key chain, strap hinges, a static door handle, press light, handle, caster, and u-bolt with a faucet line zip-tied to it. (It looks weird, but he really liked it.)
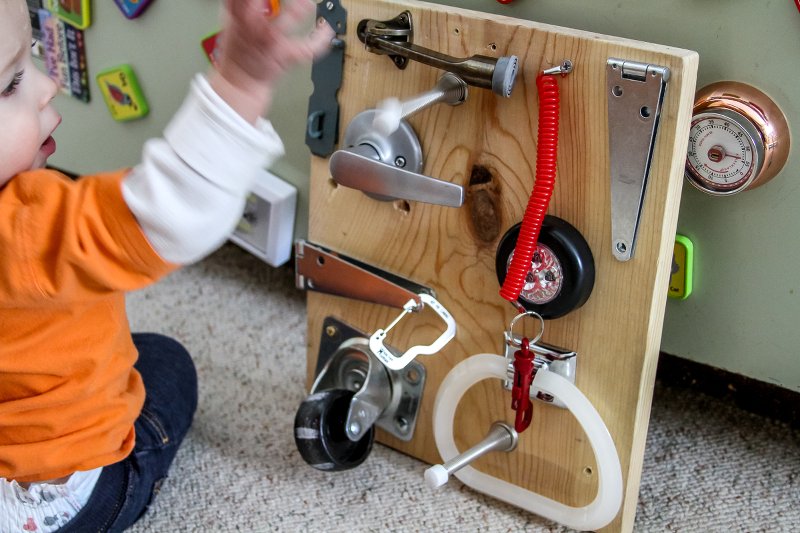
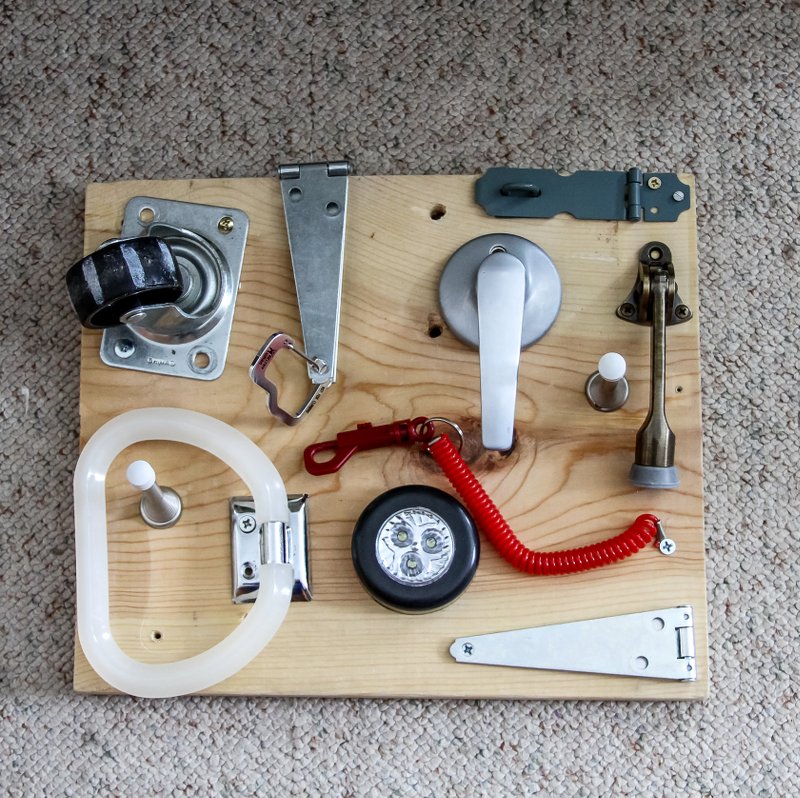
And here is our current board. I left the caster wheel, hinges, light and red key-chain. (That is one of his FAVORITES and has been on here since I first made the board.) I added a hinged lock, hinged door stop, towel ring and two door stop springs. (These are the new favorite…boiiinnnngggg!) I’ve got carabiners that I clip on to various parts of the board. In this photo it’s hooked onto one of the strap hinges.
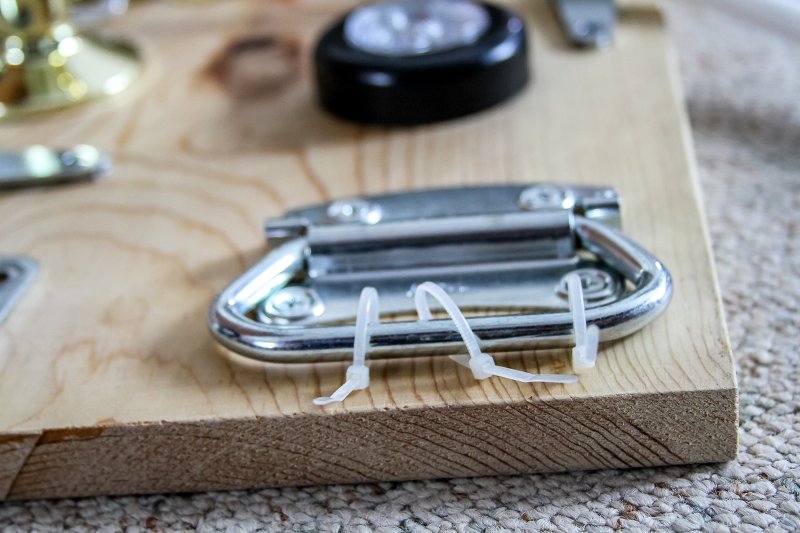
I’ve also found that adding zip-ties to existing hardware is a super quick way to add a little extra interest. Adding a few to this handle gave it more texture and things to spin.
It’s so fun and picking out new items is something I look forward to doing with Gideon. We wander the hardware aisles and I let him hold things and see what sparks his interest–then buy a few and add them. This is a great project for an overwhelmed mom…or would be a great gift for an overwhelmed mom!
50 Ideas For Your Busy Board
The possibilities are endless, but here is a big ol’ list of 50 ideas of simple things to put on your DIY busy board to get started. Keep in mind that not all items are appropriate for all ages and kids should always be supervised while playing with a board…just in case a small piece should come off.
drawer handles
hinged handles
door knocker
knobs of all shapes and sizes
hose spigot knob
static door knobs and handles
turnable door knobs and handles
door hinges
cabinet hinges
strap hinges
piano hinges
slide locks
chain locks
combination locks of all kinds
lock with a key (I would attach the key with a string so it doesn’t get lost)
coiled key chain (like mine above)
retractable name tag
sand paper or textured fabrics/ribbons
closet push light
battery operated light switches
battery operated door bell
toggle switches
dimmer dials
bike safety light
chain
pulley
wheels or casters (I painted white stripes on mine to help Gideon see it move)
latches of all kinds
velcro
toilet paper holder
towel ring
bungee cords (without the metal hook ends)
U-bolts (these are fun to put extra pieces on, like nuts, washers, curtain rings, etc)
mirror
zippers
use carabiners to attach measuring spoons, keys, bells, paintbrushes, etc
sponges
M-F pill box
a land line phone
reflectors
pet collar
belt buckle
toys that squeak
house numbers
Gears
silicone hot pads
an old thermostat dial
faucets and handles
pieces of hose, water line or other flexible tubing
We have very few, true holiday traditions. Easter is always iffy since weather in the Dakotas is highly unpredictable. Somewhat frequent summer burn-bans make 4th of July sparklers hit and miss. Our Thanksgiving table is always set for company–but we never really know who will be dining with us. Christmas and New Years are usually spent traveling–and those plans never seem to materialize until a week or so before December 25.
Valentine’s Day is different.
We don’t do anything elaborate for Valentine’s Day. Sometimes we go on a date. Sometimes we don’t. We might eat dinner out. Or maybe we just eat at home. I guess it’s really as unpredictable as the rest of the holidays. But we do have one tradition, and it might be my favorite of the whole year.
I don’t know how it started. I think I happened across this photo of beautiful, homemade ice cream sandwiches in an issue of Martha Stewart Living. And since V-Day falls right smack-dab in the middle of the coldest part of winter (for those of us in the midwest) I thought I’d give it a try. (Here is her recipe. The cookies are a lot like the traditional ice cream sandwich cookies you can buy in the store. I made these a few times, but I had a knack for over baking them.)
I’ve been making homemade ice cream sandwiches for about 6 years now. Every year they get a little better. This year our treat was sweeter than ever because I shared my favorite edible Valentines with not one handsome boy–but two!
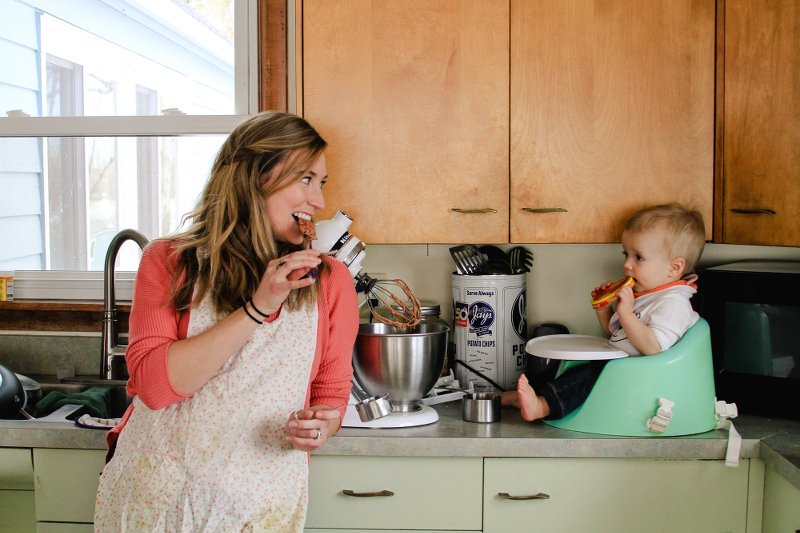
Maybe now that Gideon has joined our household we’ll create more traditions. Even if that doesn’t happen, hopefully he’ll always look forward to ice cream sandwiches in February. Perhaps he’ll want to help me make them even when he’s too big to be confined to a Bumbo seat on the counter.
Because I love this tradition so much I want to pass on my recipes to you. I’m a big fan of the traditional chocolate cookie sandwiches. (Like Martha’s above.) I’ve tried several cookie recipes, but this recipe from Handle the Heat is the best one I’ve found yet.
The cookies are soft and chewy–even when they’re frozen. They’re easy to make. The ingredients are usually already in my kitchen and the recipe is well-written and easy to follow. (The only down side is that they can’t be cut with a cookie cutter.) I’ve never made the cookie butter ice cream mentioned in her recipe, but I can only imagine it is di-vine!
I scoop the batter with a medium cookie scoop. Don’t be alarmed that the cookie dough looks thin. It’s more like a batter than a dough. I find that the cookies don’t spread too much and they come out light, airy and a little puffed up at first. Just don’t let their delicate look trick you in to over-baking them. They’re meant to be a little gooey.
As they cool they flatten out a bit. (Oh, and I should mention that they are delightful to eat on their own. Or topped with peanut butter. Just saying.)
I’ve used lots of different fillings over the years too. The first year I did store-bought strawberry ice cream–just like Martha. Later I did vanilla. Then two years ago I got an ice cream maker for Christmas.
Best. Gift. Ever.
Well–one of the best gifts ever. Especially for an ice cream lover like me.
This is the one I have and if you have a KitchenAid, I highly recommend it. It’s easy to use, affordable, and makes a perfect sized batch of ice cream.
This year we filled our sandwiches with this Maple Nut ice cream from The Cookie Writer. It. Is. So. Good. I’ll definitely be making it again. It pairs perfectly with the chewy-gooey brownie cookies!
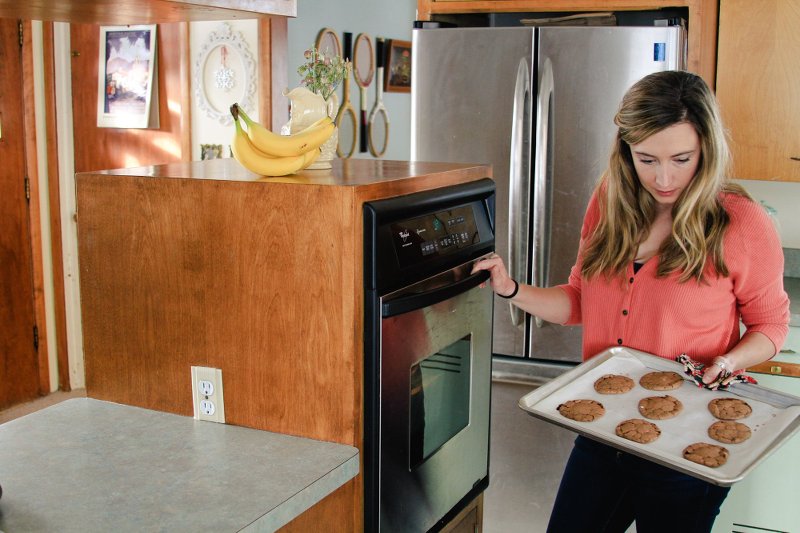
If you are going to try your hand at making your own ice cream sandwiches here are my top three tips. (Here’s a quick FYI. I don’t do elaborate staging for photos, as evidenced by the pile of used bottles waiting to be washed behind me.)
Freeze everything before assembly. They are much easier to put together if everything is solid.
Uniformity is key. Use a cookie scoop to size out cookie dough. I also use a round biscuit or cookie cutter sitting on top of a cookie as a guide for filling it with ice cream. It gives a nice clean edge and consistent filling.
Do it in two days. While this is easy, it’s also a tad time consuming. I find that making cookies and ice cream on day one and doing assemble on day two helps fit this treat into my lifestyle. Doing it that way also keeps it fun, instead of leaving me cranky that I’ve been in the kitchen all day.
For pretty presentation I wrap mine in parchment paper and tie them with baker’s twine. However, if you aren’t giving them away you can just store them in an air tight container. I’ve been told they’ll keep a couple weeks…but we eat them too quickly to know if that’s true.
Well, the time has come to make an announcement. And no. the announcement isn’t that I’m pregnant. I find mom life much more enjoyable now that Gideon can eat solids, nap without screaming and sleep all night long. I’m not quite ready to shake up this scene just yet.
I’m getting off topic already.
We’re moving…
to…
Minot!!
Yes. Those are exclamation points. And yes, I’m talking about Minot, ND. As in, only the best come north. All the way north to Practically Canada. As you can see, we are basically ready for our migration. We’ve already got the t-shirts (an no, we didn’t buy them strictly for this photo), awkward Minotauros hat and lefse sticks to prove it.
Now, you know I hate moving. And this time around isn’t much different. I’m not looking forward to it. I love our home and community here in Rapid City. My stomach is in knots just typing up this post. I’ve put off making this official for weeks and weeks. Sorry if you’ve recently asked about our next assignment and I’ve changed the subject…or never returned your text. It’s really hard for me to face the facts when it comes to moving.
However, if I have to be uprooted there are few places I’d rather call home than Minot, ND.
Unless it’s Maine. Then, yes, please pack my house up–you can expect me tomorrow.
I hear a lot of grumbling about Minot. Mostly from people who have never been. As I’ve told people in the past, it’s not a vacation destination, but it sure is a great place to come home to. I’m excited to return, not only to reconnect with some of the dearest friends I’ve ever known, but also (hopefully) to help shift the very negative vibes that exist about living there.
The reasons Derek and I like Minot so much are hard to explain. To be sure, it’s not the winters, wind or vast amounts of trees. Minot is the perfect place to pursue passions. People are eager to support new ventures (but not too new….because the locals are really slow on change.) There is community of people there who are striving side by side to make the town more fun, more inviting and more impactful.
It’s a place where an idea can become a reality, because you are usually only one or two acquaintances away from “the person you need to talk to.” It’s a place where you can pick up curling, square dancing, and accordion playing. You can be a story-time reader, an artist, an advocate. You can openly rollerblade without getting made fun of and have a “usual” order at three restaurants in town. I know, because I’ve done all those things.
I told you. It’s hard to explain. I’ll give it my best shot over the next few years.
Here’s a bit of timeline (because I know some of you will be asking.) Derek has to do a training refresher this summer. So, we’ll be headed up in the fall. Maybe before then to do a little house hunting. Basically I’m not sure when we’ll all be up and ready to unpack, but I do know it’s on the horizon.
And to everyone who put off coming to visit us while we lived in a tourist destination…Sorry, Charlie. In about 6 months if you want to darken our doorstep you’ll have to come to Minot.
I’m continuing to pray that God would renew my mind and heart when it comes to moving. So that this transition would be smooth and joyful–instead of wracked with anxiety and grief. I know God can do all things, and that kind of mind renewal for me would be a bigger miracle than Him cancelling our orders and making a way for us to stay put in Rapid City forever. If you are up for a prayer request, I’d love your intercession. While I’m nervous on the surface deep down, I think God has some really, really good things in store for us in Practically Canada.
So there. Now I’ve said it. It’s on the Internet and it’s official. We’re moving north. Uffda! It’s going to be oh-fer-fun!
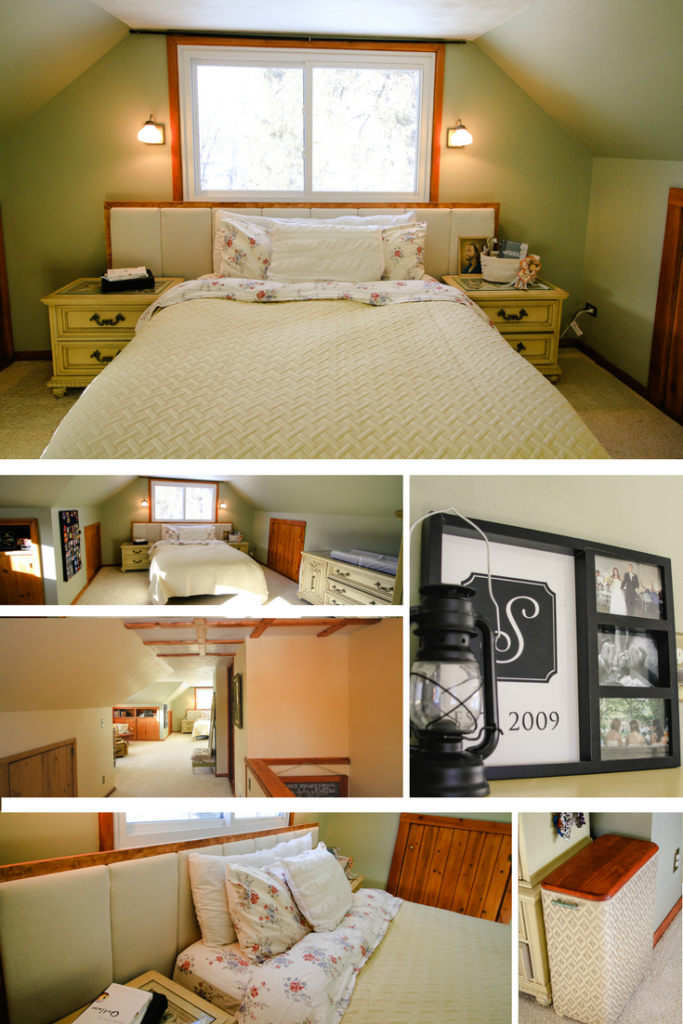
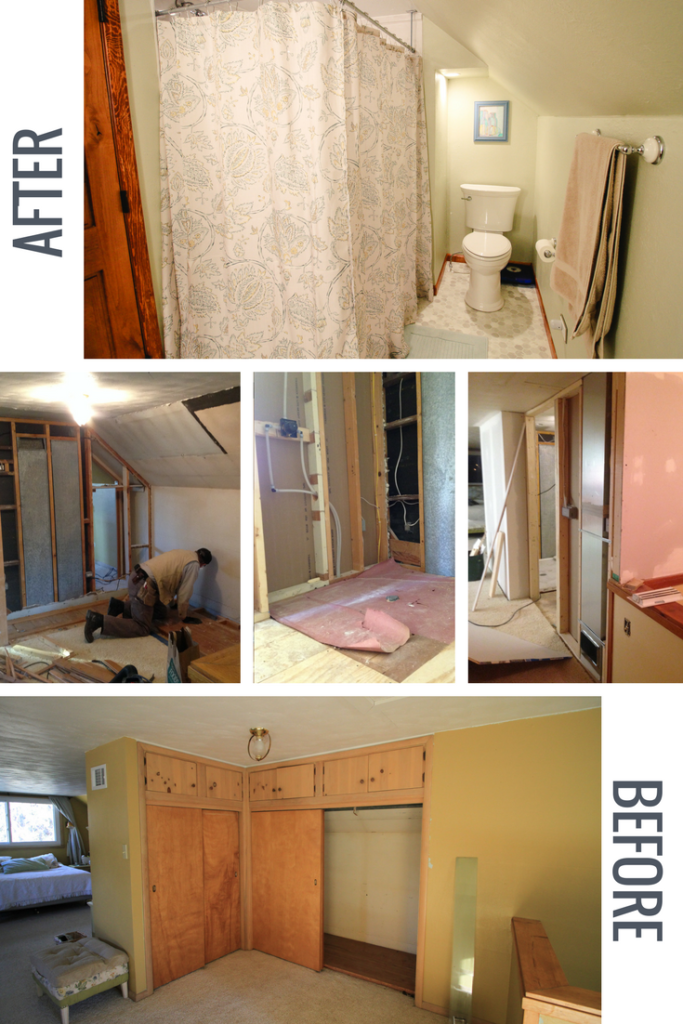
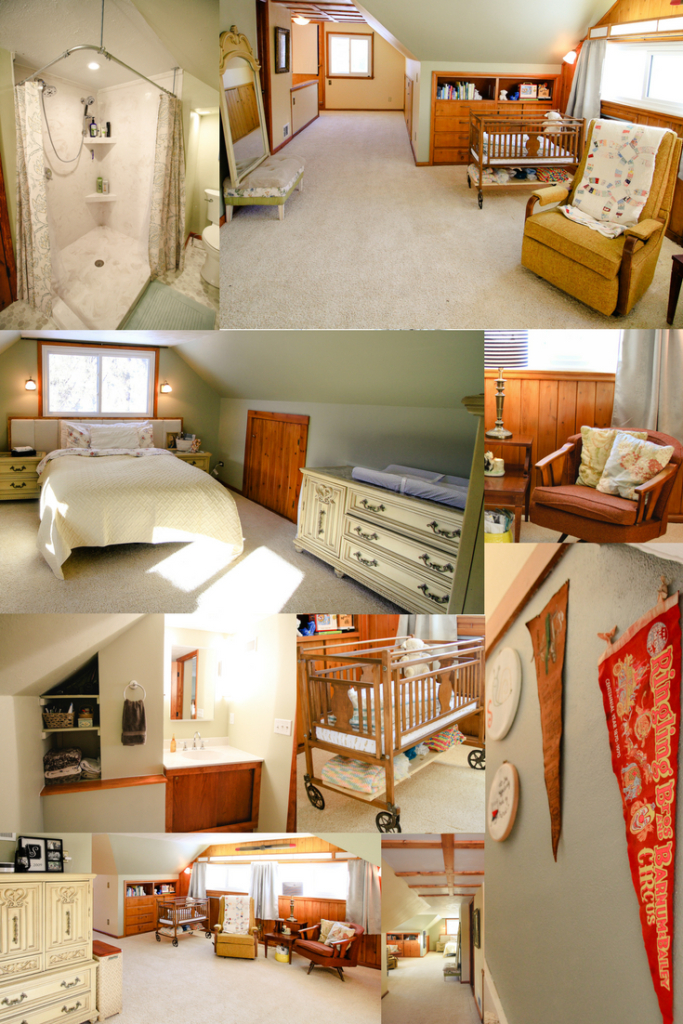
I am so excited to be showing you my finished master suite tonight!! Seriously, basically anyone who has come into my house lately has been invited upstairs to check it out because it’s been something we’ve been working on and I’ve been talking (and complaining) about for a few months.
I could gush all night, but I’ll let the photos do most of the talking for me. I’ll say this though. Since having a bathroom right in my bedroom I’ve gotten up every morning and wanted to do my hair and make up. Just because I like spending time in there. Crazy, I know. And I make my bed every morning and keep it all nice and tidy (for the most part). We’ll see how long that lasts. Well…without further ado, here’s a full look at the before and after!
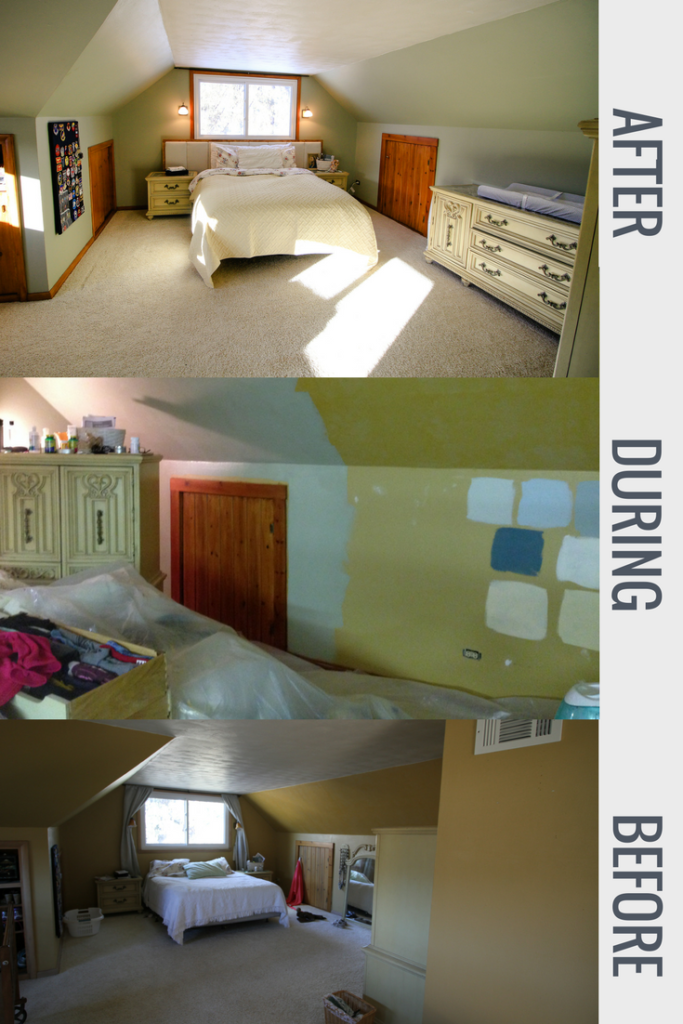
So…it wasn’t just the bathroom that got added and overhauled. We wanted to spruce up the whole space. Here’s a look at our sleeping area in progress.
What happened here?
I stained the wood to be cohesive with the rest of the house.
Updated the globes on the sconces. And by updated…I mean I took away the trendy yellow globes and replaces them with vintage milk glass globes to match the feel and age of the house.
After lots of hard decisions…I painted–obviously.
With cast off supplies from the Habitat ReStore I built a headboard. When the curtains are rehung they’ll tuck in behind it so we can close the curtains without sacrificing our ability to have the window wide open during the day.
We rearranged the furniture–after some walls were moved and closets were sealed up.
And I went stain crazy by refinishing the top of our hamper (an estate auction find) to match the other woodwork.
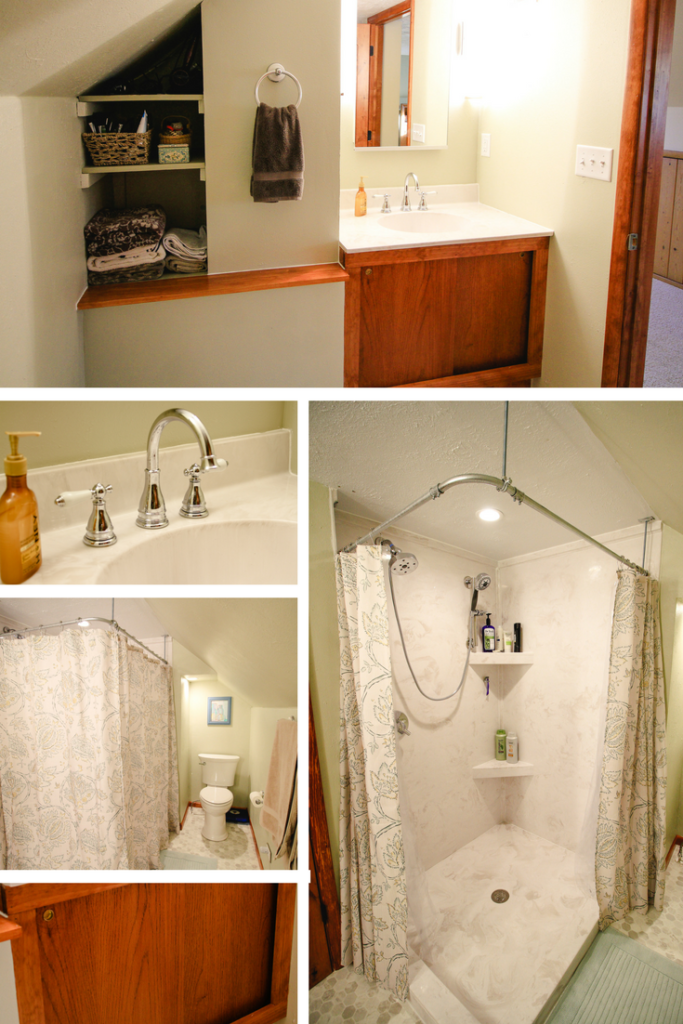
Next up let’s look at the bathroom.
I hope the way I formatted the photos makes sense. I started with the pretty and worked backwards. If you like it (or not) let me know in the comments. These photos show where the bathroom now sits. those corner closets are now our shower!
What happened here?
Our closets were removed to make room for the new bathroom.
Plumbing was run up for toilet, sink and shower.
Electical outlets were added, as were can lights, two bar lights–hanging on either side of the medicine cabinet, switches, and a vent fan.
A supply duct was rerouted.
We tore apart an old vanity from the ReStore and rebuilt it into a custom piece.
The shower–a 42×48″ masterpiece with TWO shower heads!
The paint
Sheet vinyl flooring
Some new walls and a lot of corrective mudding on the existing walls
And everything else that goes with making a brand new bathroom
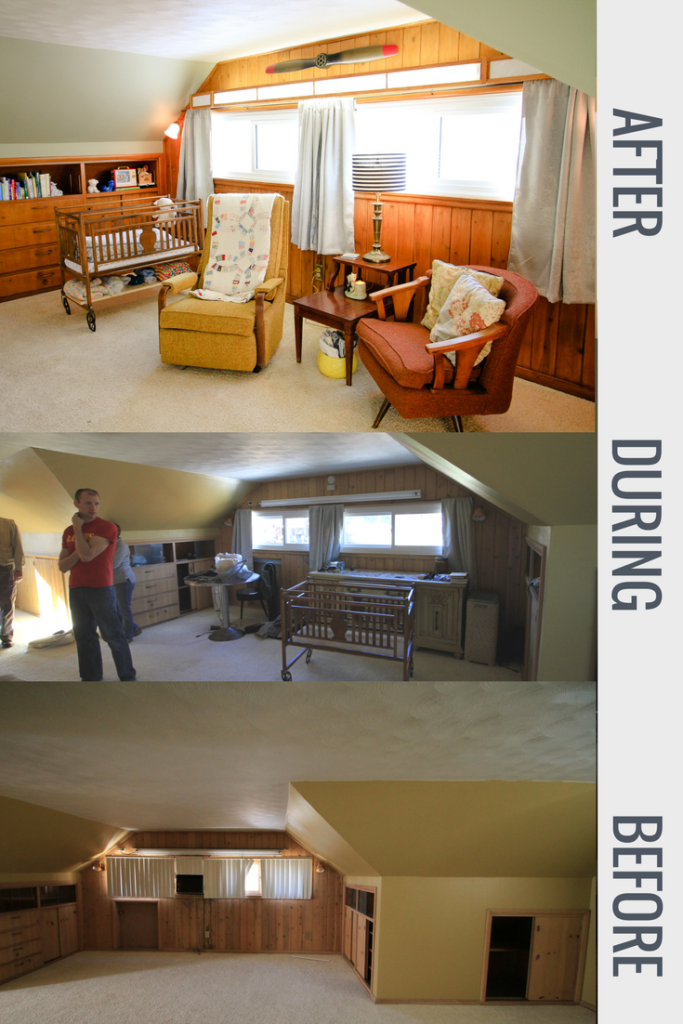
Okay, shifting to the side we’ll look at the sitting area/nursery. I’ve always thought it would be nice to have a little sitting area in the master bedroom. We kind of had one before…but it mostly housed my sewing machine and collected those only-worn-once clothes that aren’t quite ready for the hamper.
When friends of ours moved into a new house and set up a precious sitting space in their room my yearning for one of my own was rekindled. So once we started renovating, I knew a sitting space was on the list of things I wanted for sure. This will be especially nice since it’s near our “nursery.” Derek and I have already enjoyed sitting there and chatting in the sunlight–and I’m sure we’ll soon enjoy late night rockings and feedings there by moonlight.
What happened here?
New windows!! They eliminated the need for the ancient, leaky AC unit in the window.
I sanded and restained all the woodwork and built ins with PolyShades.
We swapped out the table for a crib and once an old closet was replaced by bathroom walls we had room to move the big dresser over toward the bed. (It’ll serve as our changing table.)
I removed the glass sliding doors covering the shelves to make that storage space more accessible.
Since Derek’s schedule is always changing an sometimes requires sleeping through the day, we traded the slat blinds for blackout curtains.
Sconce globes were replaced with something more age appropriate for the house.
The eyesore fluorescent light was covered up with a cover I built from pieces of molding and a panel of drop ceiling.
The space was painted.
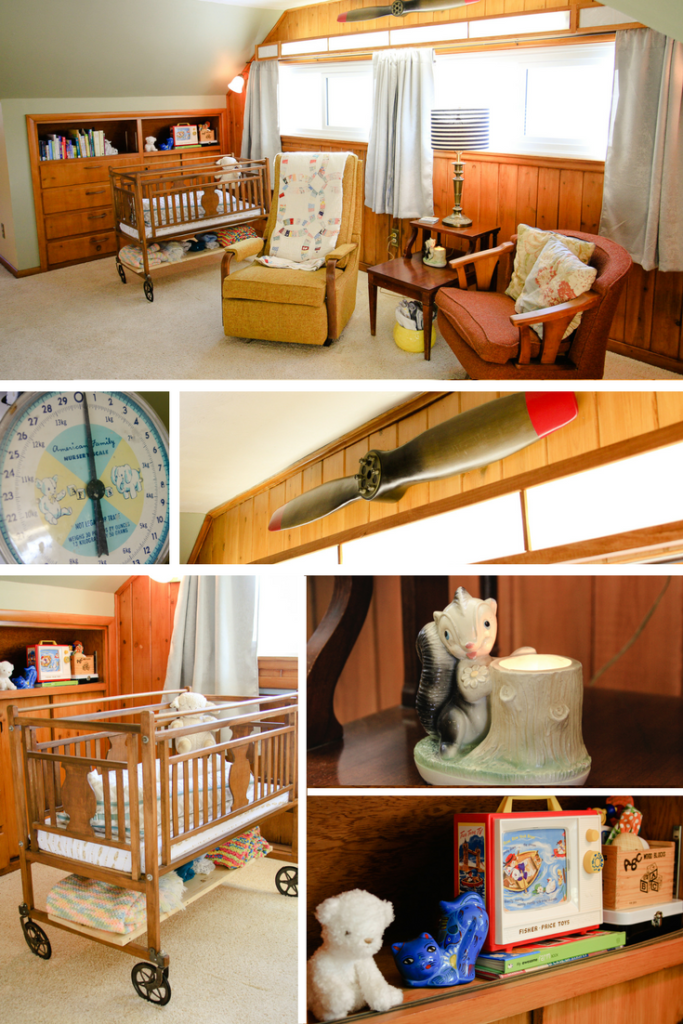
We furnished this area mostly with items we already had on hand. They were things we likes and had stored in the basement because we didn’t have use for them until we finished the bedroom.
The end table is a hand-me-down from Derek’s grandmother’s estate.
I bought the orange chair from Salvation Army for a project I did over the summer…but it didn’t end up staying, so I brought it home. (There’s something undeniably awesome about it.) They yellow recliner was purchased from the St. Vincent De Paul Thrift Store specifically for this space. It’s really hard for us to purchase new furniture…because those items tend to stick out like a sore thumb in our home. Maybe someday I’ll upholster the two chairs to match…but not quite yet.
The crib–which is the coolest thing ever–was my grandfather’s when he was a baby in 1936. I’m so honored to have it in my home.
The lamp I’ve had since college.
The night light was my mom’s. Again…I’m so blessed to be able to incorporate such special items into my child’s space.
The nursery scale is something I bought while living in Minot at a vintage fair. I used to use it in newborn photo sessions and it’s way too cute to leave in storage.
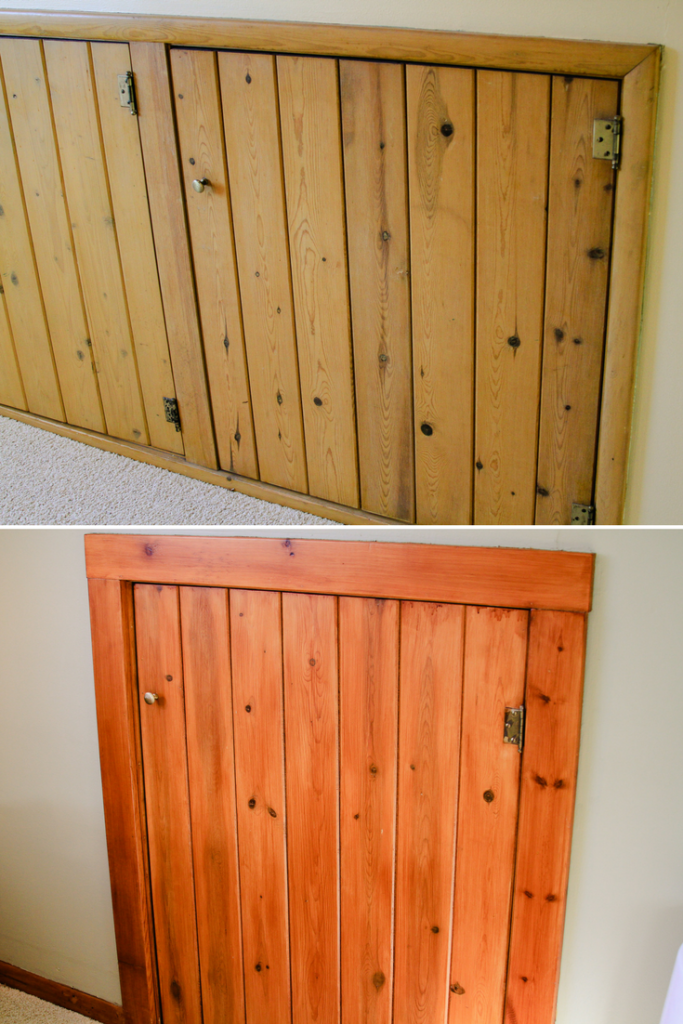
Oh, and now would be a good time to show you the B&A on the woodwork. This is what most of the doors looked like before…and how they look now. There were also parts of the woodwork (mostly trim pieces) that had been completely stripped, so they were a different color. Now everything looks cohesive and content. The red hue matches the rest of the house as well as what was popular in mid-century construction.
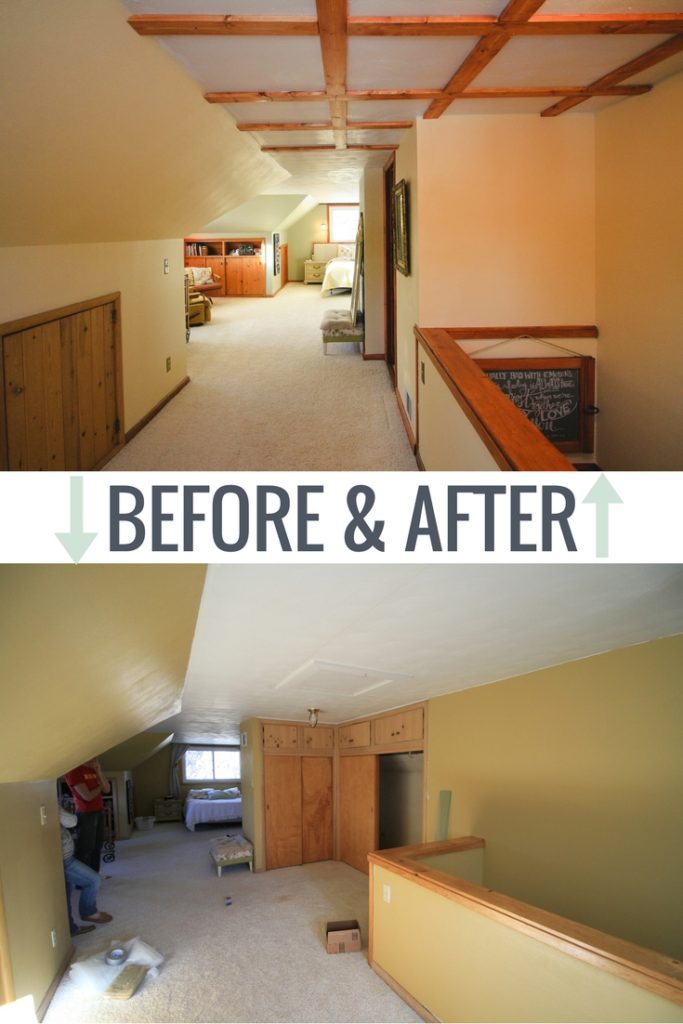
Last, let’s look at the space outside the bathroom. I love that this doesn’t feel “new.” It seems right, like it’s always been this way. When our closets were here we lost a lot of floor space. Now, that’s all been put to good use. In the coming days (months) our new closet will be built in under the slanted roof on the right. The low closets currently built into the knee wall will stay, they’ll just give added space at the back of the closet. This will be handy for storing bulky stuff like luggage, bins of puffy winter gear, etc.
What happened here?
Obviously the closets were taken out and new walls were put up.
We chose to paint the area in front of the bathroom a light cream color and the bedroom a sage to separate the spaces visually.
Our attic access door had to be moved.
We added the beams on the ceiling to reinforce some places were the attic joists were causing the drywall to crack…and to disguise our new attic entrance. And they look cool. But mostly we did it to be practical. Because no one wants to redo a ceiling right now.
It’s not very obvious, but we also swapped the light above the stairs, which hung kind of low and collected lots of dead flies, for a classic mid-century, semi-flush-mount fixture.
So there you have it. Project complete. Man, I love saying that. I get asked often what my favorite part of doing projects is. My answer is always: “Uh…when it’s done.” I like the work. Really I do. But by far my very favorite thing is when it’s all done and beautiful. I just like to sit and look at it. To enjoy the space. It’s like I can feel the house sigh with relief that the work is over and it can relax. In my own home I don’t take on projects I don’t think the house needs or wants. This one I can say for sure: the house wanted it and it’s very, very happy. Did I mention it’s really nice not to have to go down a flight of stairs to pee in the middle of the night?? Especially when you’re pregnant!
But enough about talking houses and my urinary habits. Here’s one more collage of the finished product. I wish all of you could come over for coffee and sit in the kitchen–or the bedroom with me. But for now This will have to do. Thanks for stopping by.
That’s what the adorably sweet girl at the front desk of my chiropractor said. It was a joy chatting with her before my appointments. She’s one of those people who can put you at ease immediately and have you feeling camaraderie after a 3-minute chat. It’s a gift, for sure. But on this particular day–she was very, very wrong.
She asked how I was feeling. There was just about a month left in my pregnancy. I told her I was feeling great overall and hoped I’d actually be late to deliver. After this comment she told me I was the only person she’d ever heard say that. Welp, that’s me…an anomaly.
“I just have a lot to do around my house. If I had to bring a baby home today I could, but it would really be better for everyone if I had more time.”
At this point she gushed about me nesting. Which, who knows–maybe I was.
“I went through the same thing about a month before I was due. I had so much energy. I reorganized everything in the house. I had this label maker–and I labeled everything. Even the obvious stuff…like a jar with pencils in it. I printed a “pencils” label and put it on there!”
I told you, she’s adorable. And fun. And one of my favorite people to see.
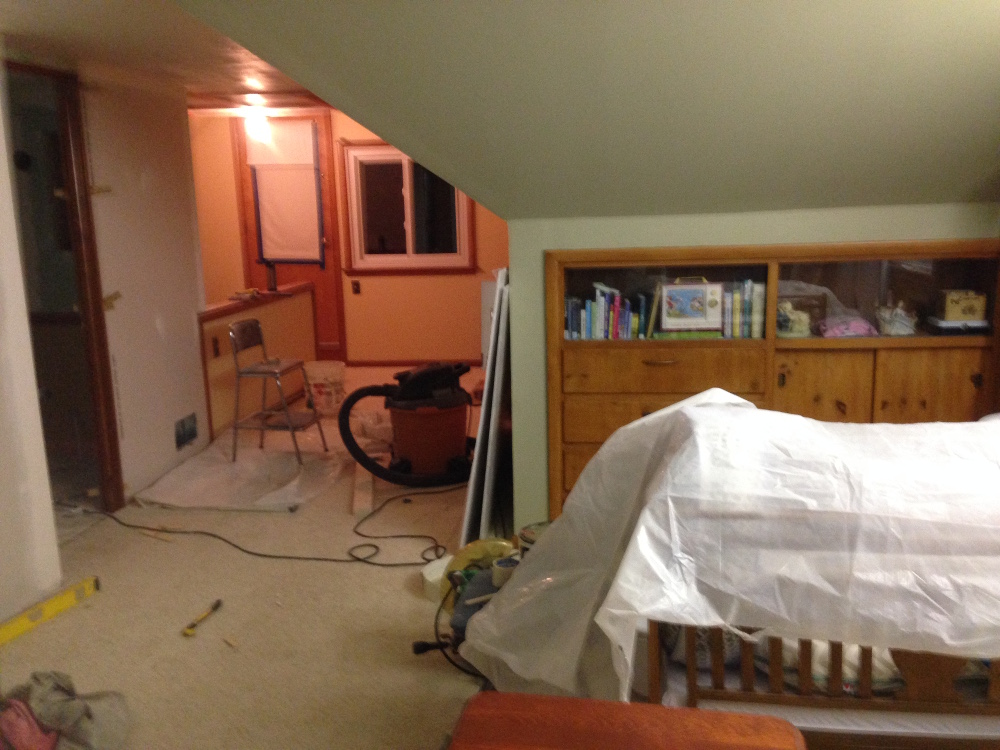
However, in my mind I was cynically thinking of how adorable her pencil label story was. If only I was reorganizing and labeling. That would be a vacation in Barbie’s dream house. Instead, when I closed my eyes and rubbed at them–they were chronically dry at this point from all the drywall dust–I could only see visions of the construction zone that I once called my bedroom.
This photo was literally taken on the day of this interaction. Walls unfinished. My poor baby’s crib full of tools and under a drop cloth. Oh and those whitish looking rags in the lower left corner–those are the clothes I’d been wearing before my appointment and I put them on again after. Grosser than putting on a wet bathing suit.
Nesting. Yeah, that’s cute.
Or maybe this is just how I nest. I don’t know. But I really doubt it.
The doctor called me back at that point. She cracked some things and yanked my legs and I walked out feeling amazing. Then I headed back to my sweet Canyon Cottage, who desperately needed my attention.
In my last post I showed you around the house. Since then I had a pretty big technical issue that required a major data transfer. Combine that time consuming task with finishing the master bedroom and it left me exhausted and with very little time to post. But things are all better now. All my photos and client archives are safe and sound. And I’ve thought about loads of things to post. Soon, a baby will be my excuse for not writing–but we’ll cross that bridge when we get to it.
Anyway. Today I’m showing you the project. To save everyone from a maaaassive post, I’ll keep the full B&A for tomorrow. It’ll keep you on the edge of your seat too. (more…)
Have you ever had a secret dream that came true? Like something super dear to your heart that you never thought would happen. Then it did. And you just couldn’t believe it. And all you could do was thank God over and over, because you just really couldn’t believe it?
Kind of like blowing out your birthday candles, and having that outlandish wish come true.
When it does you’re afraid to really tell anyone about it. Because maybe if you did it would all go away and you’d wake up and discover the whole thing had been a dream.
That’s how I feel about my home. My house. I call it the Canyon Cottage. But mostly just in my own head and on my secret Pinterest board of ideas and DIY tutorials I’ve got saved. I call it that because it’s near a place called Canyon Lake.
Besides that, I also really like canyons. There’s something magical about being at the bottom of a canyon. A place that’s been cut and formed by the forces of nature, directed by God’s own hand. Canyons are carved from harsh elements, yet become places of beauty and life. The path to this place was carved from proverbial harsh elements. On my way to this home, this front door, I was caught between walls of rock and strife. Yet somehow, after squeezing through lots of tight places, I–we, ended up here. In a beautiful canyon. Wide enough to breath in. Narrow enough to be a shelter.
Maybe that train of thought makes no sense. Or maybe it’s just too romantical. The simple truth is that I love it here and God has gifted me a portion of peace I didn’t know existed since living here. It’s been a balm to my tired mind and soul. (more…)
GET YOUR FREE 3-DAY KICK-START
Renew your zeal for the Bible with three days of exclusive devotionals! Interesting and relevant writings and reflection questions will remind you why the Word of God is so awesome. You'll learn a lot and you'll leave excited to know God more and grow deeper in your faith.
Your kick-start is on the way!
You've always dreamed of reading the Bible in chronological order. Now you can!
Getting my printable PDF plan is easy. It's not fancy, but it does fold easily into a bookmark, so you can keep it close by and easily see what's coming next. I hope you find it as useful as I do.
**Remember to check your PROMOTIONS FOLDER. Even if your confirmation comes to your normal inbox, the actual download may come to that pesky promotions folder instead!**