I’ve lived in Indiana, Florida, Oklahoma, Louisiana, South Dakota, and North Dakota. In each place I did my best to make our house into a “home.”
On the casual end of the spectrum that meant painting a wall or two. On the extreme end, it meant tearing out walls during a deployment, or overhauling a kitchen on the weekends.
No matter where we live, come summer, there is only one thing I set my mind to when it comes to creating homey vibes: plants.
Growing Flowers in North Dakota (and Everywhere Else) Has Always Been Hard
Herein lies the problem. I’m convinced that there is something in me at a molecular level that causes me to be absolutely pitiful when it comes to choosing plants, choosing where to put plants, (and most importantly) keeping plants alive.
This is all quite shocking because I come from a long line of gifted gardeners. All my grandparents were fabulous gardeners. Growing up, my parents grew all the vegetables our family needed for the year. They still do this, and also grow the most beautiful annual containers and perennial beds you’ve ever seen. My sister has a knack for choosing perfectly suited landscaping plants.
Me? Every year I try really hard. I’ve tried pretty containers, window boxes, and hanging baskets. I’ve done veggies in giant pots on a deck and so called impossible-to-kill succulents in a windowsill. Each time the story is nearly the same. Things start off well, but by July things look pretty sad. Historically speaking, many of my attempted perennials have turned out to be only annual plantings.
Part of me firmly believes that I’m naturally ungifted. Another part of me believes my plant woes stem from chronically being “not from around here.”
Trusty plants from my formative years in Indiana were no good in Florida. Tips for coaxing grass to grow in Oklahoma didn’t translate to life in Louisiana. My first year in Minot gave me a rude awakening when I tried to put my plants out at the end of April and they all died of frostbite. Later I tried again, only to discover that the shrubs I’d chosen would likely not survive the depth at which the soil freezes.
They didn’t.
The Information That’s Been Missing
I’ve finally hit some kind of stride, or at least formed some kind of gentleman’s agreement with the plants in my yard. I promise not to put anything out before Mother’s Day. The plants promise not to die until after the 4th of July. I promise to only expect the hostas and daylilies to return in the spring. The invasive weeds in my backyard flower beds promise to flower just enough to pass as “ground cover.”
It’s not great, but it’s a start.
Then, last week I attended an event that completely blew me away. This was precisely what I’d been waiting for since moving to Hot Dish Land–and I didn’t even know it. Now, I can’t shut up about it.
My church hosted a DIY planter event with a horticulture and gardening representative from the NDSU Ward County Extension Office. Everyone brought their own pot, the church supplied potting soil and a variety of annuals. The program covered how to create an appealing container, and came complete with simple handouts listing NoDak-friendly plants for all types of landscaping and containers. Then at the end there was open Q&A time for us to ask all our most burning houseplant and gardening questions.
Why did my geranium stems turn red? Why are my houseplant’s leaves turning brown at the tips? Should I be putting eggshells in the soil? How often should I be using plant food?
This may sound simple, but I just sat there with my jaw on the table. This was the exact information I have been craving in all of the places we’ve lived. In all the places I’ve lived and wanted to create a bit of curb appeal, this is what I needed.
I had no idea it existed until last week. And maybe you didn’t either. Well, now we both do.
The Simple Secret to Growing Flowers in North Dakota
Here’s my recommendation: If you need an easy event for a group who isn’t from around here, this is it. If you aren’t from around here and want a few plants to help it feel more like “home,” check out the resources at the NDSU Ward County Extension site.
Particularly, this publication has become a simple secret weapon when it comes to choosing plants that will actually GROW up here. It’s made growing flowers in North Dakota less of a guessing game and honestly has been a game changer.
Will my planter from the event survive the summer? I’d like to believe it will because I am more well informed. But only time will tell. You’ll have to ask me in August.
There may be no perfect answer, but I have found the perfect bar recipe
Midwest Bar Culture
“Are you willing to bring a pan of bars for the after-funeral luncheon?”
This sentence was written in a now nearly-decade-old email.
As I read and reread that first request for bars, I could surmise the term was referring to dessert. What on earth was a pan of bars?
I tried to imagine what a funeral luncheon dessert would include where I’m from. Cookies. Volunteers would be asked for cookies. Or maybe the email would just say, “Please bring a dessert to share at the luncheon.”
The fact that the email before me specifically said, “bars,” seemed significant. I searched my mental rolodex for bar recipes, but I came up wanting.
“A pan of bars.” It seemed like some kind of code. Obviously, this was significant. Bars are what you serve the bereaved. Bars are the dessert of choice when celebrating a life well lived. Bars were important to these people, and If I was going to fit in, I’d need to decipher their language. I’d need to become a bar-maker.
All these years later, and I’m still not a confident bar-maker. This is because the exact definition of “bar” is still hazy to me, and locals have a hard time explaining it. Just as they know a hot dish from a casserole when they see it—they can easily identify a bar from a not-bar on a crowded potluck table. A true Dakotan will defend their own definition of “bar” with polite vigor, passive passion, and a bit of nervous giggling.
Bars are part of hot dish culture. And if you want to run with the locals, you’ll need to understand the world of bars, and have at least one go-to bar recipe in your arsenal.
I’ve got you covered on both fronts. First, let me tell you what I’ve learned from locals this week about bars, then I’ll share my favorite bar recipe with you.
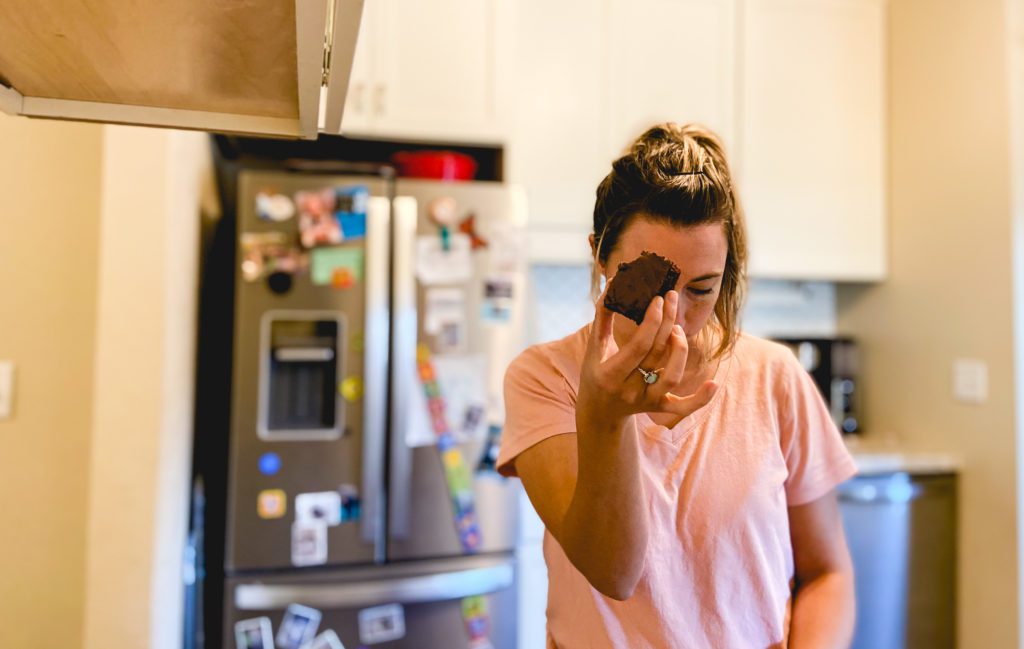
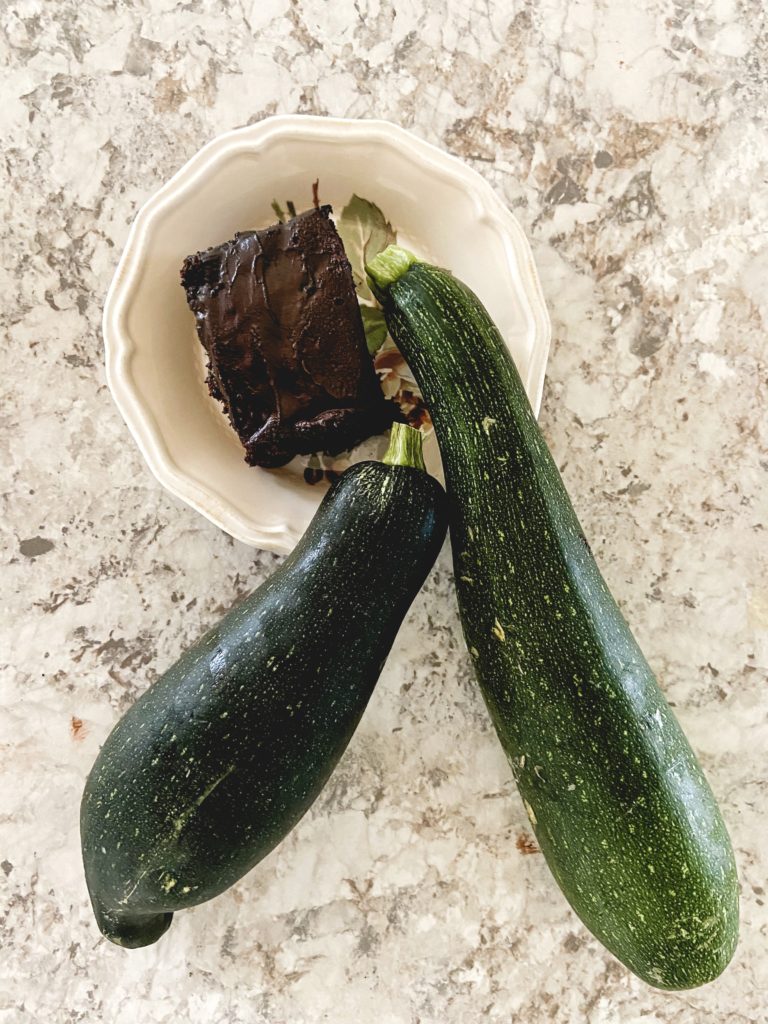
My favorite bars to make are these chocolate zucchini bars. It’s the perfect way to use extra summer produce. (Photo, Amy Allender/The Dakotan)
So, what is a bar?
At the very core, a “bar” is a dessert made in a pan, that can be cut into squares, and retains its shape when cut.
However, there are vehement exceptions and additions to be made. Let’s start with the pan. One local was insistent that a true bar is made in a metal 9×13 pan. Another told me the pan material didn’t matter, but if you’re making bars in a pan smaller than 9×13, you’ve completely missed the point of bars. Another said real bars on made on a sheet cake or jelly roll pan—meaning they are on the thin side.
Everyone agreed that brownies count as bars, but they blur the line since brownies can often be very gooey. One local explained it this way, “Brownies are bars, but they are also their own dessert category. If you bring gooey brownies when bars were requested others will probably be thinking, ‘Well that’s an interesting choice.’”
Another mark of a good bar is its ability to be eaten without utensils. As one person pointed out, this trait stops other desserts like cake from encroaching on bar territory. Traditional bars should be able to be served on napkins, for ease of serving. This also allows the eater to hold coffee, probably black and in a Styrofoam cup, in one hand and a bar in the other. Priorities.
If you are asked to bring bars to an event, locals agree that Scotcheroos will always be a safe, and winning addition to any function. There is hot debate over less-solid “bars.” One person said he believes there are neo-bar people out there who would consider layered puddings, or Jell-o desserts “bars,” but it’s up to you if you’re willing to risk your reputation.
With a holiday weekend ahead, you may be heading to an event that will have you mingling with locals. Wow them with your knowledge of bar culture by whipping up a batch of my favorite bars (recipe below). Then join me on Instagram (@amy_allender) and Facebook (@amyallenderblog) to continue the bar conversation. I’m eager to hear your take on the subject!
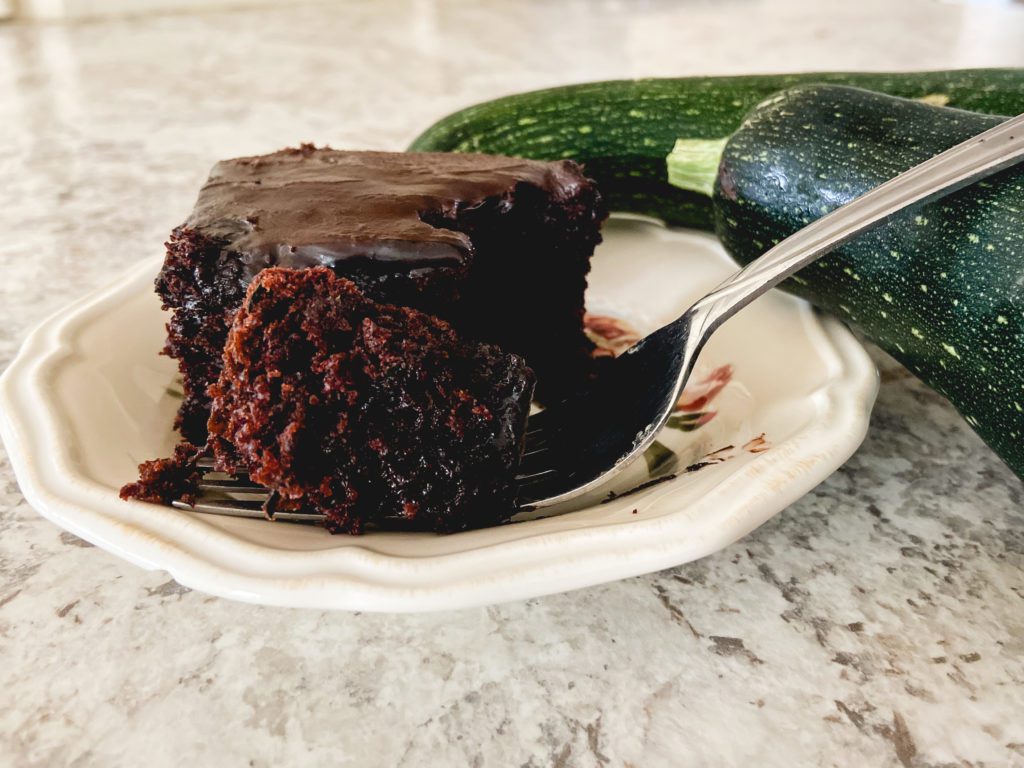
These bars are easy to make, come together in minutes, and hit all the marks of a traditional bar. Fork optional! (Photo: Amy Allender/The Dakotan)
Perfect Bar Recipe
Chocolate Zucchini Bars:
½ cup vegetable oil + a little extra
1 ½ cup white sugar
2 tsp vanilla
2 cups all-purpose flour
½ cup unsweetened cocoa powder
1 ½ tsp baking soda
1 tsp salt
2 cups shredded zucchini
Frosting:
6 Tbsp unsweetened cocoa powder
¼ cup butter at room temperature
2 cups powdered sugar
¼ cup milk
1 tsp vanilla
½ tsp salt
To make the bars:
Preheat your oven to 350˚ and prepare a 9×13 pan by greasing and flouring it.
In the bowl of a stand mixer (or large bowl) combine ½ cup oil, sugar, and vanilla. In a second bowl combine the remaining ingredients, except zucchini. Once dry ingredients are combined, add them to the bowl of your stand mixer. Mix well—it will be very dry and crumbly, you aren’t doing it wrong.
Add zucchini and mix again. The mixture will still be very thick. If it looks un-spreadable, add a bit more oil. Spread into prepared pan and bake for 25-30 minutes. They’re done when center of the bars should spring back when slightly depressed.
For frosting:
Combine all ingredients and spread on cooled bars. Allow the frosting to set up before cutting.
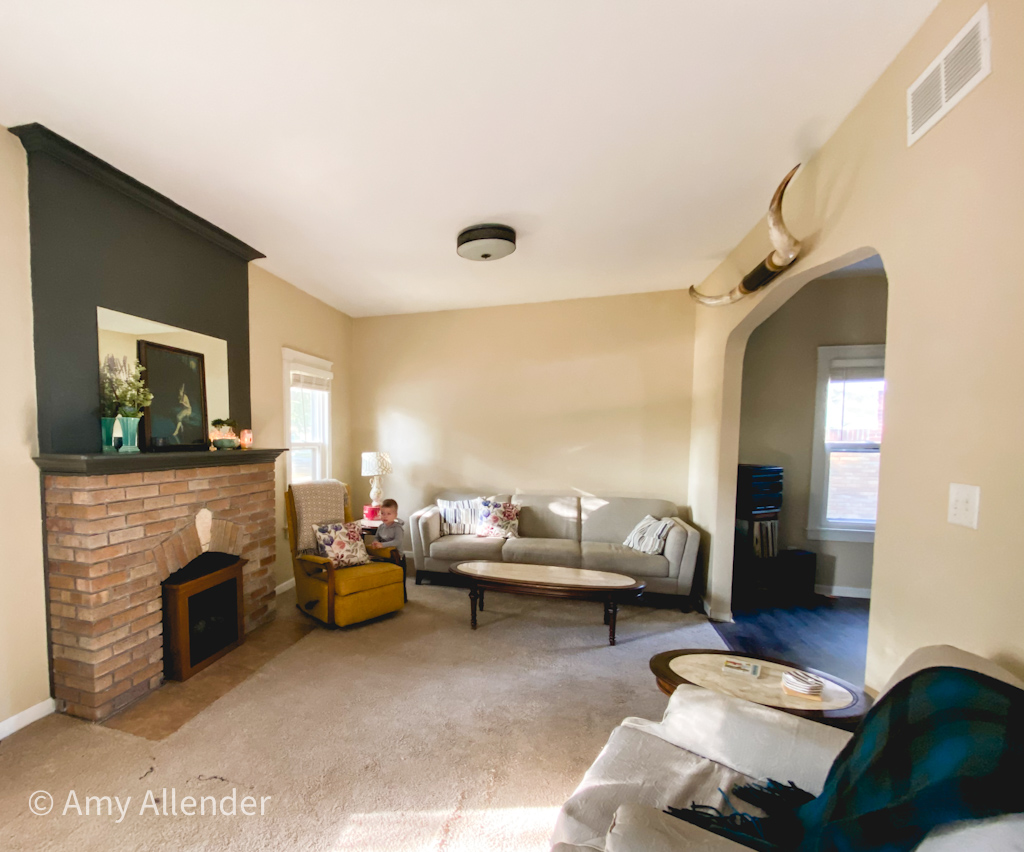
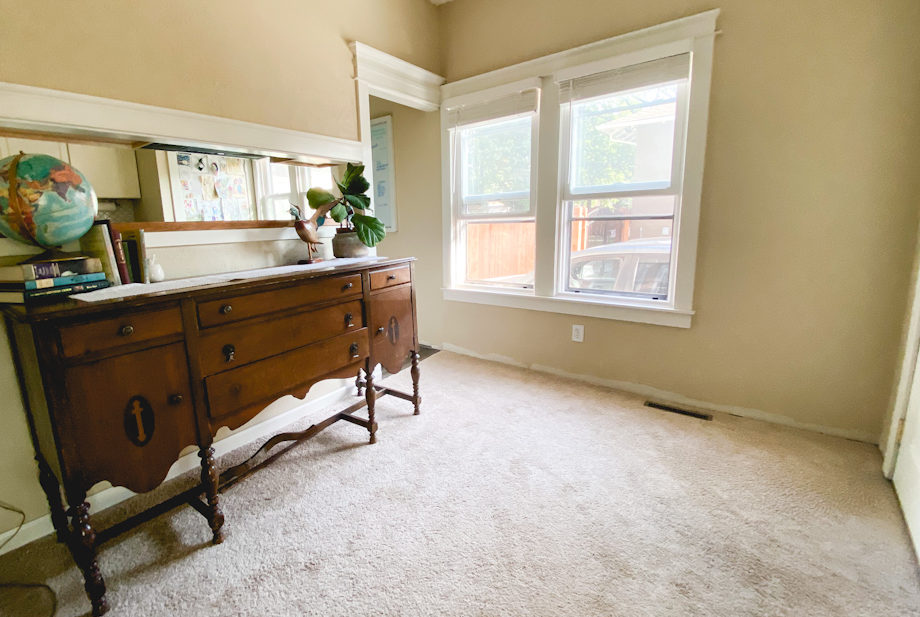
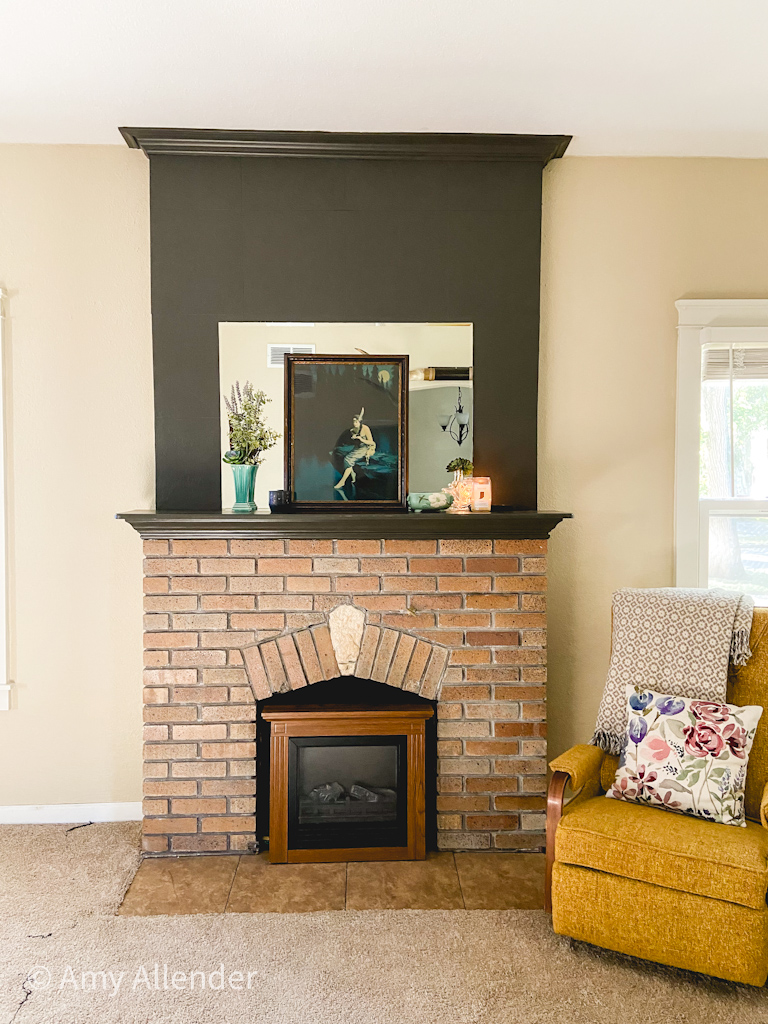
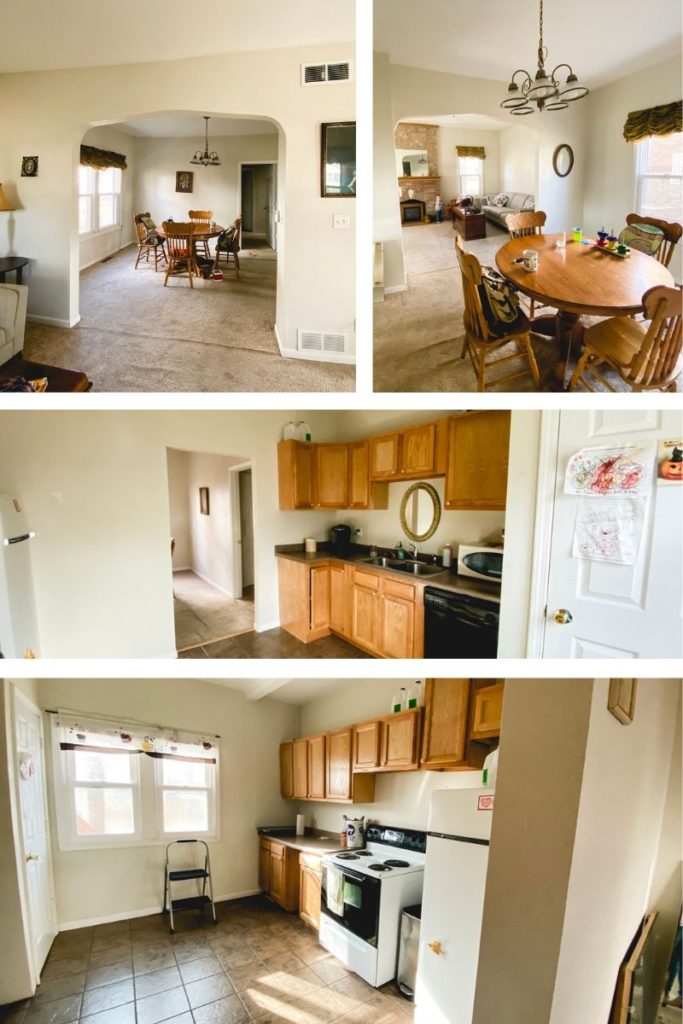
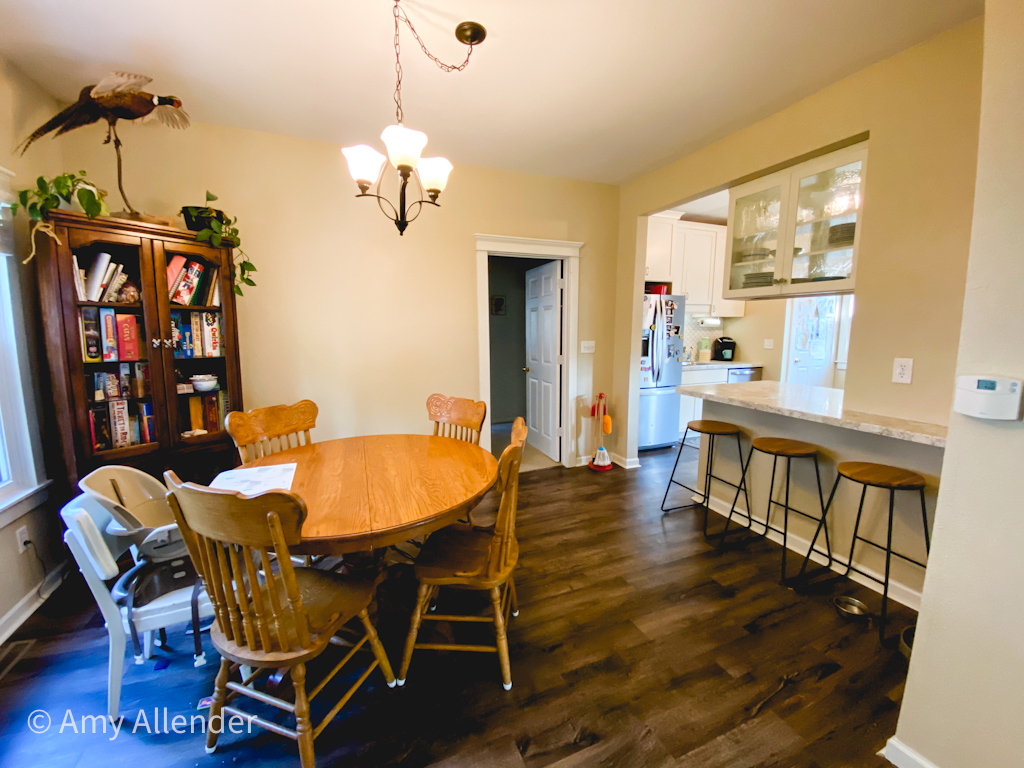
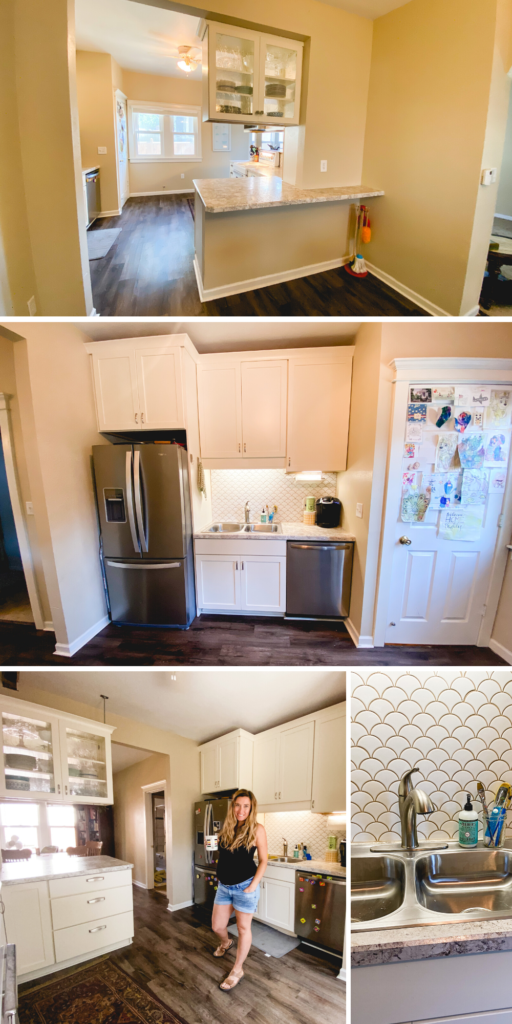
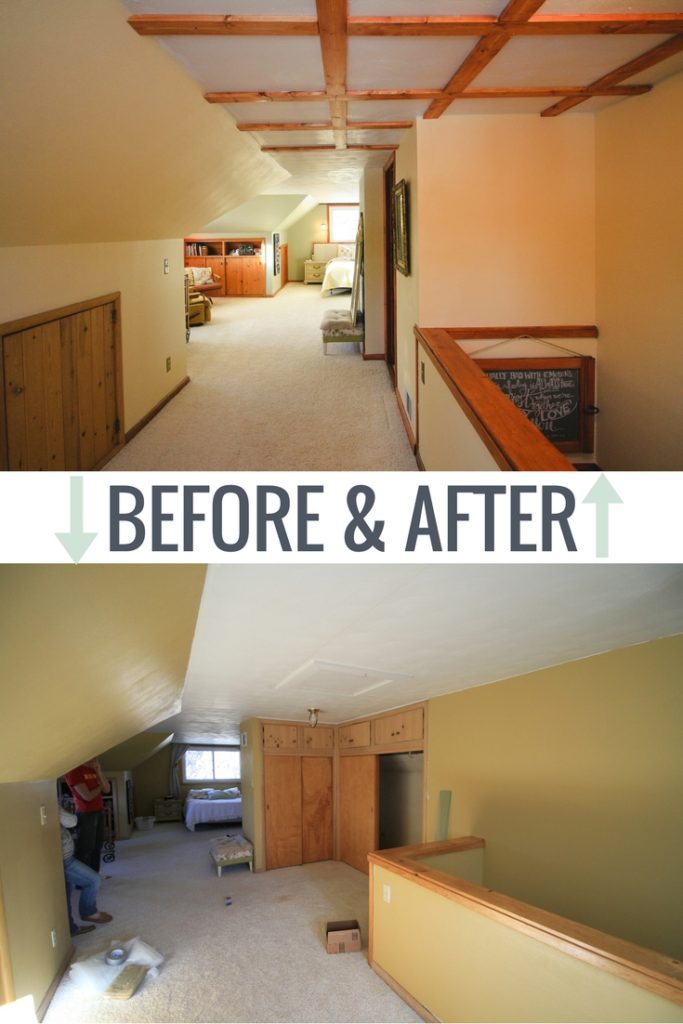
It’s been a year since we closed on Acorn House and started on a crazy adventure. There’s still a long way to go, but things have definitely improved.
As always, these photos are basically unstaged. This is house my house looked when the photos were taken (including the afters.) As time goes on, I’ll share a full “after” of each completed room. But there are very few of those right now. Thanks for coming along on the trip. Be sure to follow along on Instagram (I’ll be sharing lots of Acorn House, the early days video content this weekend.)
For now, I’ll let the photos speak for themselves.
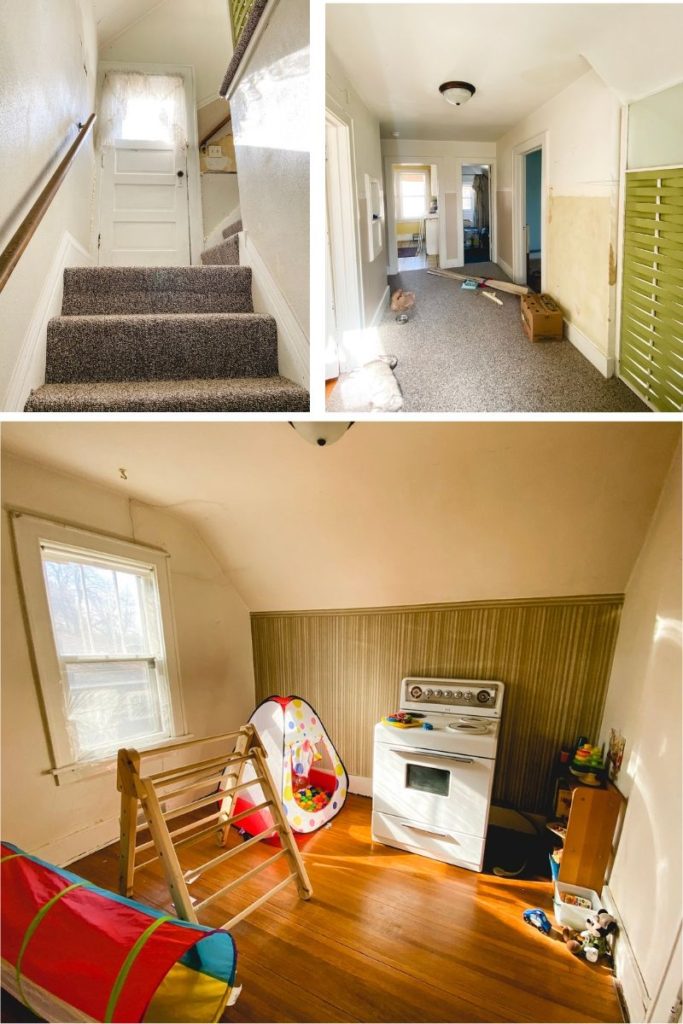
Okay. So I forgot to get a photo of the hall now. This is pretty close to finished. But it’s fully painted and there are no ladders up there now.
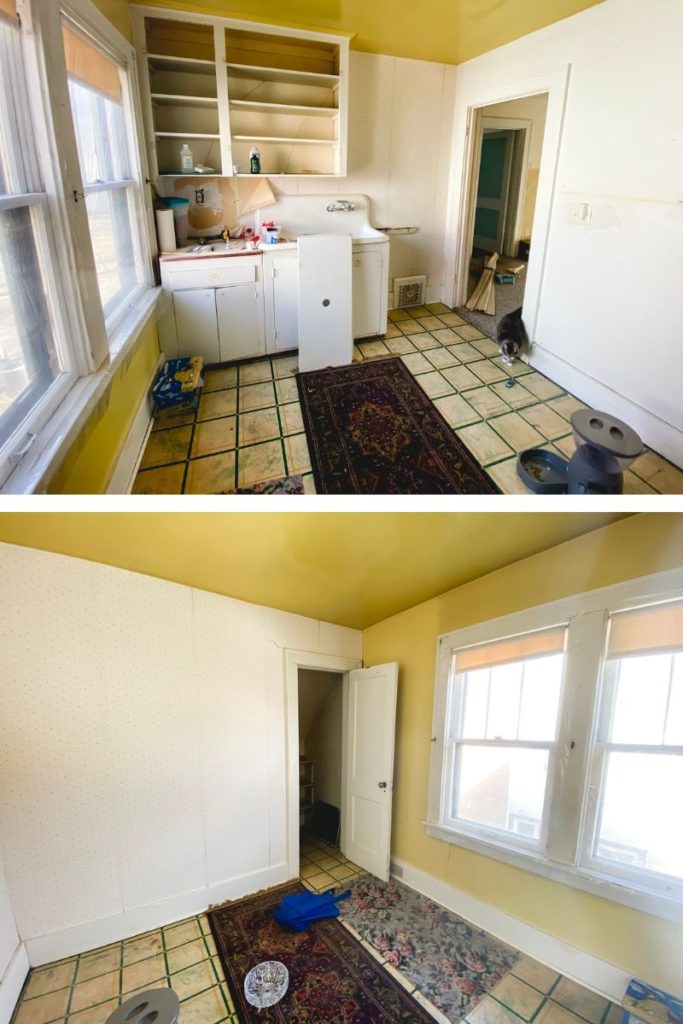
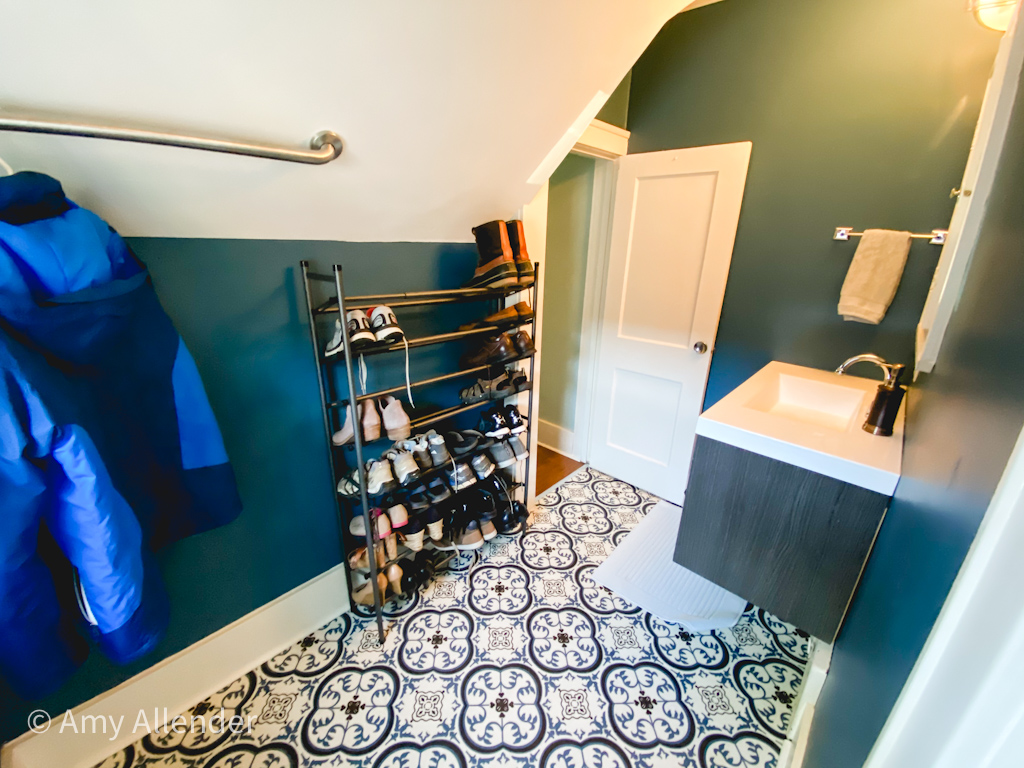
Second Floor Bathroom: Before
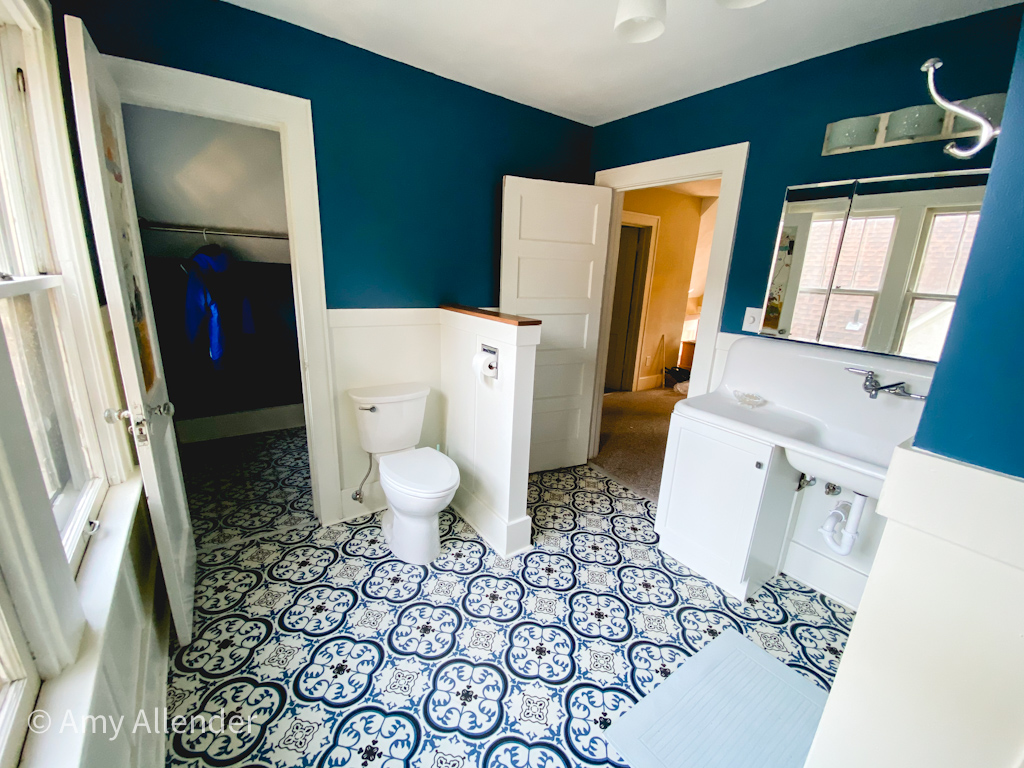
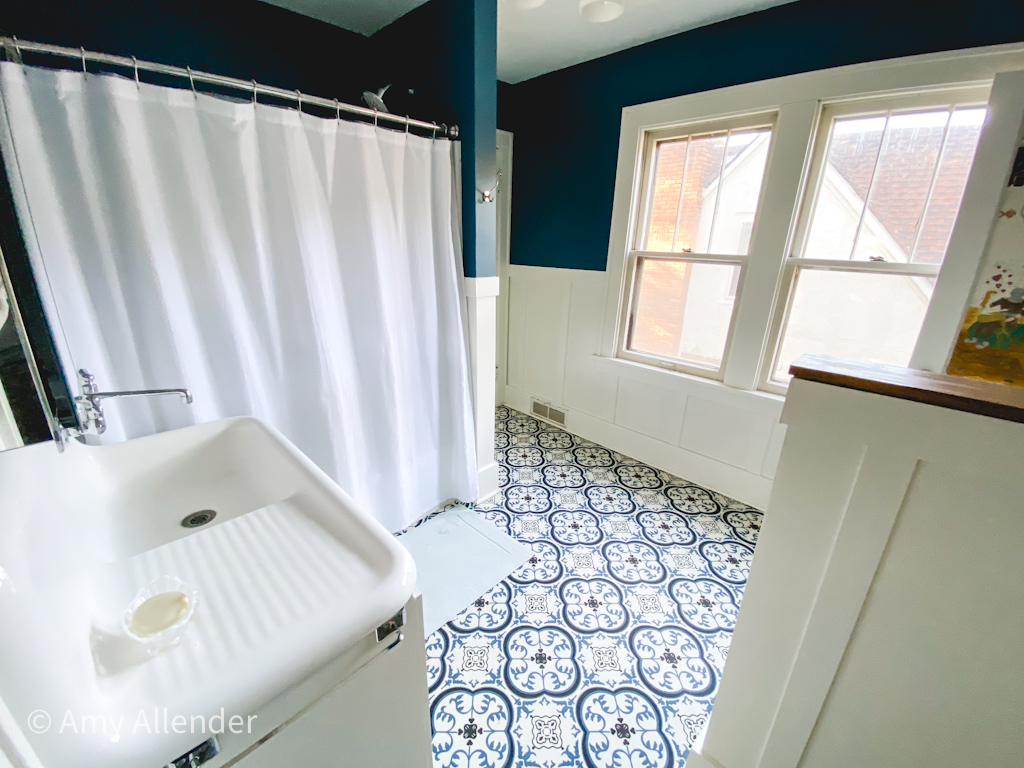
Second Floor Bathroom: After
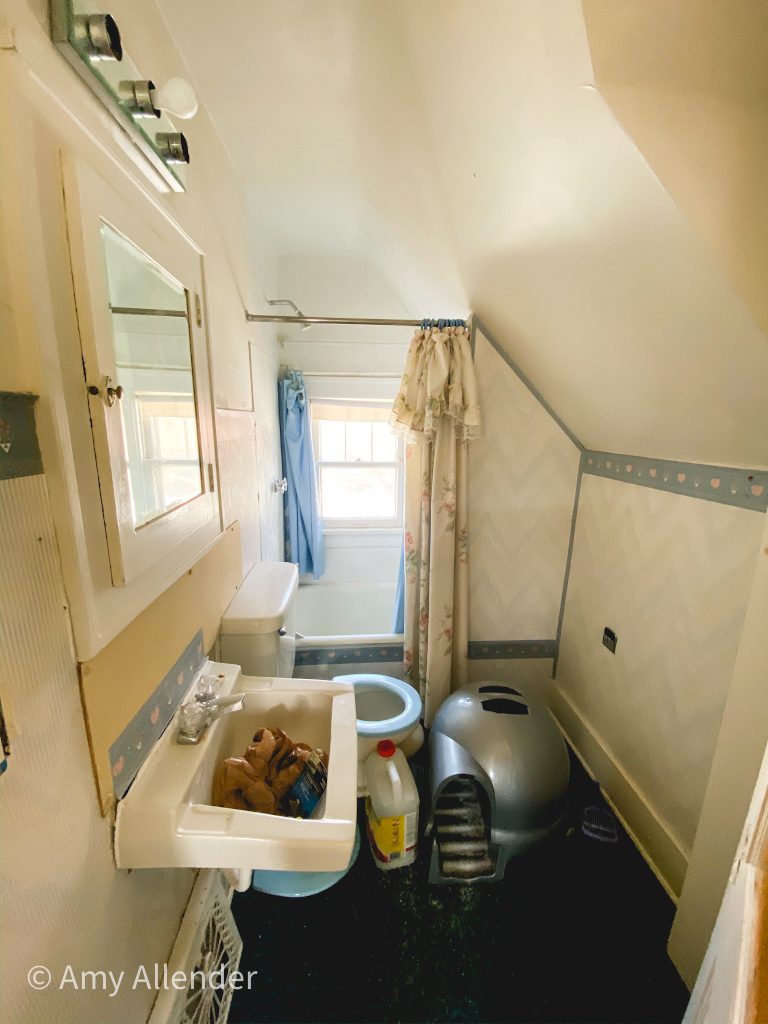
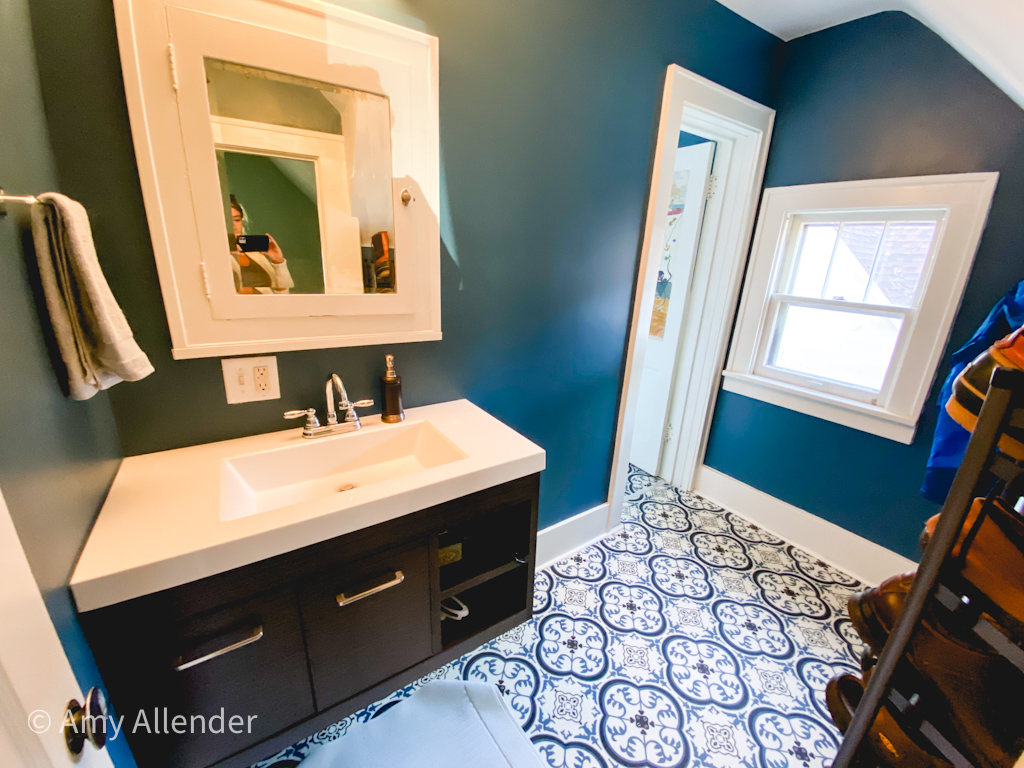
Master Powder Room: Before
Okay. So this was the actual second floor bathroom. And it didn’t connect to the master bedroom. But–it did have an ash tray reachable from the toilet and a toilet paper dispenser that had a built in radio.
Now this space houses our shoes, a clothing rack, sink and medicine cabinet. It offers a walk through to the full bathroom without needing to go into the hall. We have been pleasantly surprised by how much use we are getting out of this space.
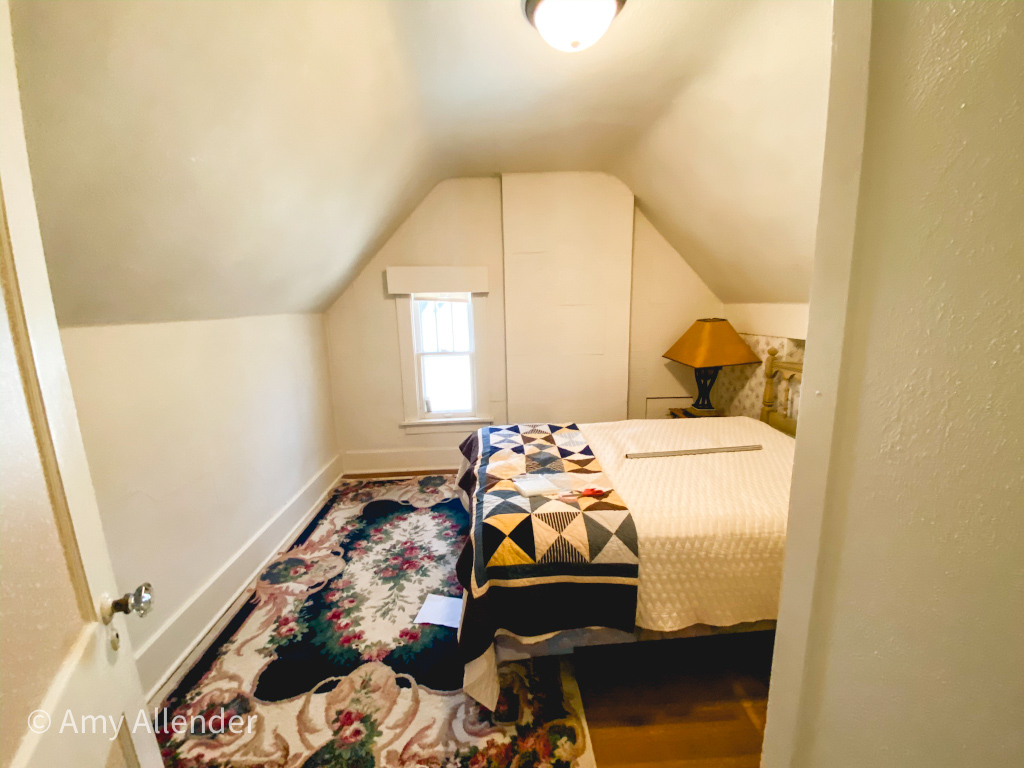
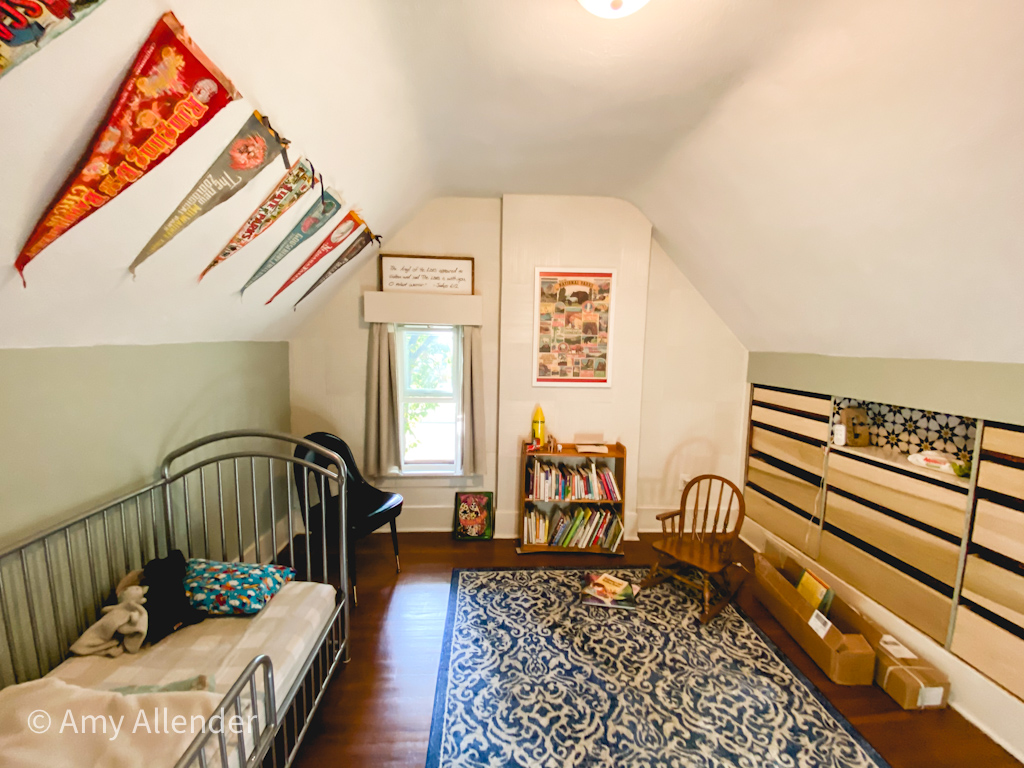
Second Floor Bedroom: Before
Second Floor Bedroom: After
Nearly done, just waiting on the drawers to get finished up!
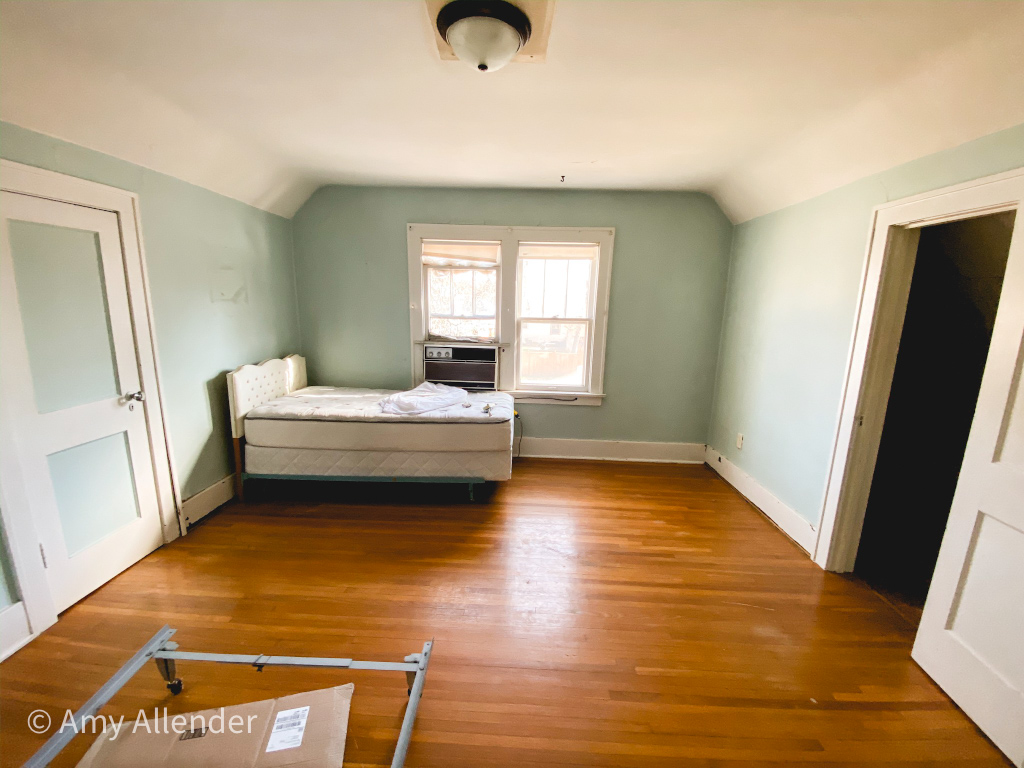
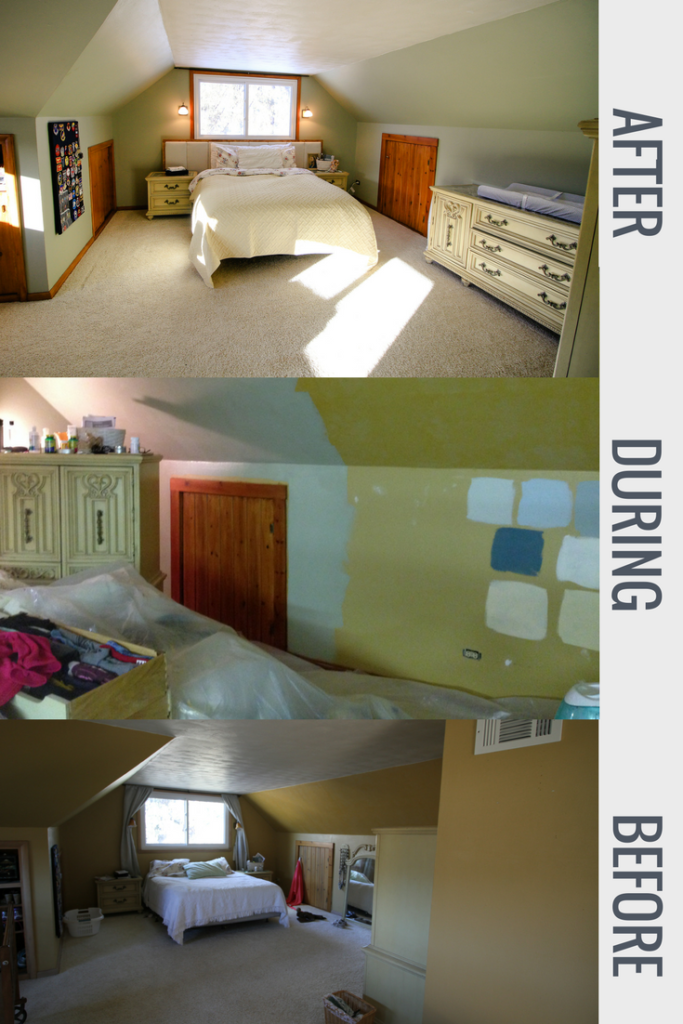
Master Bedroom: Before
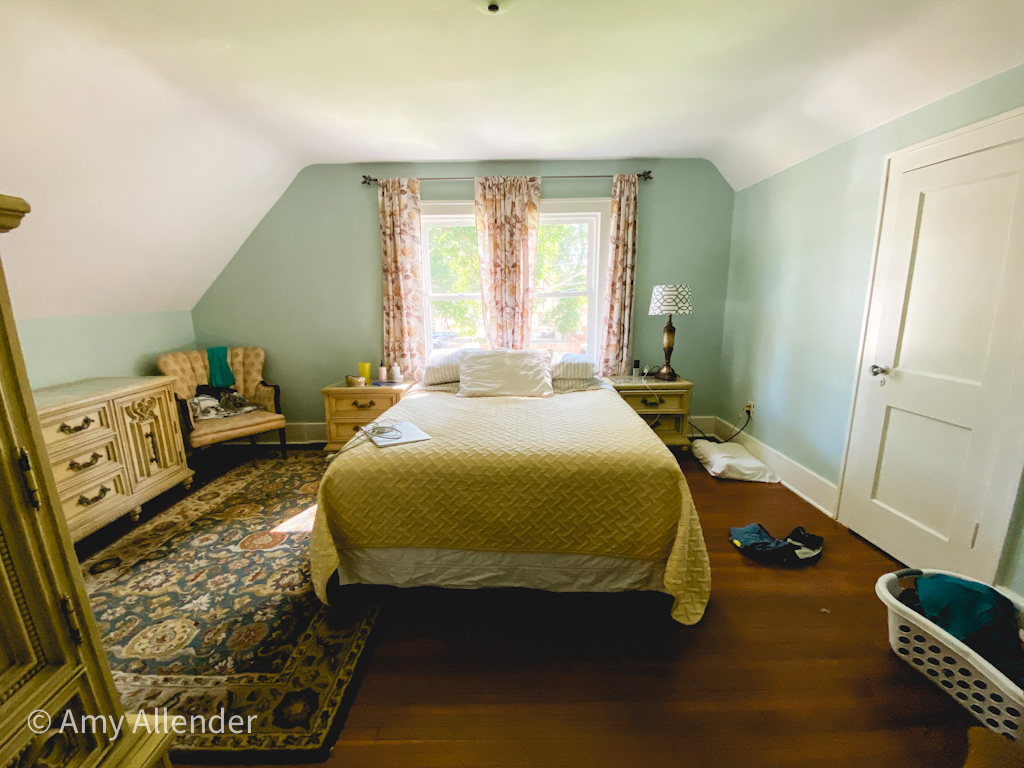
Master Bedroom: After(ish)
Yes, there is laundry strewn about. But this is my real life. I snapped this photo a couple days after we finally moved into the master bedroom. Usually the laundry isn’t running amok. I’m almost ready to do a full post on this one.
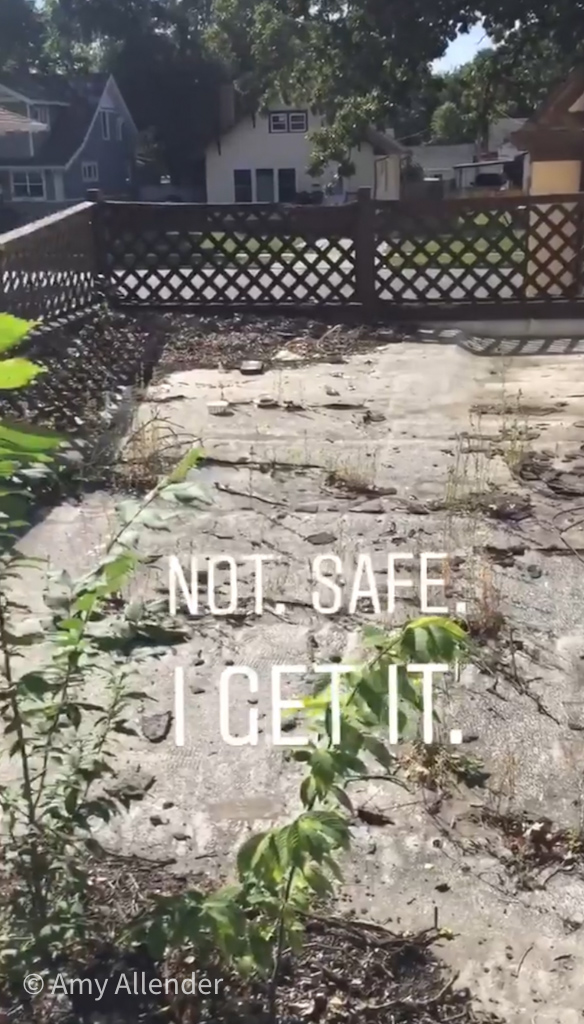
Rooftop Patio: Before
This is a screenshot from an Instagram Story when we first moved in. Trash and saplings were everywhere. The roof was literally caving in over the garage.
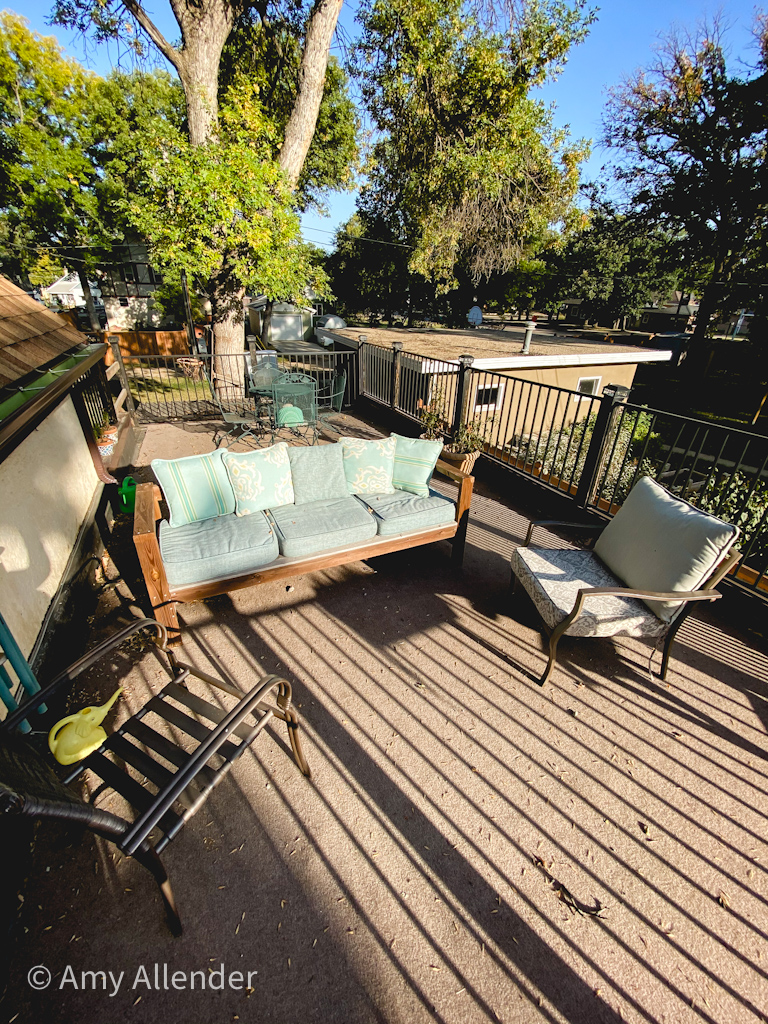
Unstaged, but still very pleasant. This is one of our favorite places. We eat loads of meals out here and we love to sit and read books on the couch. Like I said, there’s still a long way to go, but we’ve also come a long way too.
More Projects and Life at Acorn House
Want more projects and to see behind the scenes progress? Follow along on Instagram and Facebook. There you’ll join a community of people striving to live intentionally and see life through a Christ-centered lens. I share tips and inspiration for living daily for God, intentionally seeing the positive, and fully understanding Scripture.
Or–sign up for my emails and you’ll get all my posts directly to your inbox!
Today I’m sharing an everyday devotional about trusting God in the mess of our lives. I’ve learned over and over that things usually look worse before they look better–and trusting God in the mess is safe. Read along as I tell you a story from everyday life and weave a lesson about God’s grace and truth into it.
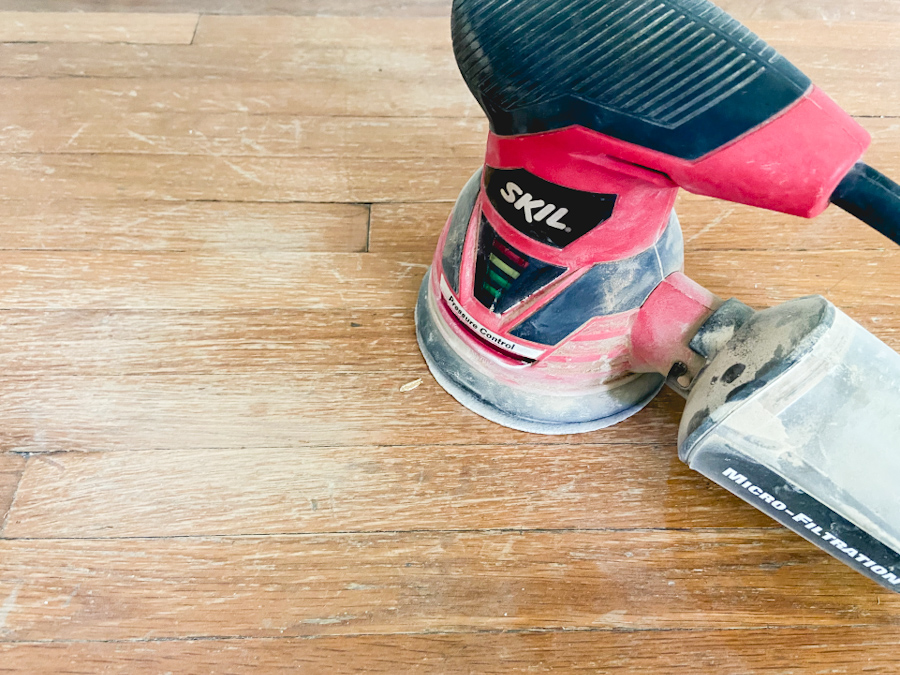
Last week I spent an afternoon sanding down the hardwood floors in our soon-to-be master bedroom. I almost didn’t want to start. Most of the floor was in pretty good shape. There were some places where leaky windows had left water damage, or years of foot traffic had worn away the finish completely, leaving bare, exposed wood.
It was a shame sand the nice places. The only thing that propelled me into action was having faith that, in the end, the finished product would look better. What looked “kind of okay” would be breathtaking.
This brings me around to a truth that I’ve learned after working on lots of old houses:
Things Nearly Always Look Worse Before They Look Better.
Pinterest is flooded with beautiful Before & After photos. I love looking at B&A pictures. They’re addictive to me, but often, these images leave out an important look into the middle.
There’s a difficult season in the middle of any project–where things look worse than when you started. Even if you know what you are doing is necessary and will be great when its done, it’s inevitable that things will look like a hotter mess as you start to improve than when you started.
I’ve had “middle moments” when I started to wonder if things were really that bad to begin with. Yes, kitchen cabinets that are intact would be nice. But when prepping dinner means using a dismantled dishwasher as your only counter space, and cleanup means hauling all the dirty dishes upstairs to a decrepit 1950’s apartment kitchen–it’s easy to start thinking things would be better if we’d never started this project.
It’s not just home improvement projects that this holds true for. Think about reorganizing, unpacking, or sorting excess. The mess always gets bigger before it comes into a new, better state.
Israel’s Middle Moment | Trusting God in the Mess
Back to sanding the floor.
As I let the sander do its worst to a mostly-okay floor, my mind drifted off to Pentateuch chapters, still fresh in my mind from the 90 Day Bible Reading Challenge.
How many times did the Israelites rail against Moses, asking him why he’d led them out of Egypt to “die in the wilderness”? Why he’d brought them away from Egypt, where:
“We remember the fish which we used to eat free in Egypt, the cucumbers and the melons and the leeks and the onions and the garlic, but now our appetite is gone.”
Yes, they were slaves. Sure, they were belittled, treated less-than, and strictly limited on how they could worship the God they knew to be true. Of course, it wasn’t ideal. But in the heat of the desert, in the midst of that “middle moment” where they’d been didn’t look so bad.
As a modern reader, it’s easy for me to judge Israel. I mentally scold them for not trusting God in the mess. I easily shame them for having weak faith and faltering. Isn’t it obvious? God has something much bigger and better planned. Why don’t they just hush up and eat the manna? Cool your jets, God is doing something huge and wonderful for you–just give Him a hot second.
It’s easy to take that stance when we know the ending. And not just the ending of that journey, when they really do reach the land flowing with milk and honey. We understand that all the law and the prophets and the wandering lead to reconciliation to God for all people, through the sacrifice of Jesus–His perfect, holy son.
We’re blessed to have a more complete picture. Israel, however, was living the “middle moment.”
Fear in the Middle Moments
As I sanded the floor down I felt great empathy for these people. For them, Egypt was the only home they’d ever known. Slavery was the only lifestyle they’d ever lived. It might have even seemed “basically okay.” Walking away took guts.
Like taking a sander to a floor that was basically okay.
What if I take the finish off and the new stain looks crummy? How will I fix it if I just make it worse?
What if we left Egypt–and all we’ll ever know now is dry, dusty wilderness and wandering?
What if we threw away an unpleasant, but stable existence only to watch our children die out here?
How will we ever live with ourselves if there is no promised land and this whole journey has been wasted?
The floor looked more ragged and dingy while I sanded. The once clean room was covered in dust.
Things nearly always look worse before they look better.
Intentionally Take Heart in Your Middle Moments
Friends, let’s be encouraged by the generations before us. Maybe you are about to jump into something that will shake up your world. You know it needs to happen, but you’re nervous. Plaster this truth on the walls of your heart: Things may look worse before they look better. But God is the author of beauty and redeems even the biggest messes.
Maybe you are in a “middle moment.” Some corner of your life is in total disarray. You want to put things back, but it’s too late. You’ve walked out of Egypt. You’ve turned the sander on the floor. Keep moving forward. God will lead you out. Intentionally reminder yourself: Things look worse before they look better. God is bringing something good from this mess. (Get more encouragement from the Moving Forward in Hard Times series.)
Maybe you are lucky enough to have walked through the “middle moment” and come to the promised land. Hold on to the clarity you have. Do not praise your own strength or effort. Remember, what God brought you through. Continue to seek the ways He worked through that season, continue to praise Him. Write it out. Remember what He has done. Recall it often. Do not make the same mistake as the Israelites.
They stopped talking about it. They stopped teaching their children about that hard season in the wilderness. Eventually, it was a vague, distant tale. And again, a hard season crept upon them, another trial. Another “middle moment.”
No matter where you are, or what you are facing, remember that things may look worse before they look better. But, when we walk with God, we can trust that we are being led toward a finished product, a destination far better than where we started.
Join The Community
Join the community on Instagram and Facebook to connect with me and others who aim to live intentionally and see the world through a Christ-Centered lens. I share photos, more everyday stories, practical encouragement for living out your faith and getting excited about God’s Word. Also be sure to head to the Resource Library to find an ever-growing collection of Bible Study resources, created with YOU in mind!
Today I’m excited to be sharing how to make a DIY busy board along with 50 busy board ideas!
I really like making toys for kids. Before Gideon was born I had a little more disposable time and was able to make some super cool things for the little in my life. Now, I’m a little more pressed for time, but I still really like making things for my guy to enjoy.
Hopefully in the near future I’ll sit down and make him something really fun and elaborate. But that hasn’t happened quite yet.
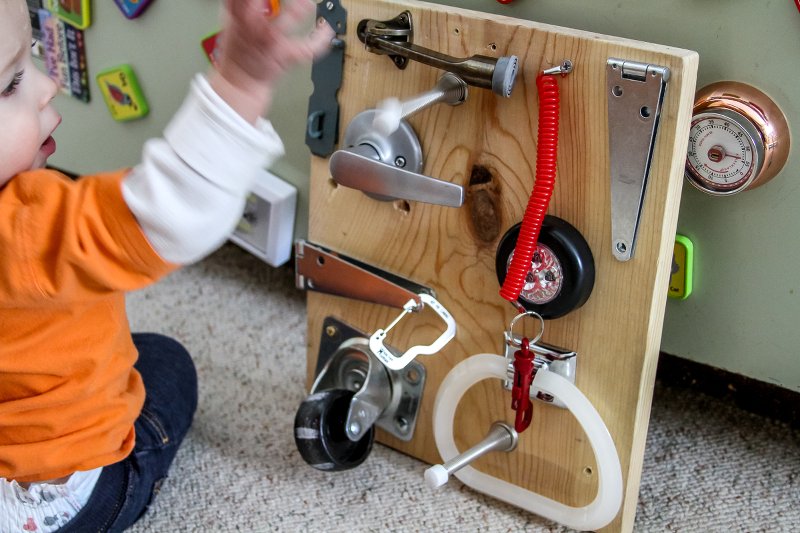
One of the most-used and most-loved homemade toys I’ve created for him has been his busy board. It’s really nothing too exciting to look at, but I’m sharing it here because it is ever-evolving (it has grown with him), cheap, fun to make, and super fast to put together.
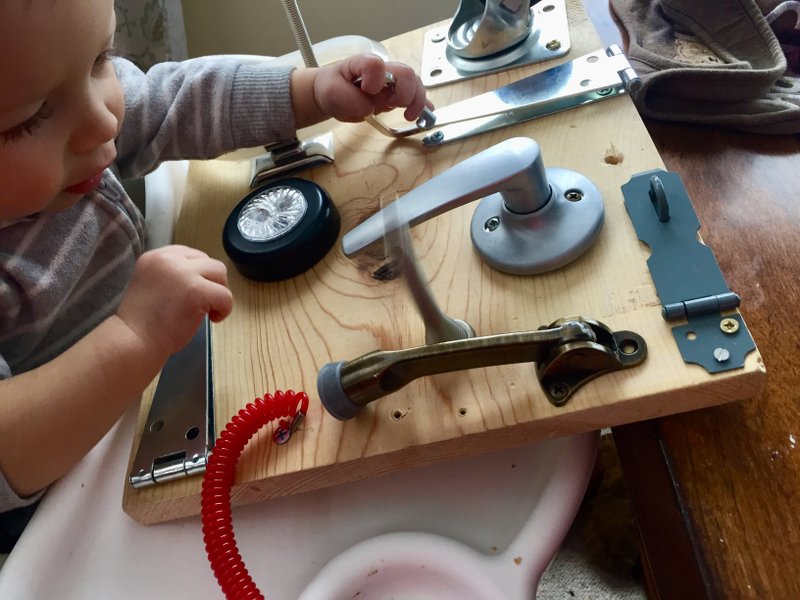
I started this busy board for Gideon when he was about 4 months old. At that time we were working on tummy time. This was something he could look at and play with on the floor, or could be in front of him while propped up on the Boppy. He loved it then. He loves it now. And a friend’s 3-year-old was recently here and she exclaimed, “I want one of these for my birthday.” It’s truly a gem for all ages, and it’s easy to make and update!
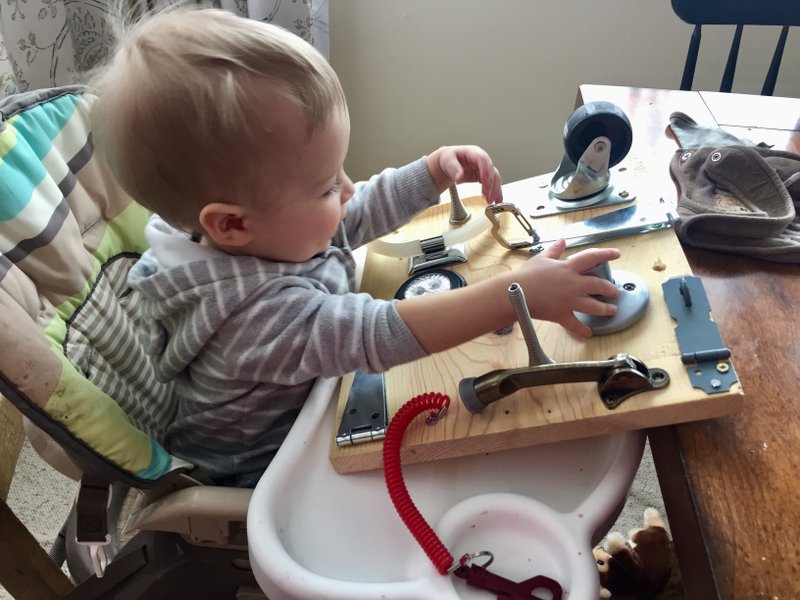
I often put the board on his high chair tray while I’m getting his meal prepped. This gives him something to do and buys me a couple extra minutes.
Build A DIY Busy Board
Here’s what you’ll need to create a busy board of your own.
Scrap of wood
Hardware knick knacks
That’s it! Honestly, you probably have everything you need already laying around the house.
I used a scrap of 1″ pine we had in the basement left over from our Master Bedroom Remodel. A quick sanding and wipe with a damp rag made it clean and clear of any splinters.
Then I gathered up mismatched hardware pieces and screwed them in. For the very first version of the board I attached several cabinet handles with interesting shapes, a piece of sandpaper, a chain, etc. Mostly just things to feel and see since his motor skills were very basic. Bang! Done.
Now, if you look at Pinterest you can easily become overwhelmed by elaborate busy boards. Those are great and super cute–but your baby isn’t going to care much about the boards aesthetics. At least, not when they are still learning to hold their head up, crawl, and walk.
Here is the most beautiful part of a very simple board like this: you can easily change and modify it as frequently as you like! Since it is just a scrap piece of wood, you can take things off and make new holes and have no regrets.
How To Update A DIY Busy Board
Here is my busy board “work flow.”
After a couple months your child will make it pretty obvious which items he is still loving and which items he is over. I remove items that have lost their luster and replace them with new things we’ve picked up at Menard’s or the Habitat ReStore. I try to reuse screw holes if I can. If not, I try to place the new item over the existing hole just to cover it up. If that doesn’t work, I simply give the old hole a quick sand to smooth out splinters and drill a new hole.
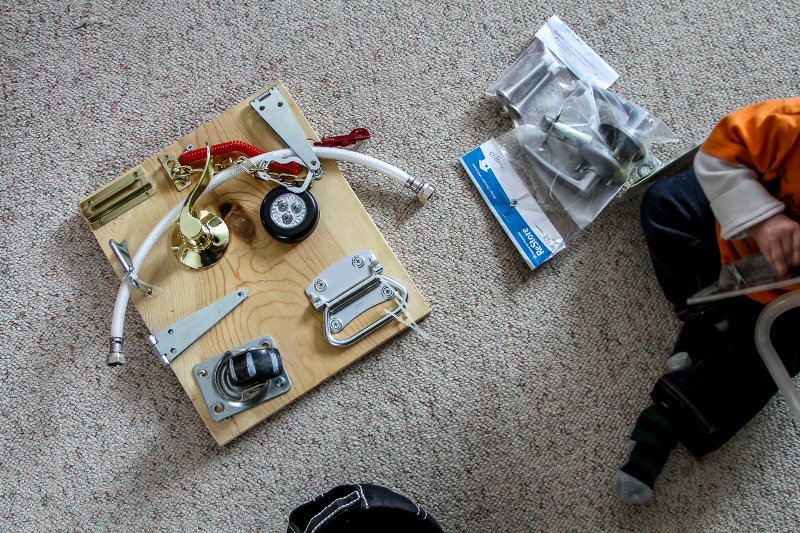
To give you an idea of how gradually I change the board, here is a photo prior to our most recent update. The board included a slide lock, stretchy key chain, strap hinges, a static door handle, press light, handle, caster, and u-bolt with a faucet line zip-tied to it. (It looks weird, but he really liked it.)
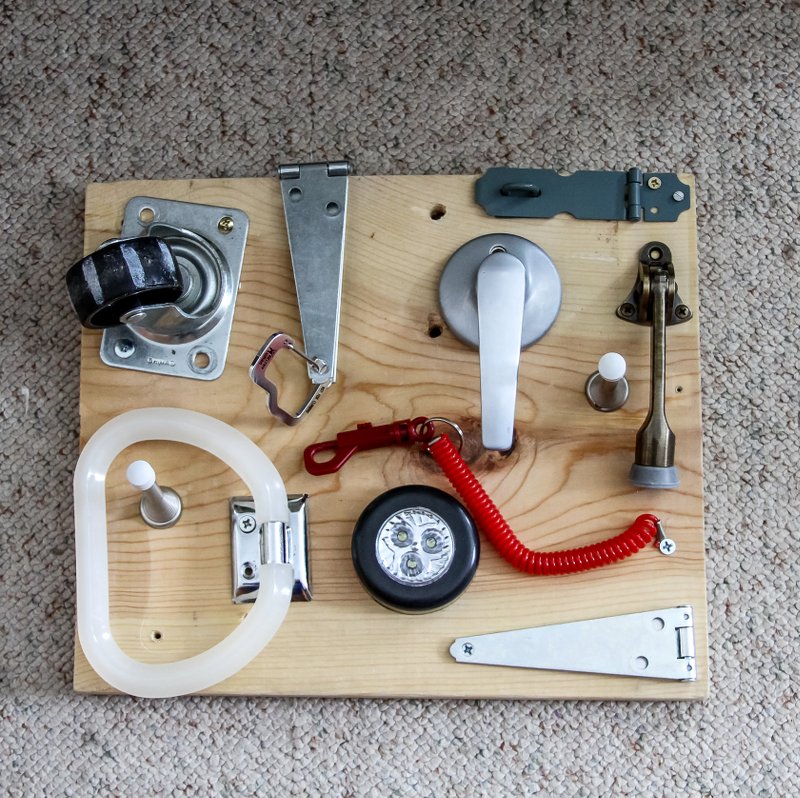
And here is our current board. I left the caster wheel, hinges, light and red key-chain. (That is one of his FAVORITES and has been on here since I first made the board.) I added a hinged lock, hinged door stop, towel ring and two door stop springs. (These are the new favorite…boiiinnnngggg!) I’ve got carabiners that I clip on to various parts of the board. In this photo it’s hooked onto one of the strap hinges.
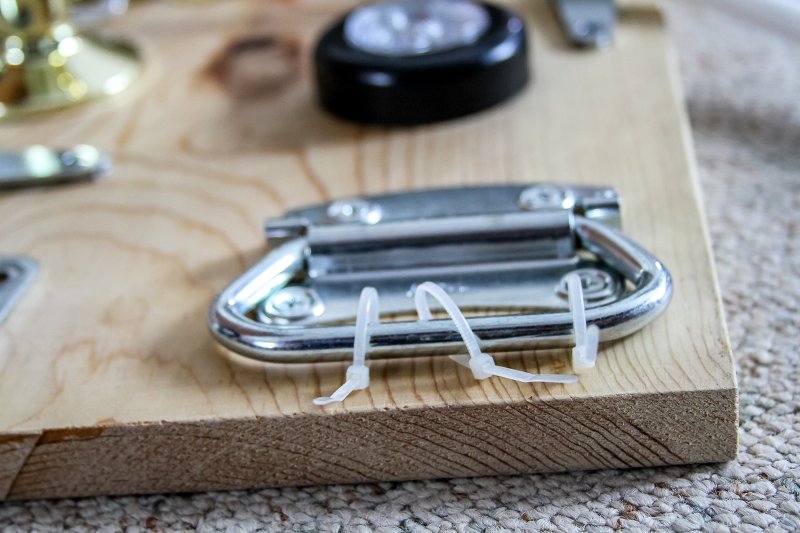
I’ve also found that adding zip-ties to existing hardware is a super quick way to add a little extra interest. Adding a few to this handle gave it more texture and things to spin.
It’s so fun and picking out new items is something I look forward to doing with Gideon. We wander the hardware aisles and I let him hold things and see what sparks his interest–then buy a few and add them. This is a great project for an overwhelmed mom…or would be a great gift for an overwhelmed mom!
50 Ideas For Your Busy Board
The possibilities are endless, but here is a big ol’ list of 50 ideas of simple things to put on your DIY busy board to get started. Keep in mind that not all items are appropriate for all ages and kids should always be supervised while playing with a board…just in case a small piece should come off.
drawer handles
hinged handles
door knocker
knobs of all shapes and sizes
hose spigot knob
static door knobs and handles
turnable door knobs and handles
door hinges
cabinet hinges
strap hinges
piano hinges
slide locks
chain locks
combination locks of all kinds
lock with a key (I would attach the key with a string so it doesn’t get lost)
coiled key chain (like mine above)
retractable name tag
sand paper or textured fabrics/ribbons
closet push light
battery operated light switches
battery operated door bell
toggle switches
dimmer dials
bike safety light
chain
pulley
wheels or casters (I painted white stripes on mine to help Gideon see it move)
latches of all kinds
velcro
toilet paper holder
towel ring
bungee cords (without the metal hook ends)
U-bolts (these are fun to put extra pieces on, like nuts, washers, curtain rings, etc)
mirror
zippers
use carabiners to attach measuring spoons, keys, bells, paintbrushes, etc
sponges
M-F pill box
a land line phone
reflectors
pet collar
belt buckle
toys that squeak
house numbers
Gears
silicone hot pads
an old thermostat dial
faucets and handles
pieces of hose, water line or other flexible tubing
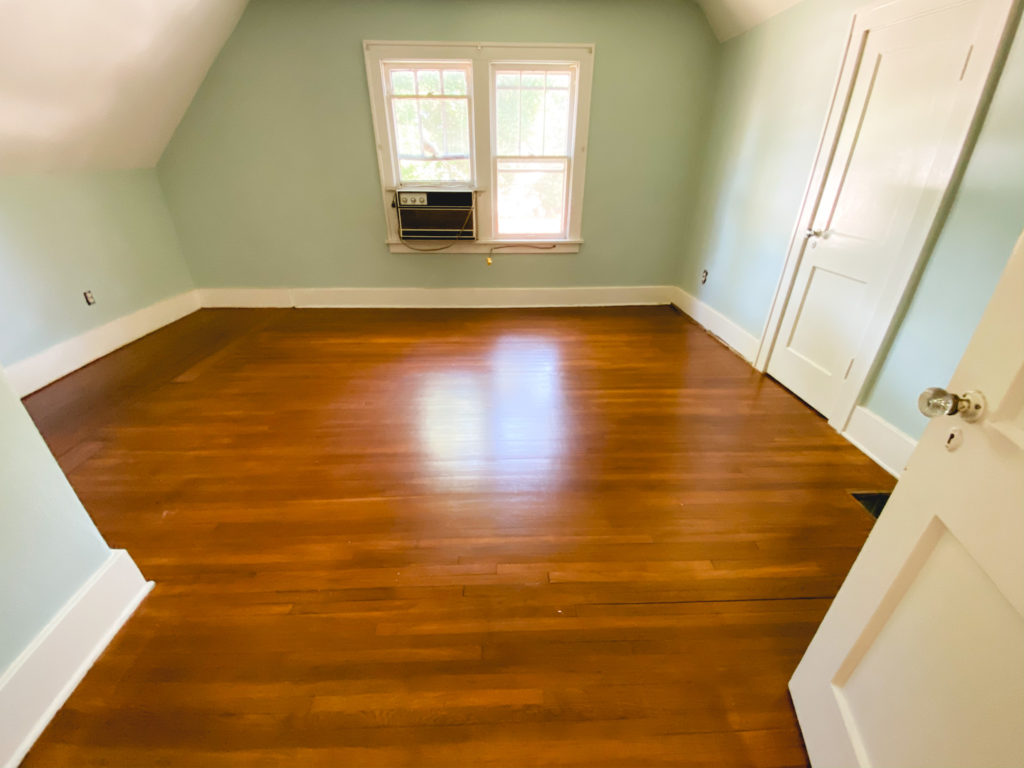
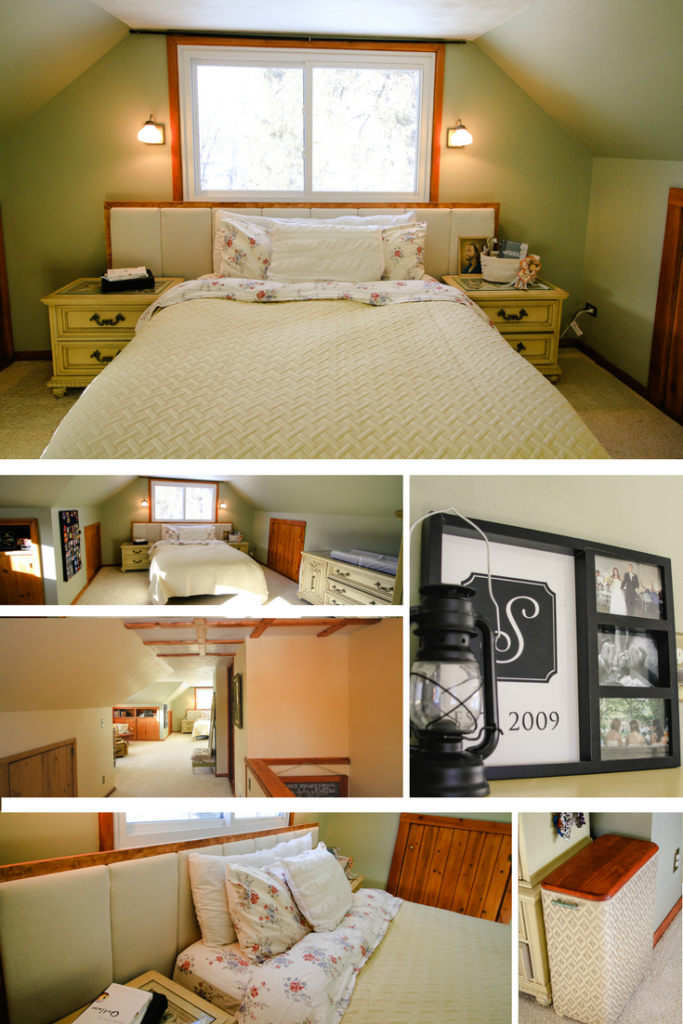
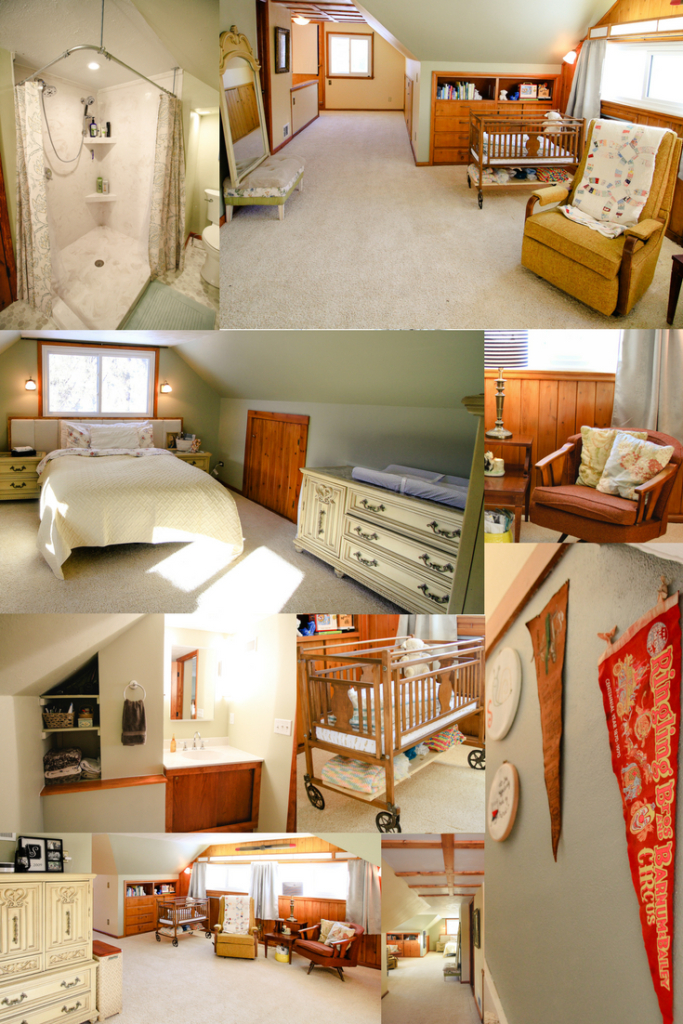
I am so excited to be showing you my finished master suite tonight!! Seriously, basically anyone who has come into my house lately has been invited upstairs to check it out because it’s been something we’ve been working on and I’ve been talking (and complaining) about for a few months.
I could gush all night, but I’ll let the photos do most of the talking for me. I’ll say this though. Since having a bathroom right in my bedroom I’ve gotten up every morning and wanted to do my hair and make up. Just because I like spending time in there. Crazy, I know. And I make my bed every morning and keep it all nice and tidy (for the most part). We’ll see how long that lasts. Well…without further ado, here’s a full look at the before and after!
So…it wasn’t just the bathroom that got added and overhauled. We wanted to spruce up the whole space. Here’s a look at our sleeping area in progress.
What happened here?
I stained the wood to be cohesive with the rest of the house.
Updated the globes on the sconces. And by updated…I mean I took away the trendy yellow globes and replaces them with vintage milk glass globes to match the feel and age of the house.
After lots of hard decisions…I painted–obviously.
With cast off supplies from the Habitat ReStore I built a headboard. When the curtains are rehung they’ll tuck in behind it so we can close the curtains without sacrificing our ability to have the window wide open during the day.
We rearranged the furniture–after some walls were moved and closets were sealed up.
And I went stain crazy by refinishing the top of our hamper (an estate auction find) to match the other woodwork.
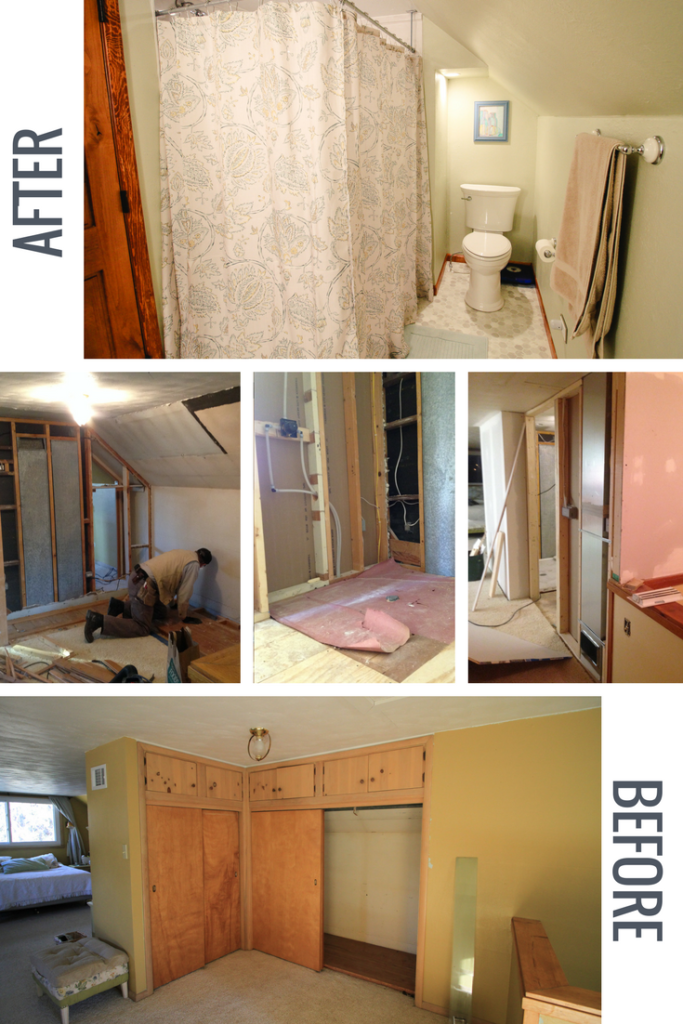
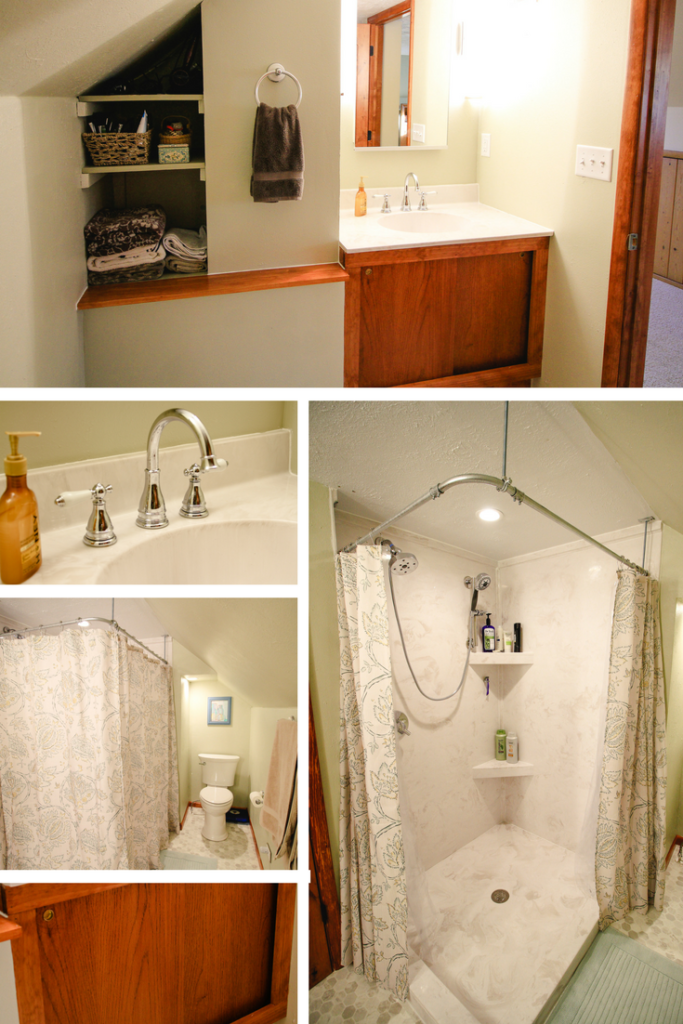
Next up let’s look at the bathroom.
I hope the way I formatted the photos makes sense. I started with the pretty and worked backwards. If you like it (or not) let me know in the comments. These photos show where the bathroom now sits. those corner closets are now our shower!
What happened here?
Our closets were removed to make room for the new bathroom.
Plumbing was run up for toilet, sink and shower.
Electical outlets were added, as were can lights, two bar lights–hanging on either side of the medicine cabinet, switches, and a vent fan.
A supply duct was rerouted.
We tore apart an old vanity from the ReStore and rebuilt it into a custom piece.
The shower–a 42×48″ masterpiece with TWO shower heads!
The paint
Sheet vinyl flooring
Some new walls and a lot of corrective mudding on the existing walls
And everything else that goes with making a brand new bathroom
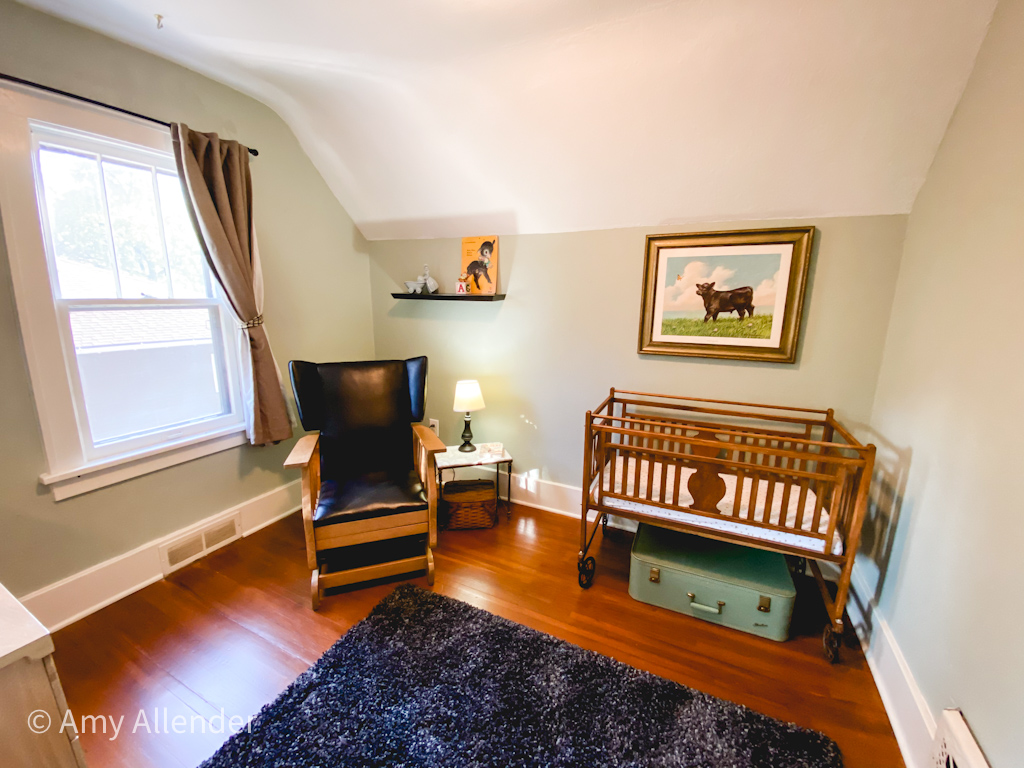
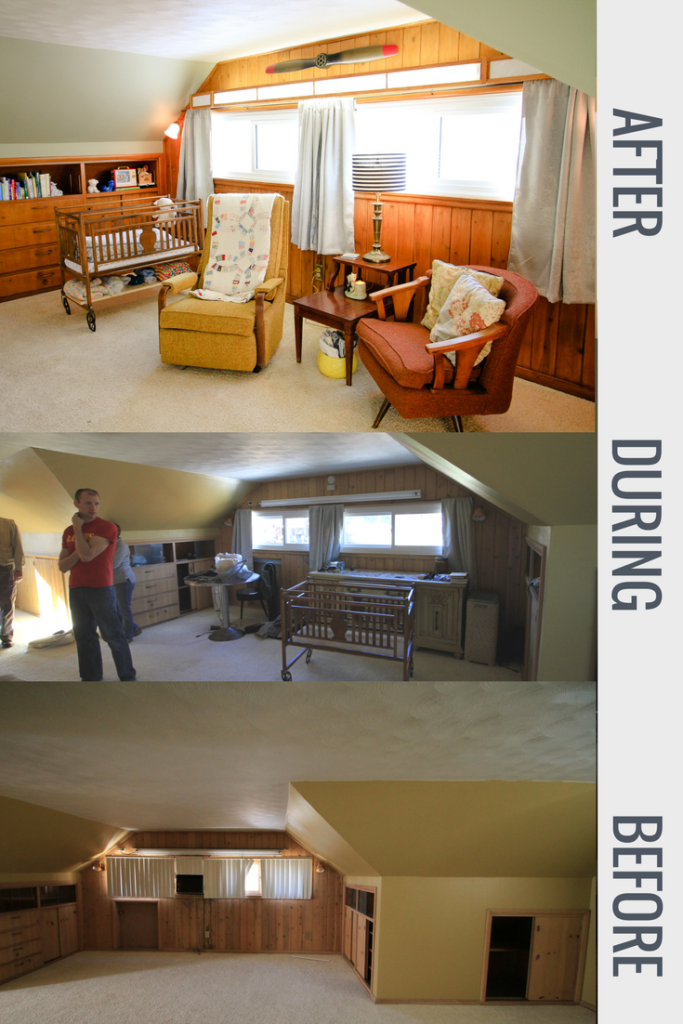
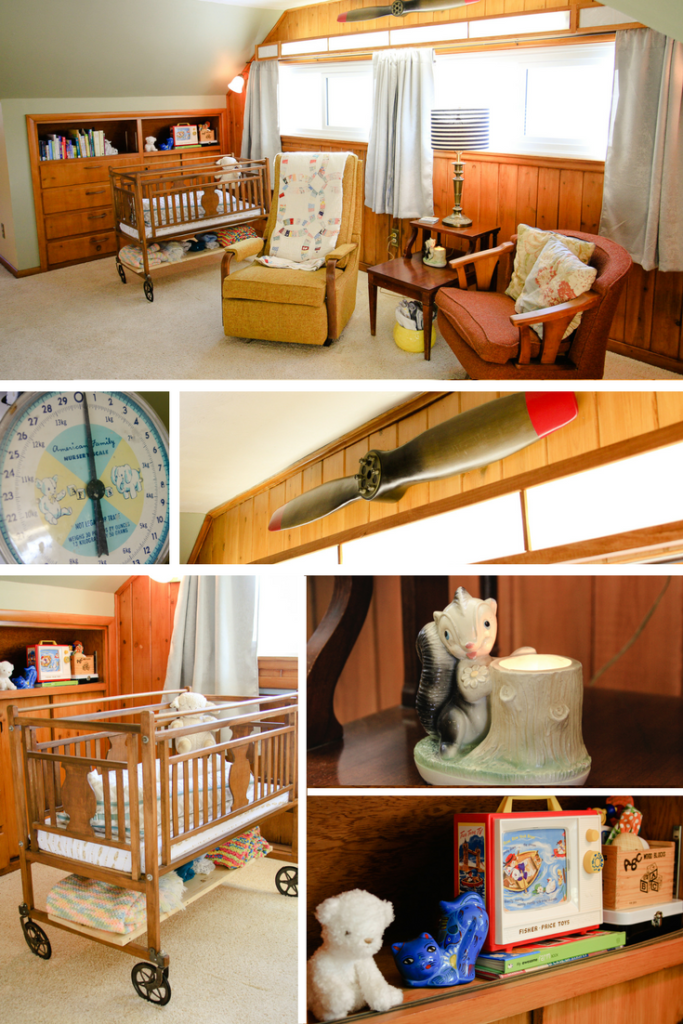
Okay, shifting to the side we’ll look at the sitting area/nursery. I’ve always thought it would be nice to have a little sitting area in the master bedroom. We kind of had one before…but it mostly housed my sewing machine and collected those only-worn-once clothes that aren’t quite ready for the hamper.
When friends of ours moved into a new house and set up a precious sitting space in their room my yearning for one of my own was rekindled. So once we started renovating, I knew a sitting space was on the list of things I wanted for sure. This will be especially nice since it’s near our “nursery.” Derek and I have already enjoyed sitting there and chatting in the sunlight–and I’m sure we’ll soon enjoy late night rockings and feedings there by moonlight.
What happened here?
New windows!! They eliminated the need for the ancient, leaky AC unit in the window.
I sanded and restained all the woodwork and built ins with PolyShades.
We swapped out the table for a crib and once an old closet was replaced by bathroom walls we had room to move the big dresser over toward the bed. (It’ll serve as our changing table.)
I removed the glass sliding doors covering the shelves to make that storage space more accessible.
Since Derek’s schedule is always changing an sometimes requires sleeping through the day, we traded the slat blinds for blackout curtains.
Sconce globes were replaced with something more age appropriate for the house.
The eyesore fluorescent light was covered up with a cover I built from pieces of molding and a panel of drop ceiling.
The space was painted.
We furnished this area mostly with items we already had on hand. They were things we likes and had stored in the basement because we didn’t have use for them until we finished the bedroom.
The end table is a hand-me-down from Derek’s grandmother’s estate.
I bought the orange chair from Salvation Army for a project I did over the summer…but it didn’t end up staying, so I brought it home. (There’s something undeniably awesome about it.) They yellow recliner was purchased from the St. Vincent De Paul Thrift Store specifically for this space. It’s really hard for us to purchase new furniture…because those items tend to stick out like a sore thumb in our home. Maybe someday I’ll upholster the two chairs to match…but not quite yet.
The crib–which is the coolest thing ever–was my grandfather’s when he was a baby in 1936. I’m so honored to have it in my home.
The lamp I’ve had since college.
The night light was my mom’s. Again…I’m so blessed to be able to incorporate such special items into my child’s space.
The nursery scale is something I bought while living in Minot at a vintage fair. I used to use it in newborn photo sessions and it’s way too cute to leave in storage.
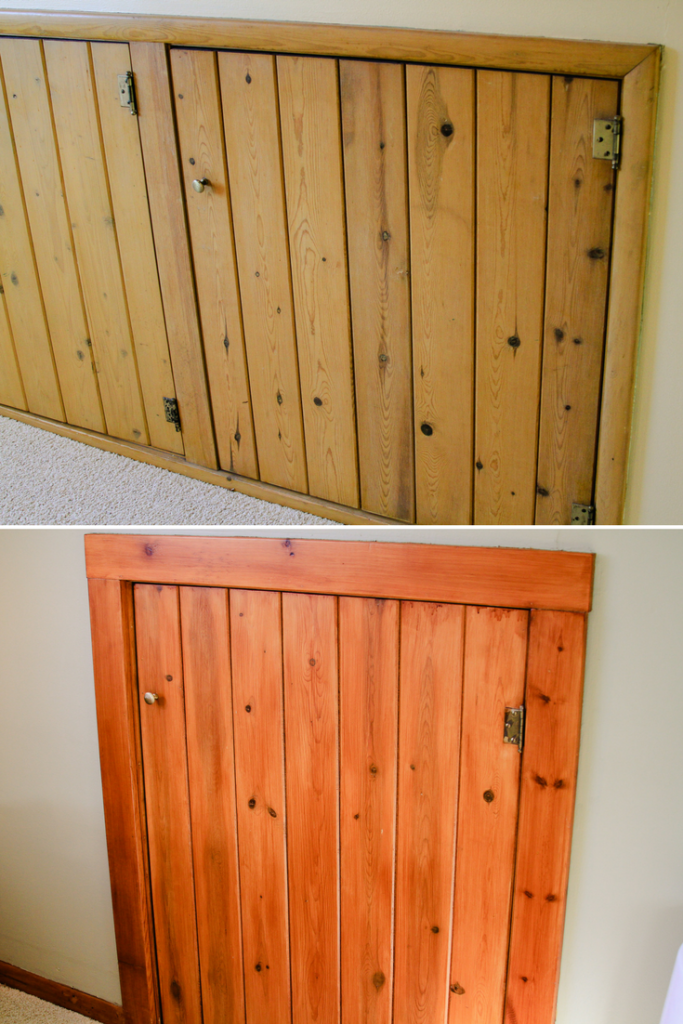
Oh, and now would be a good time to show you the B&A on the woodwork. This is what most of the doors looked like before…and how they look now. There were also parts of the woodwork (mostly trim pieces) that had been completely stripped, so they were a different color. Now everything looks cohesive and content. The red hue matches the rest of the house as well as what was popular in mid-century construction.
Last, let’s look at the space outside the bathroom. I love that this doesn’t feel “new.” It seems right, like it’s always been this way. When our closets were here we lost a lot of floor space. Now, that’s all been put to good use. In the coming days (months) our new closet will be built in under the slanted roof on the right. The low closets currently built into the knee wall will stay, they’ll just give added space at the back of the closet. This will be handy for storing bulky stuff like luggage, bins of puffy winter gear, etc.
What happened here?
Obviously the closets were taken out and new walls were put up.
We chose to paint the area in front of the bathroom a light cream color and the bedroom a sage to separate the spaces visually.
Our attic access door had to be moved.
We added the beams on the ceiling to reinforce some places were the attic joists were causing the drywall to crack…and to disguise our new attic entrance. And they look cool. But mostly we did it to be practical. Because no one wants to redo a ceiling right now.
It’s not very obvious, but we also swapped the light above the stairs, which hung kind of low and collected lots of dead flies, for a classic mid-century, semi-flush-mount fixture.
So there you have it. Project complete. Man, I love saying that. I get asked often what my favorite part of doing projects is. My answer is always: “Uh…when it’s done.” I like the work. Really I do. But by far my very favorite thing is when it’s all done and beautiful. I just like to sit and look at it. To enjoy the space. It’s like I can feel the house sigh with relief that the work is over and it can relax. In my own home I don’t take on projects I don’t think the house needs or wants. This one I can say for sure: the house wanted it and it’s very, very happy. Did I mention it’s really nice not to have to go down a flight of stairs to pee in the middle of the night?? Especially when you’re pregnant!
But enough about talking houses and my urinary habits. Here’s one more collage of the finished product. I wish all of you could come over for coffee and sit in the kitchen–or the bedroom with me. But for now This will have to do. Thanks for stopping by.
That’s what the adorably sweet girl at the front desk of my chiropractor said. It was a joy chatting with her before my appointments. She’s one of those people who can put you at ease immediately and have you feeling camaraderie after a 3-minute chat. It’s a gift, for sure. But on this particular day–she was very, very wrong.
She asked how I was feeling. There was just about a month left in my pregnancy. I told her I was feeling great overall and hoped I’d actually be late to deliver. After this comment she told me I was the only person she’d ever heard say that. Welp, that’s me…an anomaly.
“I just have a lot to do around my house. If I had to bring a baby home today I could, but it would really be better for everyone if I had more time.”
At this point she gushed about me nesting. Which, who knows–maybe I was.
“I went through the same thing about a month before I was due. I had so much energy. I reorganized everything in the house. I had this label maker–and I labeled everything. Even the obvious stuff…like a jar with pencils in it. I printed a “pencils” label and put it on there!”
I told you, she’s adorable. And fun. And one of my favorite people to see.
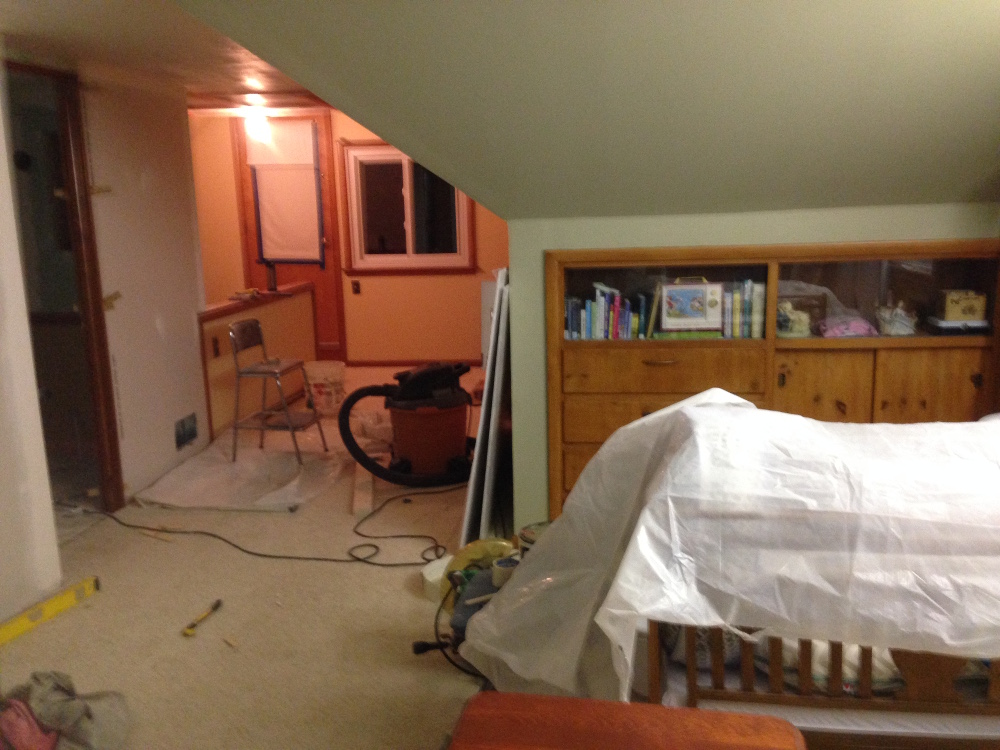
However, in my mind I was cynically thinking of how adorable her pencil label story was. If only I was reorganizing and labeling. That would be a vacation in Barbie’s dream house. Instead, when I closed my eyes and rubbed at them–they were chronically dry at this point from all the drywall dust–I could only see visions of the construction zone that I once called my bedroom.
This photo was literally taken on the day of this interaction. Walls unfinished. My poor baby’s crib full of tools and under a drop cloth. Oh and those whitish looking rags in the lower left corner–those are the clothes I’d been wearing before my appointment and I put them on again after. Grosser than putting on a wet bathing suit.
Nesting. Yeah, that’s cute.
Or maybe this is just how I nest. I don’t know. But I really doubt it.
The doctor called me back at that point. She cracked some things and yanked my legs and I walked out feeling amazing. Then I headed back to my sweet Canyon Cottage, who desperately needed my attention.
In my last post I showed you around the house. Since then I had a pretty big technical issue that required a major data transfer. Combine that time consuming task with finishing the master bedroom and it left me exhausted and with very little time to post. But things are all better now. All my photos and client archives are safe and sound. And I’ve thought about loads of things to post. Soon, a baby will be my excuse for not writing–but we’ll cross that bridge when we get to it.
Anyway. Today I’m showing you the project. To save everyone from a maaaassive post, I’ll keep the full B&A for tomorrow. It’ll keep you on the edge of your seat too. (more…)
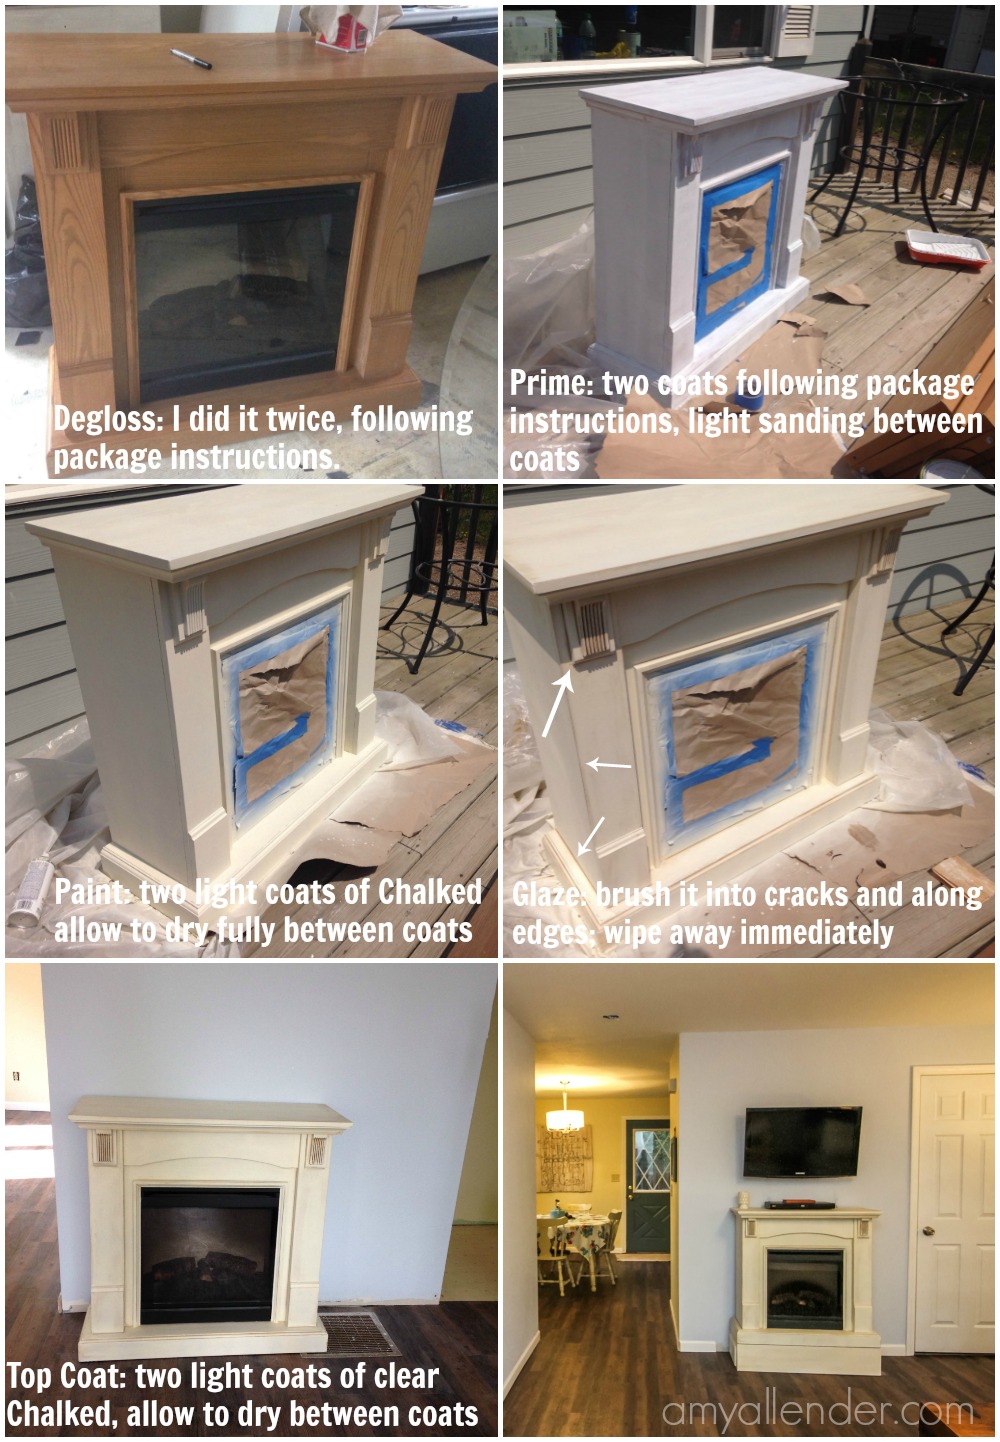
Tonight I’ve got more from Katie and Sam’s place. If you have a piece of furniture sitting around your house that you have been itching to paint, but are too nervous to dive in…read this post. I’ve used lots of refinishing techniques before…but tonight I’m telling you about a product I just tried that is simple to use and left me with fab results.
I really wanted their home to have a “lived in” look to it, which was kind of tricky…because on many of the rooms we were starting from scratch and building something totally brand new. One thing that really helped give their rooms some character was refinishing and repurposing pieces that they already owned {like that rad grandfather clock} and selectively buying new or new-to-them pieces that looked like they’d been around a while.
Through the process of creating that lived-in look…I refinished a lot of pieces. This was super fun and a great learning experience. I didn’t tell them at the time…but I kind of guinea pigged with their items–trying new techniques and products to see if I could unearth a new product that I loved. And I did!
I could write an absolute love story about how much I adore Zinsser and Rust-oleum products. If you read my blog, you probably know I’m in love with these product lines. So when I was at Menard’s {my home away from home} for the zillionth time that week…and a new, pretty end cap featuring a new paint line from Rust-oleum caught my eye…I was immediately itching like a kid with pox for a project to try it out on.
The product feature was a display for Rust-oleum’s “Chalked” paint line. It’s pretty, chalky colors that go on with the tenacity of chalk paint and dry to a smooth, chalky finish {something that hides flaws much better than a high gloss coating.} Paint comes in brushable cans that can be tinted to lots of colors or sprays that come in limited colors.
When Sam told me that he wanted their fire place painted {because he, like lots of us hates clashing wood tones} I knew this was the perfect opportunity to try out that Chalked line. I loved it. It was so easy to use. It turned out great. If you are thinking of refinishing your first ever piece of furniture…I highly recommend starting with this line–it was that easy to use and the results were outstanding.
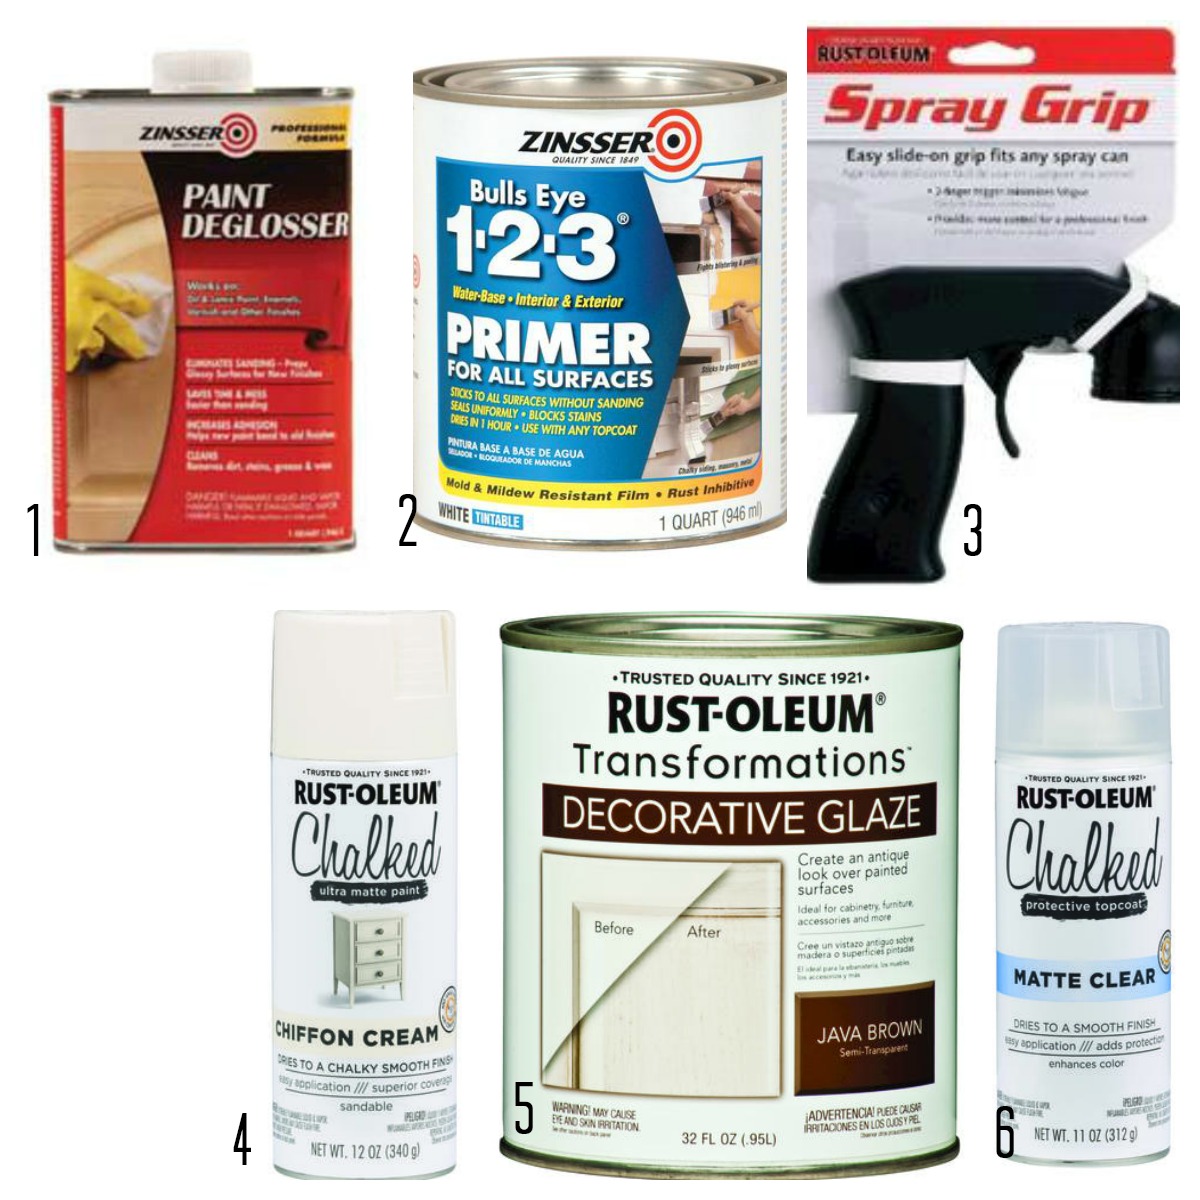
Here’s what I used. If you read the post on the grandfather clock–a lot of this will look familiar. Once you’ve got the basics you’ll be set to refinish lots of pieces!
Zinsser’s deglosser. This strips away and dulls furniture’s existing finish so you can repaint without sanding or fully stripping a piece.
Bull’s Eye 1-2-3 Primer. Although chalk paints claim to go on smoothly without primer or any kind of surface prep–I’ve always found that laying a base coat is a good idea. Your paint will go farther and the finish will adhere better.
Chalked in Chiffon Cream–When painting a piece of furniture “white” I always opt for a cream or off-white option. It hides dirt and feels less stark.
Java Brown glaze–I had this left over from my cabinet redo several years ago. A little goes a looong way. You can also use wood stain if that’s more readily available to you.
I tried something new tonight–putting the instructions right on the image. Do you like? I’m kind of torn.
At any rate…it’s just that simple. Follow all the instructions on all of the packages. Do this all in a well ventilated area–or outside on a not-windy day…it’s pretty smelly, and it’ll dry faster. I promise you. If you can follow instructions, you can do this.
The trickiest–most artistic–part is the glaze. But even that isn’t too hard. I think glazing pieces makes a huge difference. Look at the difference between the painting and glazing steps. The glaze defines all the cool detailing on the mantle. Suddenly, the ridges and grooves that were all but lost when it was naturally finished stand out like the star of the show.
If you are spray painting something with a glass front–like this–be sure to fully tape/paper it off so it doesn’t collect spray dust. Let ‘er dry and bring it inside.
Have you used Chalked? What did you think? Is there a product you’ve tried and loved? If so…I wanna hear about it! {And NO–Zinsser and Rust-oleum don’t give me any bribes for plugging their products. I just genuinely love them.}
Renew your zeal for the Bible with three days of exclusive devotionals! Interesting and relevant writings and reflection questions will remind you why the Word of God is so awesome. You'll learn a lot and you'll leave excited to know God more and grow deeper in your faith.
Your kick-start is on the way!
You've always dreamed of reading the Bible in chronological order. Now you can!
Getting my printable PDF plan is easy. It's not fancy, but it does fold easily into a bookmark, so you can keep it close by and easily see what's coming next. I hope you find it as useful as I do.
**Remember to check your PROMOTIONS FOLDER. Even if your confirmation comes to your normal inbox, the actual download may come to that pesky promotions folder instead!**