by Amy | Jul 14, 2015 | Blog, The Art of Projects, the house
I’m kind of a hypocrite. I have a very strong dislike of wood paneling. But if I call it bead board and plan to paint it white…suddenly it’s chic to me. I can’t explain my thought process. At any rate, the stairs and laundry center are lined with bead board. And I like it.
For me, one of the hardest parts of a project is outsourcing the stuff we can’t do ourselves. It’s not a control thing. I like skills…but really, I don’t have a desire to be a master plumber or a wiring guru. It’s definitely not that I think I could do better. Some things I would gladly leave to the pros. Maybe it’s the money. Maybe it’s that I don’t know enough about construction to know what is fair or what is necessary–so I get flustered. It’s just hard.
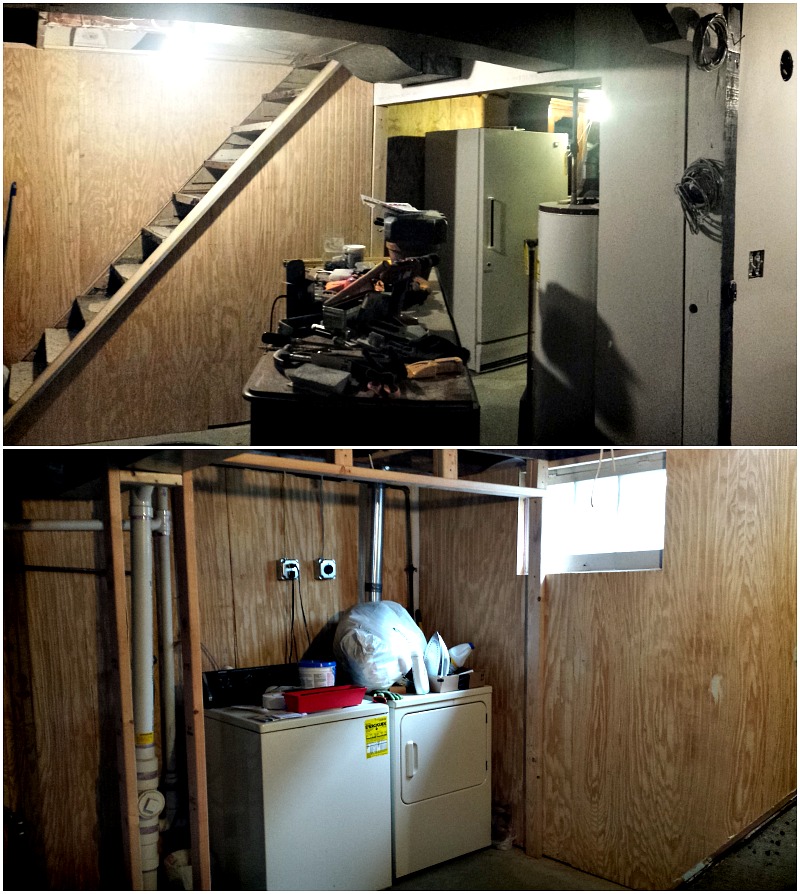
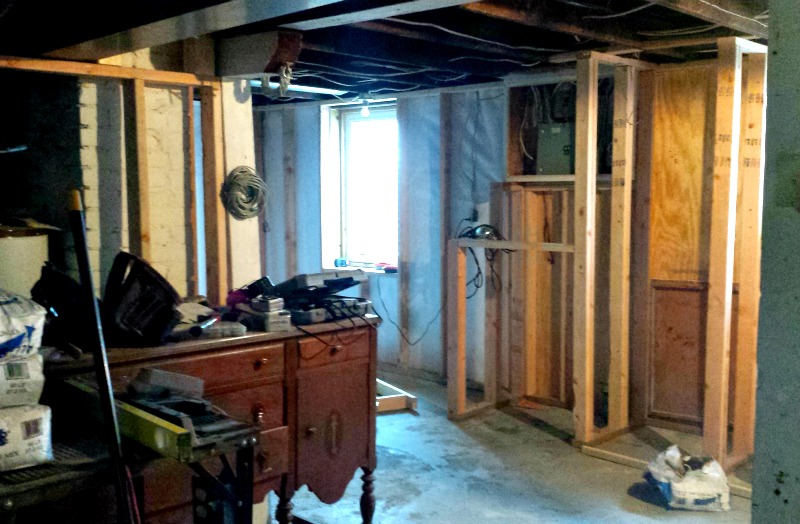
But, there comes a time on every major project that a contractor is needed. So, after the studs were up and the walls were framed in…it was time for me to make some calls. I guess that’s the other hard part about contracting jobs out: the calls. I don’t know who to call. Half the time I don’t even know where to start. And after a terrible experience with an electrician during the bedroom remodel…I’ve been a little wary that I’d get another dud.
When I look for a contractor here’s my basic process. Step 1. Ask for referrals. From real people. That I really {at least kind of} know in real life. The Internet is good for reviews, but I trust a face to face review over five stars on Google. I ask around at church, the gym, the coffee shop…basically anywhere I can get a small-talk conversation going about my latest project.
Step 2. Internet. I like to cross check word of mouth referrals with the what people are saying online. If asking around didn’t yield any results I go to Angie’s List. It’s a bonus if they are registered with the BBB.
Step 3. Call at least three. Get them to come out and give you a quote. See what they think would be best for your project. I give preference to contractors that don’t look at me like I’m an idiot when I explain that we’d like to do part of the work ourselves…and who don’t seem judgy that a girl is lining up the project.
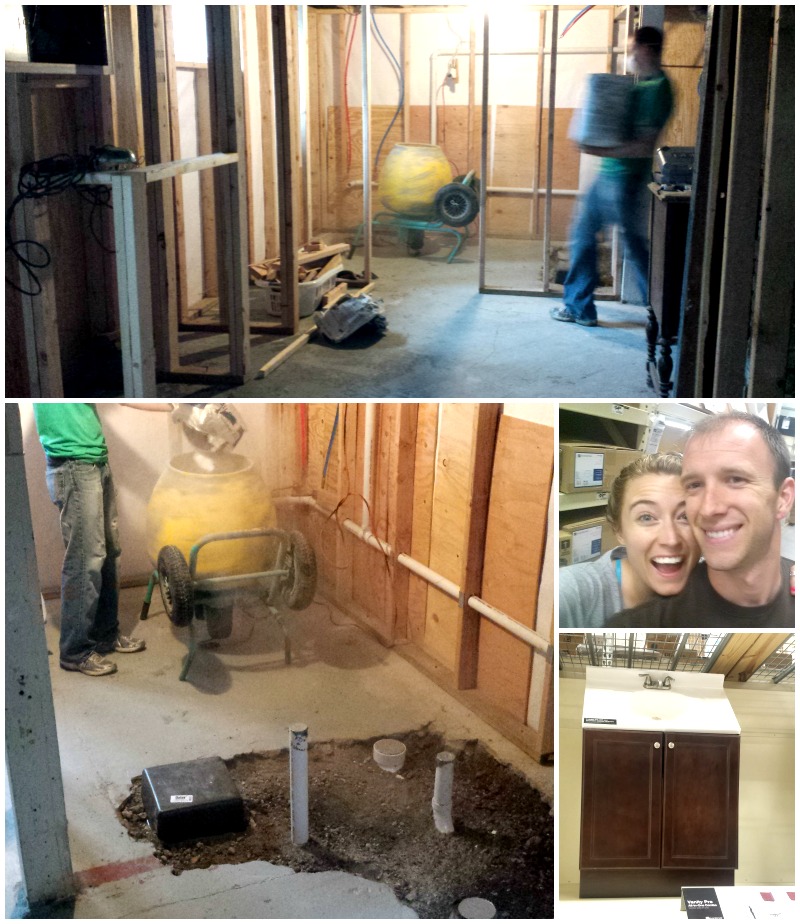
We got three quotes on electric and three quotes on plumbing. And as luck would have it, they were able to come during the same week. That was really nice because once the studs were up there really wasn’t much we could do ourselves until the fancy stuff was taken care of.
During their estimate visits, the electricians brought a slight code violation to my attention. Turns out you can’t put a circuit panel in the back of a closet…awkward. Really, it makes perfect sense…but we hadn’t thought about it. As to prevent a fire hazard…we changed the layout of our closet.
You can see the closet in the photo below. The panel is that open boxy thing right under the joists to the right of the window. Originally the closet would have gone all the way to the ceiling and been flush with the side of the circuit housing. To leave it exposed we created a shelf/cubby closet next to the full height closet. Make sense? I don’t look at it as losing closet width, but gaining a cubby and a shelf. {Lemonade, am I right?}
The electricians came and did their preliminary work and told us to call them back to the job once we had the drywall and ceiling in place.
The plumbers came and did something similar. They roughed in the basic set up then came back to finish. This meant we got to go shopping for the fixtures we wanted. After weeks of 2×4’s and toe nailing getting to even think about shower stalls and sinks made it feel like we were getting places.
The plumbers were kind enough to let us fix the concrete that they had to jack hammer up in their process. It took an afternoon for Derek to get it done…but in the end we saved about $300 by doing it ourselves! {And it was pretty easy with the help of that darling baby cement mixer we rented for $20! Notice the girl with the bad back…who was unable to lift or help in the concrete process at all was calling it “easy”…}
Next time I write about the basement I’ll show off the bathroom {it’s nearly done now!} and I’ll tell you a very embarrassing story. But right now, I’m off to sort some more senior photos and cut some door casing.
Amy
by Amy | Apr 30, 2015 | Blog, The Art of Art
I do lots of things here in Practically Canada. Lots and lots of things. Lots of varied activities that lend themselves to a never-boring {but sometimes a little too busy} lifestyle. But–of all the things I do, working with the Minot Area Council of the Arts {MACA}’s Artists in the Schools Program is definitely in my top three.
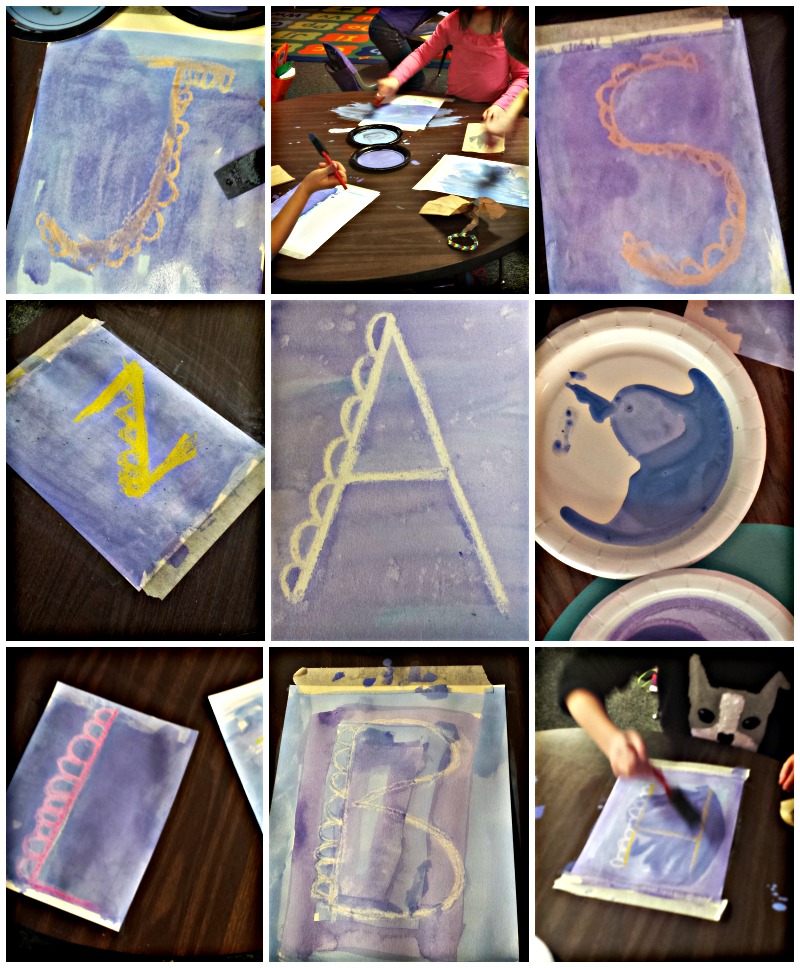
You’ve heard me talk about this before. I’ve cut snowflakes, learned the color wheel and painted many, many canvases. Last week I did another class focusing on optical illusion art for kids with an outstanding group of 3rd grade students at Bell Elementary. This project is a little tricky, so I don’t break it out unless the group is well behaved and able to tune in and follow directions. This particular class was fantastic on all fronts.
I started with the usual discussion on what an optical illusion is. How sometimes things aren’t always as they first appear {a lesson not only for art, but for many aspects of life.} The kids always love learning about optical illusions and they are so excited for the chance to make their very own version of op art.
This particular project is great because it combines artistic skill with mathematical skills such as use of a ruler, measuring, and pattern creation. It’s also cool because every kid can turn out a really cool product–even those who don’t see themselves as “artistic.” I love proving to kids that they can be artists even if they don’t have a natural aptitude for free hand drawing or painting. I believe it is vital that little ones embrace their creativity–and that adults don’t stifle it by instilling an attitude that “you aren’t artistic.” Creativity is key to problem solving…so let’s not crush their creativity! Agreed?
Okay. I’m finished ranting. I just love art. And kids. And kids doing art.
So. Now I’ll explain how we did this one. It’s pretty simple really.
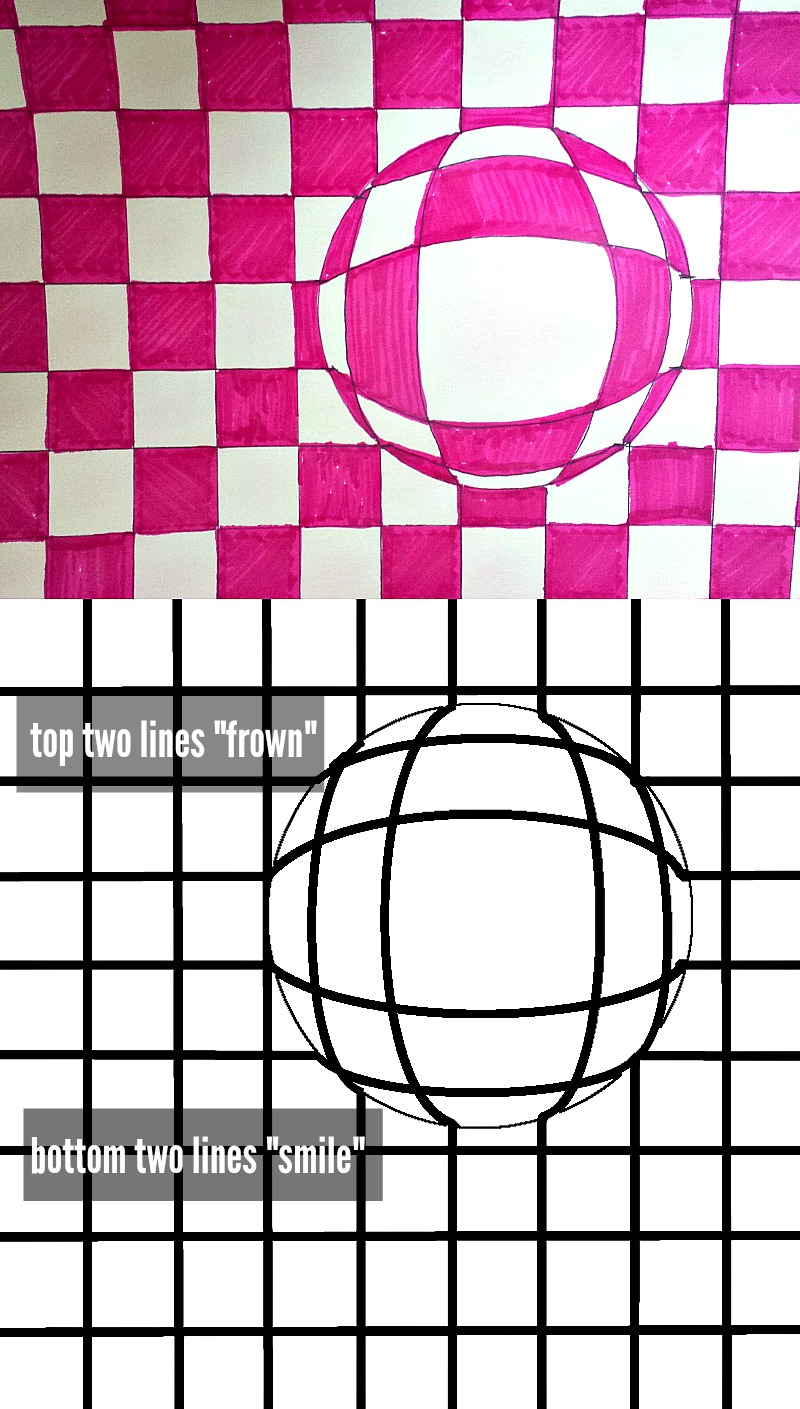
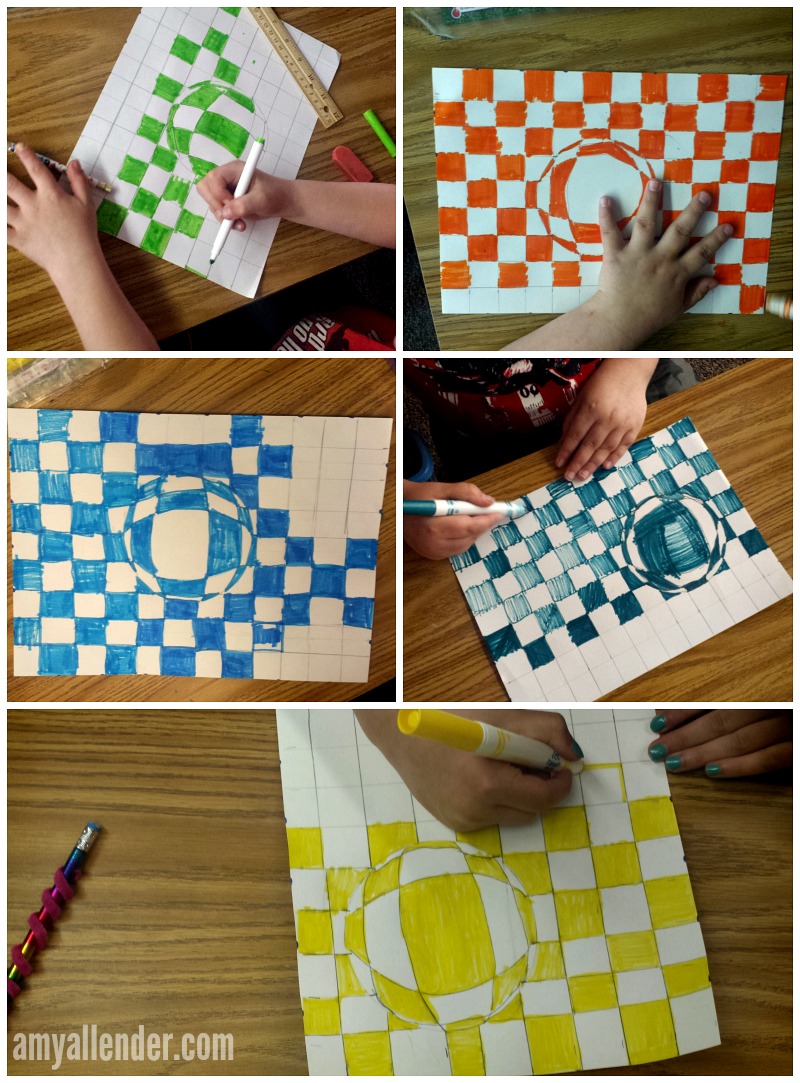
The top is my example. The bottom is how the grid looks before it’s colored.
Start kids off with their paper flat on their desk. Have everyone trace a circle on their paper. Anywhere is fine.
Have them use a ruler to mark every inch. Then, without turning the paper…have them slide the ruler to the bottom of the page and mark every inch again. Have them connect the dots–stopping at the edge of the circle so they don’t draw through it–repeat on the other two sides of their page.
Once the grid is done, have them connect the lines that but up to the edge of the circle. The top two should be connected with a line that looks like a frown–following the arc of the circle. The bottom two should “smile.” Then, turn the paper 90˚ and repeat that process. Then, it’s just a matter of creating a pattern of color.
Start with a row that runs through the circle. Color every other square. Where the circle intersects with a square it should be the opposite color. {If the square is uncolored that section of the circle will be colored; if the square is colored that part of the circle will be uncolored.} Inside the circle every other space will be colored. Then resume the pattern in the squares.
Once that first row is finished, complete the pattern within the circle. Then finish the pattern in the squares–every other should be colored, with the rows alternating like a checker board.
So that’s it. Hopefully that’s helpful to my teacher friends out there. It really is a great project for honing in on all kinds of skills. Just maybe it’ll be something fun for your classes at the end of this school year!
Amy
by Amy | Mar 18, 2015 | Blog, The Art of Projects, the house
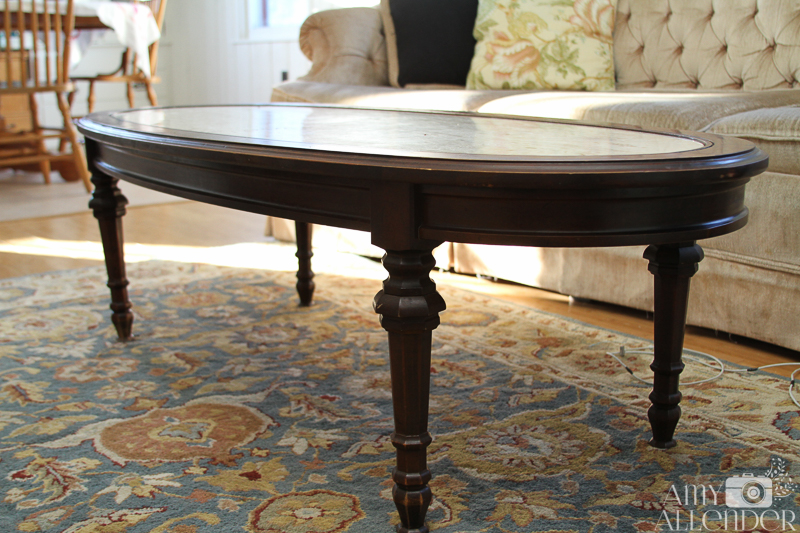
It’s been a few weeks since I told you I planned on refinishing antique tables I inherited from my grandparents. If you missed the “before” post, you can read it here. The original plan was to simply strip off the old finish {the shiny part}, that had been damaged by years of second-hand smoke exposure, multiple moves and age.
I started off by using the deglosser that came with the Rustoleum kit I used on the cabinets–when I redid the kitchen. I thought this might be enough to take off the old finish and allow me to put a new coat of glossy polyurethane on top.
The deglosser did it’s job. I was left with a mostly matte finish on the tables. This would have been perfect if I had planned to paint the tables. I have no doubt that paint would have adhered beautifully to the new, dull surface. However…there was still residual finish on the tables and there was still a good amount of damage left. {Doesn’t that sound weird? A good amount of damage?} Too much damage to proceed with a new top coat. I’d come this far…and I wanted to do it right…so {a little begrudgingly} I decided that the tables needed to be completely stripped before I could confidently add a new finish.
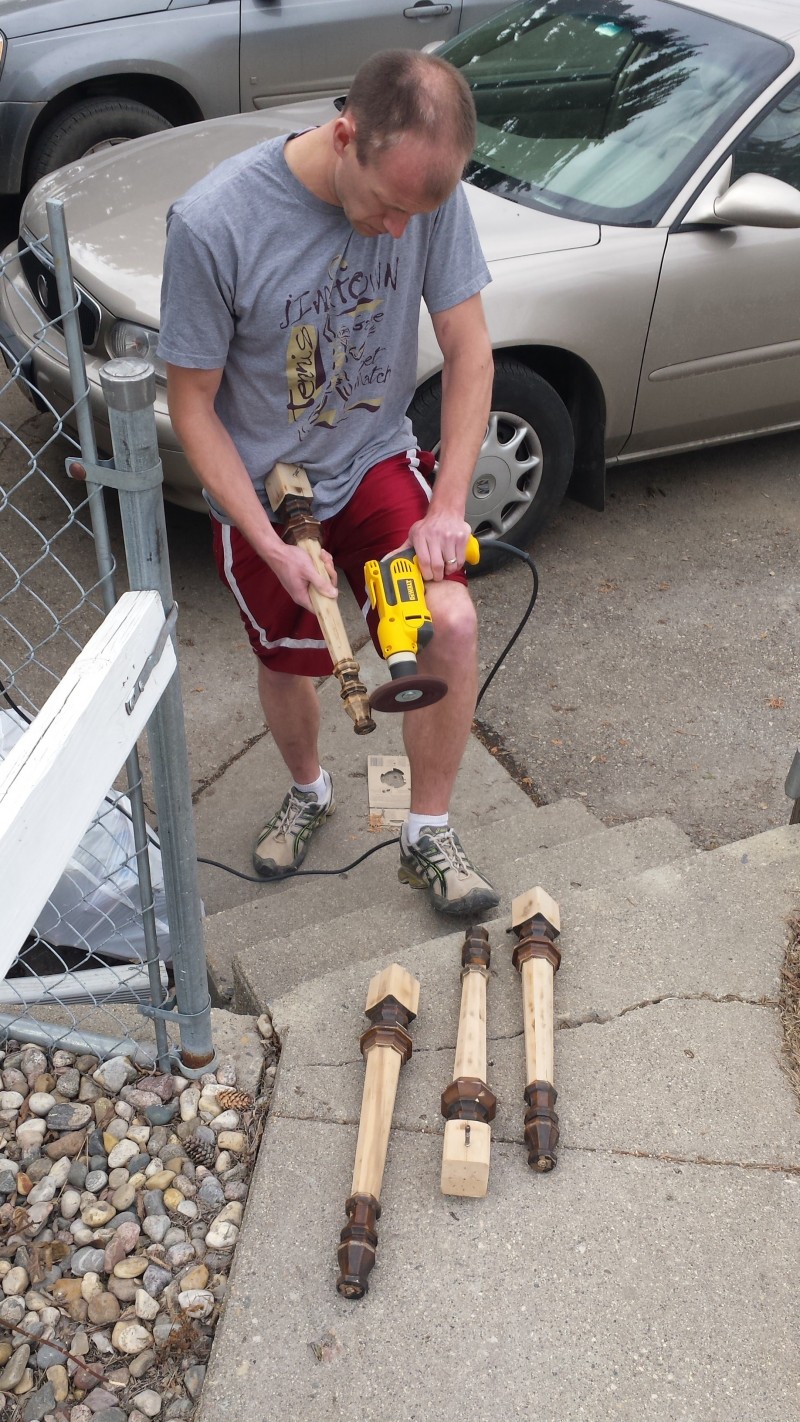
Completely stripping the old finish and stain required a few new tools {hooray!} I’m not the owner of this brand new orbital sander and a Dremel. Do any of you have a Dremel? Do you like it? It wasn’t nearly as handy as I had hoped. It’s like a power tool for Polly Pocket! So tiny!! But it did help a lot on some of the tricky curves. My biggest complaint is that I’ve been going through accessories like crazy. The pieces that work only last a short time. Okay, I’ll go into the exact pieces I used on another post. Long story short…I own a Dremel.
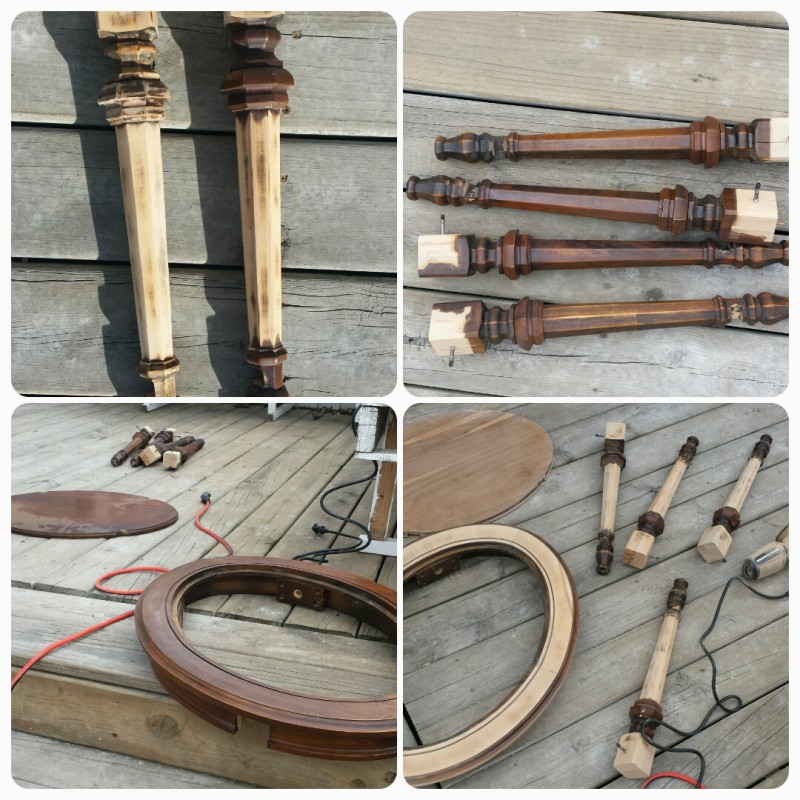
I used the orbital sander on all the flat surfaces and took it down to the bare wood. After losing my mind using just the Dremel on the table legs {and going through loads of tiny accessory sanders}, Derek went out and bought a paint stripper that attaches to the drill. It works wonders! This 3M product, lasted a long time, didn’t chew up the wood and worked efficiently.
Once everything was naked it was time to stain. If you’ve been reading the blog for a while now, you might know that I’m a color-commitment-phobic. {That’s why I didn’t want to paint them.} I stood in the stain aisle for about 20 minutes…thinking. I walked out with the perfect color. Turns out it’s nearly identical to what I started with. That’s totally fine, I thought they were pretty–they just had a rotten finish on them. The real bummer is that to you, at home, you probably won’t be able to see much difference in the before and after. You’ll just have to take my word on it. The look much better.
I put three coats of oil based polyurethane–I chose Varathane–on each table. Since the weather turned chilly again and I’m still cat sitting {any my guests tend to be on the ornery side} we had to do some of the finishing in our tiny front room…the only space that can comfortably be blocked off from all furry footprints. I could just imagine a perfect glossy finish with cat hair and paw prints embedded in it. But, the crisis was avoided and the nearly-finished products are looking stellar–if not much different.
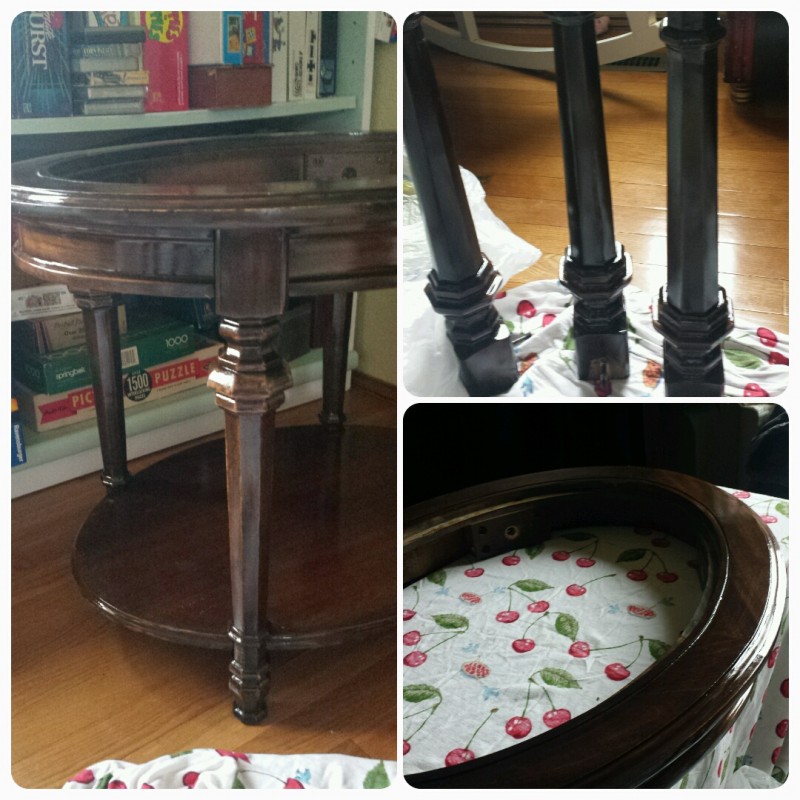
Once these are all done, we’ll be starting on the coffee table. It’s been a lot of work–lots more than I had imagined from the get-go–but I’ve learned a lot and this is by far the most professional furniture redo I’ve ever done. Color me pleased.
by Amy | Feb 27, 2015 | Blog, The Art of Art
Over the next week I’ll be teaching six Artists in the Schools session at elementary schools across town. Today, I kicked off the marathon with a Water and Wax session with a group of first grade students.
The idea behind this session is to teach students a little science in with the art project–and to make something cool. We discussed the absorption property of water–how it sometimes soaks in to things, and other times rolls off a surface. Then I covered the fact that crayons, made of wax, repel water and led in to the project.
As you may imagine–if you’ve ever worked with elementary school kids–that getting the instructions out to a group of first graders was much more challenging in person than typing the words here on the blog. There was a lot of restlessness while the teacher and I tag-teamed to get papers taped to desks. Once they were down there was peeling of tape…and retaping…and a few threats of revoked participation rights.
Once the paper was out I heard this:
“Once we have a paper can we start?”
I hadn’t even shown them the example.
I explained our first step–find a light colored crayon. Not white–because we need to see our lines. Any other light color: yellow, light green, peach, light pink. Little did I know this would be such a hard step to follow. There were about four students sharing a table and caddy of crayons, so they needed to share their table’s supply amongst themselves. Once I told them to find their crayon, this is what I heard.
“Um, we don’t have a white crayon.”
“Okay. You don’t need one right now.”
“My favorite color is purple, so I’m using that.”
“Is purple a light color–something closer to white than black?”
“I don’t think so.”
“Okay. Pick another color…yellow, light green, peach, or light pink.”
“What about dark blue?”
“What about it?”
“Aaaammmmyyy! Our table doesn’t have light green!”
“Okay. Do you have one of the other colors?”
“Yeah.”
“So….the problem is….?”
“We don’t have any of the colors you told us to use. Can I use green instead?”
I look in the caddy. All the colors are there. I pass one to each child.
Once the color situation was mostly resolved we moved on. I told them to draw the first letter of their first name on their paper. Then I explained how they could add the “dragon scales” to one side of the letter to make it look a little more fancy. “If you understand what to do, you may begin.” Then things took an awkward turn.
“Uh, Amy…I did mine this way.” Dark purple crayon is on the paper. The teacher swoops in, asking why she used that crayon when only moments before, we’d given her a peach color to use. Paper is flipped, crisis averted.
While half the students are still working, the other half has finished and are now leaving their seats one by one and coming to my side {as I’m trying to help someone with a legit question} to tell me they’ve finished. Meanwhile, one little guy comes up and says,
“Well…I did an A.”
“Okay. That’s good. We’ll move on in just a second.”
“My name doesn’t start with an A. I did it because that’s what you said you were doing.”
A whole table–who was pretty chatty during instruction time–all drew the letter A, as in Amy, instead of their own letters. Untape, flip, retape.
Next direction. Trace your letter using that same color, or a white crayon. Go over it at least eight times. Make your marks nice and heavy, we want lots of wax on the paper.
This part went pretty smoothly…with the exception of a few who finished in about 60 seconds and immediately came to tell me that they were done. I just told them to keep tracing. When everyone seemed to have their letter traced enough times–one kid told me he traced his 38 times–we moved on to the paint portion of the class.
Paint is always scary to me, but these guys did great. Even the one who used so much that it was as much on the table as on the paper {see top middle photo above…} My very favorite part was hearing them gasp and get excited when their letter appeared after repelling the water color. “Its. Working!” I love when they think they’ve made something really cool. I love it when they are proud of their work.
All in all a good class, all in all, great work. I really love doing these sessions in the schools. Despite the weird questions and the faulty listening and the short attention spans, I really do think they try their best. And…Boy, oh, boy do they make me laugh.
by Amy | Jan 20, 2015 | Blog, The Art of Gathering
I simply cannot believe I’ve let so much time pass before showing you these photos. I honestly don’t know where the time goes. But I digress…Today I’m so excited to be showing you images from a baby shower we threw for my sister back in December.
It was an amazing group effort from our mom, aunt, a couple of Erin‘s friends, and myself. It was an effort that spanned across state lines, and an effort that paid off big. In my opinion, it was a fantastic shower. I’m so happy I convinced her to let me help throw it and so very grateful to everyone who came…despite the party being only a couple days after Christmas.
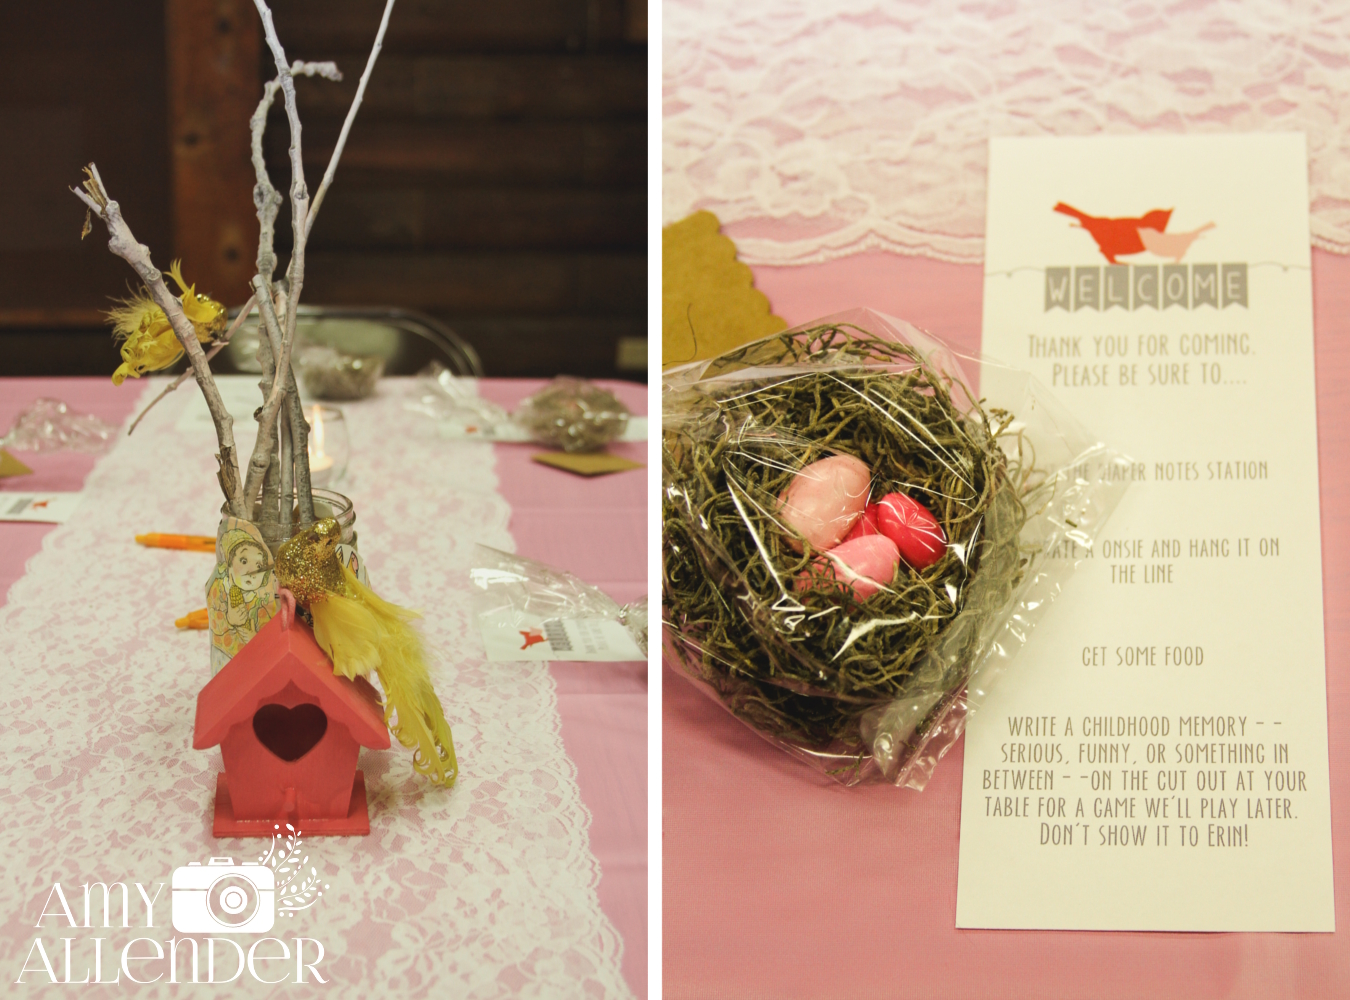
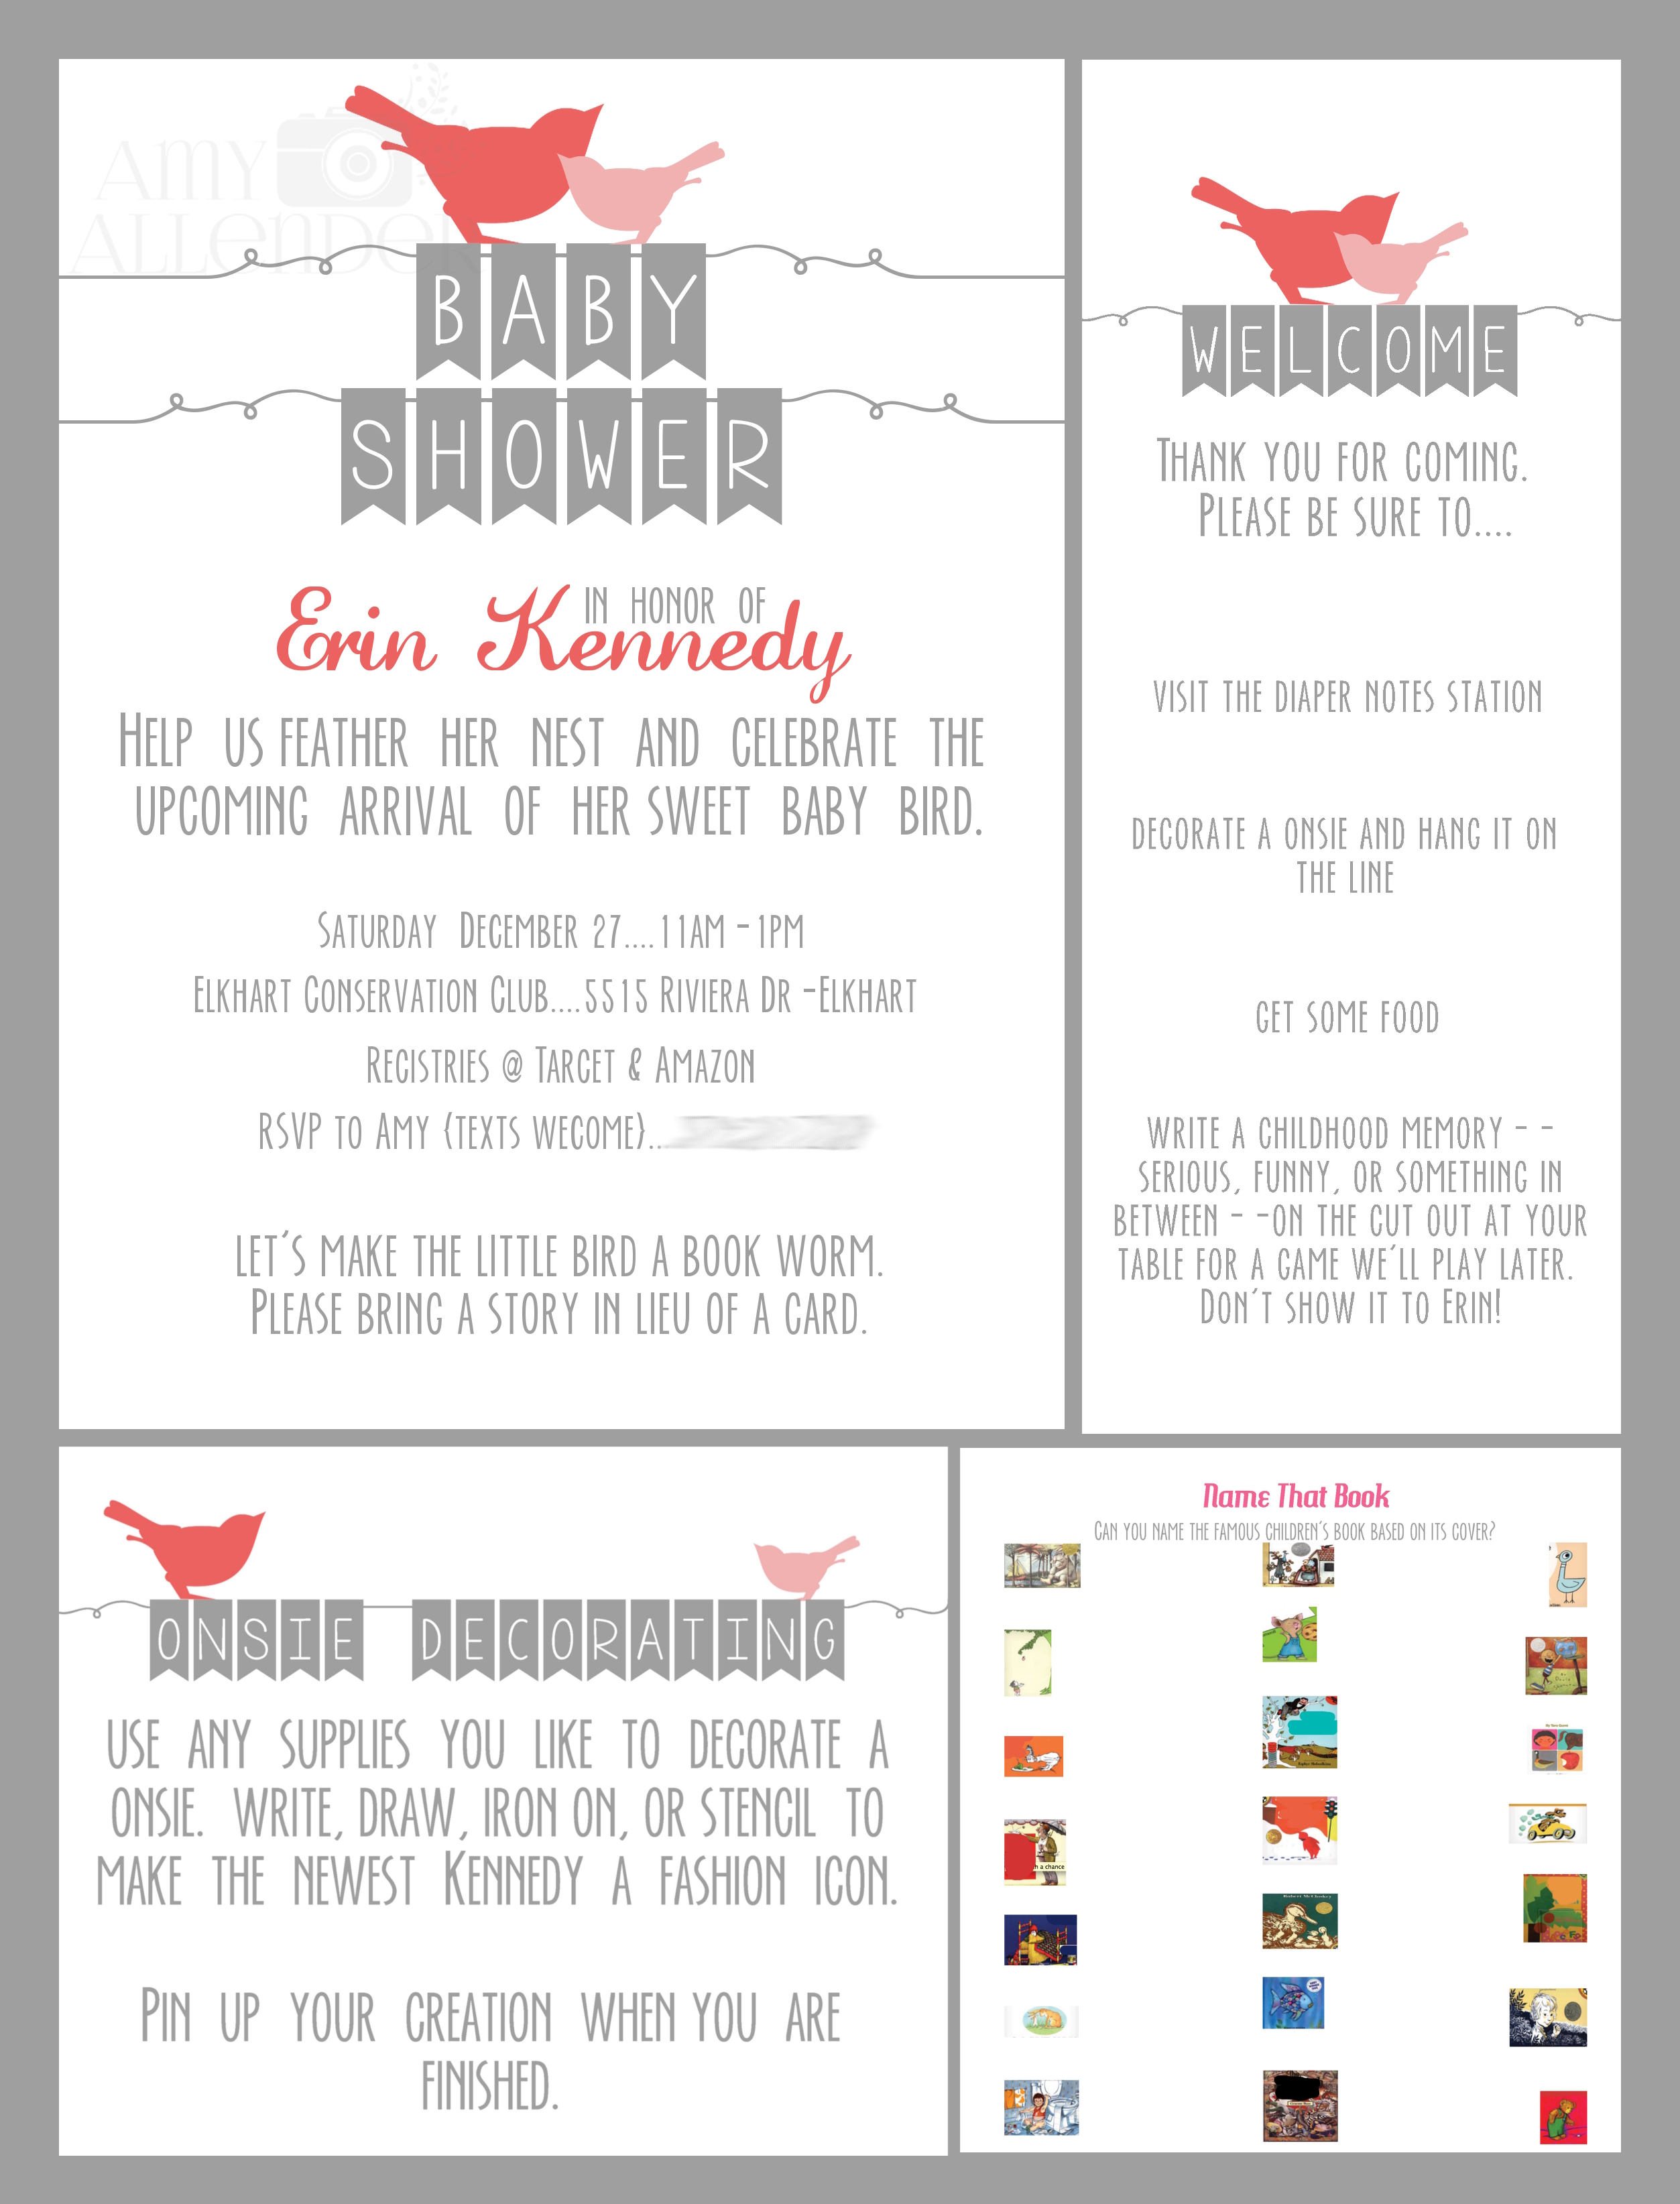
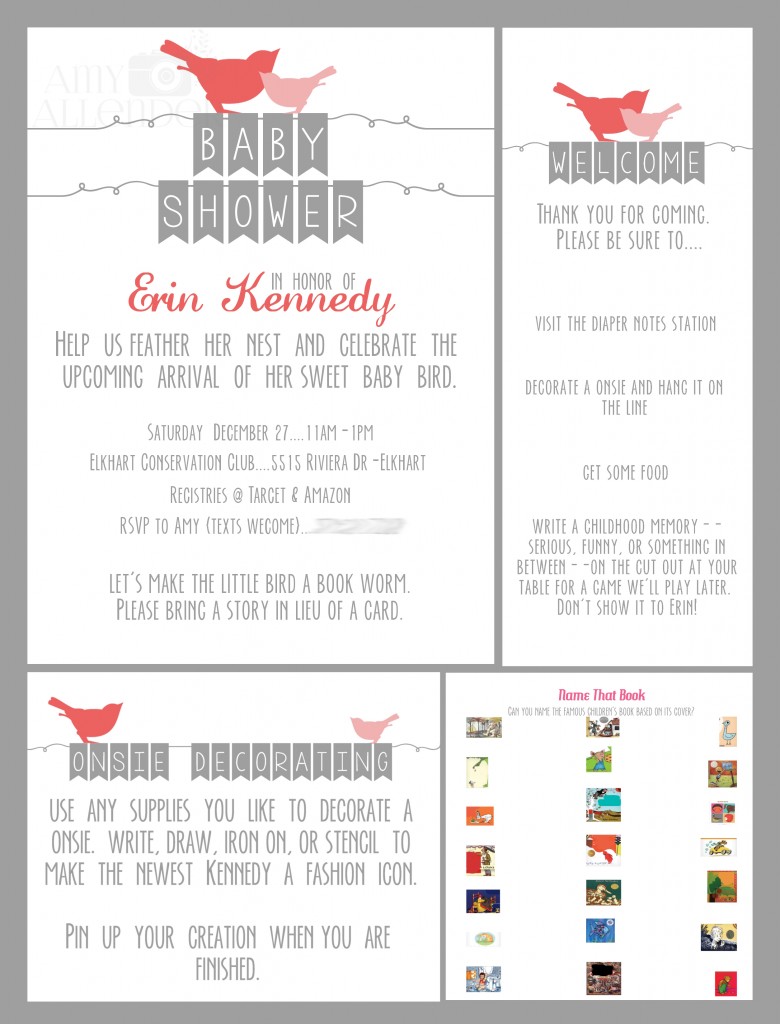
Erin is going with a “Bird & Books” themed nursery…so that’s the theme we went with a book and bird themed baby shower as well. The shower was held at our county Conservation Club, where my dad is a member. Their lodge was a perfect backdrop. It was cozy and rustic…and they have an amazing fireplace. I made this word art for the nursery. It’s a quote from Jason Mraz, one of Erin’s favorite artists. I think it’s the perfect wish for a tiny, new soul.
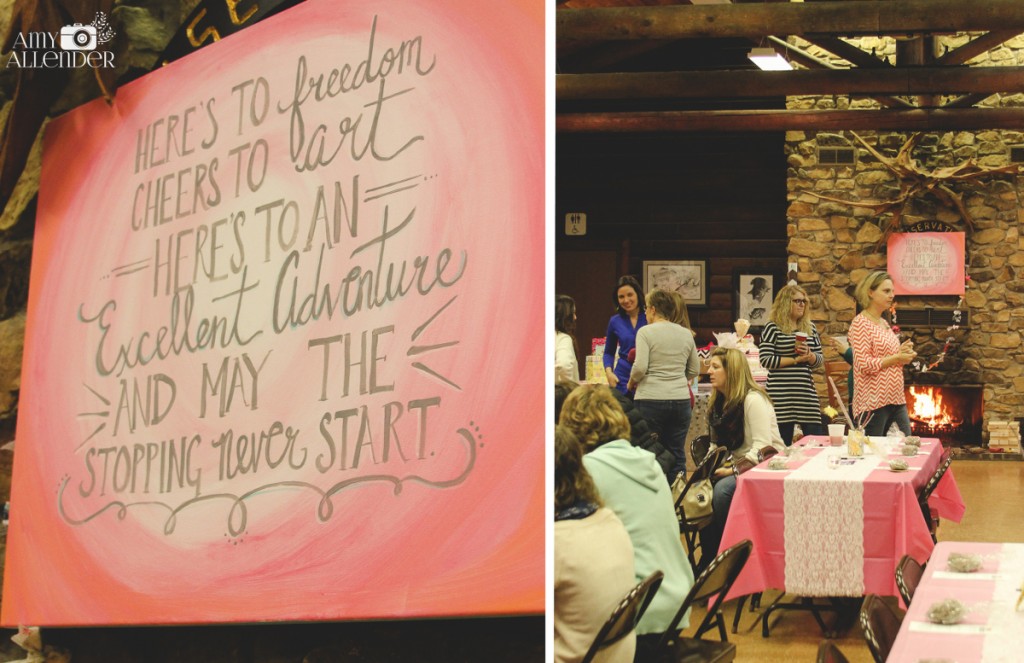
Erin’s friends Courtney and Nicole pulled the decor together and they did an amazing job. Courtney decoupaged kids’ book pages to jars, which Nicole filled with pink-painted twigs. Every table had a lace runner and a bird house or two and a couple glittery clip on birds.
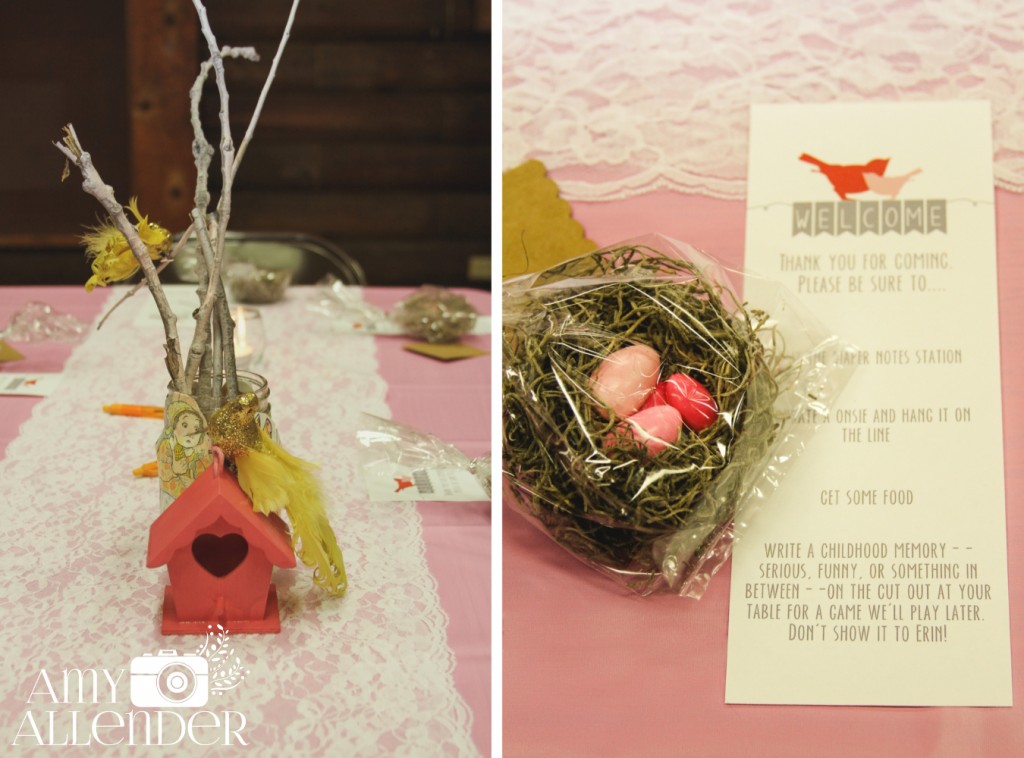
Since I’m a huge fan of order at parties…I created a “program” that we put at every seat. Basically, it told guests what activities were available–to encourage as much participation as possible. Courtney and I whipped up tiny favor nests from Spanish moss. It was a quick–but messy task. They are house in favor bags and filled with Jordan Almonds. If I did it again, I’d go with chocolate covered almonds. That’s what I thought I bought–but alas, we ended up with these hard-on-the-teeth treats.
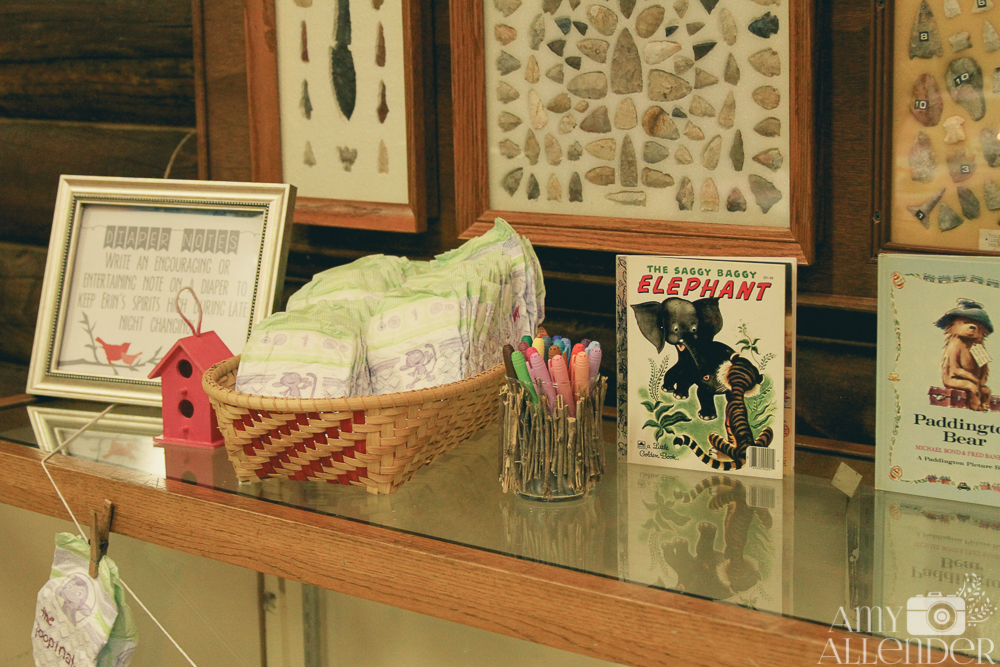
Because we are a pretty casual bunch, the activities were loosely structured. We set up a diaper-note station, where guests were invited to use colorful Sharpies to write clever notes on a stash of diapers to be used during late night changings. We also set up a onsie decorating station, and asked guests to write a childhood memory on a small card at their seat. I like that we didn’t opt for a set time to do each activity, but let folks do what they wanted at their own pace.
I was responsible for buying onsie decorating supplies and I tried to keep all level of artists in mind. In the end, this is what I decided to buy: White onsies ranging from NB-9 months in size, markers, alphabet stencils, flourish stencils, iron on jewels, iron on embellishments, iron on ribbon, iron on “screen printing” images, scissors, iron on fabric {cut any shape.} It was nice that all the embellishments were permanent and instantly set–no paint or drying time.
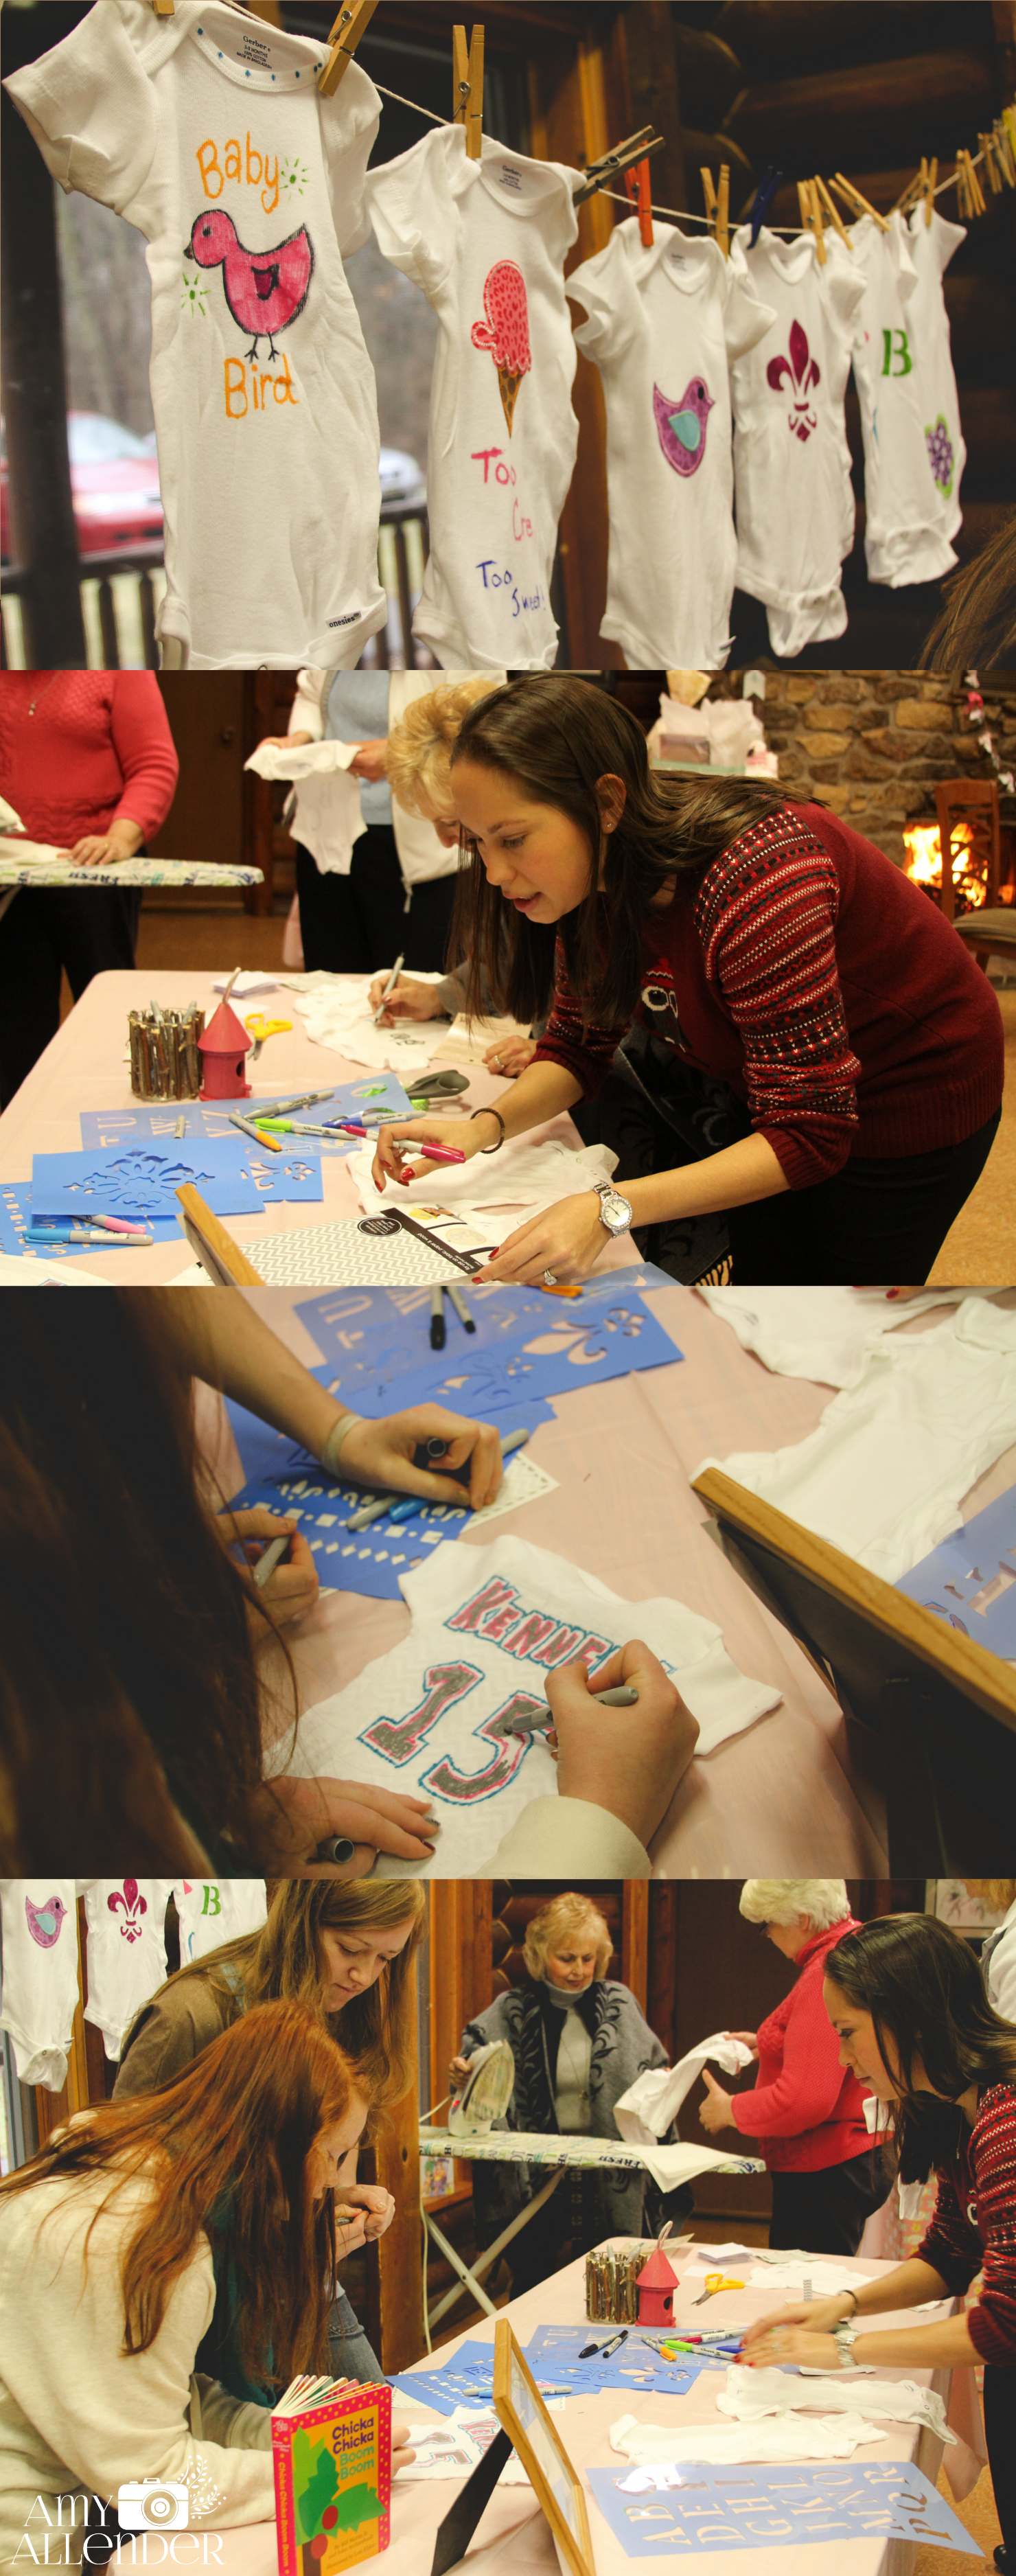
Everyone did an amazing job. I was so excited to see how everyone loved making their own creative onsie. The iron-on elements and stencils really them look nice and purposeful…not like a bunch of people just wrote on some clothes with markers. I think having those things on hand also made this station feel more accessible to ladies who don’t necessarily see themselves as artsy.
I loved the design suite I put together for the shower. Once the main elements were created, I reused them on every piece of paper at the party. It helped keep things consistent.
We played two games. One was “Name That Book,” which you can see in the image above. For this game I searched the Children’s Book Guide online. They offer a list of the top 100 Children’s Books of All Time. I used 24 for our game. I copied the covers onto a sheet–very small–and blotted out the titles. Guests then had to identify as many as they could using only the tiny image as a guide.
Our other game involved childhood memories from all the guests. Each person wrote a memory on a small card at their seat. I collected them, then read them one at a time to Erin. From the pile, she selected one as her favorite {Apples to Apples style.} That lady was our winner. Then Erin tried to match each memory to the guest that wrote it. This was such a fun game, since all kinds of memories were shared. They included things like:
I remember dancing to the Lawrence Welk’s show when I spent the night at Grandma’s house.
While my dad was mowing the lawn, I ‘operated’ on my sister’s arm using a play doctor’s kit and a real razor…the pretend anesthetic didn’t last….
As I child I liked to drink lemonade and read in the shade of a tree.
I would sit behind the couch and say every swear word I knew.
I used to look at my reflection in a blank TV screen and whisper news stories to myself.
I grew up in the city, but I had family who owned a farm. Once I mistook chicken poop for gum and ate it…
That last one was our winner. I’m telling you, it was a great time.
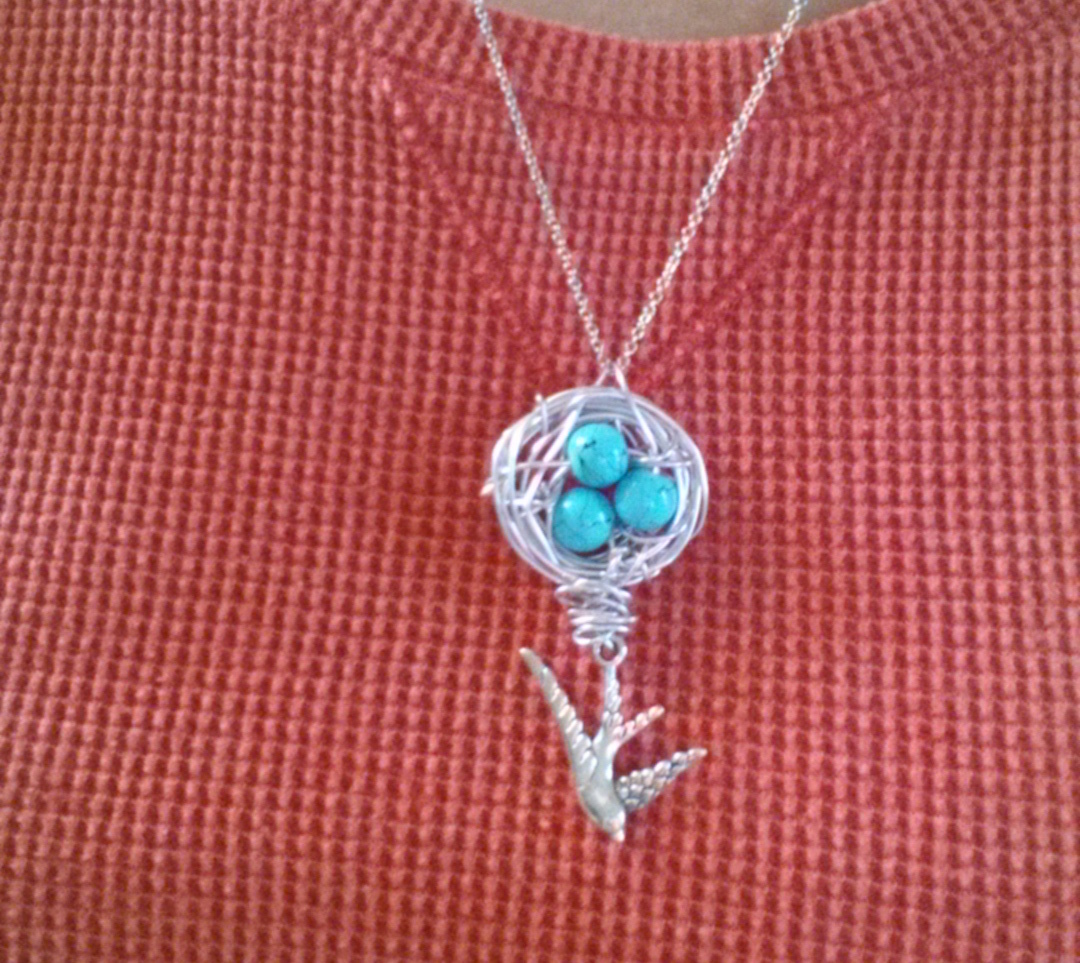
Game winners each received one of these necklaces which I crafted up with my bare hands.
It was a great time. I hope Erin had as much fun as I did. Congratulations {again}…we are all s excited to meet the newest Kennedy!
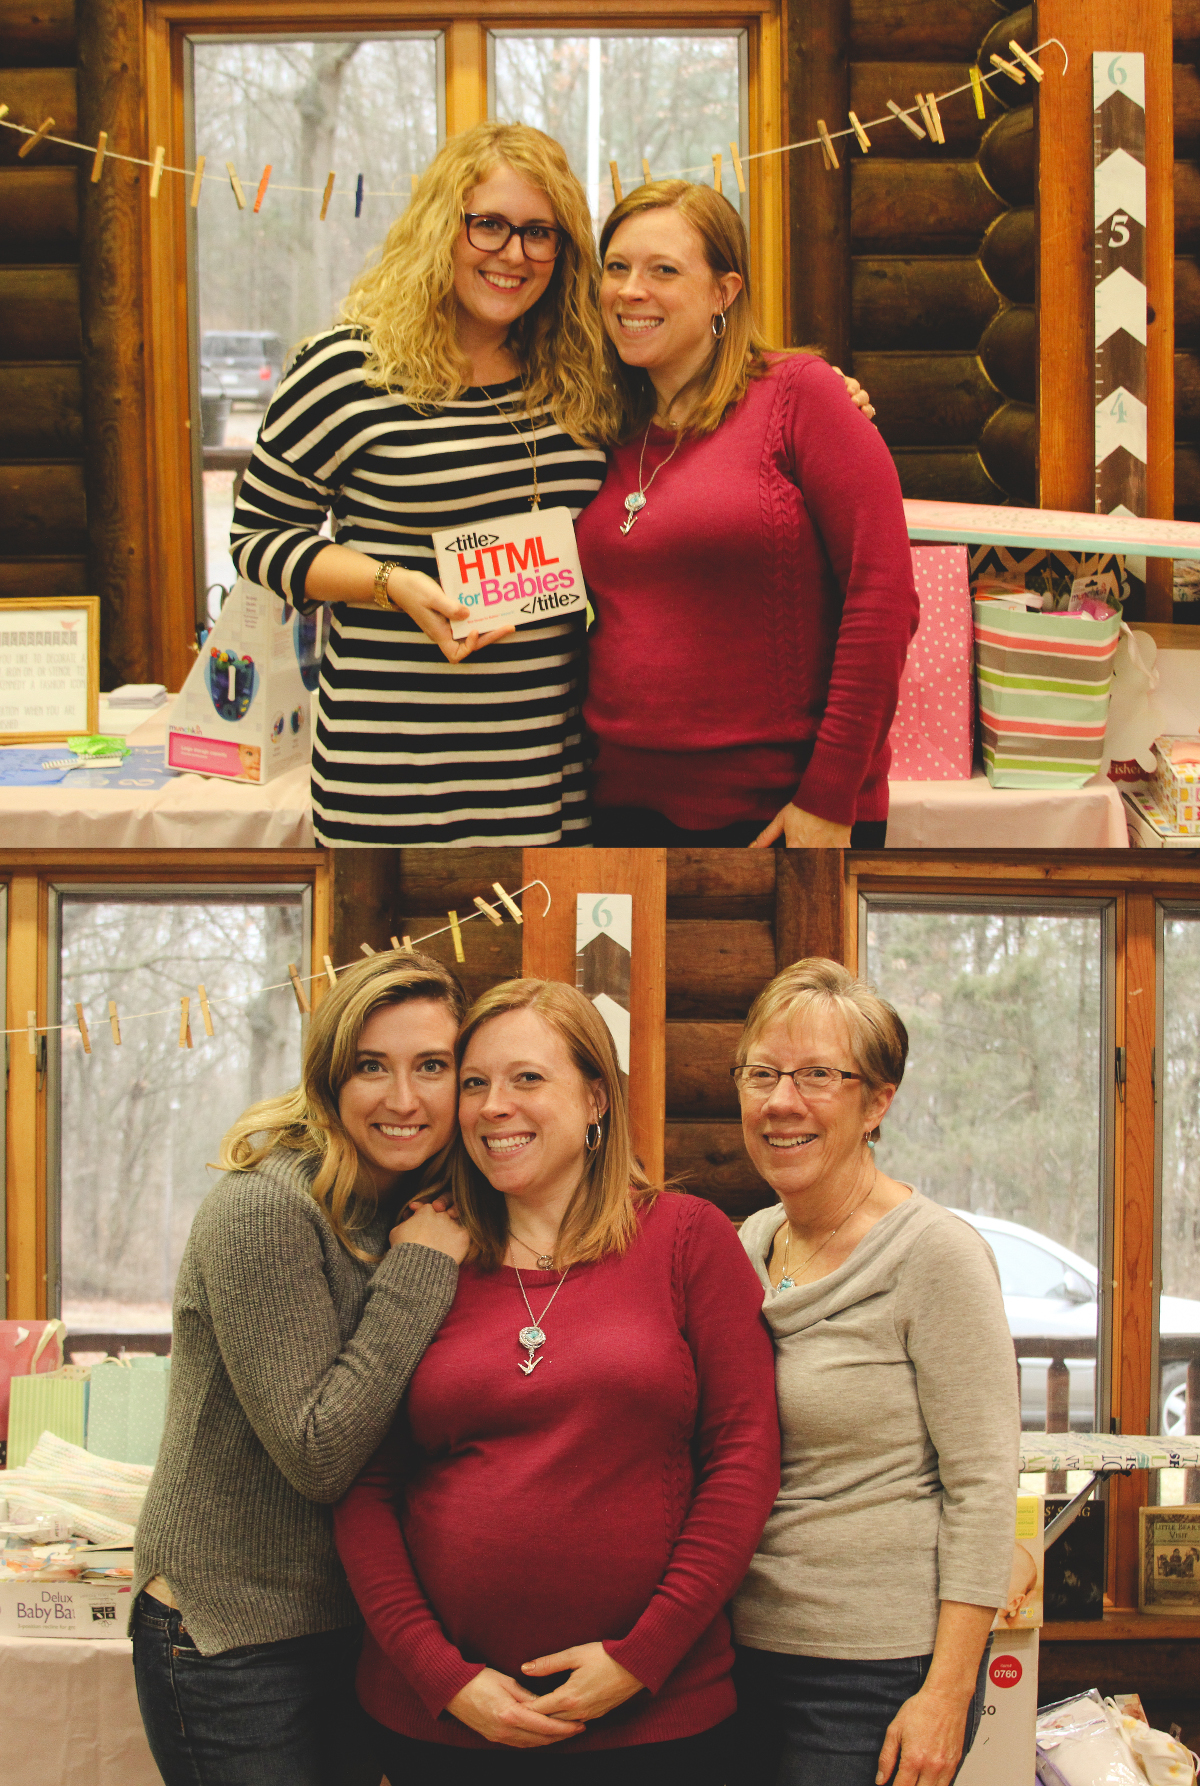
PS…I did a really crummy photo job with some of this. But–I’m too excited and I can’t help bragging. Do you see that chevron stick in the background of the photos above?! It’s a growth chart. I made it and I love it. It’s just a 4″x6′ piece of wood that I sanded and stenciled! Perfect for tracking the rapid ascend of this growing family!
by Amy | Dec 12, 2014 | Blog, The Art of Projects
Over the last month or so, I’ve been busily putting together Christmas gifts…in an effort to keep from losing my mind at the very end. All in all, it’s going well. I just have one more gift to put together, then I’ll call it good. And while what I’ll be showing you today doesn’t exactly have to be a gift it’s nice to have on hand and does make a lovely present for someone moving to a cold climate, a college student, or that person on you list who has a loooong commute.
 {Image via}
Today, we are talking a DIY winter emergency car kit.
This idea surfaced the week of Thanksgiving when I realized my own winter emergency car kit had been depleted of some of its necessities. My kit was, fittingly, given to me as a gift by my dad when I left for college. I think he even gave it to me for Christmas my freshman year. Even though it is winter appropriate, I’ve left in my car year-round since I got it. Luckily I haven’t needed the major stuff…but I regularly burn through some of the smaller items, at which point I replace them.
When my parents were in town for the holiday, I asked my dad for tips on restocking my kit and making a second kit–for Derek’s car. You see, he’s kind of an emergency preparedness guru. For a while he was our county’s Emergency Management Coordinator. Even now, his work involves creating plans for the “what ifs” of life. It’s safe to call him a trustworthy and expert source.
The following in a list he put together for me. It is formatted in order of importance with the necessities first and the “nice-to-haves” toward the end. Start with an empty backpack. If you are making this for yourself, just use what you have on hand. If it’s being given as a gift, splurge for new, or like-new, items.
1. First Aid Kit. This should have supplies for treating injuries {bandages, gauze, cold compress, aspirin, antiseptic ointment, etc.} as well as medications needed/taken by you and your family, or personal hygiene items custom to you {prescriptions, extra glasses, spare contacts, etc.} The Red Cross sells ready made first aid kits, or you can pick one up at a local drug store.
2. Cell Phone Charger. Keep a spare phone charger in the car that can plug in to the cigarette lighter.
3. A Gallon of Water. Don’t store it in an old milk jug. Instead, keep it in unopened bottles, empty/washed pop liters. Don’t fill bottles all the way to the top. Leave some space as the water will expand if it freezes.
4. Food. Keep about a three day supply. This doesn’t mean you need a ton of food…just some high calorie, high nutrient items, like protein bars. Clif Bars are a great choice.
5. Flashlight. Don’t store batteries in the flashlight. Instead, store them in a separate, unopened container and update them regularly as cold temps can deplete their power.
6. Waterproof Matches. Get the strike-anywhere variety and keep a stash of them in an old prescription bottle. This will keep them from scattering at the bottom of your bag and it will keep them dry. Heat is vital to surviving a winter car catastrophe. Matches can provide heat. You can burn the candles {that you’ll put in the kit in a minute}, or–if needed–items in your vehicle.
7. Candle in a Can. Dad recommends putting several candles in a coffee tin with a plastic, seal-able lid. The can will offer a place to keep your fire safe and will keep your candles dry.
8. Emergency Blanket. A blanket or sleeping bag that can compress is ideal for your winter car kit. I really like these compression bags, made for backpacking, that help pack a sleeping bag or blanket into a very small, tight bundle.
9. Extra Clothing. These can be things that were headed to the Goodwill. Bigger is better than smaller in this case. Put in a coat/sweatshirt {fleece is good since it repels water}, hat, sturdy gloves, socks, boots, a rain poncho, and a compact towel.
10. Tools. Add a multipurpose tool like this one, traction pads for stuck tires, a small {but sturdy} shovel, an axe, plastic sheeting or tarp, and duct tape. If you can’t find traction pad, or don’t want to buy them you can pack a gallon bag of clay cat litter instead.
Dad also added these nice-to-have items.
11. A battery powered, or hand-crank radio–a weather radio, if possible.
12. Extra batteries.
13. A written list of family contact information–in case your phone dies and you don’t have the numbers memorized, or if help arrives and needs to know who to contact.
14. Extra cash.
15. A state map.
16. Playing cards.
by Amy | Nov 7, 2014 | Blog, Crafts, The Art of Projects
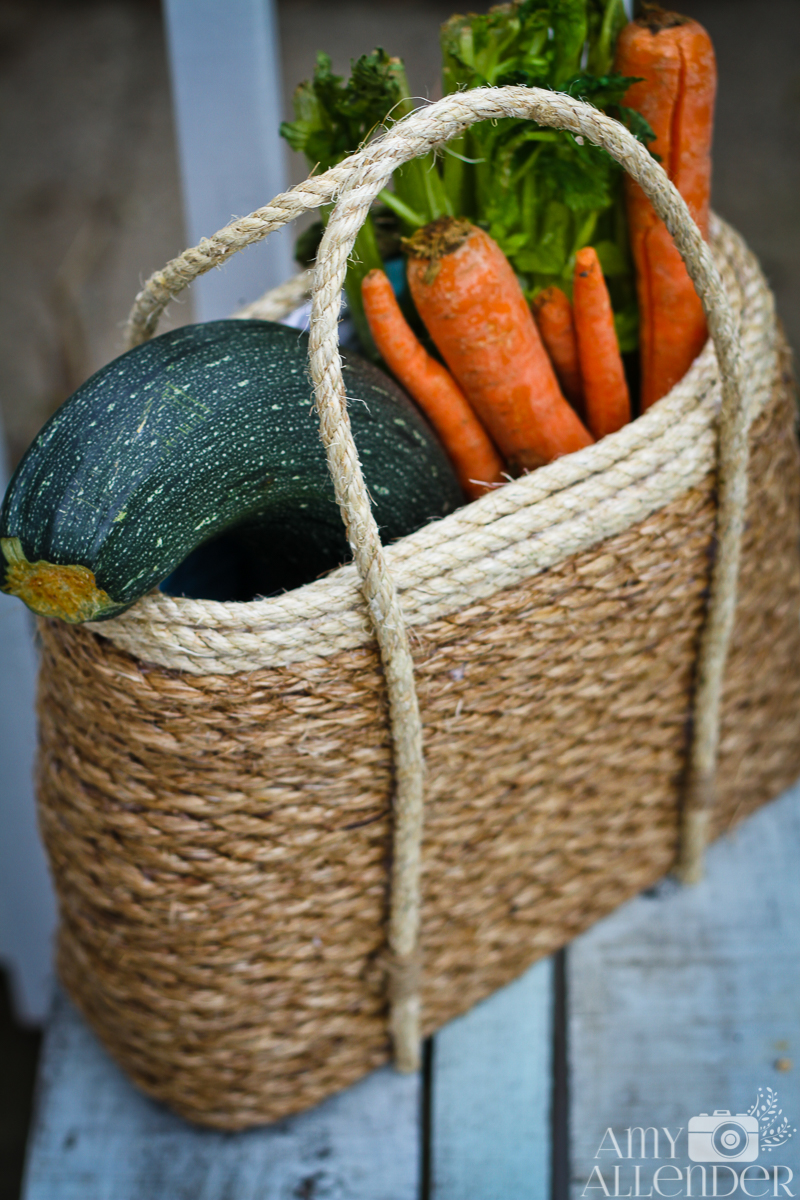
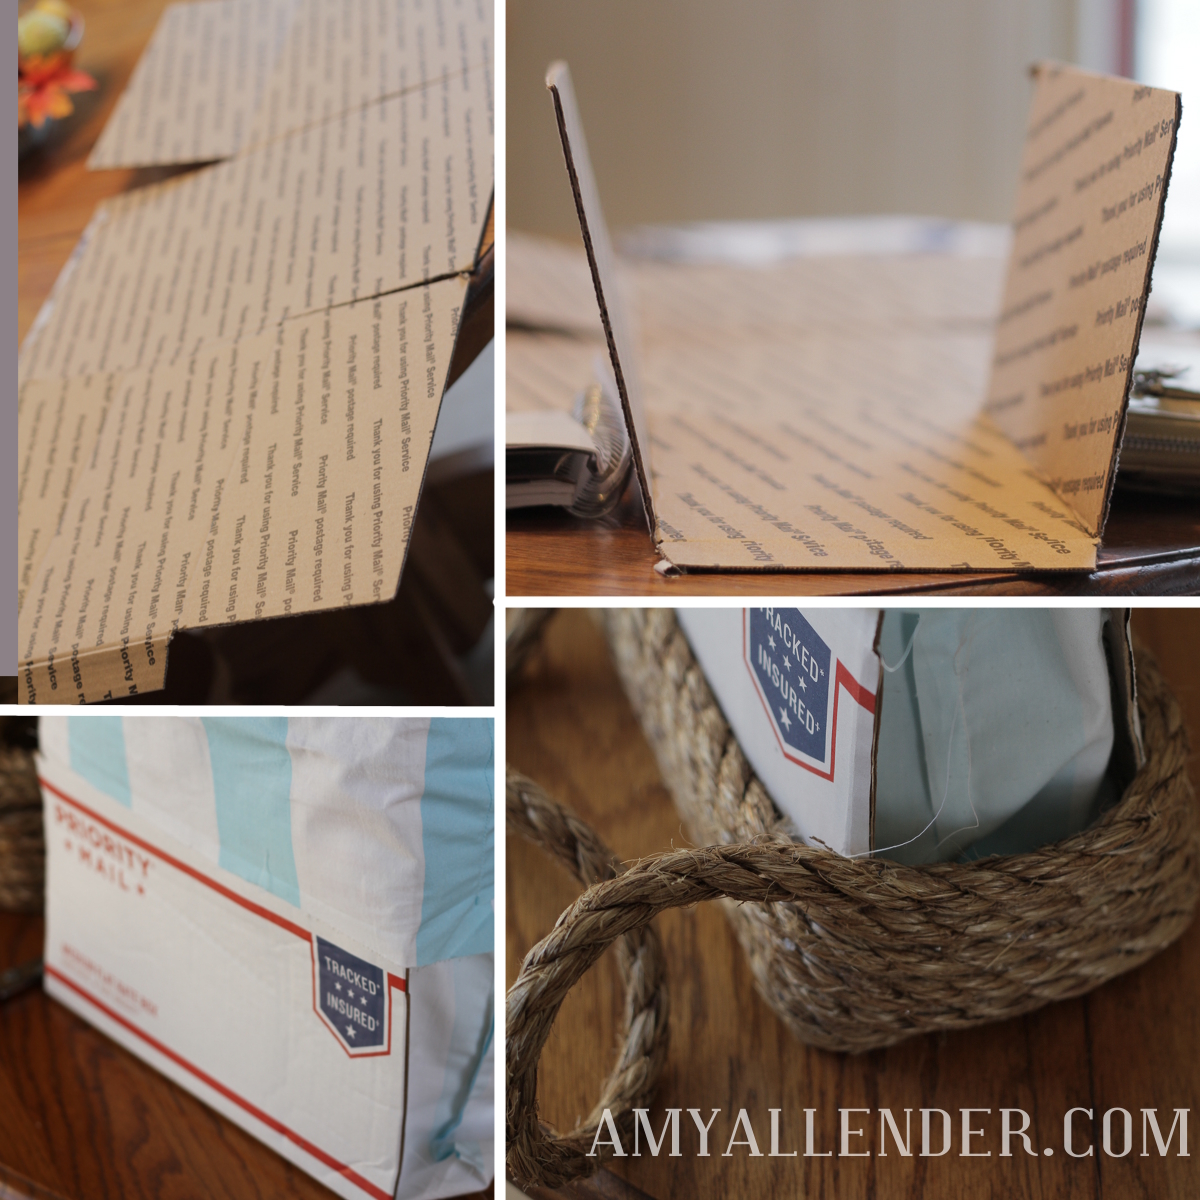
A long time ago….way back when there wasn’t frost on the ground and it stayed light until 11 o’clock at night, and I’d just had back surgery and wasn’t allowed to do much…I got glue gun happy and made this adorable DIY sisal tote bag.

That first one was a bit of an experiment so I didn’t document the process. But it came out lovely. I gave it away as a gift to my cousin and she just couldn’t believe that I’d made it from rope, a pillow case and a flat-rate mailing box. In my efforts to craft early for Christmas, I’ve made another, and this time I’ve got photos and instructions.

First gather your supplies:
A flat rate mailing box–or another cardboard box. Any size will do, but it’ll affect the finished shape of your tote.
Glue gun and lots of sticks.
A pillow case.
Sisal rope in a couple sizes.

Start with your box. Lay out flat, like the fist image. Here you can play around with folding up different sides to form the shape of your tote. The first one I made used a large flat rate box…the skinny kind. This one is a medium, more boxy box.
Fit your old pillowcase inside as a lining. Use some glue to adhere it to the bottom then fold the sides over the top. Cut away and excess you have, then glue the top of the pillowcase to the box. It doesn’t really matter how it looks right at this point, since it’s going to get covered up.
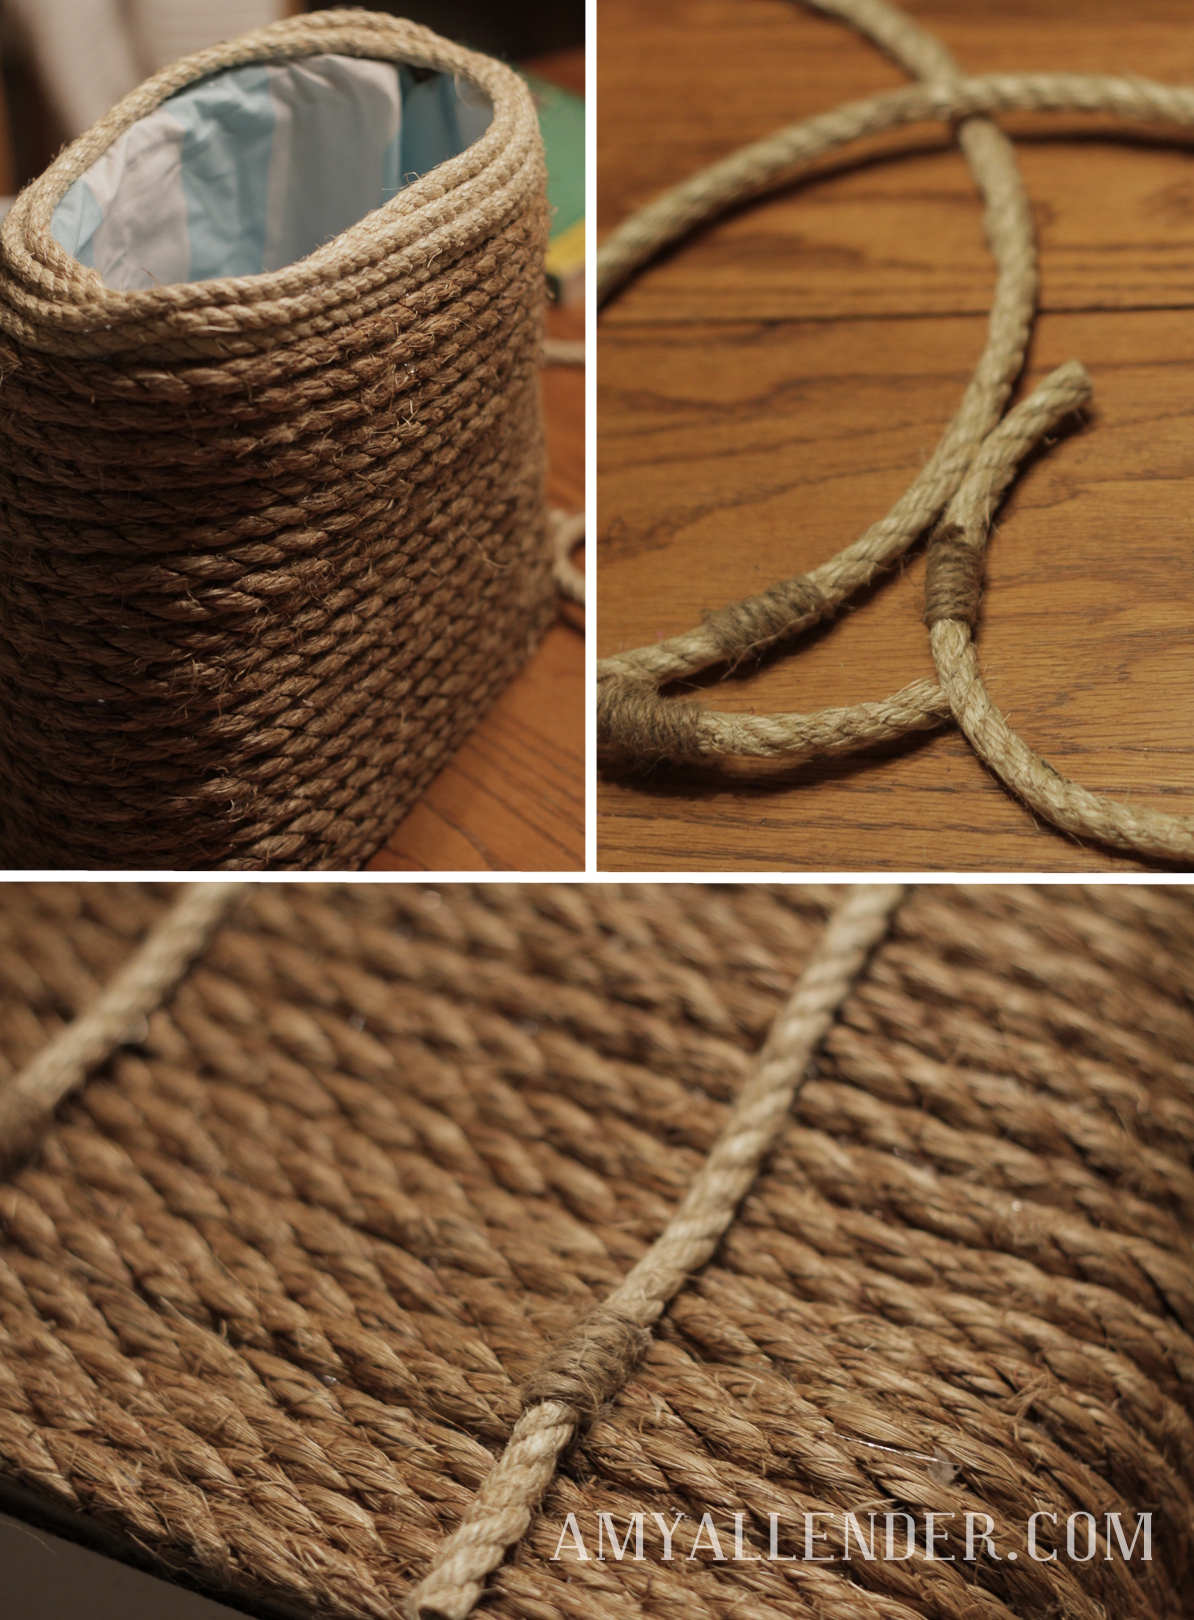
Then, start wrapping. Use a bead of glue to secure the rope to the box. When you get to the skinny sides with no cardboard, gently wrap it around and secure it well on either side.
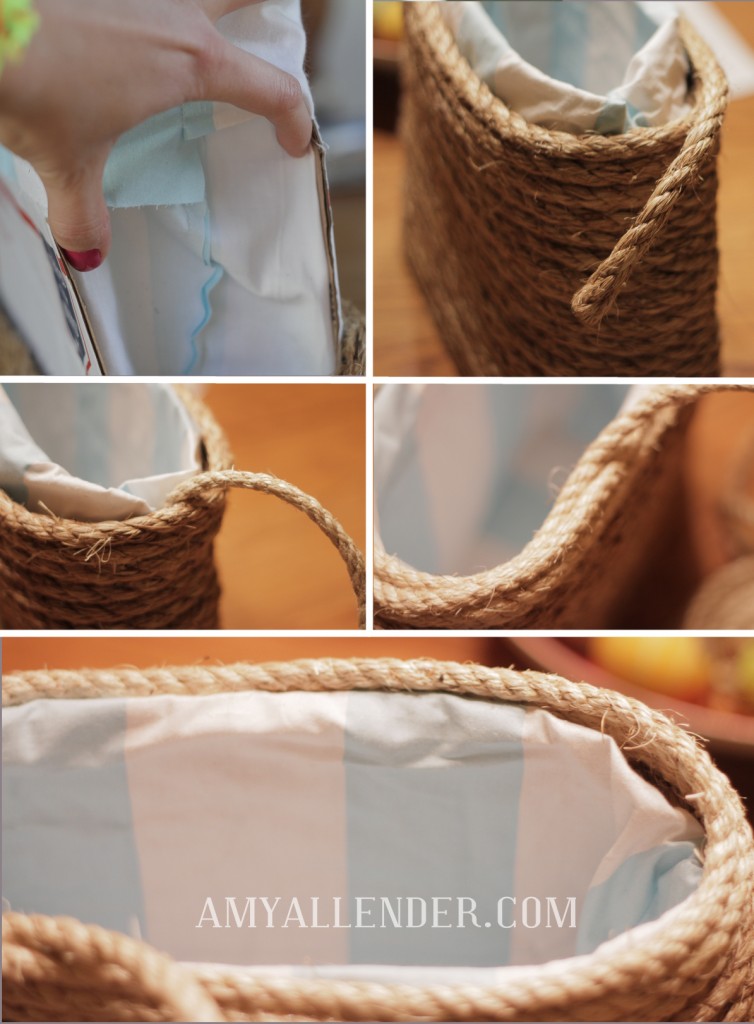
This next part is pretty important. So listen to me and take my advice. As you continue wrapping, use your hand to keep consistent space on the sides as you wrap the rope around. Naturally, the box will want to become narrower toward the top. Every time you wrap around the side, use those polished fingers of yours to keep the space…so you don’t have a tote with a wide base and a really skinny opening at the top.
It’s kind of basic after that. Just keep wrapping. Switch rope sizes if you like. But keep going, around and around and around.
When you want to switch sizes, wrap to the side of your box, then tuck the end down the size {the lining will hide it} and glue it in place. Then take the end of your new rope, tuck it inside the side of the box as well, glue it in place and start wrapping where you left off.
Once you get to the top, wrap all the way up and over the rim, and do a row or two on the inside of the lining. You can see that part in this image of the first one I made.

Coil and glue rope on the bottom…and you’re almost done.
The last step is making handles.

Cut two pieces of rope for handles. If you want to embellish them a little bit, you can wrap skinny cord around them. Just be sure to space the details consistently so they are symmetrical once the handles are attached.
Attach the handles with hot glue or a combination of hot glue and super glue. If you are planning to use your tote mostly for decor, hot glue will be fine. But if you are planning to haul anything heavy in it, I’d recommend using super glue to be sure it can hold up.
Let everything dry and you’re done.
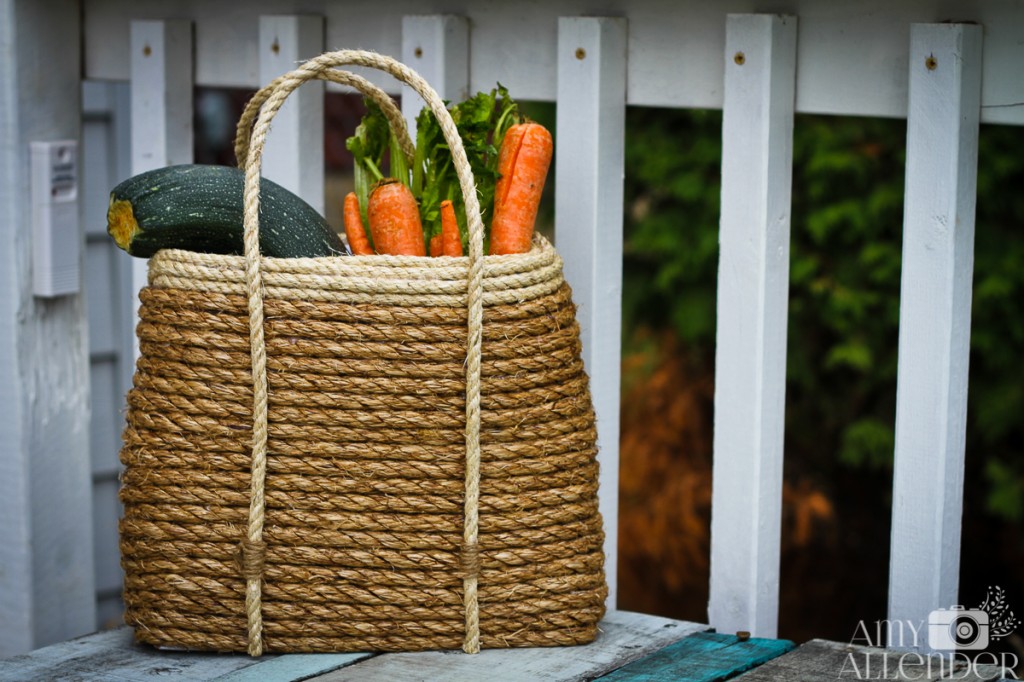
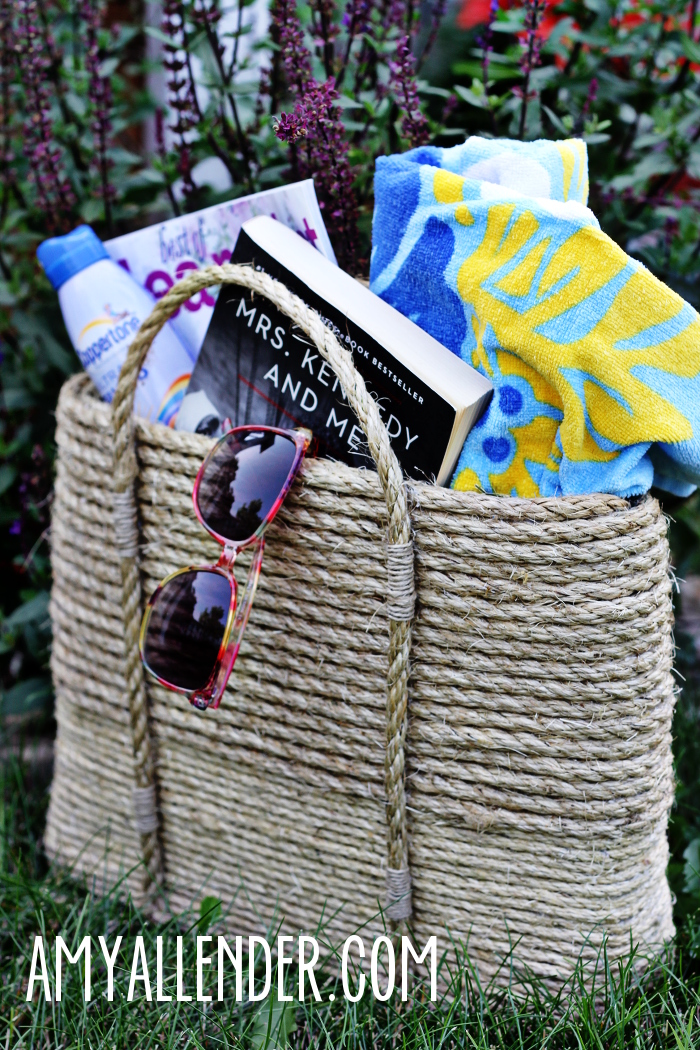
I really love the way these turn out…even it it does take some time, some glue burns and maybe a hint of crafter’s rage to produce one. They get easier and easier the more you make…so don’t be afraid. I’m totally confident in your ability to make a DIY sisal tote. They really do make awesome gifts. And they are super fun to fill with goodies and give away. You don’t even need to wrap it, just slap a bow on it and put it under the tree.
I haven’t decided what direction I’ll go with this one. {I won’t be giving it away filled with produce…} Two bottles of wine or sparkling cider and two pretty glasses fit nicely inside. Or, a couple magazines, a throw blanket and a subscription notice could be good filler. Or maybe I’ll pack it with picnic supplies. The options are endless.
Happy Friday. Happy crafting.
by Amy | Oct 21, 2014 | Blog, Crafts, The Art of Art, The Art of Projects
I’m still trying to get some Christmas crafts in the works. One thing that I want to make for a few friends are canvas/sign art. I really didn’t know what route I wanted to go…so I started looking into the bowels of the Internet for inspiration. Without further ado…
20 tutorials, resources and ideas for creating your very own DIY Canvas Art
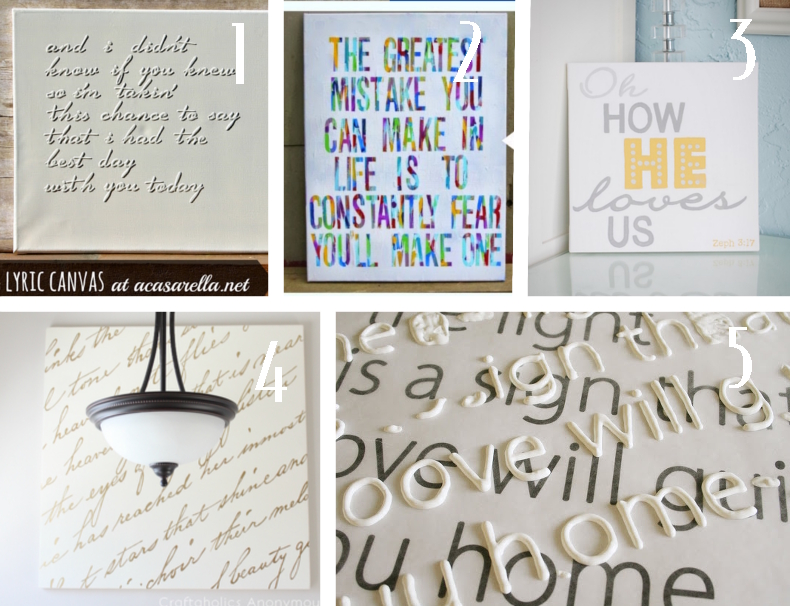
1. This technique from ‘A Casarella is fool proof. You don’t even make the letters yourself, and it looks super classy.
2. Great tutorial on making this colorful canvas, from Kallie at But First, Coffee.
3. I use this technique for all kinds of projects…including my statement stairs! Leana, at A Small Snippet did a great job of making an easy to follow tutorial.
4. This one requires a projector…but the results are simply amazing! Craftaholics Anonymous has a fab tutorial for using liquid leaf to make this statement piece.
5. This is another technique I love. Only basic supplies needed to transfer any font you can think of to canvas! See the how-to at Virginia & Charlie.
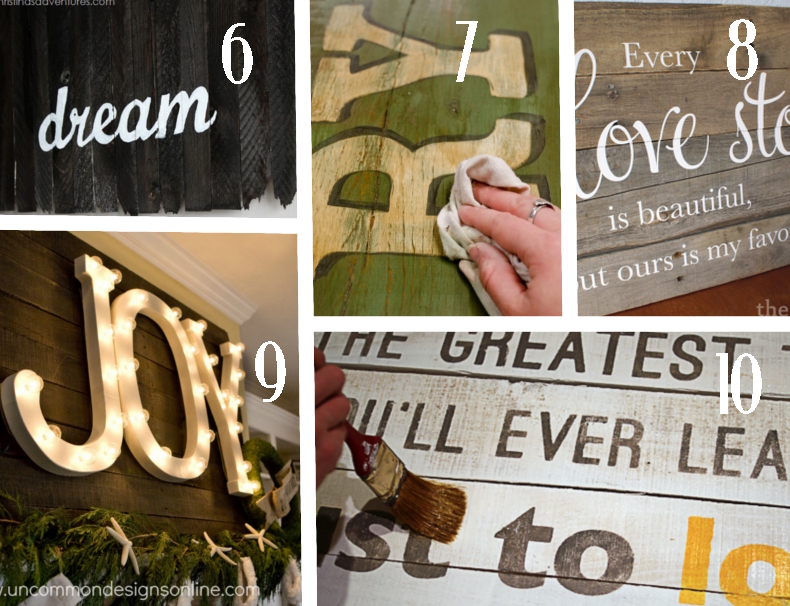
6. Christa’s Adventures offers an easy to follow tutorial for making an upcycled sign and adding lettering to it.
7. When it comes to making a distressed sign, I haven’t found a tutorial I like better than this one from Miss Mustard Seed.
8. The Thinking Closet made this sign with vinyl lettering. But even if you don’t have a vinyl cutter you should still pin this one simply for the sake of the pallet-sign tutorial.
9. This one doesn’t require any lettering at all. Just buy the letters and light them up. Another great tutorial from Uncommon Designs.
10. This tutorial from Saved By Love Creations does an awesome job of breaking down this pallet sign and how she got it perfectly lettered.
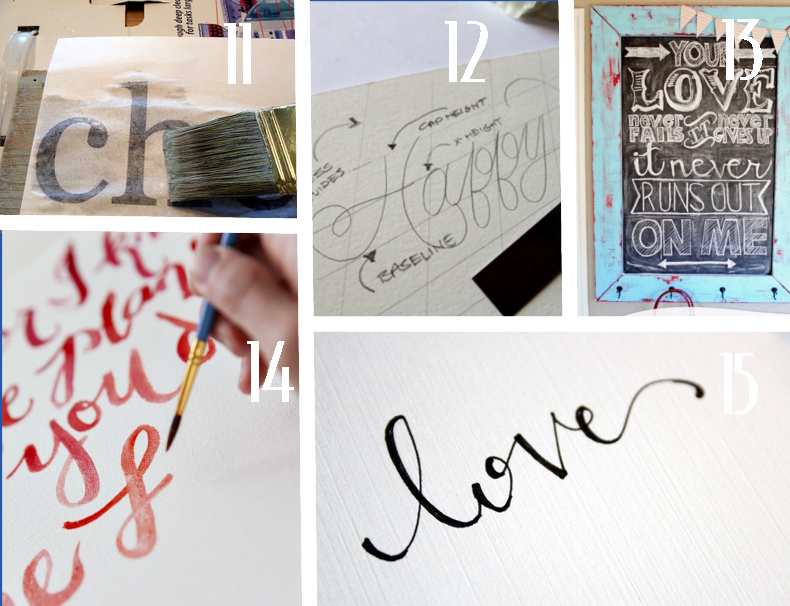
For those of you feeling a little more adventurous, here are five awesome tutorials on hand lettering and sign painting.
11. Diddle Dumpling used her printer and water to make a perfect transfer onto wood. Then she painted over the top.
12. This is a great look at how to create a hand lettered design from start to finish. Head over to A Pair & A Spare to see the tutorial.
13. Kristi from I Should Be Mopping the Floor did a guest post at Ring Around the Rosies to explain her technique for letting on a chalkboard.
14. For those confident in free handing, here’s a handy tip from Oh, So Very Pretty. I love that the tutorial covers the lovely gradient effect she achieved on the canvas!
15. Emily at Jones Design Company offers a great how-to on turning your own hand writing into something fancy-schmancy.
Now, just to make sure you are ready to create, here are five more resources for getting your quote art under way!
16. Get letting inspiration and great fonts from DaFont.com
17. Bible Gateway put out a list of it’s 100 most-read verses. It’s a great place to find the perfect quote.
18. Oh, and this is the page for A-Z Lyrics. I’ve got this linked to all the Switchfoot songs right now…a great place to find good quotes, since they are one of the greatest bands of all time. {But you can search any artist you like.}
19. Brainy Quotes has a great data base of all kinds of quotes. You can search by author or genre.
20. And finally a link to Rifle Paper Co. If you can’t glean inspiration from her, you won’t get it anywhere.
Happy Making!