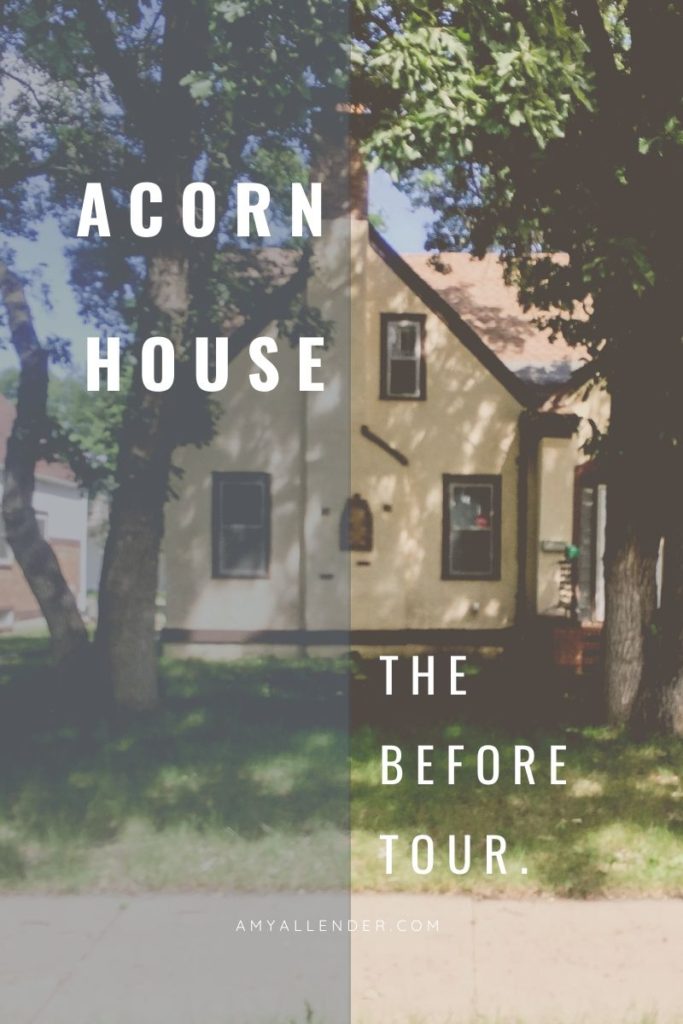
Well everybody. Today is the day. I’m bringing you a “Before Tour” of Acorn house. Yes, you read it right. I’ve named my house. Henceforth we’ll be calling it Acorn House. I thought it needed a name and the squirrel seems to be this house’s guardian. And nemesis. Rolled into one.
Not to mention, acorns rain down in the yard. I hauled off literally more than 400 lbs of acorns from the driveway and yard shortly after moving in. (No, that’s not an exaggeration.)
To be totally transparent, I have been wanting to get this posted for a while. I took these great, wide angle photographs of the house before we had closed. Then last week when I sat down to start sorting them into a tour for you, my external hard drive became inaccessible on my computer. The drive is now at the doctor (AKA data recovery place). Calling to check its progress really scares me. Imagining that all my photos are gone turns my blood to ice.
However, to get my mind off of the fact that all my gorgeous images from years past (that I never took the time to print or organize into books) may be gone–I took new photos. And organized them to share with you here.
Without further rambling, let’s just get to it. I didn’t number photos in collages, but any comments will be from top to bottom, left to right. Oh–and if you have Instagram, you should totally follow me there. I share stories from the house, things I find, and there is a video house tour saved to highlights. Let’s be friends!
The First Floor
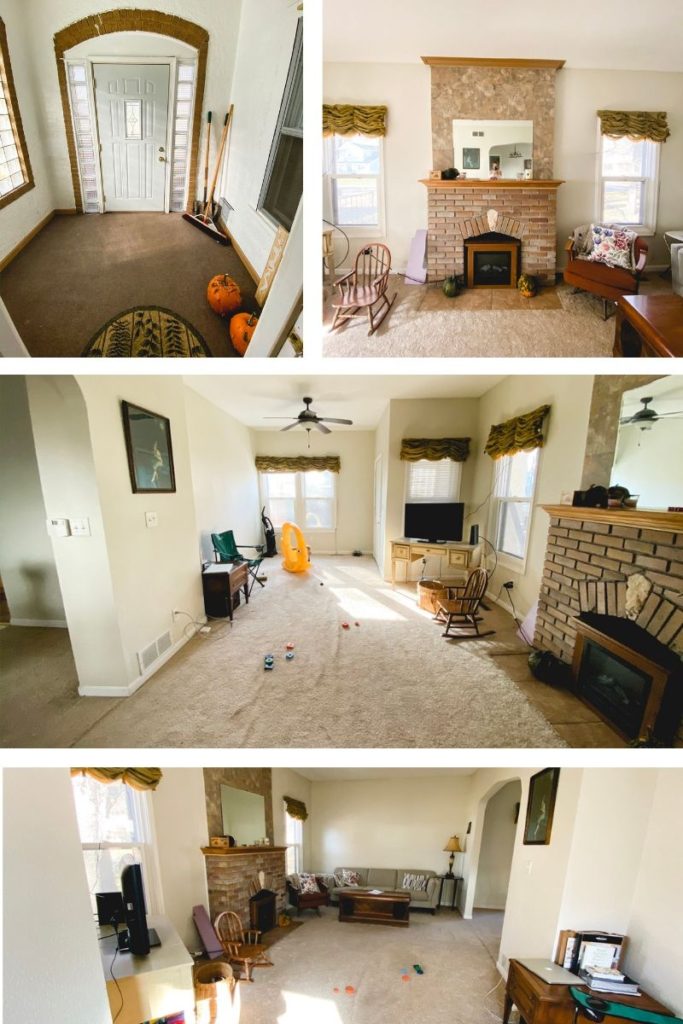
Living Room
The 2011 flood damaged the first floor. After the flood, the owner’s (an elderly woman) family was anxious to get her back into her house as quickly as possible. Repairs were made in haste–and in some cases were not made well. Everything here is builder-grade and inexpensive. That’s okay, though! I’d rather rework something that wasn’t done well, than overhaul good work done in poor taste.
Our goal is to reimagine the historic elements that probably once graced this house and make better use of its square footage. It’s an elegant house, but right now looks very dull.
One of my favorite things about Acorn House is the HIGH ceilings. I have never lived in a house with such beautiful, tall rooms. The entryway is small, but lofty just like the rest of the rooms, and it features vintage privacy glass and original brickwork.
Inside the front entryway is a long, narrow living room. This is presenting some interesting challenges. The fireplace has been rebricked and currently houses an electric fireplace. Jury is out on whether the chimney is safe to use this winter. Oh, and did I mention I didn’t stage these photos. You’ll have to excuse the toys, and random bits. We live here.
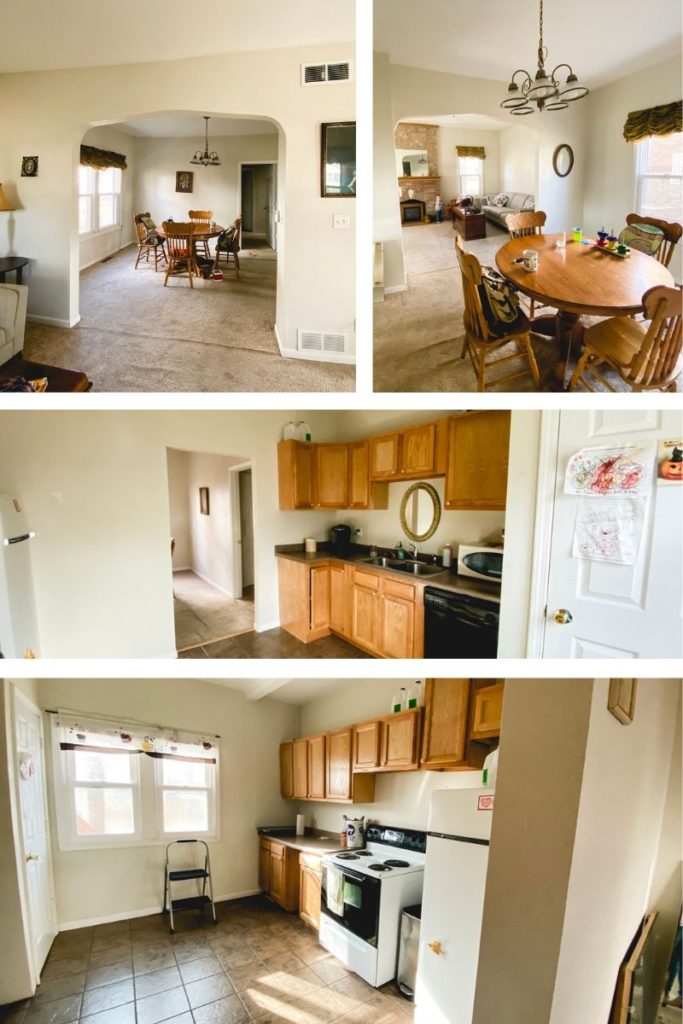
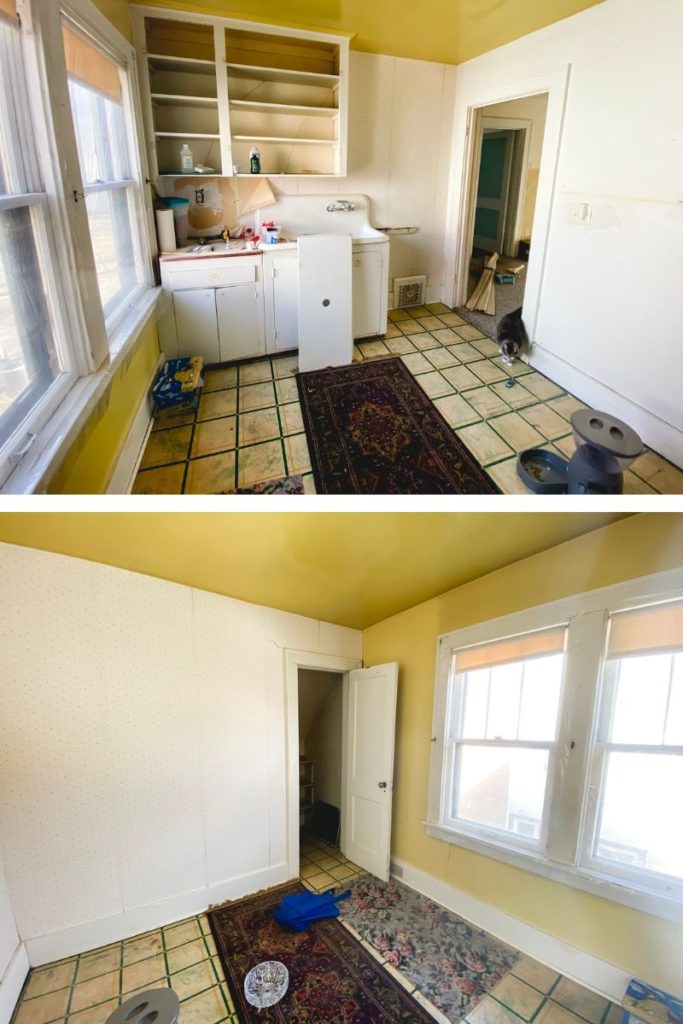
Dining Room and Kitchen
Beyond the living room, an arched wall opens to the dining area. From there a relativly small door opening goes into a very boxed-off kitchen. Another door leads back to the bathroom and first floor bedrooms.
The kitchen is a decent size, but the space is poorly used. Not to mention anyone in the kitchen is completely excluded from all the fun happening elsewhere on the first floor. We plan to make use of the high ceilings by adding floor to ceiling cabinets. And I have dreams (maybe I should use the word “schemes”) in my head for making the kitchen more inclusive and less trap-like.
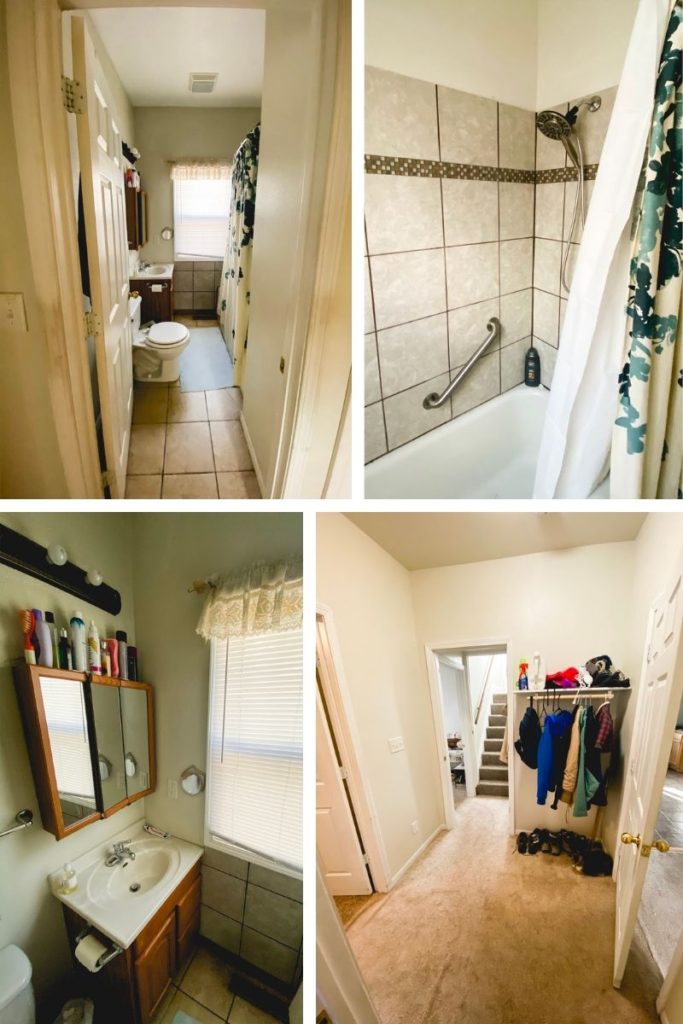
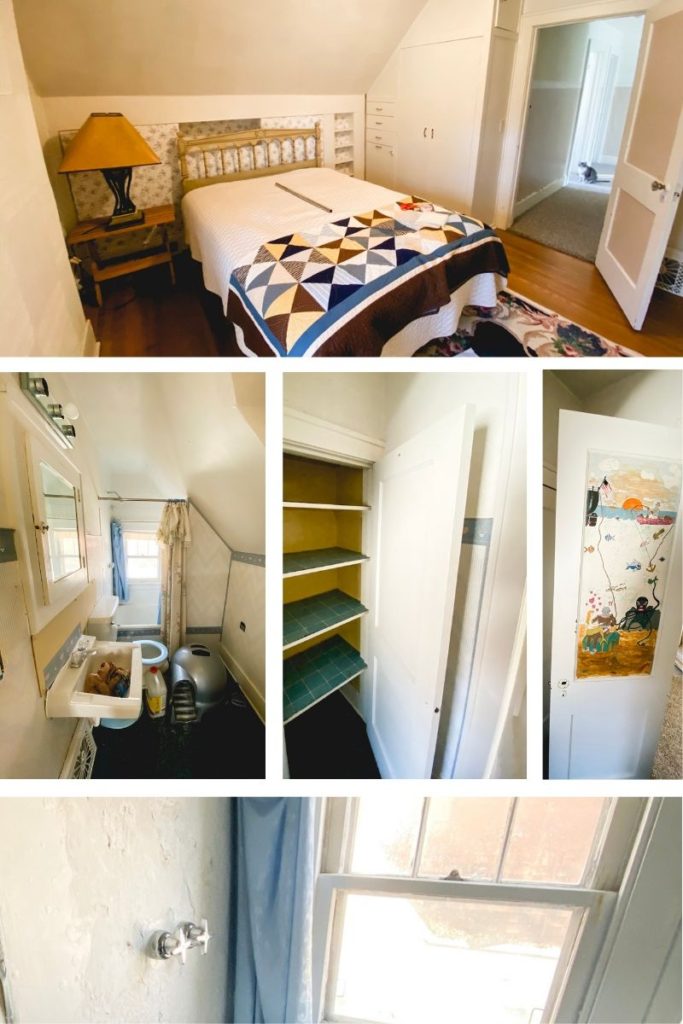
Bathroom and Hall
Currently we only have one functioning bathroom. This gem on the first floor. It was retiled after the flood. However, a lot of settling has happened and most of the floor tile is loose. A plumbing issue left the vanity moldy and warped. Needless to say that will be going away soon. I should also note that the vanity is unusually low. Like, so low my mom commented on it, and she is 5’1″.
Back by the bathroom there’s an awkward, wide hallway, and a linen closet (not pictured.) I’m still brainstorming how to give this an increase in functionality.
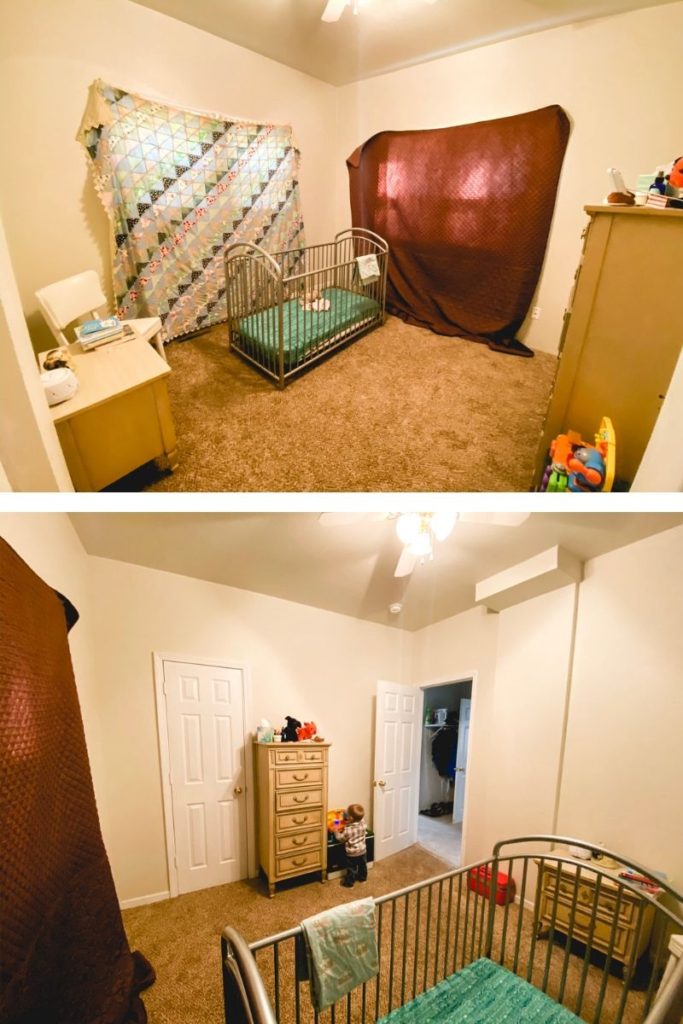
Bedrooms
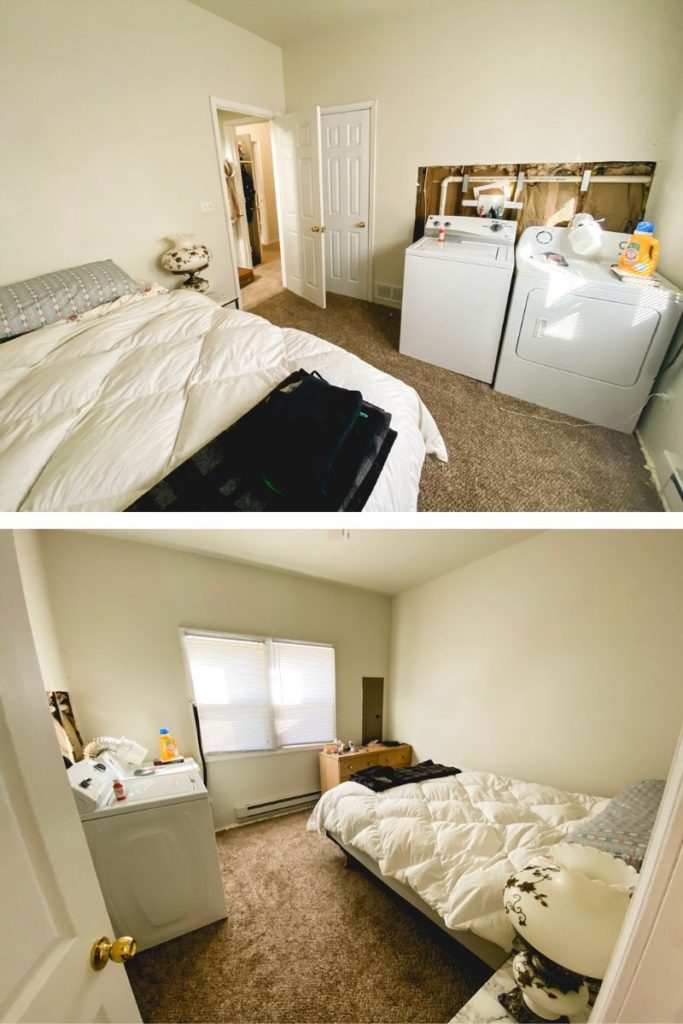
The main floor has two bedrooms. Someday I’ll get blackout curtains, but until that day arrives, we’ve got these comforters (left behind in the house) hanging from nails (already there) over the windows. It was meant to be.
The current master bedroom doubles as a laundry room. At first I thought I’d hate this, but there are some perks. First, no need for a hamper because I just deposit dirty clothes right into the washer. Second, it smells really nice. Third, no trips up and down stairs with hampers.
On the not so nice side of things, these rooms are very drafty. And I do mean very. I spent a week and multiple cans of crack filler and caulk staunching the flow of icy air into our rooms. But I’ll have to tell you about that another time. Long story short, they’re getting better. Our next cold snap will be the real test!
The Second Floor
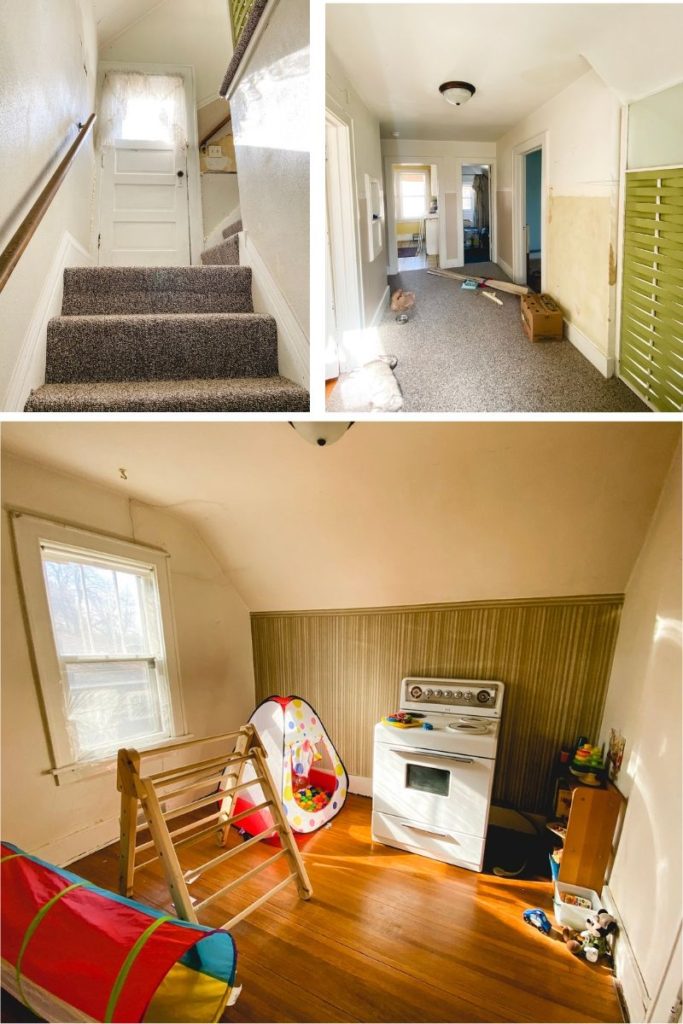
Stairs and Bedroom
The second floor of the house was converted into an apartment in the 50’s or 60’s. Lots of the original character is intact, and will serve as a starting point for restoring the first floor.
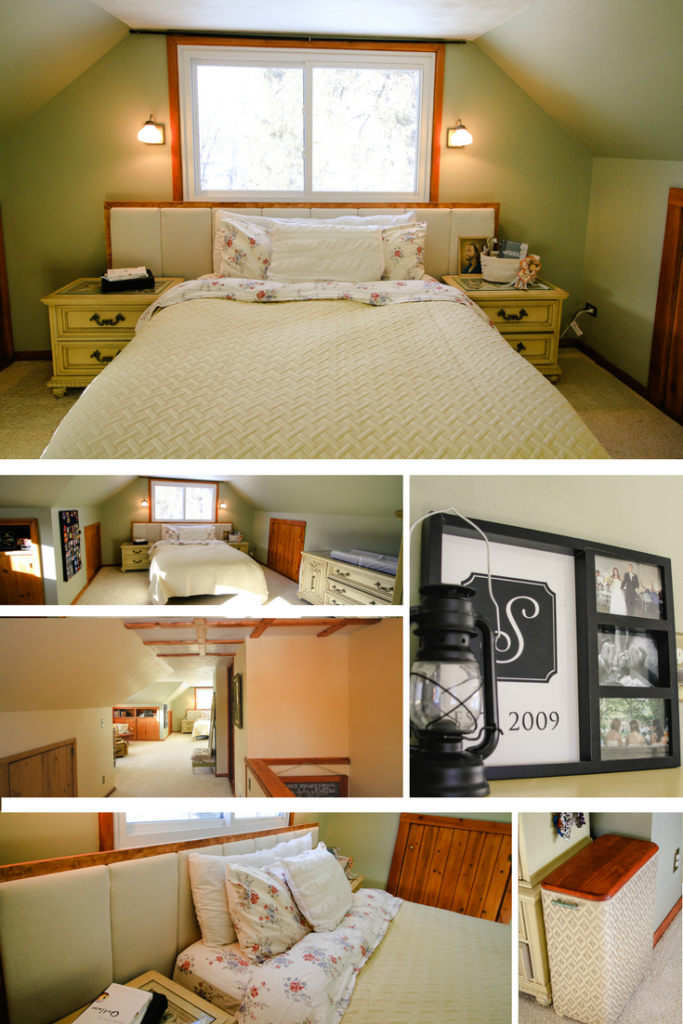
I love the light that comes in upstairs. It’s pretty any time of day. The wide hallway is unusual in an old house, and a great feature. We’ll be returning this to a single family home and have plans to create a master bedroom and very nice bathroom up here.
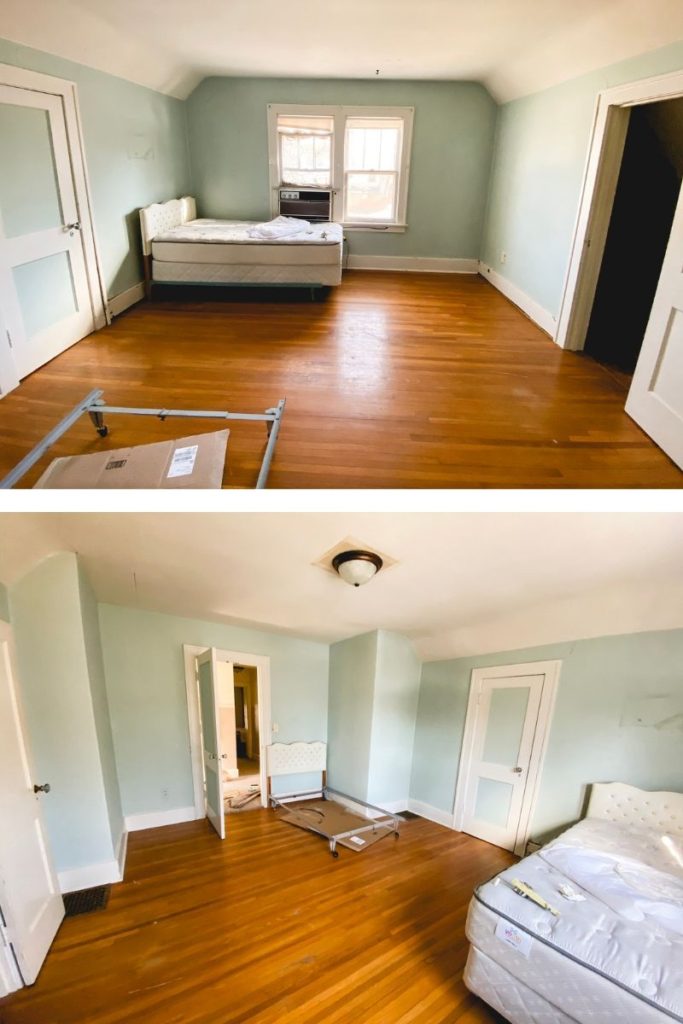
Future Master Bedroom
This room will likely become the master bedroom. It will require reworking to make a better closet and access to the bathroom.
Bedroom and Bathroom
The third bedroom upstairs has an adorable built in wardrobe, which we will keep. The wallpaper, which is stapled up, will go.
The bathroom upstairs is completely defunct. The water is completely off because the toilet is held together with tape and the sink is falling off the wall. The inside of the shower surround has been textured with drywall compound (don’t ask me why), and the tub is uniquely petite. This will all go.
The bathroom also houses one of the most greatest curiosities of Acorn House: a door mural. Many have come to marvel at the very odd, yet detailed scene on one panel of the door. Lots of people (who do not live here) are petitioning me to keep it. I smile and nod, but I’m making no promises.
Kitchen
Lastly, we’ve got the second kitchen. If you follow on Instagram you know we wrangled the vintage appliances out of here in preparation for the second floor remodel. I’ve since started dismantling other items as well–in an effort to salvage any vintage hardware worth keeping and reusing.
Our plan is to live on the first floor, even though it isn’t particularly pretty, while we renovate the second floor. Then we’ll switch places.
I cannot wait to roll out some after photos, but we are still a long way off. First we need to address the less beautiful things. Things like the roof (don’t even get me started), the garage, drafts, cracks, and a vast array of exterior tidbits that need to be winterized.
I wish you could all come over for coffee and project time–but for now we’ll just have to settle for sharing photos and virtual lattes. Thanks for stopping by–more to come.
I am so excited to be showing you my finished master suite tonight!! Seriously, basically anyone who has come into my house lately has been invited upstairs to check it out because it’s been something we’ve been working on and I’ve been talking (and complaining) about for a few months.
I could gush all night, but I’ll let the photos do most of the talking for me. I’ll say this though. Since having a bathroom right in my bedroom I’ve gotten up every morning and wanted to do my hair and make up. Just because I like spending time in there. Crazy, I know. And I make my bed every morning and keep it all nice and tidy (for the most part). We’ll see how long that lasts. Well…without further ado, here’s a full look at the before and after!
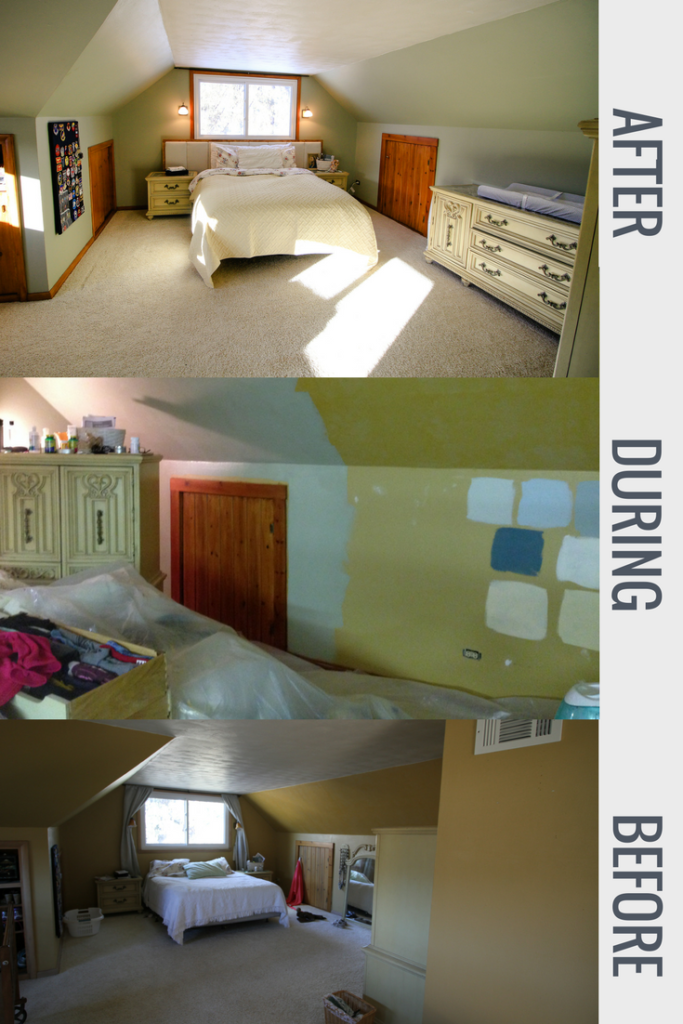
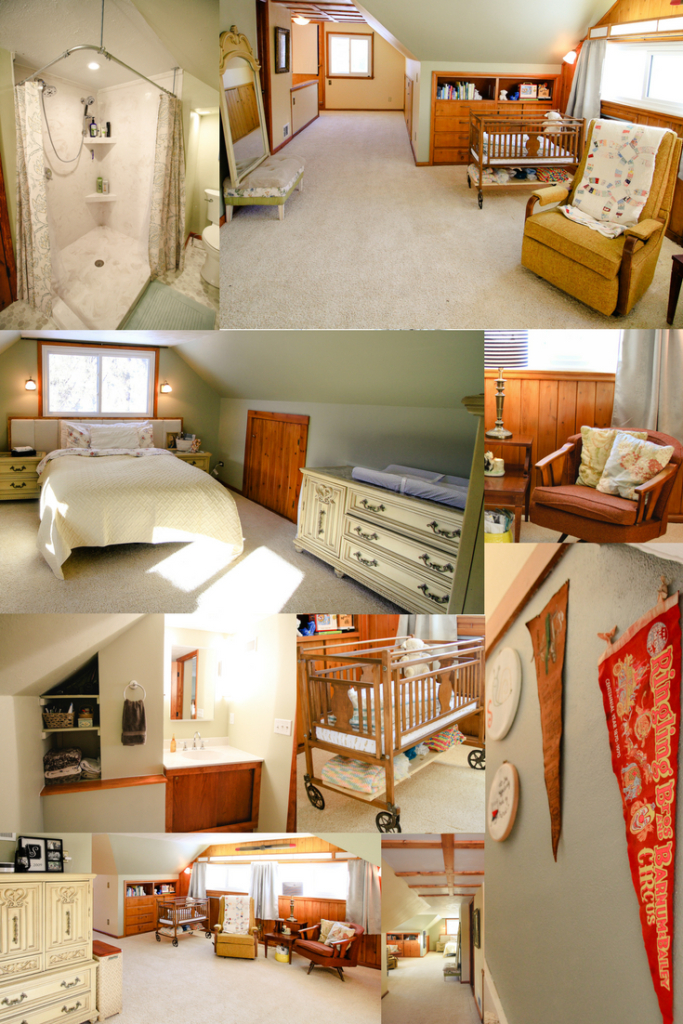
So…it wasn’t just the bathroom that got added and overhauled. We wanted to spruce up the whole space. Here’s a look at our sleeping area in progress.
What happened here?
I stained the wood to be cohesive with the rest of the house.
Updated the globes on the sconces. And by updated…I mean I took away the trendy yellow globes and replaces them with vintage milk glass globes to match the feel and age of the house.
After lots of hard decisions…I painted–obviously.
With cast off supplies from the Habitat ReStore I built a headboard. When the curtains are rehung they’ll tuck in behind it so we can close the curtains without sacrificing our ability to have the window wide open during the day.
We rearranged the furniture–after some walls were moved and closets were sealed up.
And I went stain crazy by refinishing the top of our hamper (an estate auction find) to match the other woodwork.
Next up let’s look at the bathroom.
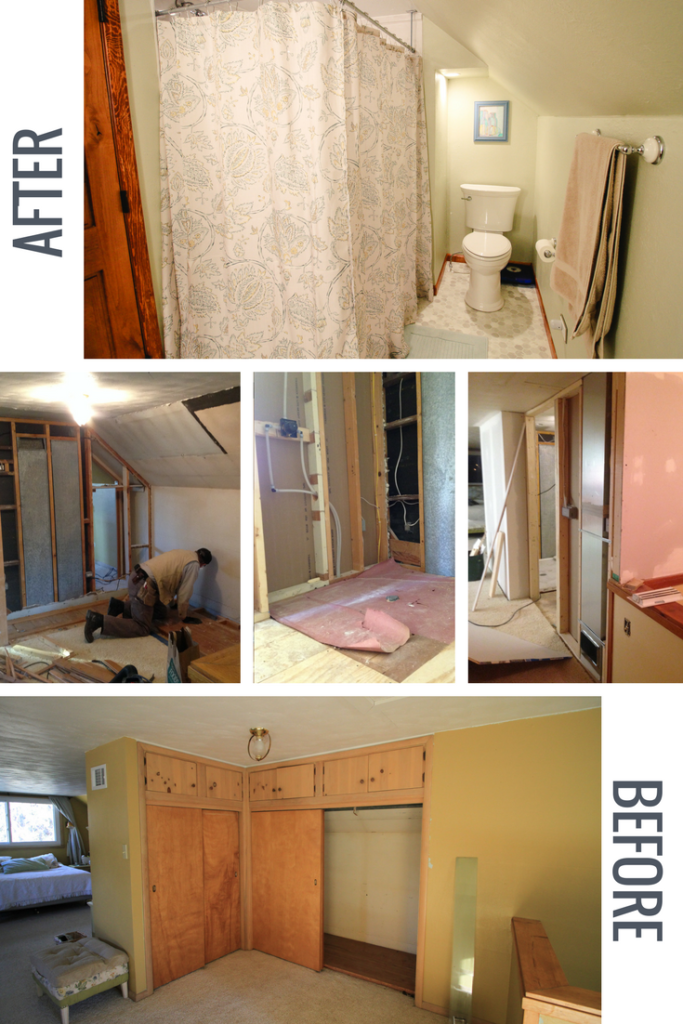
I hope the way I formatted the photos makes sense. I started with the pretty and worked backwards. If you like it (or not) let me know in the comments. These photos show where the bathroom now sits. those corner closets are now our shower!
What happened here?
Our closets were removed to make room for the new bathroom.
Plumbing was run up for toilet, sink and shower.
Electical outlets were added, as were can lights, two bar lights–hanging on either side of the medicine cabinet, switches, and a vent fan.
A supply duct was rerouted.
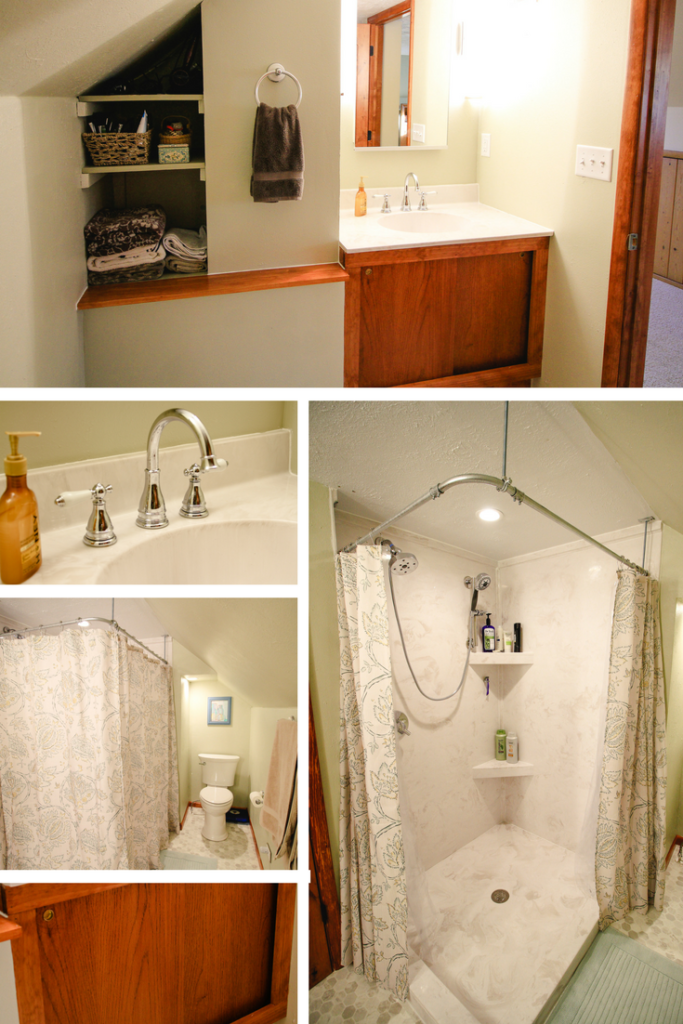
We tore apart an old vanity from the ReStore and rebuilt it into a custom piece.
The shower–a 42×48″ masterpiece with TWO shower heads!
The paint
Sheet vinyl flooring
Some new walls and a lot of corrective mudding on the existing walls
And everything else that goes with making a brand new bathroom
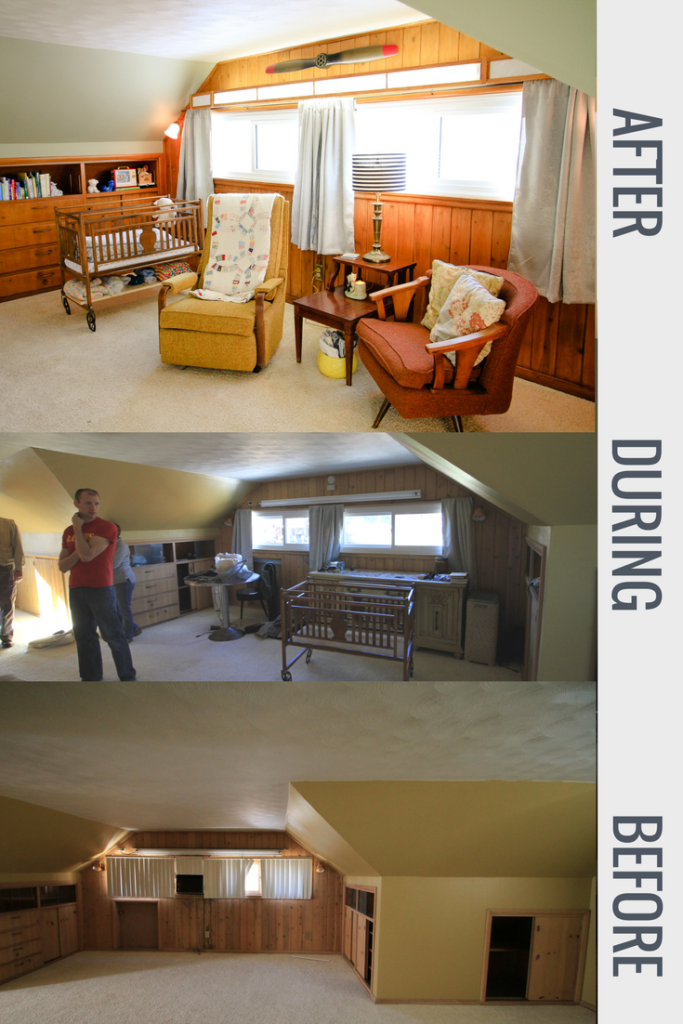
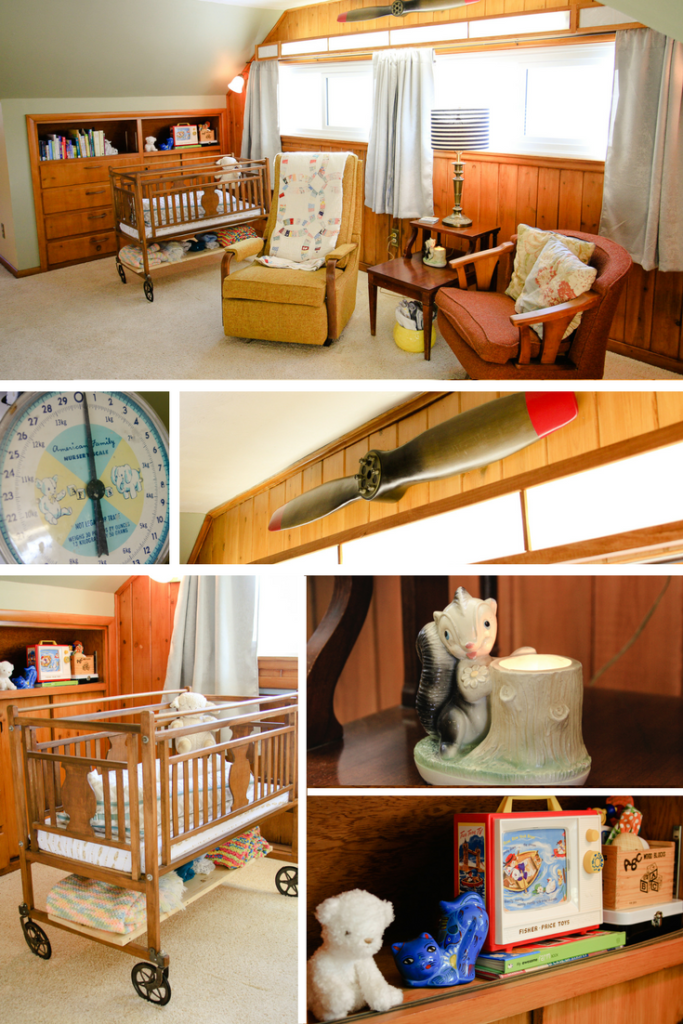
Okay, shifting to the side we’ll look at the sitting area/nursery. I’ve always thought it would be nice to have a little sitting area in the master bedroom. We kind of had one before…but it mostly housed my sewing machine and collected those only-worn-once clothes that aren’t quite ready for the hamper.
When friends of ours moved into a new house and set up a precious sitting space in their room my yearning for one of my own was rekindled. So once we started renovating, I knew a sitting space was on the list of things I wanted for sure. This will be especially nice since it’s near our “nursery.” Derek and I have already enjoyed sitting there and chatting in the sunlight–and I’m sure we’ll soon enjoy late night rockings and feedings there by moonlight.
What happened here?
New windows!! They eliminated the need for the ancient, leaky AC unit in the window.
I sanded and restained all the woodwork and built ins with PolyShades.
We swapped out the table for a crib and once an old closet was replaced by bathroom walls we had room to move the big dresser over toward the bed. (It’ll serve as our changing table.)
I removed the glass sliding doors covering the shelves to make that storage space more accessible.
Since Derek’s schedule is always changing an sometimes requires sleeping through the day, we traded the slat blinds for blackout curtains.
Sconce globes were replaced with something more age appropriate for the house.
The eyesore fluorescent light was covered up with a cover I built from pieces of molding and a panel of drop ceiling.
The space was painted.
We furnished this area mostly with items we already had on hand. They were things we likes and had stored in the basement because we didn’t have use for them until we finished the bedroom.
The end table is a hand-me-down from Derek’s grandmother’s estate.
I bought the orange chair from Salvation Army for a project I did over the summer…but it didn’t end up staying, so I brought it home. (There’s something undeniably awesome about it.) They yellow recliner was purchased from the St. Vincent De Paul Thrift Store specifically for this space. It’s really hard for us to purchase new furniture…because those items tend to stick out like a sore thumb in our home. Maybe someday I’ll upholster the two chairs to match…but not quite yet.
The crib–which is the coolest thing ever–was my grandfather’s when he was a baby in 1936. I’m so honored to have it in my home.
The lamp I’ve had since college.
The night light was my mom’s. Again…I’m so blessed to be able to incorporate such special items into my child’s space.
The nursery scale is something I bought while living in Minot at a vintage fair. I used to use it in newborn photo sessions and it’s way too cute to leave in storage.
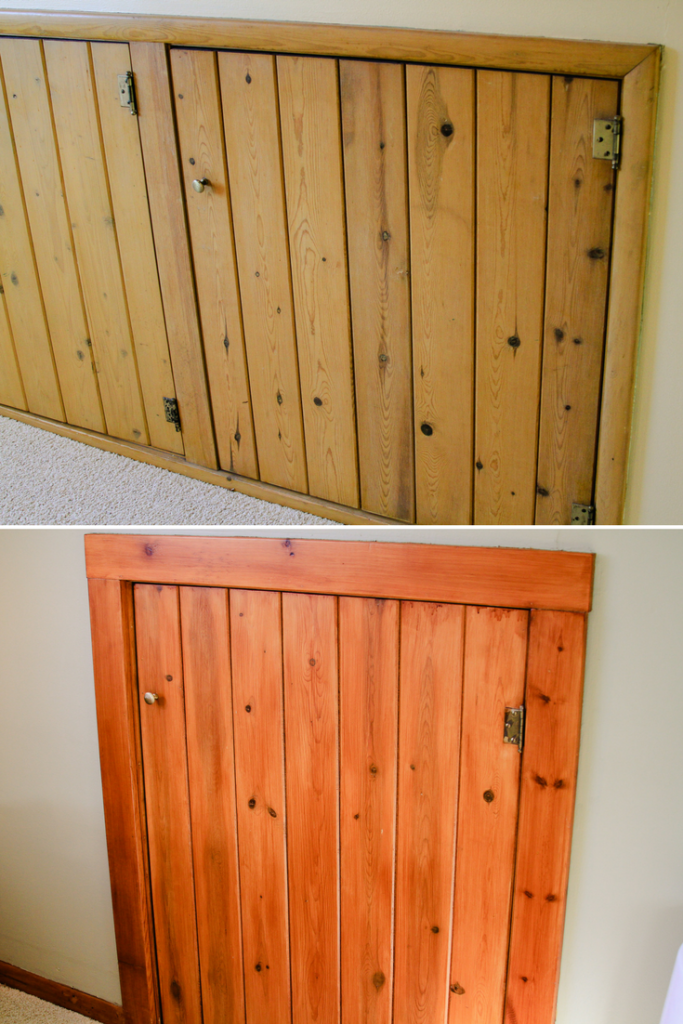
Oh, and now would be a good time to show you the B&A on the woodwork. This is what most of the doors looked like before…and how they look now. There were also parts of the woodwork (mostly trim pieces) that had been completely stripped, so they were a different color. Now everything looks cohesive and content. The red hue matches the rest of the house as well as what was popular in mid-century construction.
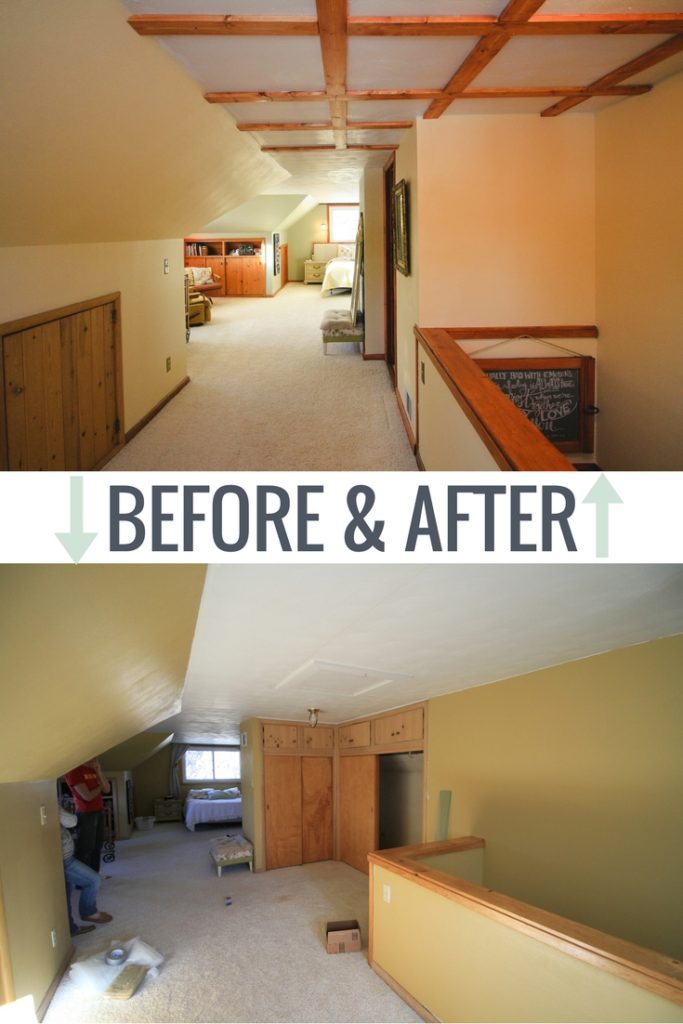
Last, let’s look at the space outside the bathroom. I love that this doesn’t feel “new.” It seems right, like it’s always been this way. When our closets were here we lost a lot of floor space. Now, that’s all been put to good use. In the coming days (months) our new closet will be built in under the slanted roof on the right. The low closets currently built into the knee wall will stay, they’ll just give added space at the back of the closet. This will be handy for storing bulky stuff like luggage, bins of puffy winter gear, etc.
What happened here?
Obviously the closets were taken out and new walls were put up.
We chose to paint the area in front of the bathroom a light cream color and the bedroom a sage to separate the spaces visually.
Our attic access door had to be moved.
We added the beams on the ceiling to reinforce some places were the attic joists were causing the drywall to crack…and to disguise our new attic entrance. And they look cool. But mostly we did it to be practical. Because no one wants to redo a ceiling right now.
It’s not very obvious, but we also swapped the light above the stairs, which hung kind of low and collected lots of dead flies, for a classic mid-century, semi-flush-mount fixture.
So there you have it. Project complete. Man, I love saying that. I get asked often what my favorite part of doing projects is. My answer is always: “Uh…when it’s done.” I like the work. Really I do. But by far my very favorite thing is when it’s all done and beautiful. I just like to sit and look at it. To enjoy the space. It’s like I can feel the house sigh with relief that the work is over and it can relax. In my own home I don’t take on projects I don’t think the house needs or wants. This one I can say for sure: the house wanted it and it’s very, very happy. Did I mention it’s really nice not to have to go down a flight of stairs to pee in the middle of the night?? Especially when you’re pregnant!
But enough about talking houses and my urinary habits. Here’s one more collage of the finished product. I wish all of you could come over for coffee and sit in the kitchen–or the bedroom with me. But for now This will have to do. Thanks for stopping by.
Have you ever had a secret dream that came true? Like something super dear to your heart that you never thought would happen. Then it did. And you just couldn’t believe it. And all you could do was thank God over and over, because you just really couldn’t believe it?
Kind of like blowing out your birthday candles, and having that outlandish wish come true.
When it does you’re afraid to really tell anyone about it. Because maybe if you did it would all go away and you’d wake up and discover the whole thing had been a dream.
That’s how I feel about my home. My house. I call it the Canyon Cottage. But mostly just in my own head and on my secret Pinterest board of ideas and DIY tutorials I’ve got saved. I call it that because it’s near a place called Canyon Lake.
Besides that, I also really like canyons. There’s something magical about being at the bottom of a canyon. A place that’s been cut and formed by the forces of nature, directed by God’s own hand. Canyons are carved from harsh elements, yet become places of beauty and life. The path to this place was carved from proverbial harsh elements. On my way to this home, this front door, I was caught between walls of rock and strife. Yet somehow, after squeezing through lots of tight places, I–we, ended up here. In a beautiful canyon. Wide enough to breath in. Narrow enough to be a shelter.
Maybe that train of thought makes no sense. Or maybe it’s just too romantical. The simple truth is that I love it here and God has gifted me a portion of peace I didn’t know existed since living here. It’s been a balm to my tired mind and soul. (more…)
It’s been a while since I’ve posted. And I’m hoping to come to you with a big fat explanation of all the adventures that have been taking place here. Let’s just say it has involved dead bats, a new house, endless woodwork to refinish, contractors, and sliding to the door Risky Business style {fully clothed, of course} to answer the door when I thought it was Derek…only to find it was a new neighbor {who I’m pretty sure thought I was 15.} It’s been one awkward adventure after another.
But in the midst of the arrival of boxes and furniture, unpacking, and shifting furniture around to refinish fabulous hardwood floors…I was inspired by the lovely folks at Arhaus to put together a post about fall decor ideas. Now…you know I’m a fan of total transparency, so I’m going to be honest. My house is currently decorated with polyurethane cans, rags and step ladders. However, my family is coming from far and wide {Indiana and Wisconsin} to spend Thanksgiving with me, and I’ll be a monkey’s uncle before I let my house go decor-bare for one of my favorite occasions. So this year, more than any before, I’m relying on my easiest, quickest, most trusty fall decor methods to turn my middle-of-a-remodel abode into something more guest appropriate.
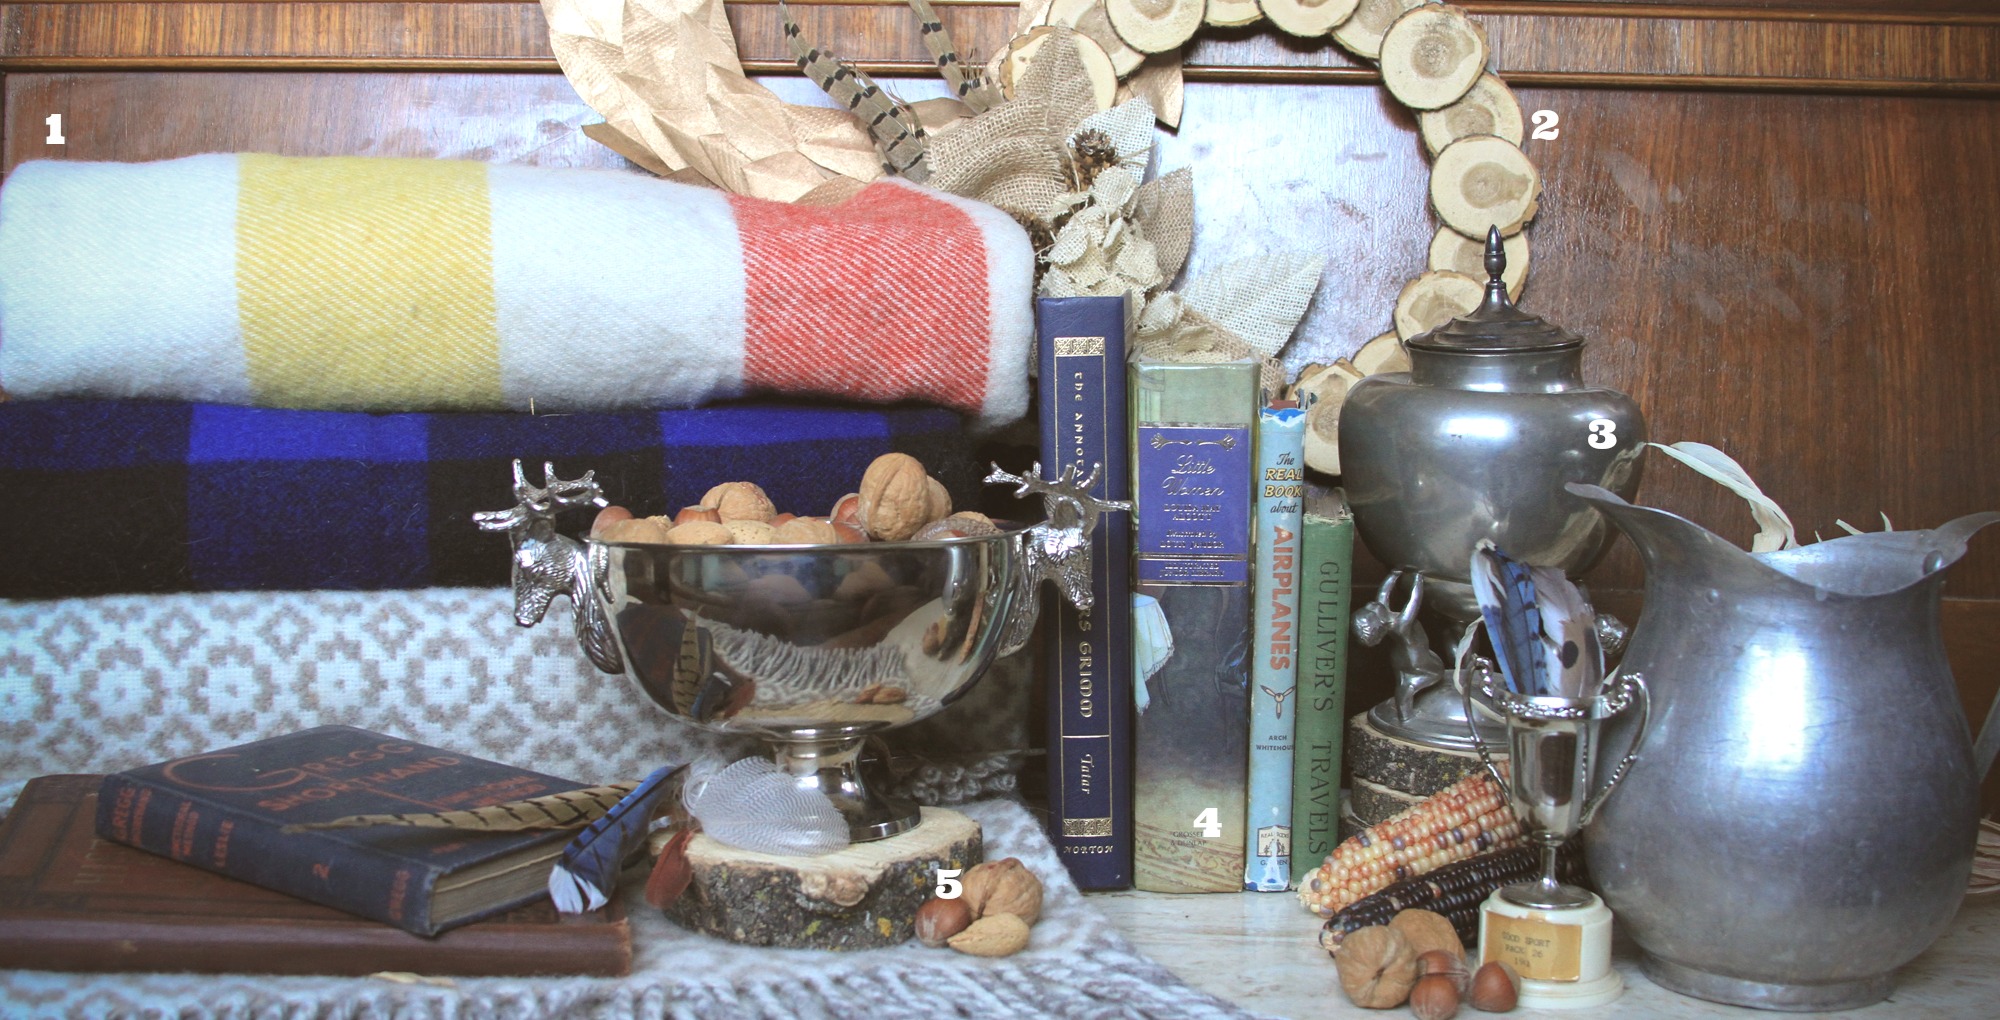
For fall and Thanksgiving {much like the other holidays} I like to decorate with things I have on hand or things that are easily accessible and shiftable after the season is over. Therefore, the five items I’m going to showcase today are all things I have around my house that I like to bring front and center in the fall. Let’s go.
Image via the Pendleton site. Click to go to source.
1. Wool Blankets. I love wool. It’s a problem. And it’s growing as I age. I love wool blankets and wish I was rich so I could buy every single one in the Filson, Pendleton and Woolrich catalogs. I consider them a good investment, since wool never goes out of style and will last lifetimes if properly cared for. {I like to tell Derek I’m buying heirlooms…} As soon as cooler weather starts to hit and leaves change, these puppies come out of hibernation. I fling them over an arm chair, stack them on a trunk or end table for easy access, and layer them up on beds. They don’t have to match, they don’t have to be perfect. Just the fuzzy, warm texture is enough to bring a sense of fall into your living room. And since they can be pricey, but do last a lifetime–keep your eye on online markets {like eBay}, estate sales and auctions, and flea markets to score wool blankets for a fraction of the catalog cost. Bonus, if you come across some that are damaged you can scoop them up and repurpose them into pillow covers for you couch throws.
2. Natural Elements. I love that fall starts out with a big burst of color. Then things start to fade out and we are surrounded by an awesome neutral pallet. For this reason, I’m into using natural elements and textures to decorate for this season. It’s calming to have a house full of low-key tones after the brightness of summer and the colorful pops that come with the Christmas season. Really anything that let’s you bring a piece of the season indoors is fine by me. A few of my favorites. include wood discs, golden paper leaves, burlap of all kinds, birch wrapped candles {not pictured above}, feathers of all sorts and leaves straight from the tree. Use these items to make wreaths, fill vases and mason jars, and accent any other arrangement you might be working on.
Originally from Good Housekeeping, image found on Everything Fabulous. Click image to be taken to their site.
3. Silver and Pewter. Something about silver and pewter just sings about fall to me. While I think it’s a little drab for summer, these items come front and center in the fall. Something about them reminds me of spooky Halloween stories, rustic pilgrim meals, and medieval feasts. Group weathered silver items together on an end table or as a center piece. Fill them up with leaves, feathers, mums, or nuts. If you are shopping, suggest looking for things that are a bit imperfect, have a matte or pewter finish, and are not cheap-chincy chrome. One of the best features of these items is that they are a perfect backdrop for nuetral-fall elements, then transition seamlessly to Christmas by filling them with lights, glittery ornaments and evergreen branches.
4. Vintage Books. Fall ushers in a time of early sunsets and long evenings spent indoors. I like to hearken back to a time before Netflix, when our grandparents and great grandparents spent evenings entertaining themselves with books. Reading stories aloud to one another, using the energy of their imagination to generate the images. In my house, it’s mostly board games and movies after dark {at 5:30 or so}…but I like to give a nod to this old tradition by stacking up my favorite classics on end tables. Or using them as pedestals for my favorite pewter pitcher.
Image via Divine Dinner Party. Click image to visit their site.
5. Nuts. Nuts get a category all their own–even though maybe they are a natural element. Transparency: I’ve had these nuts for years. We own a nut cracker. Each year I get a few fresh nuts for cracking. Each year, more get added to my “decor” nut box. Nuts are a conversation piece…because no one really knows how to crack them any more. Kids are hilarious when they try to break in. And they can give your Thanksgiving guests something to do while they wait for the turkey…without getting overly snacky. You can spray paint them gold. You can fill jars in all sizes for a centerpiece. You can put them out in a pretty bowl on the end table. You can add them to wreaths. You can buy them dirt cheap. Pick up a few from the grocery store, set them out for all to see–and just that easy…you’ve decorated for fall.
I want to extend a BIG THANKS to Arhaus for featuring this post and these ideas on their site! Be sure to check them out and see what’s inspiring them this fall. They have super pretty furniture and lots of inspiring decor–I’m flattered to be included. {Disclaimer…Arhaus has in no way paid or compensated me for this post or these compliments.}
**This space has been featured on Shutterfly’s interactive album “How to Decorate a Small Living Room.” Click over for more great ideas, cool spaces and inspiration from other talented designers and decorators.***
Tonight is a super special, super exciting night. And yes…it’s very much night. My day has gotten away from me, but I simply couldn’t wait one more day to write this post. I’ve had some busy days lately shuffling my suitcases and precious Panda kitten from hotel to hotel and Derek and I house hunt. Before you think I’m writing a big complainy post, hear me out. Yes, moving rooms has been a pain. But–pretty much every day I wake up and praise Jesus for the miracle of living in Rapid City. Seriously…I cannot believe I get to live here. The thrill of living in the Dakotas still hasn’t worn off and I don’t think it ever will!
Okay. But back to the super special night ahead.
Remember Sam and Katie? Their home was flooded in May after an unfortunate plumbing issue. You can read about that here. Long short version is that the house had to be nearly gutted–and they hired me to help them restore it’s charm. My job included installing baseboards and trim, creating adorable house-age-appropriate window frames, helping choose paint colors, shopping for finishes, eating Dairy Queen on the deck, soliciting help from the church youth group, refinishing furniture, and making a million trips to Menard’s.
Rooms completely refinished include two bathrooms, living room, basement living room, deck. The kitchen was only half pooped but we restored that as well.
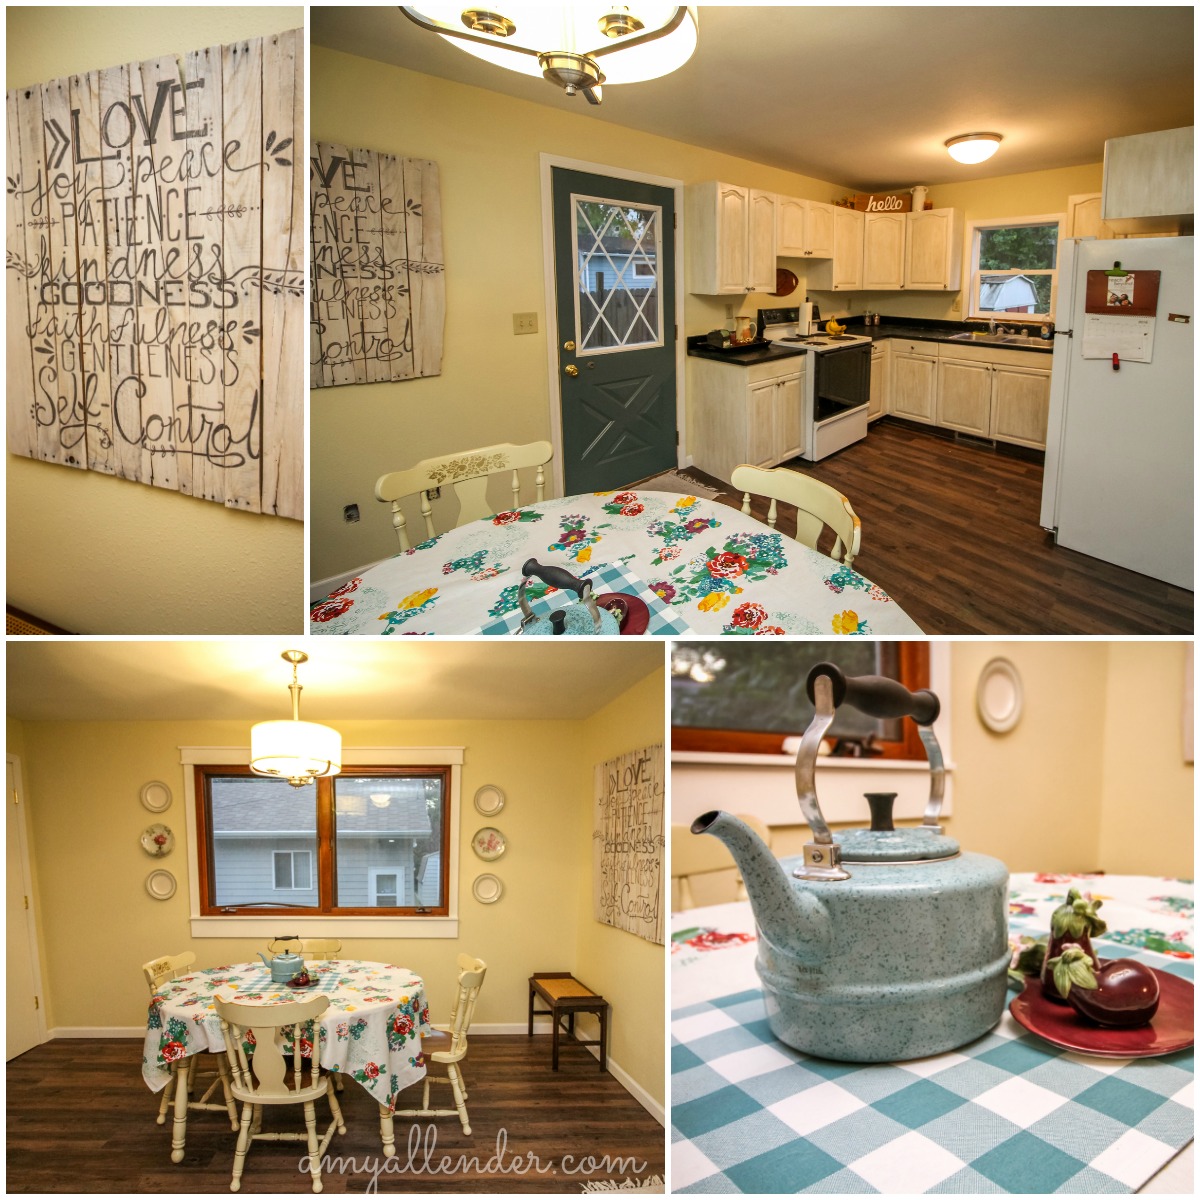
Fine…enough of me talking your ear off. Let’s take a tour!
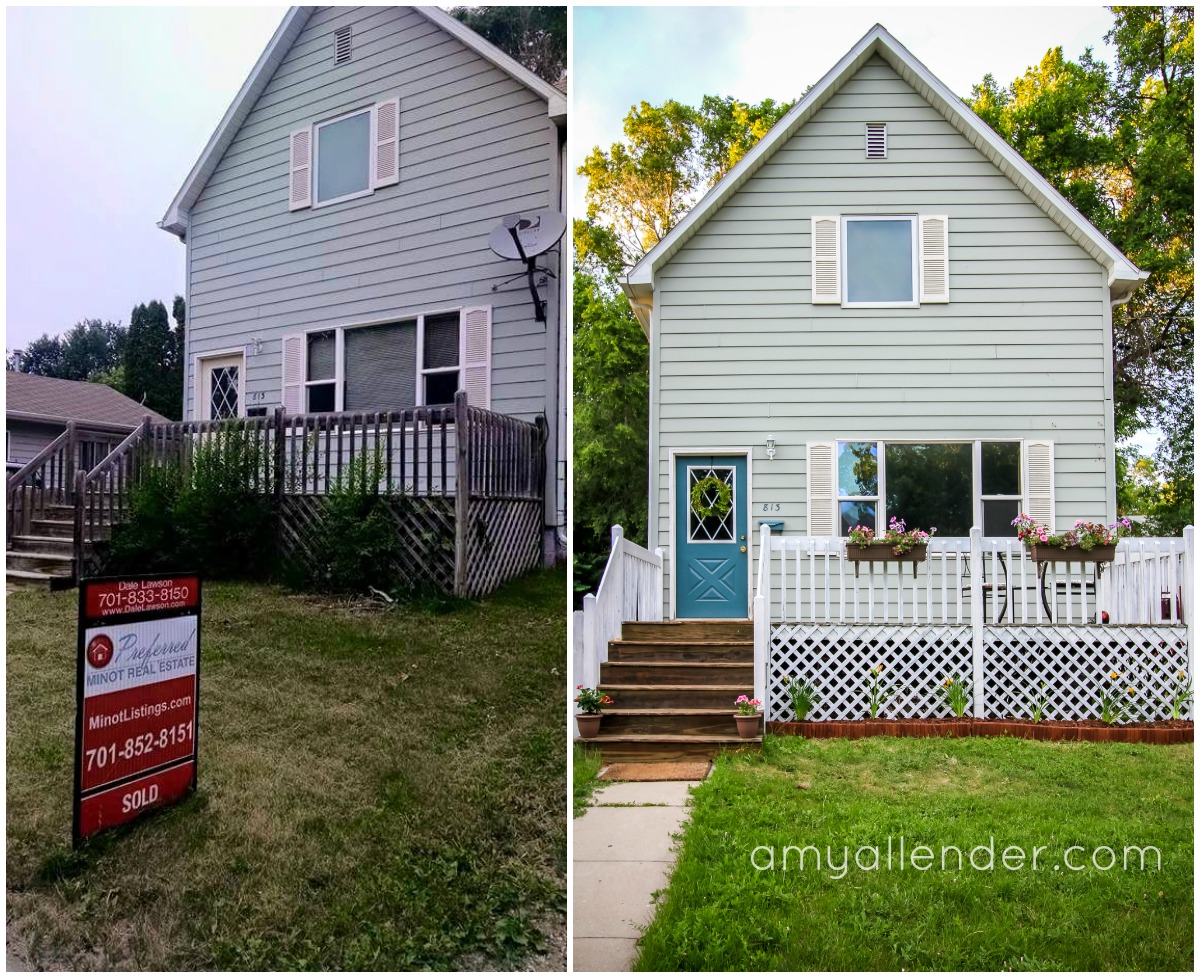
Let’s start outside. First of all, let me state that we didn’t paint the siding. The color shift is from a super cloudy night shot versus a sunny afternoon shot. What we did do–paint and restain the deck/lattice, upgrade landscaping, add window boxes to the rail, paint the door/mail box/house numbers, upcycle old kitchen furniture to deck seating.
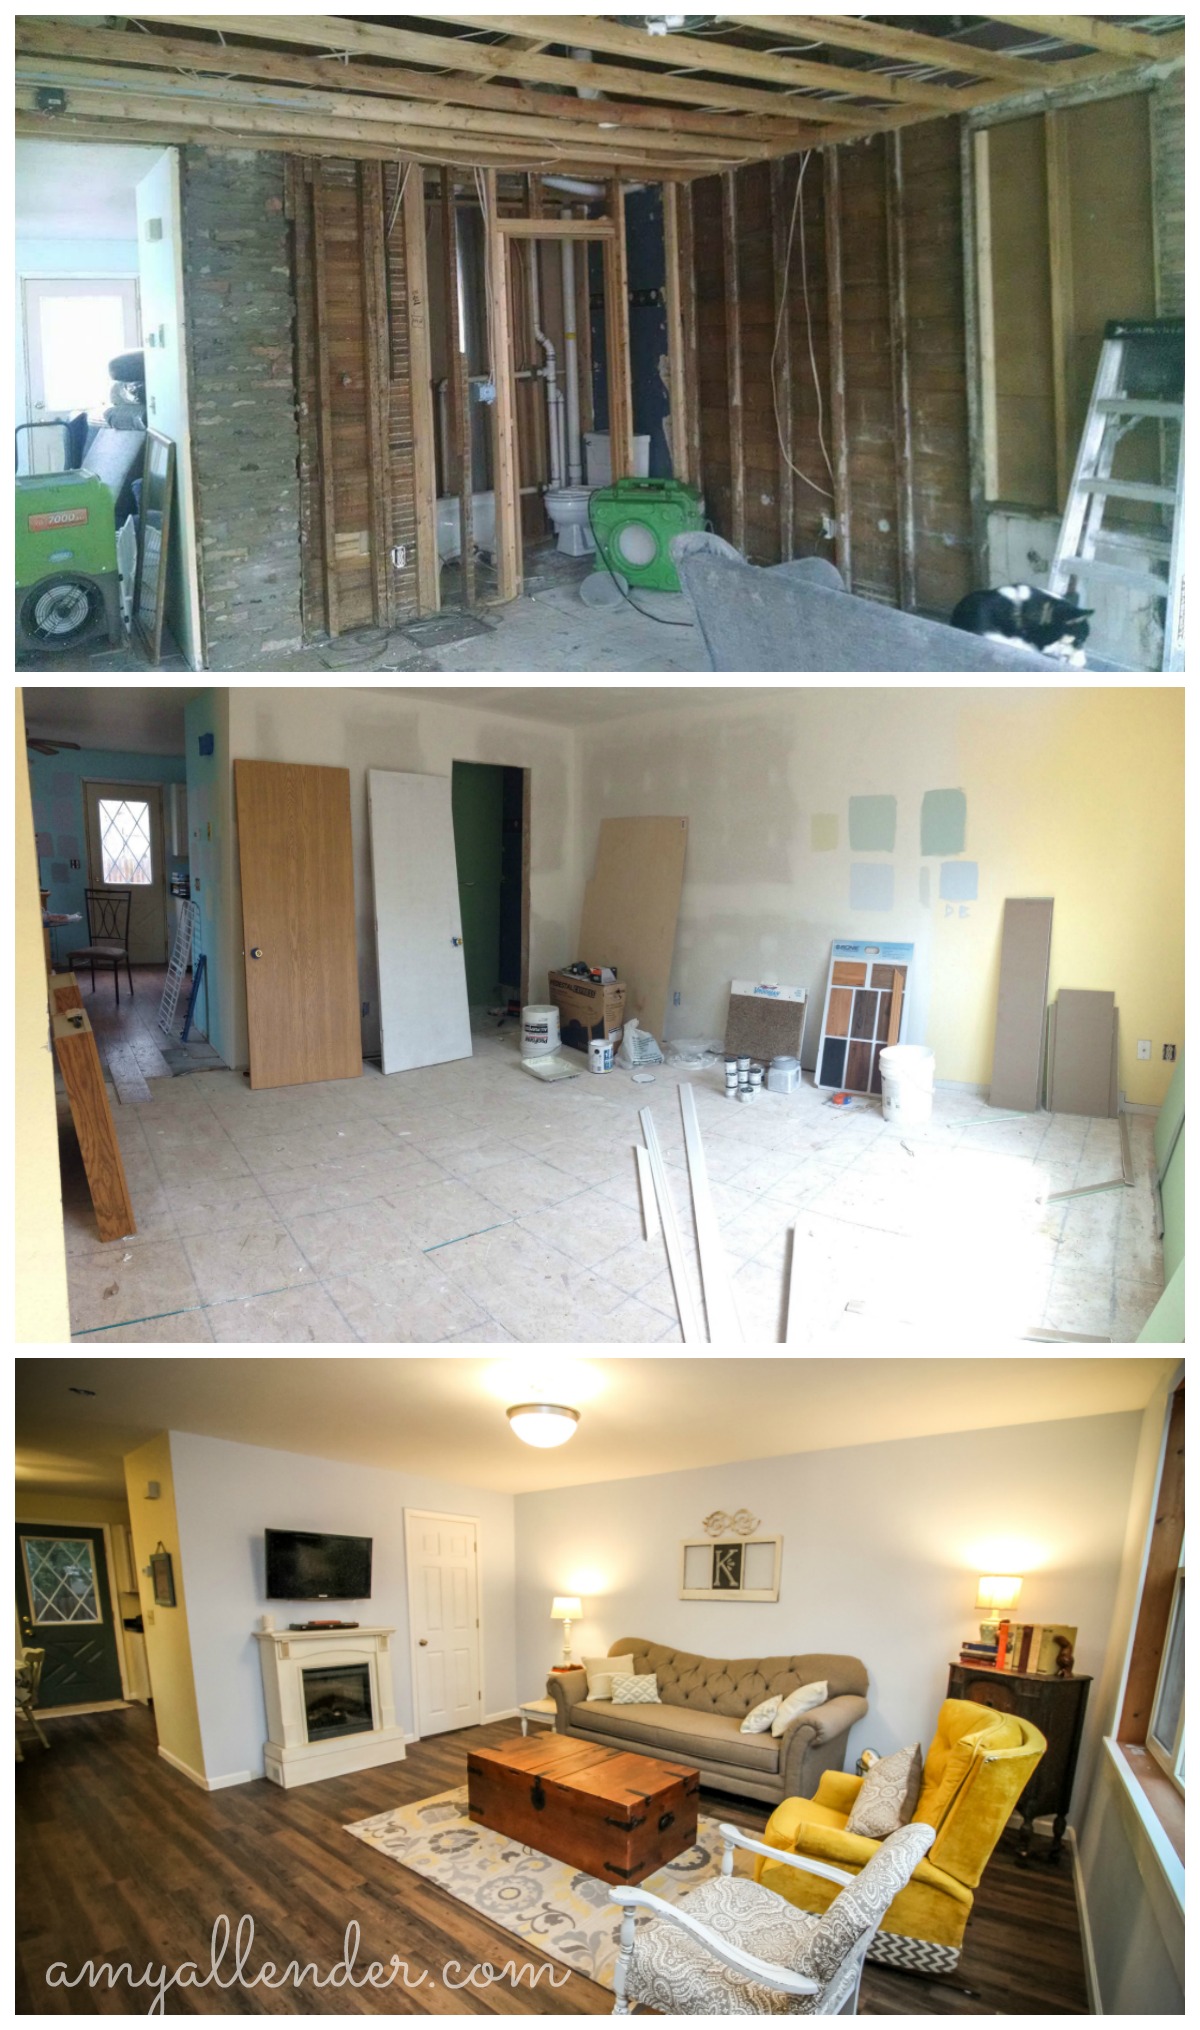
Living room? You got it! Look at this amazing transformation from gutted to completely finished! When Derek saw this photo just now he said, “Oh, is that their basement when it was gutted?” Nope. This is all photos of the living room.
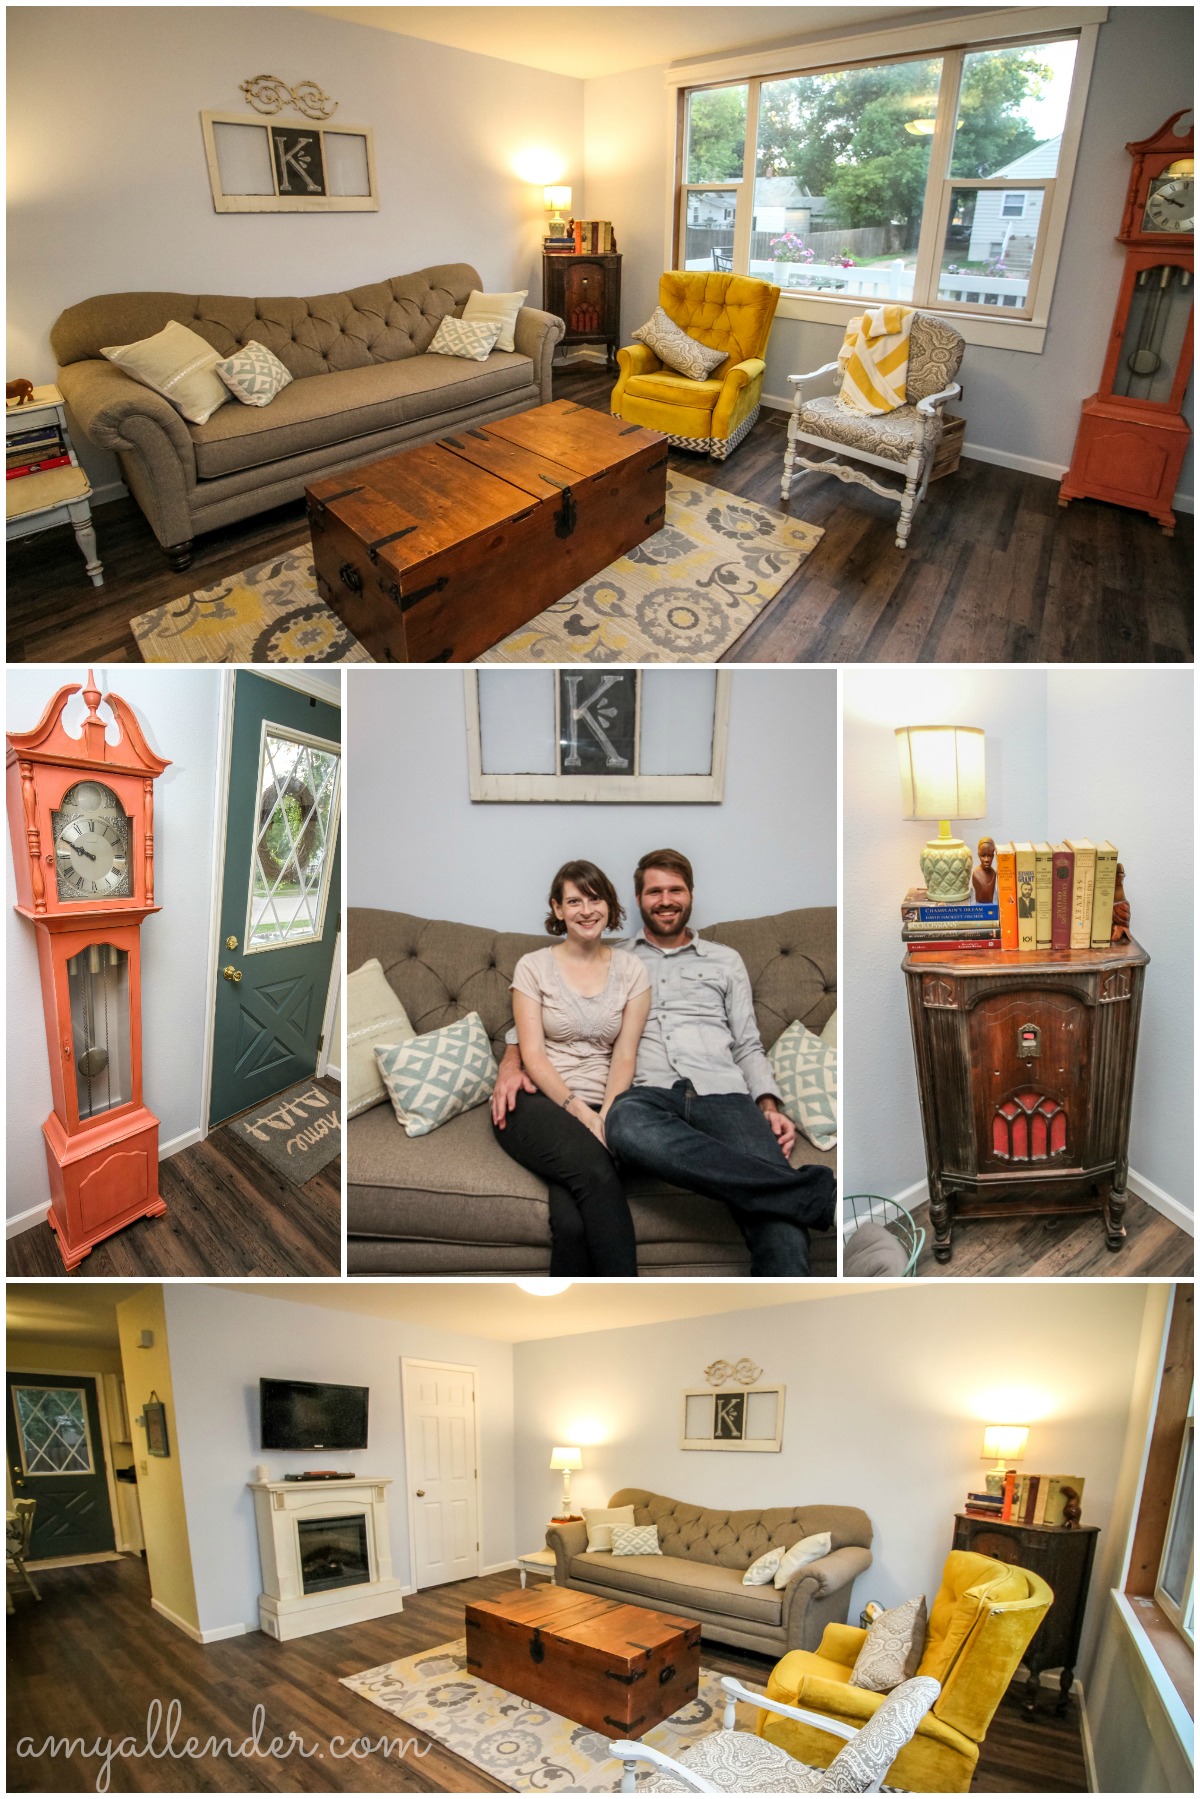
Since this is an old home, Sam, Katie and I wanted to keep it’s original charm–even though we were working with new materials {since the original finishes were a little soggy.} I think it turned out fabulous. Simple. It looks lived in. Classic.
Here’s a little list of what went down. Drywall {not by me.} Painting, new flooring {not by me}, craftsman window trim, baseboards, upcycled vintage radio to blue-tooth speaker holder {that’s like my favorite thing!! the old radio was totally gutted and Sam had the genius idea to use it to hold their speakers}, new lighting and lamps, refinished end table/fireplace/clock, reupholstered chair, cleaned up recliner, gallery wall.
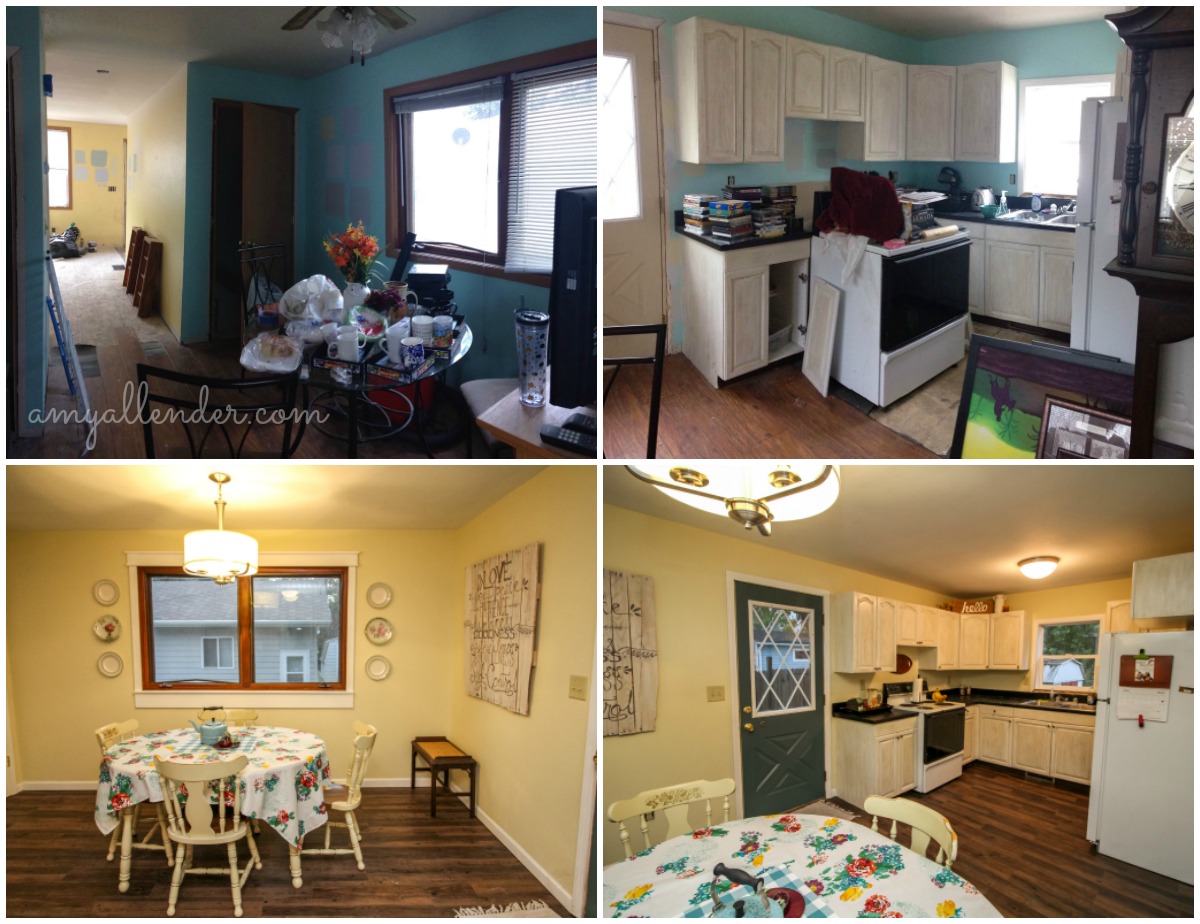
Next, take a look at the kitchen.
In the kitchen I added craftsman trim to the beautiful window, painted the door, hung new lighting, hung vintage plates on the wall and created a custom piece of pallet art. The room also got a fresh coat of paint and a new floor.
The bathroom where this whole project began now looks like this:
I didn’t have too much to do with this. Just a little help with the floor and paint. But it’s too pretty to leave out. Don’t you love that shower curtain?!
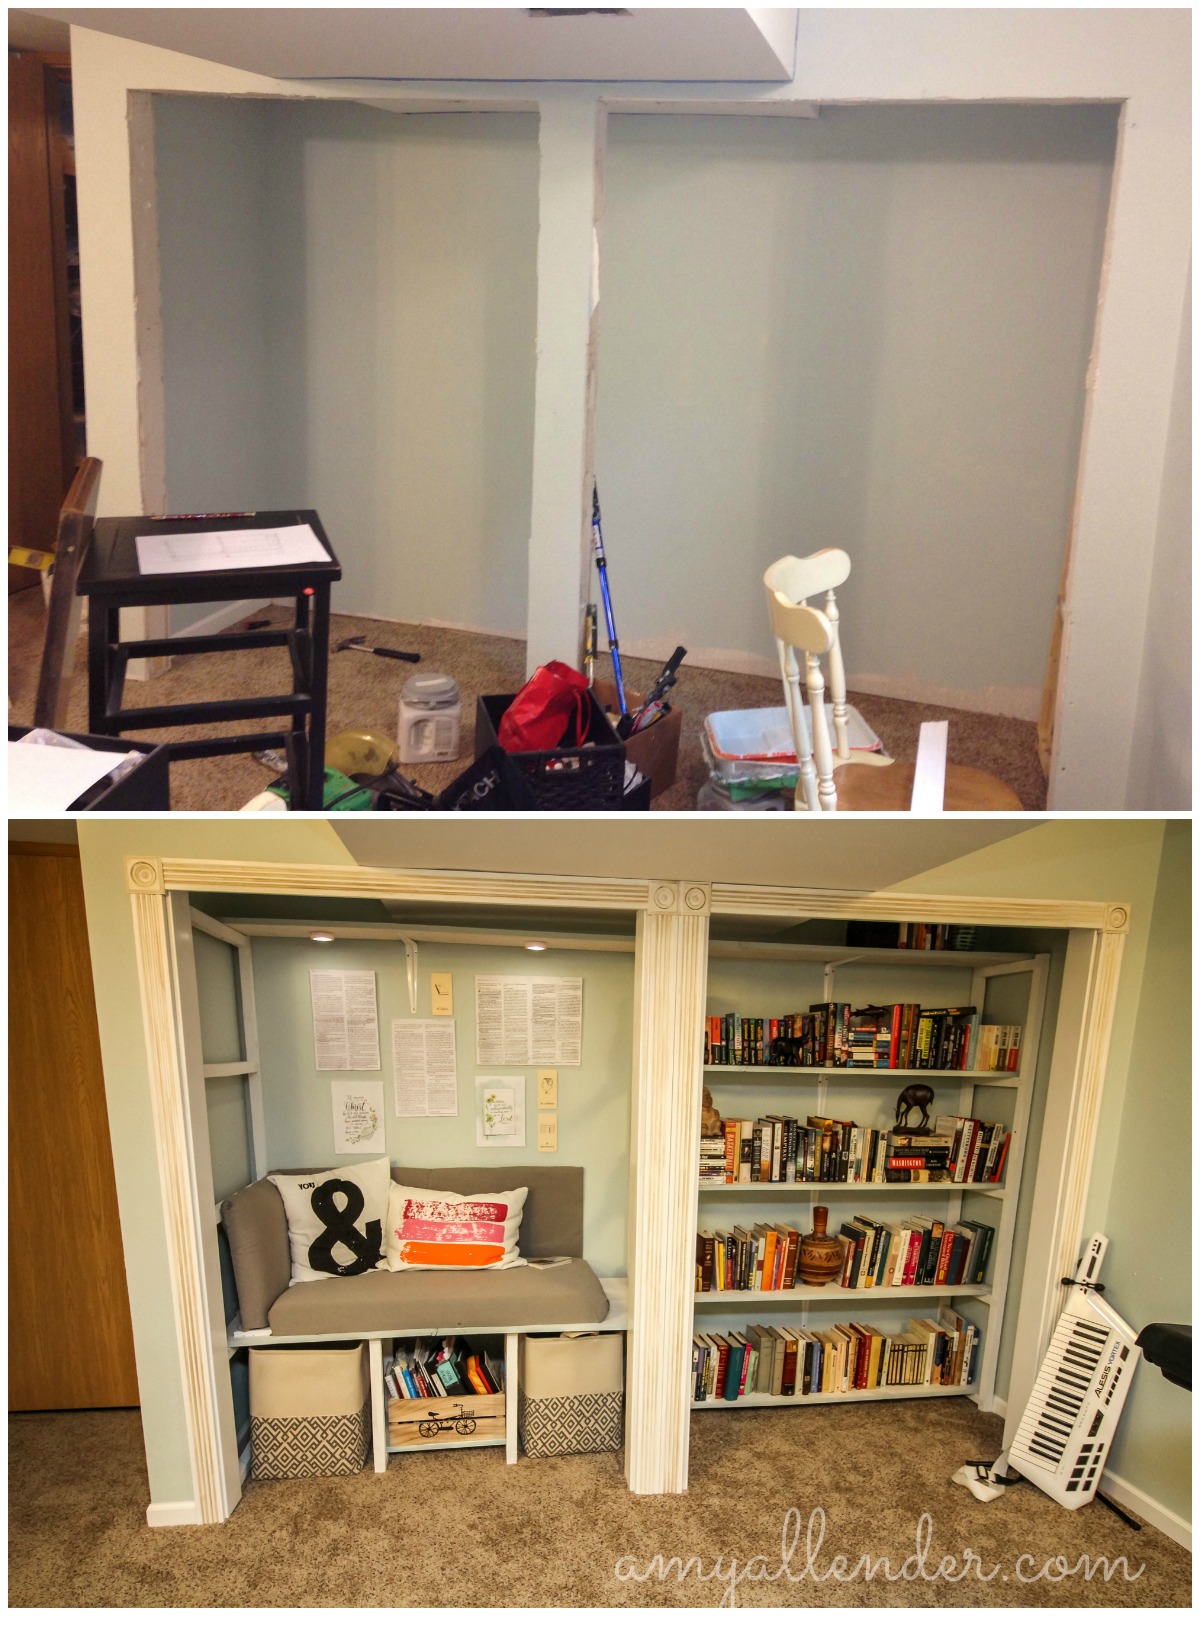
Last, let’s look at the basement. Again, the whole space was gutted. Unfortunately, I forgot to get a total before photo. This is an image of the old closet after the drywall was finished.
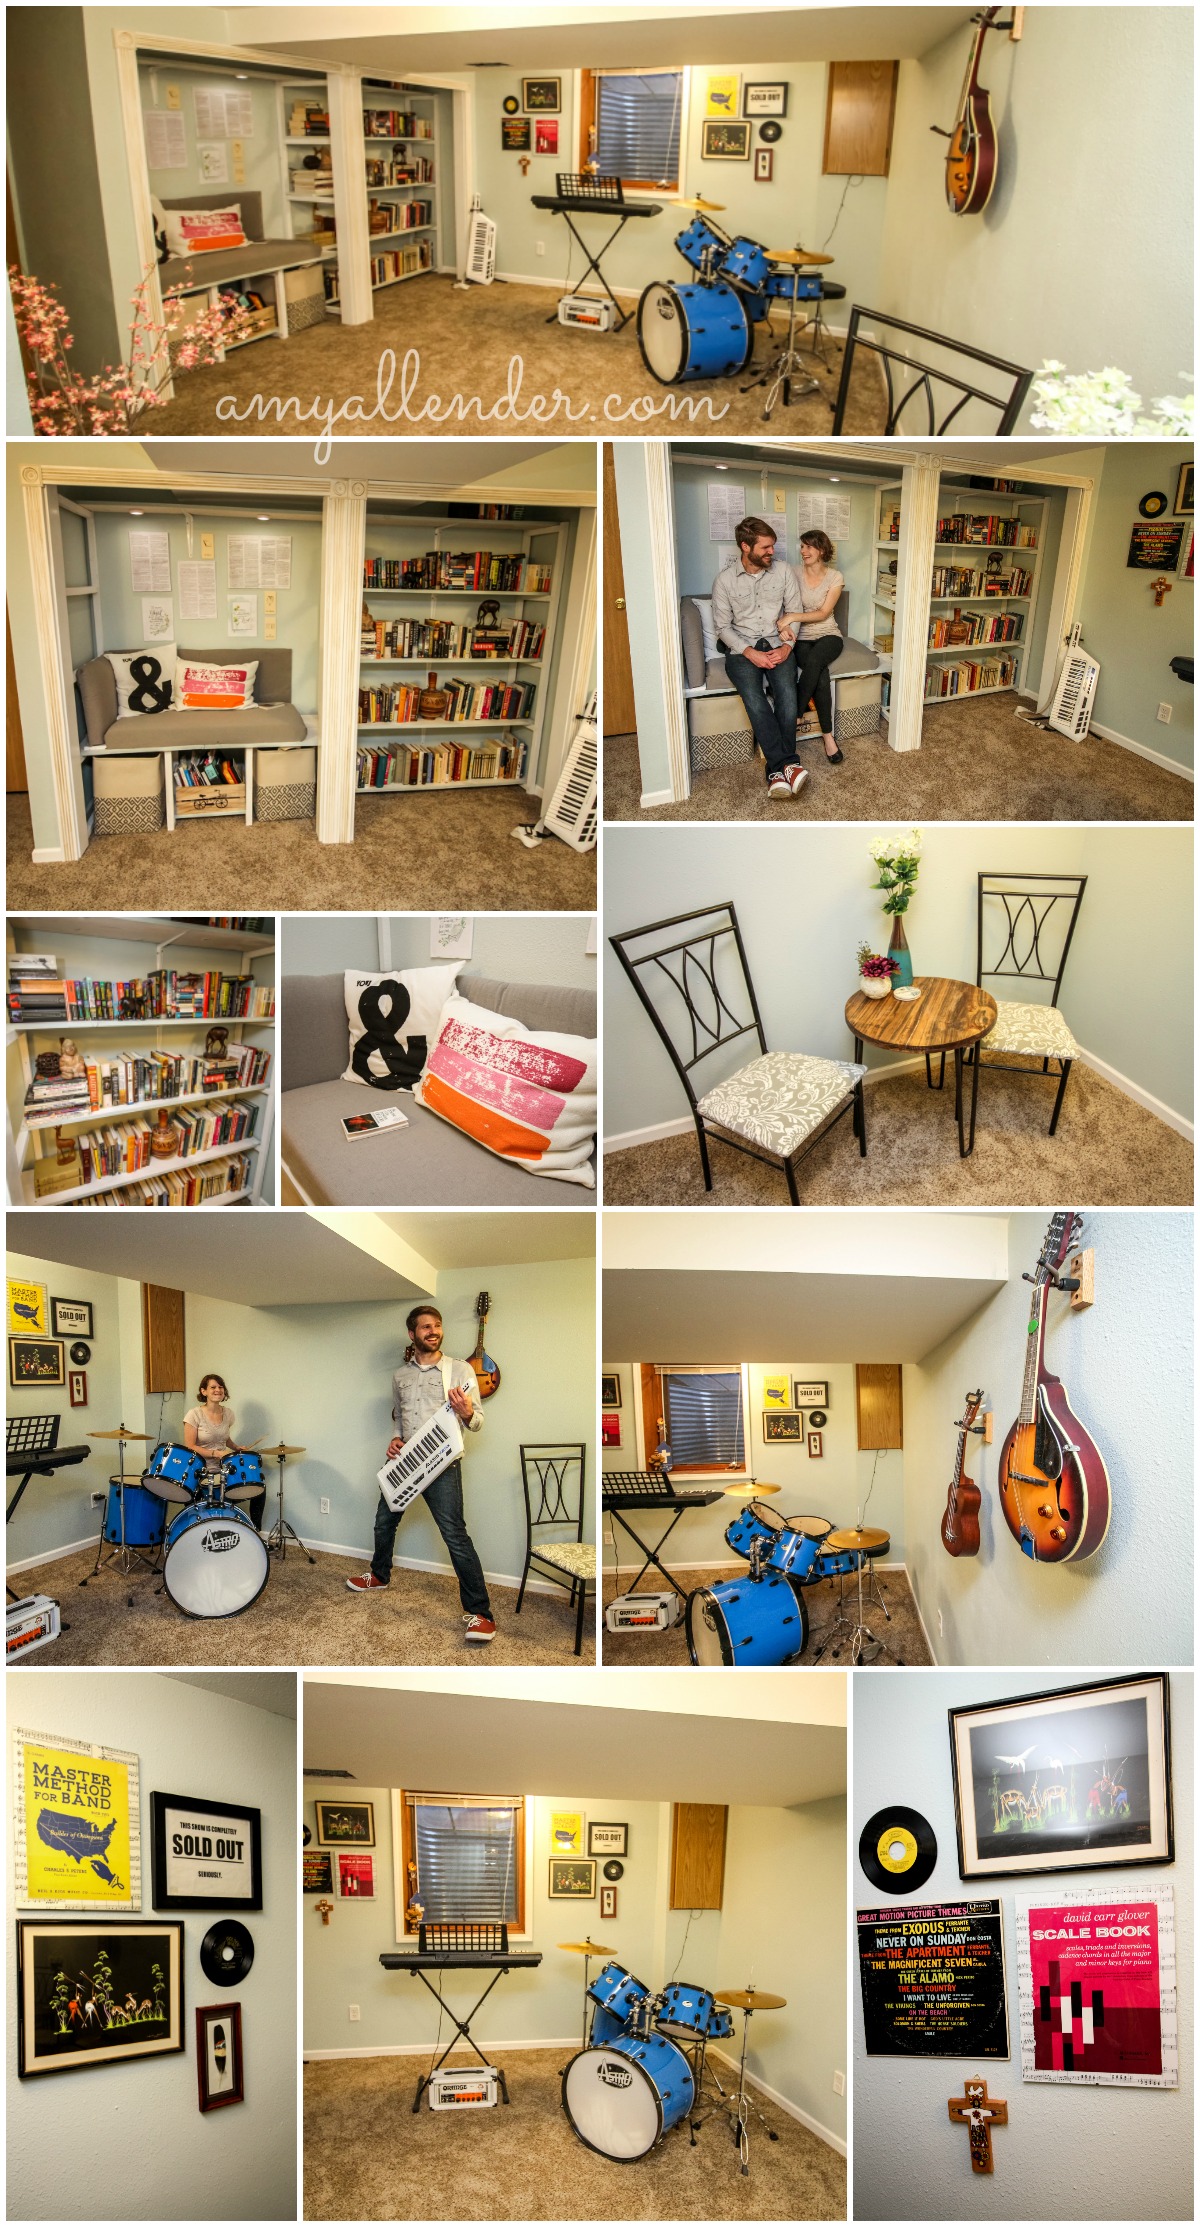
Sam and Katie like to read, so one thing they requested was space for their books. Since this space was not going to be used as a bedroom, I converted the standard closet into a book nook. This gave them space for their library, a quiet place to read, and a cool place to hang out when the youth group kids come over.
These two are also super musical–so it was also important to give them space for their instruments. So in addition to the book nook, this room acts as a space for them to practice their music and play music together. I think their basement totally delivers. It’s a perfect harmony of books, music and quirky style. All paired with lots of storage and {of course} pretty finishes.
There you have it. Isn’t it just the cutest??! Every time Katie posts a photo on Facebook I just stare at it because the place is so pretty. I loved working with the homeowners to create a finished project–but I mostly loved this project because it let me work with friends!
Tonight I’ve got more from Katie and Sam’s place. If you have a piece of furniture sitting around your house that you have been itching to paint, but are too nervous to dive in…read this post. I’ve used lots of refinishing techniques before…but tonight I’m telling you about a product I just tried that is simple to use and left me with fab results.
I really wanted their home to have a “lived in” look to it, which was kind of tricky…because on many of the rooms we were starting from scratch and building something totally brand new. One thing that really helped give their rooms some character was refinishing and repurposing pieces that they already owned {like that rad grandfather clock} and selectively buying new or new-to-them pieces that looked like they’d been around a while.
Through the process of creating that lived-in look…I refinished a lot of pieces. This was super fun and a great learning experience. I didn’t tell them at the time…but I kind of guinea pigged with their items–trying new techniques and products to see if I could unearth a new product that I loved. And I did!
I could write an absolute love story about how much I adore Zinsser and Rust-oleum products. If you read my blog, you probably know I’m in love with these product lines. So when I was at Menard’s {my home away from home} for the zillionth time that week…and a new, pretty end cap featuring a new paint line from Rust-oleum caught my eye…I was immediately itching like a kid with pox for a project to try it out on.
The product feature was a display for Rust-oleum’s “Chalked” paint line. It’s pretty, chalky colors that go on with the tenacity of chalk paint and dry to a smooth, chalky finish {something that hides flaws much better than a high gloss coating.} Paint comes in brushable cans that can be tinted to lots of colors or sprays that come in limited colors.
When Sam told me that he wanted their fire place painted {because he, like lots of us hates clashing wood tones} I knew this was the perfect opportunity to try out that Chalked line. I loved it. It was so easy to use. It turned out great. If you are thinking of refinishing your first ever piece of furniture…I highly recommend starting with this line–it was that easy to use and the results were outstanding.
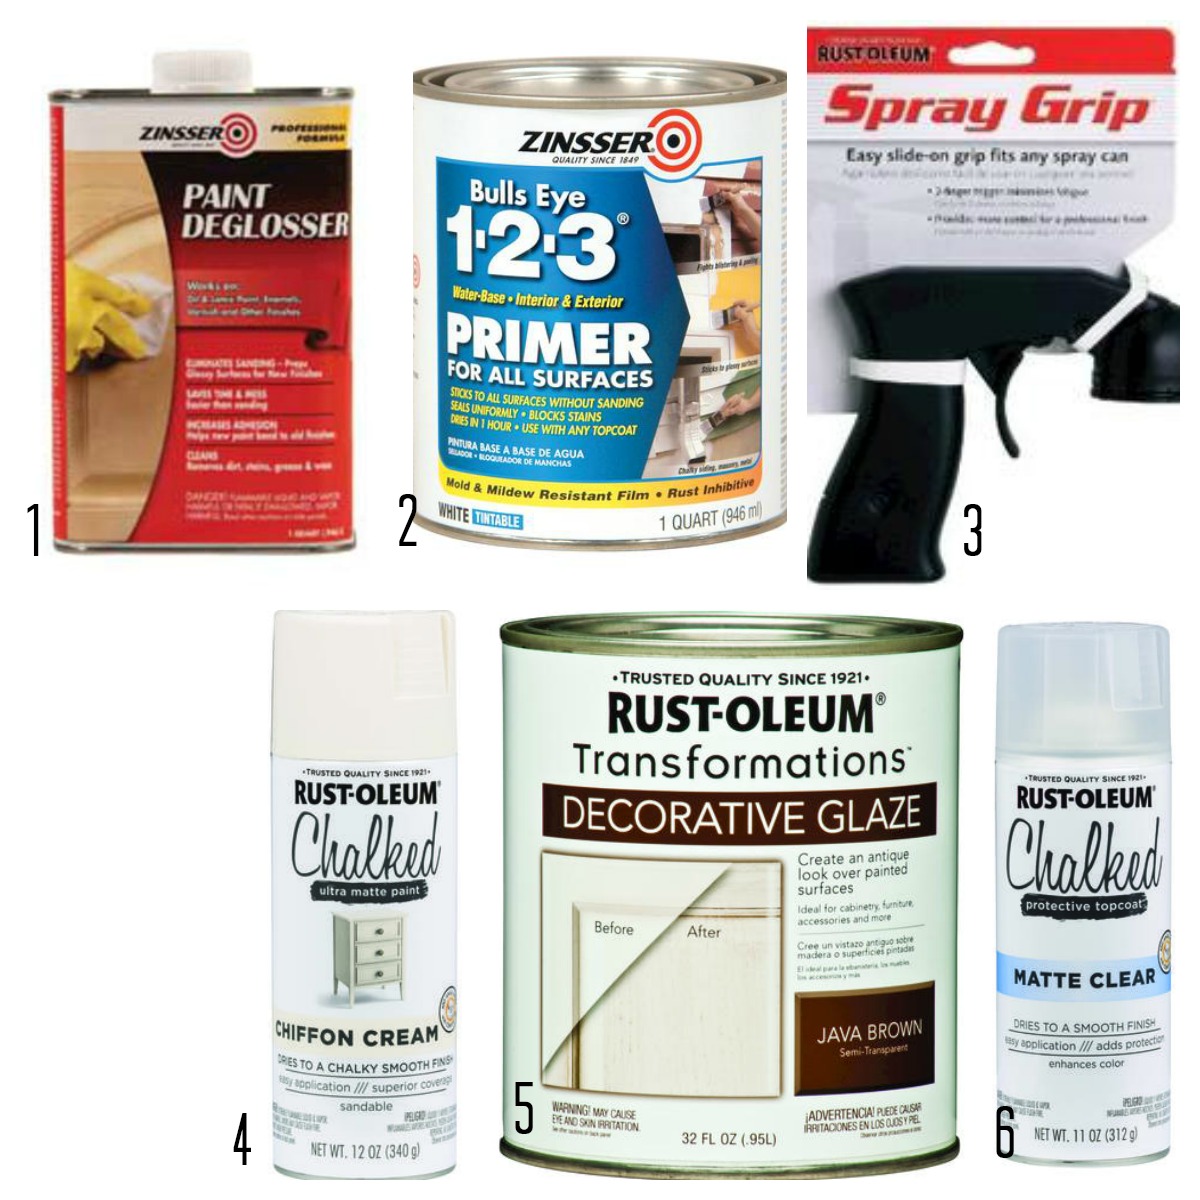
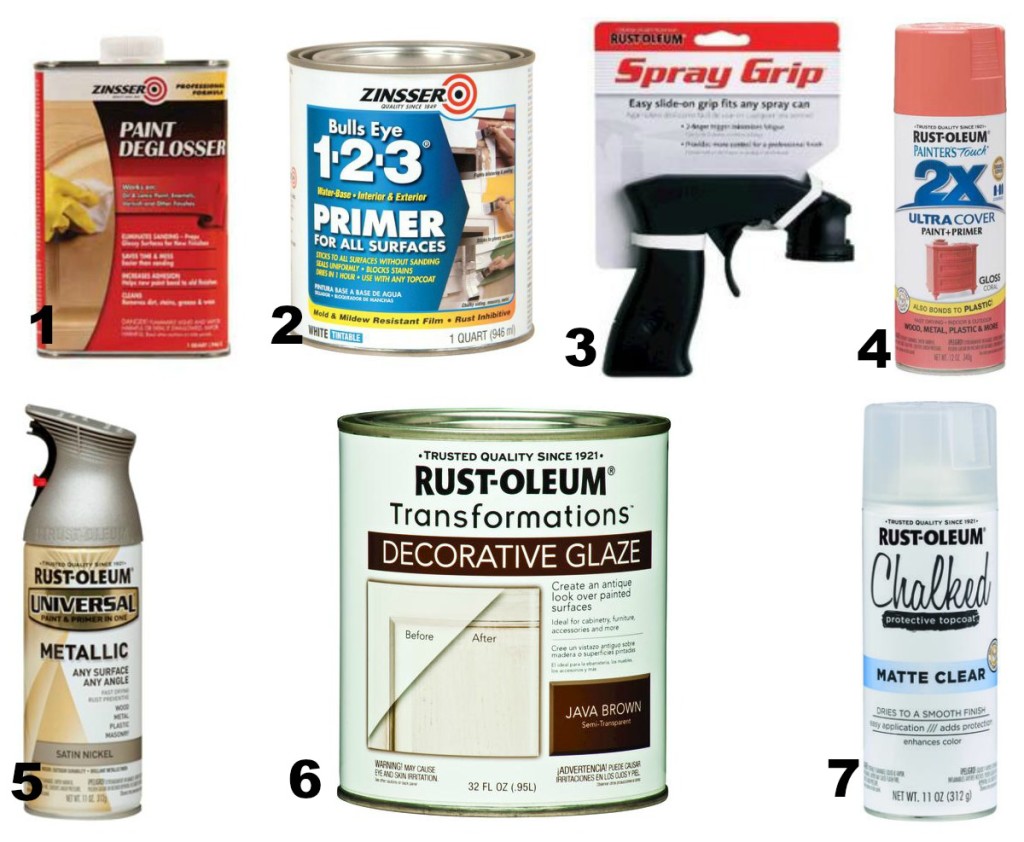
Here’s what I used. If you read the post on the grandfather clock–a lot of this will look familiar. Once you’ve got the basics you’ll be set to refinish lots of pieces!
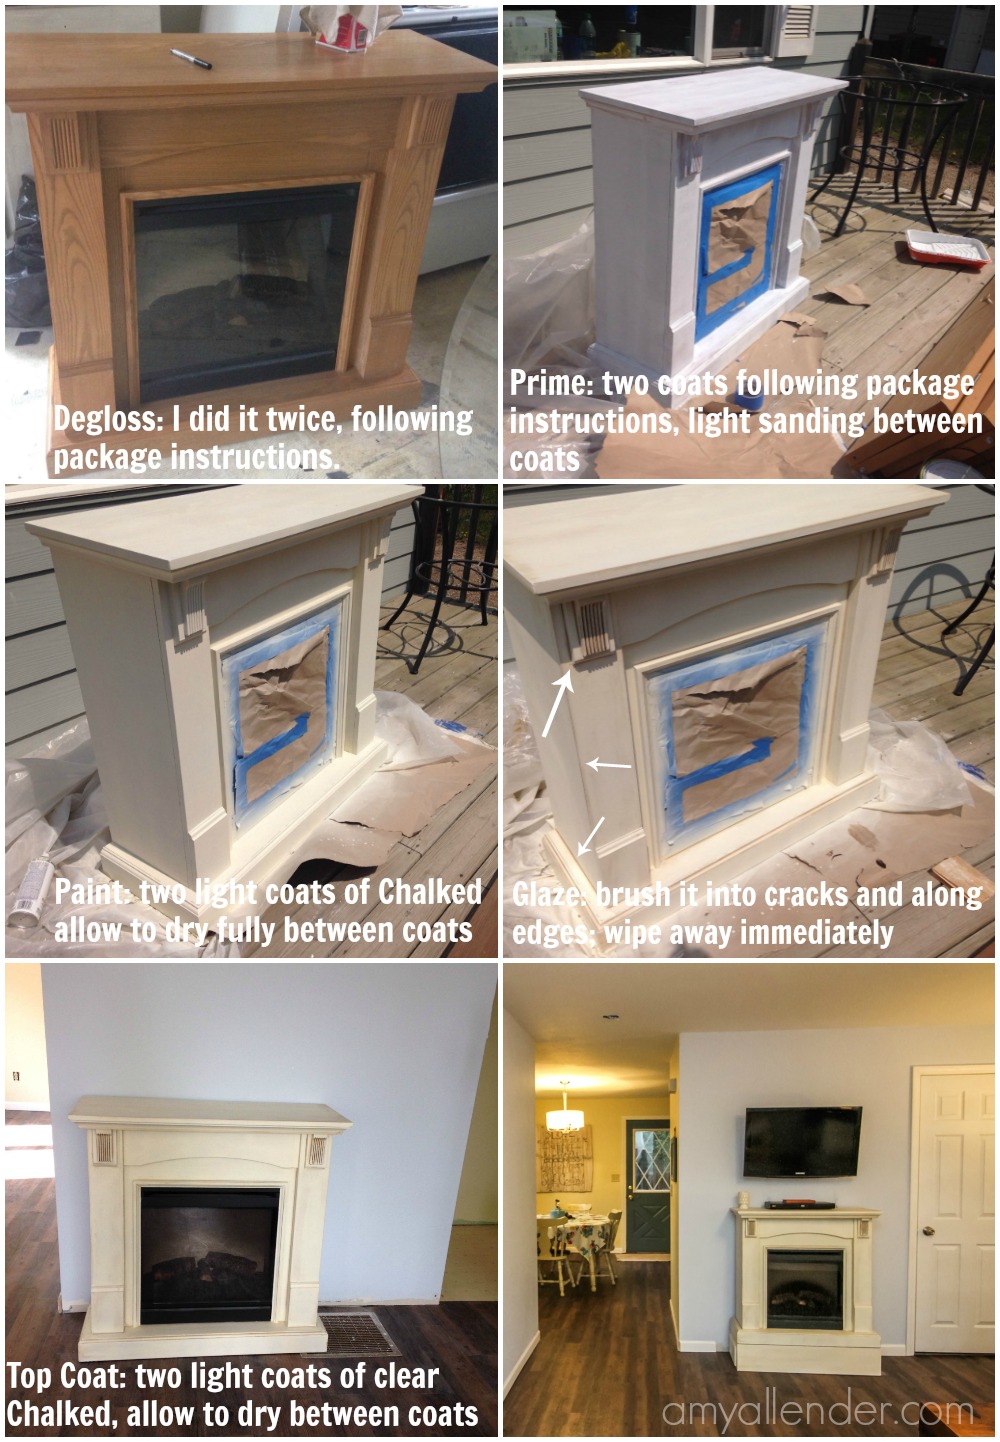
Zinsser’s deglosser. This strips away and dulls furniture’s existing finish so you can repaint without sanding or fully stripping a piece.
Bull’s Eye 1-2-3 Primer. Although chalk paints claim to go on smoothly without primer or any kind of surface prep–I’ve always found that laying a base coat is a good idea. Your paint will go farther and the finish will adhere better.
Chalked in Chiffon Cream–When painting a piece of furniture “white” I always opt for a cream or off-white option. It hides dirt and feels less stark.
Java Brown glaze–I had this left over from my cabinet redo several years ago. A little goes a looong way. You can also use wood stain if that’s more readily available to you.
I tried something new tonight–putting the instructions right on the image. Do you like? I’m kind of torn.
At any rate…it’s just that simple. Follow all the instructions on all of the packages. Do this all in a well ventilated area–or outside on a not-windy day…it’s pretty smelly, and it’ll dry faster. I promise you. If you can follow instructions, you can do this.
The trickiest–most artistic–part is the glaze. But even that isn’t too hard. I think glazing pieces makes a huge difference. Look at the difference between the painting and glazing steps. The glaze defines all the cool detailing on the mantle. Suddenly, the ridges and grooves that were all but lost when it was naturally finished stand out like the star of the show.
If you are spray painting something with a glass front–like this–be sure to fully tape/paper it off so it doesn’t collect spray dust. Let ‘er dry and bring it inside.
Have you used Chalked? What did you think? Is there a product you’ve tried and loved? If so…I wanna hear about it! {And NO–Zinsser and Rust-oleum don’t give me any bribes for plugging their products. I just genuinely love them.}
I start lots of thoughts and stories with the phrase, “Here’s the thing…” And as hard as I’ve tried to think of another way to start this post, I just can’t. So…
Here’s the thing about really gutsy accent pieces. I find them very easy to create for other people…and I’m terrified to make one for myself. Is this because I’m a safe person? I don’t know. I don’t think my mom would use “safe” as the first adjective to describe me. It’s probably that at heart I’m a big scardy cat of commitment. In my house, I stick to what I know–white, white and more white. Or–I just leave a piece untouched and spend months years mulling over what color to paint a ratty old chair.
BUT–I’m a lot more brave when it comes to other people’s things. Especially if they are confident, and bold, and hip enough to want a funky accent piece. Which is exactly the case with Sam and Katie.
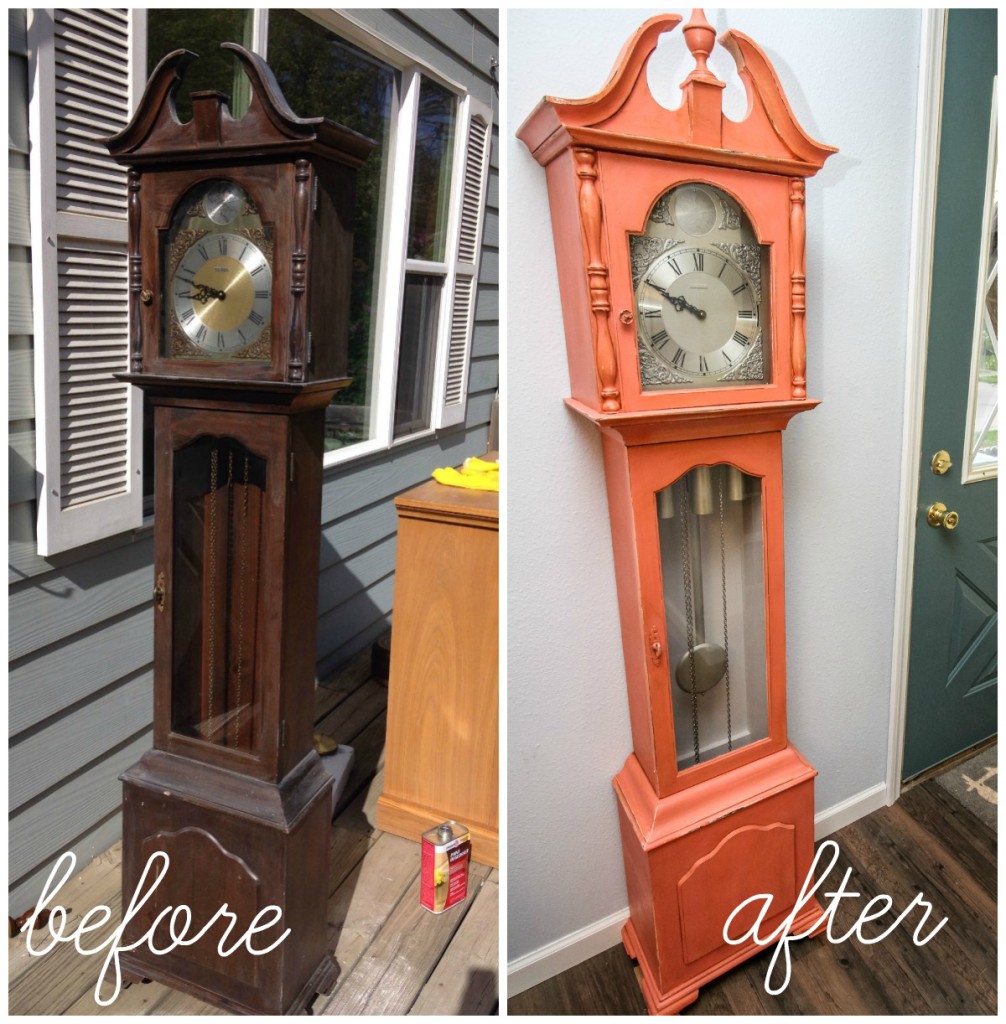
Here’s the other thing–usually it’s the wife who wants furniture painted, and the husband is all, “…that’s real wood! You can’t paint that. I like how it is…” Not in this house! In this case Sam was the big, bold, furniture-painting, color-popping machine. When he told me they had an old grandfather clock that he wanted painted in a quirky color, I knew it’d be a fun project…but never in a million years did I imagine just how fabulous it would turn out. I think the moment when the last bit of paint was dry on this bad boy and I peeled off the last scrap of tape was a momentous moment in my life: It was a moment when I shed a little color fear and my eyes were opened to just how awesome something totally bold can be.
This is one of my most favorite things ever. For real. I want to make one for myself. Or steal theirs. Luckily–it was pretty easy. Here’s how we did it.
Shopping List
Here is a handy list of all the supplies I used on this project. I got them all at Menard’s {who should really be sponsoring this blog because I love them so much and I give them a lot of free advertising.} But I’m sure you can get most of this stuff at your local store.
I’ve conveniently listed the supplied in the order they are used. Just use one after the other {follow all package instructions} and you’ll be good to go. Click the links and you’ll be taken to the Menard’s product page.
Paint deglosser from Zinsser {I love their products and trust them all.}
Chalked clear top coat {can you guys tell I’m a huge fan of Rust-oleum?}
Find Your Piece
Step one is choosing a cool piece to accent. The clock came out especially cool because it’s a very classic and formal piece in a totally unexpected color. That kind of juxtaposition makes for a great accent. They had this clock sitting around. They didn’t love it. It wasn’t getting used or looked at. It was a little beat up. It was not a family heirloom, so if it got messed up, they wouldn’t be heart broken. All these factors add up to a good make over piece. {Especially for a beginner.}
Don’t Skip Steps
If you want your paint project to last, don’t skip steps and definitely don’t skip prep! For something that’s not going to get touched very often, or treated roughly you have a little more leeway. Since the clock probably isn’t going to endure a lot of abuse, using mid-grade products and prep will do just fine. For something that will see heavy traffic–like a dining table–you’ll want to go to extremes to make sure your finish isn’t going to chip off.
First I dissembled the clock as much as possible–be super careful with the springs and gears, though! Carefully remove the head and doors and finial. Take out the weights and protect anything that you don’t want painted with tape or paper.
Next, degloss the whole surface. Grandfather clocks are typically pretty shiny/glossy. Dulling that surface down will give you a clean surface to work with–and will help the paint adhere better.
Prime all your pieces using a brush. I did two coats of primer and a light sanding afterward to get rid of any drips or brush lines.
Now spray paint your surface. Seriously, get one of those spray nozzles if you don’t already own one. In my ideal world, I would have been able to find a matte spray paint in the color we wanted…but it didn’t happen. The end result of my spray painting left me with a very shiny, very Barbie-pink clock. To tone it down I added a few extra steps:
After the pink paint had dried {you might need two coats}, I went over the whole piece with deglosser again to get rid of the shine–just don’t rub too hard, or you’ll strip the paint. Then I sanded down the edges of the details {any curved piece, sides of doors, etc} to add a little wear to it and expose the dark wood tone below. Finally, I used the glaze to bring out the detail even further. Using a small paint brush, brush glaze {or use wood stain} into the crevices of the piece–then immediately wipe out the excess…leaving dark stain or glaze in the cracks. I also brushed and wiped glaze off of the sides of the clock to tone down the color a bit.
Then…while all that was drying, I went to work on the inside of the clock. We painted the inside using one of the paint samples that was not chosen for the living room walls {see discussion on paint samples here.} I sprayed the weights satin nickel, and carefully taped off the wood and also sprayed the face of the clock–the gold just didn’t seem to fit with the funky new color.
After it’s all dry, move it inside and bask in the glory of your clock. Awesome, right?
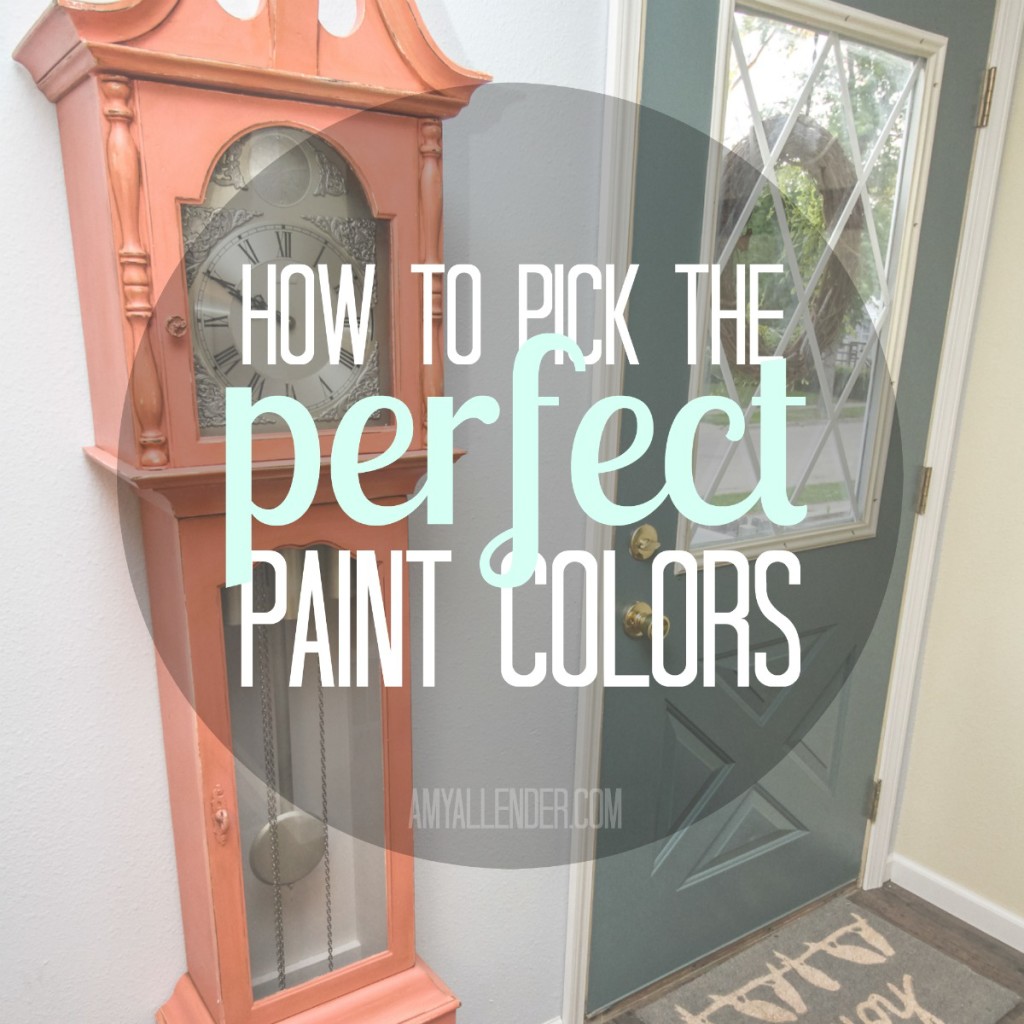
Can you tell me how to pick paint colors for my house?
Man, oh man, oh man, oh man. This is a million dollar question that I get asked all the time. And by million dollar–I mean, if I got paid a dollar each time I’ve been asked how to go about picking paint colors without regret…I’d probably have a million by now.
Not that I get tired of fielding this question. It’s valid. And picking paint colors is super stressful! {At least for people who are afraid of commitment…like me.} If you’ve ever picked a color, and disliked it as you were rolling it on the wall, telling yourself, “Maybe I’ll like it better when it’s dry…” Or, “It’ll look better when the whole room is painted…” only to hate it even more once it’s dry and once you’ve dedicated a whole weekend to painting–you know the pain of picking poorly. If at all possible, it’s best to avoid that situation all together. So here…is my very best advice for picking colors with no regrats….I mean, no regrets.
As you may remember, I started telling you about Sam and Katie’s house. Long story short, there was an epic indoor floor and I was lucky enough to come on board {ahoy mateys!} to help with the recovery process. Since everything was ripped out {see before photos here} they had to start from scratch and pick wall colors for pretty much all their walls. Since their project is fresh in my mind, we’ll use them as an example.
How to pick paint colors | Five easy steps
1. Know Yourself.
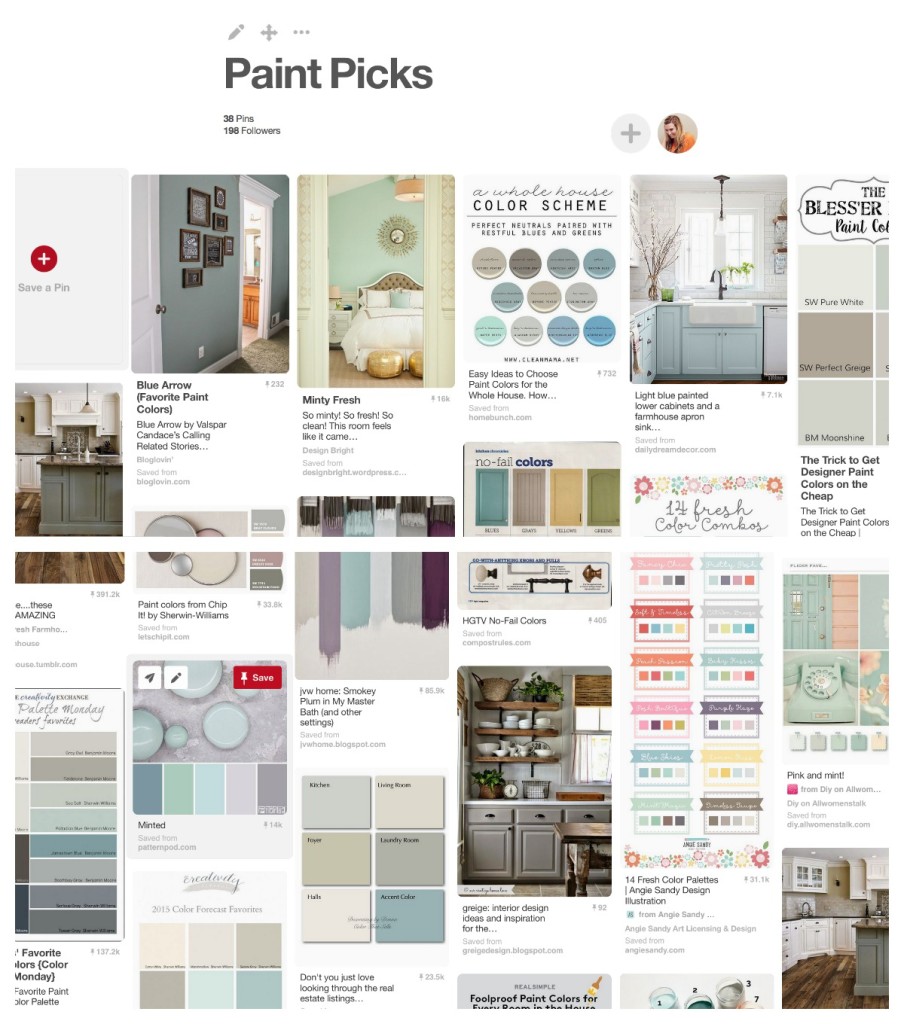
This is key when picking paint. Just know what you like. If you gravitate toward cool colors–stick to that. If you love white and cream and gray in sweaters and typeface and accessories, you probably aren’t going to love waking up to a burnt orange bedroom. If you are completely indecisive, get to know yourself. Spend time making a Pinterest board {yes, I’m giving you this assignment.} Pin any room that you think has a pretty color. Pin cabinets that you like. Pin anything painted that strikes your fancy. Don’t look back at the board until you’ve got a bunch of pins. Chances are, you’ll see a theme. Proof? Here’s mine. See a trend? And if you wanna cheat, you can just follow my board here.
2. Take Out the Guesswork
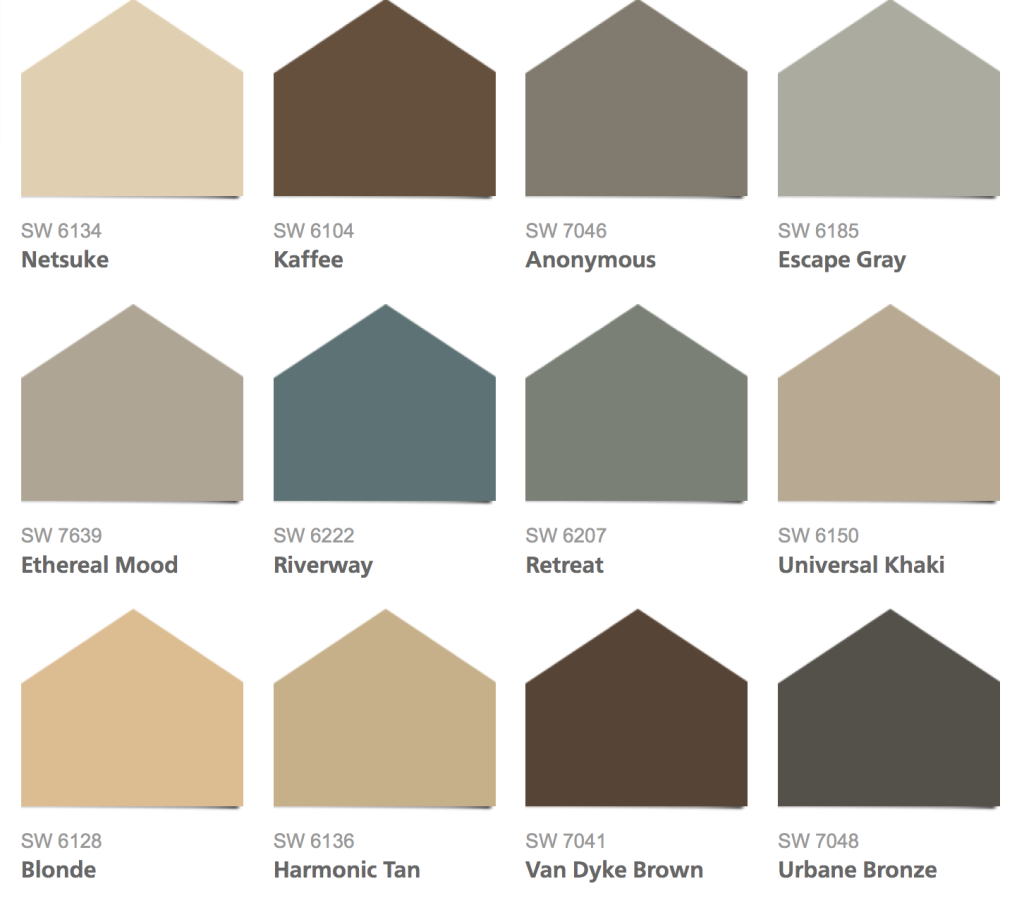
Once you kind of know what you like you need to find some paint. If you walk into a home improvement store and approach the rainbow wall of chips, you’ll soon see that liking “gray” isn’t as concrete as you once thought. Suddenly there are cool grays and warm grays. There’s sidewalk, and moonlit path, and ethereal mood. Take some of the guesswork out by going to a paint store–where the employees deal only in paint. {I love Sherwin Williams for this.} There you’ll easily find color pallets, premade, just for you. See SW’s color pallets here. Pick the one that has colors most similar to your pinterest board. Colors within the pallet are all made to look good together, now it’s just a matter of picking your favorites.
3. Don’t Trust the Pictures
Paint pallets will often come with images of the paint color used in staged rooms. These are a good starting point–but don’t trust the photos. Paint is keenly effected by light. The direction of light coming in to your windows. The placement of your lamps. The warmth of your lightbulbs. The strength of the sun in your zip code all effect how a paint color will actually look on your actual walls. It’s all very sciency and light wavy.
Photos in the professional images are made to look perfect with flash bulbs and perfectly controlled lighting. You probably don’t live on a photo set…so you’ll need to shell out a few bucks for some sample jars.
Samples cost money–true. But they could also save you bigger money on wasting a gallon of paint that you hate. So, get out the cash {they usually run about $5 each}. And don’t sweat the left overs. These are all colors you like anyway, so you can put them to use later on smaller projects. {I’ll show you how to use them next week.}
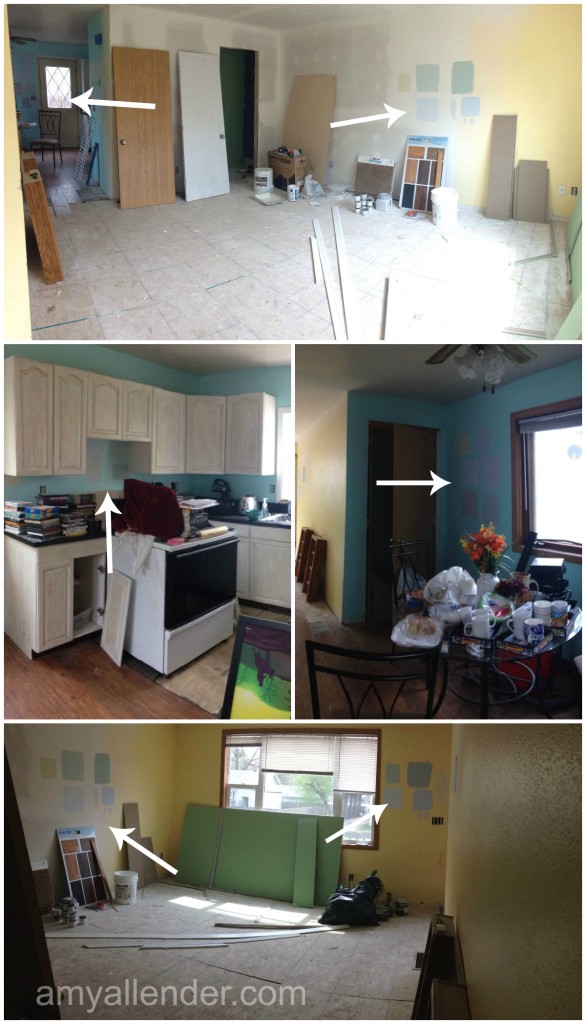
When you sample, sample right. Put up a big swatch of color on every wall in the room you’ll be painting. The color will look different on different walls. Keep track of what color you put where–I like to make a grid on the wall, and on a piece of paper. If there is a shadow {like under a kitchen cabinet} paint it there. If you can see from one room into another, paint where you can see the two colors coming together. You can see in the image above where we put samples for Katie and Sam. Once they are up–wait. Leave your swatches alone. Look at them in the morning. See how they look with your lamps on. See how you like them with over head lights on. Then decide.
4. Limit Yourself
A lot of variety is good sometimes. Like…in a workout routine or in ice cream flavors. When it comes to paint–limit yourself. Different paint colors will help define separate areas of your home–but too many colors will cause disunity and confusion, and an overall circusy feeling. And it’s a lot of work and a lot of left over paint.
I like to stick to about four colors in a home. You can go bigger if you like. But four is a pretty safe area. There is some repetition which lends continuity–but there is enough variety to keep it interesting. I like to play it safe when it comes to color commitment. Then I get gutsier with smaller, more mobile things…accessory accents.
5. Accent Colors
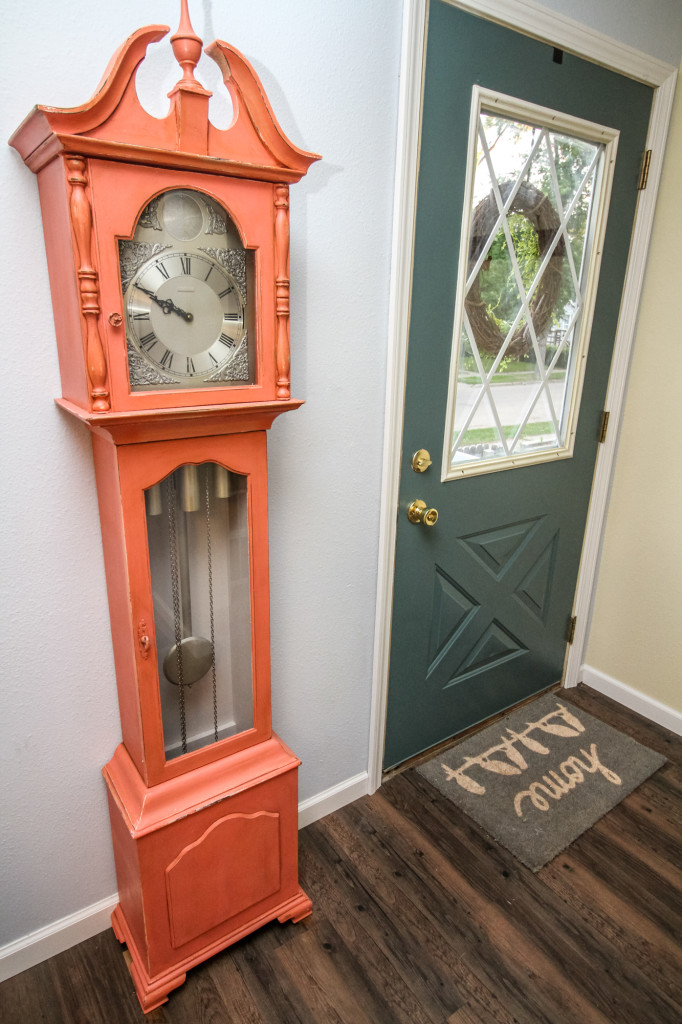
Once you’ve got your walls done you can think about accents. If you are aching for a pop of color, decide on where you’d like it. Do you have an old piece of furniture you’d like to paint? Perfect. This can be an accent! Wanna paint your bland, beat up door? Perfect. Paint the inside too!
Go through a similar process. Look at colors you like. Grab a paint chip {the paper with the color on it} and tape it to the furniture/door/area your accent will live. Give it a day or two before you decide.
If you don’t know where to start–start with a paint pallet…those often include accent ideas. Or make another Pin board. If in doubt, mustard yellow, peacock blue, and a toned down coral are always good “pop” pieces against a fairly neutral wall.
Happy painting! Did I miss anything? How do you pick your paint colors? Oh–and don’t you love that clock?!! I’ll show you how I made it happen tomorrow.
Renew your zeal for the Bible with three days of exclusive devotionals! Interesting and relevant writings and reflection questions will remind you why the Word of God is so awesome. You'll learn a lot and you'll leave excited to know God more and grow deeper in your faith.
Your kick-start is on the way!
You've always dreamed of reading the Bible in chronological order. Now you can!
Getting my printable PDF plan is easy. It's not fancy, but it does fold easily into a bookmark, so you can keep it close by and easily see what's coming next. I hope you find it as useful as I do.
**Remember to check your PROMOTIONS FOLDER. Even if your confirmation comes to your normal inbox, the actual download may come to that pesky promotions folder instead!**