by Amy | Aug 19, 2016 | Blog, The Art of Projects, the house

I start lots of thoughts and stories with the phrase, “Here’s the thing…” And as hard as I’ve tried to think of another way to start this post, I just can’t. So…
Here’s the thing about really gutsy accent pieces. I find them very easy to create for other people…and I’m terrified to make one for myself. Is this because I’m a safe person? I don’t know. I don’t think my mom would use “safe” as the first adjective to describe me. It’s probably that at heart I’m a big scardy cat of commitment. In my house, I stick to what I know–white, white and more white. Or–I just leave a piece untouched and spend months years mulling over what color to paint a ratty old chair.
BUT–I’m a lot more brave when it comes to other people’s things. Especially if they are confident, and bold, and hip enough to want a funky accent piece. Which is exactly the case with Sam and Katie.
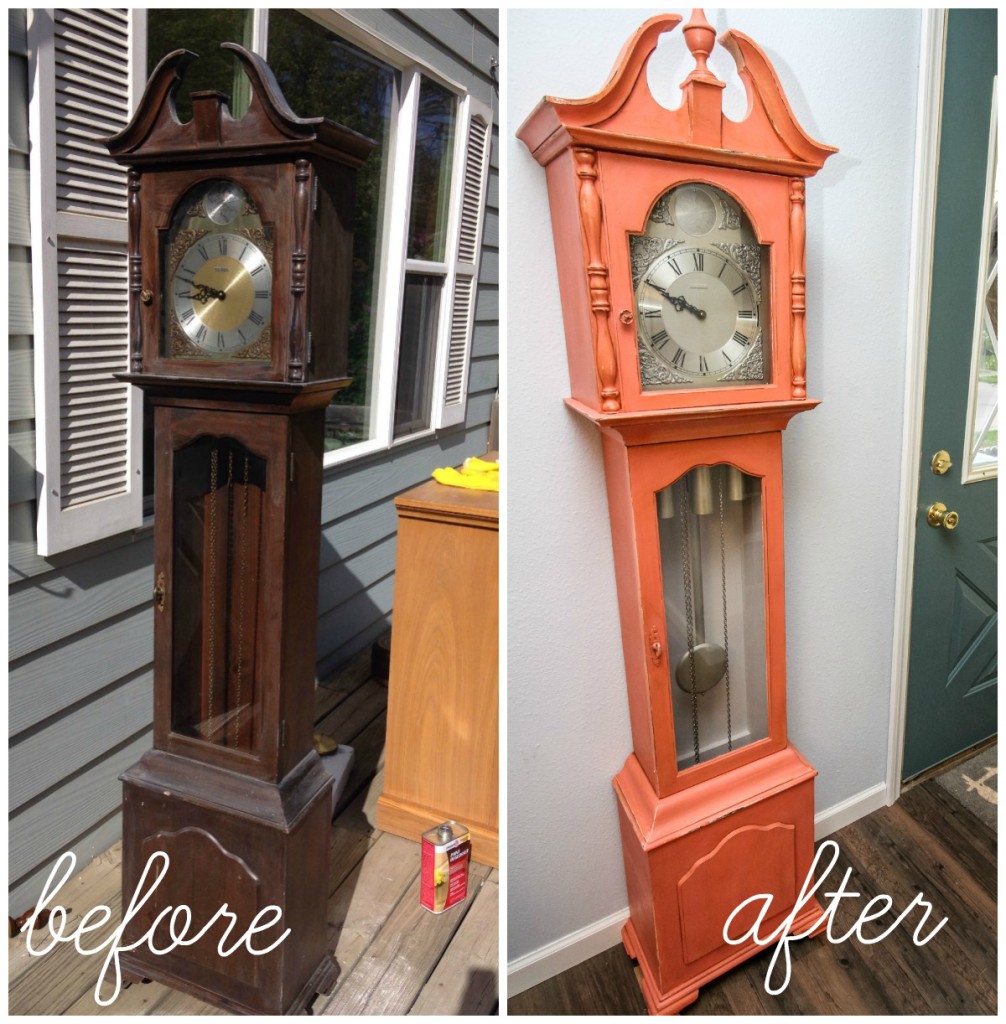
Here’s the other thing–usually it’s the wife who wants furniture painted, and the husband is all, “…that’s real wood! You can’t paint that. I like how it is…” Not in this house! In this case Sam was the big, bold, furniture-painting, color-popping machine. When he told me they had an old grandfather clock that he wanted painted in a quirky color, I knew it’d be a fun project…but never in a million years did I imagine just how fabulous it would turn out. I think the moment when the last bit of paint was dry on this bad boy and I peeled off the last scrap of tape was a momentous moment in my life: It was a moment when I shed a little color fear and my eyes were opened to just how awesome something totally bold can be.
This is one of my most favorite things ever. For real. I want to make one for myself. Or steal theirs. Luckily–it was pretty easy. Here’s how we did it.
Shopping List
Here is a handy list of all the supplies I used on this project. I got them all at Menard’s {who should really be sponsoring this blog because I love them so much and I give them a lot of free advertising.} But I’m sure you can get most of this stuff at your local store.
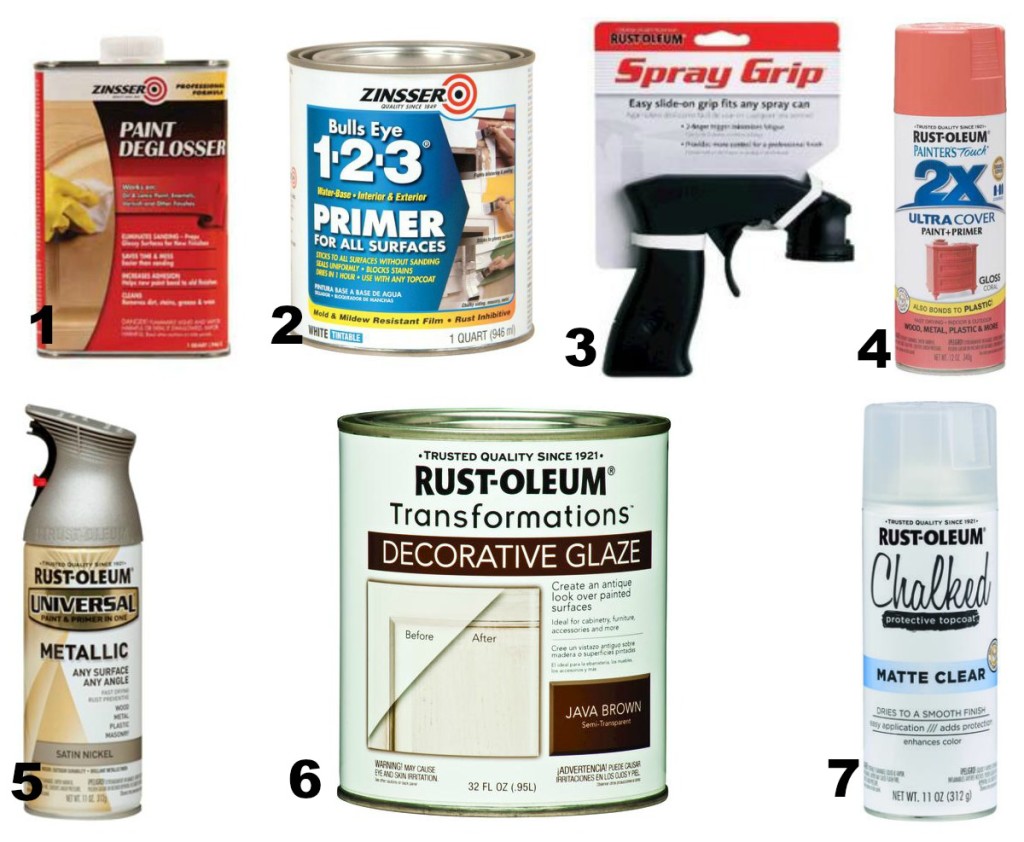
I’ve conveniently listed the supplied in the order they are used. Just use one after the other {follow all package instructions} and you’ll be good to go. Click the links and you’ll be taken to the Menard’s product page.
- Paint deglosser from Zinsser {I love their products and trust them all.}
- Bull’s Eye Primer–it’s formulated to stick to all surfaces
- Spray paint nozzle–this will change your life for $2.50
- Spray paint
- Rustoleum satin nickel finish spray paint
- Java Brown decorative glaze–I used the leftovers from my cabinet project
- Chalked clear top coat {can you guys tell I’m a huge fan of Rust-oleum?}
Find Your Piece
Step one is choosing a cool piece to accent. The clock came out especially cool because it’s a very classic and formal piece in a totally unexpected color. That kind of juxtaposition makes for a great accent. They had this clock sitting around. They didn’t love it. It wasn’t getting used or looked at. It was a little beat up. It was not a family heirloom, so if it got messed up, they wouldn’t be heart broken. All these factors add up to a good make over piece. {Especially for a beginner.}
Don’t Skip Steps
If you want your paint project to last, don’t skip steps and definitely don’t skip prep! For something that’s not going to get touched very often, or treated roughly you have a little more leeway. Since the clock probably isn’t going to endure a lot of abuse, using mid-grade products and prep will do just fine. For something that will see heavy traffic–like a dining table–you’ll want to go to extremes to make sure your finish isn’t going to chip off.
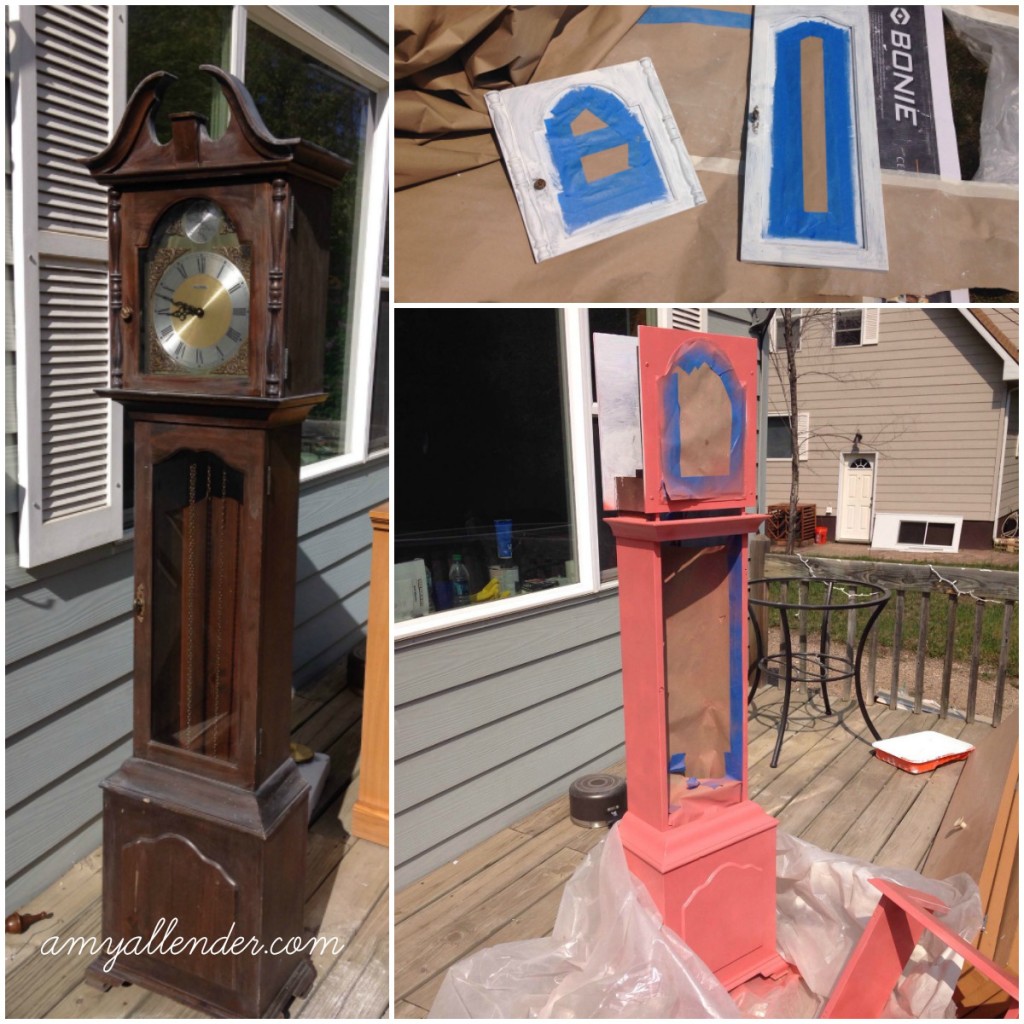
First I dissembled the clock as much as possible–be super careful with the springs and gears, though! Carefully remove the head and doors and finial. Take out the weights and protect anything that you don’t want painted with tape or paper.
Next, degloss the whole surface. Grandfather clocks are typically pretty shiny/glossy. Dulling that surface down will give you a clean surface to work with–and will help the paint adhere better.
Prime all your pieces using a brush. I did two coats of primer and a light sanding afterward to get rid of any drips or brush lines.
Now spray paint your surface. Seriously, get one of those spray nozzles if you don’t already own one. In my ideal world, I would have been able to find a matte spray paint in the color we wanted…but it didn’t happen. The end result of my spray painting left me with a very shiny, very Barbie-pink clock. To tone it down I added a few extra steps:
After the pink paint had dried {you might need two coats}, I went over the whole piece with deglosser again to get rid of the shine–just don’t rub too hard, or you’ll strip the paint. Then I sanded down the edges of the details {any curved piece, sides of doors, etc} to add a little wear to it and expose the dark wood tone below. Finally, I used the glaze to bring out the detail even further. Using a small paint brush, brush glaze {or use wood stain} into the crevices of the piece–then immediately wipe out the excess…leaving dark stain or glaze in the cracks. I also brushed and wiped glaze off of the sides of the clock to tone down the color a bit.
Then…while all that was drying, I went to work on the inside of the clock. We painted the inside using one of the paint samples that was not chosen for the living room walls {see discussion on paint samples here.} I sprayed the weights satin nickel, and carefully taped off the wood and also sprayed the face of the clock–the gold just didn’t seem to fit with the funky new color.
After it’s all dry, move it inside and bask in the glory of your clock. Awesome, right?
by Amy | Aug 9, 2016 | Blog, The Art of Projects, the house
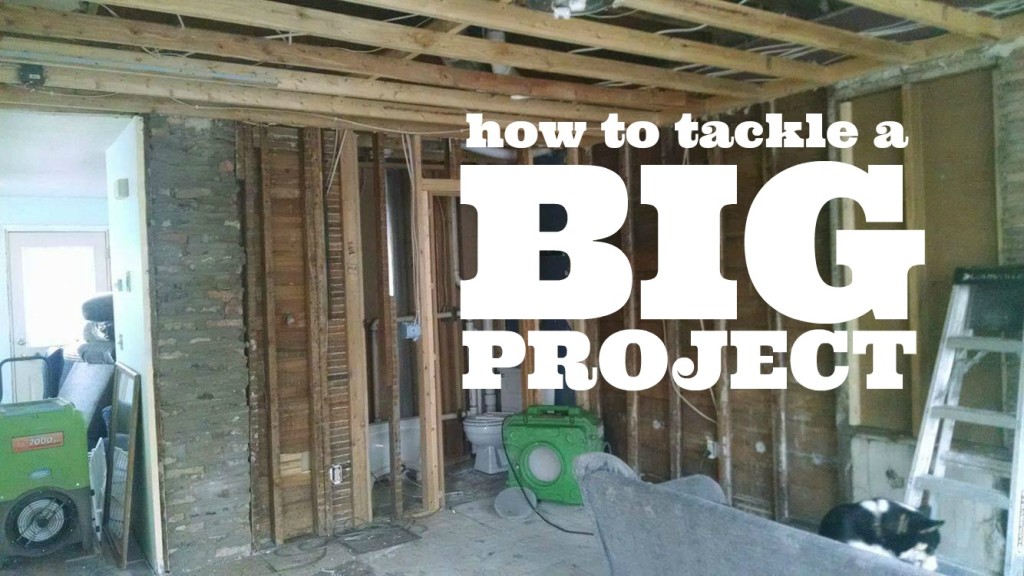
Have you ever faced a goal or wanted to start in on a big project, but were unsure of where to begin? I think most of us have been there. I know I’ve been there many times. But being unsure of how to start a big project, is no reason to avoid ambitious undertakings. I wrote a piece on tackling large goals for Start Up Mindset a while back–you can see the piece here. Today I’m going to talk about tackling a big home improvement project.
Whether your projects are big or small–when you’ve got lots of things that need to be done, it’s tricky to find a good starting point and have the tenacity to get the job done. Today, I’ve compiled a list of five tips for tackling overwhelming home projects.
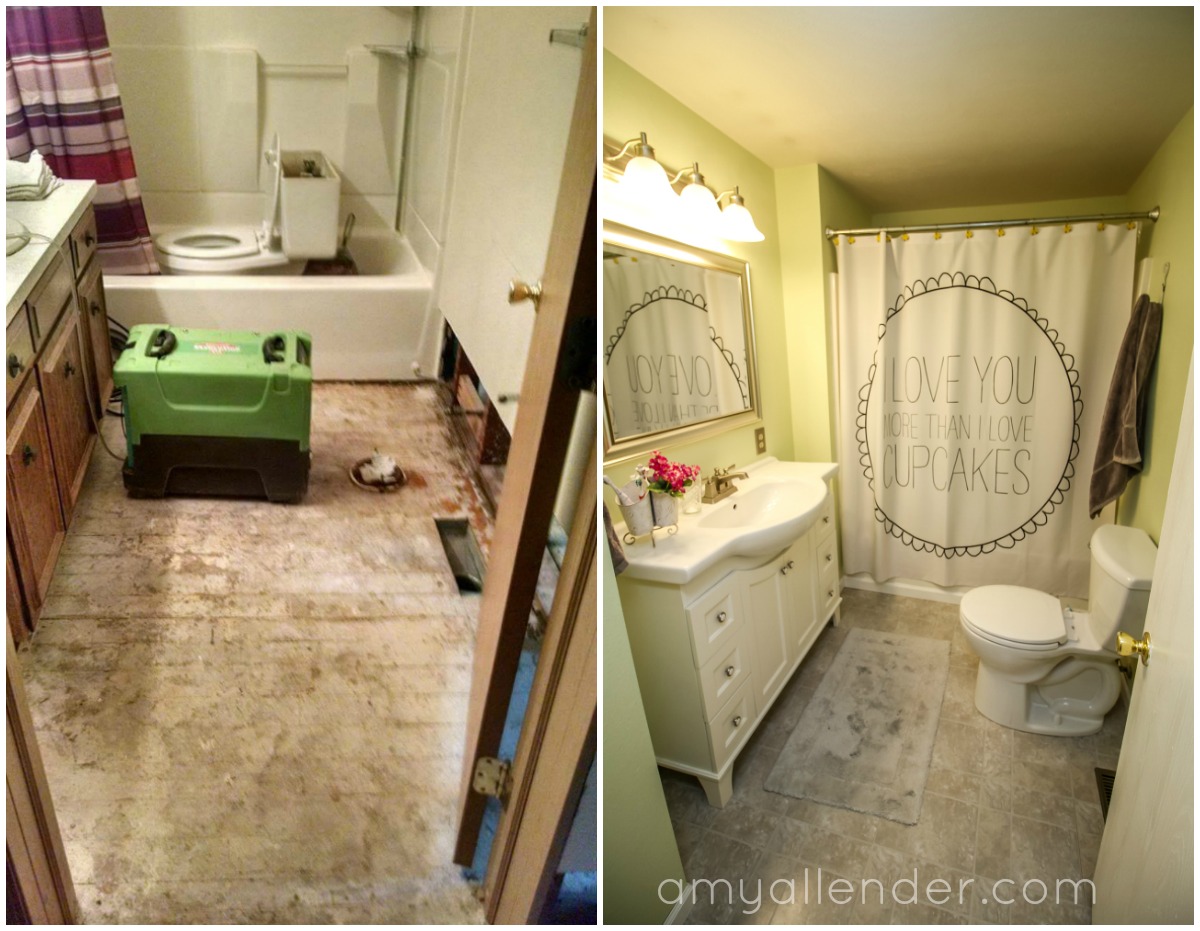
Yesterday I told you about Katie and Sam’s tragic indoor flood. Since the water laid waste to most of their house, and the rest of it was already on the do-list, their home is the perfect case study for undertaking a big project.
1. Identify the most important things.
Take it from me, some parts of a project are much more fun than others. Picking out a new couch, potting plants, and hanging a gallery wall are all super fun and super rewarding. They offer instant gratification and rarely leave your mind frazzled or toes stubbed. But–these are not the most important components of your project.
Don’t get side tracked by the stuff you find fun. Keep a rational mind. Look around objectively and decide what is most important to your day to day living.
For Katie and Sam, the absolute most important thing was getting their full bathroom up and running again. The flood displaced them from their home and they were unable to move home until they had a place to shower and a toilet to use.
Take care of the necessities first. A working bathroom. A water heater. Working appliances. Proper plumbing and working sinks. Safe, working lights. Fix broken windows. Take care of leaks.
2. Know your limits.
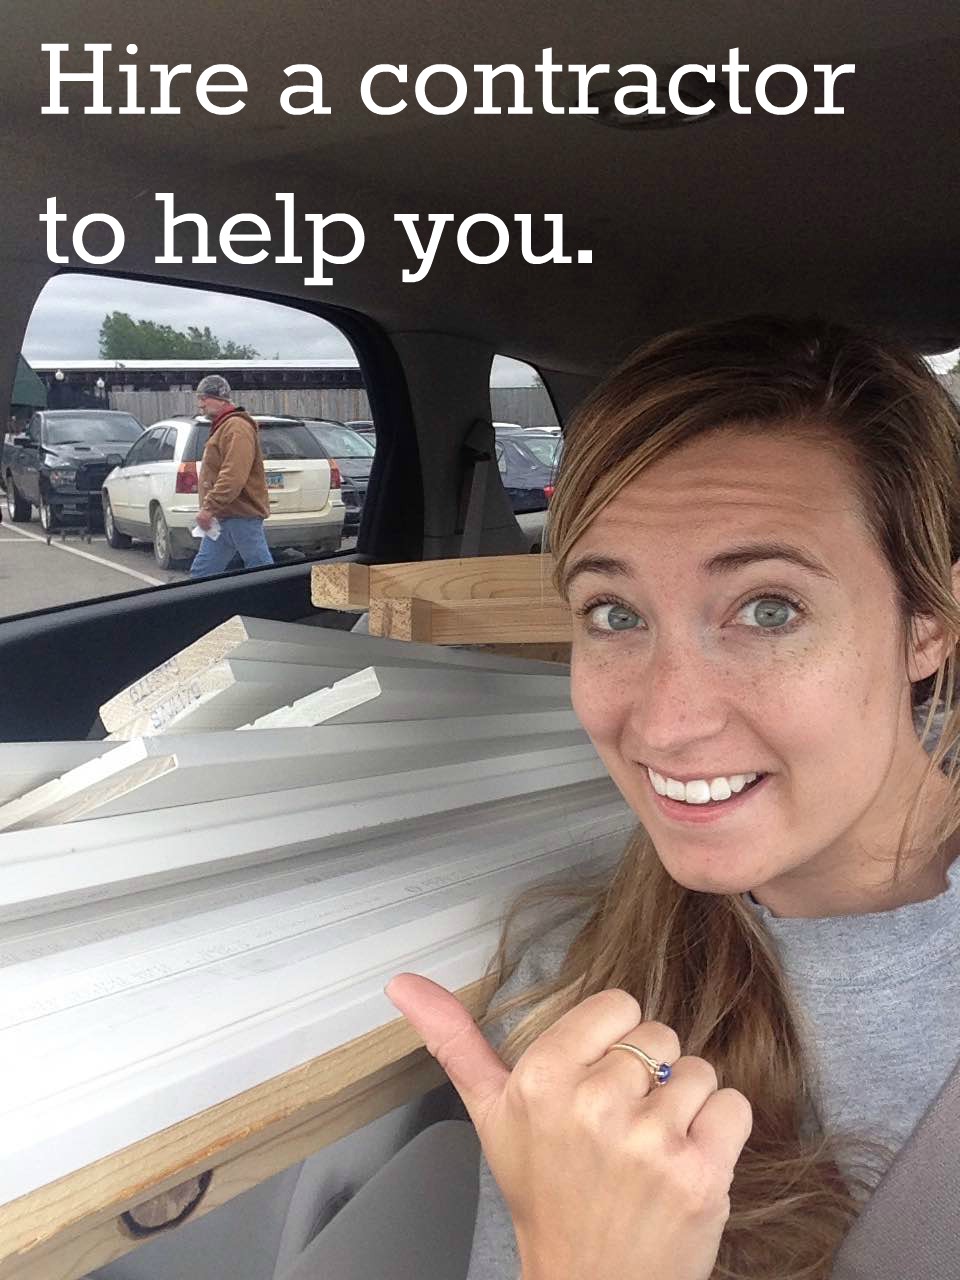
After you’ve decided on your priorities, think about your limits. Are you capable of putting in a new toilet? Do you know how to hang drywall? Can you safely and properly install new wiring? If vital parts of your project are outside of your scope–outsource them. Delegate. Years down the line when your wiring isn’t catching fire and your pipes are intact, you’ll be glad you trusted a pro–even if it did cost a little extra.
Another limit to think about is your time. Even if you can do these things–do you have the time? Can you commit to getting these things done in a timely manner, or is it worth the extra expense to have it done quickly, efficiently and professionally? Lots of folks want to be DIY-ers, but soon find out that home improvement takes a lot of time and projects can drag on much longer than expected. I believe in finishing projects–as well as starting them. It becomes cumbersome to live in a construction zone–if you don’t have the skills {or energy/ability to learn the skills needed}, or time to commit, delegate.
At Katie and Sam’s place they helped with lots of stuff and delegated lots of stuff. Proper flood clean up, plumbing, drywall/texturing, doors, trim and floor installation were delegated to contractors. They helped with painting, prep, shopping, electronic installation, etc. It was important to them that they project was done quickly and skillfully–so they outsourced the big stuff and some of the smaller things that they were capable of, but didn’t have time to commit to.
3. Make a list of wants and objectives.
Outside of the things that must work and must be done to give you a functional home–home improvement gives you a lot of creative freedom. How do you want your rooms to be used? What do you want to do in your yard? What is important to you? Do you need space for entertaining? A place to read? Peace and quiet? A durable home that can endure the wrath of teenage shenanigans? Discuss these things and come up with a “dream sheet” of sorts. My list for a living room might look like this:
Durable furniture that I won’t stress about getting dirty or dinged up, new floor, big rug, fresh window trim, wall mounted-floating TV, gallery wall, washable wall paint, cozy seating with space to add extra seating for large gatherings.
Once you know what you want out of your rooms you can get to work.
4. Work rooms from most visible to least visible.
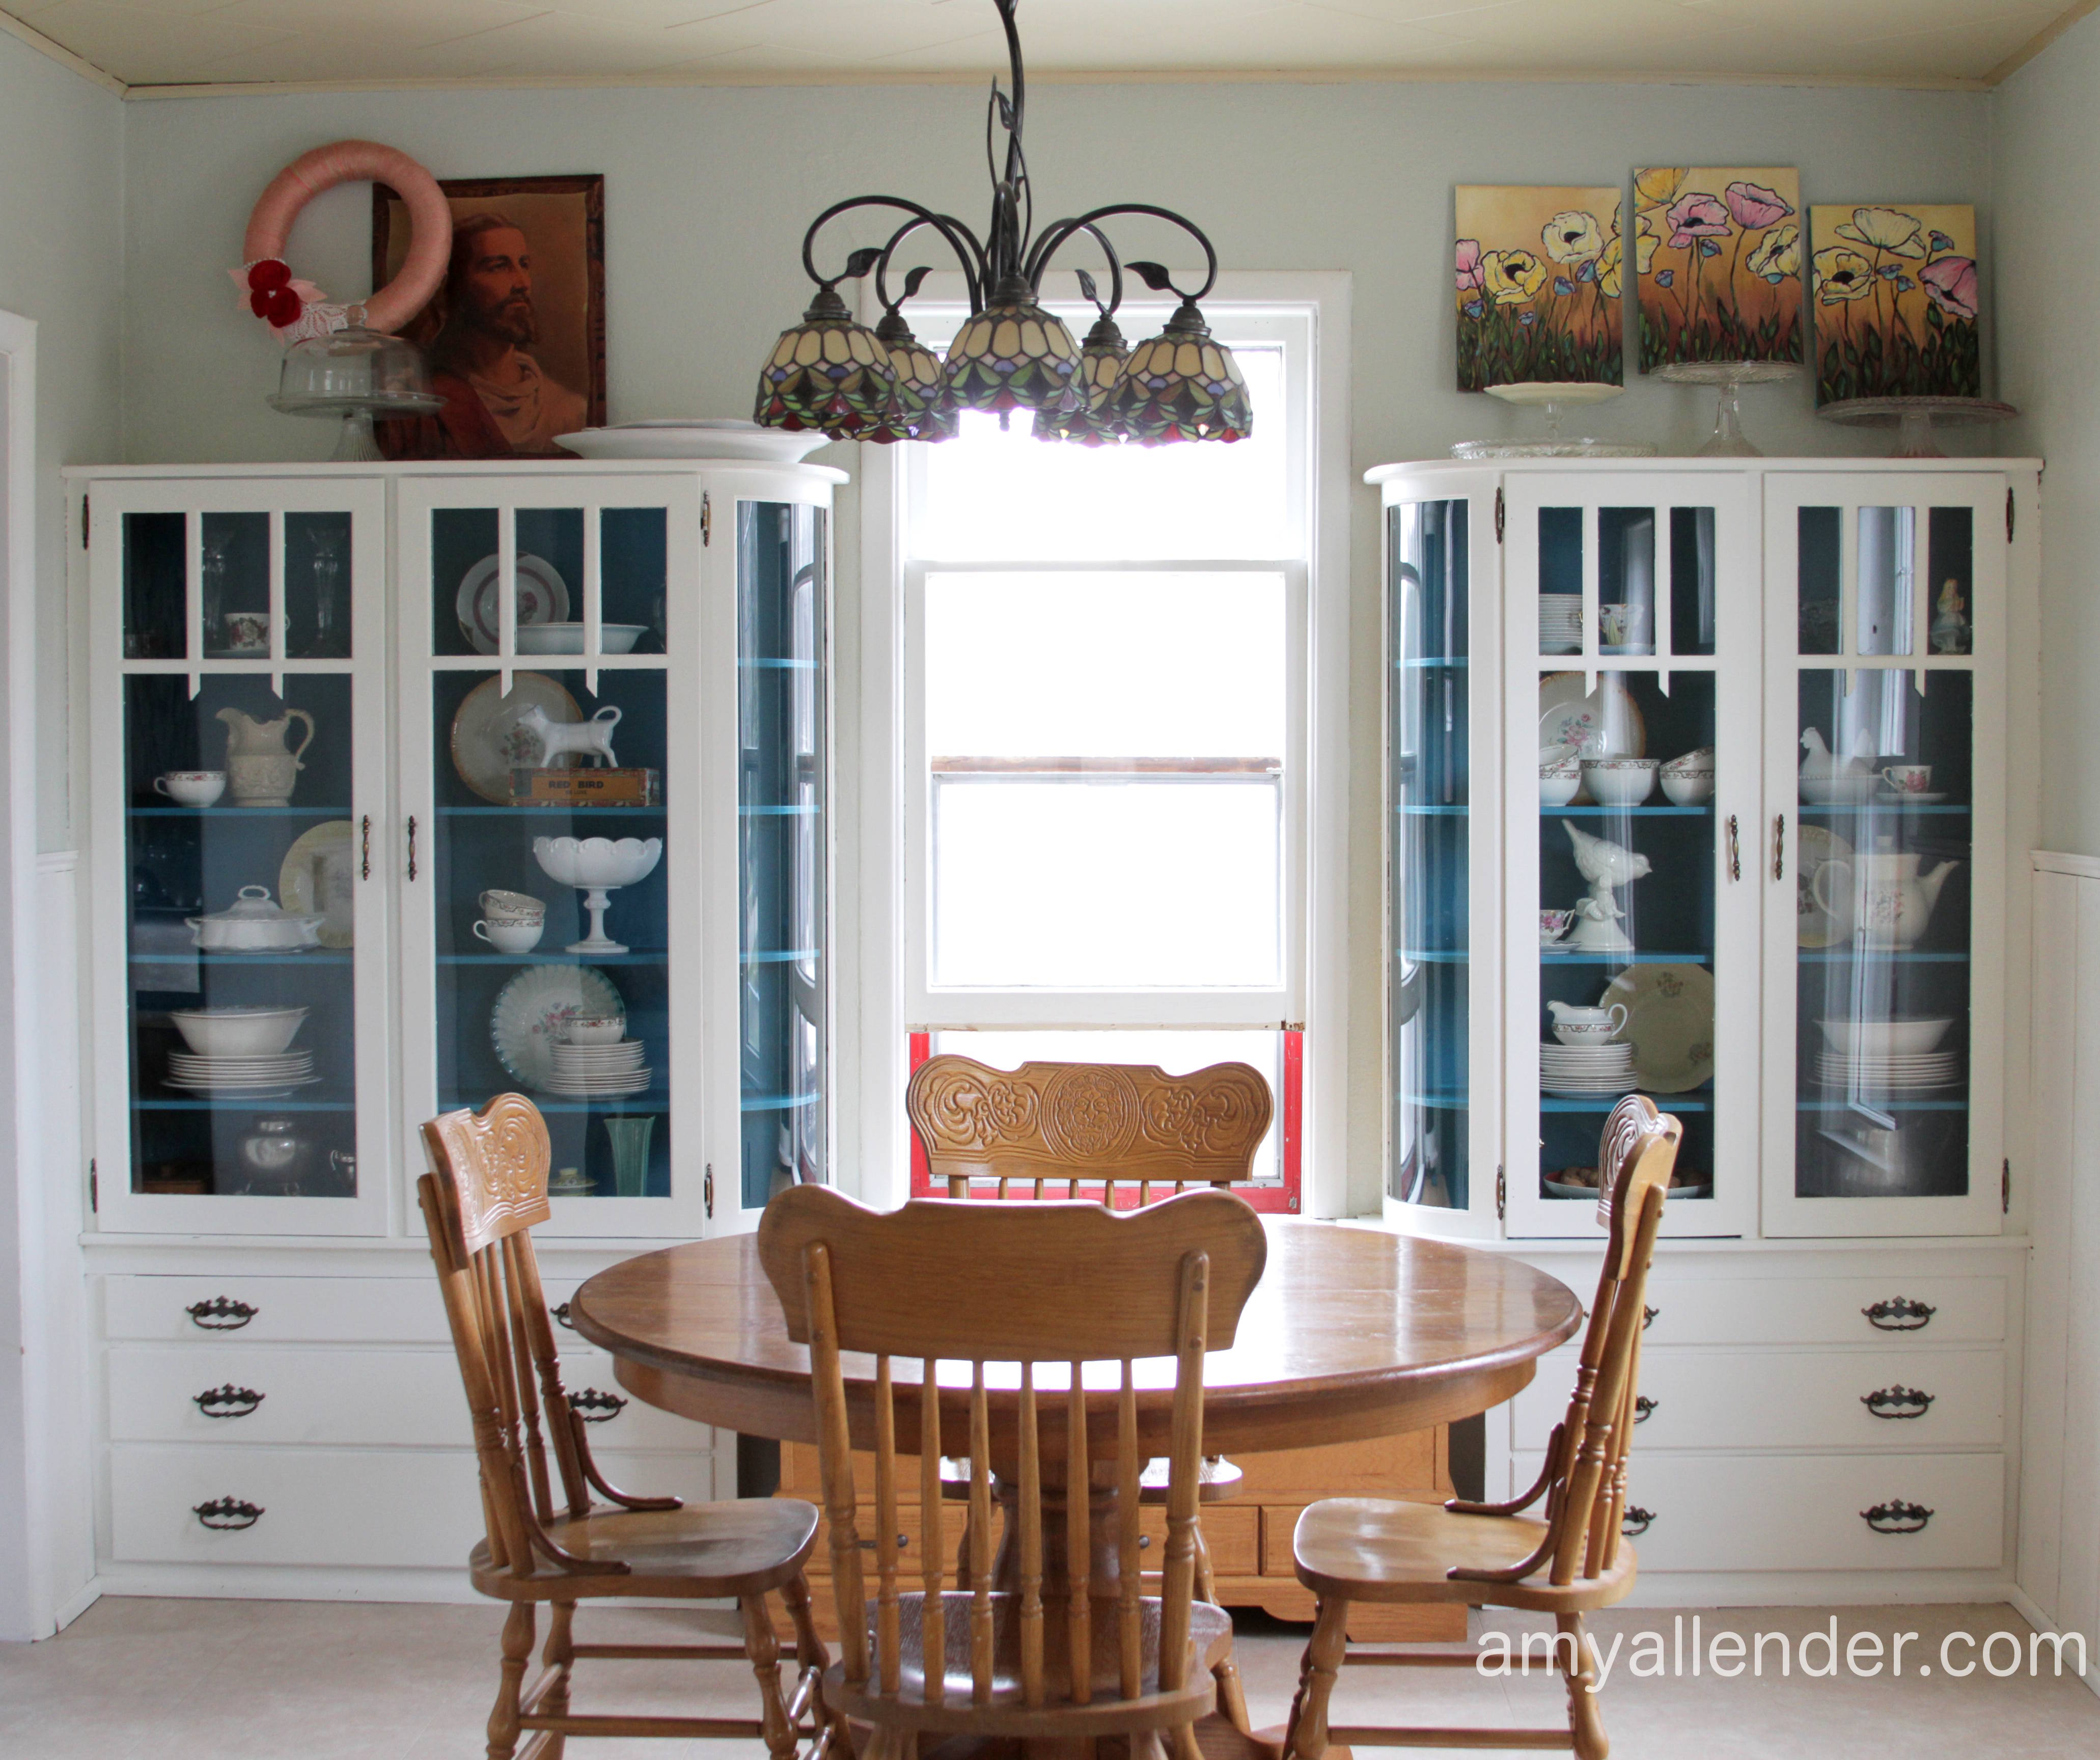
I already covered starting with repairs that make your house safe and livable. Once your leaks have stopped and your wiring isn’t threatening a fire, start improvements from the most visible rooms in your house to the least visible.
Start by tackling the room you spend the most time in–and where guests spend the most time. For me, this is usually our living room {a kitchen is usually a close second.}. Next up it’s a common area bathroom. Then any other common space. Then outdoor entertaining space, bedrooms, and finally hidden storage spaces that only I lay eyes on.
5. Work top to bottom.
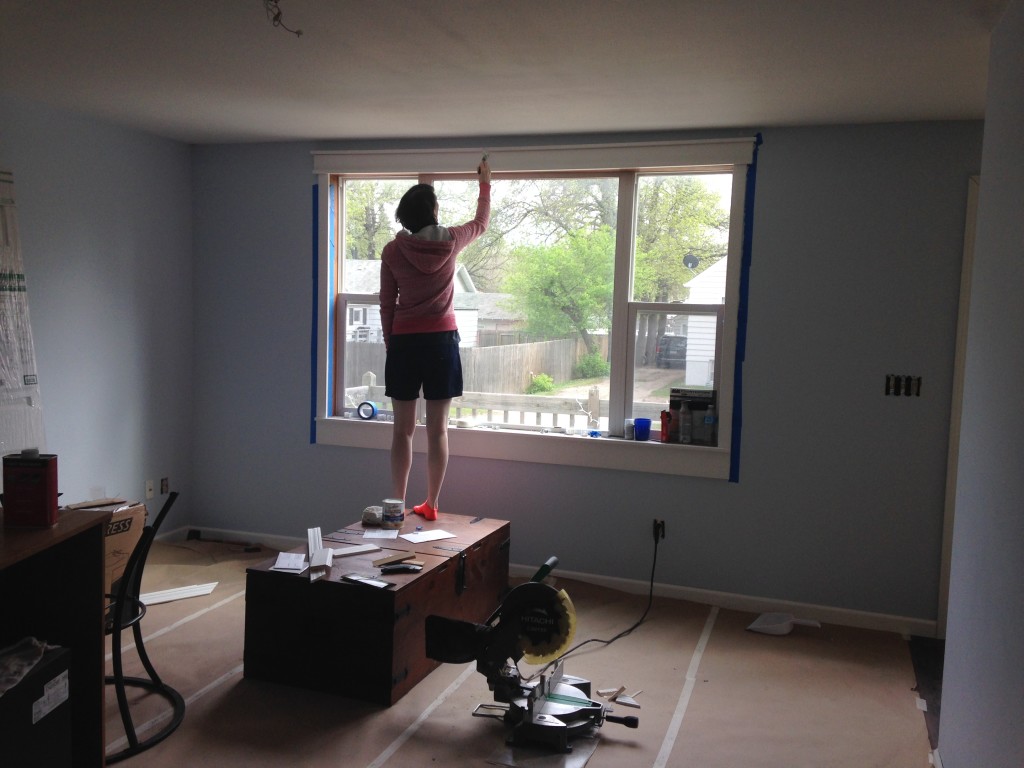
My dad taught me to work top to bottom when washing a car. My mom taught me to work top to bottom when cleaning the house–any dust that fell would be vacuumed up last. Now, I’m telling you–in your home, work top to bottom, outside in.
Take a look at what you are doing and execute it from the top down. Work from the outside–from the outermost part of your walls {for example: wiring/plumbing..things that go inside the walls–drywall–paint–trim–curtains}
First do anything that lies behind the wall–electric, plumbing, recessed shelving. Next tackle texture and painting from the top down, starting with the ceilings {if you are replacing the floor always do the painting before the new flooring is installed so you don’t need to stress about spills}. Finally hit the floor.
Once you’ve got a floor, start working inward–add trim and baseboards before any permanent fixtures are installed {like a toilet, mounted TV or fireplace} so you don’t have to work around them. After permanent pieces are in place tackle the moveable–furniture, rugs, curtains. Finally–breaking the pattern just a smidge–add the semi-permanent. I consider anything that will most likely not be moved often, but can be moved if needed–peg racks for coats, gallery walls, wall decor, etc. I put the semi-permanent up last because I like to see the furniture and rugs in the room first. And I like to have a place to sit down at the end of the day.
by Amy | Jul 22, 2016 | Blog, The Art of Projects, the house
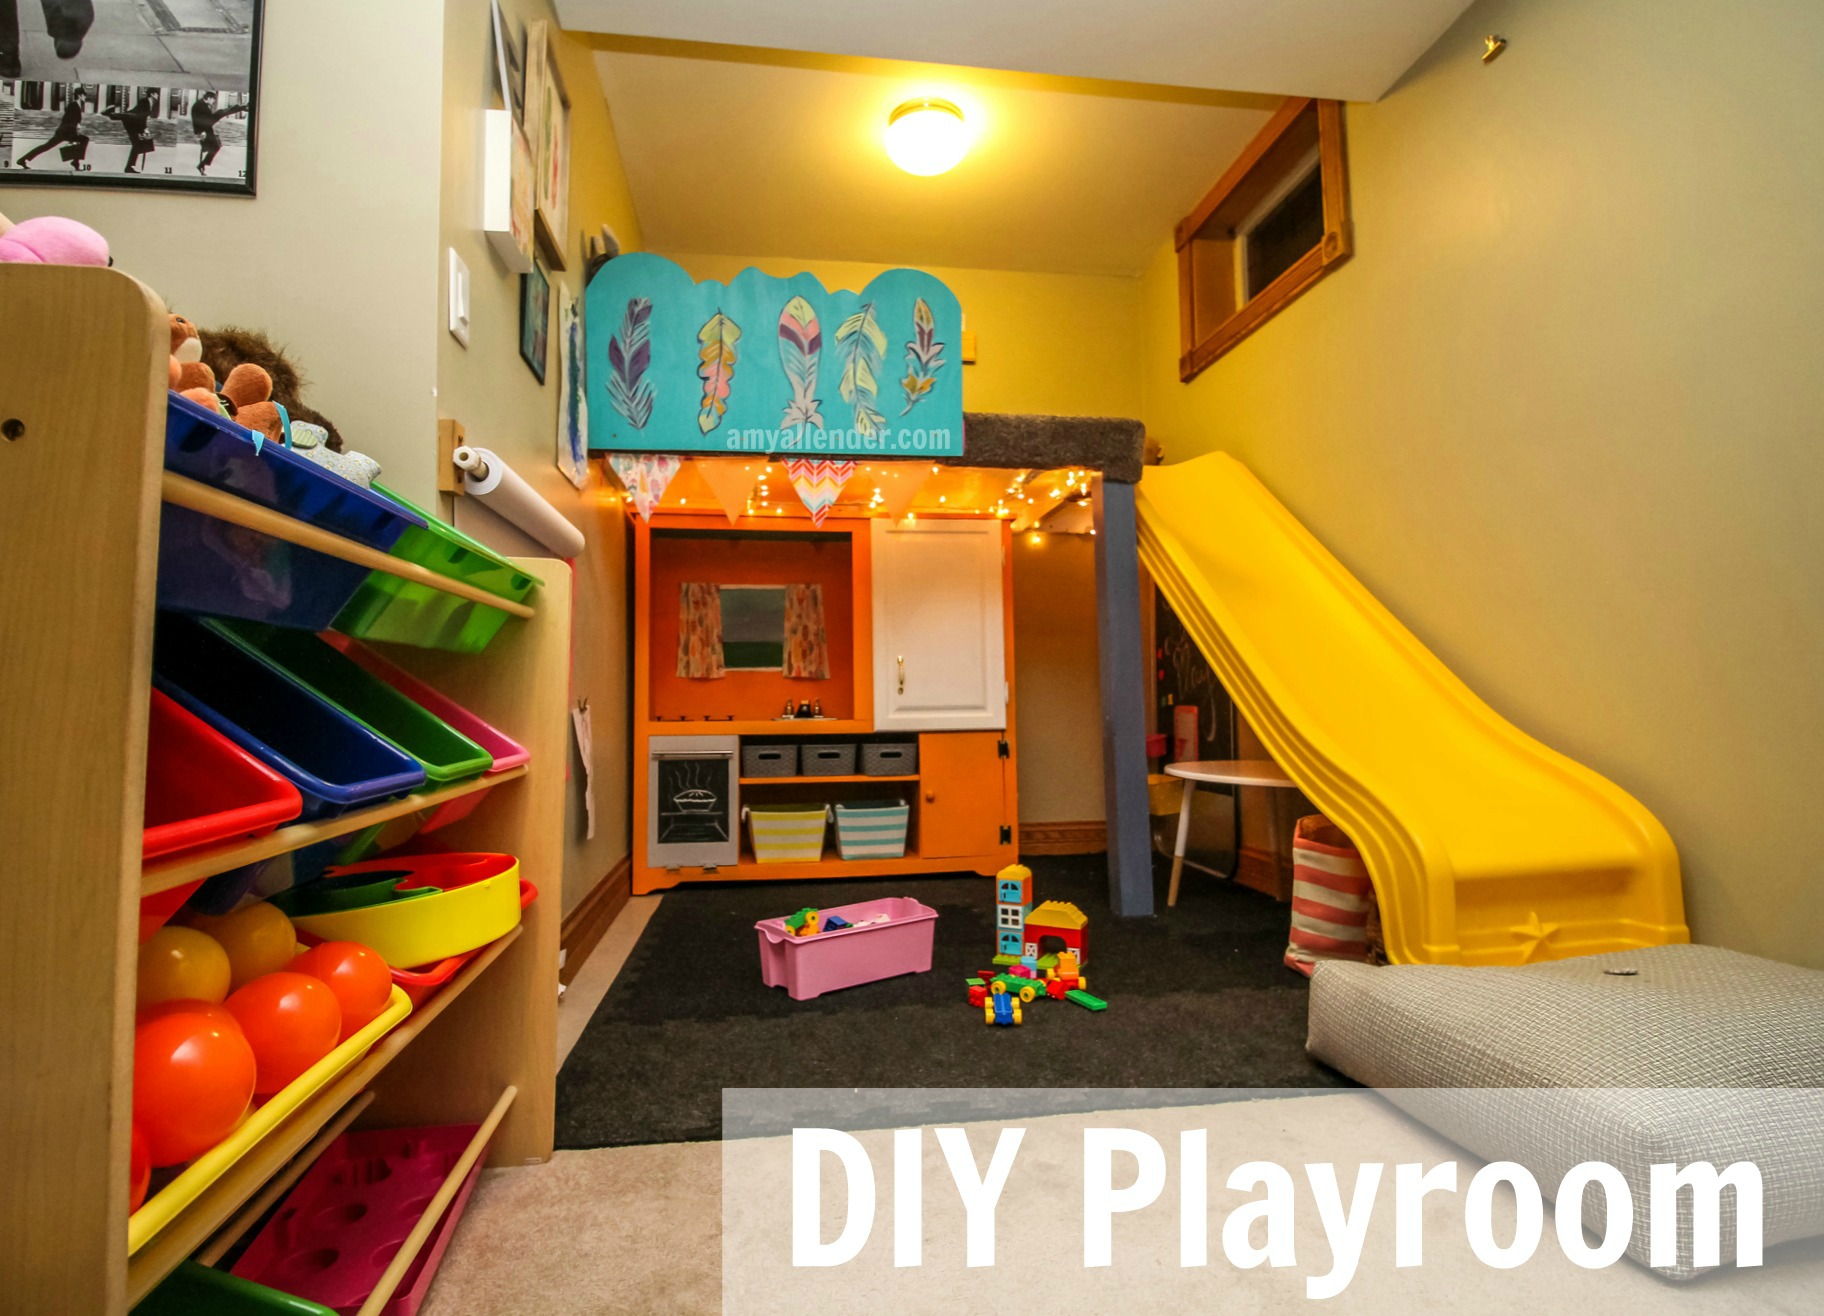
DIY Playroom
“Ellie and I were just playing downstairs. I heard something run down the steps and I figured it was one of the dogs. Then a small person flung themselves on to my back. ‘Up. UP. UP,’ she said. Haven. She was talking about the loft. There isn’t a ladder, and she wanted up in that loft so bad. She was barefoot and her hair was wet.
” ‘Do your parents know you’re here?’ I asked her.
” ‘Yep.’ I put her in the loft. A minute later Caleb, her dad, came down. She had sneaked out of their house after bath time. They had no idea…but the first place they looked was the play room. When he called her she just hid up there in the loft.”
My sister Erin called to tell me that story shortly after I’d the playroom for her daughter Ellie. Haven is their neighbor. She’s four. I’d like to tell you that was the only time she snuck {yes–snuck–I know it’s not a word…but it should be} over, but it wasn’t. After laying eyes on this sweet space she had playroom fever. Over the next week or so I was getting reports of a sneaky kiddo sliding silently through the back door–unseen, pounding on the locked door begging to come in, and being taken home very upset when she’d get caught. Eventually the newness wore off, but Erin still assures me that whenever Haven comes over to play she wants to be downstairs–in the loft.
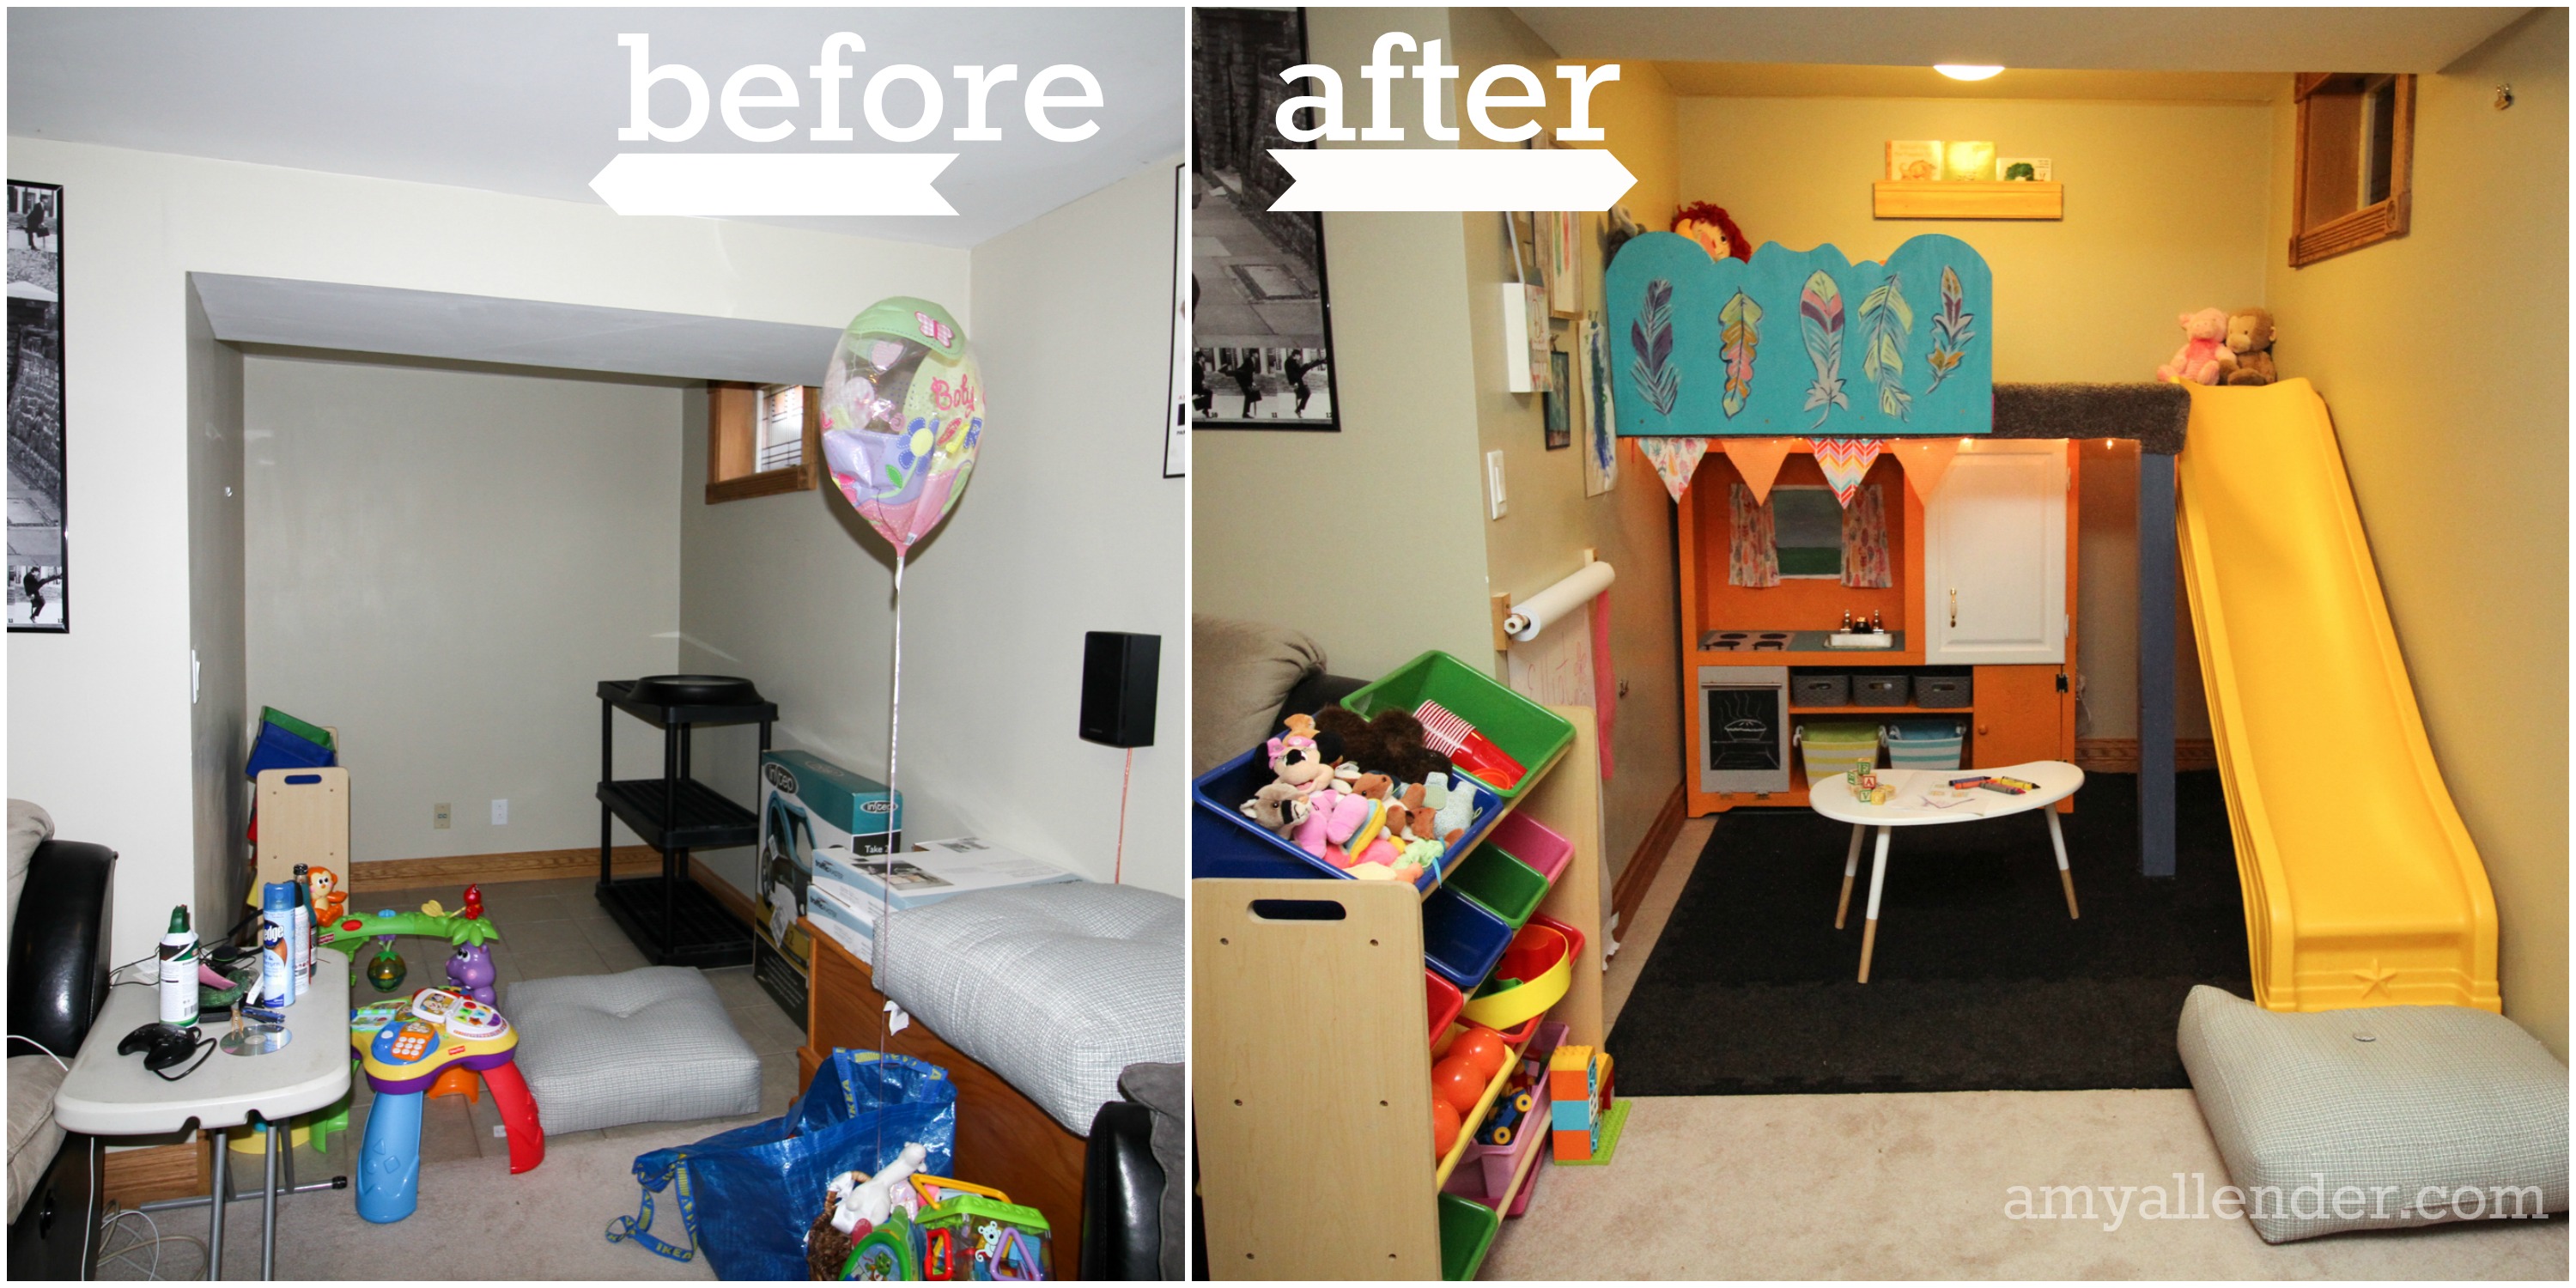
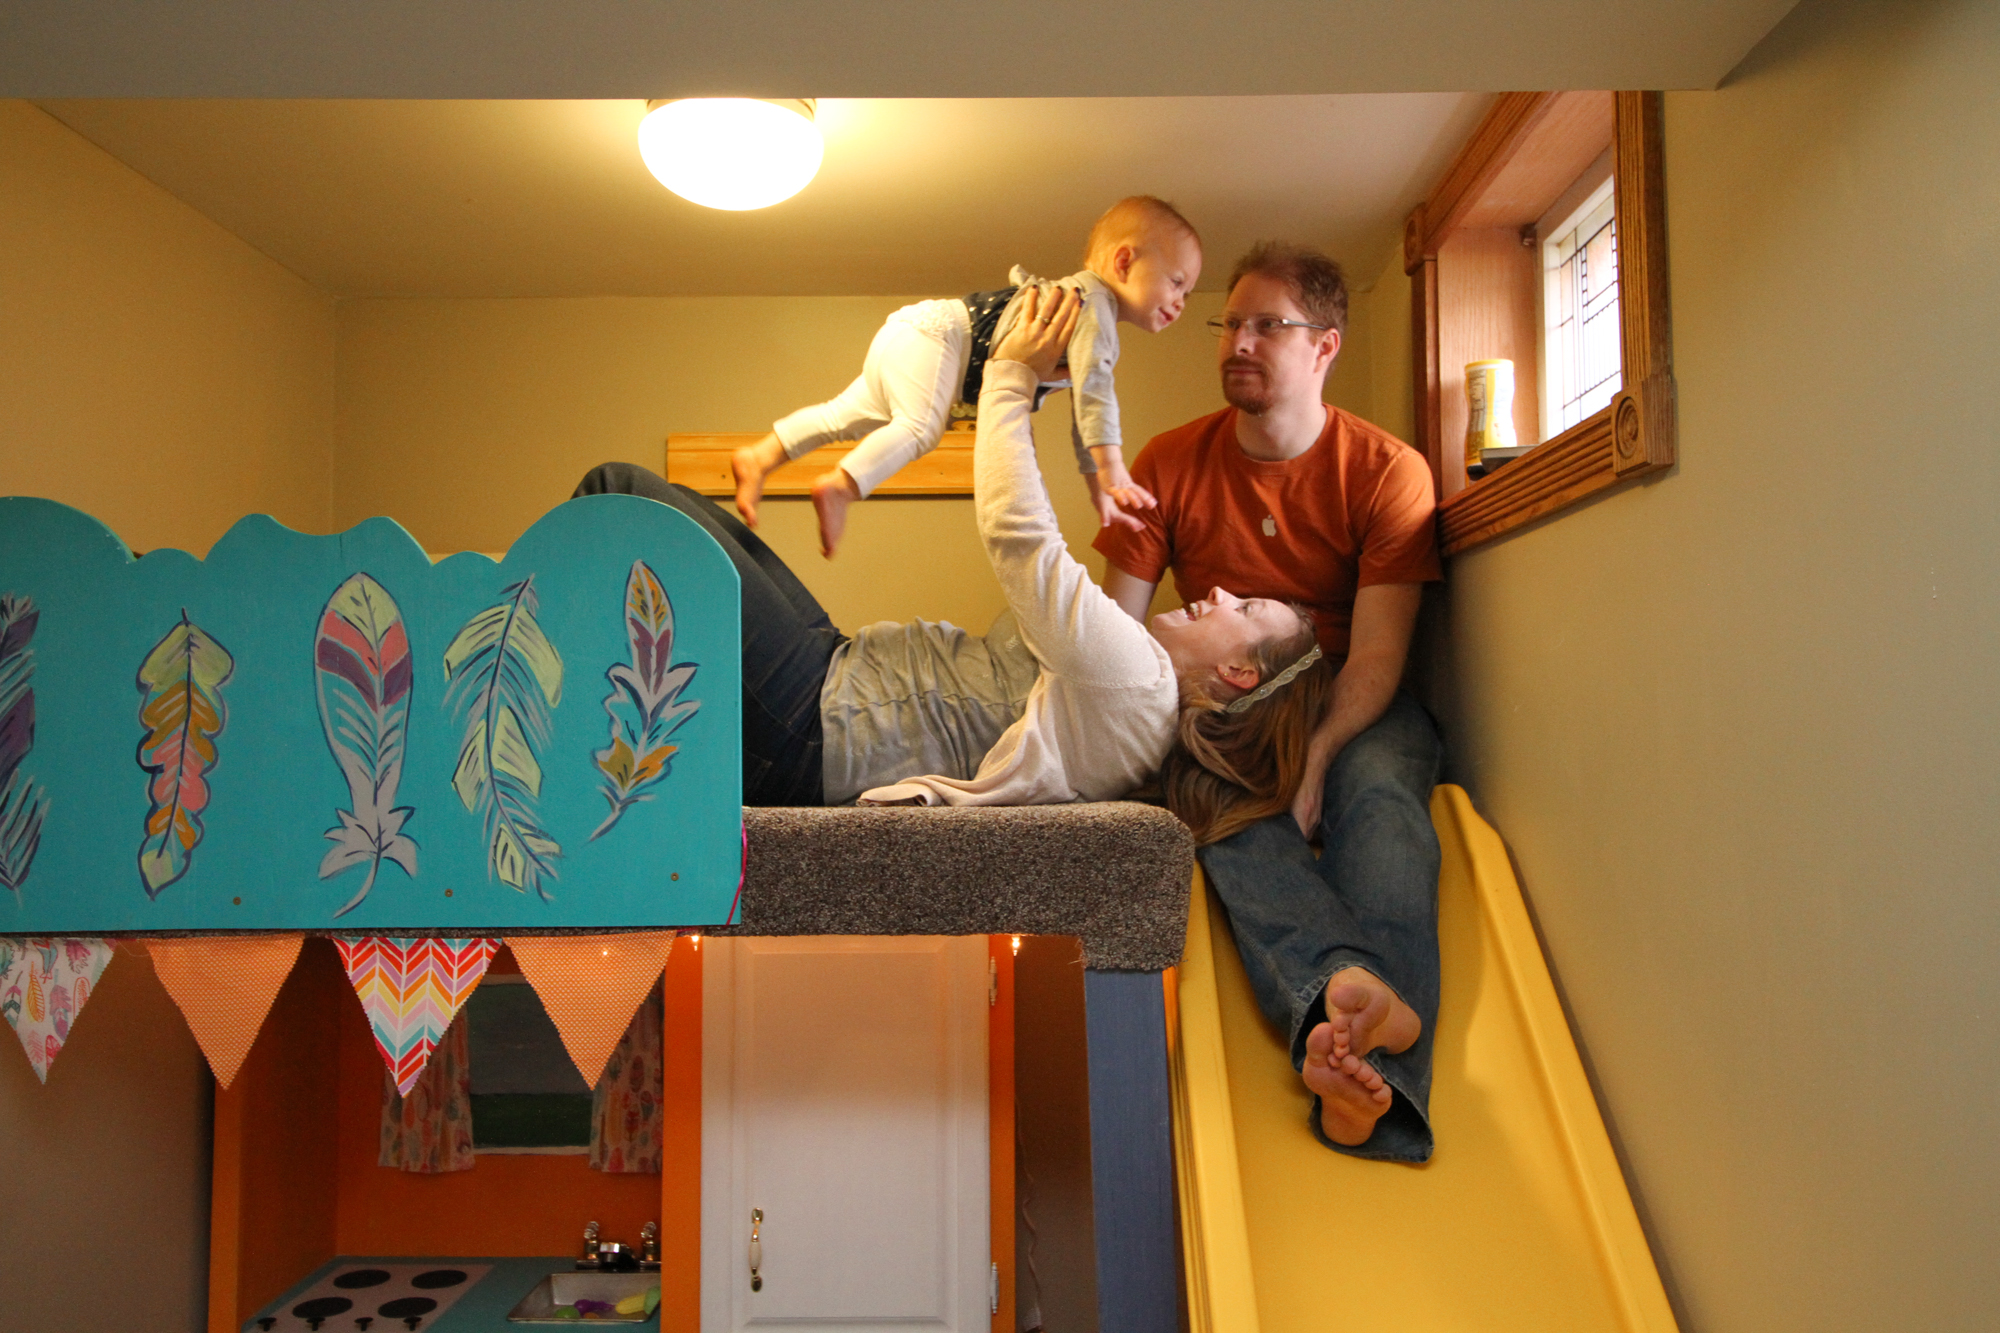
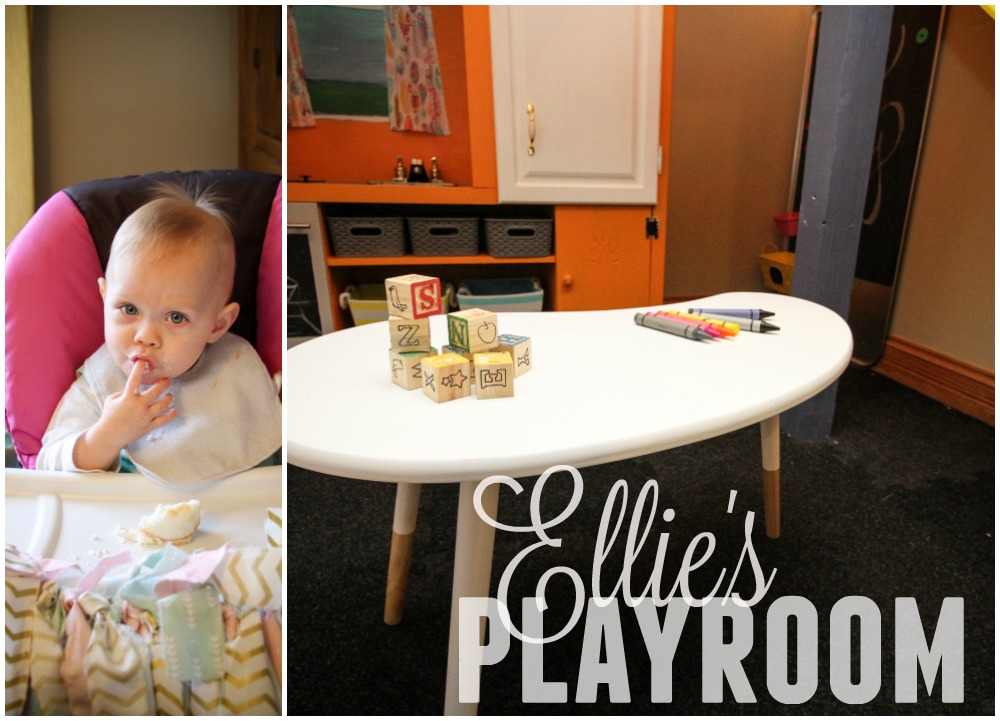
I take that as a win. It means they space will keep Ellie occupied for years to come. And that’s a good thing. The photo above shows just how cute it ended up…but let’s take a look at the side-by-side.
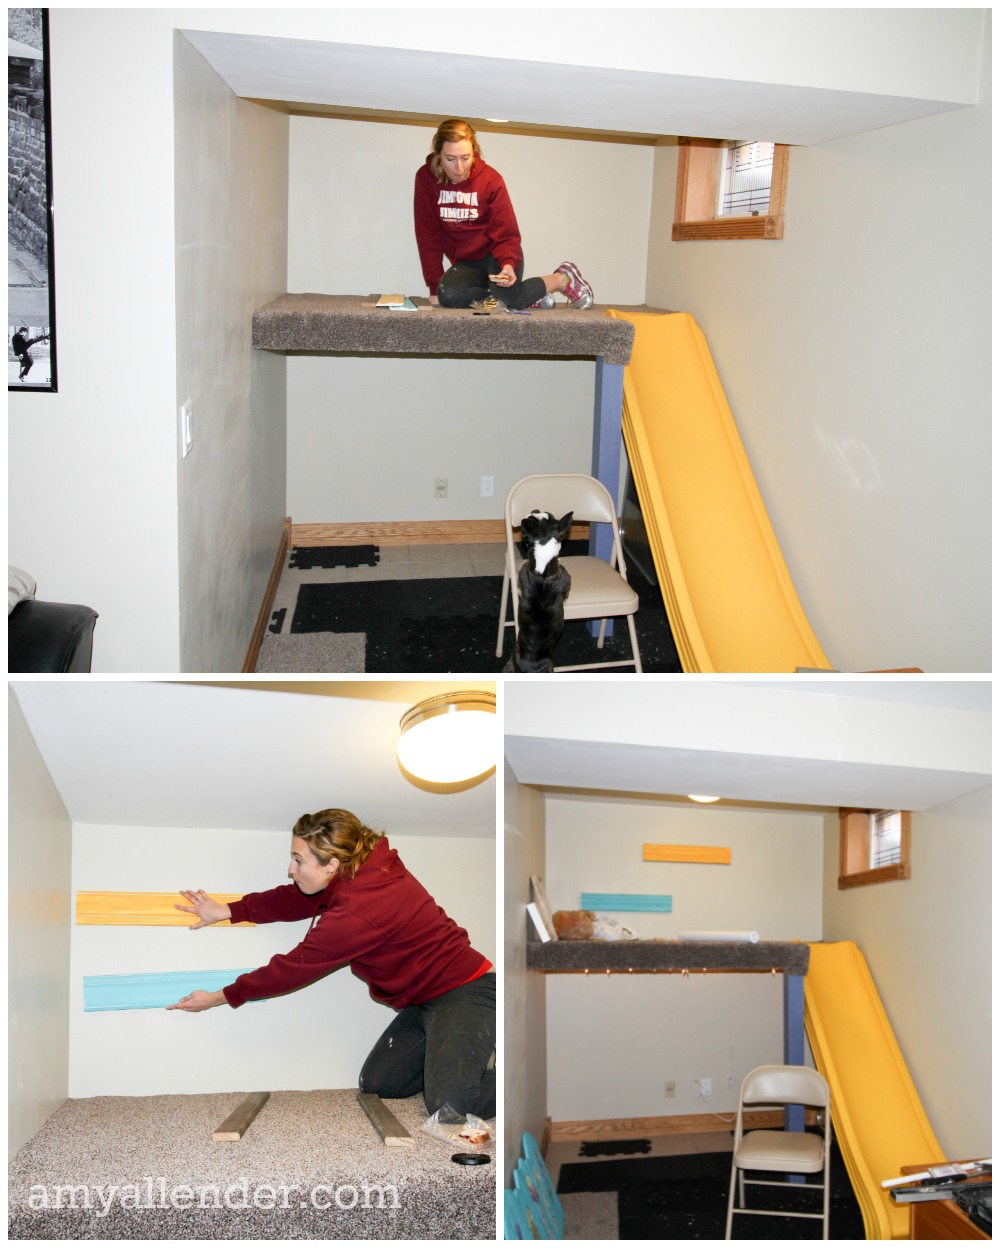
This super fun playroom packs a reading nook, soft space, playground, play kitchen, sensory board, two art spaces, floor play area and toy storage into a 6’x7′ space. The extra toy shelf and landing cushion take the playroom out just a bit past the tiled nook for a grand total of 9’x7′. That’s still pretty darn good. This project illustrates that good planning and creative solutions can turn an awkward, unusable area into something really useful. Even if your house didn’t come with an awkward nook, lots of these ideas can be implemented into a corner or even an awkward closet.
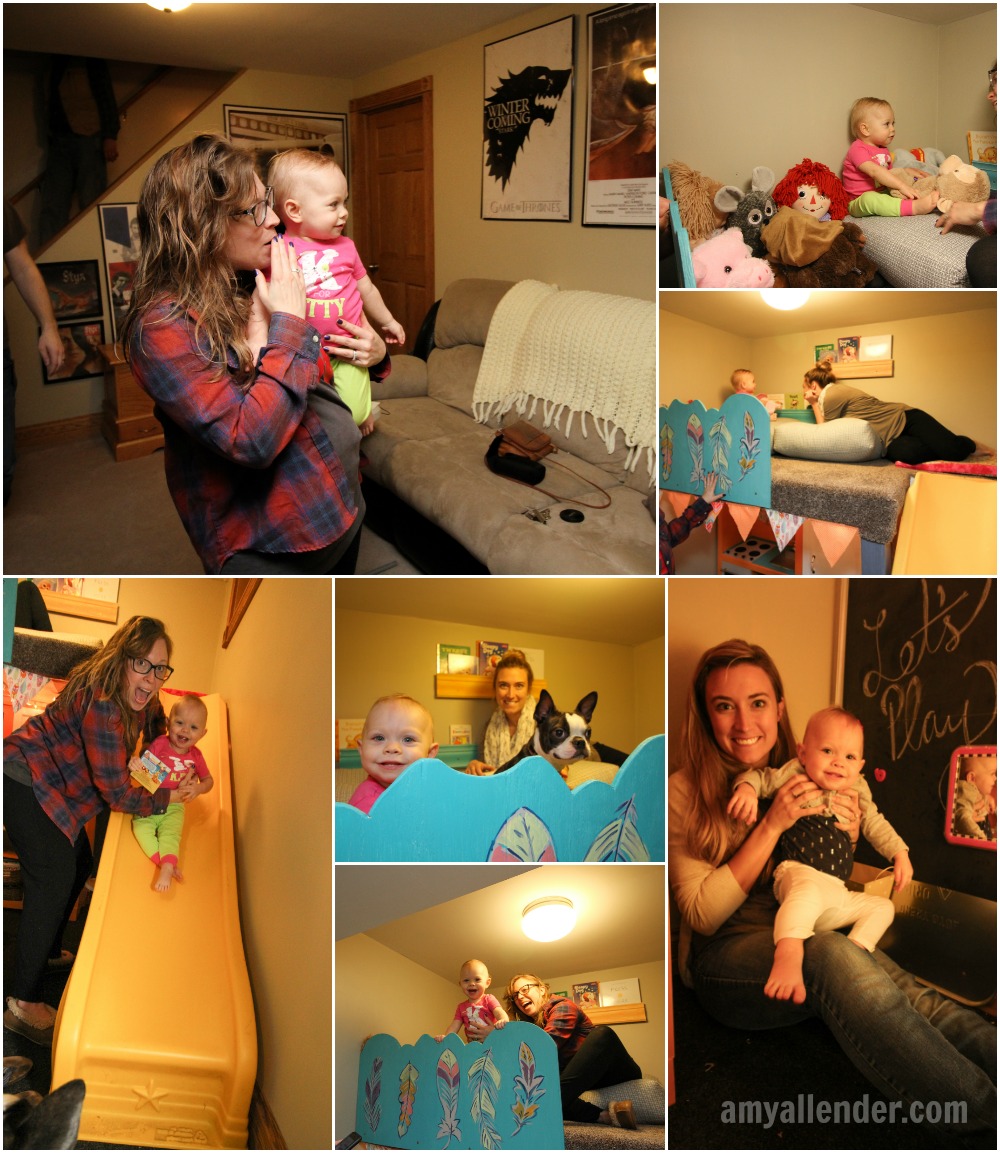
To refresh you all–I designed and implemented this make over as a birthday gift for Erin and Ellie. Because I’m a firm believer that big reveals are about 90% of the fun when doing a project in someone else’s home–Dad and I worked on the playroom while Erin and her husband, Adam were working. They were quarantined to the upper levels of the home until reveal night. {Except for when Adam had to help Dad unstick the play kitchen from the stairway…}
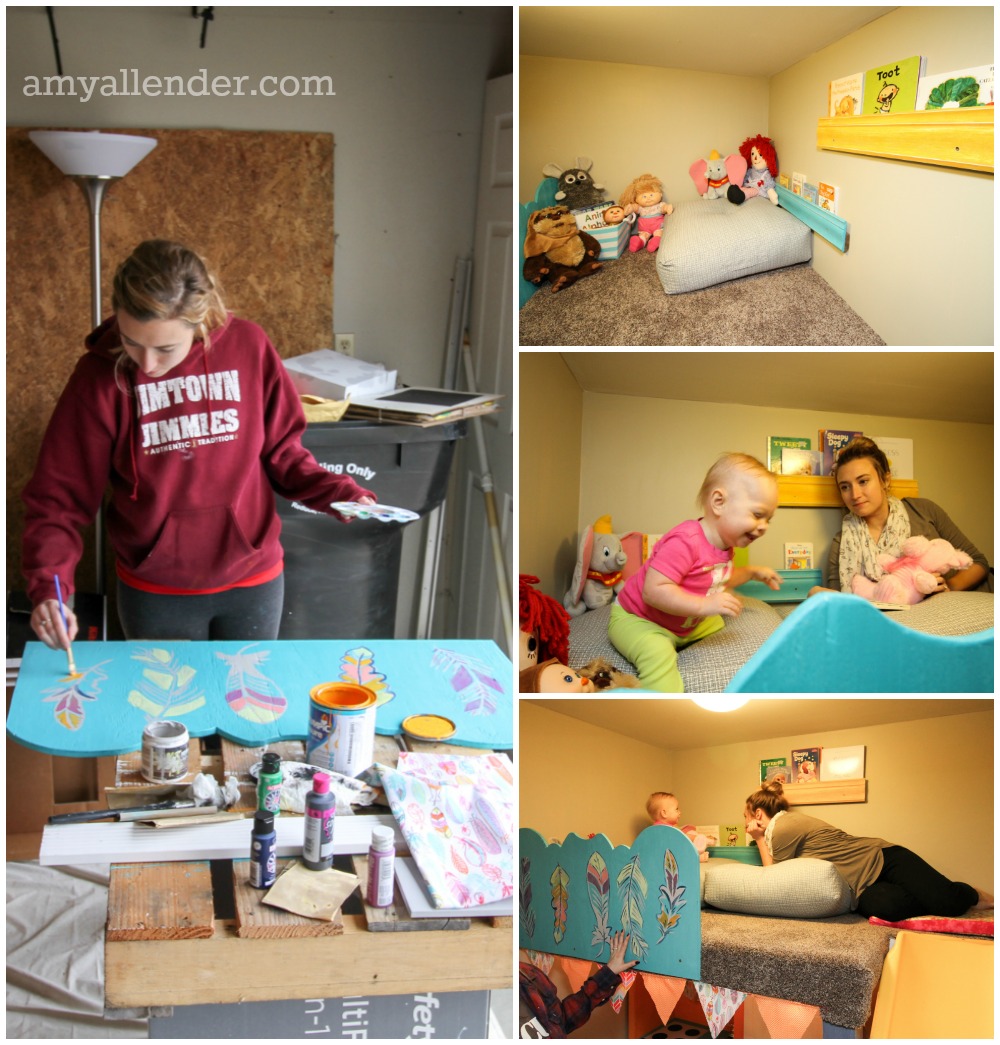
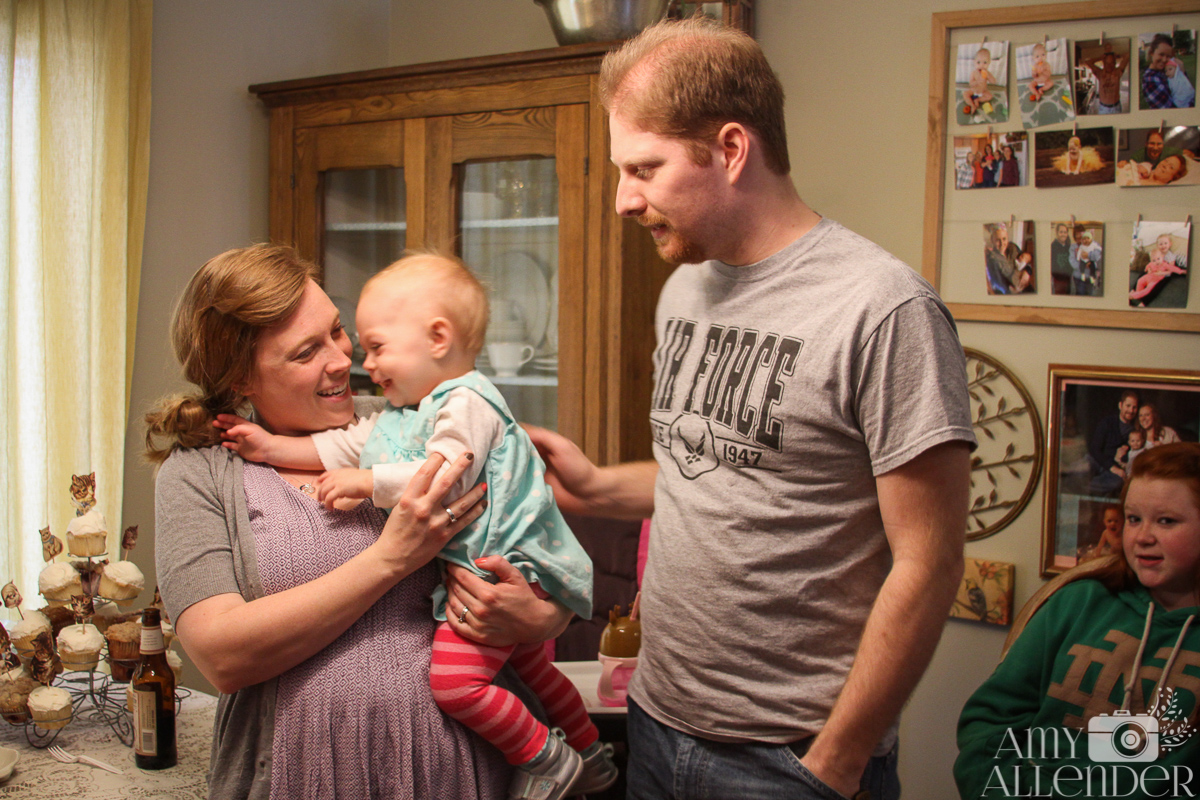
The big reveal happened close to bed time, after I’d installed the last bit of bunting and put in the play table. Ellie liked it–but let’s be honest…at 1 she really lacks the life experience to understand that most houses don’t have slides in the basement. Erin, on the other hand loved it. At least it seemed like she did. I honestly think it was all more than she expected. Even silly Penny, the Boston Terrier liked it. Except for when Adam sent her down the slide.
Since finishing this space I’ve been thrilled to hear how much use it’s getting. Erin says Elliot and Haven read books up in the loft and have a blast sending all of Ellie’s “babies” and balls down the slide. I’ve talked to Erin late at night when Ellie has been unable to sleep because of a fever, or cutting a new tooth and they’ll be in the playroom “cooking” or coloring. A pretty space isn’t worth much if it’s not serving a purpose.
Here’s a look at key spaces, ideas and tips involved in making your own DIY playroom.
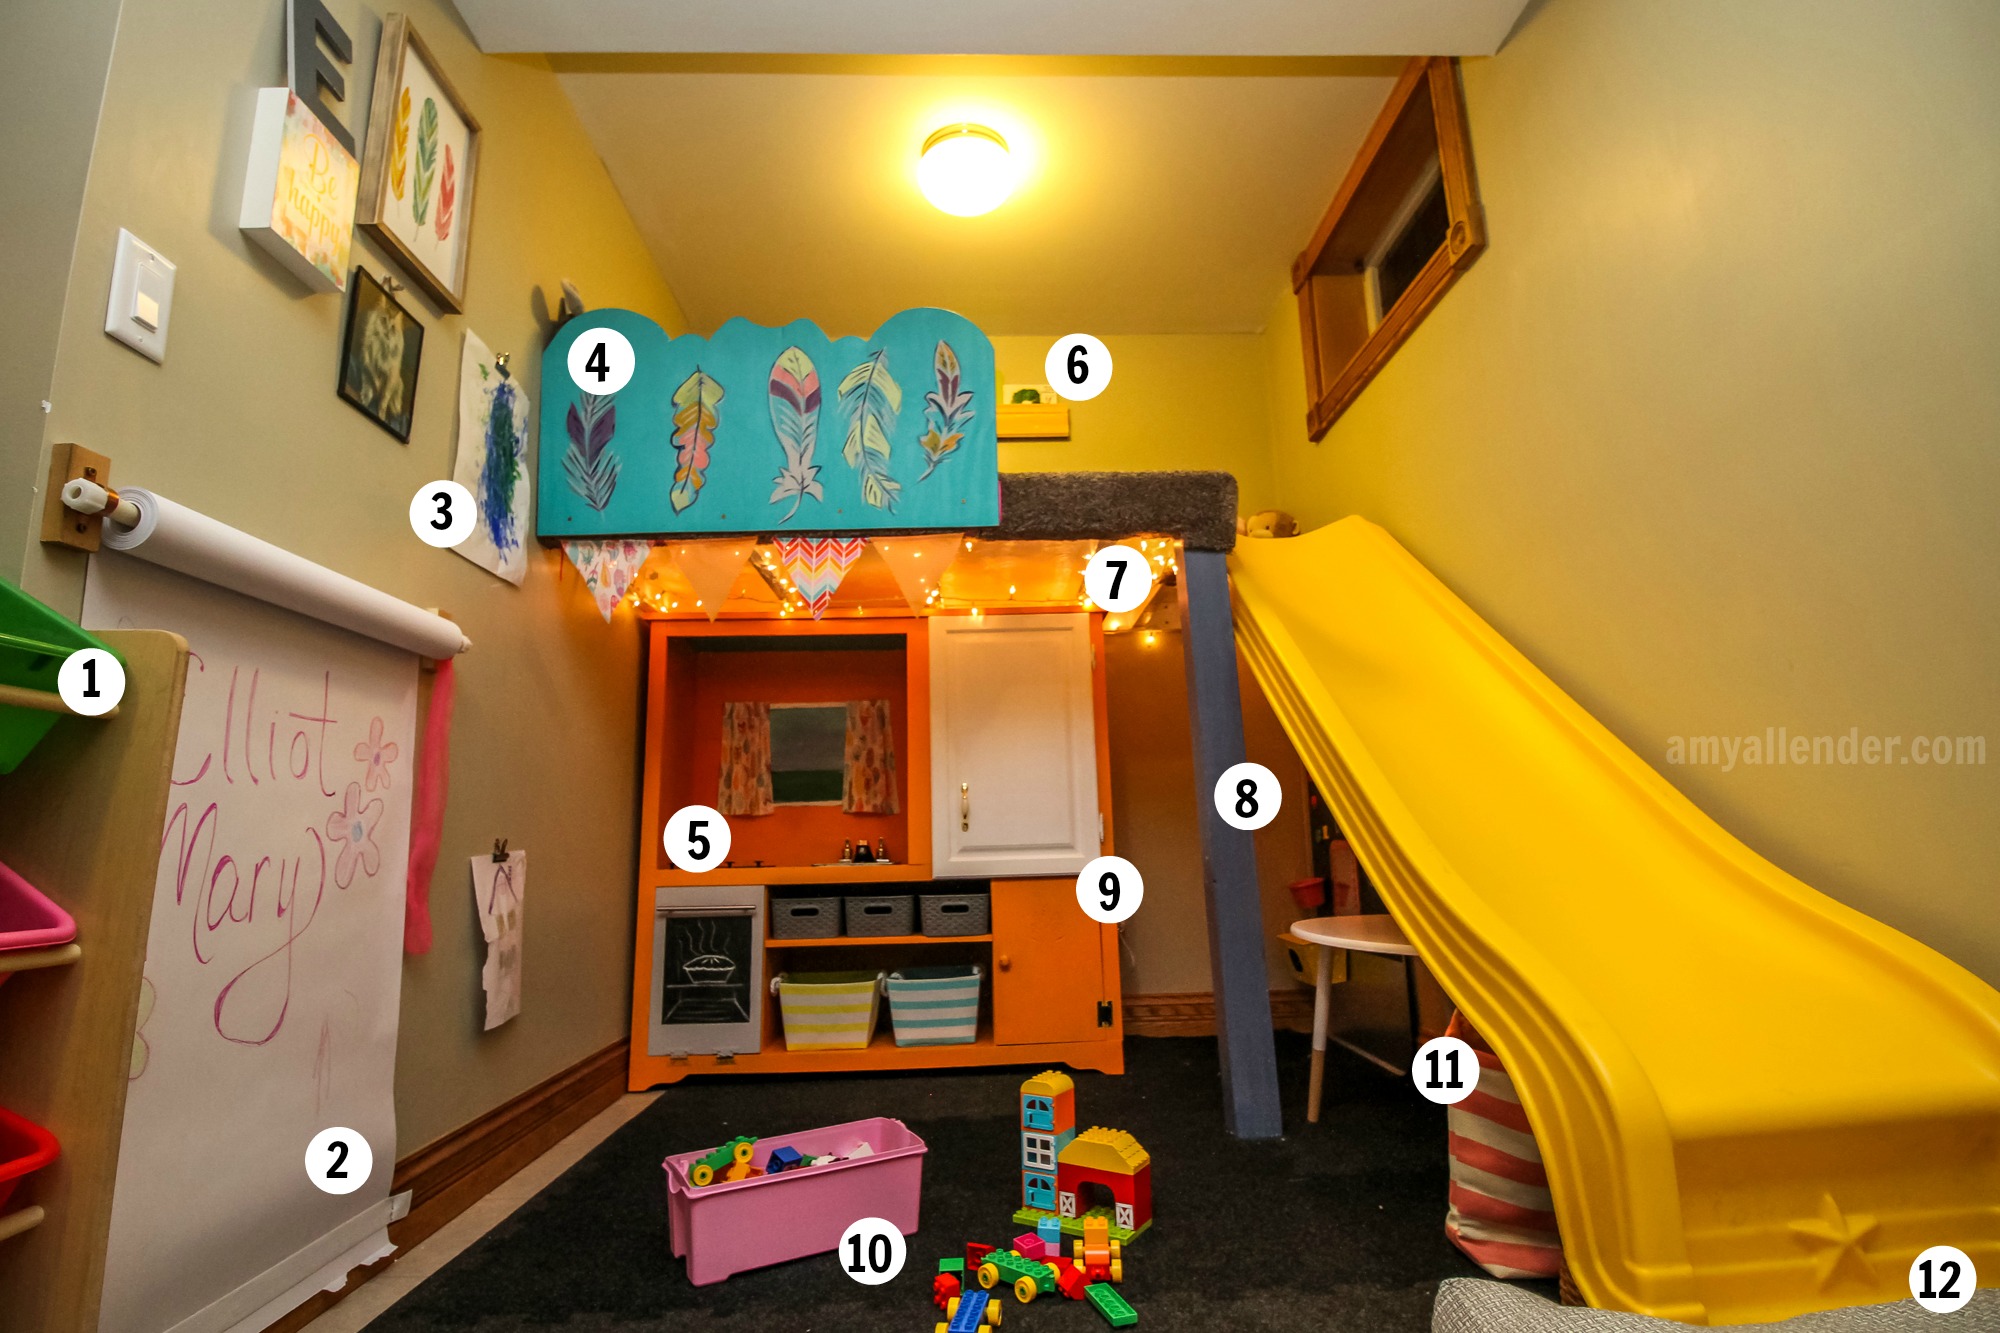
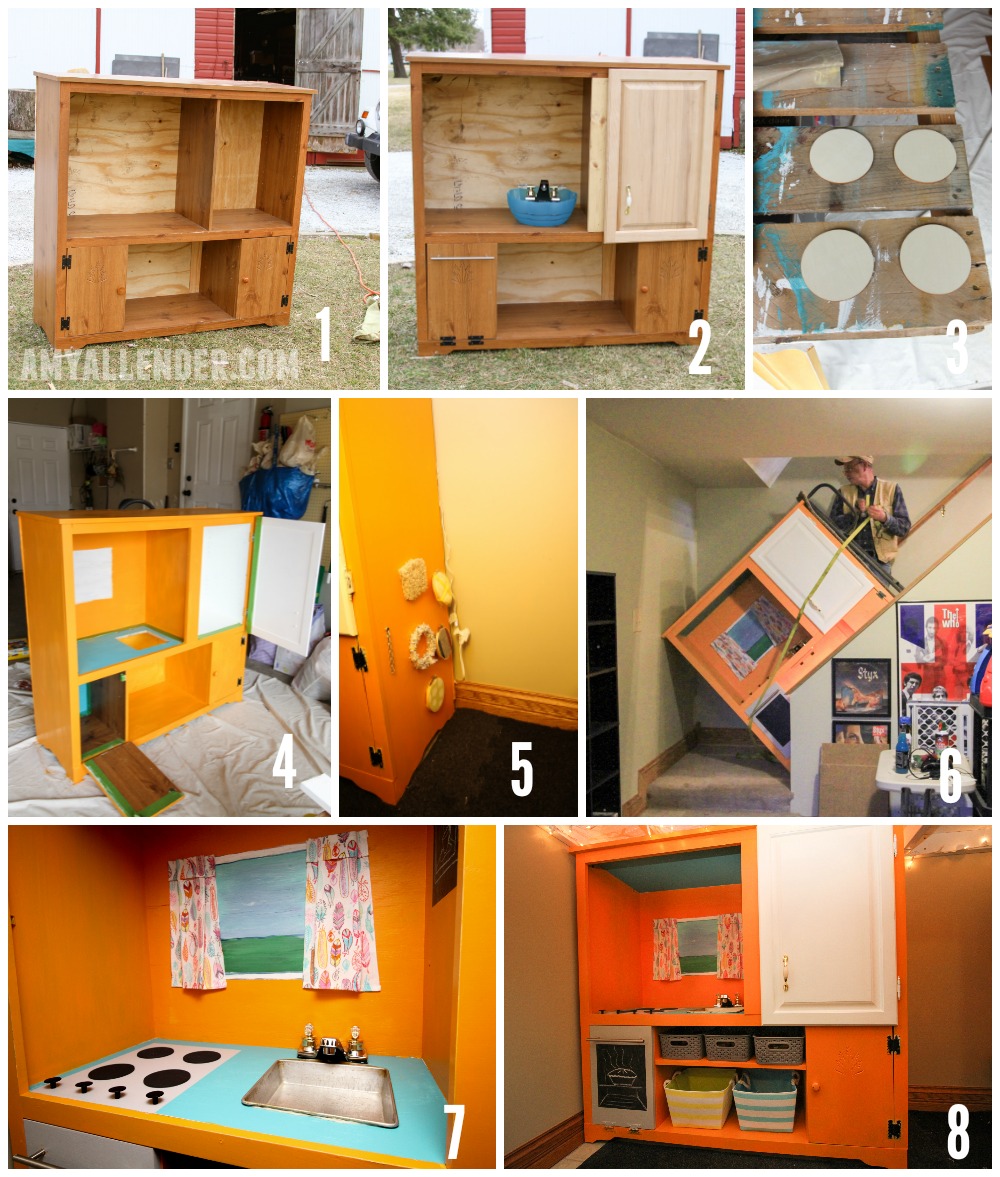
- Erin bought this standard toy shelf from a friend. It fits perfectly next to the arm of the couch {the rest of the basement is a TV/living room} and adds an easy-to-organize space for all of Ellie’s loose pieces and toys.
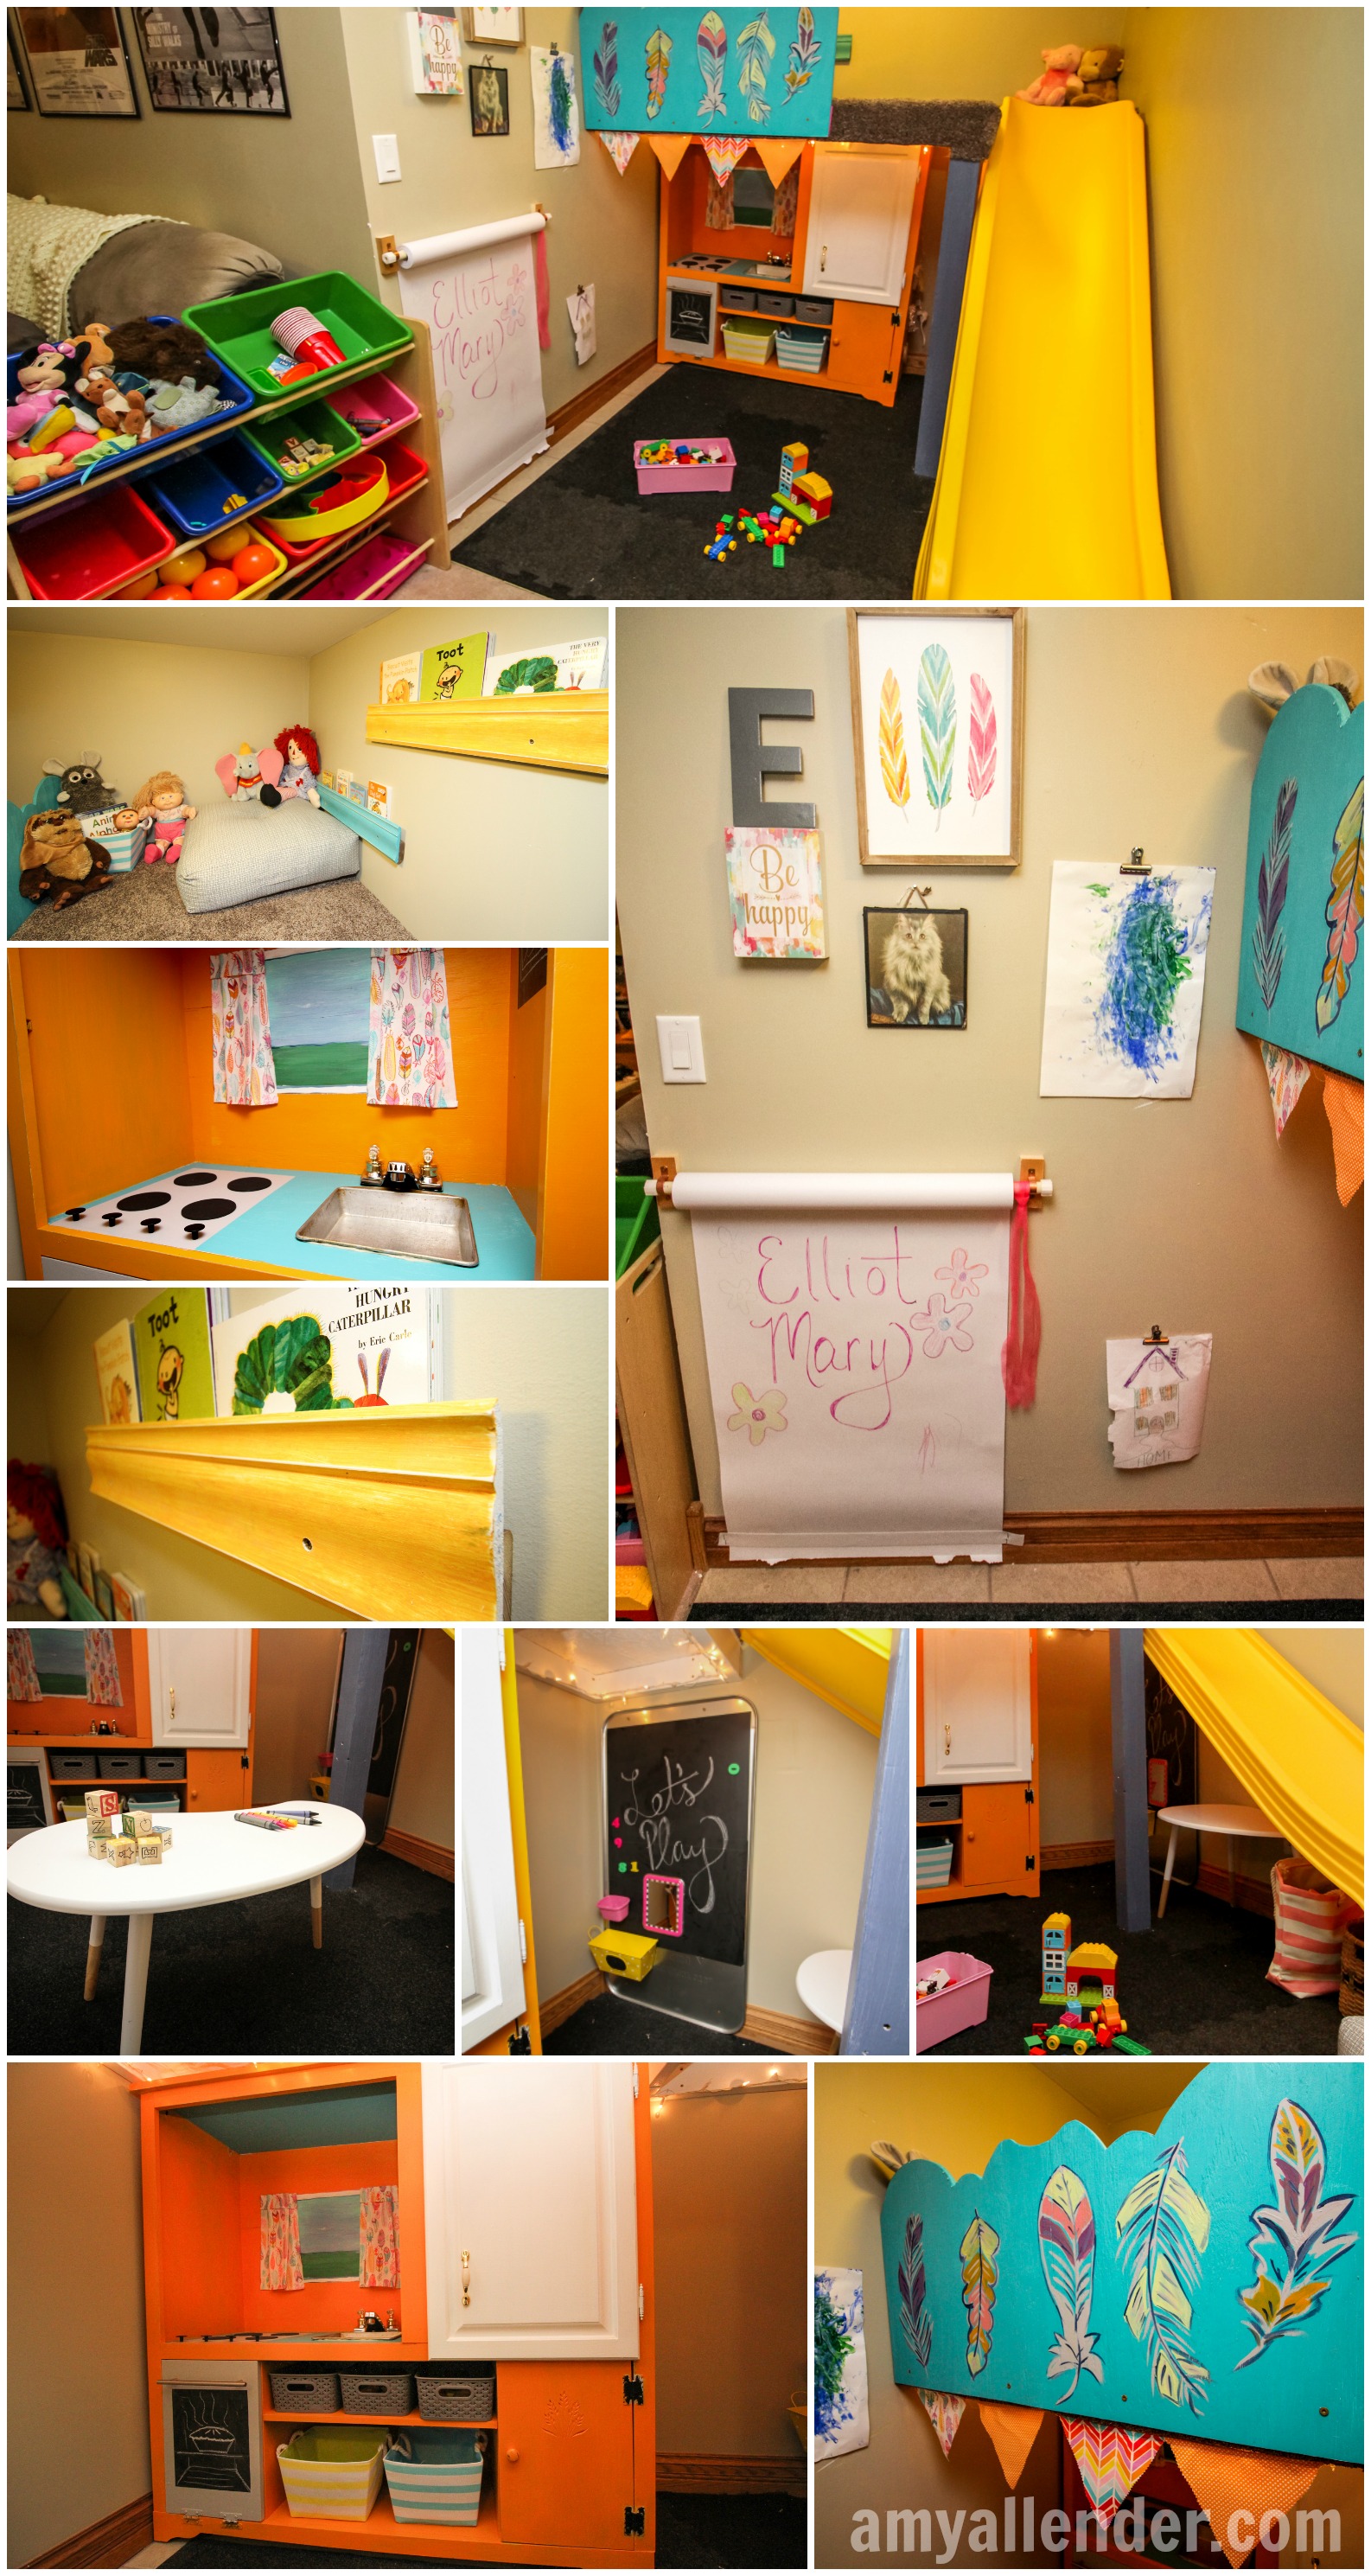
2. A roll of paper mounted to the wall and secured with pipe straps gives Elliot a place to draw with crayons and pencils. A piece of wide elastic holds the paper in place and prevents it from curling.
3. Office clips hung on the wall {and space for a few more in the future} provide space to display Ellie’s latest artwork
4. A piece of plywood painted with feathers to match the fabric accents acts as a guard rail in the loft. Since Elliot is so young, no ladder was installed–to prevent her from sneaking up unsupervised. As she grows, the barrier will be unscrewed and shifted to the right {next to the slide.} Wall mounted ladder rungs will be installed on the wall as a ladder into the loft without taking up valuable floor space.
5. In addition to being super fun, the play kitchen {upcycled from an old entertainment center} offers lots of toy storage…well hidden in pretty bins.
6. The loft houses large floor cushions from Costco, stuffed animals and books. Scrap molding was used to make a cheap effective book rack. It’s a perfect place for reading, napping, and watching Curious George from across the room. Oh yeah, and it’s great place to throw toys down the slide and launch yourself onto the slide.
7. White lights stapled to the loft frame brighten up the dim space underneath.
8. An oil drip pan covered in chalkboard contact paper {next time I’d use chalkboard paint} is mounted under the slide for a second drawing space and place to play with magnetic letters and numbers
9. An easily changeable and updateable sensory board in mounted on the side of the play kitchen. {See my inspiration here}
10. Rubber backed floor tiles fit together like puzzle pieces and soften up the floor–making it more comfortable to sit on and safer to fall on. It’s easy to vacuum and easy to replace a tile if needed, making it a great place to play Legos.
11. Dead space under the slide houses even more toy storage bins and a play table. It’s easy to slide out and use for finger painting or snack time, but stores neatly under the slide and out of the way to free up space for playing on the floor. {See table in details collage above.}
12. To soften up fast landings, a floor cushion sits under then end of the slide.
Jealous yet? I know I am. And I don’t blame Haven one bit for sneaking over all the time. Wouldn’t you?
Before I go…I owe some big thank yous: to my dad–Warren “the machine” Allender for all of his construction help; to my mom–for doing all of the sewing and for taking over babysitting duty while Dad and I worked; to Erin and Adam for trusting me with their house, and for giving birth to the cutest baby on record {in my biased opinion}; and to Ellie for melting my heart and giving me an excuse to design the funnest space I’ve ever taken on.
xo
Amy
PS–in case you missed a post this week, here’s the introduction to this project, the post about building the loft, and how to make a play kitchen and art spaces.
by Amy | Jul 21, 2016 | Blog, The Art of Projects, the house
DIY Play Kitchen & DIY Art Spaces
This week I’m show casing a super cute-cool-awesome playroom I designed {and executed with help from my dad} for my niece. If you missed the introductory post, you can see it here. Yesterday I showed you how we installed a loft to add additional floor surface into the tight space. You can see that post here.
We left off here….Loft, slide, flooring, book rack and twinkle lights installed. Today I’ll show you how I upcycled an old entertainment center into a DIY play kitchen and created some creative space. {Aunt Amy is a big advocate of encouraging little ones to draw, paint and color.}
Now, onto the kitchen. Ellie loves to play cook, so I really wanted to give her a space to be a chef–and give my sister a place to store the quickly growing collection of play food she is amassing. Here’s the B&A.
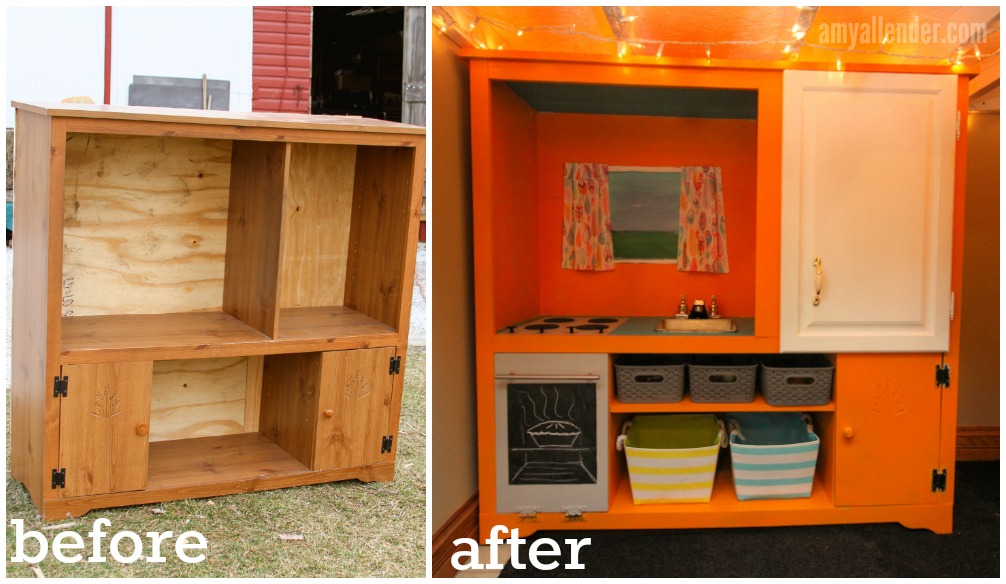
The beauty of this DIY play kitchen is that it can be made for next to nothing–and it’s super easy to execute. So even if you aren’t making a loft and a full play room–this is an easy piece to make for your home, or a friend. It’s sturdy and in also offers lots of storage space. I’m a big fan of pieces with doors and room for bins–better for corralling and hiding a mess. A lot of the process is pretty straight forward, but for the sake of an infographic…here’s a breakdown.
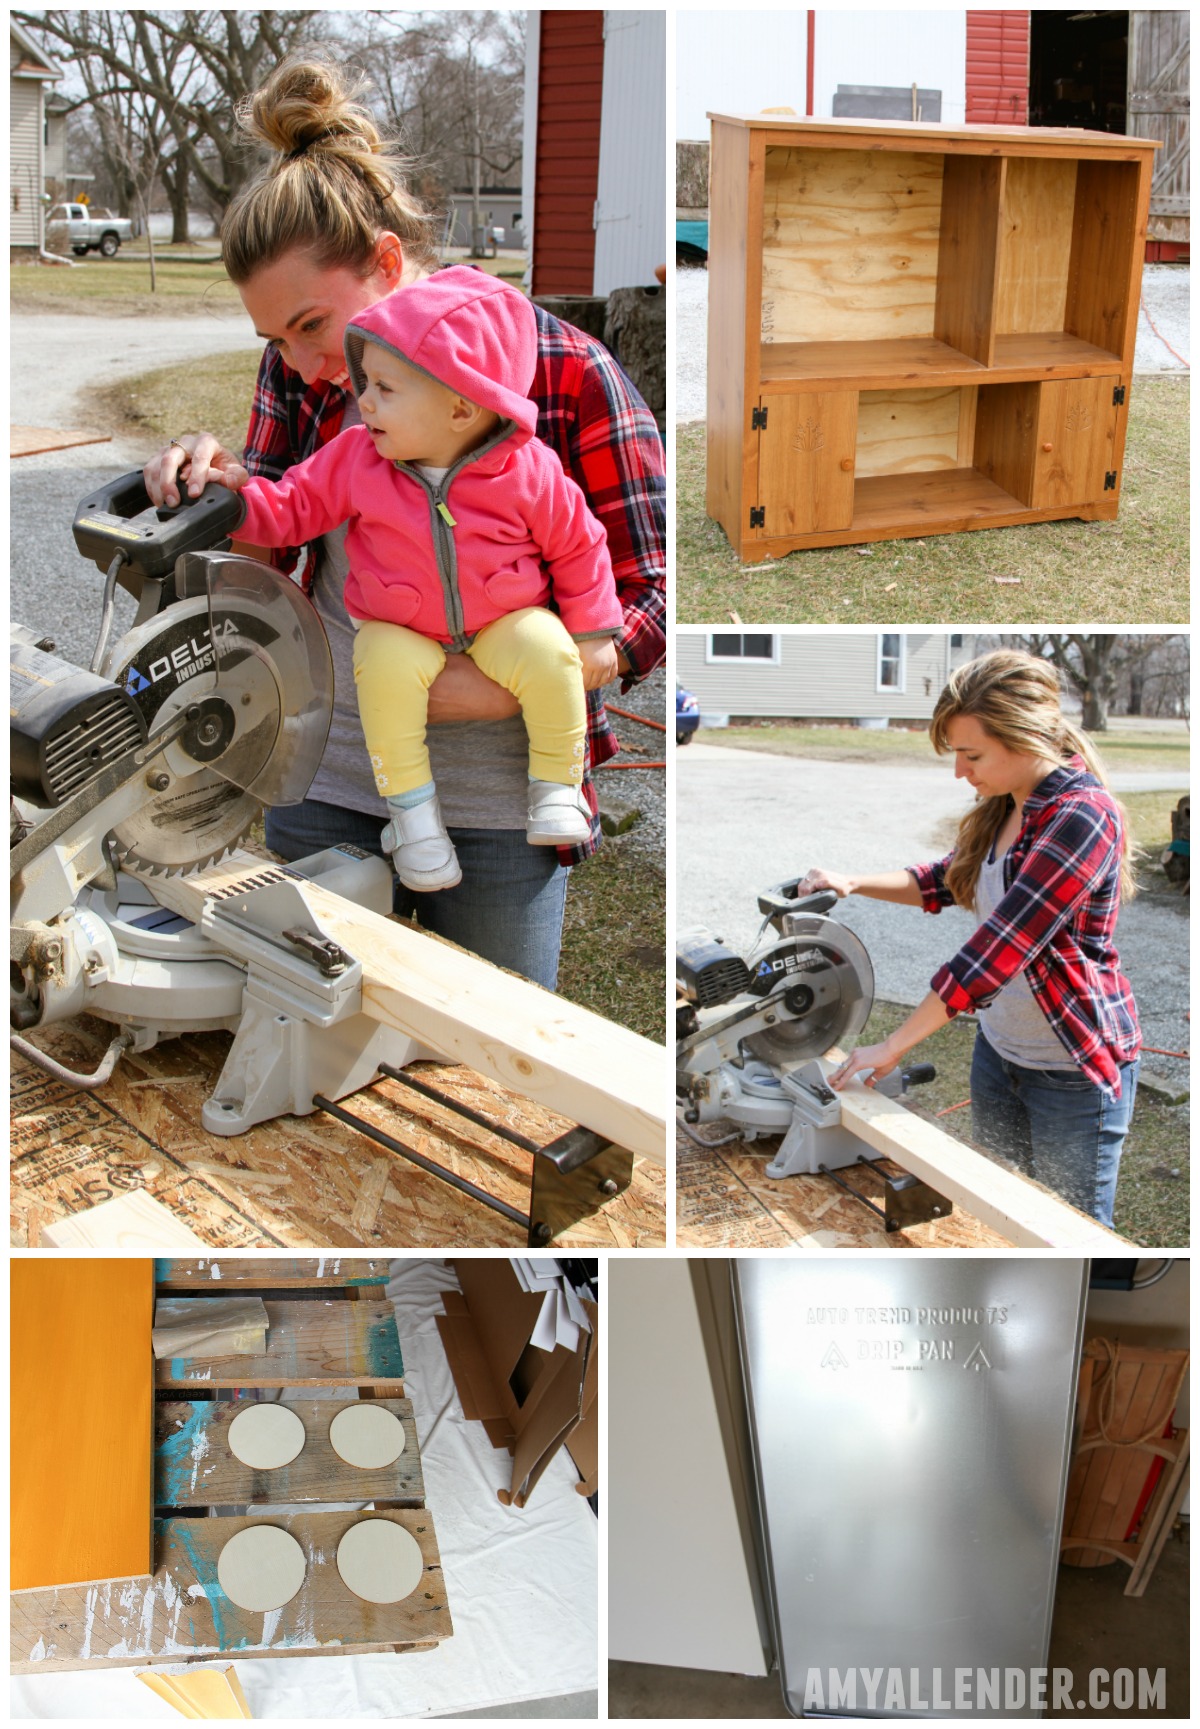
- I started with my parent’s old entertainment center. If you don’t happen to have one lying around, check out a thrift store…or better yet a Habitat ReStore {if you are lucky enough to have one in your community.} At the ReStore there were loads of them for about $15 each–probably since TV’s are no longer made in this shape….
2. A quick visit to the Habitat ReStore {or your local hardware store} gave me a cupboard door, a door handle, and “oven” handle. I attached the cabinet door to cover the shelves and added a scrap of wood to hide the gap left because the door wasn’t quite wide enough to cover the space. Next, I removed the hinges from the lower left cupboard and moved them to the bottom so this door would open like an oven. To finish the oven, I added a nice, long handle.
I also picked up a faucet to use with the sink. I planned to recess that blue bowl in to the “counter”, but it ended up being a little too deep.
3. A package of four, small wooden discs from Hobby Lobby were painted black and secured to the counter with wood glue to serve as “burners.”
4. Because the surface of the entertainment center was somewhat glossy I primed it with {my fave!!} Zinsser Bulls Eye 1-2-3. It’s made to cover over any surface and ready if for a top coat. In hind sight, I wish I would have spray painted this piece. I highly recommend doing that–at least on the outside–to cover brush strokes. It also would have been a bit cheaper than buying paint {the job was a little too big to use a sample sized container…but a quart left me a lot leftover.}
5. On the side of the entertainment center we made a small sensory wall. Since Ellie was only one when we did this project, I started with different textures held inside small embroidery hoops. As she gets older these can be swapped out and locks, chains and switches can be added. My inspiration came from this awesome DIY sensory wall.
6. Actually getting the kitchen into the basement was our biggest challenge. We pretty much lodged it in the stairway. That’s what we Allenders refer to as an oopsie poopsie. This left the happy homeowners with some slight drywall damage and me with a thrown back. But it was well worth it.
7. Dad helped me install the faucet…which is super fun because the handles actually turn. And we used a jigsaw to recess an old 8×8 baking pan for a sink. I really love that it looks like a stainless steel kitchen sink. The oven knobs are just cheap, black cabinet knobs. A window breaks up the orange on the back wall, and a piece of chalk board contact paper gives some “menu” space on the right wall.
8. I used more chalkboard contact paper to cover the front of the oven. Tip for future DIYers–I’d use chalk board paint instead. In the months since this project was completed, I’ve been told it hasn’t held up well. Some well placed bins make the deep shelves more useful for toy storage and organization.
Once the kitchen was done, it was time to add in creative spaces. This is another super simple project that can fit into any home. This is an oil pan {I found it in the automotive section of Wal-Mart}. I covered it with chalkboard contact paper for drawing space. I bought a few bins from Hobby Lobby to store chalk and magnetic shapes and letters, then attached magnets to the bins with hot glue to keep them in place. **Again–if I did this all over again, I’d use chalk board paint instead of the contact paper because Erin has said it’s not holding up well.
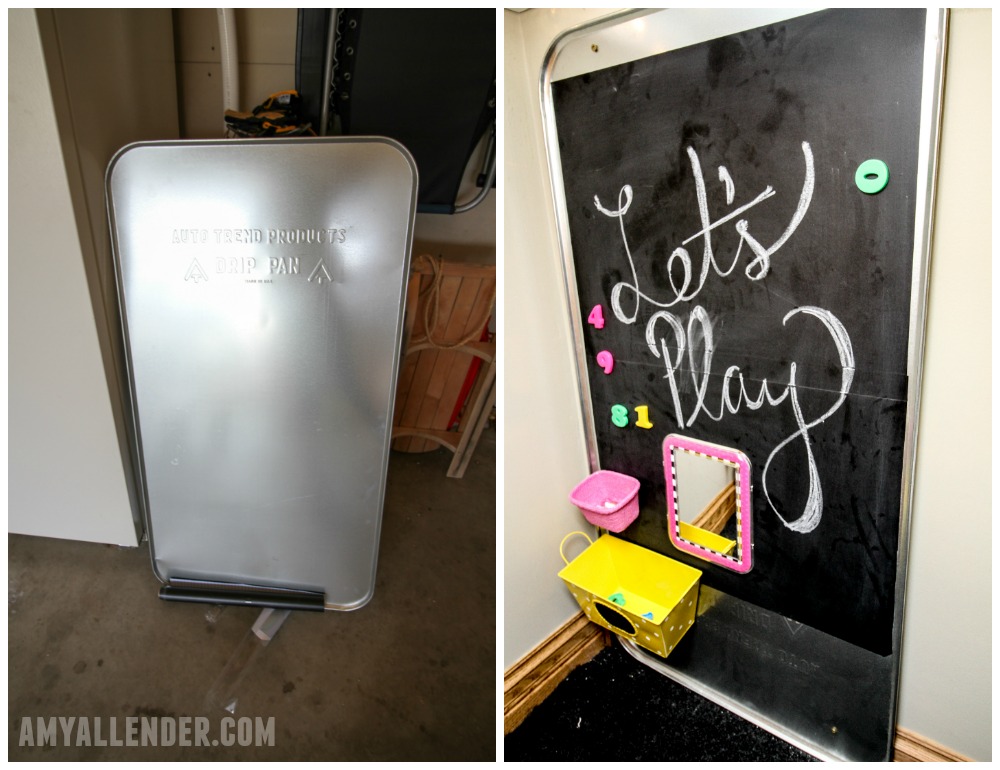
For those non-chalky times I also added a paper roll and some space for displaying future works of art.
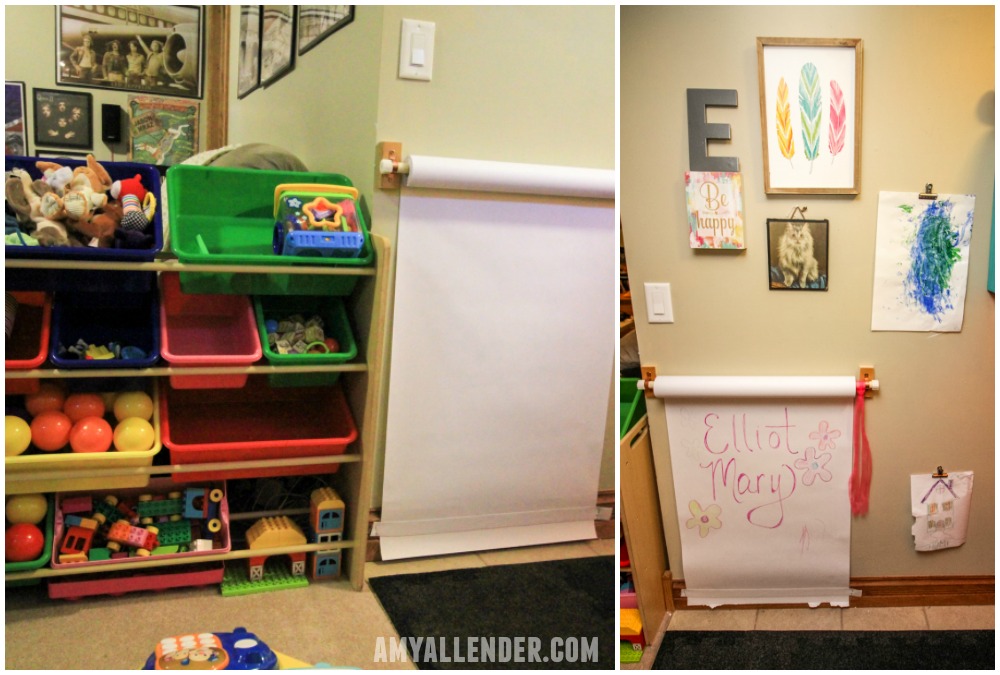
Dad put the paper rod up by running a rod through the center of a roll of paper and attaching that to the wall with pipe straps. To hold the bottom of the page in place and from curling, we stapled a wide piece of elastic to the baseboard.
Erin already had the toy bins you see in the right image above. This just happened to fit perfectly next to the arm of the couch. This does bring the playroom out a few feet past the nook we were building in, but I think it’s a nice way to section off this portion of the basement for playing. And it only required swapping an end table to the opposite end of the couch.
Okay–well, that’s pretty much all the pieces. Tomorrow I’ll show you how it all fits together–and some adorable photos of Ellie playing in her space. Come back for the big reveal!
xo
Amy
by Amy | Jul 20, 2016 | Blog, The Art of Projects, the house
If you missed it, here is a link to yesterday’s introductory post to the DIY playroom project I took on for my sister and her sweet daughter Elliot. Today I’m showing off the DIY Playroom Loft we added to the space.
When I start any project–whether it’s home improvement, a design project or even a classroom lesson–I like to think about objectives. Even if it isn’t plausible to hit them all, I like to come up with a dream list of things a certain project would accomplish and achieve. For the playroom it was no different. Since this was a combined birthday gift for Erin and Elliot {birthdays only one day apart} I really wanted to know what they wanted…and since Elliot hasn’t quite grasped the ability to verbalize, the responsibility fell on Erin.
Oh yeah, and this space is in her house…so it’d be nice if it was something she liked and found useful. Here’s the list we came up with.
- It needs to grow with her–baby appropriate, but with the ability to transition to toddler and child
- Something softer on the floor than the tile
- A soft space for reading and storing stuffed animals
- Book storage
- Toy storage
- An art space
- Enough floor space to play, build with blocks, etc
- Organized and organize-able
- It all needs to fit into the basement nook
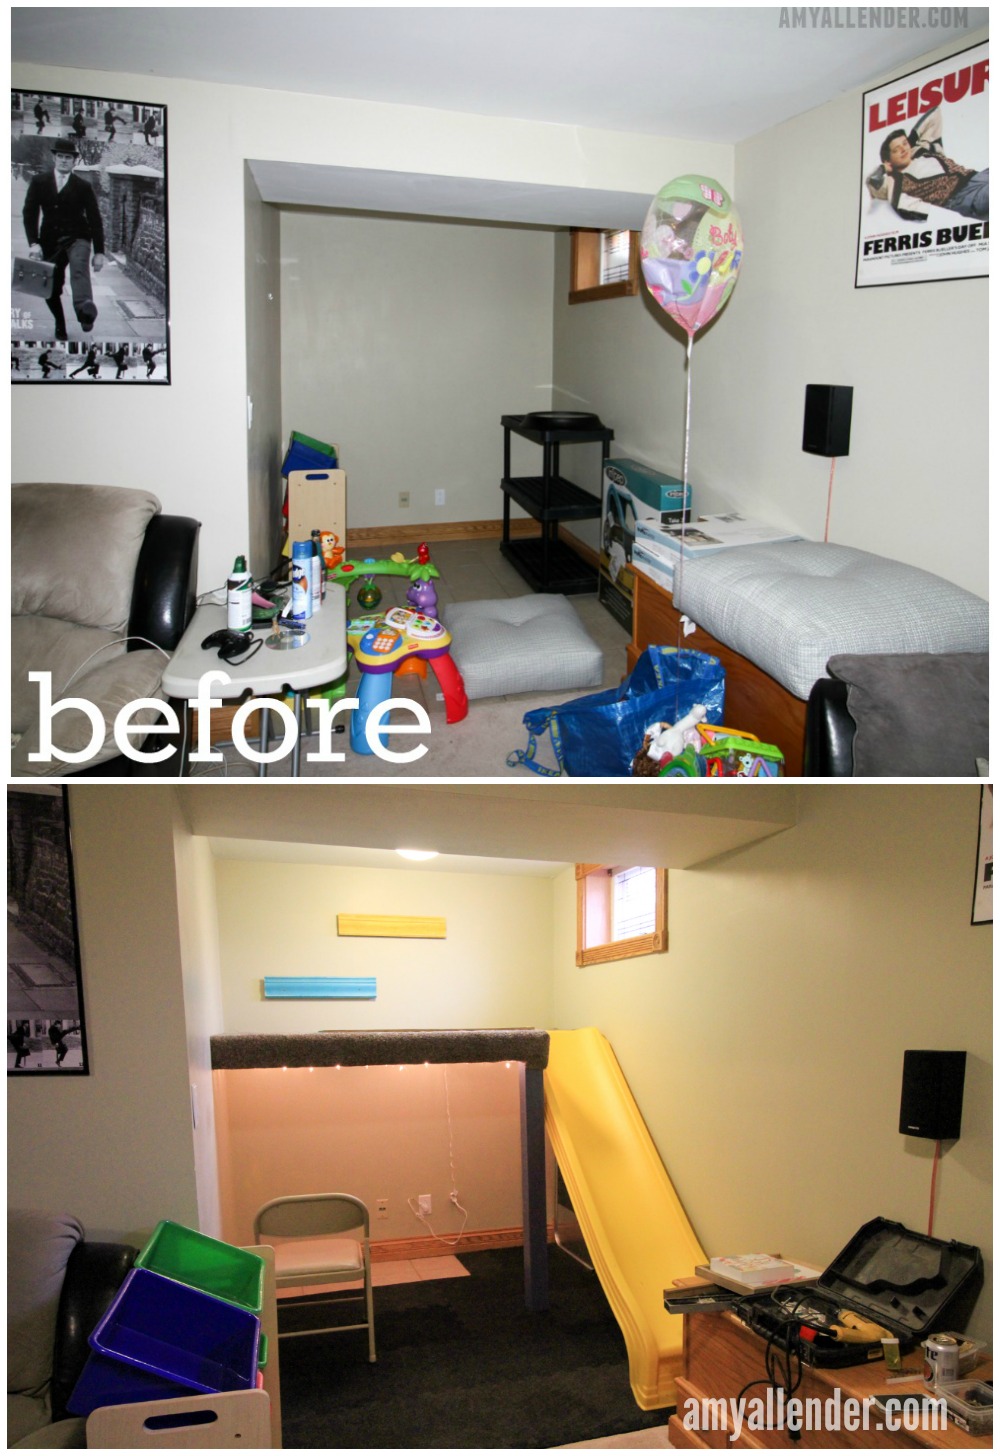
I added a few other items to the list. I really wanted to create an active space that could let her tire out, a space that she would enjoy being in…and since she loved playing at her neighbors play kitchen, I really wanted to add a kitchen too. Before we get any farther, let’s take another peek at the before space.
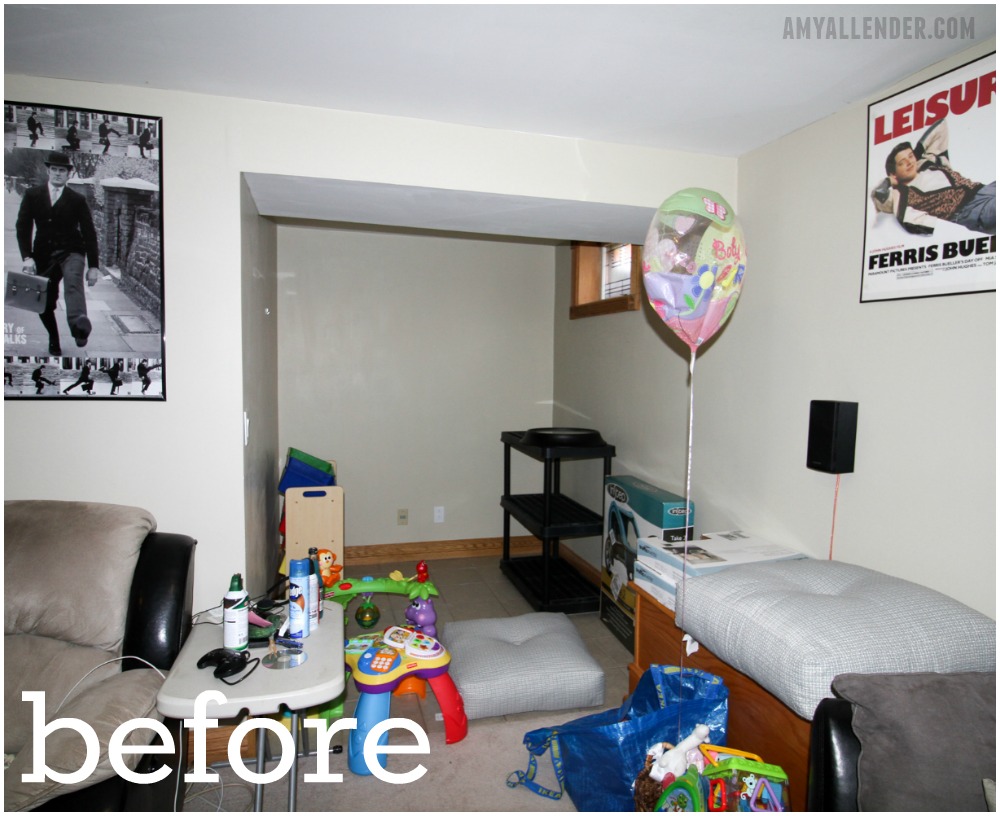
That’s a lot of things in just a 6’x7′ area. It was just a dream list, but I’d do anything for Ellie–especially since I live so far away–so I really wanted to make it happen. There wasn’t a good way to get all of the play zones into such a small space and have floor space left for playing. There wasn’t a lot of space to expand outward into the basement living room. So instead of cutting things from the list or taking up more valuable floor space–I decided to build up.
A loft. A loft would add more floor surface without taking up any additional floor space. The loft could serve as soft space, a reading nook and an active space–we’d attach a slide. The space underneath could house art, kitchen, storage and floor space. I explained the concept to my general contractor–I mean dad–and he helped get it together.
The first issue I addressed was the flooring. The tile was cold and hard and very rough to fall on. Together with Erin and her husband Adam, we picked up these flooring tiles from Home Depot. It’s the kind of rubber backed, floor tiles used in gyms and industrial spaces. They are durable, neutral and super easy to install. Because they are rubber backed they don’t slip and slide, and if something were to ruin one, they are easy to replace. All together, this was the biggest investment I made in the space.

Next we started building the loft.
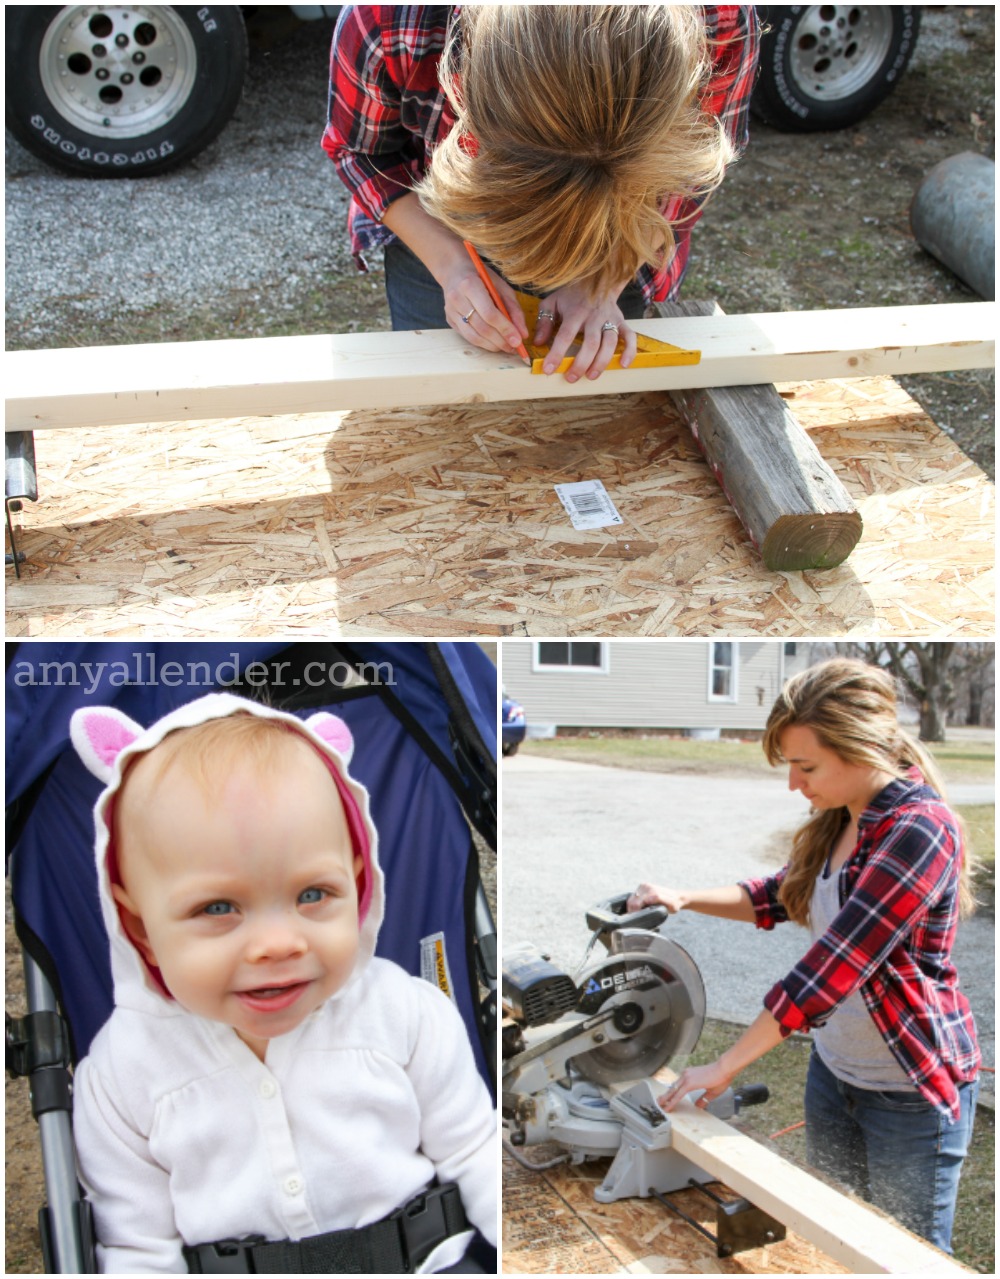
Dad and I made the loft from scrap wood and studs from the barn. First we calculated how deep we thought it needed to be, considering space for a slide–then we build a frame from 2×4’s. Ellie supervised from her stroller between walks around the yard with my mom. Erin and Adam were both at work. {Surprise projects are best.}
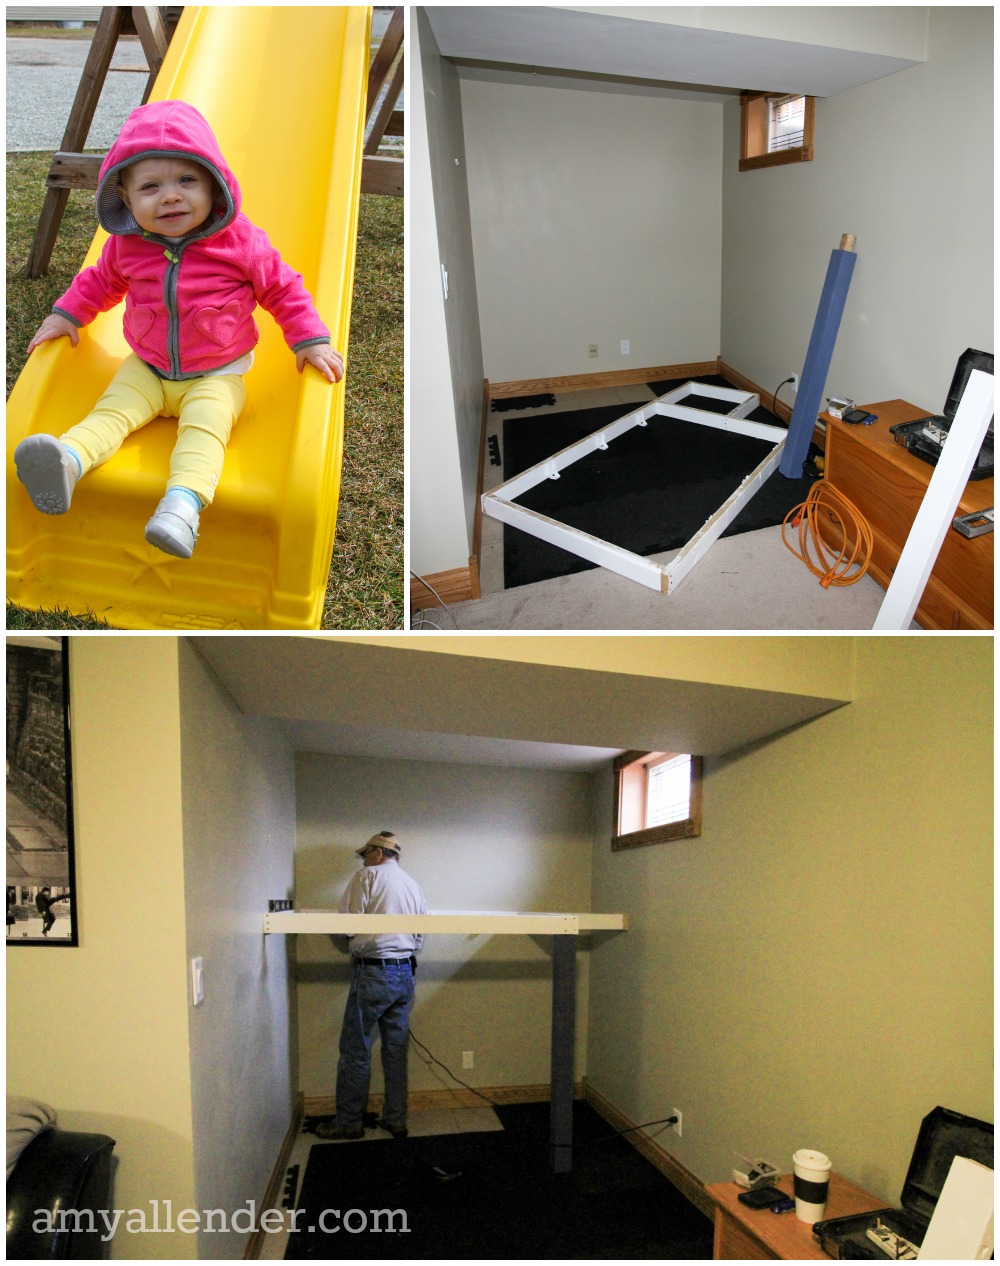
Once the floor had been installed and the loft frame was built {and Elliot had approved of the slide–like this one from Menard’s} it was time to install the loft.
Everyone involved wanted this to be sturdy and safe, so we took extra measures to be sure it would never fall or tip. First we decided on a height {really based on our slide length} and drew a level line around the nook. Next we secured the frame to studs in the walls. To finish the frame, we attached additional 2×4’s to braces across the depth of the loft to support the floor. {You can see the braces in the photo below–I forgot to take a photo of the loft fully framed.} We also included a 4×4 support beam anchored with braces to the loft frame, to support the front of the loft. Below, I’ve included a very technical work up of how we created the support beam.
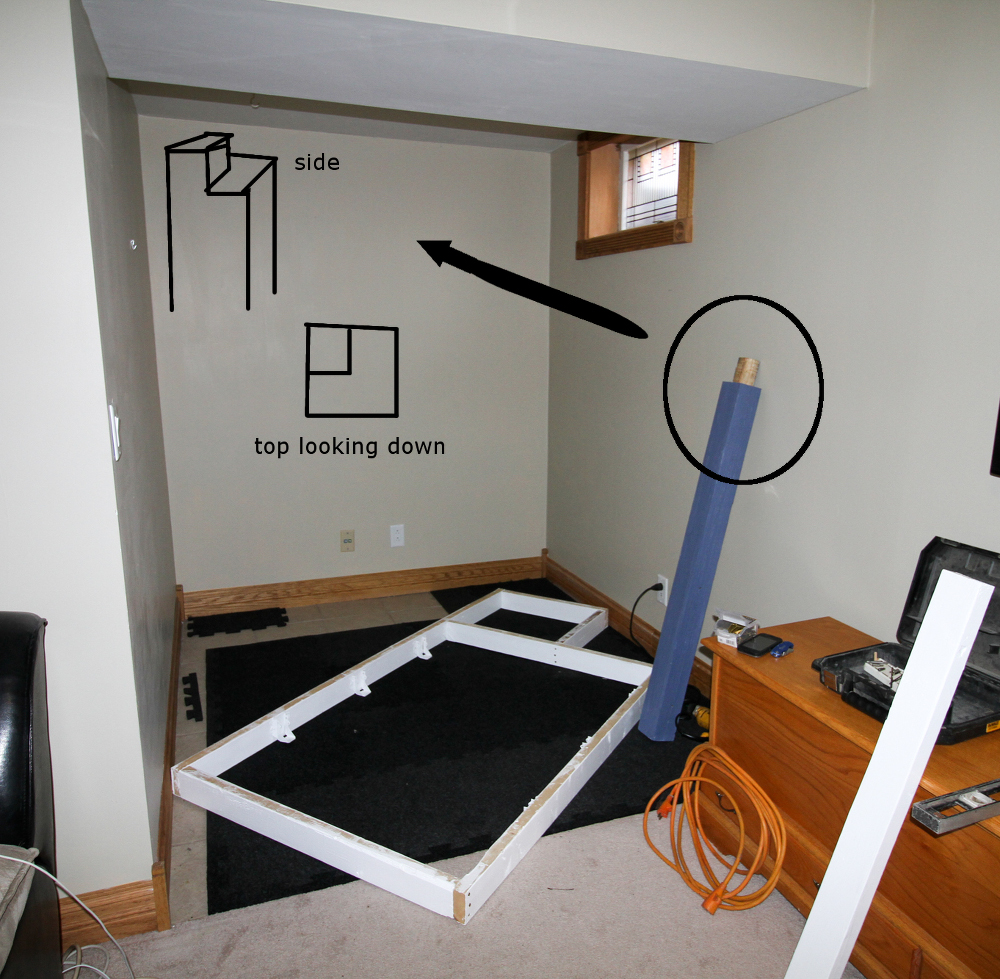
Dad geniusly notched the 4×4 so that it would perfectly fit into the corner of the loft, adding even more support. The loft frame ended up hugging the support beam…if that makes sense.
Over the frame we secured plywood and over that we attached a carpet remnant. Below are some photos of the carpeted loft–mostly unflattering because I’m always mid-chew on my PB&J. Side note…look at my sister’s pathetic little pup. She just wishes she could get up and steal my sandwich…Sorry shorty.
Elliot loves reading, so I also included a little bit of book storage in the loft. These are just pieces of molding I picked up at Home Depot. The employees gave them to me for free because they were scraps. I used the pieces of scrap wood you see in the lower left image behind the molding to create a little book rack. {See the image below for a look at the side of the book rack.} Because the space under the loft was very dim, we stapled up some white Christmas lights to the studs.
Because we don’t want our precious baby friend falling out of her reading nook, we added a bit of railing. This is another piece of scrap plywood from the barn, jig-sawed a cool shape on the top, then primed and painted. I painted some feathers on the front that match the pattern on fabric I used in other spaces. I filled the space with floor cushions Erin and I picked out at Costco and some of her excess stuffed animals and books. As you can see from “reveal night” Ellie totally digs it.
As you can maybe tell from the bottom right photo, there is no ladder attached to the loft at this time. The idea is that right now, Ellie can only be lifted up into the loft–fully supervised–so there is no risk of her getting up on the sly and taking a fall. When I show you the finished product, I’ll tell you the plan for converting this in the future.
And speaking of full reveal…we are only a couple days away. Tomorrow I’ll show you the play kitchen I made from an old entertainment center and the art space. Come on back.
xo
Amy
by Amy | Jul 19, 2016 | Blog, The Art of Projects, the house
In the time I spent away from the blog something truly amazing occurred in my life. My sister, Erin had a baby and I gained the title of aunt. The little lady who gave me this privilege is Elliot, I like to call her Ellie…and she is adorable. {Obviously…just look at her.} I love it. And I hate it because I’m chronically far away. So I do what any good aunt would do in this situation–I pray for this sweet child, and I smother her in fun and gifts whenever I can. For her first birthday {and as a birthday gift for my sister, who’s day is one day earlier} I designed a DIY playroom just for her.
Last week I told you about a looong hiatus I’d taken from writing. But I don’t want any one of you thinking even for a second that just because you weren’t seeing projects churning out on the blog that they weren’t happening. The truth is, I took on and completed some of my favorite projects of all time during these months. And they weren’t even in my own house. {Which is really saying something…because I loved my house projects.} So I guess this puts a question to rest that I get all the time, “What do you do when you run out of projects on your house? Enjoy it…or look for something else?”
Look for something else.
I think a play space is nearly vital to homes with somewhat extreme seasons. Granted, Indiana, where my family resides, is no Practically Canada–or Surface of the Sun–but the winters can be nasty and the summers can be very swampy. So, for all those days when playing outside doesn’t happen…and because it’s nice to have a space dedicated to toy storage–I think Ellie needed a play space.
Here is the before situation. Erin lives in a beautiful subdivision home on the newer side. It’s got a great full basement and lots of storage. They use the basement as a TV room–TV, couch, good sound system, you get the idea. That’s all dandy…except for the weird nook on the end of the basement opposite the staircase.
It measures 6’x7′ and has tiled flooring. Erin thinks that maybe the previous owner used it as an office. Maybe.
Regardless of its previous life, it’s an awkward space for a busy, growing family. It sat for nearly a year as dead space and a little storage. At Christmas Erin and I discussed it’s possibility as a playroom. So, over a week in early march I employed my dad to help me make it happen.
Oh, yeah…and I made Ellie work too.
{Just kidding…she mostly got pushed around in a stroller by my mom while construction took place. And the saw was completely unplugged when we snapped that miter saw photo…to send to Erin while she was working. The first rule of any project is safety.}
We used all kinds of odd materials. An old TV stand, coasters, an oil pan, a cake pan, scrap trim…And you’ll have to come back over the next few days to see what we did with all of it. The project is way too cool to cover in just a day. If you’ve been to Erin’s house, you know what I mean.
xoxo
Amy
by Amy | Oct 9, 2015 | Blog, The Art of Projects, the house

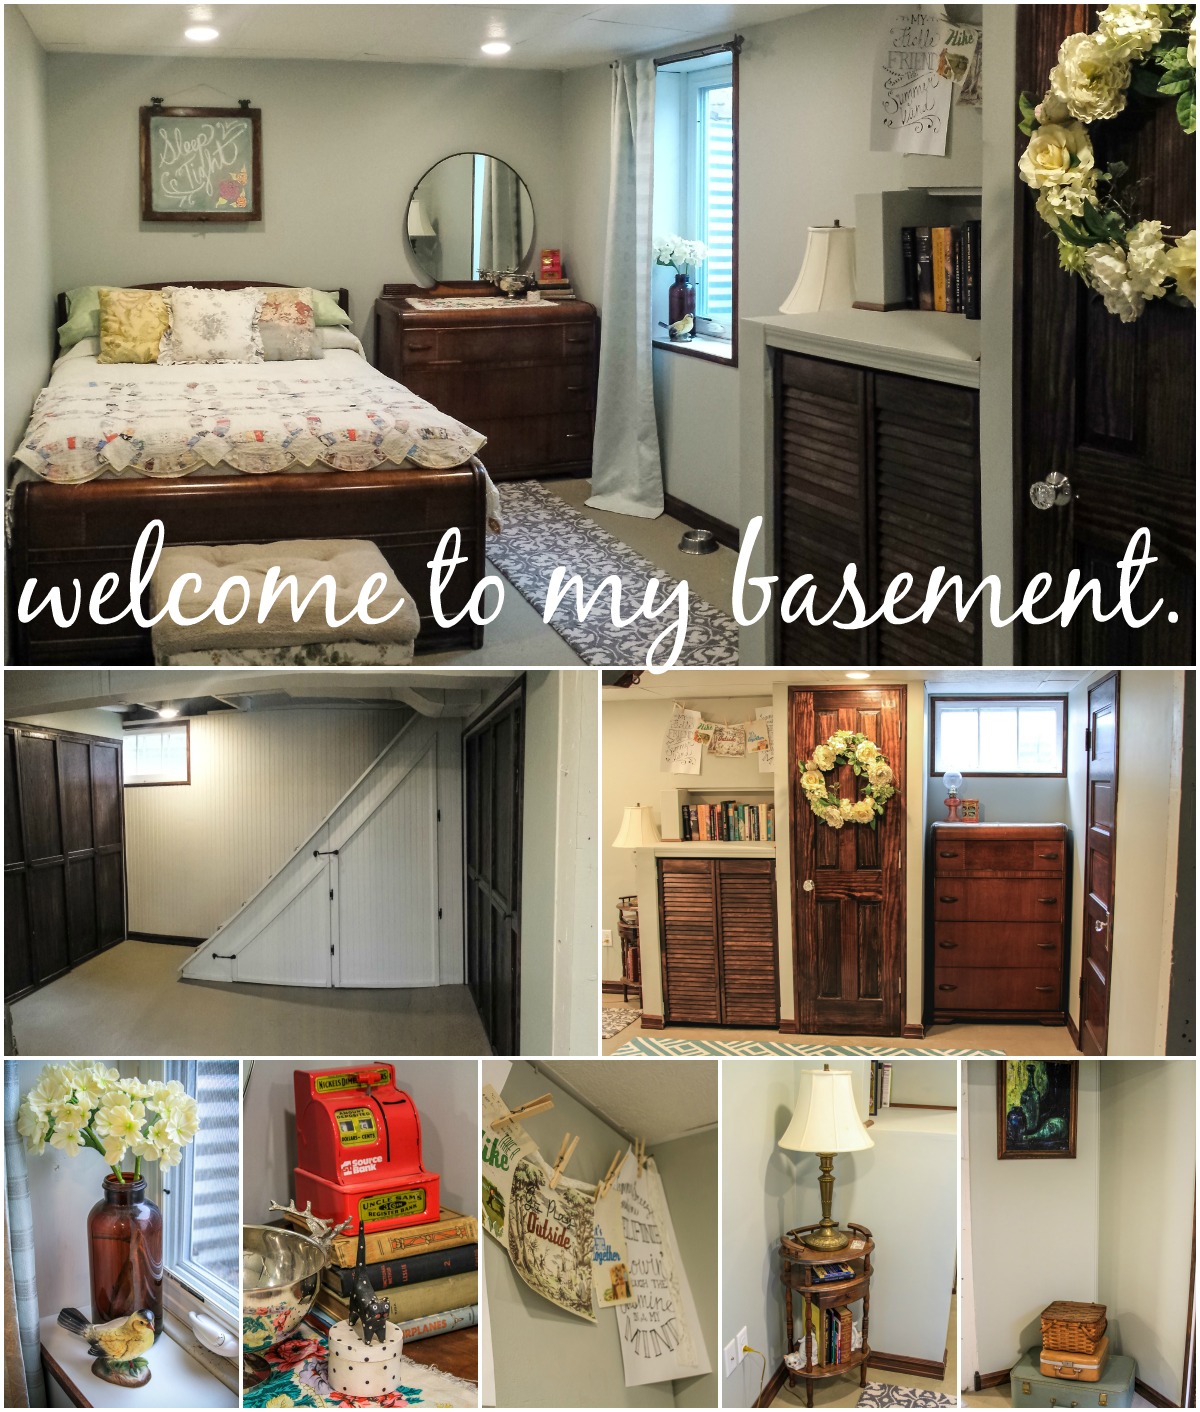
Well, well, well, well, well. The day has finally arrived. The basement has officially been finished since July {wowzers that’s quite a while…} and I’m finally posting the B&A here on the blog. For a long time I testified that the master bedroom redo has been my favorite project…or maybe the patio…but I think those just got trumped.
Maybe it’s that those other projects were done by myself–and for once Derek and I actually had a chance to tackle a project together. Maybe it’s the HUGE payout in the B&A images….the glory of having a second bathroom, the brilliantly bright can lights, killer storage, or just how darn cute it is. I may never know the reason, but this is my favorite project to date.
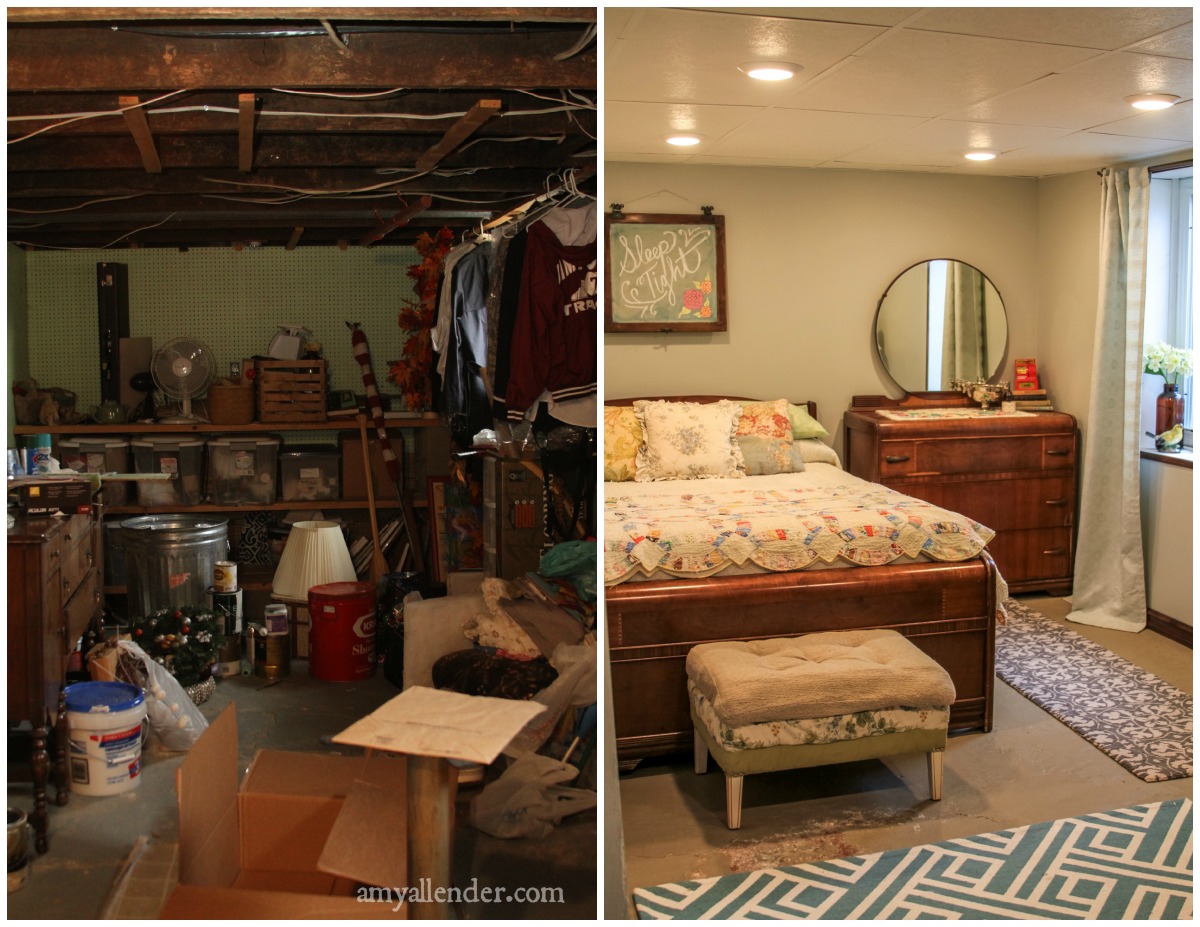
As lots of you know–we started from scratch. A totally unfinished, cement-walled, damp basement. We had things to store and they weren’t stored well. Instead the lowest level of our home was a cluttered mess of seasonal goodies that we could barely get to when we needed them. So, just to warn you all–the before photos are really a mess. Honestly, I’m a clean person. Really. I am. Please don’t judge the book that is me, by the cover that is the way our basement looked.
I’m serious. If you are going to judge me…look away right now.
Stop scrolling.
Okay, fine. You can look. You can all look. Just never bring up how cluttered it was when we talk face to face.
The now finished basement is open and mostly dedicated to being a guest quarters. It also houses a storage space, laundry nook and second bathroom. Here’s a B&A of the bedroom. {And the most amazing thin is…all that stuff on the left is still with us–well most of it–it’s just organized, restored and accessible now.}

Now watch it morph.
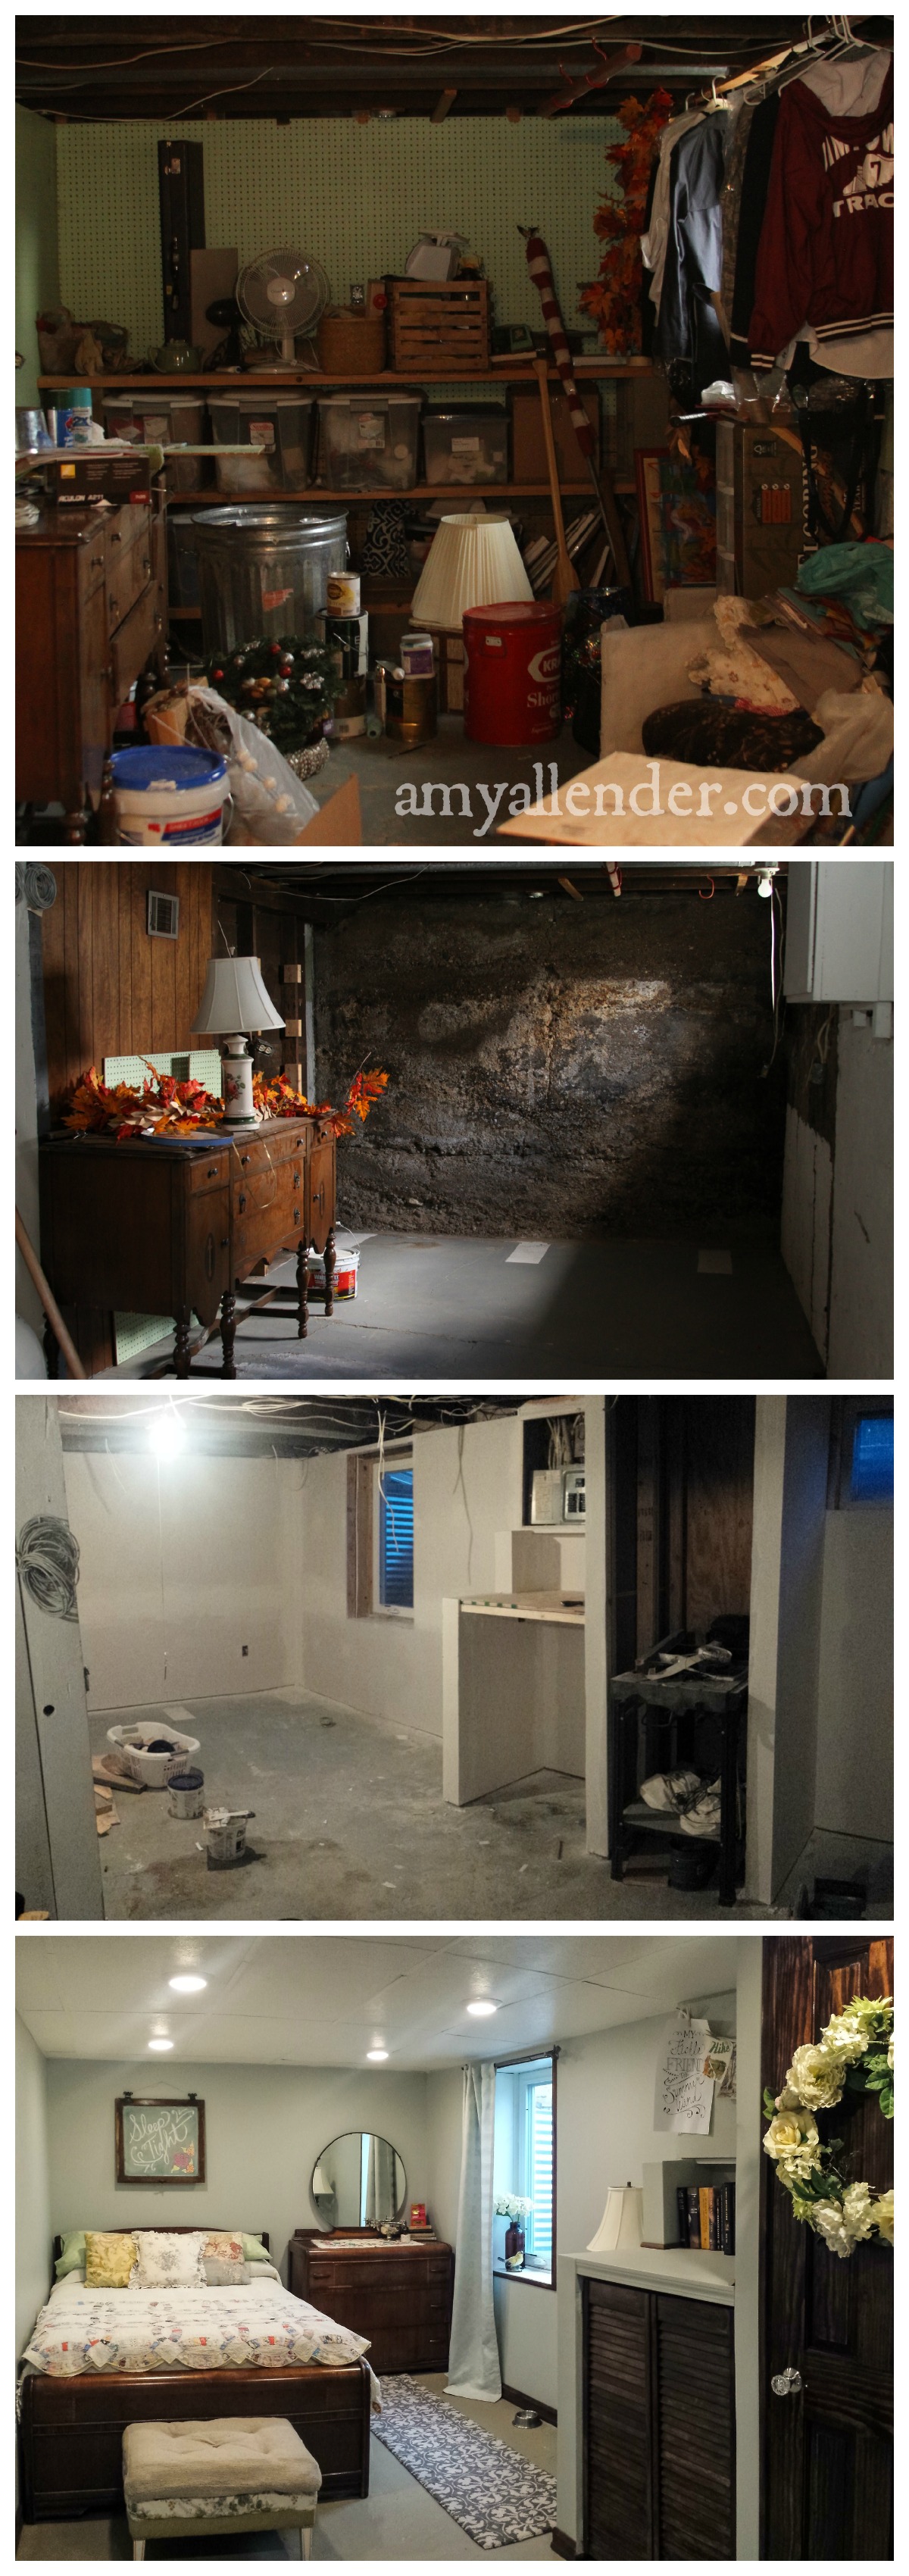
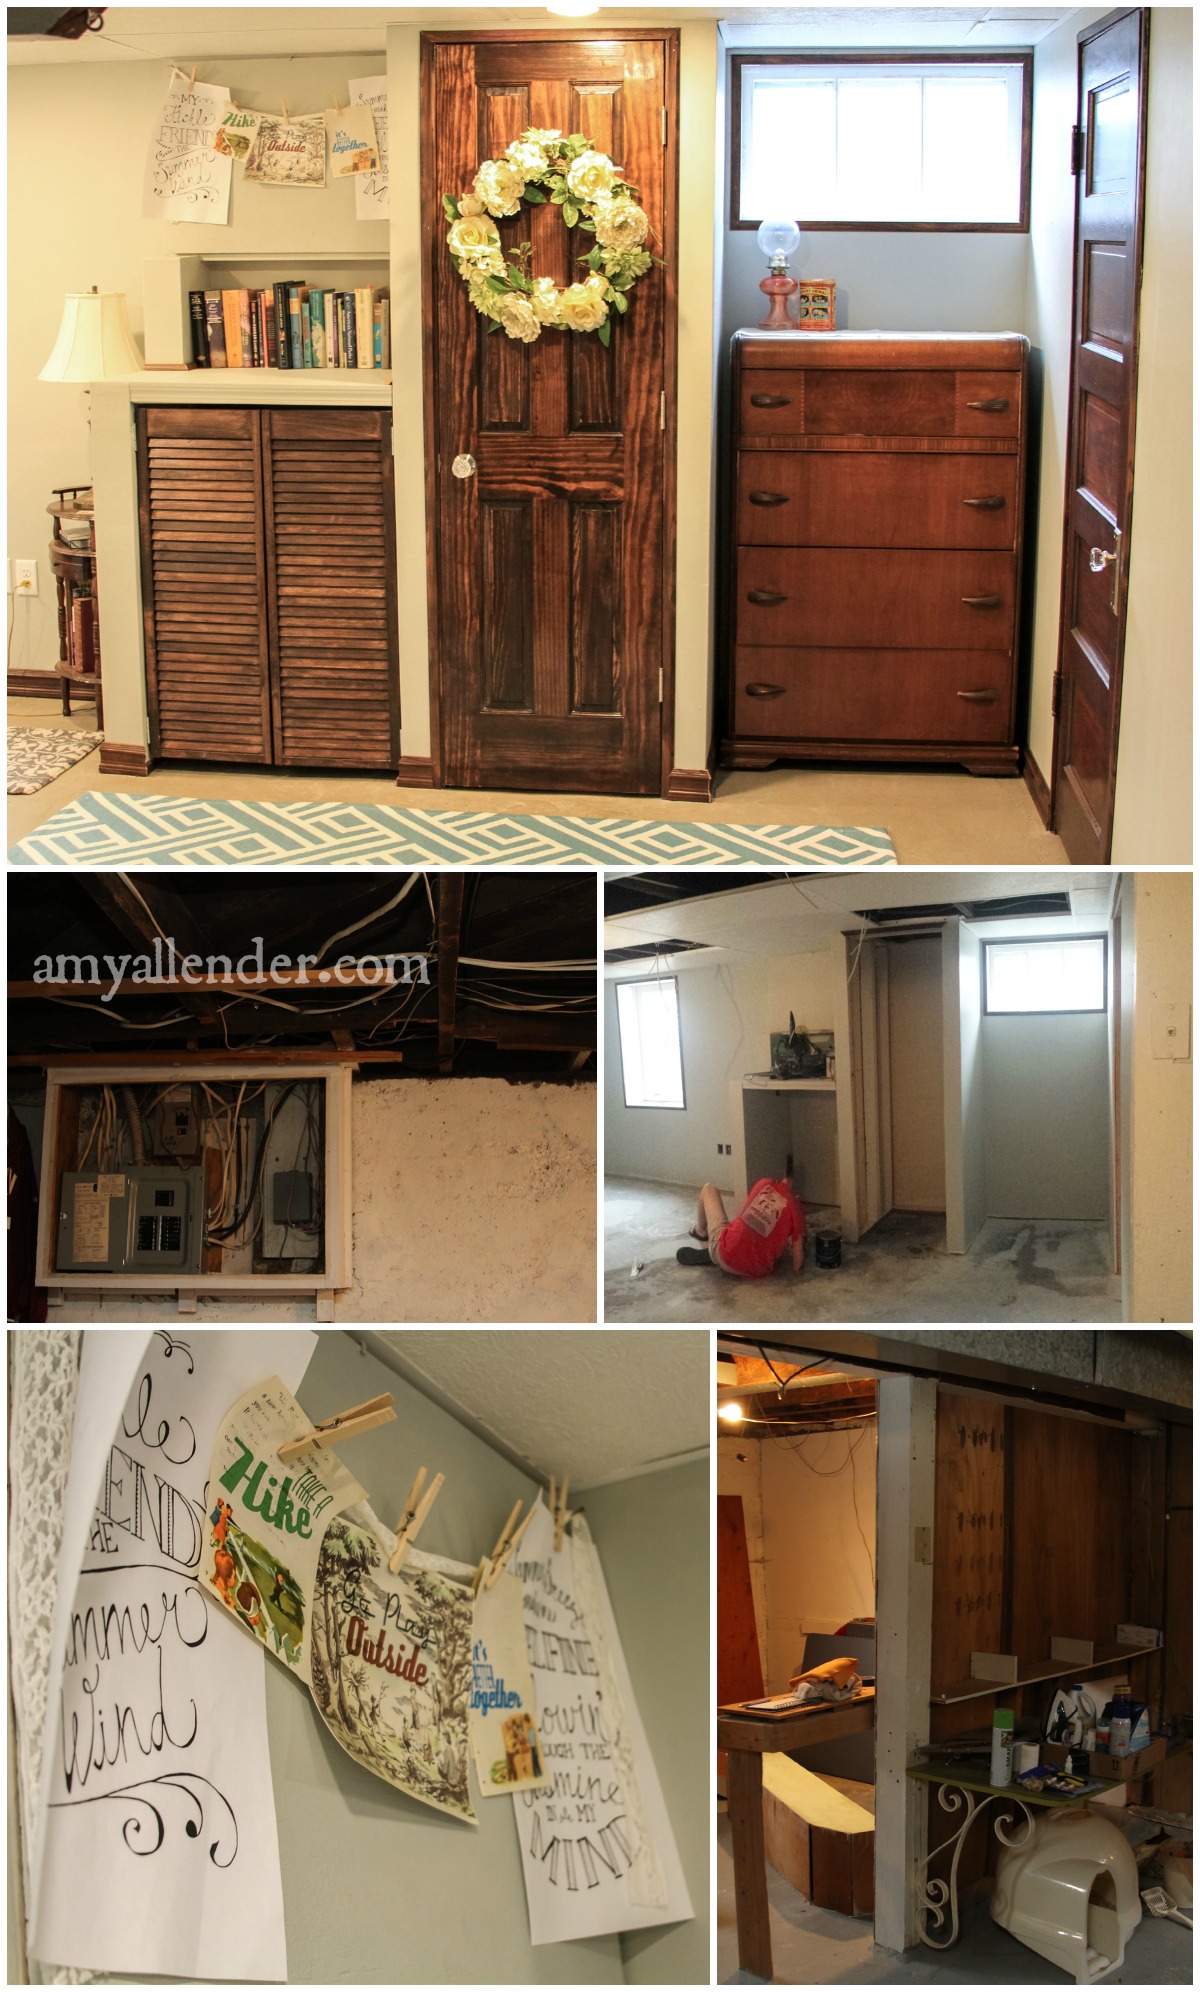
The closet situation was a little tricky since codes indicate that you aren’t allowed to put a fuse box in the back of the closet. But–I think it turned out really nice. We have a skinnier closet, but we gained some open shelving.
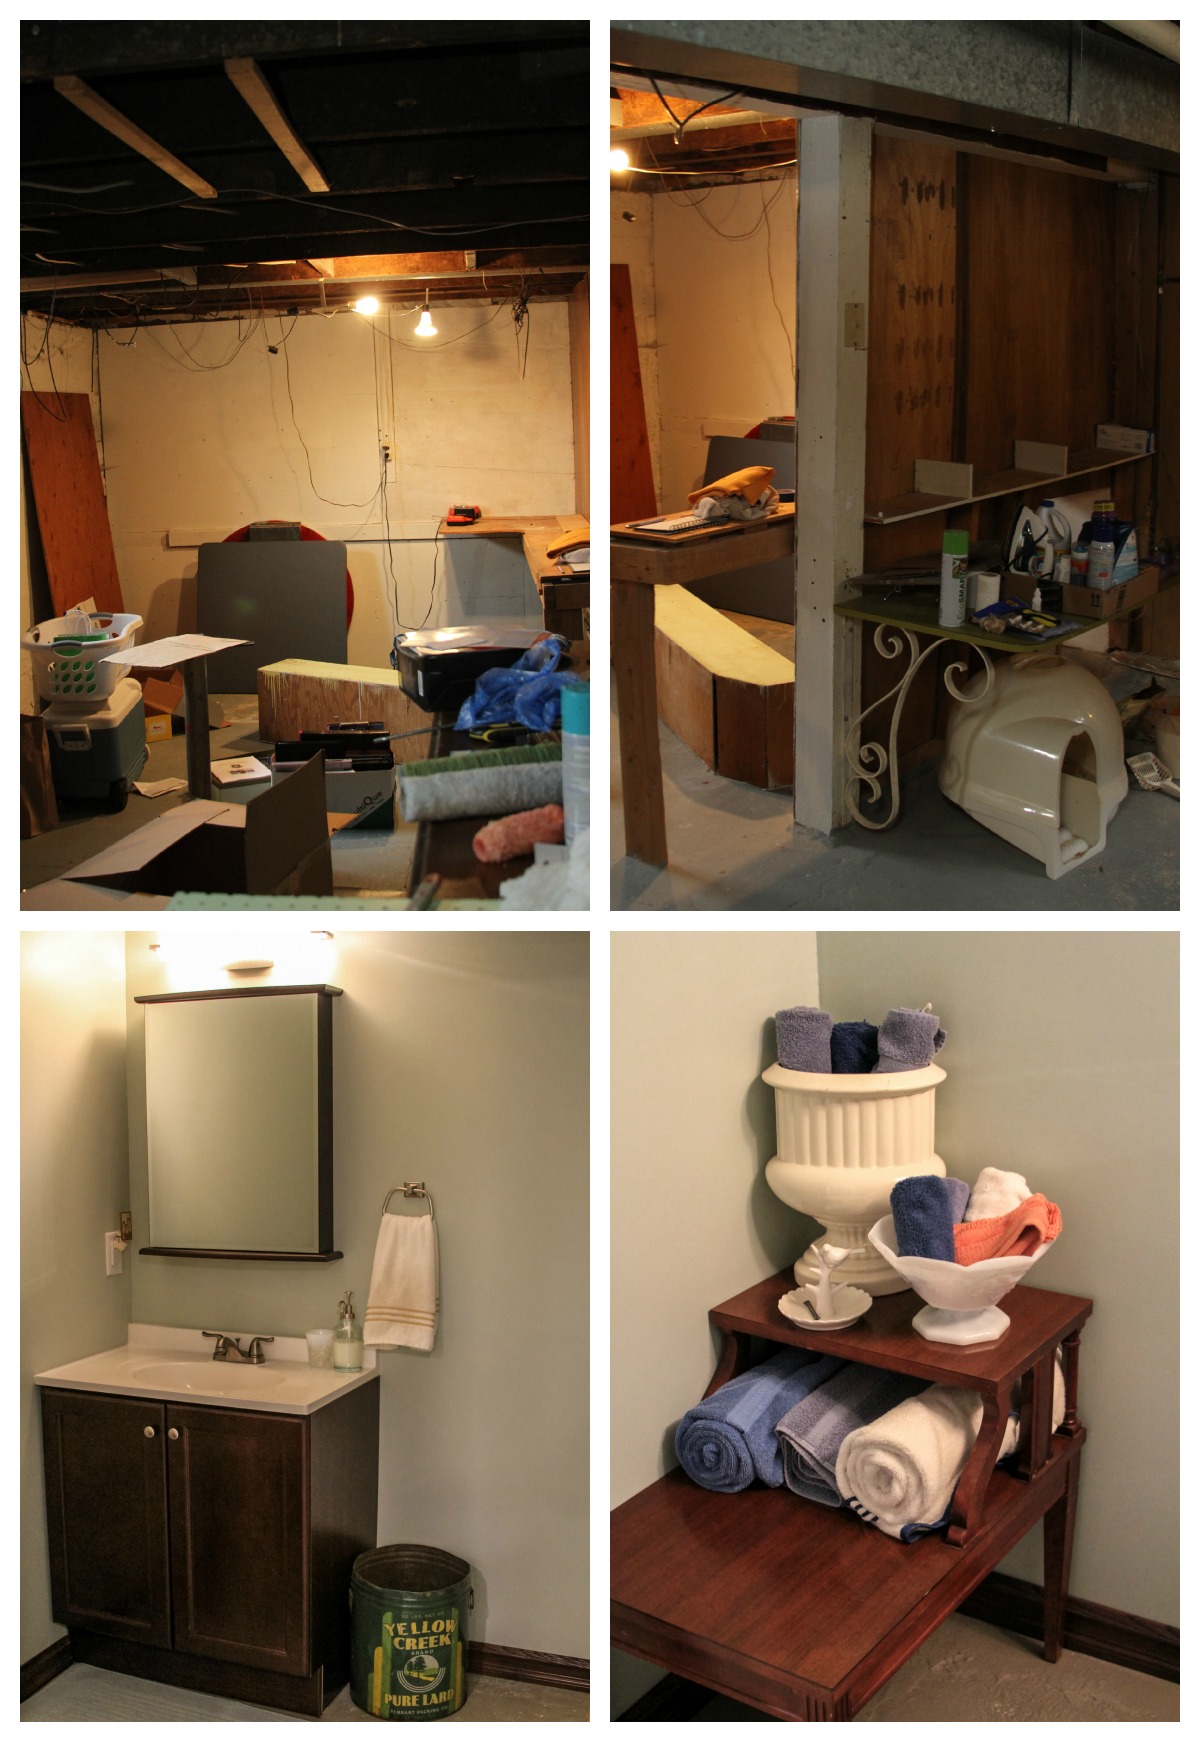
Just to give you a run down…the short closet on the left opens up to keep linens, shoes, etc. There’s also an outlet in there, so you can place a TV on the shelf facing the bed, and hide the cords. The skinny clothing closet has two rods and one shelf. The space where the dresser is could easily keep a desk or office nook. The door on the right leads to the bathroom…which you saw earlier this week. The bathroom door was salvaged from the upstairs redo.
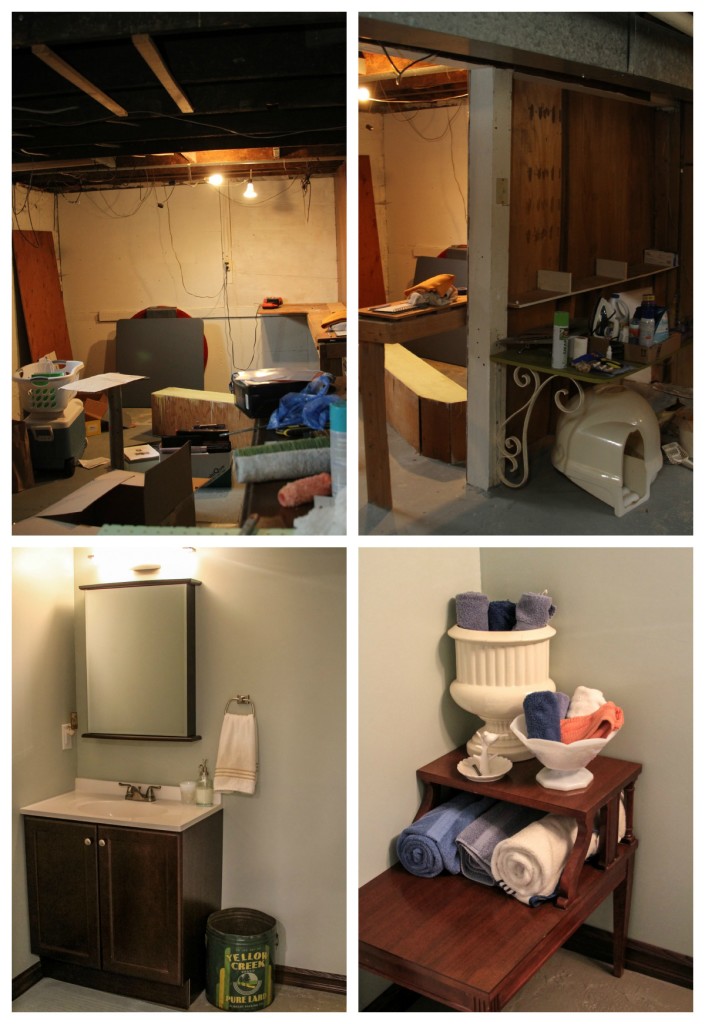
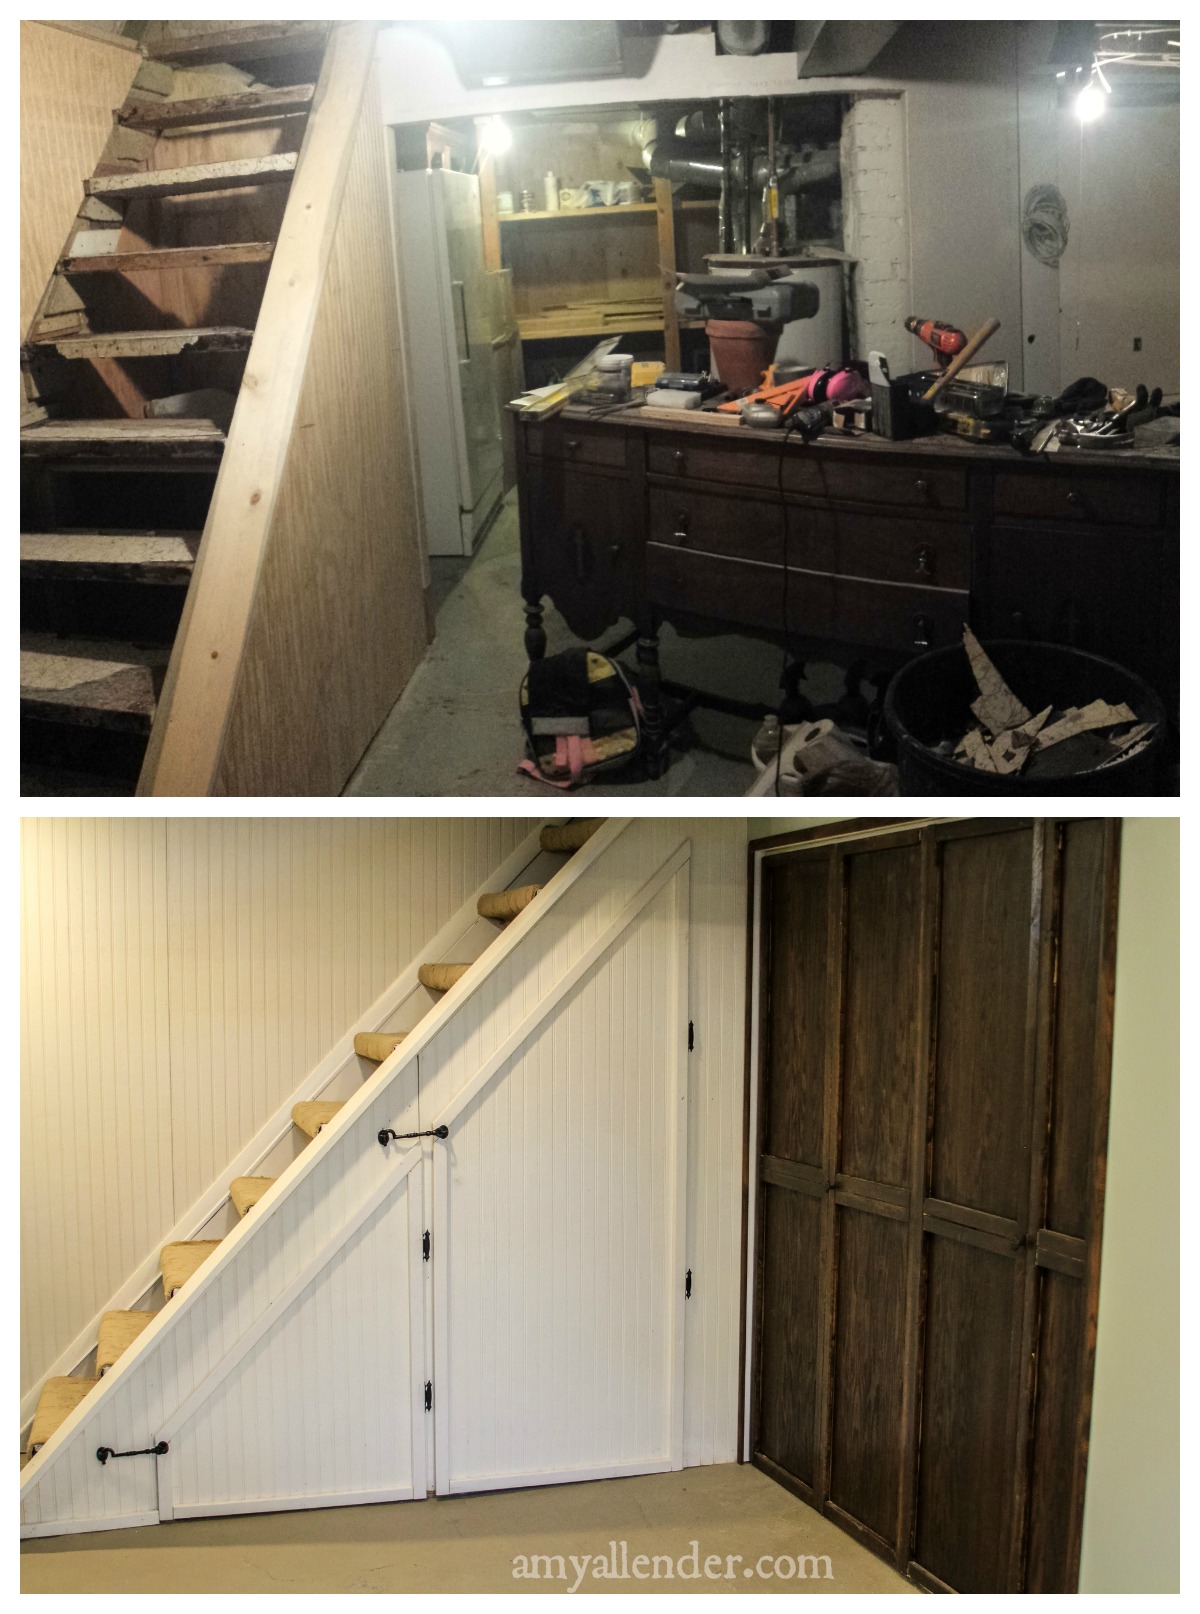
I should have done a better job documenting the bathroom…but alas, I did not. But here is a pretty good look at the totally unfinished space where the basement now stands.
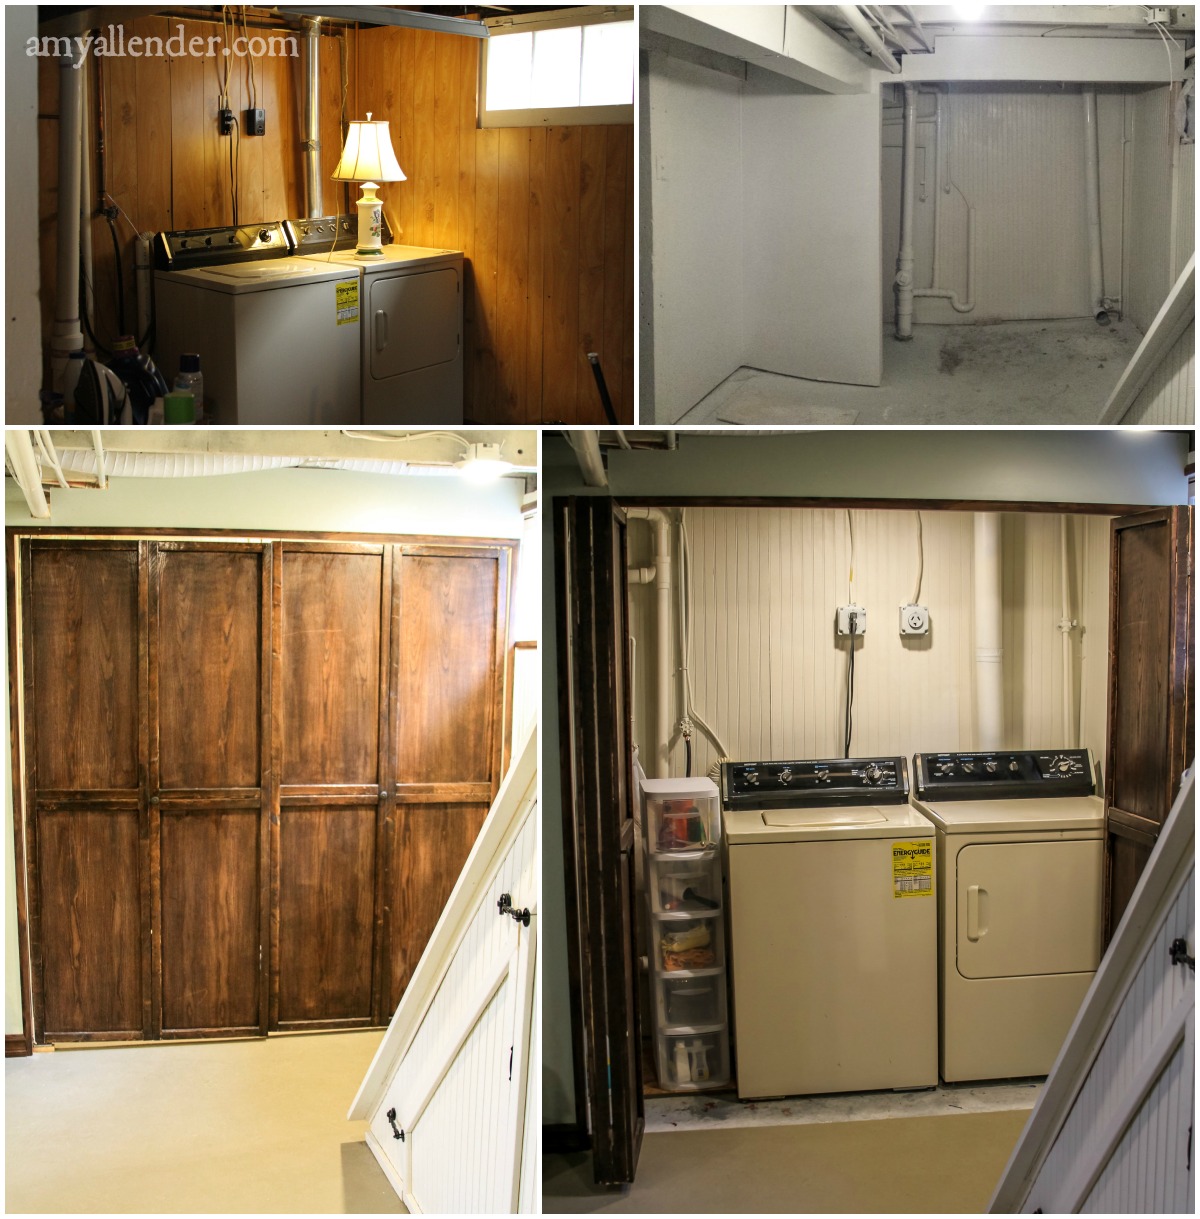
Our laundry hook up is right at the base of the stairs. Before the redo, wood paneling hid crumbing cement walls and just looked tacky. With the whole basement finished, I wanted to be sure we could hide the washer and dryer–so guests weren’t looking at something that reminded them of chores when they visit the great city of Minot, ND–renown for being a relaxation hub…
The doors we used were a major steal. They are stock doors that I stained and fancied up with trim and nice knobs.

The stairs were our biggest challenge. They are old and not square and were covered in layers of carpet, linoleum and vinyl. All of these things were held in place by about nine thousand staples, screws, and nails of all sizes.
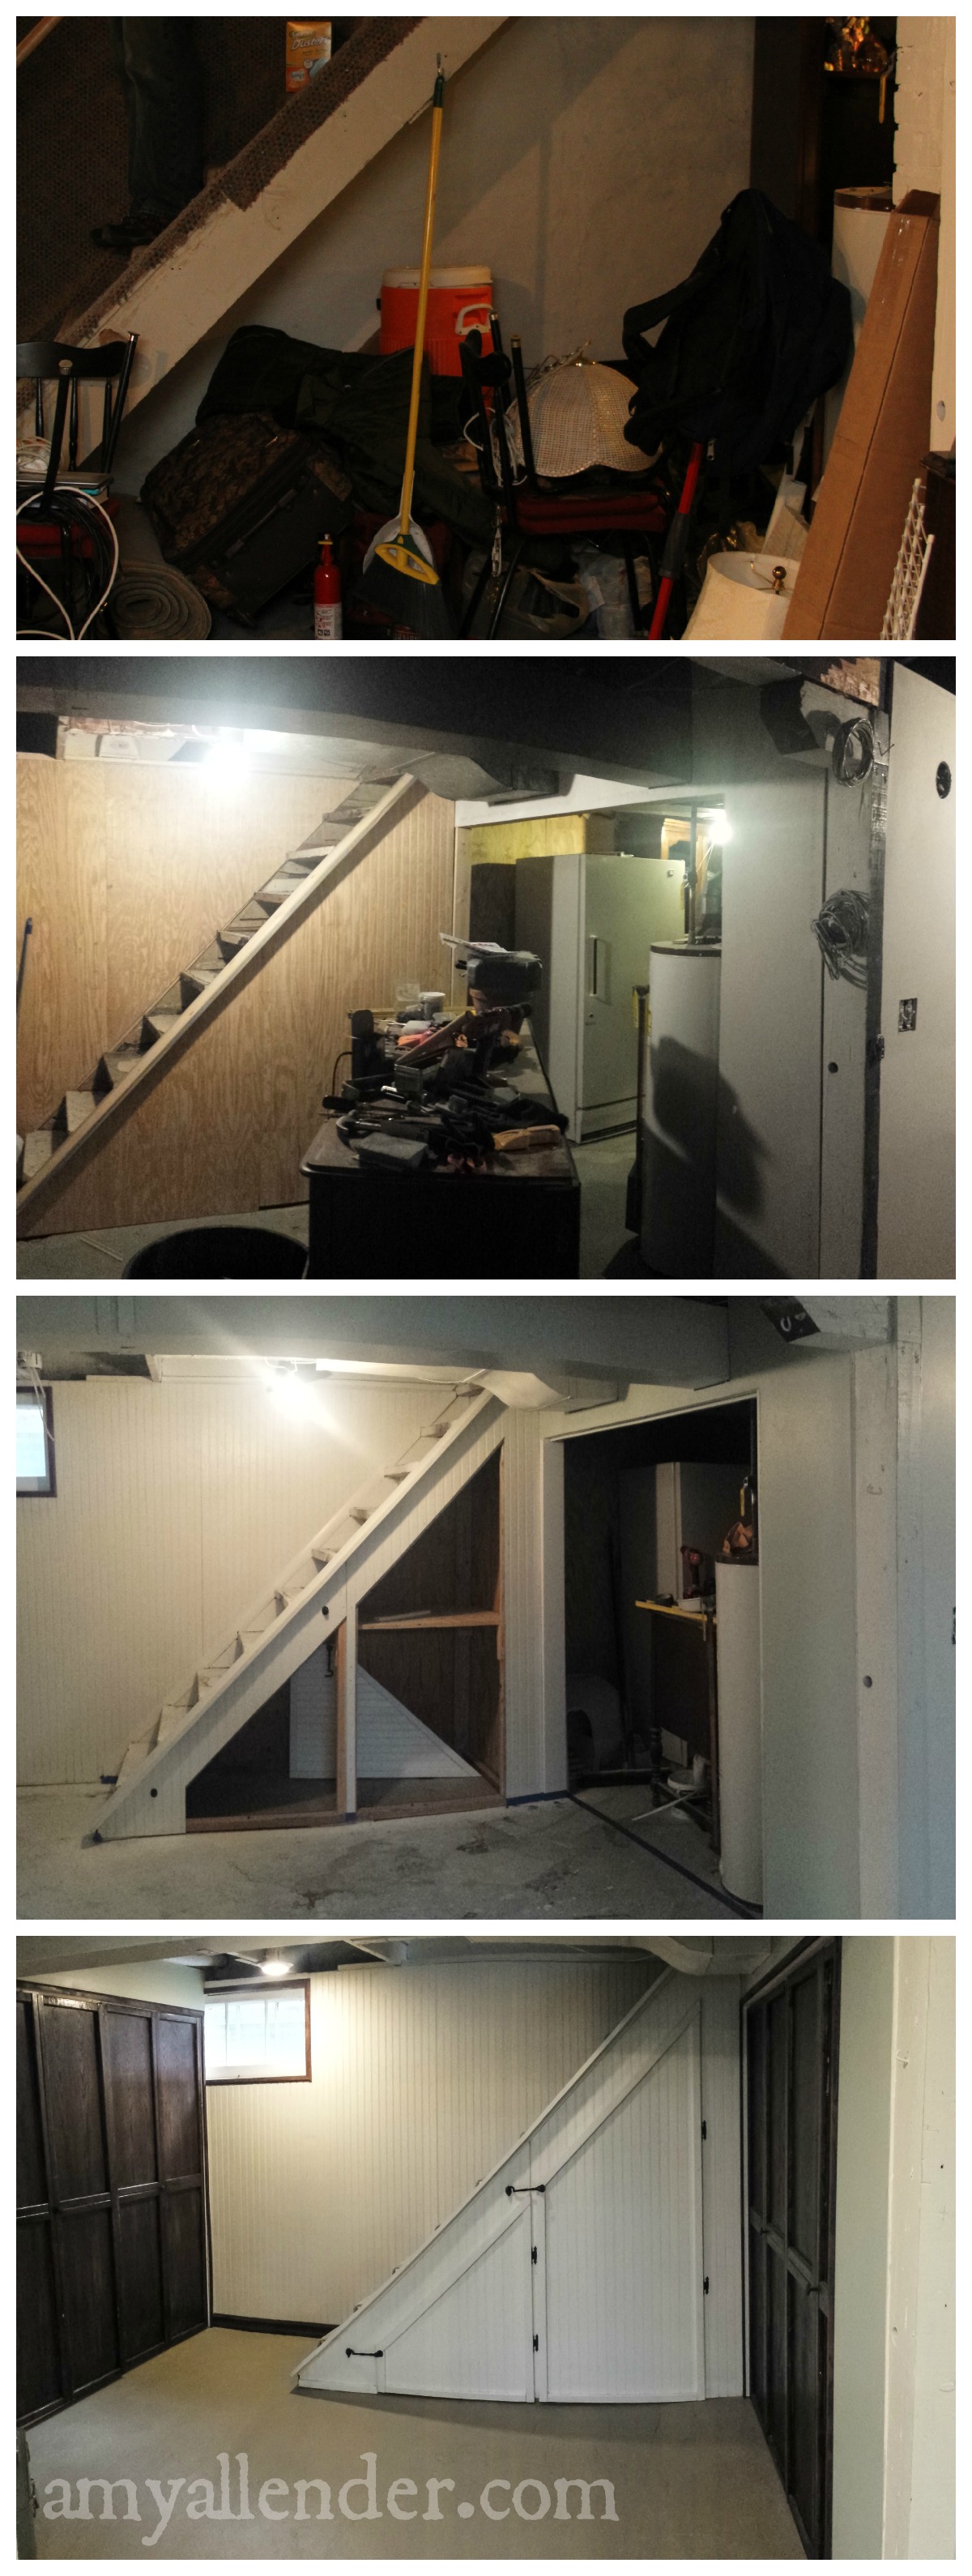 We added some nice storage with shelving under the stairs. The doorway in the right on the photo above leads to a “less finished” storage area. Our freezer, some extra furniture and seasonal decor lives back there now. Derek made some awesome shelving that easily organize those big RubberMaid tubs–and makes it easy for me to get them out without help. You can see the shelves below. I’ll have to show you that area in another post.
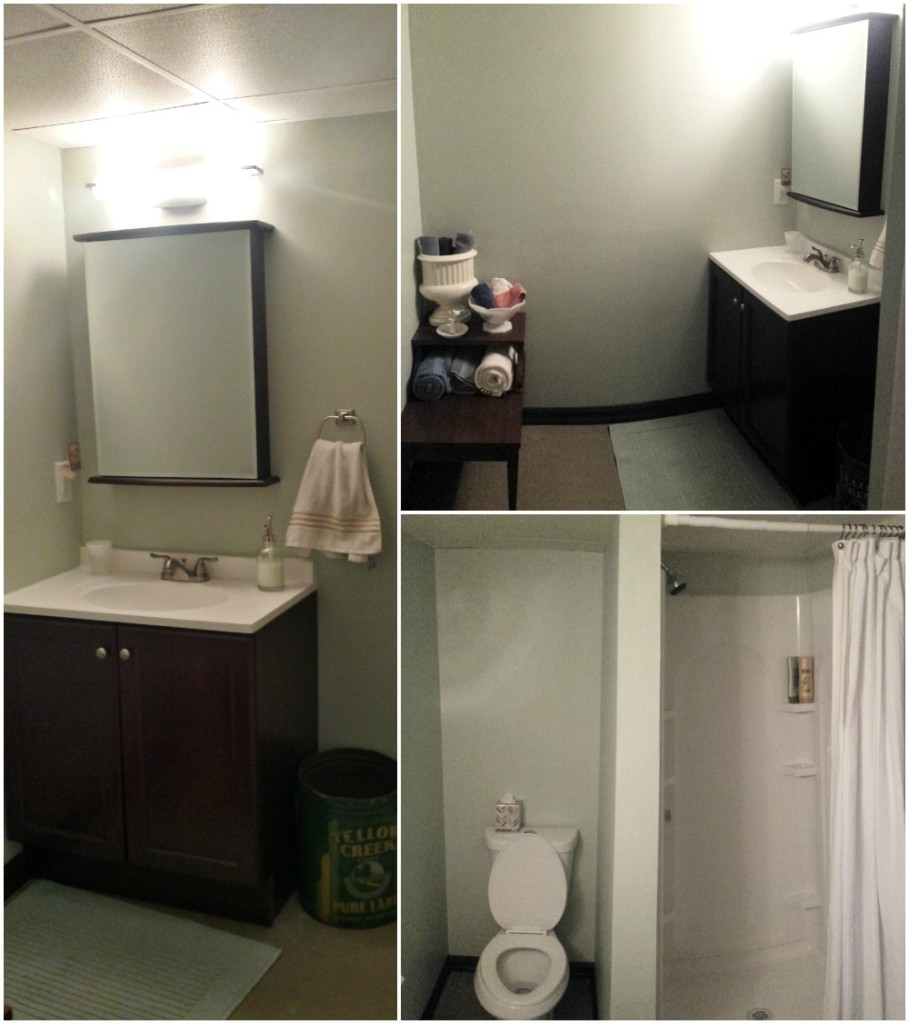
We were a little concerned that this new, freshly finished space wouldn’t flow well with the rest of the house…which is on the old, thrifty and eclectic side. But if there’s one thing I’m good at, it’s granny-ing up a space. I didn’t buy a single thing do decorate with. Instead I joyously got items that previously had no place in the house and stuck them downstairs. I steered clear of using any decor that was new, and just shopped the shelves in the other rooms of our home.
I layered the bed with vintage coverlets, pinned up some of my artwork that didn’t sell at a craft fair, and brought out my weird array of books to display. An old lard tin is the bathroom trash bin, a planter holds towels, and an end table that once belonged to Derek’s grandmother keeps the bathroom organized.
I love this space. Dearly. Thanks to all of you who came over and helped frame walls, hammer nails, or install ceiling tile. And thanks to all of you who have been asking to see the end result. It’s a pleasure to share the end result with you.

Happy Friday!
by Amy | Oct 2, 2015 | Blog, The Art of Projects, the house
Sometimes projects are just too big to handle alone. No matter how much I wish I could learn every skill in the whole world, it’s just not feasible. So…when that happens you call in back up. Last time I wrote about the basement I talked briefly about our process of finding contractors. Tonight I’m going to tell you about our plumbers–and one of the most awkward things I’ve done over the last calendar year.
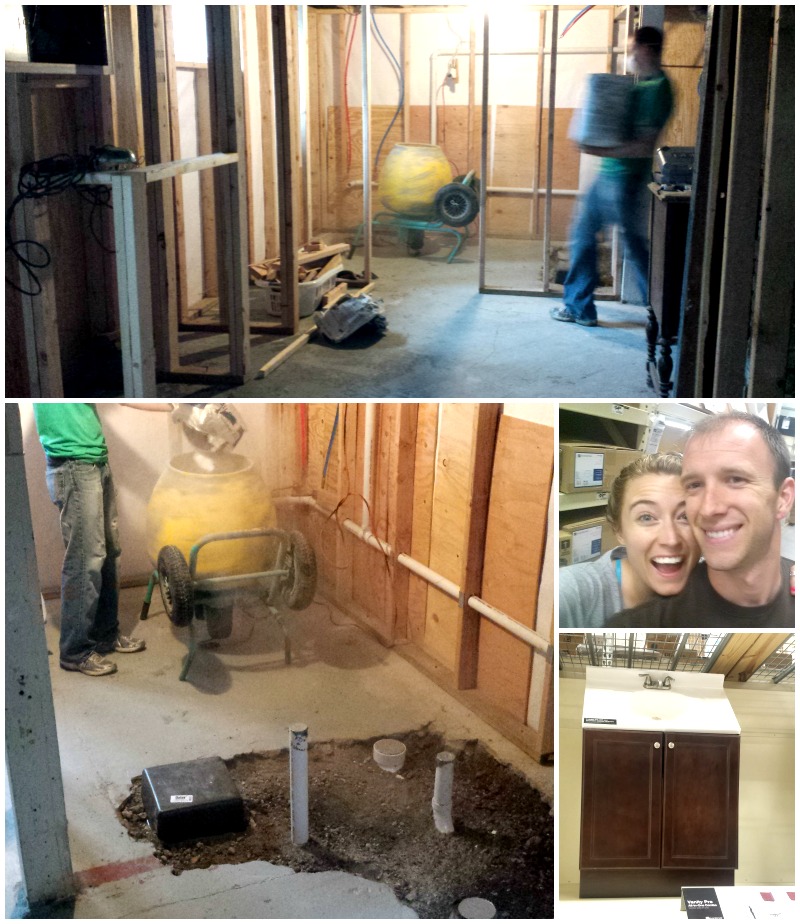
But before I get to that…let me just say that making a bathroom from scratch is a lot of work. And it’s complicated. We tried to tell ourselves that part of it was ready…since there was a floor drain. Okay, maybe that was just my wishful thinking. The reality was that drain in the floor or not, making a bathroom where there was formerly only a cement floor and cement walls was a real challenge.
So the weirdness begins. Derek and I are not architects. {Even though in my restless college years I did a semester as an interior design major…so I’m somewhat savvy with drawing up floor plans. Somewhat.} However, we drew up our own plans, on graph paper, to a very rough scale. We went to the hardware store and looked at tubs and toilets and sinks. The whole shebang. Then came home and figured how it would fit in the space we had. We made a plan.
Then the plumbers showed up.
They’d already come for the estimate and a second visit–when Derek was actually able to be home–to go over details. So on the day they arrived ready to jack hammer up the floor I thought everything was already in order.
But they had questions. And suddenly there was an issue with putting a tub in. And there was a question about how far the pipes could reach. And it would all end up costing more money than planned. And did I really want that? And how should they proceed? And how big is the exact unit that was going in?
I dug out the highly accurate floor plan we had made up–but the questions still remained and Derek was at work. So, I made some choices. I changed the plan. This was one of the most stressful mornings of my recent life. I axed the bathtub and shower combo, instead opting for a shower stall…which seems very small in theory.
While they tore up the floor, I stewed upstairs hoping that Derek wouldn’t hate the choices I’d made, and that a three foot shower would be big enough to hold a grown-up-sized showerer.
When they left, there was a hole in the floor and our job was to fix it–which you can read about in the last basement post.
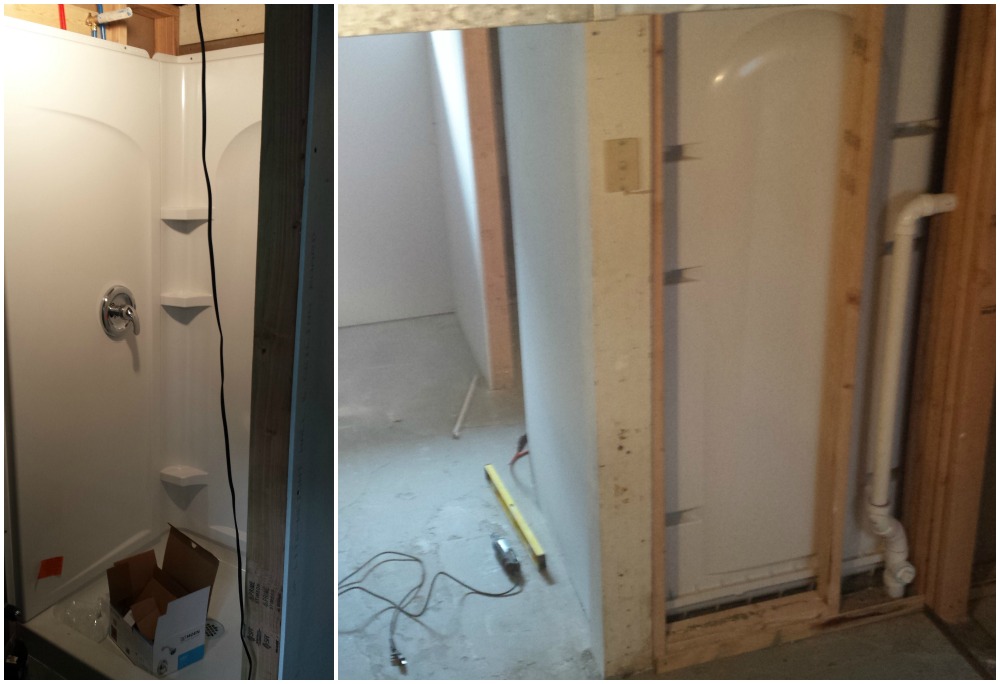
In the end, it all ended up just fine. After the floor had been cured and we’d added studs for an additional wall–the downside of my choice for a shower stall…one more wall to frame–they plumbers came back and put in the shower. Derek is a genius, so he installed the toilet and sink for us. Things were really starting to look finished–then we turned on the shower.
As great as the plumbers had been, they made one little mistake. The shower faucet didn’t work properly. The “on” was “off”, the middle of the temperature gauge made the water hot…while cold was warm and hot was cool. Weird. A simple phone call and they offered to come back and fix it. Which leads me to a very. embarrassing. morning.
When I got on the phone with the man in charge of our project, he told me the crew would be by mid-morning–probably around 10:30 am. Cool. That’s great.
I wake up on the morning of the appointment. It’s 8am. I get up, throw on some grubby gym clothes. Stretchy pants and an athletic, long sleeved t-shirt. It’s purple {you know how I am with purple clothes.} It’s the kind with a weird athletic hood. You know, with a perfect circle for your head to go through–very effective for outdoor running, very stupid looking in real life. To paint a perfect picture, I need to tell you that I typically go to bed with wet hair. I sleep on it and it gets crazy and wavy overnight. In the morning I tame it down…but first thing in the morning, it’s a curly, beach-head mess.
So I throw on the t-shirt. As I pull it on, the hood catches up over my head. Totally fine, because I’m cold anyway, and no one is in the house to mock my appearance.
Since I’ve got some time, I clean the bathroom upstairs and get laundry together. Meanwhile, Panda {the world’s most precious baby angel cat} is meowing, meowing, meowing. Because, although she is adorable and my BFF, she’s also addicted to food–and in the morning she demands her breakfast.

I finish rinsing the sink, flush the freshly scrubbed toilet and grab two laundry baskets stacked on top of each other filled with clothes. Hood still up, hair still a mess, I head downstairs. It’s 8:30am.
As I descend the stairs I loudly declare in a sing-song voice, “It’s breakfast time for babies!” I’m obviously talking to Panda. She’s a baby angel, after all. And that’s just kind of how I talk to my cat–whether I’m alone in the house or not. I can’t help it. I’m weird. And in this moment, I looked really weird too. Like a purple scuba diver without a mask. Then it happens. From the kitchen I hear,
“Hello?”
It’s a man’s deep voice and it’s not Derek. For a split second I freak out. Then I see who it is. The plumbers. One standing on my kitchen mat, the other just outside on the deck.
“Mrs. Smith?”
Oh. My gosh.
Quick. I pull the hood off my head, run a hand through that crazy mane and sit the basket of dirty sports bras on the table.
“Hey, yeah. Morning…I was just, uh…”
“We knocked and knocked but you didn’t answer. Sorry for trying the door. It was unlocked.”
Ahh, yes, knocking while the water was running and the toilet was flushing. “I was just talking to my cat.”
“What?”
“What? I mean…I need to feed my cat. But that can wait. She’s too fat anyway.”
Blank stare.
“Nate said you guys wouldn’t be by until mid-morning.”
“Nope this is our first stop.”
“Okay…well, let’s go downstairs…”
Happy Friday. Try not to be too awkward this weekend. The bathroom is hard to get in a picture, but I did my best. Better, non-phone photos are coming next week.
Amy