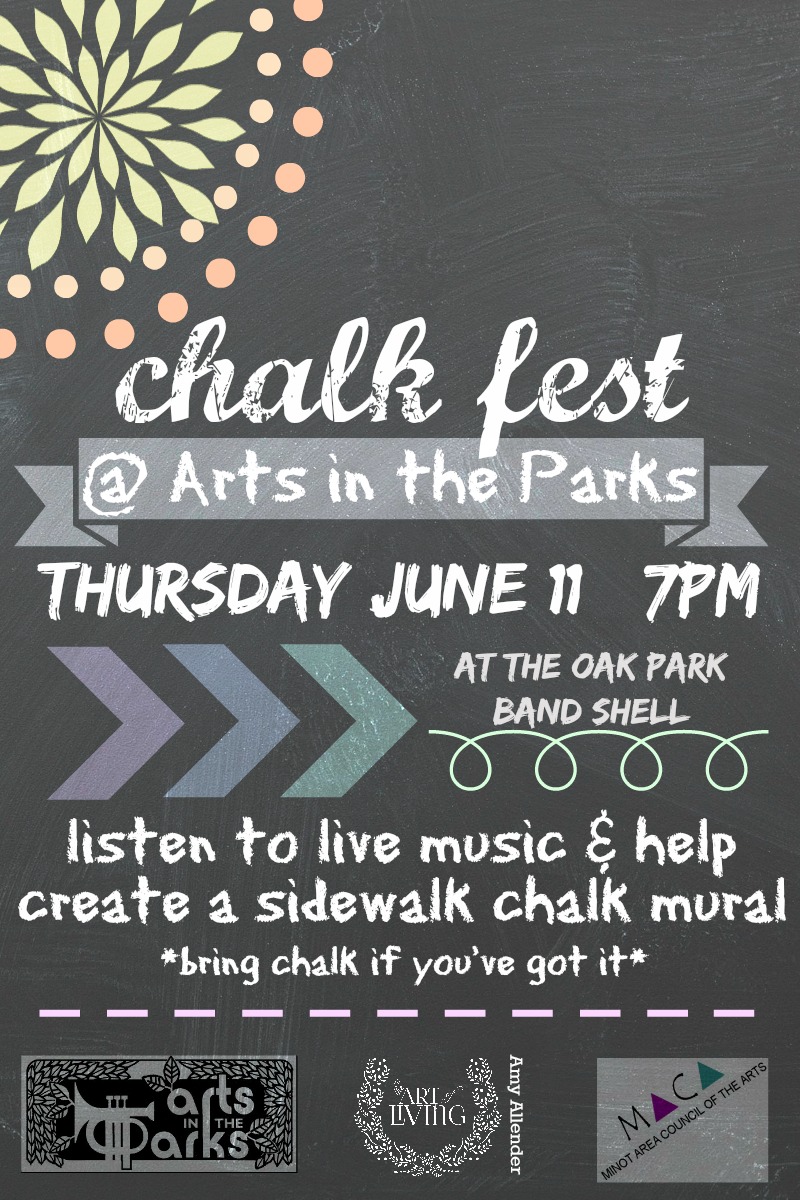
by Amy | Jul 6, 2015 | Blog, The Art of Art
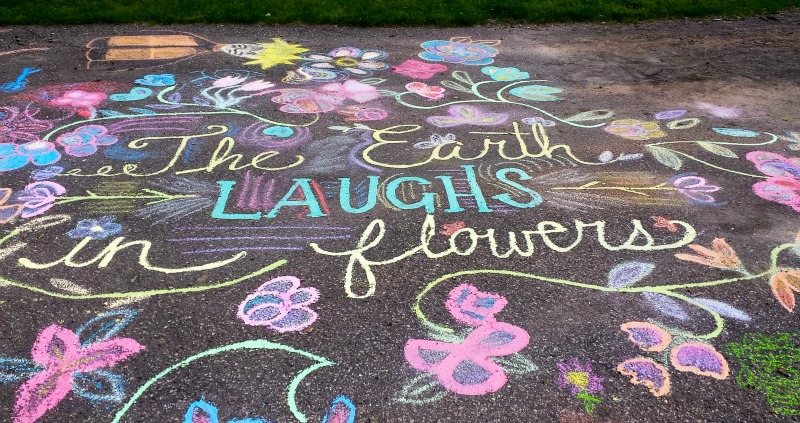
Hemingway once wrote, “The earth laughs in flowers.” That might be true…but a few weeks ago the earth was laughing with flowers, butterflies, rainbows, ice cream cones and a few basketballs…or at least that’s what our community chalk mural was filled with.
A few weeks ago I was the featured artist at Minot’s Arts in the Park series–from the arts council. And…in an effort to draw a bigger {maybe younger} crowd I decided to create an interactive sidewalk chalk mural. 1.) Because I love side walk chalk–and all chalk, really. 2.) Because I really like to think up ways to get the community involved in art. And…3.) Because I get nervous being “featured” at anything–I’d rather make up some activity and trick others into hanging out with me. Yes, I’m really that awkward and creepy.
I put this flyer out on the web just a few days before the event {it was a last minute decision.} And I was so impressed at how kind people in town were to share it. Minot really is hungry for fun things to do…so folks are eager to share and spread the word.
And I think it paid off. We did have a bigger and younger crowd. I started with this blank canvas…and if I did it all over again, I’d bring a broom to sweep up the goose poop and dirt before I started drawing. {I touched a lot of goose poop with my bare hands that night…} Before the concert I drew in the quote and outlined a few flowers. When folks arrived, I encouraged them to color in an outline or draw flowers–since that was the theme–but I don’t like to be bossy, so really there were no rules.
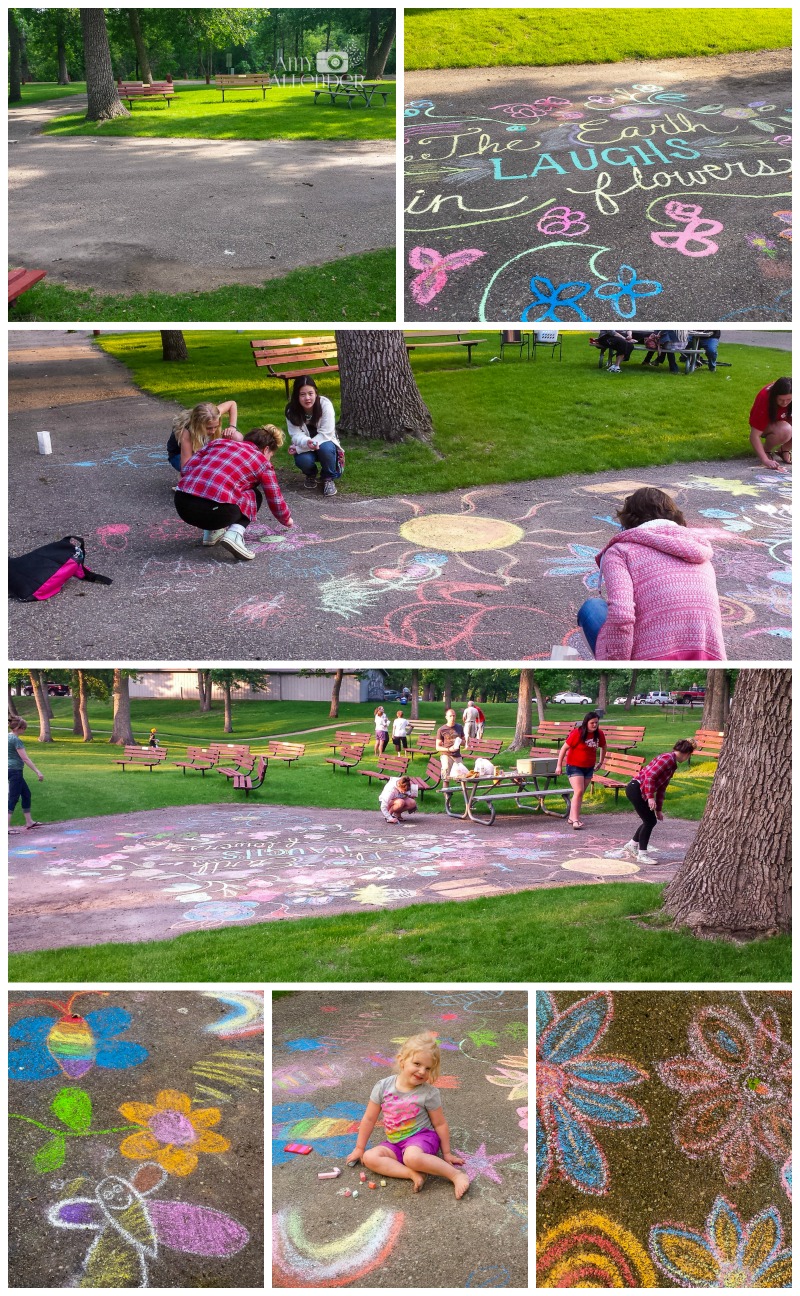
I was hoping we’d get more people who stopped in and contributed a flower or two–and some did–but I was just as content with the solid stream of kiddos and teens who stayed and colored with me the whole night. Some even stayed after the band had packed up and gone home.
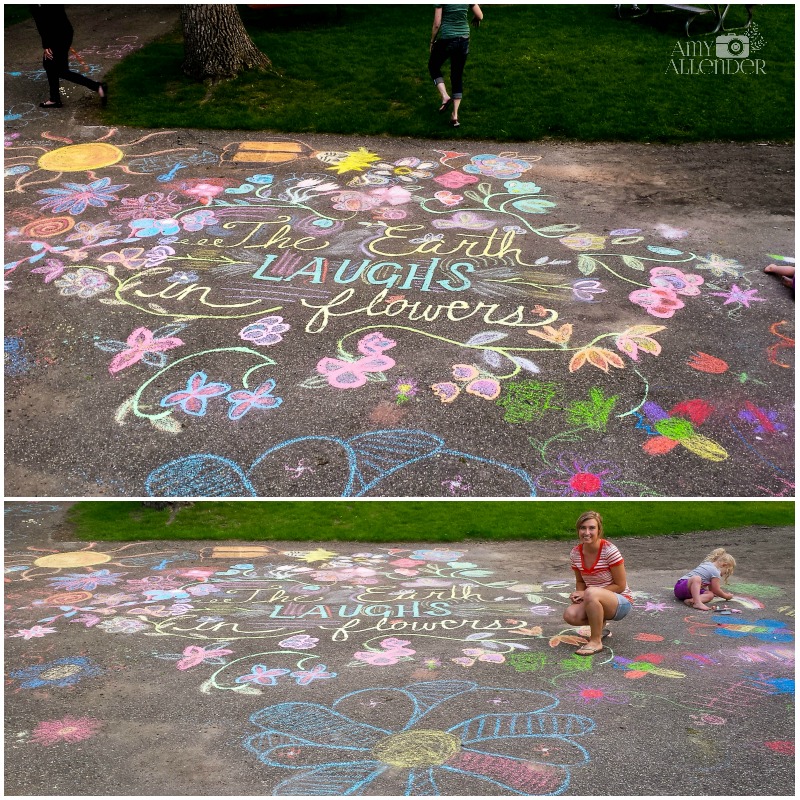
In the end, I think it came out pretty well. Colorful, joyful, summery. If the earth laughs in flowers, I honestly believe sidewalks smile in chalk.
Amy
by Amy | Apr 30, 2015 | Blog, The Art of Art
I do lots of things here in Practically Canada. Lots and lots of things. Lots of varied activities that lend themselves to a never-boring {but sometimes a little too busy} lifestyle. But–of all the things I do, working with the Minot Area Council of the Arts {MACA}’s Artists in the Schools Program is definitely in my top three.
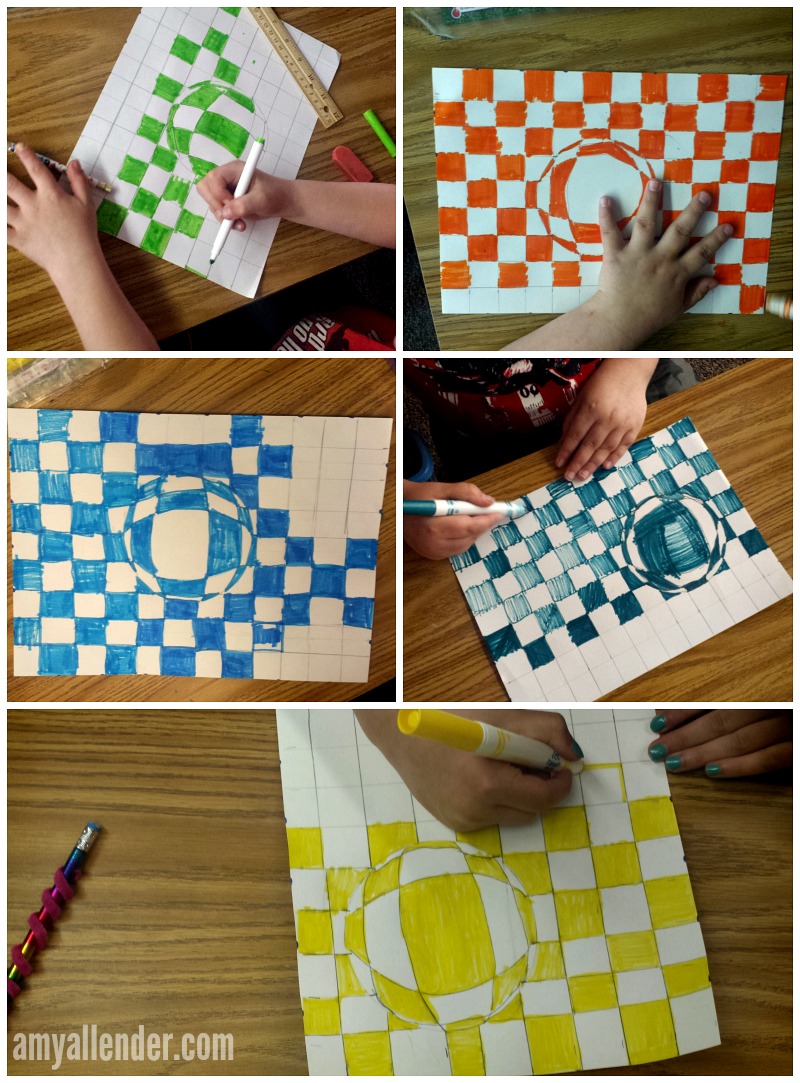
You’ve heard me talk about this before. I’ve cut snowflakes, learned the color wheel and painted many, many canvases. Last week I did another class focusing on optical illusion art for kids with an outstanding group of 3rd grade students at Bell Elementary. This project is a little tricky, so I don’t break it out unless the group is well behaved and able to tune in and follow directions. This particular class was fantastic on all fronts.
I started with the usual discussion on what an optical illusion is. How sometimes things aren’t always as they first appear {a lesson not only for art, but for many aspects of life.} The kids always love learning about optical illusions and they are so excited for the chance to make their very own version of op art.
This particular project is great because it combines artistic skill with mathematical skills such as use of a ruler, measuring, and pattern creation. It’s also cool because every kid can turn out a really cool product–even those who don’t see themselves as “artistic.” I love proving to kids that they can be artists even if they don’t have a natural aptitude for free hand drawing or painting. I believe it is vital that little ones embrace their creativity–and that adults don’t stifle it by instilling an attitude that “you aren’t artistic.” Creativity is key to problem solving…so let’s not crush their creativity! Agreed?
Okay. I’m finished ranting. I just love art. And kids. And kids doing art.
So. Now I’ll explain how we did this one. It’s pretty simple really.
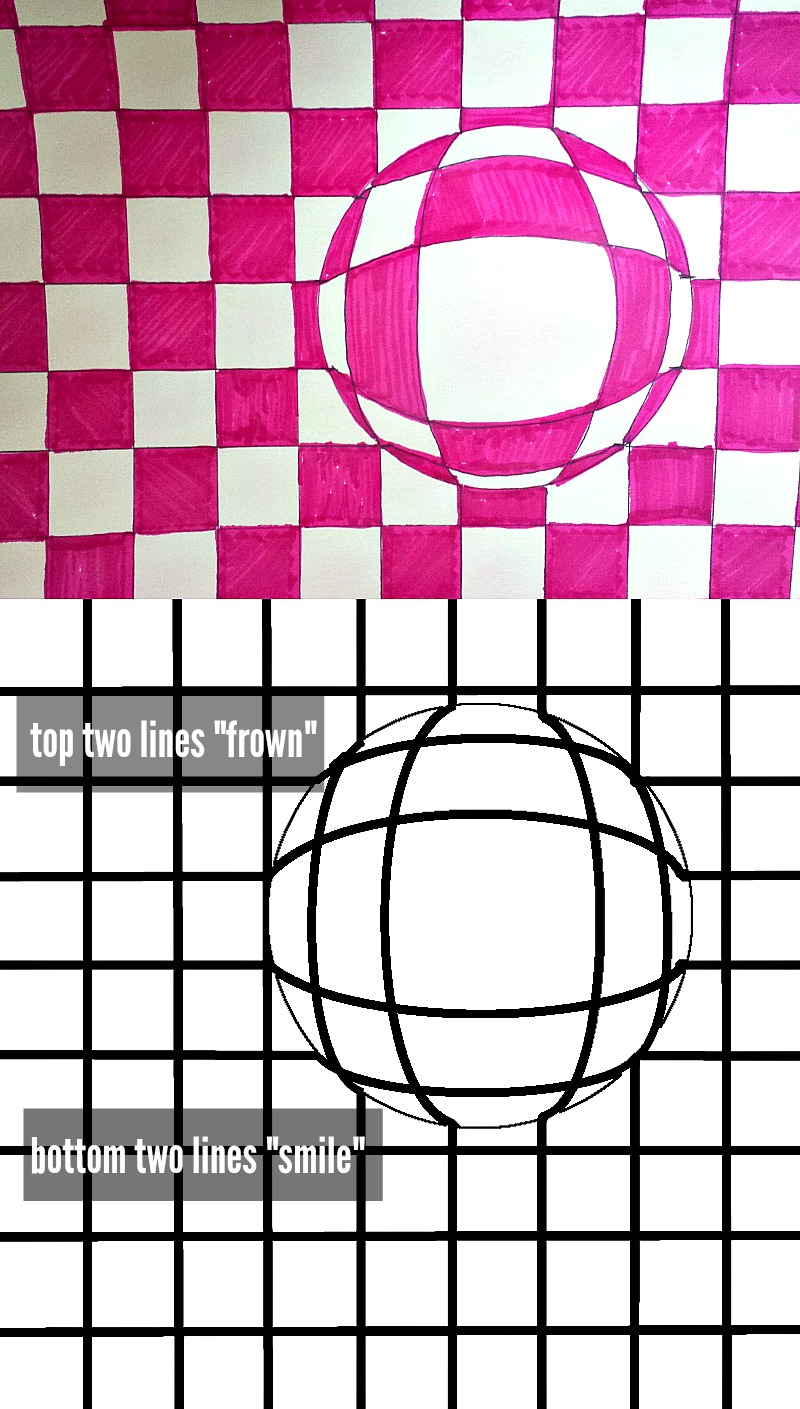
The top is my example. The bottom is how the grid looks before it’s colored.
Start kids off with their paper flat on their desk. Have everyone trace a circle on their paper. Anywhere is fine.
Have them use a ruler to mark every inch. Then, without turning the paper…have them slide the ruler to the bottom of the page and mark every inch again. Have them connect the dots–stopping at the edge of the circle so they don’t draw through it–repeat on the other two sides of their page.
Once the grid is done, have them connect the lines that but up to the edge of the circle. The top two should be connected with a line that looks like a frown–following the arc of the circle. The bottom two should “smile.” Then, turn the paper 90˚ and repeat that process. Then, it’s just a matter of creating a pattern of color.
Start with a row that runs through the circle. Color every other square. Where the circle intersects with a square it should be the opposite color. {If the square is uncolored that section of the circle will be colored; if the square is colored that part of the circle will be uncolored.} Inside the circle every other space will be colored. Then resume the pattern in the squares.
Once that first row is finished, complete the pattern within the circle. Then finish the pattern in the squares–every other should be colored, with the rows alternating like a checker board.
So that’s it. Hopefully that’s helpful to my teacher friends out there. It really is a great project for honing in on all kinds of skills. Just maybe it’ll be something fun for your classes at the end of this school year!
Amy
by Amy | Feb 27, 2015 | Blog, The Art of Art
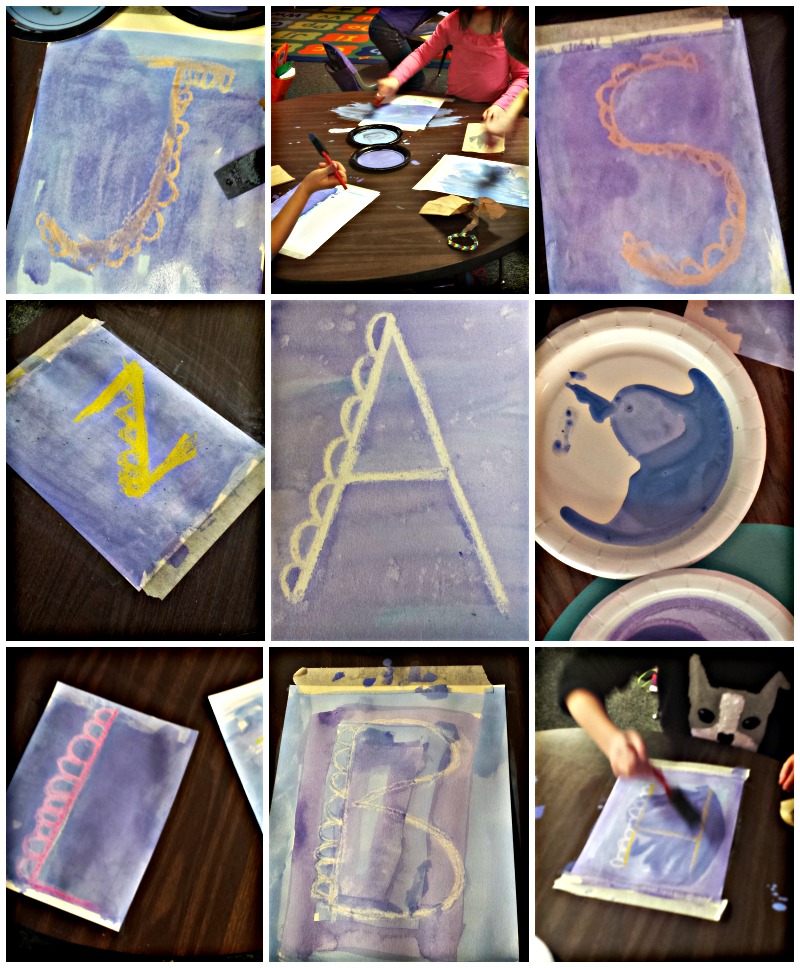
Over the next week I’ll be teaching six Artists in the Schools session at elementary schools across town. Today, I kicked off the marathon with a Water and Wax session with a group of first grade students.
The idea behind this session is to teach students a little science in with the art project–and to make something cool. We discussed the absorption property of water–how it sometimes soaks in to things, and other times rolls off a surface. Then I covered the fact that crayons, made of wax, repel water and led in to the project.
As you may imagine–if you’ve ever worked with elementary school kids–that getting the instructions out to a group of first graders was much more challenging in person than typing the words here on the blog. There was a lot of restlessness while the teacher and I tag-teamed to get papers taped to desks. Once they were down there was peeling of tape…and retaping…and a few threats of revoked participation rights.
Once the paper was out I heard this:
“Once we have a paper can we start?”
I hadn’t even shown them the example.
I explained our first step–find a light colored crayon. Not white–because we need to see our lines. Any other light color: yellow, light green, peach, light pink. Little did I know this would be such a hard step to follow. There were about four students sharing a table and caddy of crayons, so they needed to share their table’s supply amongst themselves. Once I told them to find their crayon, this is what I heard.
“Um, we don’t have a white crayon.”
“Okay. You don’t need one right now.”
“My favorite color is purple, so I’m using that.”
“Is purple a light color–something closer to white than black?”
“I don’t think so.”
“Okay. Pick another color…yellow, light green, peach, or light pink.”
“What about dark blue?”
“What about it?”
“Aaaammmmyyy! Our table doesn’t have light green!”
“Okay. Do you have one of the other colors?”
“Yeah.”
“So….the problem is….?”
“We don’t have any of the colors you told us to use. Can I use green instead?”
I look in the caddy. All the colors are there. I pass one to each child.
Once the color situation was mostly resolved we moved on. I told them to draw the first letter of their first name on their paper. Then I explained how they could add the “dragon scales” to one side of the letter to make it look a little more fancy. “If you understand what to do, you may begin.” Then things took an awkward turn.
“Uh, Amy…I did mine this way.” Dark purple crayon is on the paper. The teacher swoops in, asking why she used that crayon when only moments before, we’d given her a peach color to use. Paper is flipped, crisis averted.
While half the students are still working, the other half has finished and are now leaving their seats one by one and coming to my side {as I’m trying to help someone with a legit question} to tell me they’ve finished. Meanwhile, one little guy comes up and says,
“Well…I did an A.”
“Okay. That’s good. We’ll move on in just a second.”
“My name doesn’t start with an A. I did it because that’s what you said you were doing.”
A whole table–who was pretty chatty during instruction time–all drew the letter A, as in Amy, instead of their own letters. Untape, flip, retape.
Next direction. Trace your letter using that same color, or a white crayon. Go over it at least eight times. Make your marks nice and heavy, we want lots of wax on the paper.
This part went pretty smoothly…with the exception of a few who finished in about 60 seconds and immediately came to tell me that they were done. I just told them to keep tracing. When everyone seemed to have their letter traced enough times–one kid told me he traced his 38 times–we moved on to the paint portion of the class.
Paint is always scary to me, but these guys did great. Even the one who used so much that it was as much on the table as on the paper {see top middle photo above…} My very favorite part was hearing them gasp and get excited when their letter appeared after repelling the water color. “Its. Working!” I love when they think they’ve made something really cool. I love it when they are proud of their work.
All in all a good class, all in all, great work. I really love doing these sessions in the schools. Despite the weird questions and the faulty listening and the short attention spans, I really do think they try their best. And…Boy, oh, boy do they make me laugh.
by Amy | Dec 8, 2014 | Blog, The Art of Art
I’ve struggled for years to come up with an answer for this question: What do you do? Or…from the especially confused: So what exactly is it that you do?
I still don’t know how to put it into words. I do all kinds of things. Lots and lots of random things for lots of people, and lots of causes. And that’s fine. I like it that way. Even as the photography season slows down a bit, I’ve been plenty busy with the million and one other fun opportunities that Practically Canada is throwing my way.
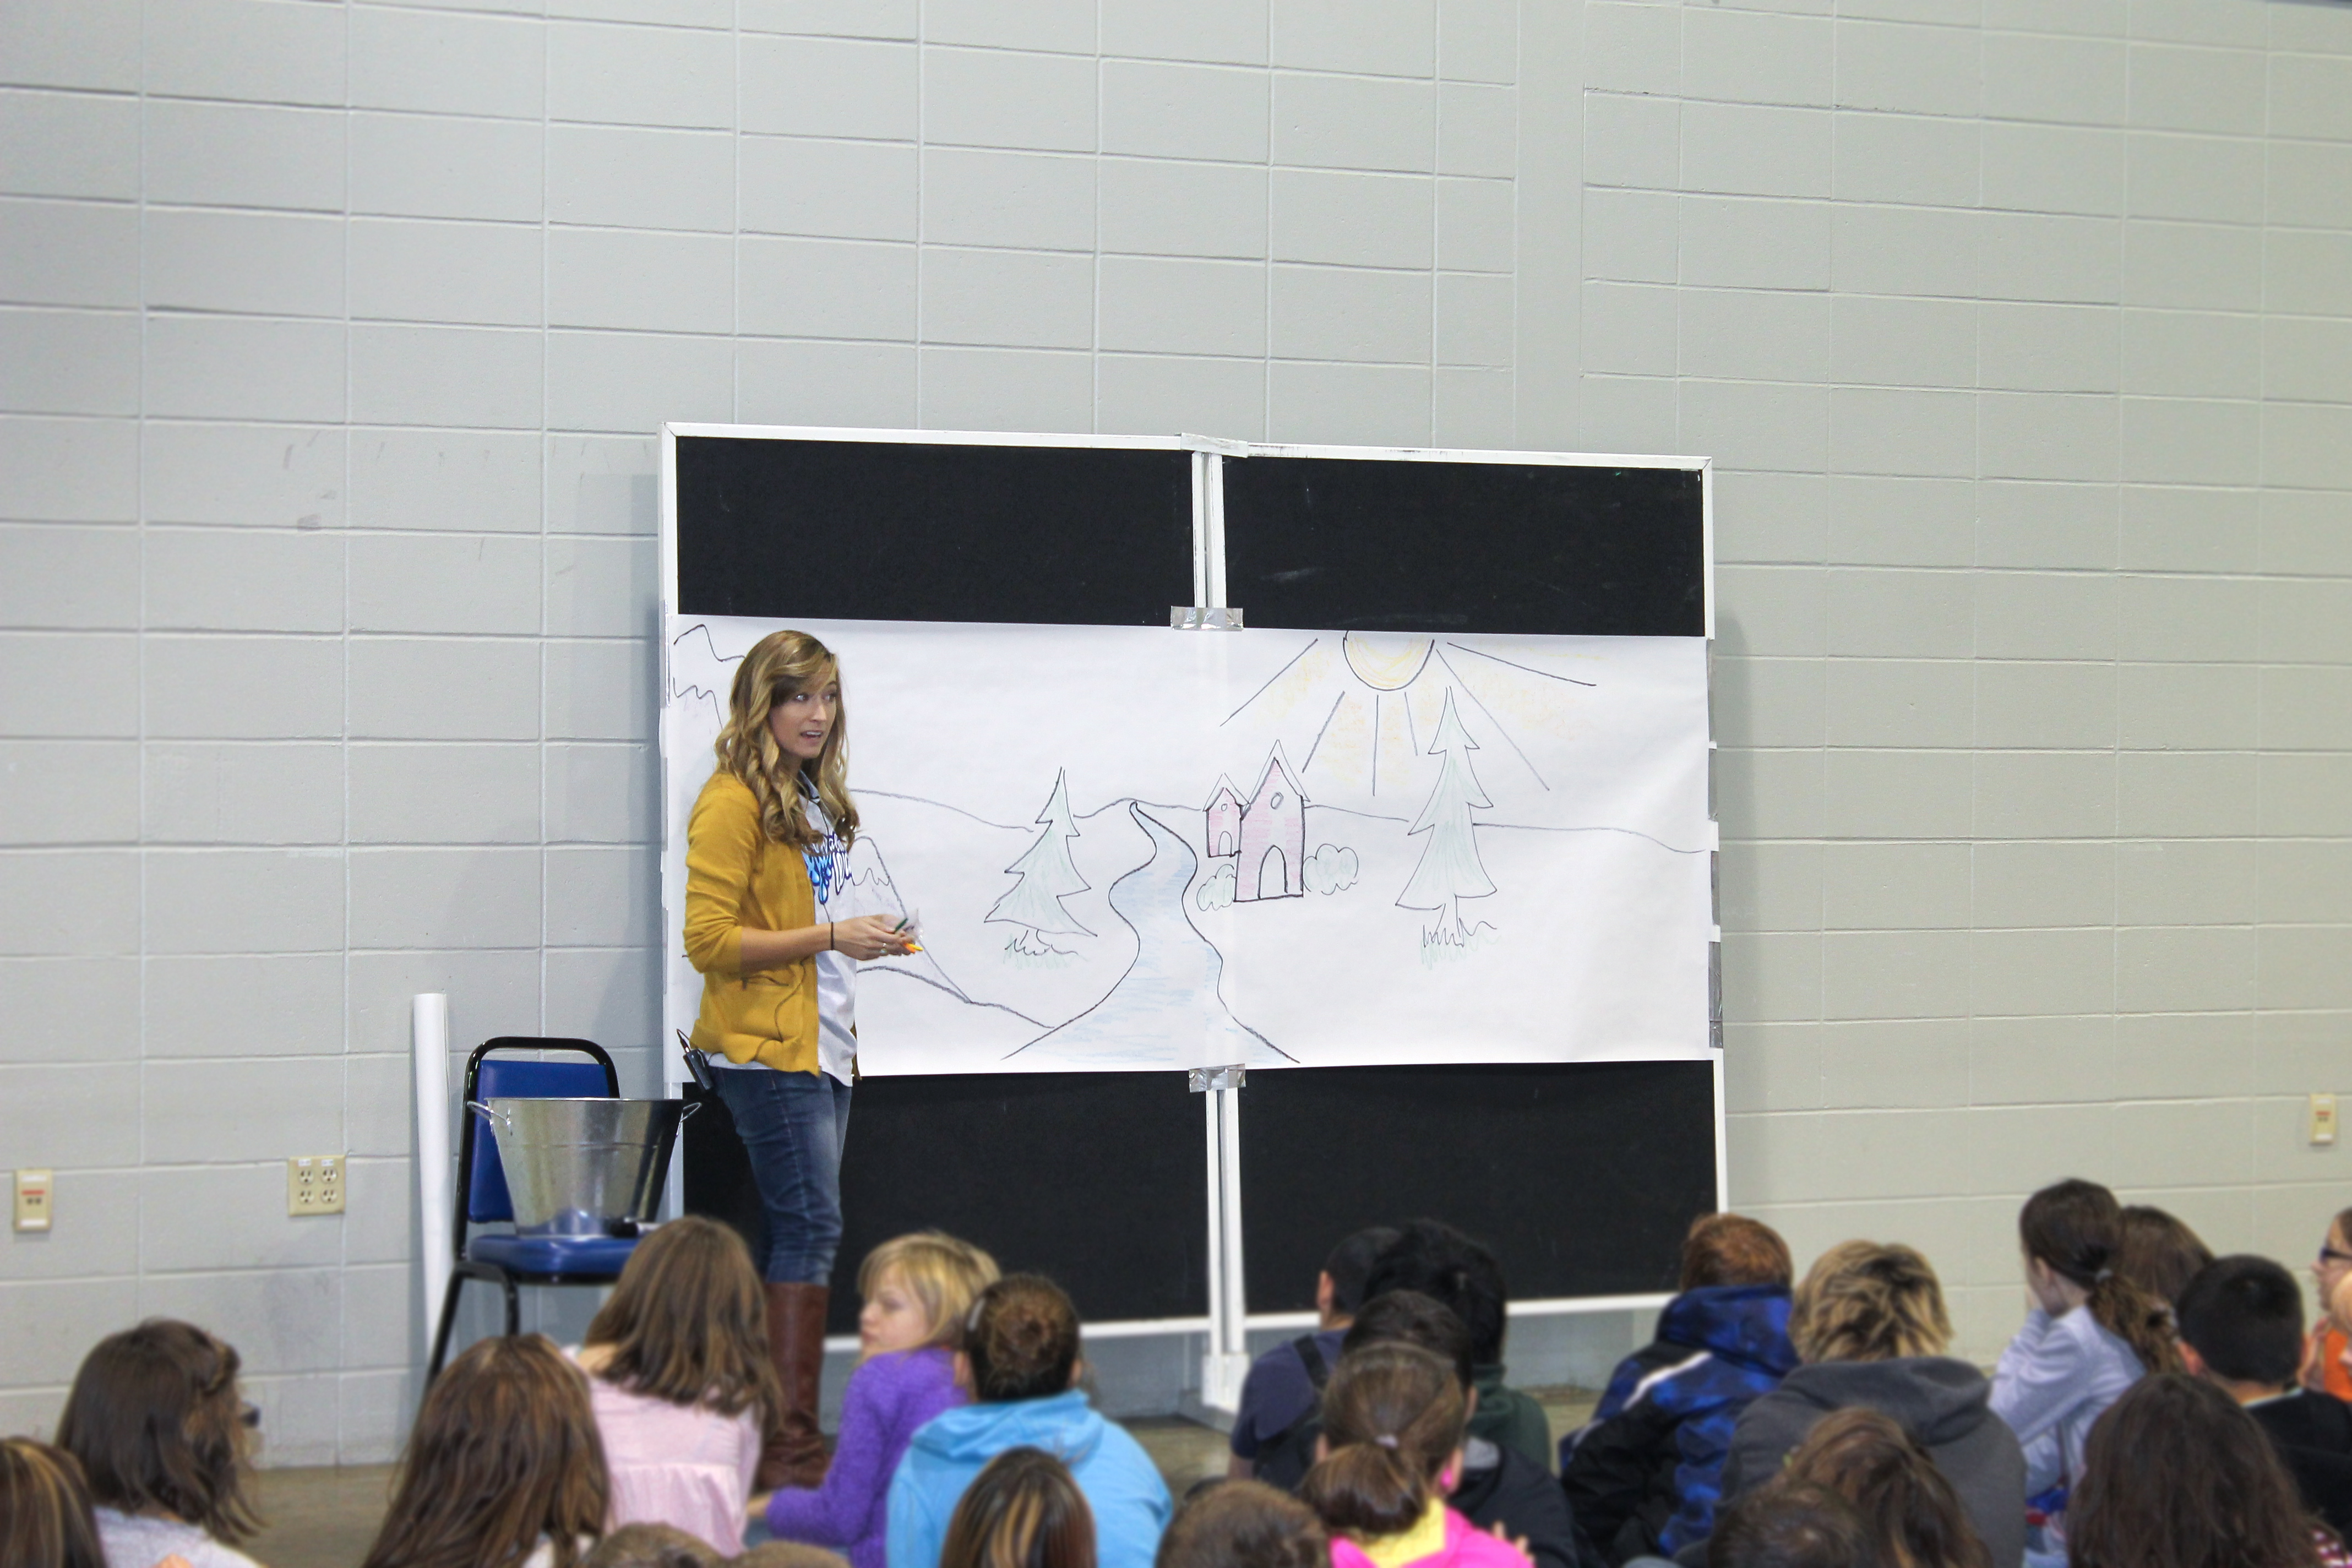
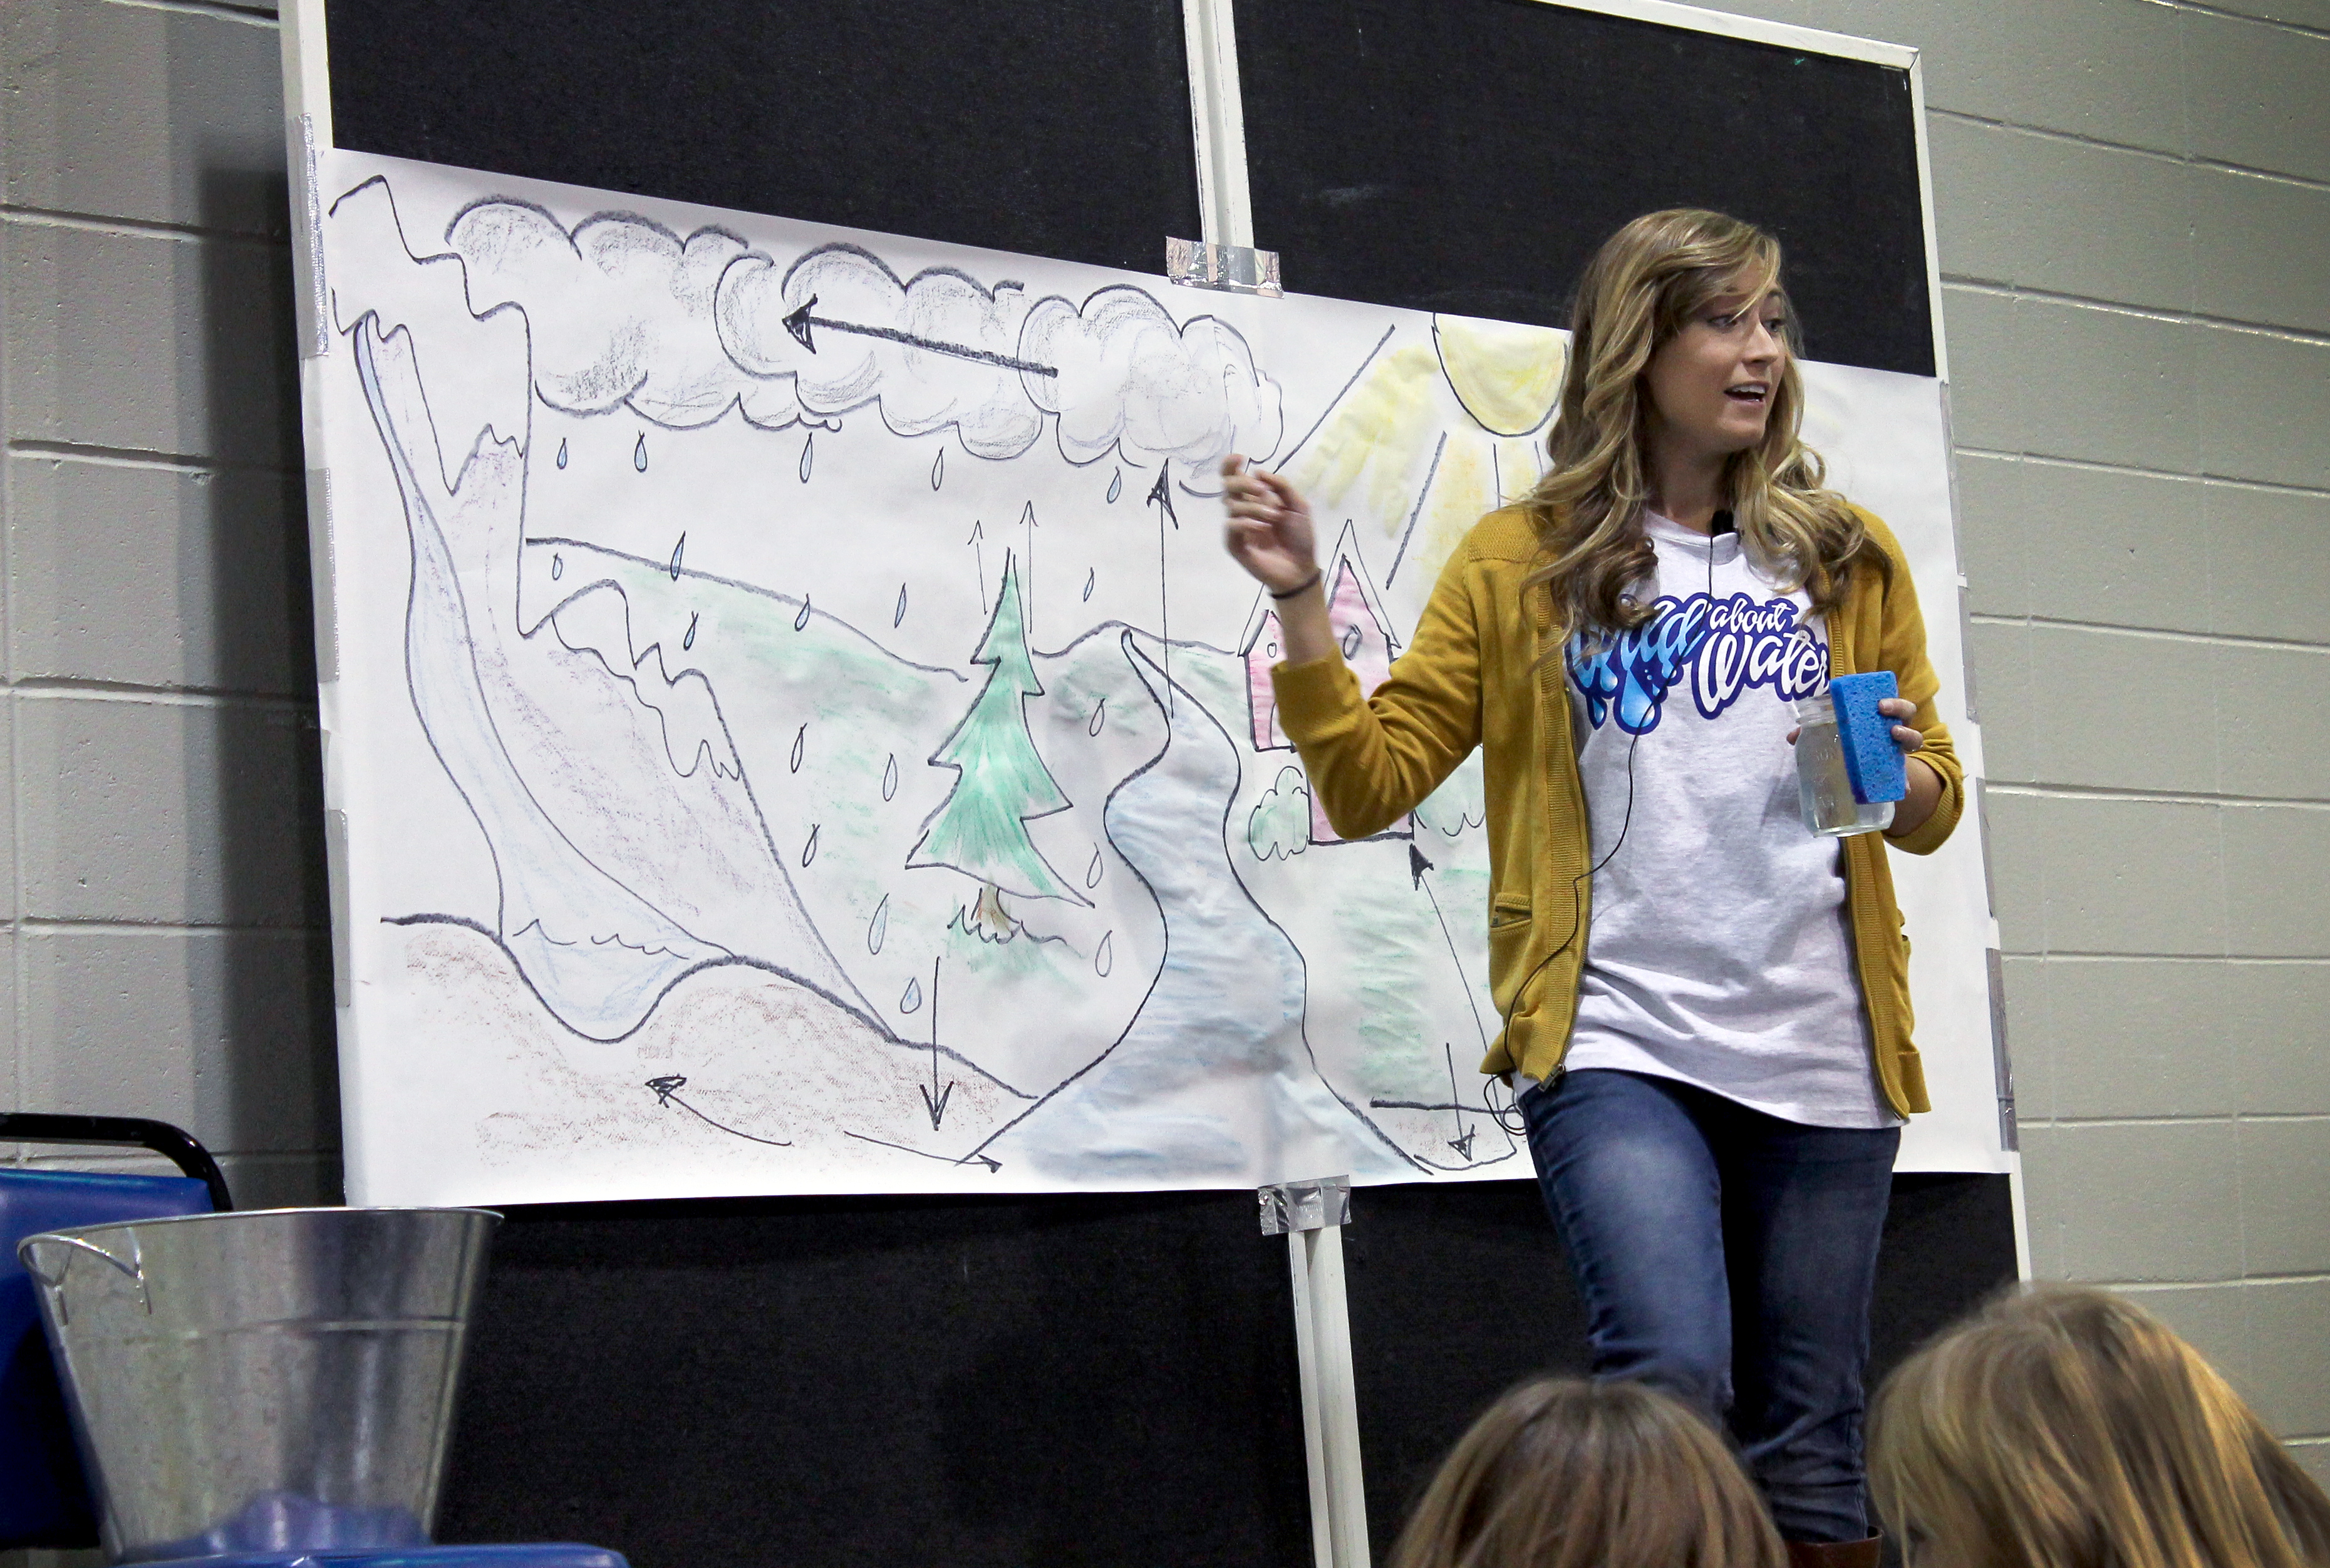
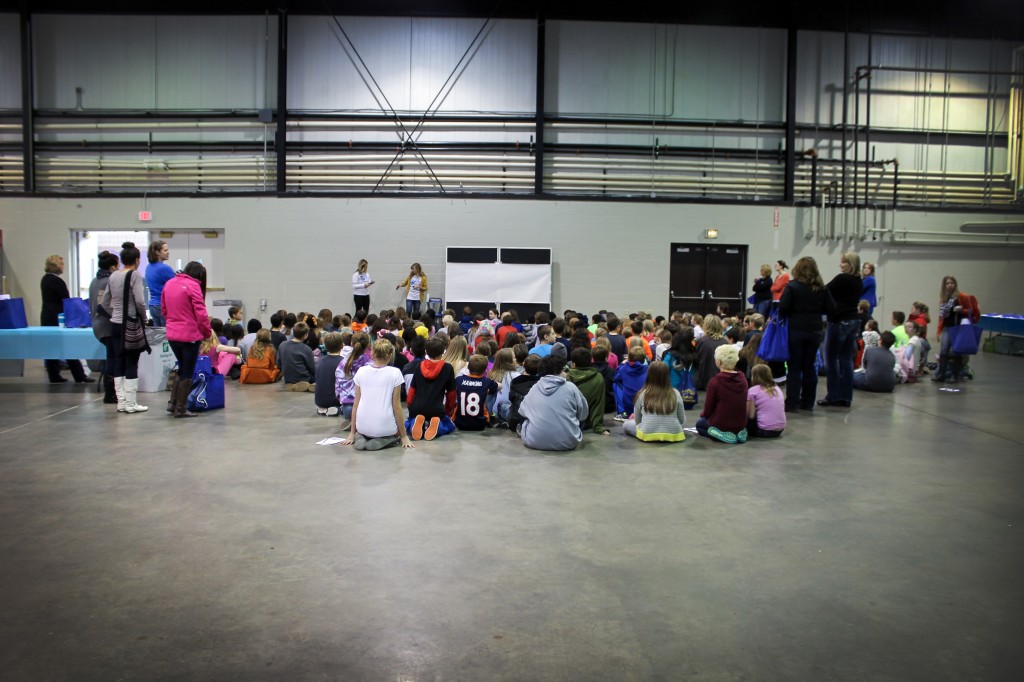
One such awesome, fun, random activity was the Wild About Water Festival that happened a few weeks ago. Before Thanksgiving even. I know, shame on me for not getting this post up sooner. What is the Wild About Water Festival? In short, it’s a program for elementary school students that teaches them about all things water. Water in our bodies, how it effects health, ecosystem stuff, the water cycle, water shed, flooding, river history…you get the picture.
The next thing you are probably wondering, is how I fit into this equation. If you’ve spent time with me you know I’m not especially sciency. I’m a lot of things…but I’m no Bill Nye. So, you can probably imagine my surprise when the kind folks from Ackerman Estvold, a local engineering firm, contacted me about doing a short, art-centered presentation for the even. I was a little nervous, but I love kiddos and a kind word from the Minot Area Council of the Arts seemed to have given them confidence in my abilities, even if I’m not a rocket scientist. So I agreed. And…Just like that, I can now add “5th Grade Science-Art-Speaker Thing” to my list of skills. I think it should go between Nesquick mascot guide and Christmas tree shearer. {Both real, paying jobs that I’ve held at one time or another.}
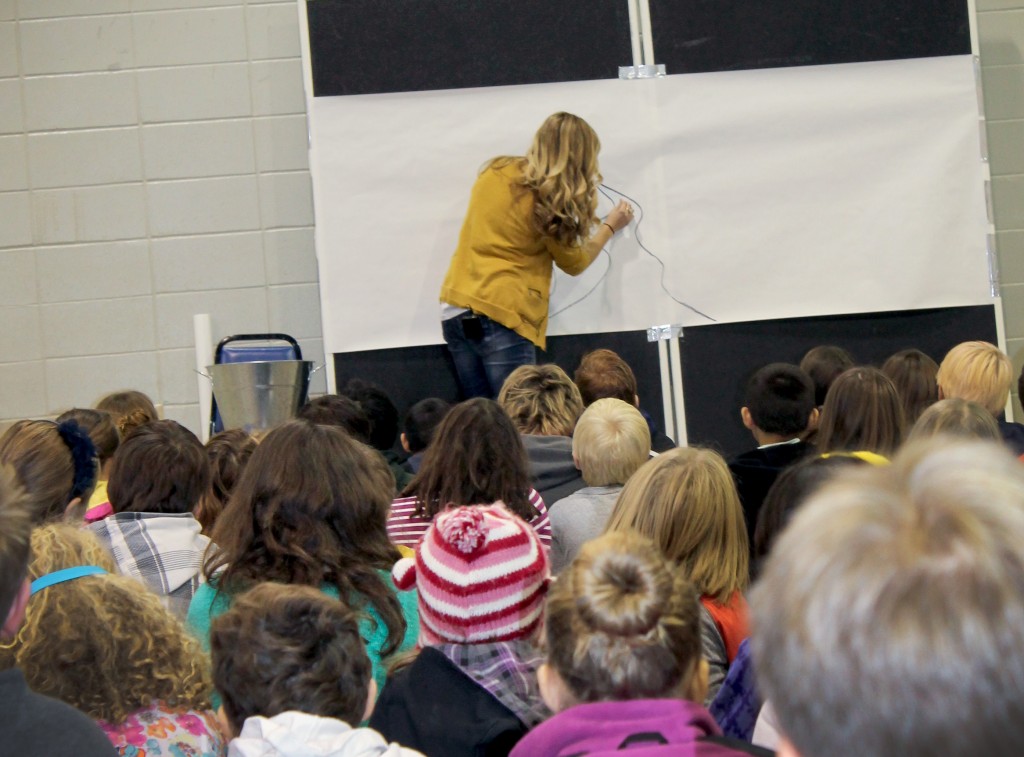
I spent the weeks between our meeting and the festival preparing a short spiel about the basic natural water cycle…and pairing that spiel with a talk-and-draw mural that progressed with my words. I’d go through the steps of the water cycle, drawing a landscape and coloring it in with water color crayons {which are totally awesome BTW}.
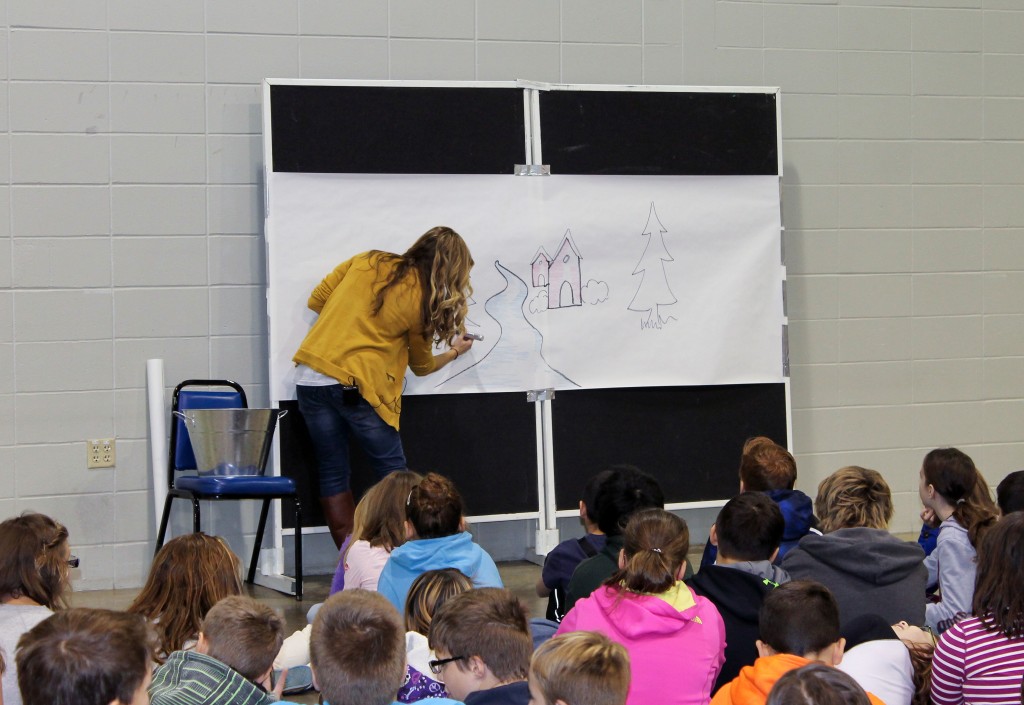
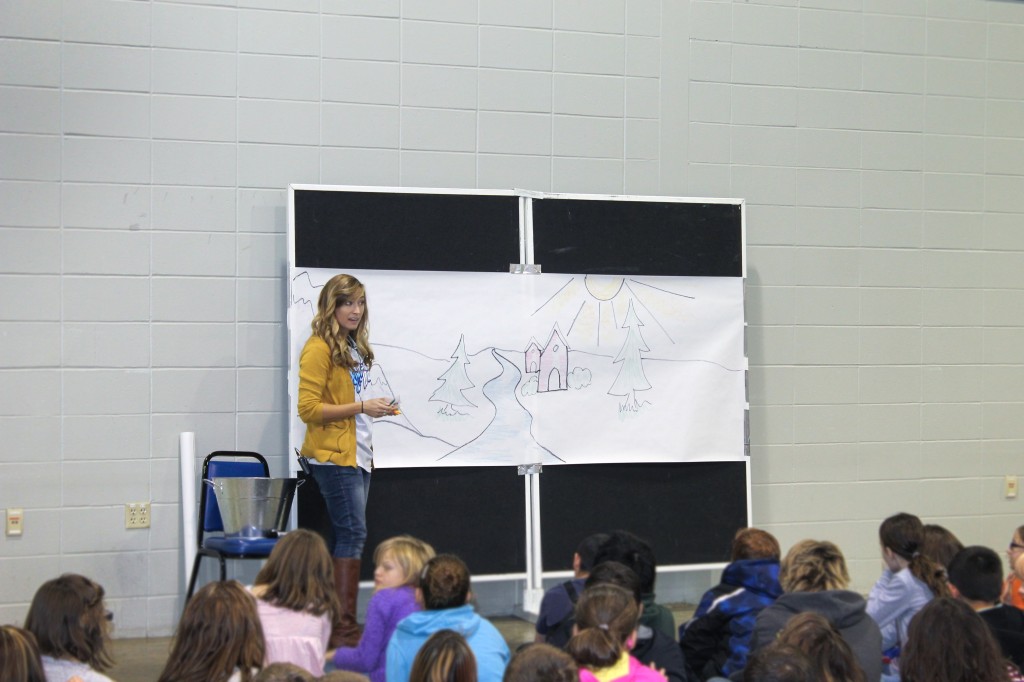
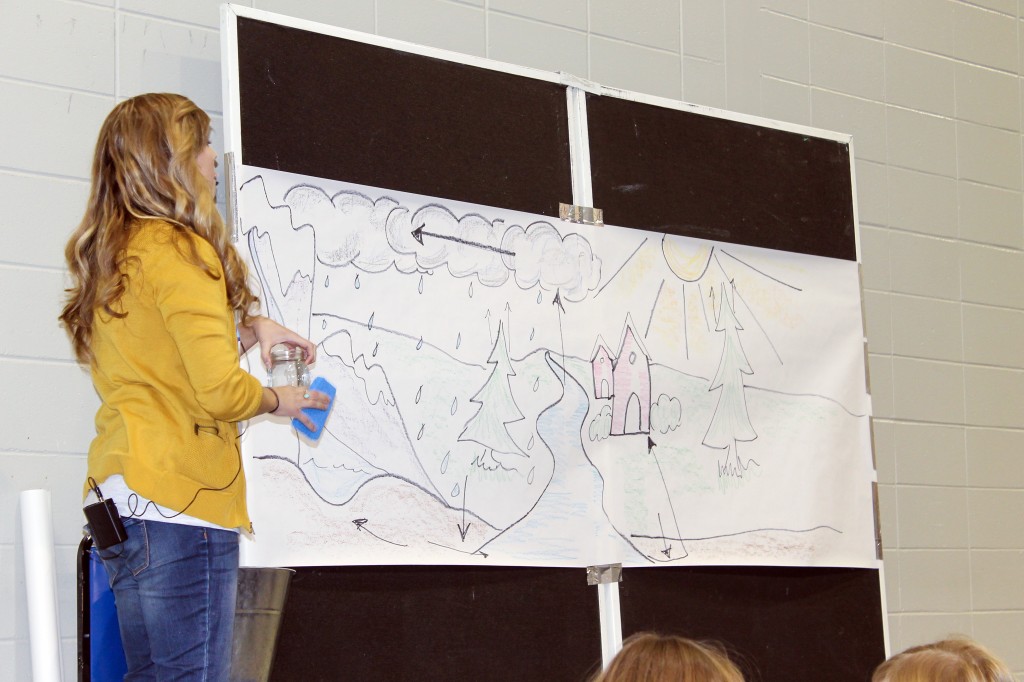
Then, when the cycle was ready to start over, I swapped crayons and marker for water and a sponge. This time I asked the 5th graders {a multi-hundred crowd that although young and adorable also wielded the ability to make me a little nervous} to shout out the steps as I used the water to bring our drawing to life…because water brings things to life. Get it?
I had two major prayers going in. One, that the other adults there–history teachers, water treatment employees, and others who seemed much more legit than me–wouldn’t tell me afterwards that I’d gotten the cycle totally wrong and ruined hundreds of children’s water education. And two–that the kids wouldn’t think I was horribly lame.
I think we can all remember an elementary school presentation that was awful and the topic of recess mockery after it was over. I didn’t want to be that girl.

I must have practiced my water cycle talk a hundred times in the days leading up to the festival. I’d make Derek listen to it before bed. I’d say it in the shower. I’d recite it while I drove. On the big day, my palms were a little sweaty when I started. And I’m sure I messed up a couple times. But things went fine. The kids were impressed when the crayon turned to water color paint. Some even stopped me afterward to tell me that 1) “That was awesome. and 2) I talk like Princess Anna from Frozen. {I get that a lot–it’s an odd compliment.} And the grown ups seemed to think it was pretty okay too.
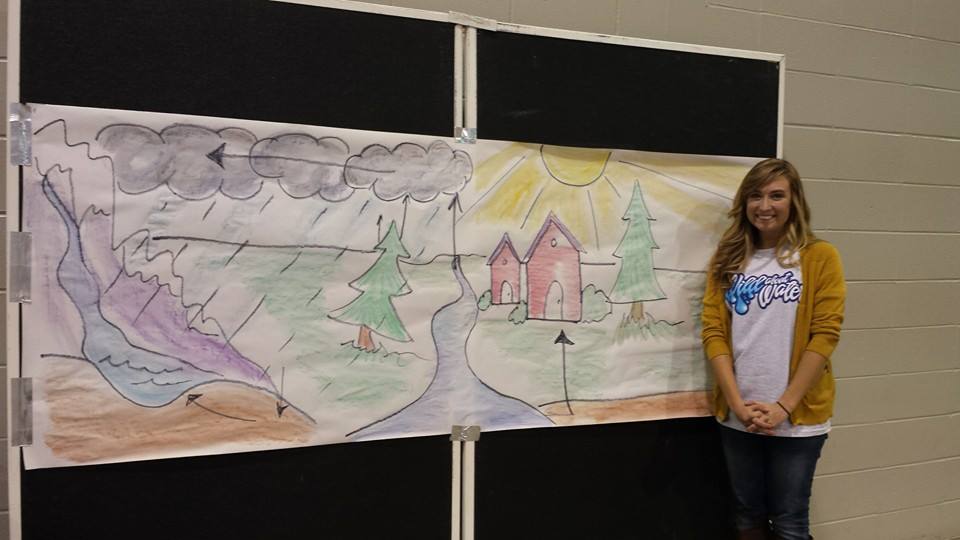
I had an amazing time. All of it was fun–from getting to know the folks at Ackerman Estvold, learning up on water, making new friends, and having the opportunity to draw, talk and joke with a crowd of kids…to learning the water cycle in a new way. I love art, and I’m very glad the Minot community strives to make it a part of the education experience. I’m so happy to have been a part of the Wild About Water Festival. Sharing my very varied skill set to do as much as I can, for as many as I can, for as long as I can is my heart’s greatest desire. And I thank all involved for letting me share in this amazing and important event.
**PS–a big thanks to Ackerman Estvold for giving me photos from the day!
by Amy | Oct 21, 2014 | Blog, Crafts, The Art of Art, The Art of Projects
I’m still trying to get some Christmas crafts in the works. One thing that I want to make for a few friends are canvas/sign art. I really didn’t know what route I wanted to go…so I started looking into the bowels of the Internet for inspiration. Without further ado…
20 tutorials, resources and ideas for creating your very own DIY Canvas Art
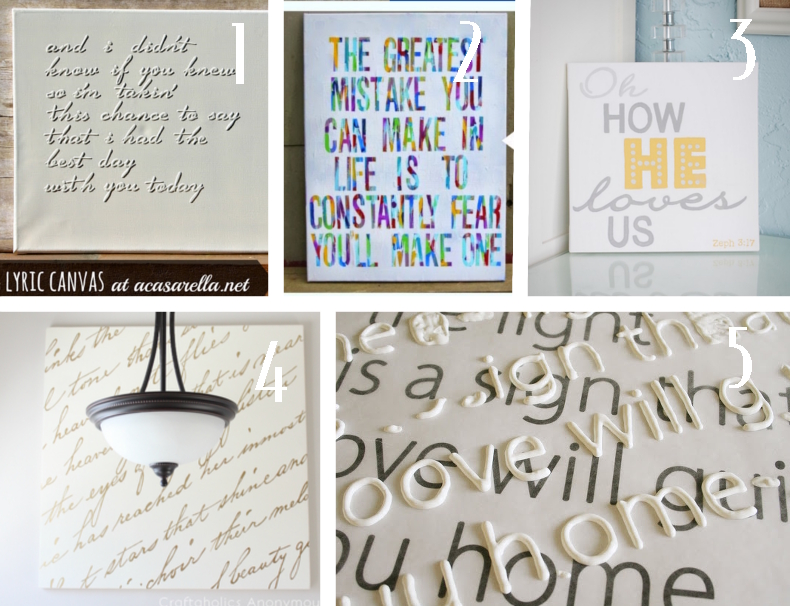
1. This technique from ‘A Casarella is fool proof. You don’t even make the letters yourself, and it looks super classy.
2. Great tutorial on making this colorful canvas, from Kallie at But First, Coffee.
3. I use this technique for all kinds of projects…including my statement stairs! Leana, at A Small Snippet did a great job of making an easy to follow tutorial.
4. This one requires a projector…but the results are simply amazing! Craftaholics Anonymous has a fab tutorial for using liquid leaf to make this statement piece.
5. This is another technique I love. Only basic supplies needed to transfer any font you can think of to canvas! See the how-to at Virginia & Charlie.
6. Christa’s Adventures offers an easy to follow tutorial for making an upcycled sign and adding lettering to it.
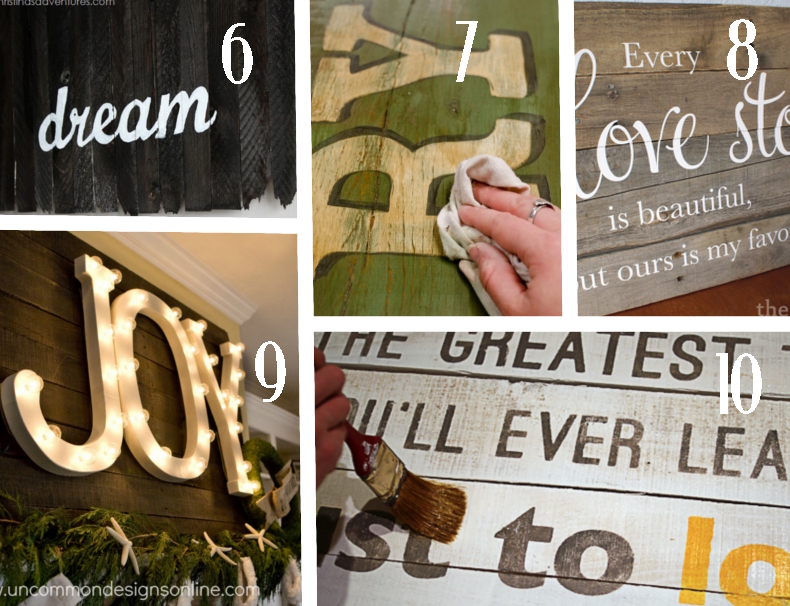
7. When it comes to making a distressed sign, I haven’t found a tutorial I like better than this one from Miss Mustard Seed.
8. The Thinking Closet made this sign with vinyl lettering. But even if you don’t have a vinyl cutter you should still pin this one simply for the sake of the pallet-sign tutorial.
9. This one doesn’t require any lettering at all. Just buy the letters and light them up. Another great tutorial from Uncommon Designs.
10. This tutorial from Saved By Love Creations does an awesome job of breaking down this pallet sign and how she got it perfectly lettered.
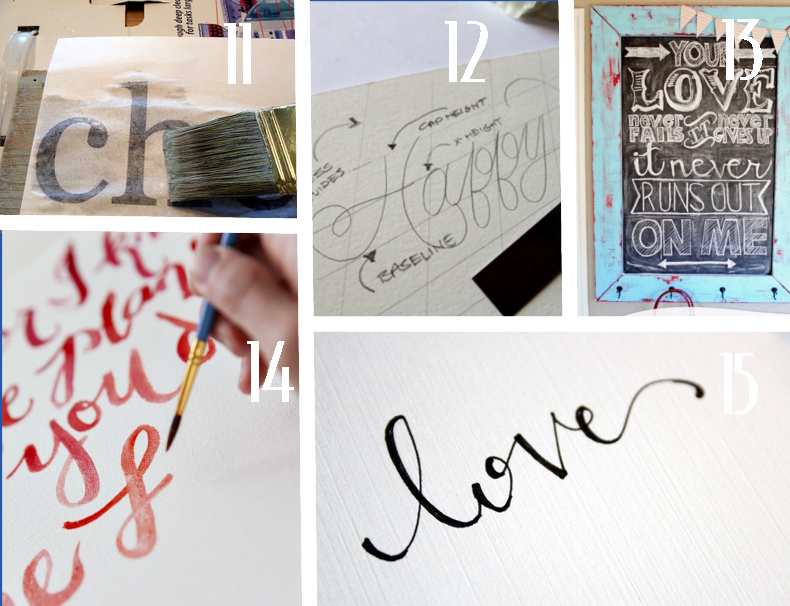
For those of you feeling a little more adventurous, here are five awesome tutorials on hand lettering and sign painting.
11. Diddle Dumpling used her printer and water to make a perfect transfer onto wood. Then she painted over the top.
12. This is a great look at how to create a hand lettered design from start to finish. Head over to A Pair & A Spare to see the tutorial.
13. Kristi from I Should Be Mopping the Floor did a guest post at Ring Around the Rosies to explain her technique for letting on a chalkboard.
14. For those confident in free handing, here’s a handy tip from Oh, So Very Pretty. I love that the tutorial covers the lovely gradient effect she achieved on the canvas!
15. Emily at Jones Design Company offers a great how-to on turning your own hand writing into something fancy-schmancy.
Now, just to make sure you are ready to create, here are five more resources for getting your quote art under way!
16. Get letting inspiration and great fonts from DaFont.com
17. Bible Gateway put out a list of it’s 100 most-read verses. It’s a great place to find the perfect quote.
18. Oh, and this is the page for A-Z Lyrics. I’ve got this linked to all the Switchfoot songs right now…a great place to find good quotes, since they are one of the greatest bands of all time. {But you can search any artist you like.}
19. Brainy Quotes has a great data base of all kinds of quotes. You can search by author or genre.
20. And finally a link to Rifle Paper Co. If you can’t glean inspiration from her, you won’t get it anywhere.
Happy Making!
by Amy | Oct 8, 2014 | Blog, The Art of Art

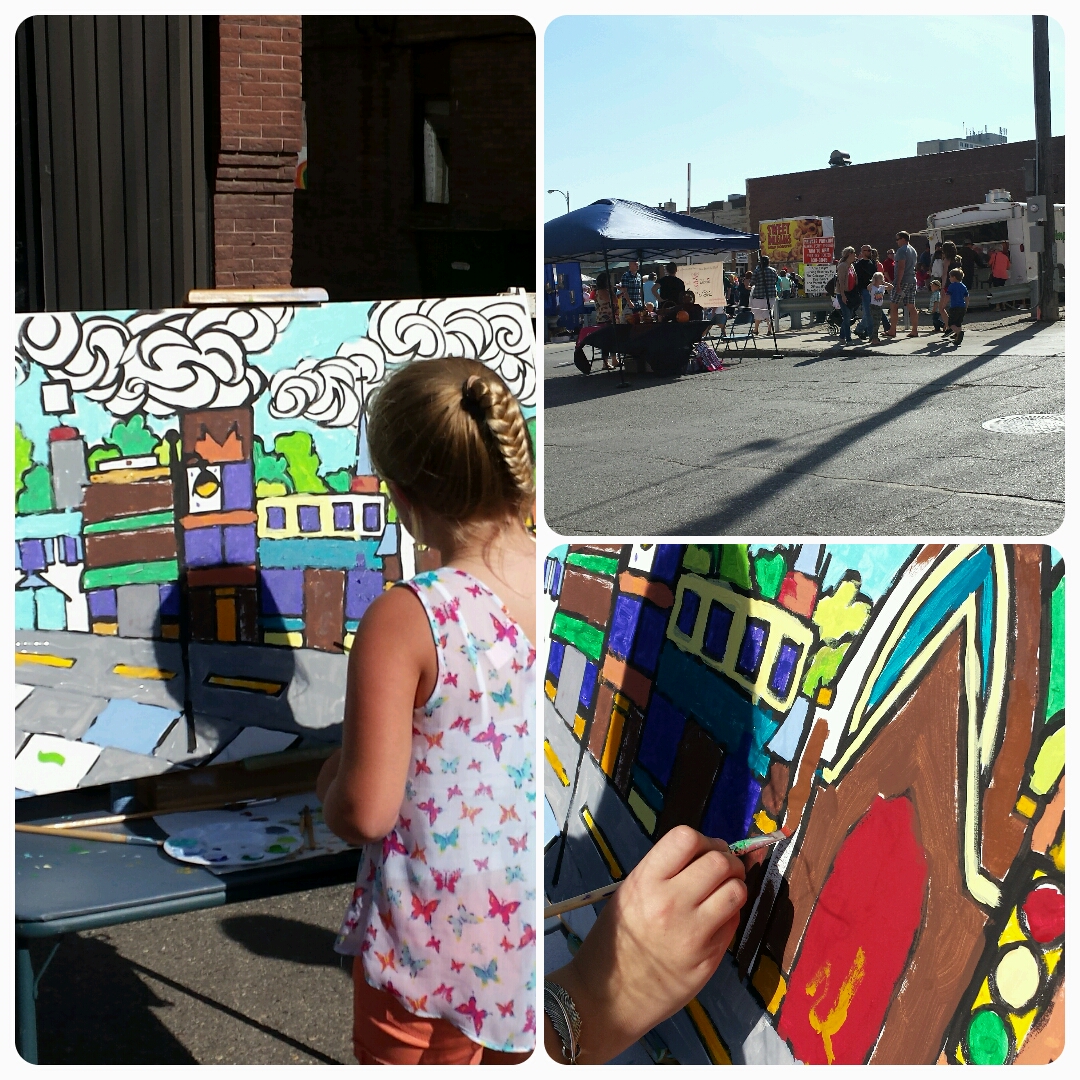
The latest Community Canvas is complete! A few weeks ago I took a “downtown” themed community canvas to Minot’s end of summer block party in downtown Minot. I’d been asked to bring it to the street festival for kids to paint on as they strolled between games and activities.
As, you can imagine, I was a little nervous when I arrived and discovered that my fellow children’s activity vendors included face painting, a bouncy house and games that gave away real prizes. After I set up and several parent’s asked it I painted faces {to which I had to say “no”} I figured the canvas would be a giant dud.
However, to my pleasant surprise, as soon as I started filling in a few spaces on my own, droves of kids started showing up, wanting to paint as well. It was a steady stream of kids for two hours straight! Sometimes there were more kids wanting to paint than brushes! The community canvas turned out to be a big hit. Crazy, I know. I had so much fun. Even the tiniest artists worked hard to stay in the lines and use the right color. Only one {who I’ll call an abstract artist} went totally rogue as you can see by the yellow streak in the red door.
I guess, it just goes to show that kids are attracted to creativity. Their little hands want to create and be creative. As grown ups, I think we should try our best to let them do that as much as they can.
So here is how the canvas progressed. Start to finish. First the outlined painting that I showed you earlier.
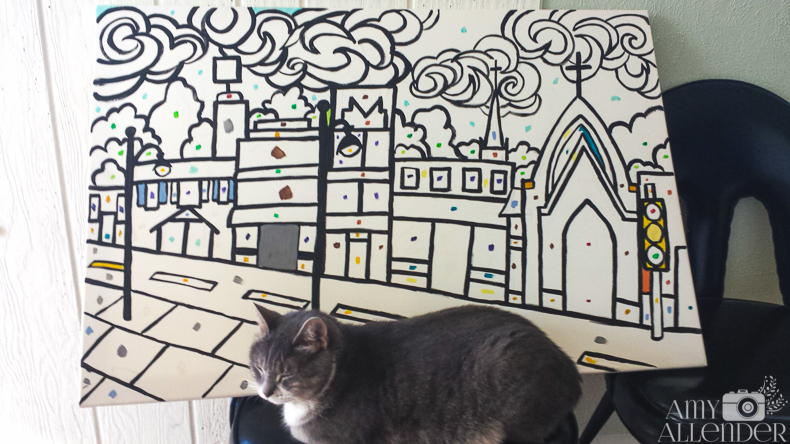
This is what I brought home from the block party.
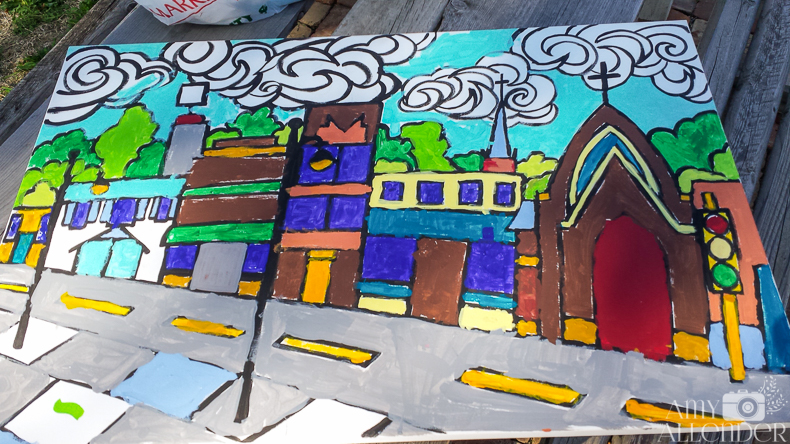
When I bring it home I basically just retrace the black outlines. In this case I added a few other details as well, like bricks, window glare and cloud color.
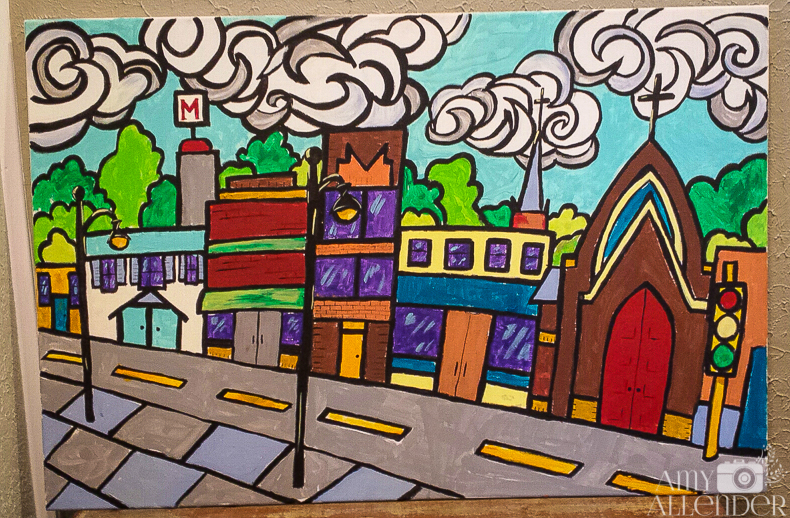
As of now, this painting still doesn’t have a home. So, if you are in the Minot area and know of a business or nonprofit that would like to have a Minot-inspired art piece…created by the children of Minot–get in touch. I’d be happy to let you have it. It doesn’t exactly match my personal decor in my home.
I feel so super blessed by the opportunities the Minot art community has given me lately. At the end of this month I’ll be doing another Community Canvas, but this time it’s actually a “Classroom Canvas”! I’ll be drawing up an owl themed canvas for a first grade classroom to paint. It’s going to be fun times a million.
Amy
by Amy | Aug 16, 2014 | Blog, The Art of Art, The Art of Living
Through the summer Minot holds Arts in the Park every Thursday and Sunday evening. A few months ago, I was blindsided when I got a call from the Minot Area Council of the Arts contacted me and asked if I’d be interested in being a featured artist.
Arts in the Park works like this. A band plays in the band shell, people come and listen, and an artist stands off to the side. You can do anything you’d like to as the artist, they just encourage it to be something interactive or a demonstration. Like most things, my art is pretty diverse. I had no idea what they wanted me to do, but they were clear that I could do anything I wanted.
So I did what I usually do in a situation like this. I try to think what I would want to see if I was just attending. This is what I came up with.

It’s a community canvas. I drew a black outline of a design {inspired by sunflowers, so perfect for this time of year.} Then I put a dot of color in every space, denoting what it should be filled with. People are welcome to come and fill in as much or as little as they want. And when it’s all filled we are left with a lovely piece of art that many hands had a part in creating.

And people loved it!
Which was so flattering, since I tend to think that my arty stuff is only stuff that my mom would like. Better yet, a woman from the arts council asked if she could buy it. {Say what??!} But wait–there’s more. Minot has an “Arts in the Schools” program that sends local artists in to schools to teach art to kids…and they asked if I’d be interested in being involved. {Duh!} Nothing is super official, but it’s still nice to be considered.
Here’s a progression of the canvas throughout the night.


What I’m getting at is that is was a great night. A night much needed as this fell right around the time of the “Unstuck” post. It was an up that I was in need of. Arts in the Park is done for the season, but if you live in Minot, you should keep a pulse on the cool things the arts council is doing. These folks are working hard to infuse our community with art, culture and fun activities, which I think is something we are all in favor of.
xo
Amy