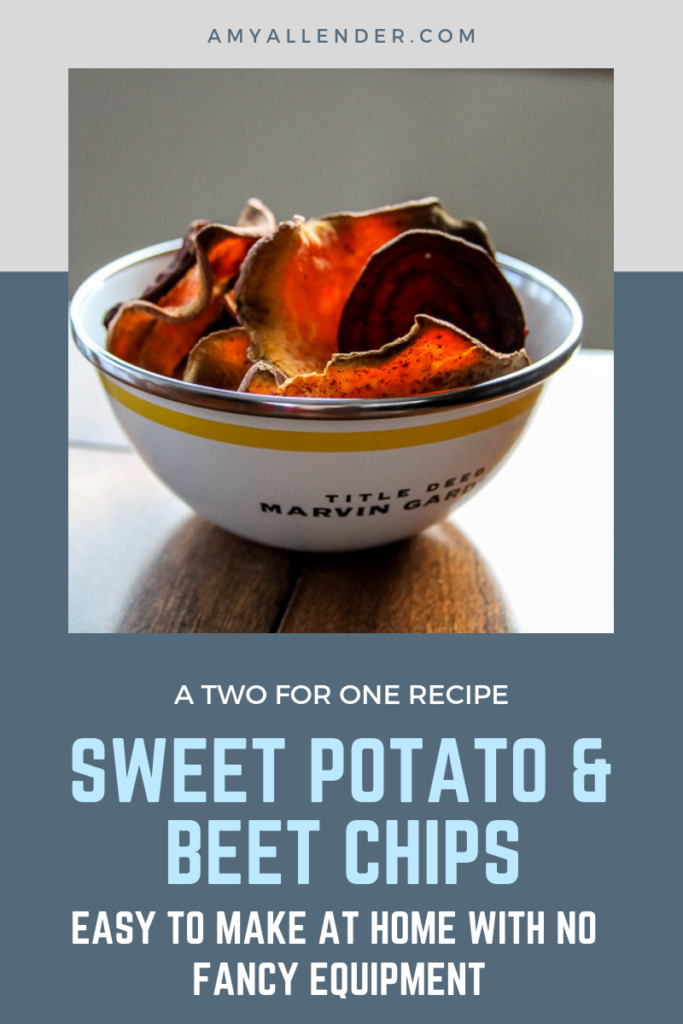
Homemade | Oven Baked |Sweet Potato and Beet Chips
Today we’ve got a two for one. Two recipes. One easy to follow post. Homemade Sweet Potato and Beet Chips here we come! I loooove this recipe so I am super excited to share it with you!
Recently I made a big ol batch of one of my go-to homemade snacks for a friend who is in the midst of a Whole 30 month. Sweet potato and Beet Chips! Her very positive response to them inspired me to finally sit down and share my technique. It’s something I’ve honed with loads of trial and error.
I have looked at and tried lots of chip recipes. I’ve made chips from all kinds of veggies–but sweet potatoes and beets are by far my favorite. A lot of recipes are out there, and they are all very similar. So my recipe might not be too unique as far as ingredients go, but what will make it unique is that I’ll tell you all my tricks for getting chips to turn out crispy–not bitter and blackened.
Warning. This post is long, but don’t be intimidated. The process is lengthy to write out, but much like the board game Seven Wonders it’s a lot quicker to do than explain the rules. It takes me about 10 minutes from pulling a sweet potato out of the pantry and getting the first batch of chips in the oven.
Oh, and you might be wondering: Why sweet potato and beets? The answer is purely opinion. Because I like the combination. Truly I prefer the beets. And I think they are easier to make. But it takes a lot of beets to make a decent amount of chips. So I always make a combo pack.
Okay. Let’s get cooking.
Tip #1: Do a trial batch.
I’ve learned is that making chips can be tempramental. So much depends on how thick your slices are, and how hot your oven runs. This post is a guideline to what works for me in my kitchen. But–it might be different in your house.
I recommend doing a trial run. Test a small, not full sheet. Peek in about 5 minutes before your timer is set to go off. Or just set it for 5 minutes less than what the recipe says. If things are looking brown and crispy, pull them out and move to the next step. If they still look soggy, you may need to add some oven time. Either way, make note than proceed with the rest of your chips. This will save you from burning a big chunk of your batch! (Which is very frustrating–I’ve done it.)
Tip #2: Start with sweet potatoes
Why? Because sweet potatoes cook at a hotter temp. Then when its time for beets you can just let the oven cool a bit and keep crisping.
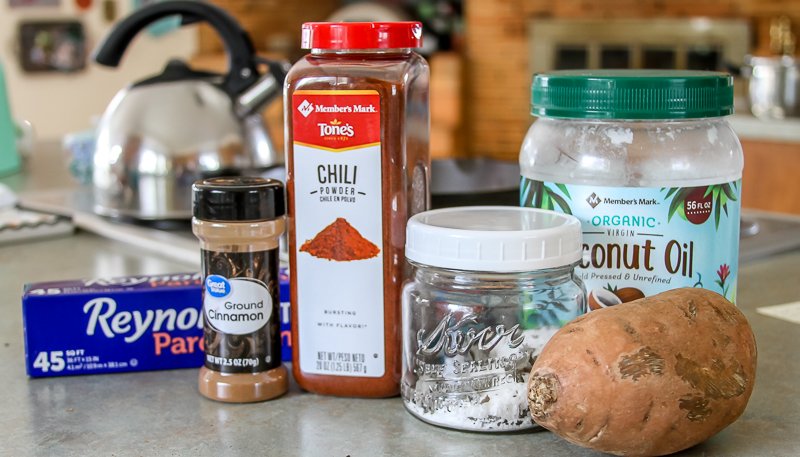
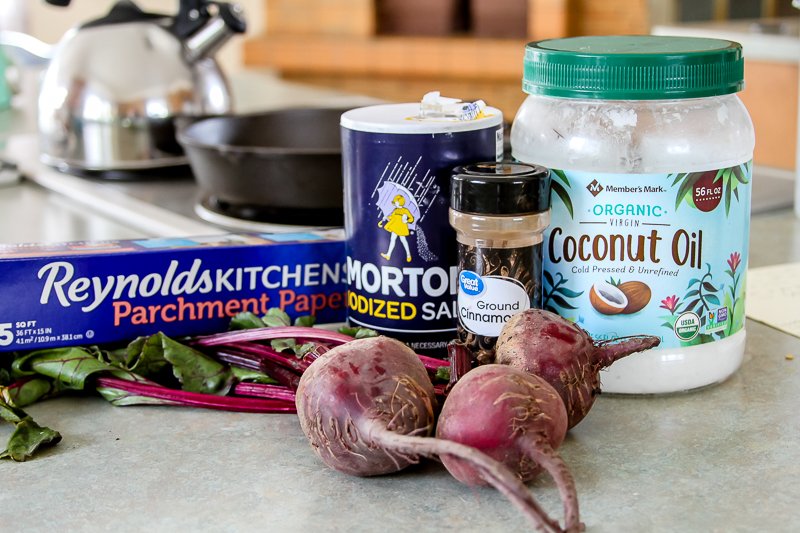
For sweet potato chips these are the ingredients you’ll need:
- Sweet Potatoes–the amount is totally up to you. 3 mid sized potatoes will give you a good yield. (One mid-sized sweet potato usually gets me 2-2.5 full cookie sheets of chips.)
- Oil–I like to use coconut oil because it adds a little sweetness, but anything will do. Olive, canola, heck just run of the mill vegetable oil will be fine.
- Salt–I like coarse salt in my cooking, so that’s what I usually have on hand, but you can use whatever is in your cabinet.
- Optional: cinnamon and chili powder–your chips will be fine without it, but I like these flavors on my chips.
Here’s the equipment you’ll need:
- Cutting board
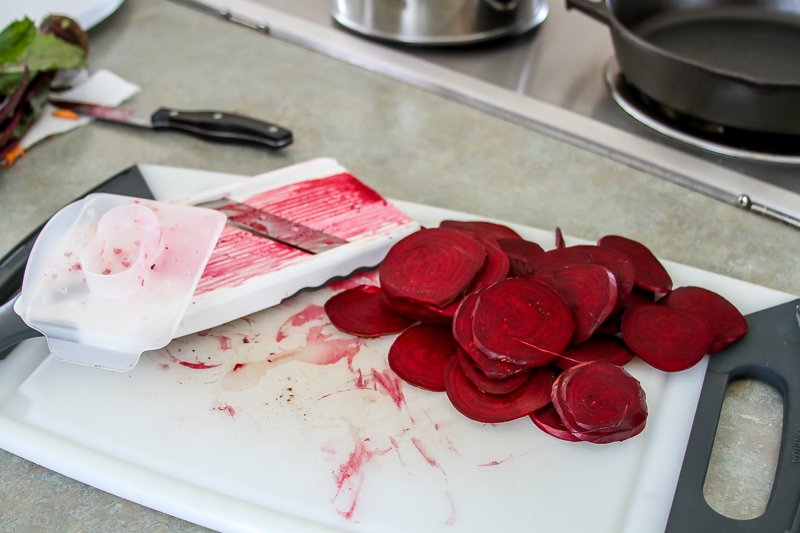
- Mandolin slicer–I linked one similar to mine. I super highly recommend if you are going to attempt chips even once to invest in a mandolin. You can get a super cheap one and upgrade later. While you can use a sharp knife to cut slices, it is VERY HARD to get them thin enough or equal in width.
- Parchment paper
- Basting brush
- Cookie sheets
- Oven
- Oven safe casserole dish (metal or glass is fine, I like to use a 9×13)
Tip #3: Work with smaller potatoes
Do you ever notice that sweet potatoes can be GIANT? While that seems like it would produce the best, biggest chips–it’s not the case. Potatoes with a smaller diameter will slice more evenly. Even slices bake more evenly and will crisp better without getting burned edges.
Now here’s the process.
First assemble your ingredients and start heating your oven to 400˚ F.
Tip #4: Always use parchment paper.
I’ve tried doing this without. It’s a stuck-to-the-pan mess. Line two cookie sheets with parchment paper. If you don’t keep parchment paper in your kitchen, you should. It’s the best.
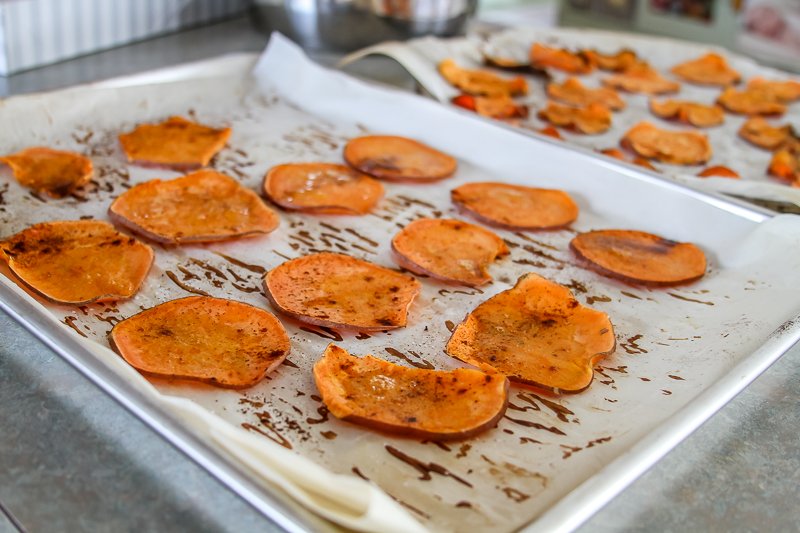
Next, slice up your potatoes as thin as you can. Put as many as you can on each cookie sheet without overlapping them.
Melt your oil–if you are using something that isn’t liquid at room temperature. Brush a little onto each slice. Then sprinkle with salt, cinnamon and chili powder.
Tip #5: Put both sheets in the oven at once.
Bake them for 15 minutes at 400˚. Take them out. Then, flip each slice and return them to the oven on opposite racks. (So the sheet that was on top is now lower and visa versa.)
This is how my chips look after the first 15 minutes. Sometimes super thin slices will be finished at this point.
If you have chips that seem done, (see notes below) pull them off the sheet and put them aside. I like to put them in a 9×13 glass casserole dish. Then flip the others over and return them to the oven.
Tip #6: As you remove chips, condense them onto one sheet.
As you remove done chips to your dish, condense the not-quite-done chips onto one sheet. Then you can start another sheet of completely raw chips and start your next batch.
Return the sheet of chips that needs to keep cooking to the oven for 10 minutes.
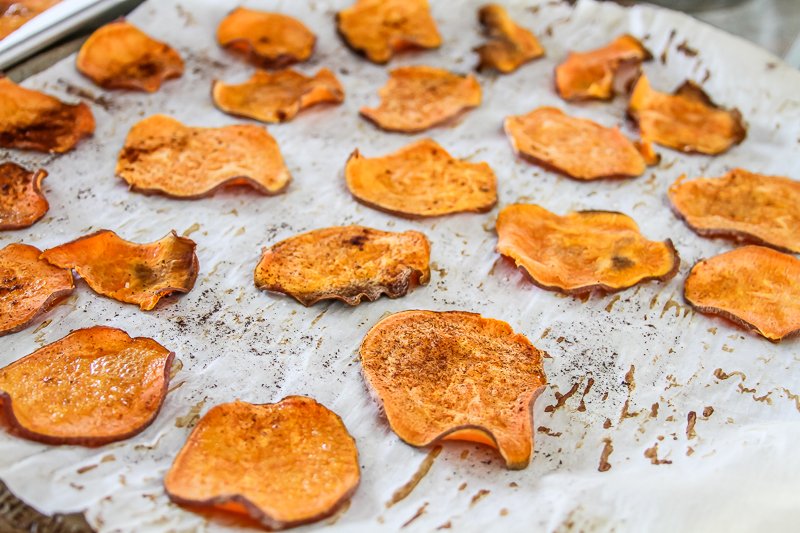
Here’s what my chips look like after 10 more minutes in the oven.
Tip #7: It’s okay if your chips aren’t perfectly crispy yet.
Now here’s where things can vary. At this point, most chips will probably be done. Others maybe not. Heck, depending on your oven, your whole batch might not be done yet and that’s okay. Condense them down, then put them back in the oven. At this point I check in about every 5 minutes. Sweet potato chips can be finicky and can start to burn quickly.
Most of your potato discs might have crispy edges, but the center might still be a little soggy. That’s okay. Don’t be tempted to keep putting them in the oven until the whole chip is dry–that will leave you with bitter burned edges. If the chip looks mostly done and crispy, remove it from the baking sheet.
Tip #8: How do I know they’re done?
- They should have changed color a bit–to a lighter orange
- They should be mostly dry
- The edges should be wavy and a little brown
- They should feel a bit rigid.
Tip #9: They’ll get crispier as they cool.
It’s true. Annnnd…you’ll do a Final Crisping.
Here is a quick guide to sweet potato chip doneness.
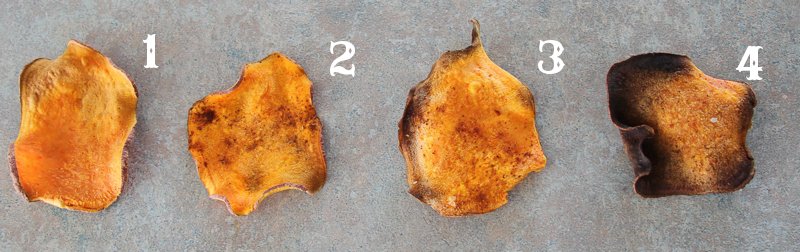
- This one is a little under done. you can see that there is a dark orange spot on the left side. It’s still raw.
- This chip is just about perfect. Edges are brown but not burned.
- This one is edging in on over done–look at the dark edges.
- This chip is burned.
Repeat until all are done according to the guidelines below. Then proceed to the Final Crisping. If you are making beet chips too, keep reading. If you are stopping with just sweet potatoes, scroll down to the Final Crisping section.
Okay. Now beets.
For beet chips here are the ingredients you need:
- Beets
- Salt
- Oil–I use coconut, but just like sweet potato chips, you can use any kind.
- Optional–cinnamon
You need the same equipment as for sweet potatoes + a mixing bowl and paper towels
Here’s the beet chip making process:
If I’m making both types of chips, I start the beet process while the sweet potatoes are starting to bake.
Assemble your ingredients. Reduce the oven temp to 300˚F.
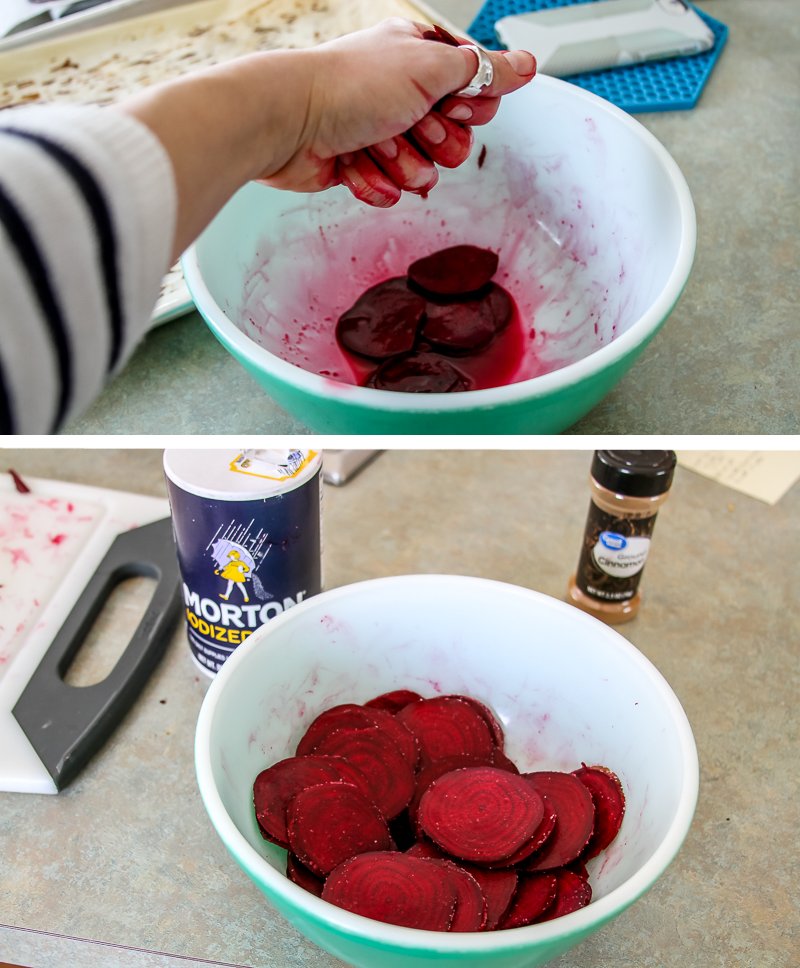
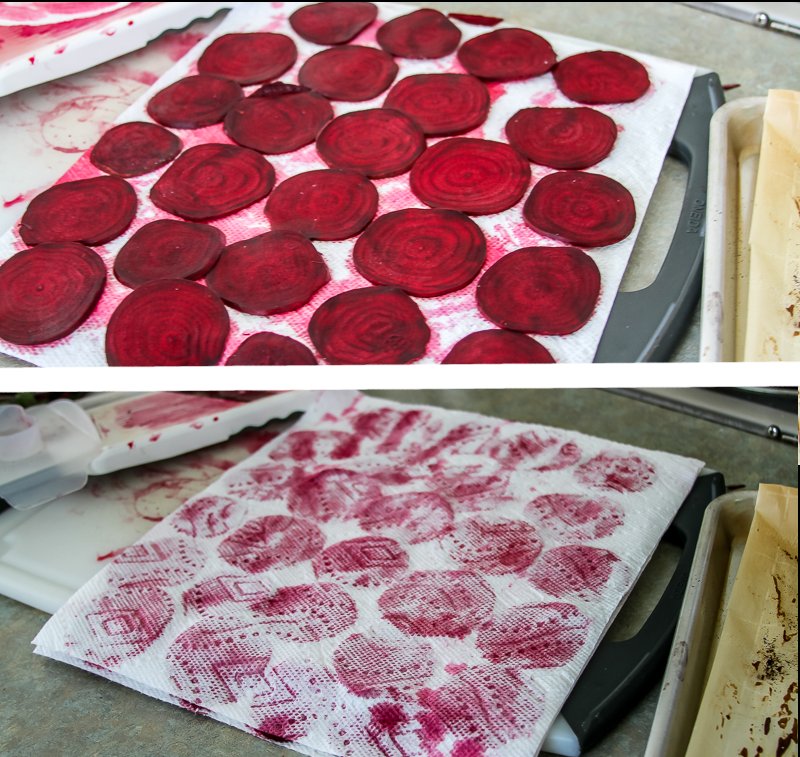
Slice your beets as thin as you can and put them in a bowl.
Tip #1: Always sweat your beets.
Beets are very juicy. Letting them sweat out some liquid will help them cook and crisp.
Once in the bowl, sprinkle them liberally with salt. If you like specifics, I’d say use 2 TBSP for 3-4 beets. But really it doesn’t matter. Salt them, then mix them with your hands a bit to evenly distribute the salt. Let them sweat (stand) for at least 15 minutes. A longer sweat will not hurt them.
After at least 15 minutes, put a paper towel on your cutting board. Squeeze the beets out and lay them in a single layer on the board. (This may mean you do this part in batches.)
Lay another paper towel over the beets and pat them dry. Once dry, transfer them to parchment lined cookie sheets.
Brush them with oil and sprinkle with cinnamon. You can add a little salt too, but I find that they already have good flavor from the sweat.
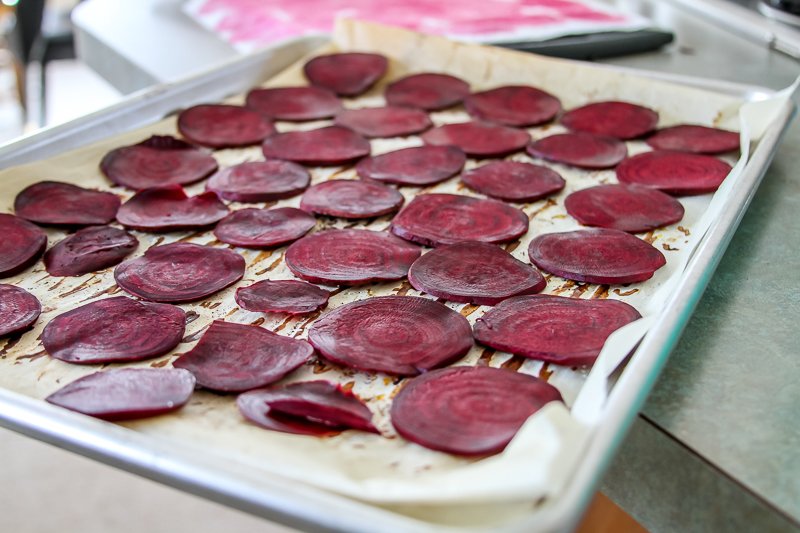
Bake these at 300˚ for 30 minutes. Take them out, flip them and switch racks, just like for sweet potatoes.
Let them bake another 15 minutes. Pull any finished chips off the sheet. Put the rest back in and bake them in 10 minute intervals (or shorter if you are nervous) until they are done. (See guidelines below.)
As chips come out done, condense them onto a single sheet. Then start another batch. Repeat until all are done according to the guidelines below.
Tip #2: How can I tell if they’re done?
I didn’t make a side-by-side for these because it’s much easier to tell. Your chips are done when:
- They have changed color. They’ll be lighter, but not tan. Burned chips are tan.
- The slices do not look wet
- The edges have curled a bit and the chip has shrunken
- They feel rigid and not meaty
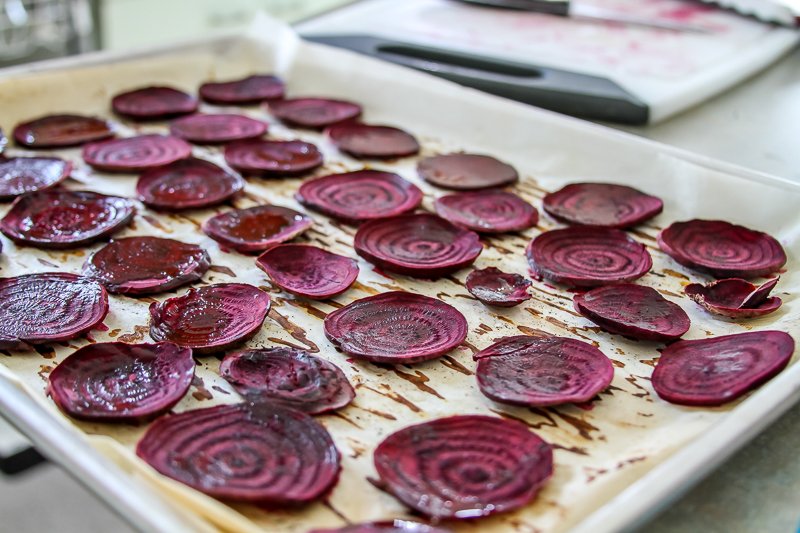
Remember they’ll continue crisping after they come out of the oven. Don’t be tempted to over bake them.
When all the chips are done, move on to the final crisping.
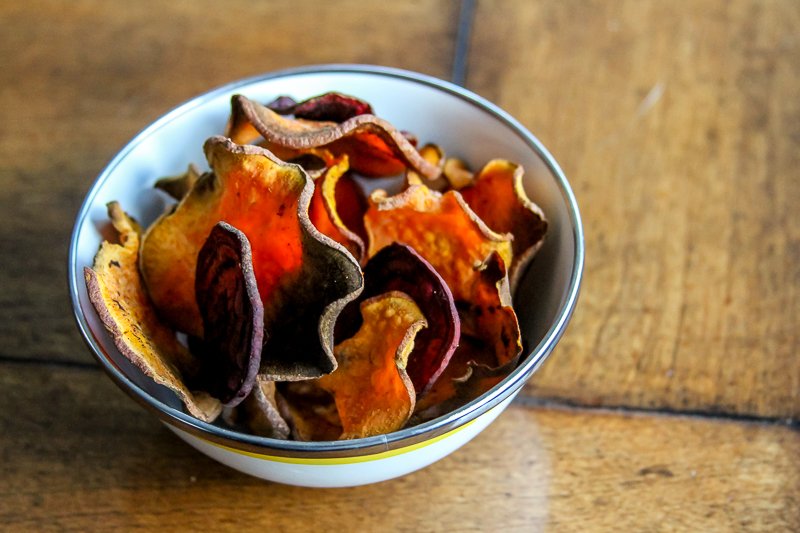
The FINAL CRISPING is key!
Now, reduce the oven temp to 200˚. Place the casserole dish with all the chips in it in the oven. This will finish drying them out without burning them. I give them a little stir about every 30 minutes or so. Leave them in for several hours. You can even turn your oven down to 175˚ and only check in ever hour.
The final crisping makes all the difference in the world. I’m not even joking.
Once they feel dry and crispy take them out and let them cool completely before covering them or putting them in any kind of air tight container.
It is a time consuming process, but its not hard. It’s easy to make these and be a multitasking machine. Do laundry. Watch your baby. Binge watch the British Baking Show. Clean. Whatever.
I hope this has been helpful. Let me know if you give it a try or have tips of your own that I left out!
xo
Amy
PS–Here is a condensed version, if you don’t like reading.
Sweet potato chips:
- Sweet potatoes
- Oil
- Salt
- Cinnamon
- Chili powder
Slice sweet potatoes and place them in a single layer on a cookie sheet lined with parchment paper. Brush with oil then sprinkle with spices. Bake at 400˚ for 20 minutes. Take them out, flip them and bake for additional 10 minutes. Keep repeating the process until they are done. *See notes on doneness above.
Beet Chips
- Beets
- Oil
- Salt
- Cinnamon
Slice your beets and place in a bowl. Sprinkle liberally with salt and let stand for minimum of 15 minutes. Squeeze out and pat dry with paper towel. Place in a single layer on parchment paper lines cookie sheets. Bake 30 minutes at 300˚. Take out, flip and return to oven for 15 minutes. Repeat until done. **see notes on doneness above.


