by Amy | Dec 13, 2012 | Blog, Crafts, The Art of Design
Hi guys. We’ve had a little COP. {Change of plans.} Today I’m giving you six…count ’em SIX free printable gift tags for all your wrapping needs. They were really fun to make. I like to punch holes in the top and string them on to packages. But they are just as cute taped on. Enjoy!

I’ve put all these tags into individual Google Docs. Just save the files you like and print them out. You can save paper by arranging more than one tag onto a Word document. The tags measure 3″ x 1.75″ but the files are high res…so you can make them a bit larger if you like. And, yes…they are free! All I ask is that when friends and family compliment them…you tell them that you got them here, at the very-fun-and-awesome Amy Allender blog.
Here is the Peace Love Joy tag…You’re Gonna Love This…Santa Asked Me…and the Something Awesome tag

And here are links for the You’ve Been Nice tag…You’ve Been Naughty…Ho3…Special Delivery
Merry Christmas. Now, I’ve got cookies to make!
Amy
by Amy | Nov 26, 2012 | Blog, The Art of Design
I know I’ve talked a lot about Christmas cards lately. And I promise…after tonight I’ll hush about it. {For a little bit.} But I just had to show you the lovely cards I designed for my Etsy shop. They are cute and totally customizable for you.
The examples show photos of me…but I’m sure your photos will look much better than mine. And for only $10 you get the file and can print as many as you like! {That’s a good deal.} There are seven designs available for you to choose from at my shop, go over to the store to see the rest. So pick your favorite…and get going. Those cards won’t send themselves.


by Amy | Nov 15, 2012 | Blog, The Art of Design
Today I’m going to give you a beginner’s lesson in design. Let me put it this way…If I can do it, you can definitely do it. So I’ll be showing you step by step how to make this:

From this:

Pretty enough to be a card, right? Well first, let me tell you that you can do this. There is nothing special about the quality of the photo or the skills you need to put it together. My mom took this photo of my family skating a year or two ago. It was snapped on a plain jane point and click camera. {Mom is not a photographer.} All you need is a little imagination, yesterday’s cute elements and this tutorial.
This is a long post…so you’ll have to click through to see the full tutorial.
(more…)
by Amy | Nov 14, 2012 | Blog, The Art of Design
Hi guys,
Christmas is coming up fast. I actually thinks that goes without saying. The season brings lots of things. Candy, cookies, warm drinks, White Russians, parties…and cards. Lots of cards.
Whether you send out a card or not…chances are you still like clever, cute photos. {I know I do!} So I made a few goodies for my goodies. You can use them to make your own cards…or just a really cute Facebook cover photo. Up to you!
Here are some examples that I made using the elements that I’m giving you today! Click the links below…that should take you to the free Google document so you can save it for yourself. Once you save the ones you like be sure to check out the tutorial on designing your very own custom cards!

I’ll start with a recent photo. The rest of these are a bit of a time warp…The stars and text are one solid graphic. Get it here.

We took this photo when we lived in Florida. It was a joke that this would be our Christmas card. We meant for it to be a bit awkward. At the time we really did miss snow…Now it’s all over the place….The tree and the thought bubble are available for you!

This is again from Florida. I guess we took good Christmas photos that year. This orange tree was in our back yard. How cool is that? The text and snowflakes are separate. There are three snowflakes for you. Here’s #1, #2, and #3.

Again…the snowflakes. Here’s a different text graphic for you. I really love this one.

Lastly, a little joy to the world.
The point of these is to be able to turn any photo into an awesome Christmas card or image to share with friends and family. Using these is super simple. Just save it to your computer, open your image in an editing program that supports layers {like PhotoShop or GIMP}, then open the layers and put them where you want!
If you don’t understand the “layers” talk…no worries. I’ll be covering how to use them tomorrow. I’ll show you how to put together your own Christmas card in GIMP. And if you really wanna go ghetto…you can always use these in Word. Create a custom paper size to fit your image. Open your image, then open the elements you want to use.
I hope you like them. I’m also cooking up custom cards for my Etsy shop. So get excited already!
Amy
by Amy | Sep 18, 2012 | Blog, The Art of Design, The Art of Projects
You remember the garage sale, right? Well, after it was all said and done we still had a few goodies left that we didn’t want to haul off to the thrift shop. A few things we thought just might sell on Craigslist.
So after giving myself plenty of time to procrastinate, I finally listed. them. I thought you might like my ads. First the ad for my sweet poker table.
I wish craigslist had a category in ‘for sale’ titled “Awesome.” Because this table is awesome. It was my grandfather’s. He played a lot of poker in his basement in the 1960’s. I inherited it. Then I moved to Minot…where housing is hard to find and very expensive once you do find it. And alas, there is no space in my humble abode for this sweet piece of man-cave-must-have.
The table comes with four chairs. There are eight place settings, each with a tray and cupholder. And who cares if you don’t play poker. Use it for game night. Any way you cut it this is a good deal. There is a small crack near one of the cupholders. I’m not shady…I’ll tell you how it is.
The legs collapse and the chairs fold up so you can store it easily. Email me or text me if you’re interested.
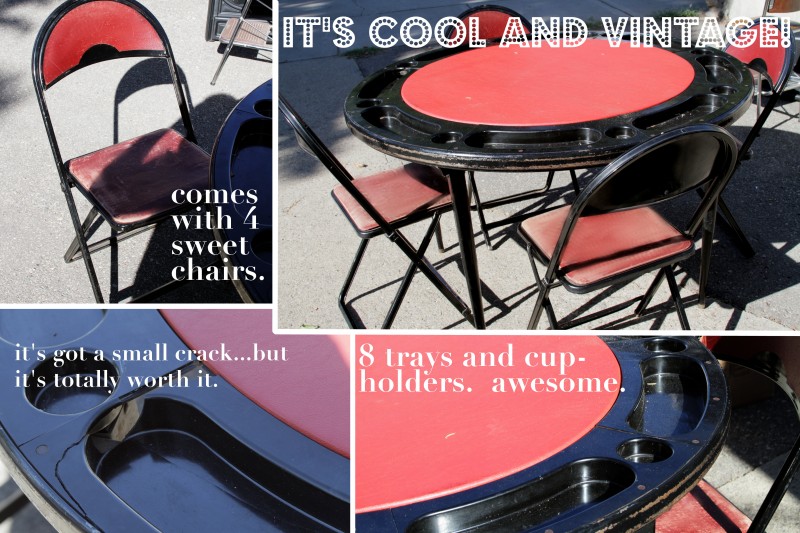
Now, let me tell you the best part. I listed this bad boy for $30. Now even 24 hours after I slapped it up, I got an offer. Then about 10 seconds later I got another offer. We ended up selling it for $40. Amazing, right? I’m so sad I had to sell it, but the couple who bought it was young and cute, so I know it’s in good hands. Well…better hands than just living in my basement.
Here’s my second ad. It’s for my winter coat. Which I love, but would really like a new one.
This is a wool Hollister coat. Women’s size small. It’s super cute. It’s been worn, but is still in great shape. I’m a clean person. I don’t smoke. And I don’t have unruly BO or anything like that. This coat is clean and darling, but I’m ready for change. I would love for you to have it. It’s not just for looks. It’ll keep you legit warm.
Email me if you’d like to make an offer.

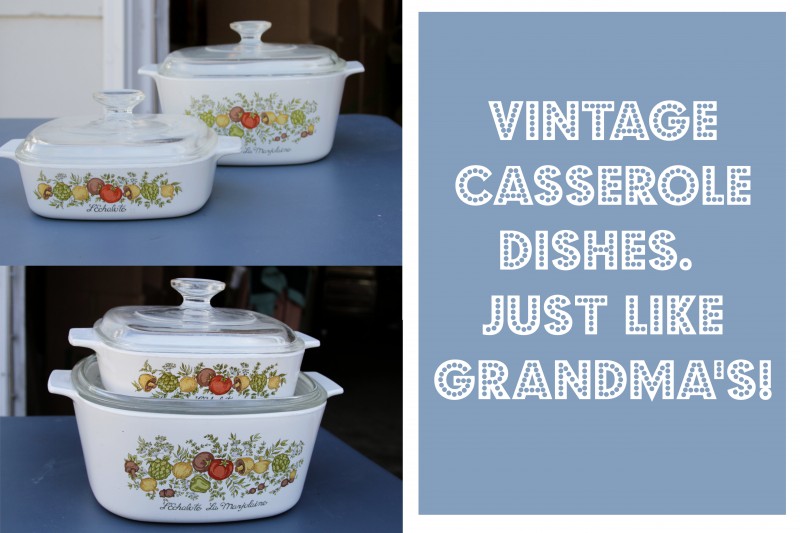
And finally, the ad I made for a set of retro casserole dishes.
I have two lovely casserole dishes for sale. We’ve all seen these. They are classics. And they don’t call them classics for nothing. There’s a reason your grandma always used them. These babies rock. Safe for oven use. Safe in the dishwasher. Convenient for fridge leftover storage.
Now, I know what you’re thinking…if they are so awesome, why aren’t you keeping them. Well, I’ll be honest with you. I’m a glassware hoarder. I’ve got casserole dishes and cake stands coming out my ears. So the hard decision had to be made. And I had to let go of a few. I hope you’ll give them a good home. They won’t let you down.
Email me if you have questions or would like to have them for your own.
Now, will the coat and casserole sell? Honestly, I don’t know. But it was worth a shot, right?
At any rate, I hope you got a good chuckle out of my lame antics. As you can see…Minot, ND is not a very happening place. {Making these ads was the highlight event of my Friday night.}
Amy
by Amy | Aug 28, 2012 | Blog, The Art of Design, The Art of Projects

So. The garage sale was a huge success. Since I have no other garage sales to compare it to…I guess that doesn’t mean too much. But we got a lot of traffic, we sold a lot of stuff, and we made some money.
I owe the success mostly to the great articles I read and the great guest post from Kuzak’s closet.
1. And you wanna know what the biggest, best piece of advice I received was? Make your sale stand out. As people came up to our garage a lot had seen the craigslist ad. They said they came to check us out because they just had to see who the loon was behind those ads. Look here to see the graphics that I ran. Here is what my ads said:
Ad #1
I’m not officially a hoarder…but if things continue at this rate I will be. I’m 25 and I’ve got enough stuff to fill an estate sale. I inherited lots of awesome stuff from grandparents…and I love vintage finds. But alas, my house is not large enough to accommodate all my treasures. So I’m selling them.
Come by Saturday August 25 from 8 a.m. to 3 p.m. or Sunday the 26th 1 p.m. to 5 p.m. Please don’t be an early bird. I can assure you, you won’t be getting the worm that is my awesome stuff. It’ll just be awkward for both of us. I’ll be getting my stuff out into the drive way {feeling like I need to make small talk with you} and you’ll just be watching me. Creepily. So please. Remove this awkward moment for both of us and just don’t show up before 8 a.m. If you are early…wait in your car.
I’ll have home made muffins and lemonade…to keep you energized through your shopping adventures. Oh and I should mention that prices are NOT FIRM. Yes, you read that right. I love a good bargain as much as you do. I’ll price to sell, but I love a good haggle.
Some of the highlight items are: Vintage linens, a retro office chair, a big media cabinet, vintage poker table, glass ware, 2 digital cameras, curtains…oh my…just listing it all makes me feel like an old woman who is planning a sale before she moves to a retirement home.
Come by. It won’t be lame.
Ad #2
Tomorrow is the day. My sign on Burdick and 3rd got nabbed tonight…but the show must go on. In case you missed my first post, here’s the skinny.
I’m too young to have so much stuff. My trove of treasures is over flowing, so in order to maintain my sanity, I must get rid of some things. That’s where you come in. Come tomorrow {Saturday 8/25} or Sunday {8/26} and buy some awesome stuff from me. I promise, my sale is full of wondrous treasures. Not lame things.
We open Saturday 8/25 at 8 a.m. and run until 3 p.m. Please don’t come early. It’ll just be awkward for you and me. But mostly me. And I don’t do well with awkward moments. So please, if you are here early, just wait in your car.
Sunday 8/26 we’ll be open from 1-5 p.m. I have to go to church. And you should too. Don’t waste the Sabbath morning on shopping second hand goods. My trinkets will be readily available after praising our Maker.
I was going to have muffins for you to munch while you shop, but I messed up the recipe. So you’ll just have to settle for a glass of lemonade instead.
See you there. Remember, it won’t be lame.
Oh yeah, and I want these things gone. So no prices are firm. Yes that is right. Prices are like Jello.
2. Now, those that didn’t see the ads had seen my street signs. I used a GIANT paint marker to create signs on old boxes. Then I staked them into high traffic corners. And I made sure that the address was the biggest and most prominent.
3. Once we got people to stroll up to our sale, I enticed them to buy with even more quirky signs. As the day went on, I continued to make more signs throughout the day to highlight items that we really wanted gone.

a. “This is a head scarf from Iraq. Seriously? Sweet!” Yeah…that was a gift from an ex-boyfriend/soldier. Sweet…but never used.
b. Nearly every vase and votive sold.
c. I gave all my shoppers a coupon for my photography services. Hey, it’s shameless self promotion.
d. The sale.
4. We constantly shifted prices. If several people walked away from an item after considering it I dropped the price a bit.
5. As things sold we rearranged and scooted things closer to the curb. No one likes a picked over sale…so I tried really hard to make it look full, even as our “inventory” thinned out. Even when the sale was over, I thought it looked full…but really, we just had one box to haul to the donation box.

a. “Sweet Frames. $1 $0.50″
b. Some work benches left in the garage. They all sold.
c. Those garden statues I was telling you about…
I’ve got just one more thing to add. We marked some things free…mostly because we wanted them gone. One was a set of 3 Care Bears place mats circa 1991 {they were left in the house when we moved in.} Those got taken after some coaxing. But we had a set of 2 Christmas teddy bear place mats that were seriously ugly. No amount of coaxing, no free sticker could make those puppies move.
On the flipside, we did sell some wildly hideous garden statues {also left behind} and a handicap parking sign {also left behind.}
Just proof that what they say about “One man’s trash…” still holds true.
Amy
by Amy | Aug 22, 2012 | Blog, The Art of Design, The Art of Projects, the house
So you may have heard me mention my first ever garage sale this weekend. Up until now, I’ve had no reason to sell anything. Our house has always had room for our things, it always seemed like we were on the verge of another move. So I always used the excuse, “Well…maybe we’ll have room for this in the next place.”
But alas…here I am settling in to life in Minot for four years. In a house that refuses to accommodate all my goods. So, I’m having an intervention of sorts, before my hoarding collecting gets out of hand.
I’ve read some really great posts from fellow bloggers and done quite a bit of research on the art of the yard sale. And here on the blog I’ll be having a mini series about the topic. So be sure to come back tomorrow for a great guest post from estate sale guru: Amanda Kuzak from Kuzak’s Closet!
But for today I’ll share what I’ve learned. And I’ll share my yard sale signage and a tip for Craigslisit-ng your sale!
I read two articles that I adored. One came from Vintage Revivals. {Which is an amazing blog if you’ve never visited before.} Author, Mandi stresses the importance of standing out from the crowd. When there is a yard sale sign on every corner how will you make your signs stand out? She gives some insight on how she did it.
Here’s what I’m doing. Minot has two online yard sale Facebook Pages. So I created some graphics and posted them to those walls. Then I made a Craigslist ad and included one graphic there. I’ll update the listing Friday and Saturday leading up to the sale.
Here are my signs.


You can get a blank copy of my signs here: This is the Gadgets & Gizmos flyer…and this is the Awesome Stuff flyer.
Just download the file, insert it into a Word document and use a text box to fill in your information. I get my fonts from DaFont.com. The font that the word “awesome” is typed in was downloaded from there. It’s called “Budmo.
Now that you’ve got a cool flyer, advertise your sale. Post your flyers on community boards and the all important craigslist! To make your flyer stand out on Craigslist, post your version of the flyer to a free photo hosting site…like Flikr or Photobucket. Then use this tiny snippet of code in your ad: <img src=”put your picture URL link here”>
Simply copy and paste the URL of your image {in this case your flyer} between the quotation marks. Do this in the screen that you type your text. Don’t add it as an “image.” It’s just that easy.
The other article I loved came from Better Homes & Gardens. If you are planning a sale you should definitely give this one a read too.
I hope these tips were a little bit helpful to you. Be sure to come back tomorrow and read Amanda’s awesome post!
Amy
by Amy | Aug 15, 2012 | Blog, The Art of Design, The Art of Projects
Hey all. So I know, I’m a little late to the finish here…but I’ve got a great back to school project for you. This is simple and cheap and fast…and sure to get any little one {or bigger ones} off to a great year.

I created s simple card-stock envelopes then filled them with some pretty pencils. I finished things off by adding some cool scrapbook paper and catchy graphics.
To make this craft you’ll need:
Card-stock | Double Stick Tape | Scrapbook Paper | One of the graphics below | Pencils
Here are the three graphics I worked with. Pirates for the boys. Back to school rhyme for the girls. And a “Billy Madison” quote for my older recipients.

I thought that pirate play on words was pretty clever.
Here’s how I did the envelope.

1. I looked for fun pencils. Target’s selection was a bit disappointing. I ended up buying Smencils from Barnes & Noble and getting the others from a party supply store. I was just at Walmart and they seemed to have some cool ones though.
2. Start with a sheet of 8 1/2 x 11 white card-stock. Make a tri-fold length wise. So your folded paper is 11″ across.
3. Cut a scrap of card-stock to fit along the back side of your tri-fold. Fold the scrap in half and double-stick-tape it in place. Repeat on the other end.
4. Now put a piece of double stick tape on the bottom flap of your tri-fold. Fold it up to complete your envelope. Write a note to your student and tuck the pencils, stickers, etc inside. Then fold the top down and secure with tape.

1. To save paper I cut strips of scrapbook paper and wrapped them around, then secured with tape.
2. Then I wrapped a thicker piece around the center to overlap the strips a bit. Finally I added my back to school graphic.
3. This is what the back of the envelope will look like.
And that’s all there is to it. I got all my paper from Hobby Lobby. For 6 packets I used less than 4 sheets of 12″x12″ paper. Happy back to school!
Here are the links for the graphics:
Pirate | Rhyme | Billy Madison
I recommend inserting the images into a word document so you can fit multiple graphics on one page! Share this with your friends…just remember to tell them where you got it!
Amy
PS–This post is entered in the CSI {Create Something Inspiring} Weekly Challenge. Go here to see where else I link up.


