by Amy | Aug 23, 2012 | Blog, The Art of Living, The Art of Projects
Hey! Today is a great day…Amanda is here from Kuzak’s Closet with a crazy informative and entertaining post. It’s so awesome…Read on!
Hey Everyone! My name is Amanda Kuzak from Kuzak’s Closet and I am so excited that Amy asked me to guest blog today! I own a Professional Organizing and Estate Sale business in Northern California. Today I want to share my top 10 tips for holding a successful garage sale and give you a fun description of the types of customers you might see at your sale.
Top 10 Tips for a Successful Sale
1.) Clean Up: Clear out a space in your garage for you to hold the sale. By starting here you will be able to prep for your sale little by little.
2.) Set Up Tables: Most people do this last but and then become overwhelmed with the mess that has been acquiring in the garage and end up canceling their sale. By setting up your tables first you will have a good infrastructure to start setting up your sale.
3.) Clear Your Clutter: Go room by room with a laundry basket or box and fill it with items that you no longer need or want to keep.
4.) Organize Your Items: Group items by like and type. If you are having your sale in your garage remember to move large items like furniture out into the driveway or lawn so buyers can get a good look at them.
5.) Price Your Items: It is important to have a price tag on every item in your sale so buyers know what you are selling and what your expectations are. Try pricing your items a touch higher than you think they should sell for. This will leave some room to negotiate, something shoppers love to do!
6.) Pre-Sell: I always list the big ticket items from my sales on Craigslist individually a few days before the sale. Craigslist buyers are typically willing to spend a little more than the average garage sale shopper.
7.) Advertise: List your sale in the local paper and/or on Craigslist: Die-hard garage sale shoppers will plan out their shopping day ahead of time. Also remember to place a few signs on major streets guiding shoppers to your house. Keep the signs simple: date, time, and address.
8.) Open On Time: Early birds are willing to pay more for items so be sure to open your doors on time. The majority of the profits from my large estate sales come within the first 3 hours of the sale (typically from 8:30am-11:30am).
9: SELL: Remember you have two goals for your sale. First you want to make some cash and second you want your unwanted stuff to go to good homes and get out of yours. Be friendly to your customers and keep rearranging the merchandise as the day goes on.
10.) Follow Through: If you have items left over from your sale follow through with your original intention and get rid of them! Donate them to your local church, charity organization, or neighbor but DON’T let them sit around and clutter up your garage until your next sale comes around!
Types of Customers
I love the variety of people that I meet at my estate sales. There are all types; the dealers, the nosy neighbors, the collectors, the lingerers, and the jerks. If you have never had a sale I will leave you with a description and visual aid for each type, enjoy!
The Dealer: These types of buyers show up hours early to a sale. They always pretend that they are not dealers but they can’t hide from me! Usually one quick look at their car when they load up their purchases reveals it because it is typically still filled up from a previous sale. Some dealers are nice and some are not. The typically work in teams, and take turns standing by their pile of goodies while the other one shops. The are experts at packing their cars and from time to time they can assist in creating a sale by oohing and aaahing over items.
At a recent sale I had a couple that arrived bright and early, they were eager to help us set up the sale and were oohing and ahhing at all of the treasures being pulled out of the garage. This couple was really nice and pleasant to deal with so I opened it up early. They power shopped for 45 minutes and ended up spending over $700 on 2 car loads of little items.
The Lingerer: This type of buyer could stay all day if you let them. They usually show up later in the afternoon and shop for several items. They like to negotiate the prices as they shop and pay as they go. I don’t understand this method because it is hard for them to keep track of how much they have spent.
At a recent sale a woman who arrived on the second day around noon and she left at 4pm. If the price tag said $40 she would offer $5 which I wouldn’t take. I did end up selling her several items over the course of her visit and she probably ended up spending $80-$100 over time.
The Nosy Neighbor: This type of buyer comes to snoop at what is available, sometimes they call their friends and other neighbors from the sale on their cell phones to gossip about what is being sold. They usually don’t appreciate antiques and are loud and obnoxious.
At a recent sale there was a neighbor who drove all of us nuts, even my client. She picked up everything and asked “what is this? how does this work?” for about 2 hours. She ended up buying an antique cherry picker and when she cashed out she asked me what is was and how much is was. I had it priced at $15 so I told her it was a cherry picker and that it was $15. She looked at me and said, “this is $15, it looks like a piece of junk!” I responded by tell her that it wasn’t junk, that is was a neat collectible and that someone who came to my sale who remembered picking cherries with her Grandma with a similar item would be thrilled to find it. She looked at me with the strangest look and ended up trying to get it for $10, I said I was firm on the price and then she handed me a crisp $100 bill and asked for change. So annoying!

The Jerk: This type of buyer thinks that they can win me over with their less than friendly personality. They put together a pile and they want to know the price, I always add up the price tags and then give them their total and they start to yell at me saying that I am ripping them off. Sometimes I kick them out of the sale and other time, depending on what they buy I will cut them a deal just so that I can get rid of them.
At a recent sale I had a big jerk shopped both days, he yelled at me about all of the prices and I couldn’t stand him. He didn’t speak English very well so it was hard to negotiate. He ended up buying several items that were missing parts and were not in working condition. This type of buyer drives me nuts.
The Collector: This type of buyer is usually eclectic and probably drives a vintage car. They also arrive to the sale early and the suspense over what is inside the sale kills them. They love the hunt and often only purchase one or two things.
At a recent sale there was a man in his mid 50s, he was the first to arrive and drove up in a vintage mustang. He was wearing bell bottoms and had his hair slicked back. He shopped for over an hour and ended up purchasing one item, an old Buick light bulb. On his way down the drive way back to his car he dropped the light bulb but luckily it didn’t break. I always look forward to meeting this type of buyer
The Young Collector: This type of buyer will either contact you before the sale starts looking for particular items or they casually show up on the second day. They are always nice and fun to work with. In most cases that I have experienced they are male and they enjoy shopping for old tools, guns, and books.
At a recent sale I had both types, an early bird collector and a casual young collector. The early bird was looking for tools and I let him come for a preview, he looked around the sale for 2 hours and ended up purchasing a few tools, an old medical lamp, and some maps. The casual collector arrived on day two with his friend, he shopped for a while and chatted with me and my crew. He ended up purchasing an antique gun case and 2 steamer trunks (I cut him a deal, buy one get one free).
by Amy | Aug 22, 2012 | Blog, The Art of Design, The Art of Projects, the house
So you may have heard me mention my first ever garage sale this weekend. Up until now, I’ve had no reason to sell anything. Our house has always had room for our things, it always seemed like we were on the verge of another move. So I always used the excuse, “Well…maybe we’ll have room for this in the next place.”
But alas…here I am settling in to life in Minot for four years. In a house that refuses to accommodate all my goods. So, I’m having an intervention of sorts, before my hoarding collecting gets out of hand.
I’ve read some really great posts from fellow bloggers and done quite a bit of research on the art of the yard sale. And here on the blog I’ll be having a mini series about the topic. So be sure to come back tomorrow for a great guest post from estate sale guru: Amanda Kuzak from Kuzak’s Closet!
But for today I’ll share what I’ve learned. And I’ll share my yard sale signage and a tip for Craigslisit-ng your sale!
I read two articles that I adored. One came from Vintage Revivals. {Which is an amazing blog if you’ve never visited before.} Author, Mandi stresses the importance of standing out from the crowd. When there is a yard sale sign on every corner how will you make your signs stand out? She gives some insight on how she did it.
Here’s what I’m doing. Minot has two online yard sale Facebook Pages. So I created some graphics and posted them to those walls. Then I made a Craigslist ad and included one graphic there. I’ll update the listing Friday and Saturday leading up to the sale.
Here are my signs.

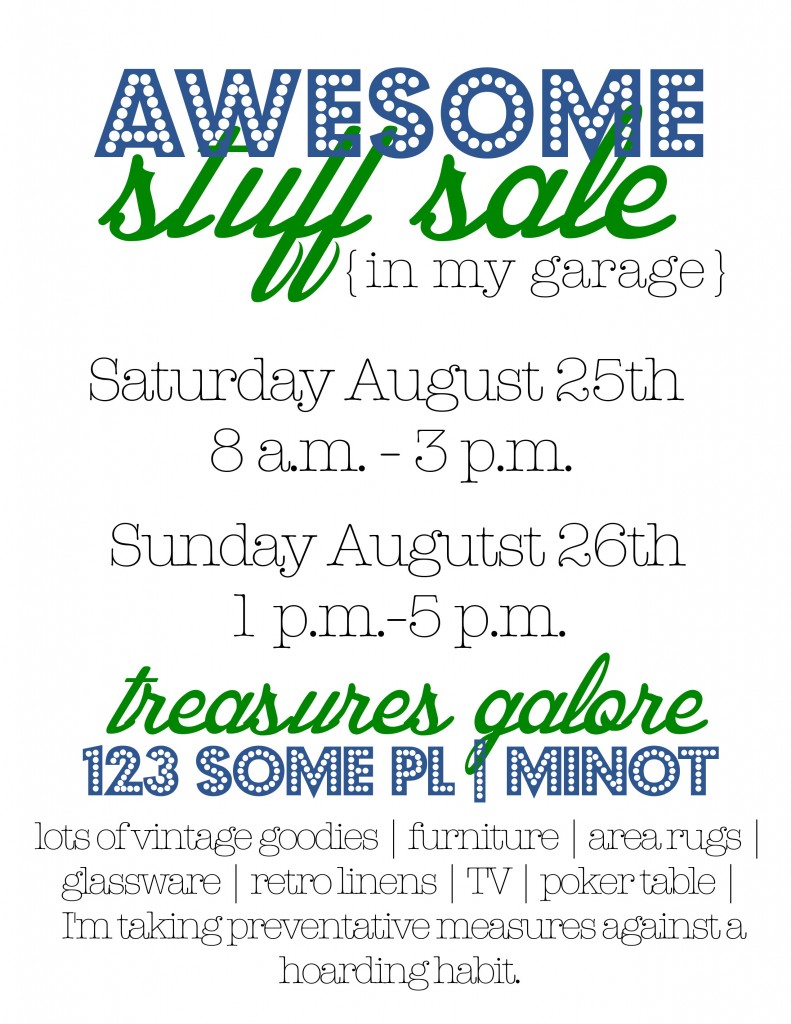
You can get a blank copy of my signs here: This is the Gadgets & Gizmos flyer…and this is the Awesome Stuff flyer.
Just download the file, insert it into a Word document and use a text box to fill in your information. I get my fonts from DaFont.com. The font that the word “awesome” is typed in was downloaded from there. It’s called “Budmo.
Now that you’ve got a cool flyer, advertise your sale. Post your flyers on community boards and the all important craigslist! To make your flyer stand out on Craigslist, post your version of the flyer to a free photo hosting site…like Flikr or Photobucket. Then use this tiny snippet of code in your ad: <img src=”put your picture URL link here”>
Simply copy and paste the URL of your image {in this case your flyer} between the quotation marks. Do this in the screen that you type your text. Don’t add it as an “image.” It’s just that easy.
The other article I loved came from Better Homes & Gardens. If you are planning a sale you should definitely give this one a read too.
I hope these tips were a little bit helpful to you. Be sure to come back tomorrow and read Amanda’s awesome post!
Amy
by Amy | Aug 21, 2012 | Blog, The Art of Projects, the house
When I first saw our house I thought “Whoa…there’s a deck.” Immediately I knew that I wanted to pretty up the front porch and make the back deck look more like it is part of the house. Instead of something just slapped on the back. I wanted things to flow.
To me my front porch looked kind of hap hazard. When I visualize the words “front porch” I see something cute and inviting. When I looked at my own porch I saw something that fit neither description. With a small budget and we added a whole lot of curb appeal to our home. And we didn’t even have to uproot any posts, pour new cement, or rebuild.
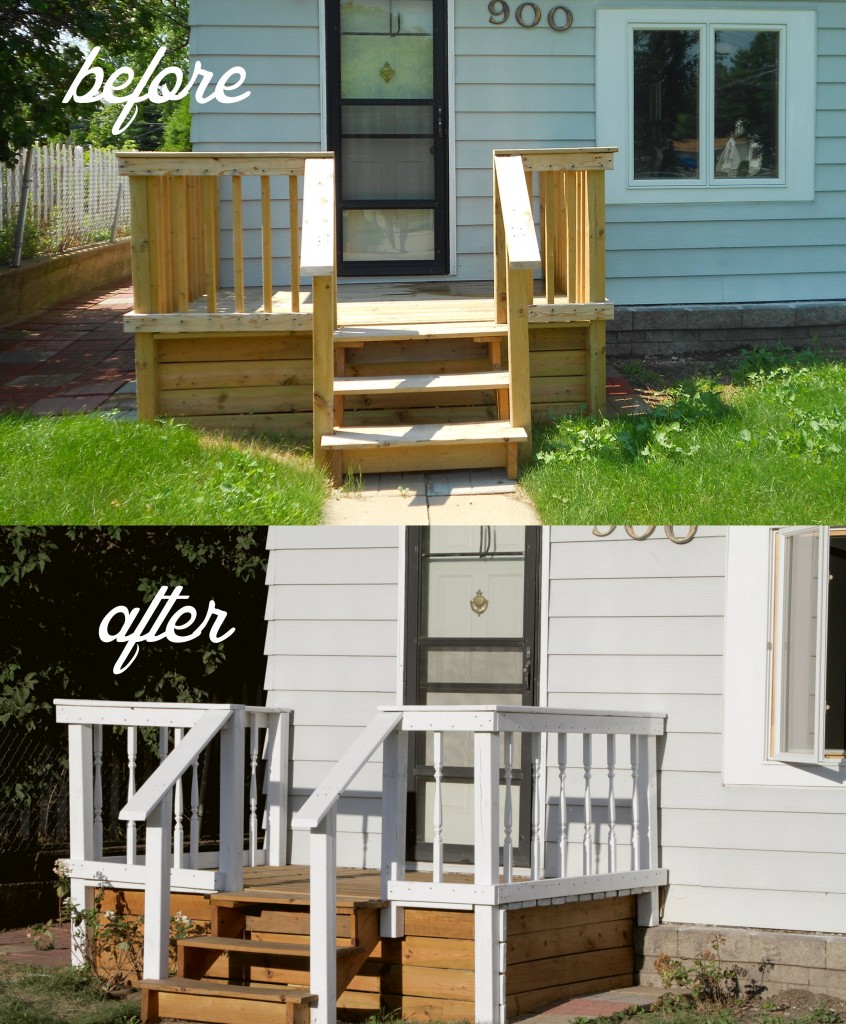
In the front we removed the square spindles and replaced them with more shapely ones. We painted the new spindles {before attaching them} and the rails with a white deck stain. Then we coated the floor and steps with a cedar colored stain.

Now…it’s not quite done. I still want to add some post caps to the rails. Maybe like these. They are only about $3 from the local Menard’s. Pretty sweet deal. I’ll add them to the back deck too. Speaking of which…take a look at that!
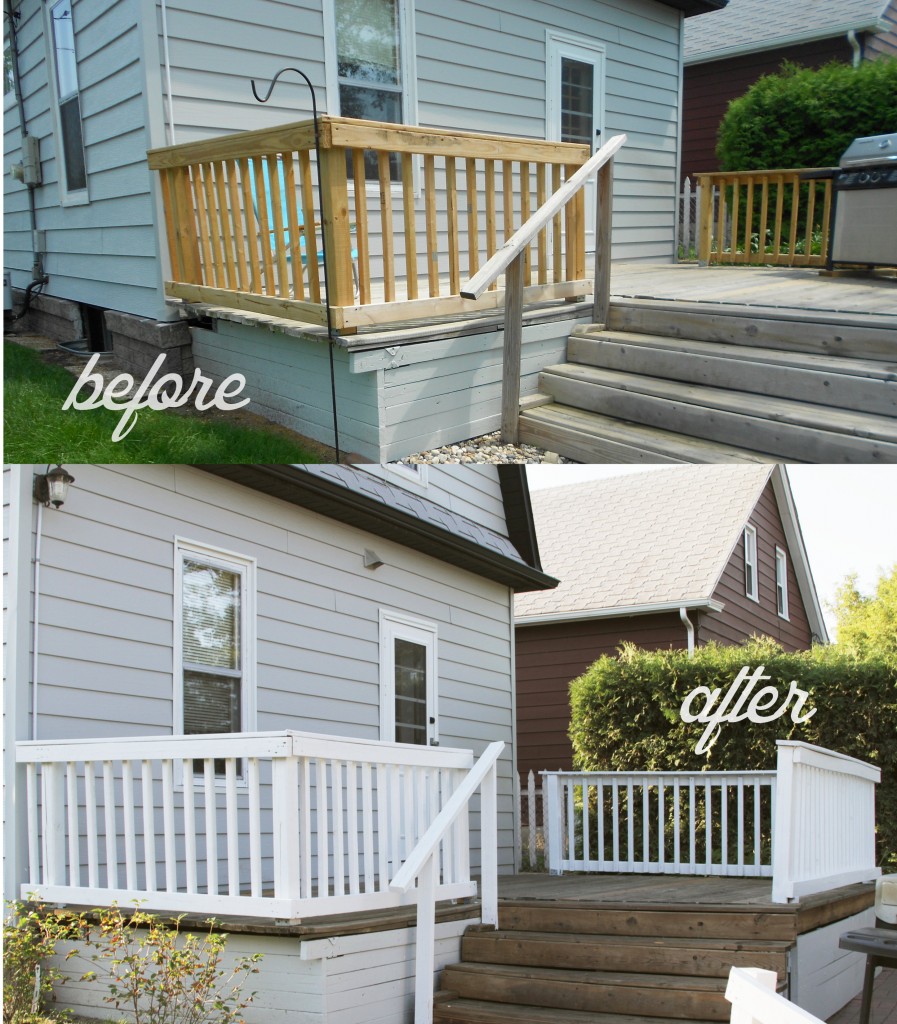
Back here we didn’t bother removing the original spindles. Instead we just added new brackets to straighten up the existing railing and painted it all white. We used the same stain on the floor here as the front porch.
It’s definitely not perfect. There are a few white drips on the floor. I moved our giant grill off the deck solo…which left a huge gouge in the steps. I may have even spilled some stain on the cement surrounding the deck. But I really love the way it turned out. And I think it’s quite lovely.
 Now I’m looking to further improve the curb appeal by adding a cuter storm door, maybe painting our house door…and adding pots of mums and pumpkins just in time for fall. Oh, and I’ll be whipping up some back deck seating {hopefully in time to enjoy the rest of the nice warm weather.}
To help me pull it together I’ve started a couple pin boards! One for the front entry…one for transforming my back deck into a lovely outdoor room. So go over and check those out. And if you like, you can follow me over there.
Let’s look one more time.

Oh yeah, and here’s a cost break down. We used Weatherscreen deck stain in white and natural cedar. Our decks took 2 gallons of each. {2 Coats of white, 1 coat of cedar stain.} They were on sale for $20 per gallon. The new spindles for the front were $1.19 each, we used 15. Leaving the whole project under $100 to complete. Awesome!
Amy
by Amy | Aug 21, 2012 | Blog, The Art of Adventure
This past weekend Derek and I started our first major house project. Well…if you don’t count the roof thing. Okay, this was my first major house project. {On this house.} And the first that made the house look prettier.
And I would love to show you photos…but my little point and click camera is dead…and I cannot seem to locate the charger. So you’ll have to wait another day or so.
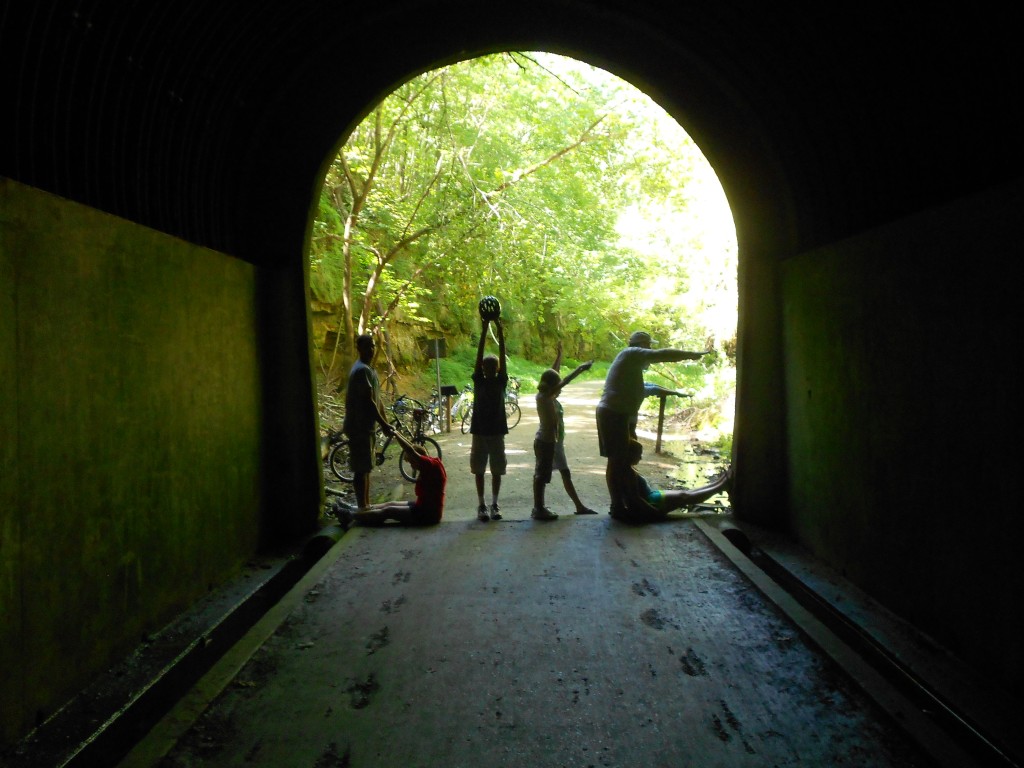
Instead, I’ll show you photos that I’ve been putting off for a while. Photos from my family’s weekend excursion to the Elroy-Sparta bike trail in Wisconsin.
I realize school is starting back up {or already has}, but it’s not too late to have one more adventure before the Midwest turns to a winter wonderland. So start planning now for a long weekend over fall break or Labor Day Weekend.
The Elroy Sparta State Trail runs from {you guessed it} Elroy, WI to Sparta, WI. It’s 32 miles long and runs along the abandoned Chicago & Northwestern Railroad. The fact that it runs where rail tracks used to be means a nice smooth ride…free of steep hills. So, even if you aren’t a pro biker you can easily tackle this ride. And the kiddos will do great too.

But maybe the absolute coolest, greatest thing about Elroy-Sparta is passing through the tunnels. The trail runs through three rock tunnels that go right though the hills. When you first enter the light at the end is tiny and you can barely see in front of your face. {So be sure to bring a flashlight.}
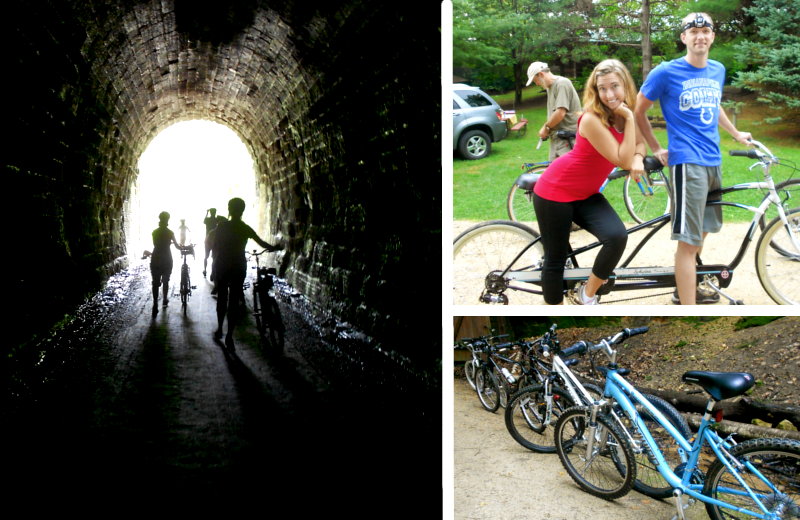
Now…I won’t be too lengthy here. But I will recommend camping at the Tunnel Trail Campground. It’s smack in the middle of the trail, so you can ride either direction. It’s clean and the showers won’t make you lose your lunch. Take a flashlight. If you go before Labor Day, ride into Wilton, WI on Sunday morning for an all you can eat pancake breakfast. It’s $5. It’s good.

What are you waiting for. Get planning.
Amy
PS–It’s Garage Sale Week! That means I’ll be purging loads of goodies. And we have an amazing guest post coming up from Kuzack’s Closet!!
by Amy | Aug 16, 2012 | Blog, The Art of Faith

While driving the other day I was struck by one of Minot’s most spectacular crops: Sunflowers. Where I’m from sunflowers aren’t a crop. They are a flower. A decoration. Corn is a crop. We plant fields of corn…not fields of flowers.
But this isn’t Indiana…and I’m glad they grow sunflowers here.
There are fields of them. As far as the eye can see. From a distance it just looks like someone has painted the ground yellow. Then, as you approach you see them…giant, perfect, mega-flowers.
And as I drove past {then stopped and stood on top of my car like a fool to take a few photos} I was reminded of something a dear friend once said at Bible study.
She said while she was praying she got an image of sunflowers in her head, and she thought it was a perfect metaphor for us as followers of Christ. Sunflowers spend their entire existence following the sun. In the morning they face east and as the day passes, their heads tilt toward the sky and follow the sun as it crosses to the west. I’m not making this up. That’s really what they do.
I think she was right. As believers we should spend our existence following the Son. Turning to face Him in every hour of our life.
Looking at the fields I felt it appropriate to take it a step deeper. I began to think of the field as a metaphor for the church as a whole.
Another thing you’ll notice when looking at a group of sunflowers is that they all face the same direction. They know the true light source. A single flower will not be distracted and look away at a lamp or a flashlight. As the sun moves across the sky, the flowers all move together. As one.
What would happen if we as the church could band together like a field of sunflowers. If the church wasn’t distracted by politics, attendance numbers, fancy buildings, or secular life? If we poured all of our attention toward the true life-source? I think it would be amazing. I think darkness would tremble.
To be clear…I’m not claiming to be a perfectly focused. I’ll be the first to admit it. But it is something to aspire to, something to strive for. It’s something to think about and pray about. Something I pray about. How can I be more focused on Christ? Where should I be looking? How can I move as part of the body of Christ? How can I be a better follower? It is so important to follow our individual callings, but we must all remember that we are called to act as one body, pursuing one mission: To glorify the Son and spread the Gospel to all nations.
All that from a country drive. Darn those cash crops and their infinite wisdom.
Amy
by Amy | Aug 15, 2012 | Blog, The Art of Design, The Art of Projects
Hey all. So I know, I’m a little late to the finish here…but I’ve got a great back to school project for you. This is simple and cheap and fast…and sure to get any little one {or bigger ones} off to a great year.
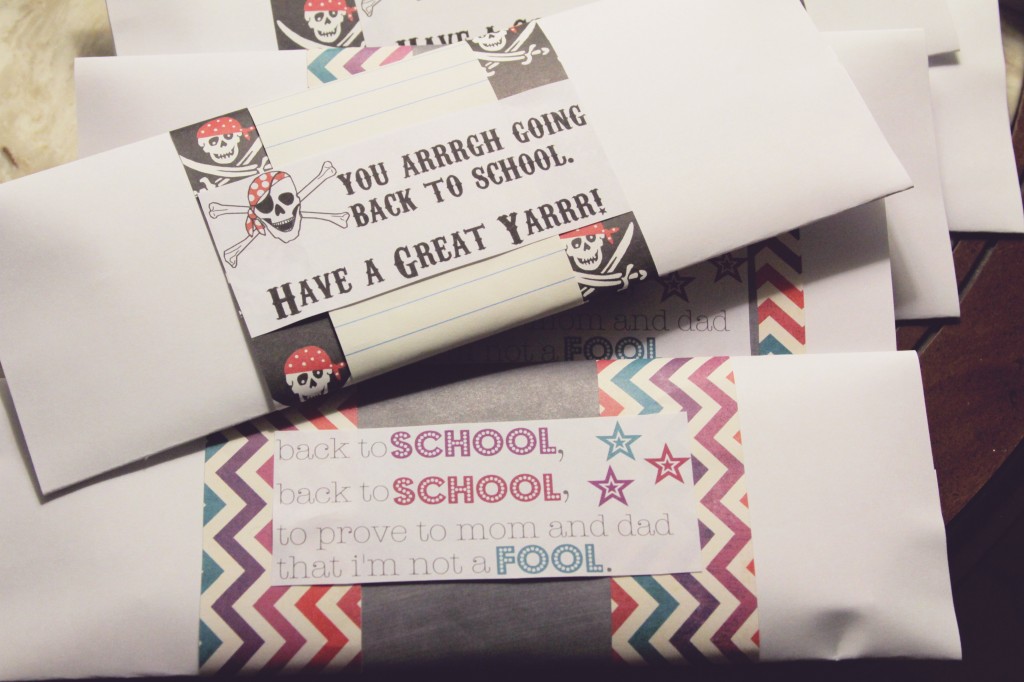
I created s simple card-stock envelopes then filled them with some pretty pencils. I finished things off by adding some cool scrapbook paper and catchy graphics.
To make this craft you’ll need:
Card-stock | Double Stick Tape | Scrapbook Paper | One of the graphics below | Pencils
Here are the three graphics I worked with. Pirates for the boys. Back to school rhyme for the girls. And a “Billy Madison” quote for my older recipients.

I thought that pirate play on words was pretty clever.
Here’s how I did the envelope.
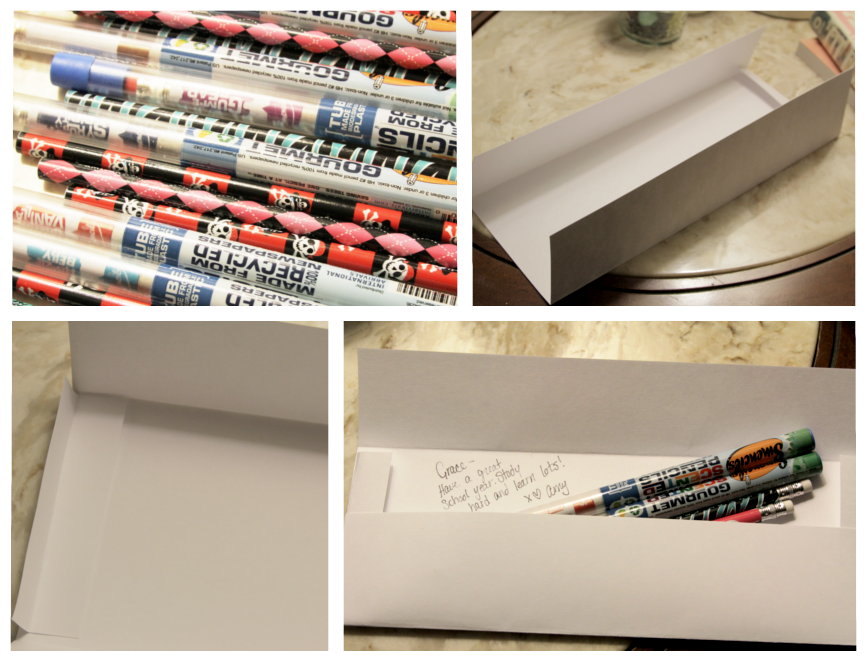
1. I looked for fun pencils. Target’s selection was a bit disappointing. I ended up buying Smencils from Barnes & Noble and getting the others from a party supply store. I was just at Walmart and they seemed to have some cool ones though.
2. Start with a sheet of 8 1/2 x 11 white card-stock. Make a tri-fold length wise. So your folded paper is 11″ across.
3. Cut a scrap of card-stock to fit along the back side of your tri-fold. Fold the scrap in half and double-stick-tape it in place. Repeat on the other end.
4. Now put a piece of double stick tape on the bottom flap of your tri-fold. Fold it up to complete your envelope. Write a note to your student and tuck the pencils, stickers, etc inside. Then fold the top down and secure with tape.
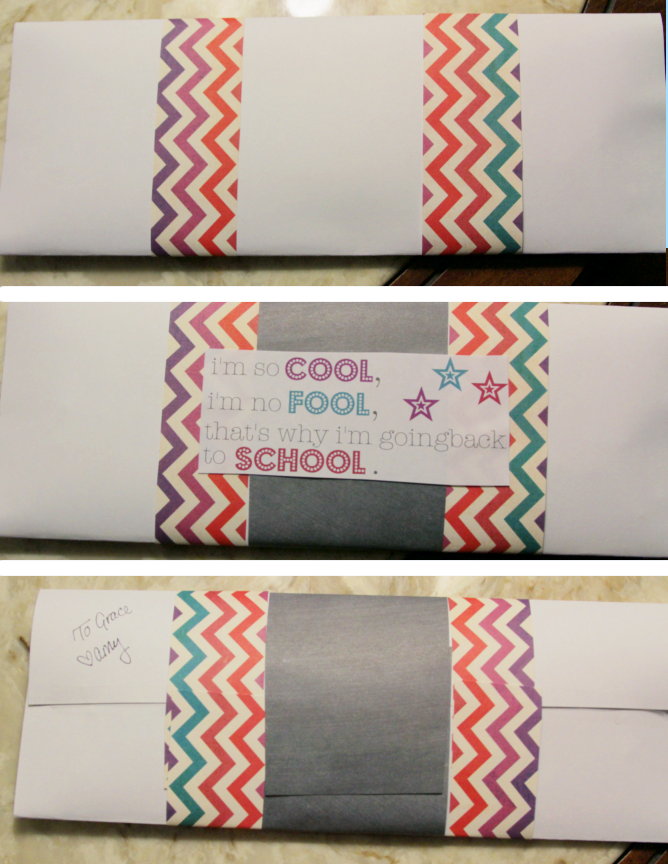
1. To save paper I cut strips of scrapbook paper and wrapped them around, then secured with tape.
2. Then I wrapped a thicker piece around the center to overlap the strips a bit. Finally I added my back to school graphic.
3. This is what the back of the envelope will look like.
And that’s all there is to it. I got all my paper from Hobby Lobby. For 6 packets I used less than 4 sheets of 12″x12″ paper. Happy back to school!
Here are the links for the graphics:
Pirate | Rhyme | Billy Madison
I recommend inserting the images into a word document so you can fit multiple graphics on one page! Share this with your friends…just remember to tell them where you got it!
Amy
PS–This post is entered in the CSI {Create Something Inspiring} Weekly Challenge. Go here to see where else I link up.


by Amy | Aug 14, 2012 | Blog, The Art of the Moment
I had the best time ever shooting my debut Trash the Dress Session at the Elkhart County 4-H Fair. It was even more fun because this blushing bride {she was actually married about a year ago} is my sister!
It truly was a day spent trashing the dress, as we trudged through muddy paths and avoided “surprises” near the horse barn. Erin was a real sport as she braved the heat in a hot gown and ducked under tent eaves when the rain picked up.

My favorite ride at the midway is the Crazy Mouse. Maybe that’s why I love this series of photos. Or maybe I love it because of the candy colored beams and adorable cars.


Okay. Two sisters…two different tastes. My favorite is the Mouse. Erin’s favorite is the Carpet Slide. Now…if you ask me…the Slide doesn’t really count as ride. But I don’t argue with the bride. The sweet fella working the Slide even let her ride down {for free!} Be sure to flip through the gallery at the bottom of the post to see her ride!



I’m so grateful that Erin asked me to Trash Her Dress. And that she didn’t back down when we woke up to drizzle and heat. And I’m especially thankful that she paid me in Dairy Bar Ice Cream and Kiwanis Club BBQ Beef Sandwiches. {She’s my sister…she can compensate any way she likes.} If you’ve never had Dairy Bar…let me tell you, it could be a currency all its own.
Now, take a minute to see the rest of the shoot. You wont regret it!
[nggallery id=4]
Amy
This pretty post is partying here:
Sugar Bee Crafts, Debbie Does Creations, Kurtz Corner, Sweet Anne, A Bowl Full of Lemons, Adventures of a DIY Mom, Funky Polka Dot Giraffe, Homework


by Amy | Aug 13, 2012 | Blog, The Art of Faith

I’ve had a good deal of sad news come my way lately. But I’m not quite ready to dive into all of that. So tonight I’m going to tell you a good “Sunday-night” story. It’s one of those heart-warmers.
A little backstory is required to fully appreciate this tale. Just a bit.
First, my sister-in-law, her husband and two kids are amazing. I’m blessed to have a sister and brother-in-law that set such an amazing Christian example for me. When I think about how I want to raise my future-hypothetical-children I pretty much want to follow right in their footsteps.
Next they live on a farm and have only in the past couple years have they started to be okay with the idea of barn cats {at their daughter’s continued pleading.}
Finally…there has only been one cat that wandered into their lives that they really liked. His name is Patches and he adores them. He would lay in the snow and ice on their front steps…just anxiously waiting someone to come out and pet him.
So, the story begins. Patches went missing. Three weeks missing. And in farm life terms that pretty much translates to “Patches is gone for good.” Coyotes, cars or a person who stumbled upon the world’s most loving cat could all be possible culprits for the loss.
But the fact remained that Patchy was gone.
And for some reason their daughter finally came to this realization one night. I guess maybe it had something to do with the fact that I had asked her that day where she thought he’ gone or if he was coming back. At any rate, she broke down hard. She was torn up, as any child would be…when the only cat your family has ever liked has just disappeared and is not coming back.
Upset by his daughter’s deep sadness, Mark went outside after putting her to bed and began to pray. The prayer was simple and bold.
God, I don’t know why Grace is so upset tonight. But she loves that cat and her heart is broken. My kids really did love that pet and I know you love them. So…I don’t know where that cat has gone off to…but I do know that you can bring it back, even if it’s dead somewhere.
Direct, sincere, heartfelt, bold. The way we should all pray. I love that I have a bro that can lead by example. Instead of telling his girl to get over it “It’s just a cat,” or just getting a new one…he prayed. He had compassion for his daughter’s feelings and asked God to amend a situation that was out of his control.
Here’s the ending to the story. The next day, the first time the kids went outside…there was Patches. Home.
God hears our prayers and he knows our hearts. He knows when we need a win, when we need a little hope. And He always delivers. He cares for you, me….even barn cats.
Amy
PS –The photo above was taken the day after Patches amazing return. Now they are a little more lenient on letting him inside!


