by Amy | Nov 14, 2014 | Blog, The Art of the Moment
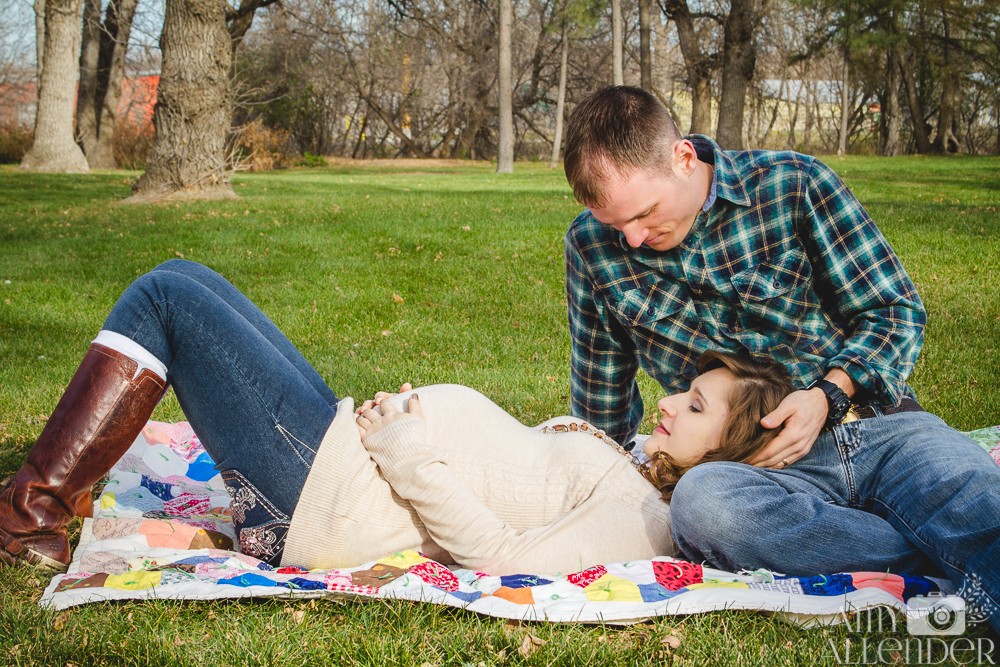
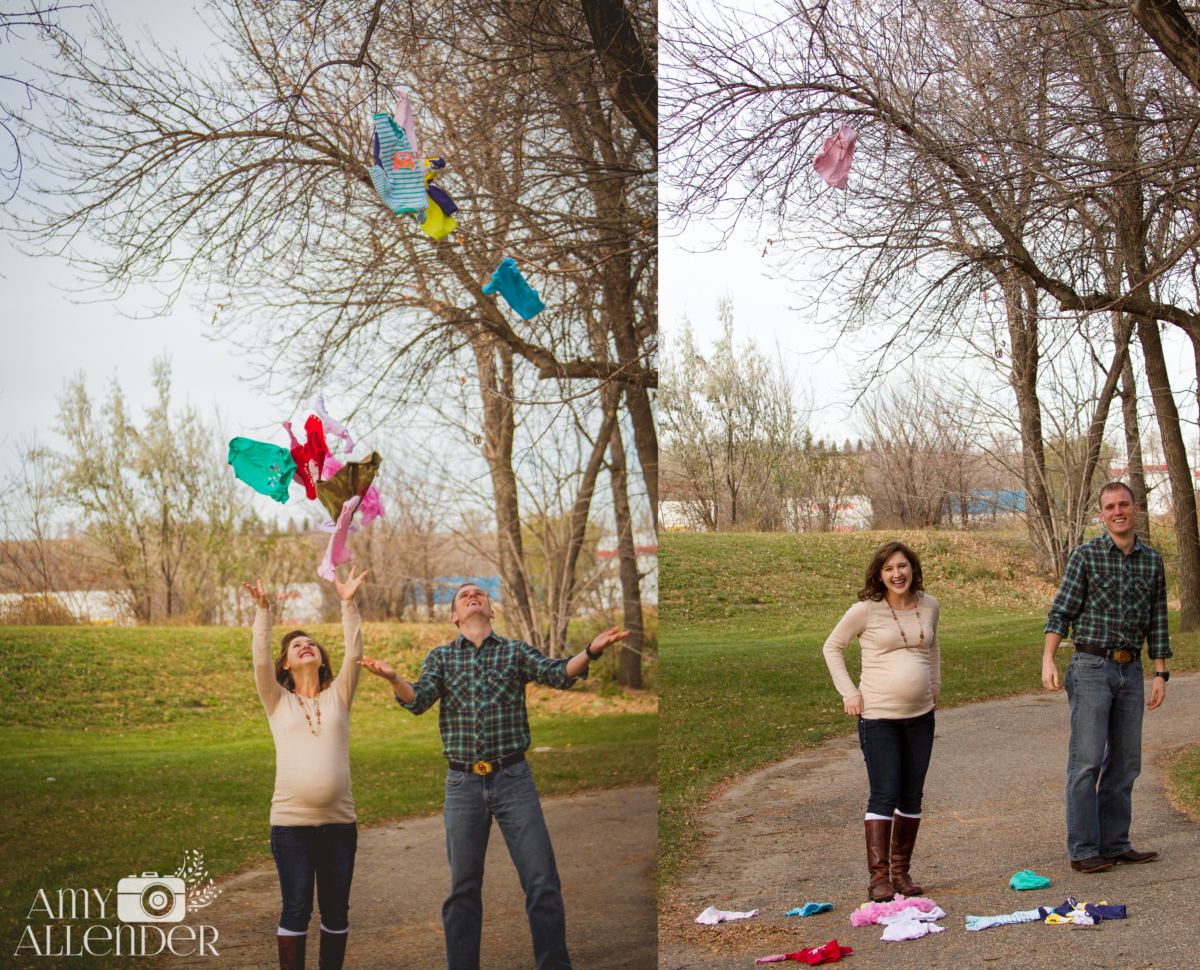
A couple weeks ago I met the Rockwells. This is them. Sarah and I emailed and texted back and forth in the days leading up to the session…and I’m so glad she didn’t color me crazy when I asked her to bring a variety of onsies and an assortment of their favorite baby clothing along with them. I love the clothes line. I love these photos. I love this couple.
It was such a treat to spend time with them. There is something simply magical about a couple filled with joy about their upcoming arrival. This little one is so blessed to be entering into a family that is so anxious to love her with all their might. While these two didn’t go on and on about how excited they are to be becoming first time parents, they glow with an enthusiasm that makes my heart go pitter-patter. I think you’ll see what I mean.


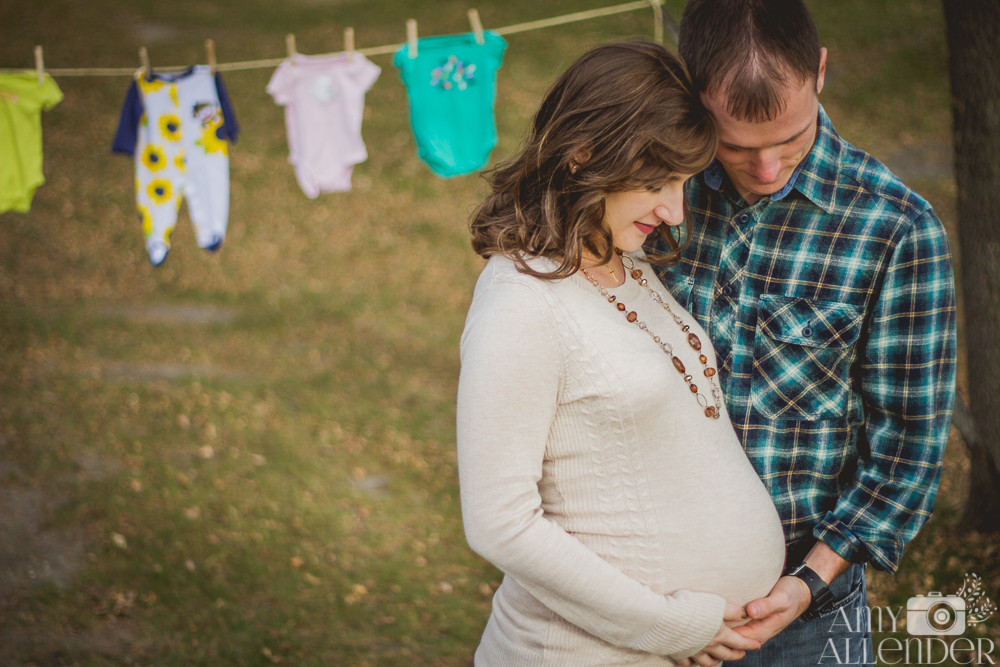

Once we were all done with the clothesline maternity photos, this might have happened. Baby-clothes confetti seemed like a good idea at the time…


Rockwells, congratulations on this amazing milestone! I am so very happy to have met you and spent an afternoon {a chilly afternoon} getting to know you. I simply cannot wait to meet your little one in December!

PS–Thanks you guys for speaking to me in public later in the evening when you ran into me looking like this…I appreciate you acknowledging me, and not thinking I’m completely crazy.
by Amy | Nov 12, 2014 | Uncategorized
 {image via}
I find that sometimes the hardest part about walking the Christian faith is talking the talk of faith. Now, I don’t mean catching on to the Christian jargon that crops up in small groups and church committee meetings {that’s a post for another day.} I mean actually talking about my faith on an average day, in my every day interactions.
Lately I’ve made a concentrated effort to try to bring up Christ, God, the Spirit, and faith in every day life…in a way that is totally normal {for me that means not too awkward}, that doesn’t read as preachy or snobby. I want my faith to be such a key part of me that it spills out naturally onto every part of my life and every interaction in my day.
I’m in no way perfect {#obvious} but I have improved. Here are seven things that have helped me talk a better, less weird talk. I hope they help you too.
1. Get comfortable by chatting with like-minded friends. My comfort level in the faith department grew by leaps and bounds when I found a solid group of friends who had Christ on the mind. We are all striving to set our eyes on Him, so whether we are having a low-key Yahtzee night or dinner out, spiritual topics usually come onto the table. How are we growing, what are we struggling with, what are we learning from our Bible study? When we vent about our problems, someone is quick to give solid, Scriptural-based advice. This atmosphere is a perfect place to get comfortable talking the talk.
2. Get involved with your faith. If you start serving in church {with the nursery, youth group, a committee, pot lucks, greeters…} you’ll be contributing to the body of Christ, while giving yourself some totally normal talking points. It’s inevitable that someone will ask you what you’ve been up to lately. When that question arises, you can tell them about the crazy kid in the nursery, or how you were helping with a funeral that served the weirdest food, or how you are just blown away by the wisdom exhibited by teens in the youth group. That opens up a whole conversation and an easy avenue for sharing your heart for your ministries and passion for being involved in the body.
3. Read something. People love chatting about what they’ve read lately. Pick up some faith-based fiction, or a non-fiction read that will stretch your faith. Find a small group through your church that is reading a book together and join in. You’ll learn something, probably gain new perspective on a subject, and have a talkable topic on hand. Bonus points if you do decide to meet with a group…then you’ll be able to tell others about your book club, the book you’re reading, and what you’ve learned.
4. Go somewhere. Attend a faith-based event. A music festival {like this one}, theater production {my all time favorite}, Cantata, or concert is a good place to start. These kinds of events will inspire you and they are great opportunities to bring a friend along to a Christian event that isn’t your typical Sunday morning experience. Going somewhere gives you all kinds of ways to bring your faith into the conversation…it’s your Saturday night plan, invite others along, and you can talk about how awesome it was after it’s over.
5. Know who you’re talking about. It’s easier to talk about someone you know than a stranger. Spend time in the Word and in prayer. Let your faith grow, learn something new. The Bible is full of exciting history and wisdom. Spend time reading, maybe even read the same passage or chapter for several days in a row. You’ll gain insight and probably become pretty jazzed about what you’ve picked up. When you get to know someone super cool, amazing and interesting–you just can’t help but bring them up. When you get to know God, truly know Him, I’m confident that you’ll become excited about Him {and all His perfectly glorious characteristics, amazing plan of Salvation and grace, and awesomely righteous nature}…in turn, you’ll be ready to share.
6. Become a sponsor. I’ve heard lots of genuine, unawkward conversations start when someone lays eyes on a Compassion child’s photo tacked up on the fridge. If you aren’t familiar with the program, go here. Becoming a sponsor does something wonderful for a child overseas. Not only do they receive medical care, clothing and education…they get a relationship with an adult mentor who cares for them, and Bible classes that feed them spiritually. It’s affordable and such a worthwhile organization. Once you start forming a relationship with your child it’s hard not to talk about them. You’ll want to share what you learn about them through letters. And, if friends do ask about the photo of a child on the fridge that looks nothing like you…you’ll be able to tell them about the program and why you choose to be a part of it.
7. Memorize something. Ever since I started memorizing Colossians, I cannot shut up about Colossians. I’m learning so much, I have Scripture in my mind that I can reference and insert into conversation, and it’s pretty interesting that I’m attempting to memorize such a big piece chunk of text. This has been a fantastic tool for me when it comes to talking the talk. Having Scripture fresh in my mind each day allows me to bring it up in conversation, use it to encourage, and even quote it when I pray aloud {another sometimes scary thing.} It’s easier to sound natural when interjecting Scripture into conversation when you are confident you’re saying it right, you fully understand the context, and you’ve been saying it aloud to yourself for days and days. More on the technique I’m using here. More on what I’m learning and why I love it here.
There’s a common thread through all of these things that will help you grow more comfortable with talking about your faith: Action. Our faith will remain an awkward and weird topic if we force it to remain confined to Sunday mornings and certain holidays. When our faith in Christ becomes deeply attached to our day-to-day life, conversations about it stop feeling forced and start to seem totally normal. When we allow our faith to become part of who we are, what we do, and how we think it becomes something we naturally want to talk about and are comfortable doing so.
I hope these things have helped you. Or at least given you a couple ideas, if you are having a hard time integrating your faith into your life. Give it a whirl…it’s fun when you do!
XO
Amy
by Amy | Nov 11, 2014 | Blog, The Art of the Moment
What To Wear In Christmas Photos | Ten Tips Just For You
With mini sessions fast approaching I’ve received lots of questions about what clothes look best in Christmas photos. Instead of responding one by one with a quick text message answer, I thought I’d thoughtfully put together some recommendations for you.
Now, keep in mind, these are beginners tips. If you are a seasoned pro at getting the family gussied up for picture day, feel free to go rogue. Wear what you like. Get bold, get goofy, be classy. If you are new at the whole pro-photo game…I hope some of these tips will give you some ideas and be a good starting place for you.
1. Dress for the same season.
 {This beautiful portrait come from Sara Garcia Photo Art. Go over to see more from this precious session.}
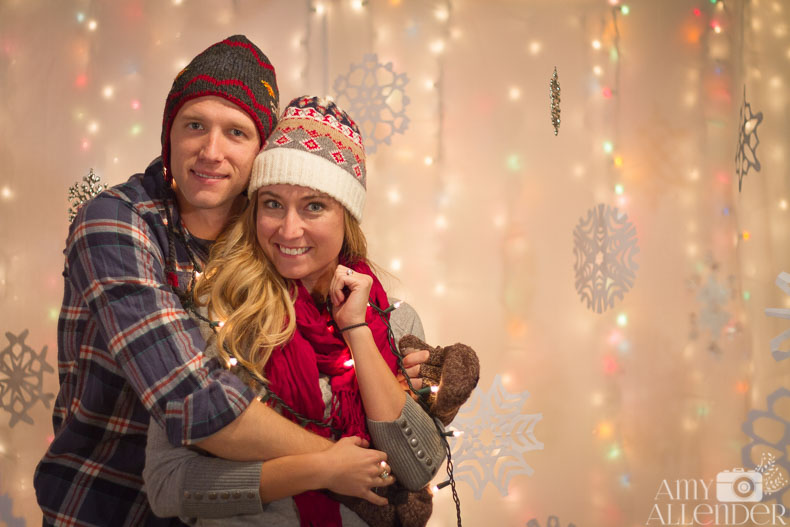
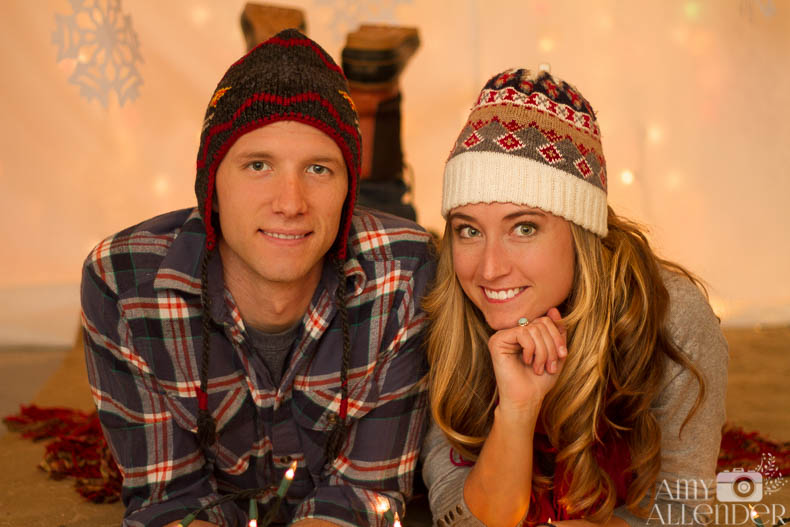
This is my first an foremost tip when it comes to Christmas card portraits. I’ve gotten lots of {very nice} compliments on the clothing Derek and I wore in the sample mini session shots. But we went through a few options before we settled on the right thing. Okay–I went through a few options, then told him that he should “…really put on the flannel–it looks cozier.”
We started with him in a cotton button down and me in a sweater I picked up in Norway. Even if we threw on some gloves and hats it looked like we were dressed for different seasons {me for -10, him for 60’s.} You can go super cozy or super breezy–just be sure your family looks like they could all be put in the same setting comfortably.
{As a side note…also dress with the same level of class. One in a cocktail dress and one in a hoodie is bound to look awkward.}
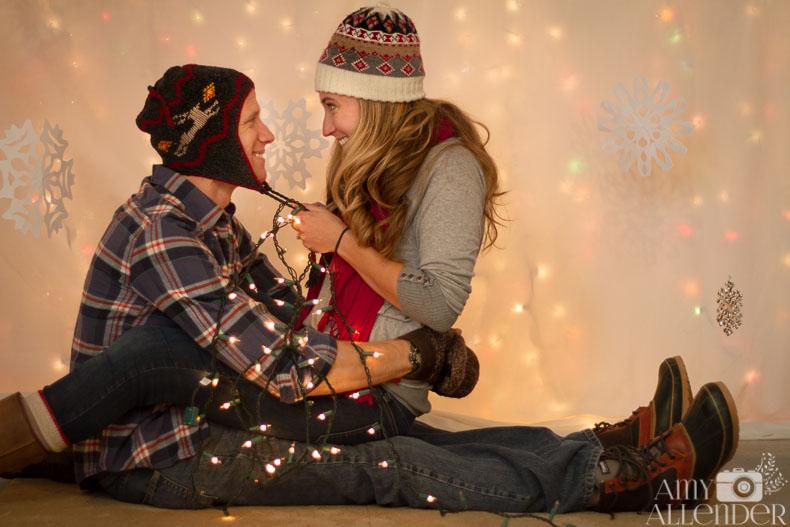
2. Jackets, hats, gloves, and scarves.
 I love this set and this photo from Kelly Klatt. Go to her website for more winter inspiration. It abounds over there!
I’m totally behind sporting outdoor winter wear to an indoor Christmas photo session. But–like most things, there are guidelines. A cute coat on the dressy side is good. Wearing your Colombia ski/sledding parka looks frumpy. A fashionable hat…or even something on the super warm and silly side is great. A ski mask is terrifying.

3. Don’t be over realistic.
Staged Christmas card photos are not meant to be a window into reality. They are created to be a little whimsical and fun. {At least mine are.} So, although you wouldn’t normally wear a jacket inside, or snow boots with cute jeans or hats and scarves without coats–it’s totally cool to do in your Christmas photo.
It’s also totally cool to go classy in your Christmas portraits. You might not want to go super dressy in a photo that will hang year-round in your home. So Christmas photos are a great time to get a little fancy, even if that’s not how you usually roll.

 This classy example hails from the blog at DKW Styling.
4. Think about fabric and texture.
Cozy is the word I love to use when I think about winter portraits. With that in mind, try to incorporate something cozy into your outfits. Flannel is a classic choice. It never gets old. Textured sweaters or a scarf with an interesting knit is also a good way to cozy up an ensemble. Layers are also a good choice and they add variety to an outfit.
5. Uniforms.
Your photos are not work. They aren’t private school. They aren’t the military. So please, please…don’t put your family in a uniform. {Unless you are the VonTrapps. Then, by all means do whatever you like.} Your photos will be lovely if you use things from your closets that your family likes to wear–even if that means you aren’t all dressed identically. This is a short session, to be displayed for a short time. So be a little more relaxed.

That said–if you are being geeky, cheeky, or going for that “awkward” look, feel free to dress as identically as you like. Feel free to click over to Awkward Family Photos for more where that came from…
6. Going neutral.
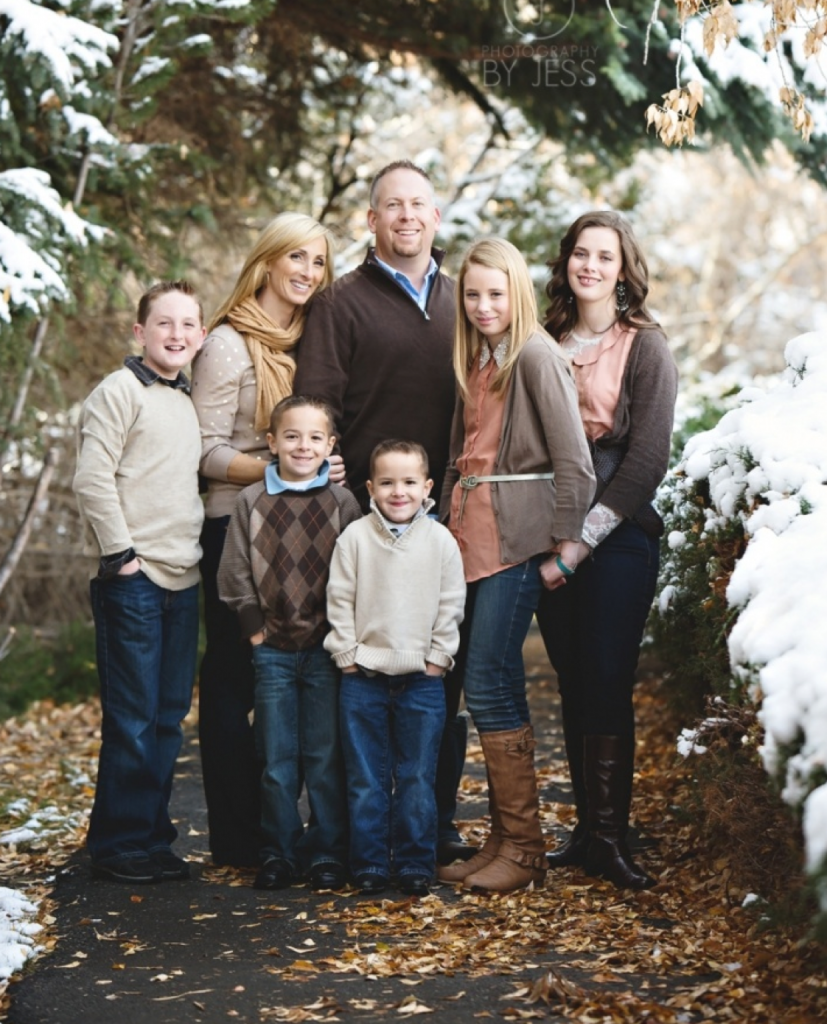 This image via Photography By Jess. See the full session and other lovely work at her site.
Sticking with a dress code of neutrals is a very safe way to make sure your family looks awesome in your photos. Neutrals can mean a variety of things. Mix any of these colors {bonus points if they are cozy, as mentioned in #4} and you’ll look great: Cream, tan, brown, gray, navy blue, pale blue, black, muted yellows.
7. Adding color.
If you’d like to add color, but are nervous about it–this tip is for you. Whatever you do, don’t panic and put everyone in black pants and a blue top.
Instead, stick with a mostly neutral pallet {see #6}, then weave a color or two throughout your family. Use the color as boldly or as sparingly as you like, but make it consistent. You can go with one bright pop of color, or weave a color throughout to keep everyone consistent. These images do a great job of demonstrating how you can add pops of color to your outfits without looking cheesy or too uniformy.
Good colors to incorporate are red {classic Christmas choice}, green, yellow, blue.
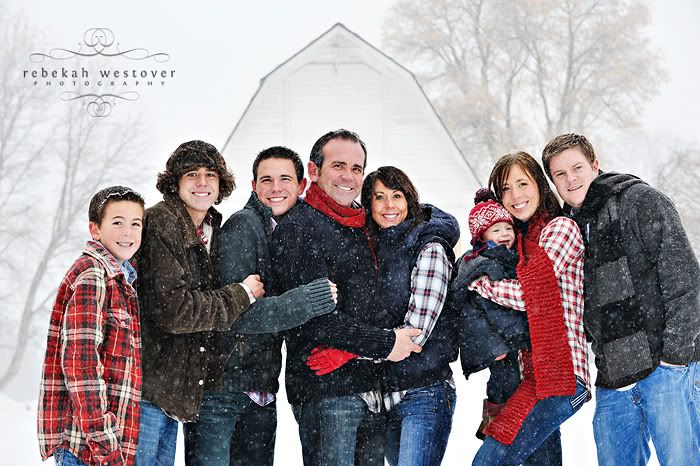
This family does a good job of weaving red through an otherwise neutral pallet. From Rebekah Westover Photography.
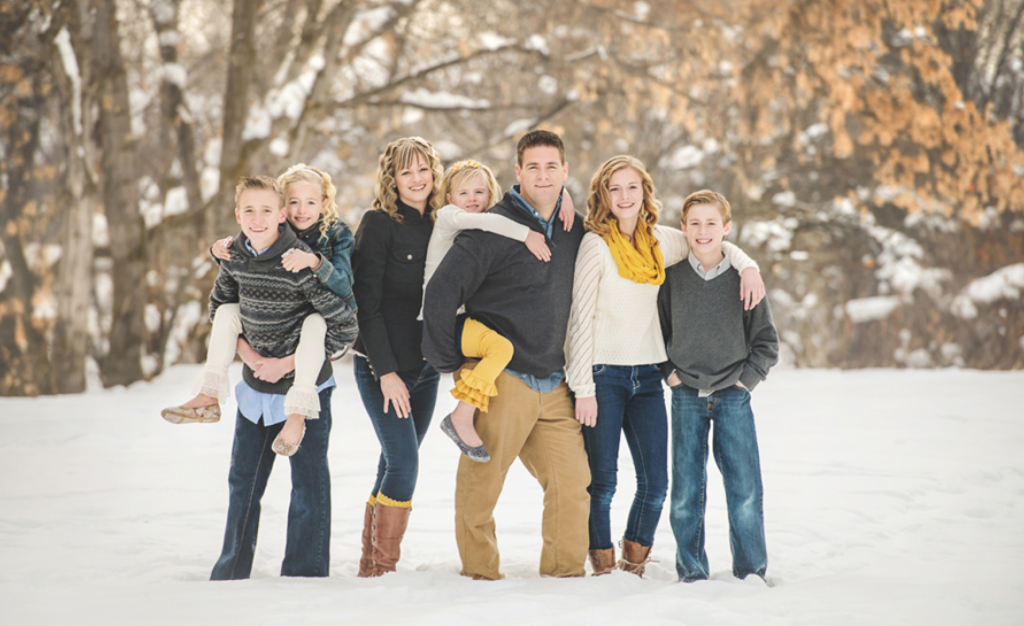
This family used mustard as their accent. See the whole session at Erin Summerill Photography.
8. Going colorful.


This vibrant portrait comes from Chelsey Bell Photography.
Like we said earlier, Christmas photos don’t have to be super realistic. So, even though your family might not normally go overboard with color–if you are feeling vibrant this is a good time to make it happen. The key to going with lots of colors is to make sure they have similar intensity {how vibrant they are}, are from the same color family {cool colors like blue, green, aqua, etc or warm colors like orange, yellow, red, etc.}, or they compliment each other.
9. Don’t be bossy.

Your husband probably isn’t a catalog model. He probably never will be. Accept it and move on. Sure, we can all look at the Eddie Bauer ads and think how classy those guys look. But, that’s not ever going to be Derek. Not in a million years. I could go buy him an outfit straight from the catalog, and he’d probably humor me by putting it on. But he wouldn’t look like himself. And he’d probably feel pretty weird.
So don’t be bossy.
Your husband and your family will look much happier during the portrait session if they feel good about what they are wearing. Let them look normal. Let them wear things they will wear again. Don’t coerce your man into wearing a button down under a wool sweater with a scarf and colored jeans. He’ll thank you for it. And your photos will look like you–which is the point.
10. Get more inspiration here.

Kristen Duke Photography has a mega post on this topic. If you are looking for more specifics and inspiration, check out her site. It’s one of the best what-to-wear articles I’ve found.
Happy dressing! I’ll see you guys at the mini sessions.
by Amy | Nov 7, 2014 | Blog, Crafts, The Art of Projects
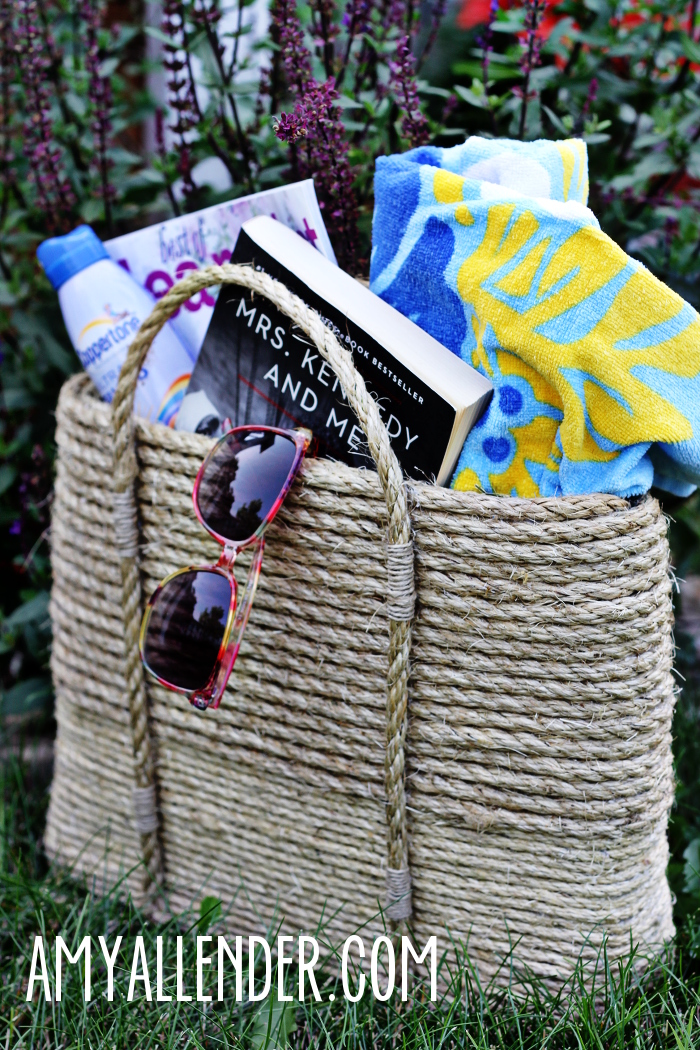
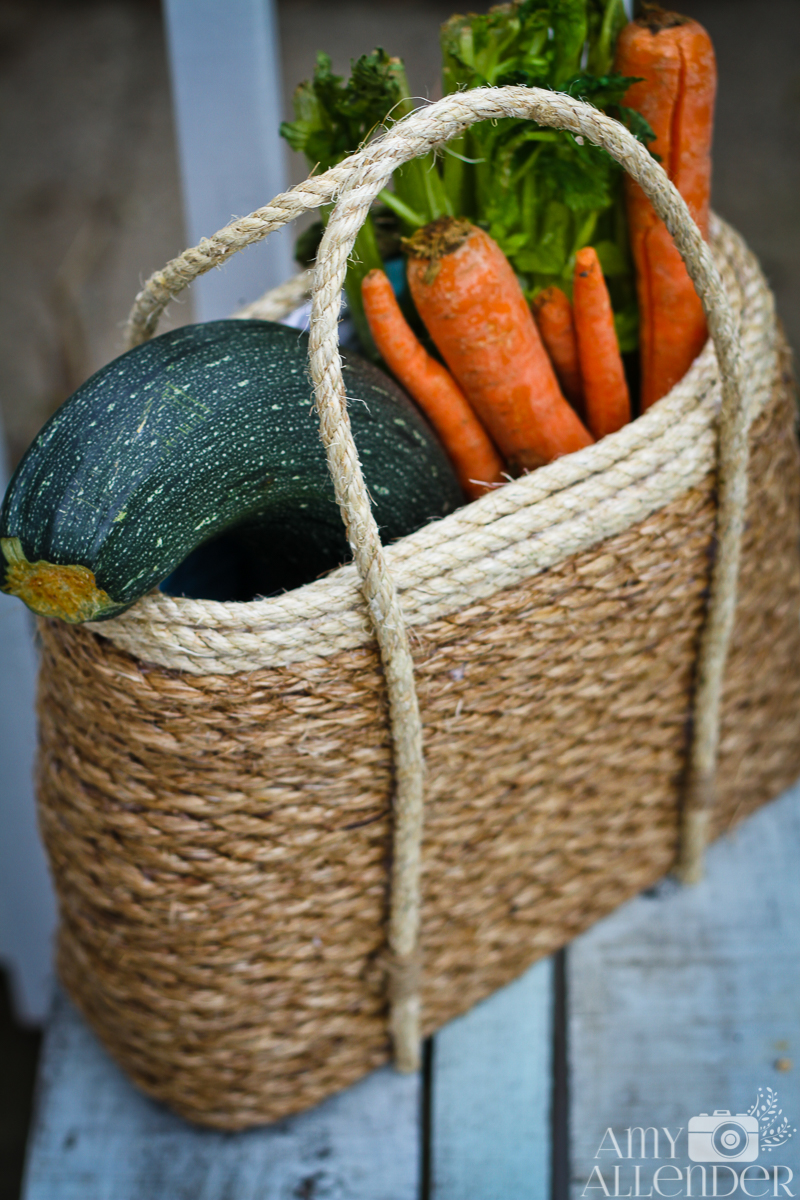
A long time ago….way back when there wasn’t frost on the ground and it stayed light until 11 o’clock at night, and I’d just had back surgery and wasn’t allowed to do much…I got glue gun happy and made this adorable DIY sisal tote bag.

That first one was a bit of an experiment so I didn’t document the process. But it came out lovely. I gave it away as a gift to my cousin and she just couldn’t believe that I’d made it from rope, a pillow case and a flat-rate mailing box. In my efforts to craft early for Christmas, I’ve made another, and this time I’ve got photos and instructions.

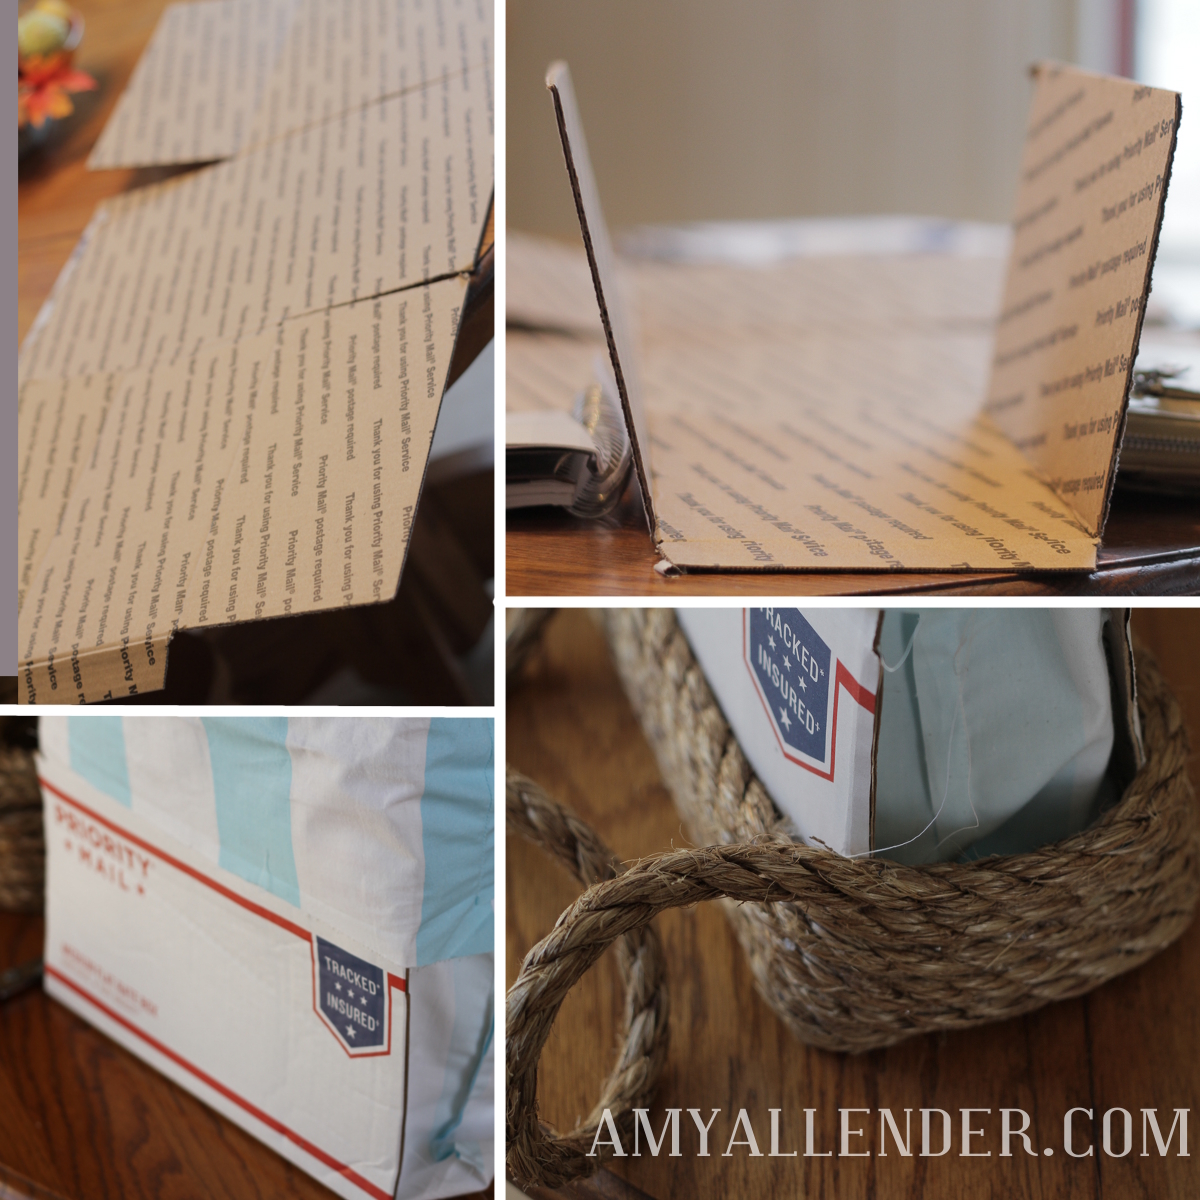
First gather your supplies:
A flat rate mailing box–or another cardboard box. Any size will do, but it’ll affect the finished shape of your tote.
Glue gun and lots of sticks.
A pillow case.
Sisal rope in a couple sizes.

Start with your box. Lay out flat, like the fist image. Here you can play around with folding up different sides to form the shape of your tote. The first one I made used a large flat rate box…the skinny kind. This one is a medium, more boxy box.
Fit your old pillowcase inside as a lining. Use some glue to adhere it to the bottom then fold the sides over the top. Cut away and excess you have, then glue the top of the pillowcase to the box. It doesn’t really matter how it looks right at this point, since it’s going to get covered up.
Then, start wrapping. Use a bead of glue to secure the rope to the box. When you get to the skinny sides with no cardboard, gently wrap it around and secure it well on either side.
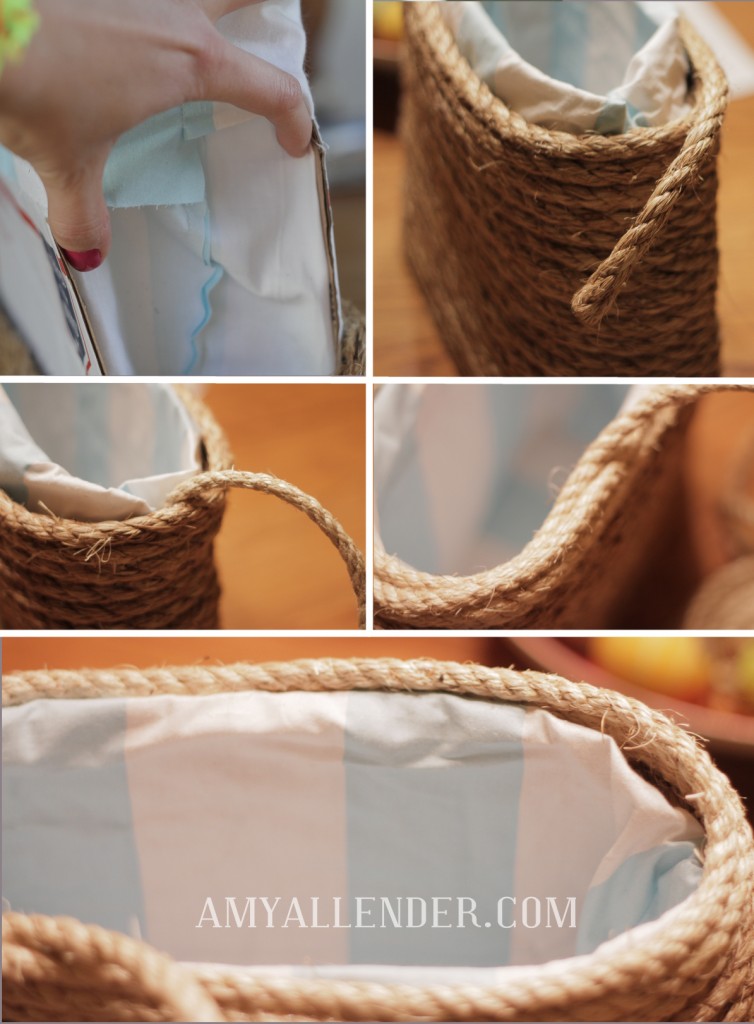
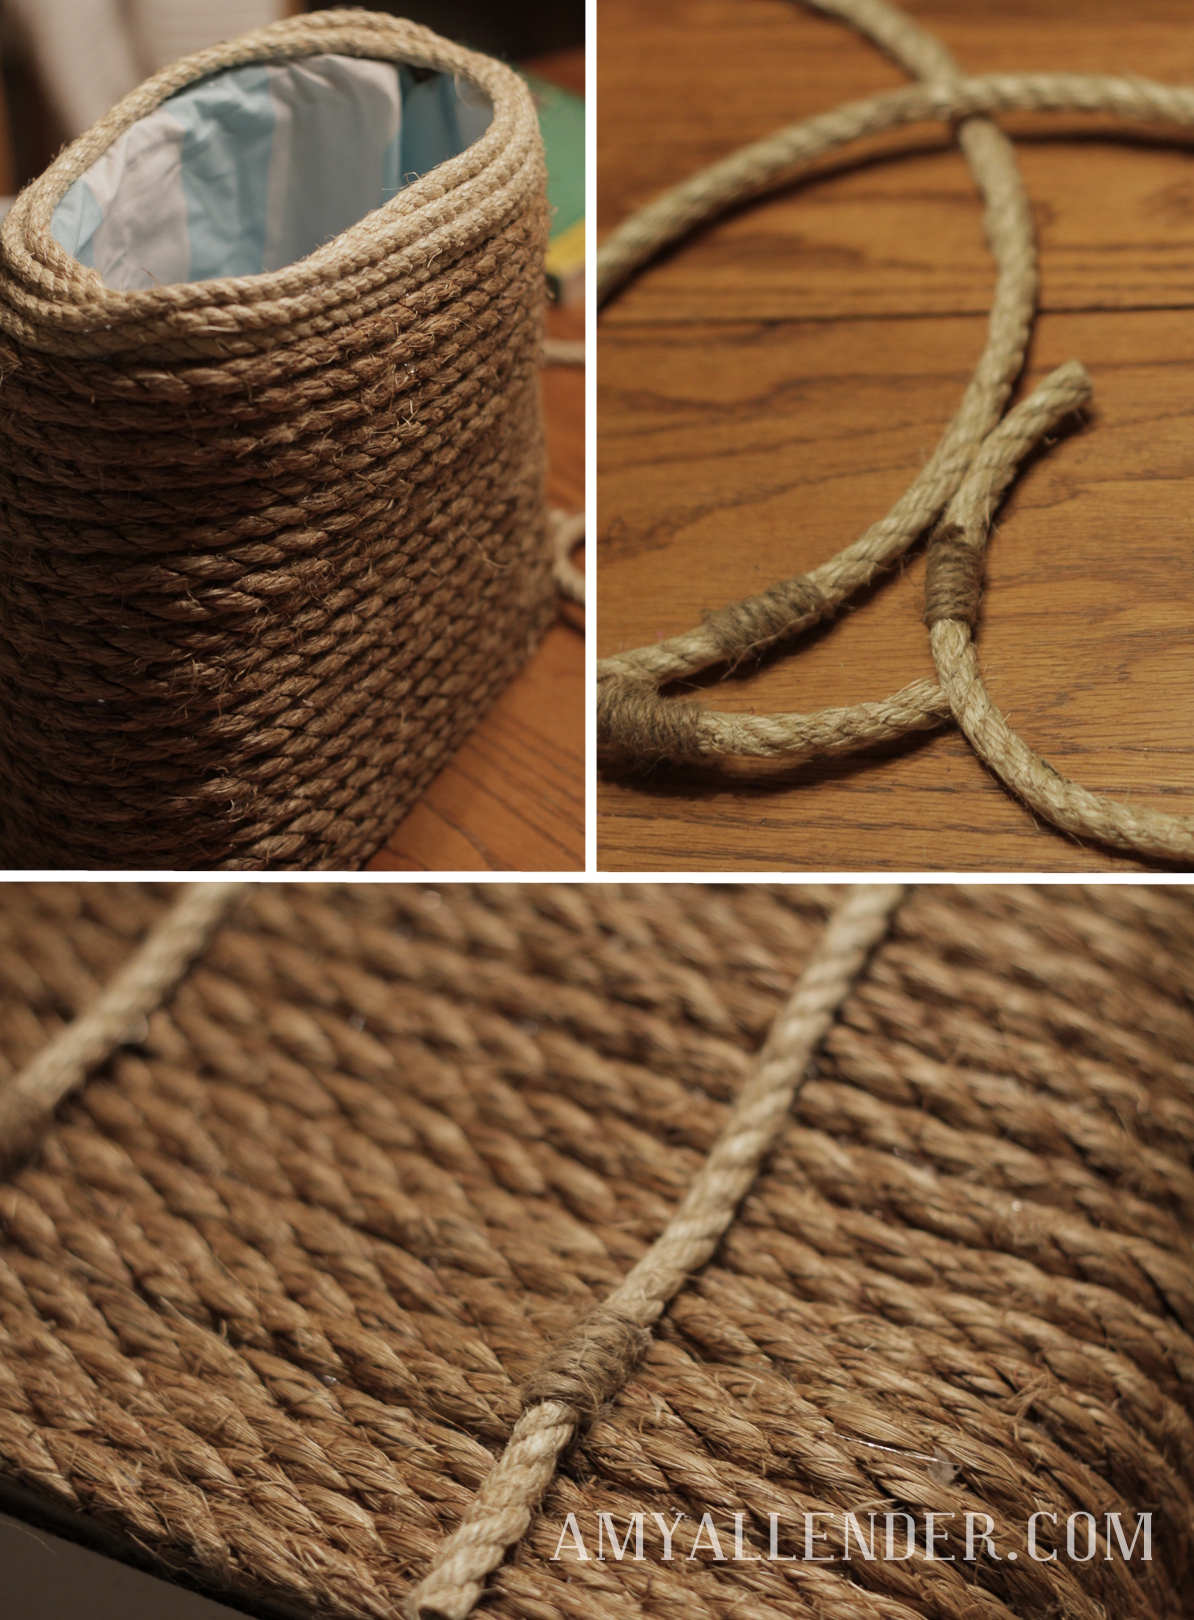
This next part is pretty important. So listen to me and take my advice. As you continue wrapping, use your hand to keep consistent space on the sides as you wrap the rope around. Naturally, the box will want to become narrower toward the top. Every time you wrap around the side, use those polished fingers of yours to keep the space…so you don’t have a tote with a wide base and a really skinny opening at the top.
It’s kind of basic after that. Just keep wrapping. Switch rope sizes if you like. But keep going, around and around and around.
When you want to switch sizes, wrap to the side of your box, then tuck the end down the size {the lining will hide it} and glue it in place. Then take the end of your new rope, tuck it inside the side of the box as well, glue it in place and start wrapping where you left off.
Once you get to the top, wrap all the way up and over the rim, and do a row or two on the inside of the lining. You can see that part in this image of the first one I made.

Coil and glue rope on the bottom…and you’re almost done.
The last step is making handles.

Cut two pieces of rope for handles. If you want to embellish them a little bit, you can wrap skinny cord around them. Just be sure to space the details consistently so they are symmetrical once the handles are attached.
Attach the handles with hot glue or a combination of hot glue and super glue. If you are planning to use your tote mostly for decor, hot glue will be fine. But if you are planning to haul anything heavy in it, I’d recommend using super glue to be sure it can hold up.
Let everything dry and you’re done.
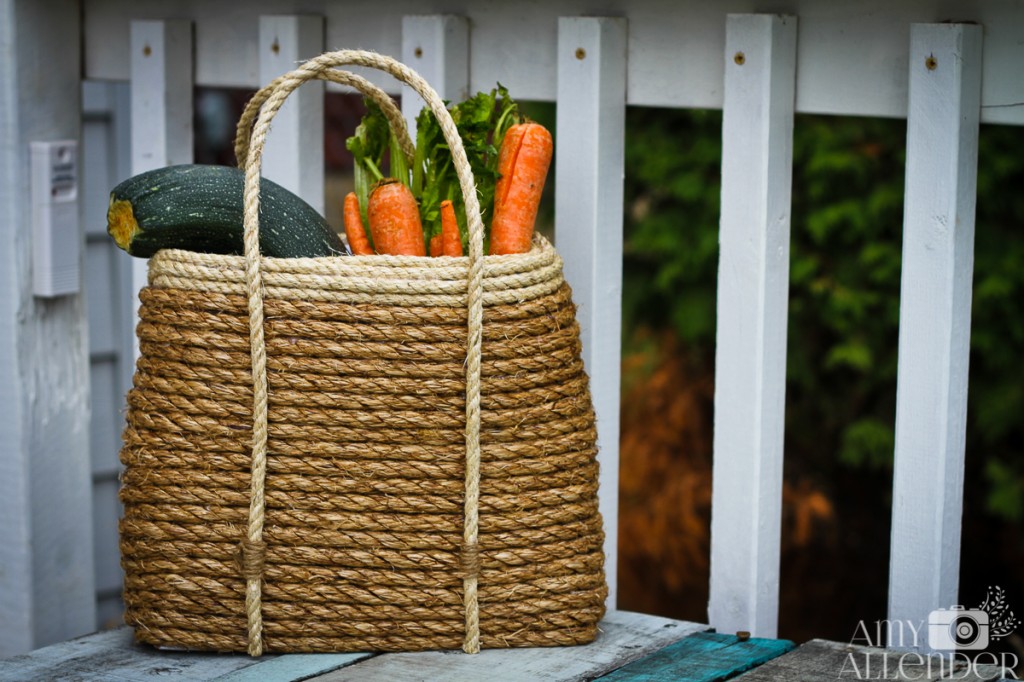
I really love the way these turn out…even it it does take some time, some glue burns and maybe a hint of crafter’s rage to produce one. They get easier and easier the more you make…so don’t be afraid. I’m totally confident in your ability to make a DIY sisal tote. They really do make awesome gifts. And they are super fun to fill with goodies and give away. You don’t even need to wrap it, just slap a bow on it and put it under the tree.
I haven’t decided what direction I’ll go with this one. {I won’t be giving it away filled with produce…} Two bottles of wine or sparkling cider and two pretty glasses fit nicely inside. Or, a couple magazines, a throw blanket and a subscription notice could be good filler. Or maybe I’ll pack it with picnic supplies. The options are endless.
Happy Friday. Happy crafting.
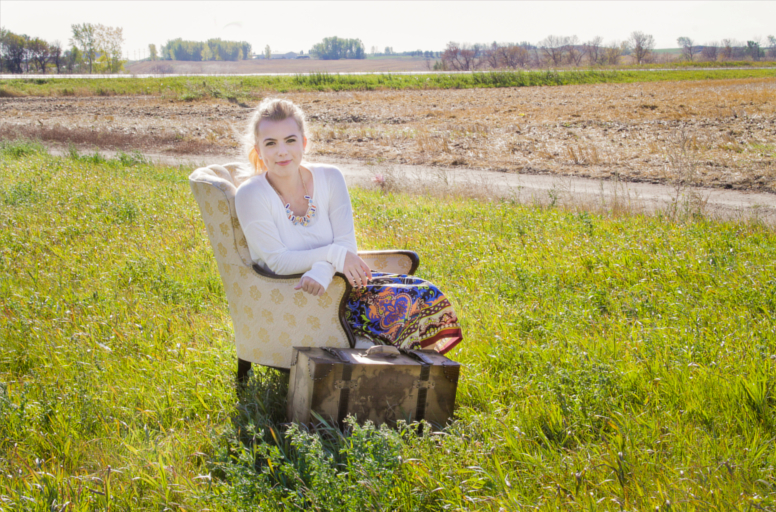
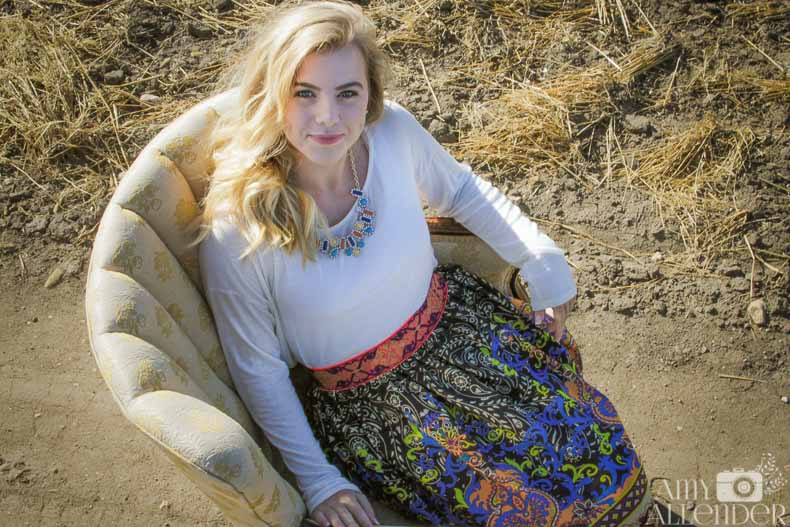
by Amy | Nov 4, 2014 | Blog, The Art of the Moment


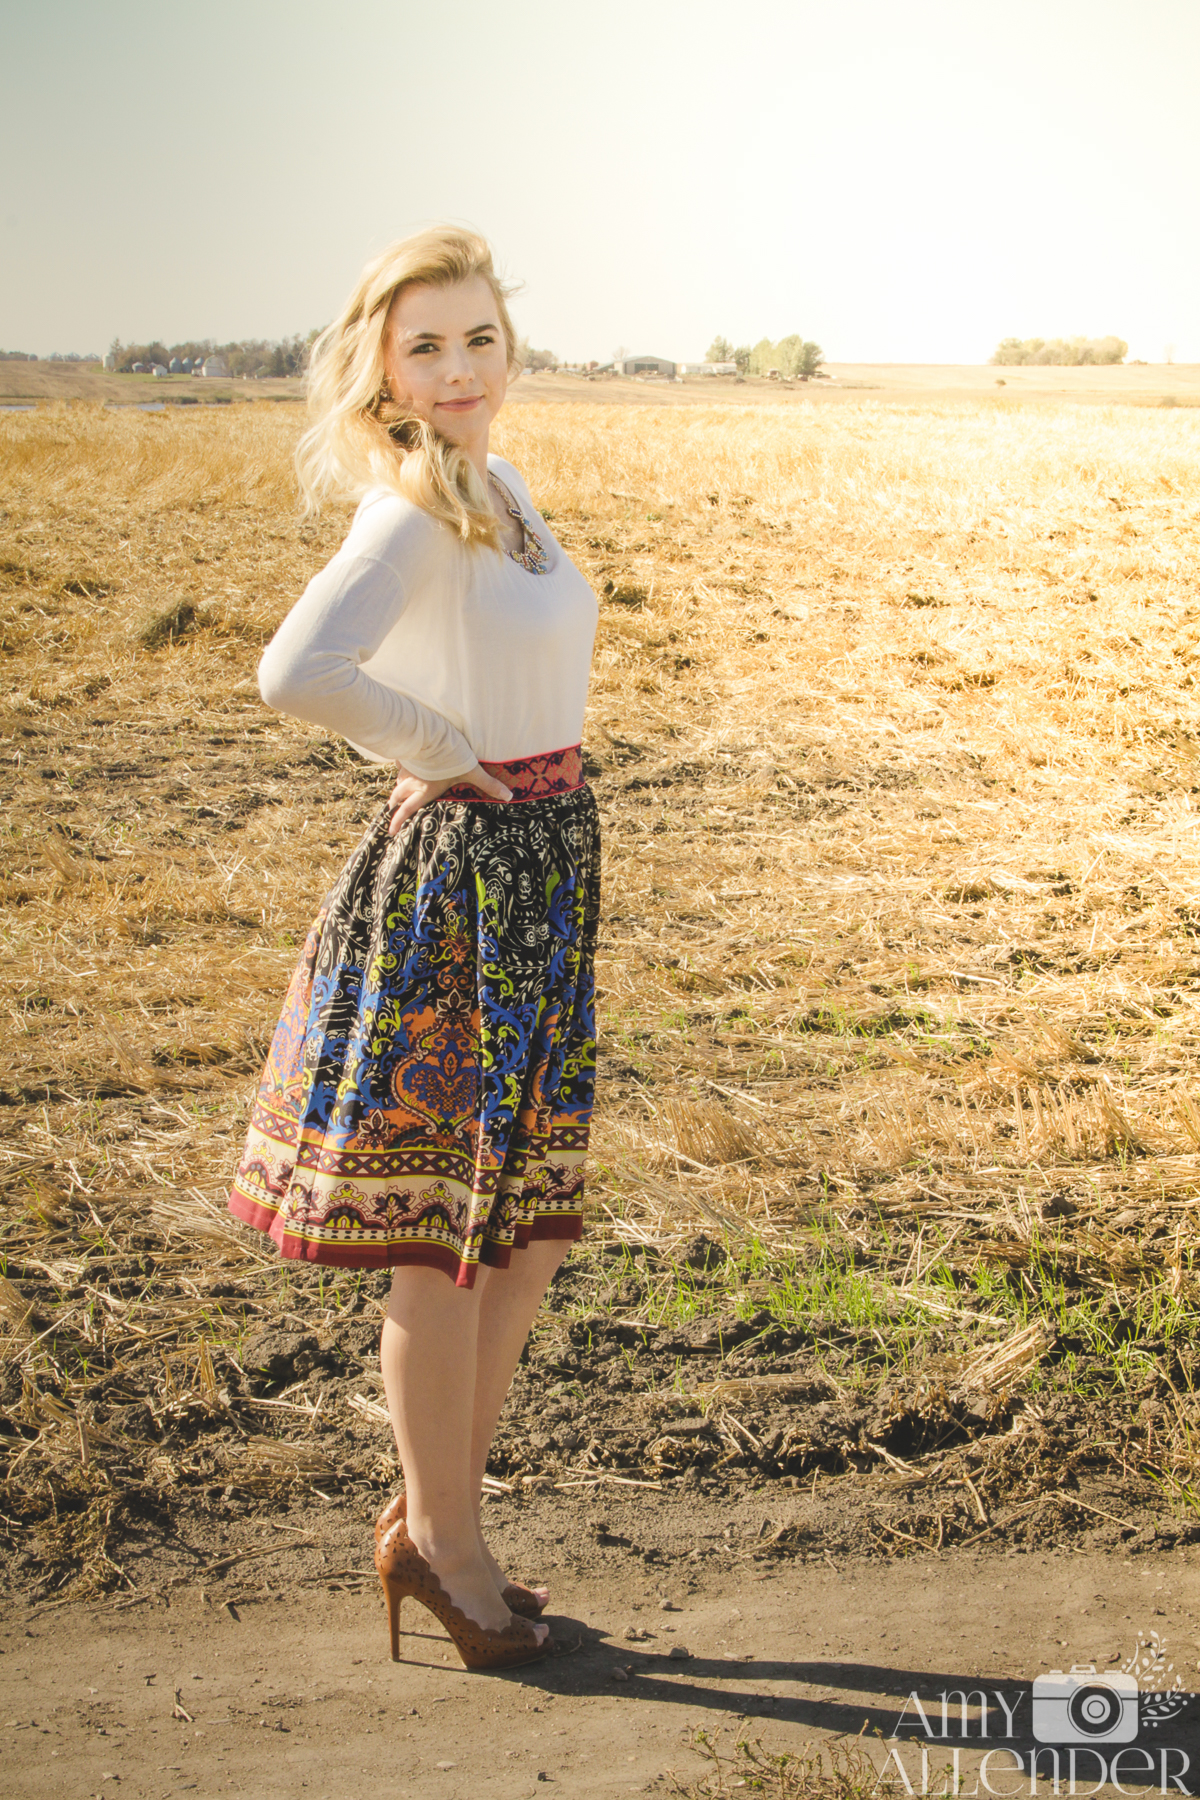
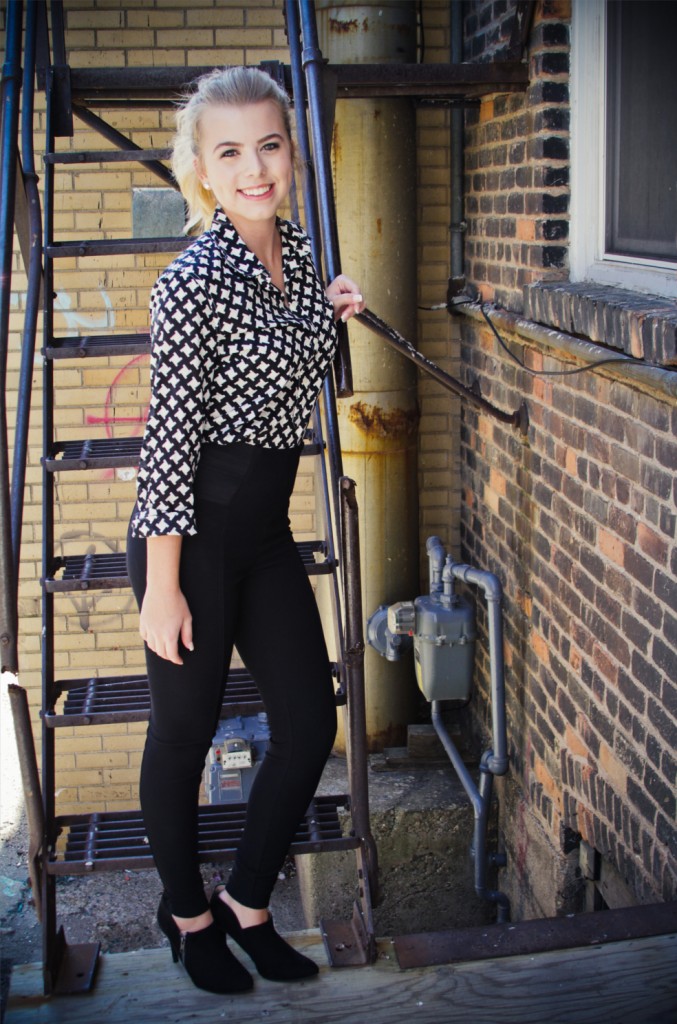
This is Genevieve. For short she goes by Gen. And just the adorable spelling of her shortened name should tell you that she is super cool and cute as a button. She’s graduating this year. At her session I complimented her on being photogenic. She laughed and said it was because the word had her name in it. PhotoGENic. On top of being pretty, and smart, she’s also got corny jokes on her side. I love it.
But seriously, taking her senior portraits was a blast…even if I did have major hair envy on the drive home.
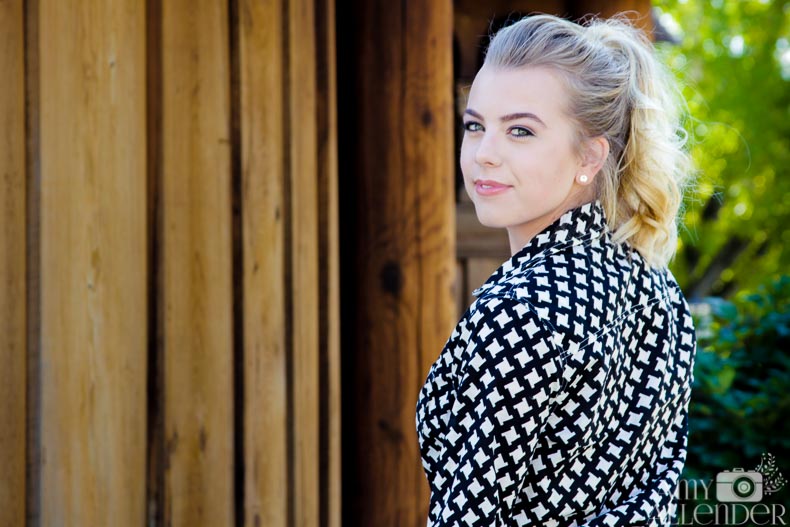
During every senior session, it seems like there is a defining moment. A moment where I wonder if I’ve asked them to do something that’s too much, or too odd, or too awkward. During Gen’s session that moment came as I made her scale several fire escapes wearing precariously skinny heels. Did they slip through the cracks a couple times? Did they nearly trip her? Was she a good sport any way? Did we get awesome photos?
The answer to all of these is y-e-s.

{Isn’t there something very Audry Hepburn meets Express ad here?}
After scrambling stairs and climbing on roofs we headed out of town. If you ask me, there’s something very dreamy about a vintage chair in the middle of no where.


Now, you might think these photos have been great. And they have. But–I’ve omitted my very favorite two. One from town, one from country. They are hanging out over at the Facebook page right now. Head over and vote for the one you like best. If at least 40 people share their opinion, Genevieve will win an 8×10″ print! Oh, and you should just go ahead and like the page while you are there so you don’t miss out on anything fun in the future.

As of right now, I don’t have any more seniors on the books. It’s been an awesome season of shooting seniors. Every single one has blessed me with their energy and enthusiasm. And all of the girls have inspired me to do cuter things with my hair and buy more dresses! {Because they have all been so very, very fashionable and adorable.} Thanks a million, class of 2015–and especially Gen…for being a great way to end the season.
xo
Amy
by Amy | Nov 3, 2014 | Blog, The Art of the Moment
It’s November! Which means, it’s time!!

Christmas mini sessions are happening. As promised, here are all the details you need.
I’ve got two dates to choose from. Sessions last about 15 minutes {but if friends are here for their session before or after you, feel free to stay and visit as long as you like!} Sessions can be scheduled at any quarter hour, but space is limited–so be sure to get your spot reserved quick.
Saturday November 15th from 1-4pm
Sunday November 23rd from 12-5pm
Session fees are just $50. You’ll get five fully edited images, with a print release and a release to share them on social media, and a custom Facebook cover collage. Files will be delivered electronically about a week after your session. Once they are in your hands you have my blessing to print them anywhere and use them as you please on all your Christmas greeting cards.
For groups of friends, sessions are $50 for up to 5 people. More people than that, it’s just $10/head–and you’ll all get the files.
**Other discounts do not apply to mini sessions
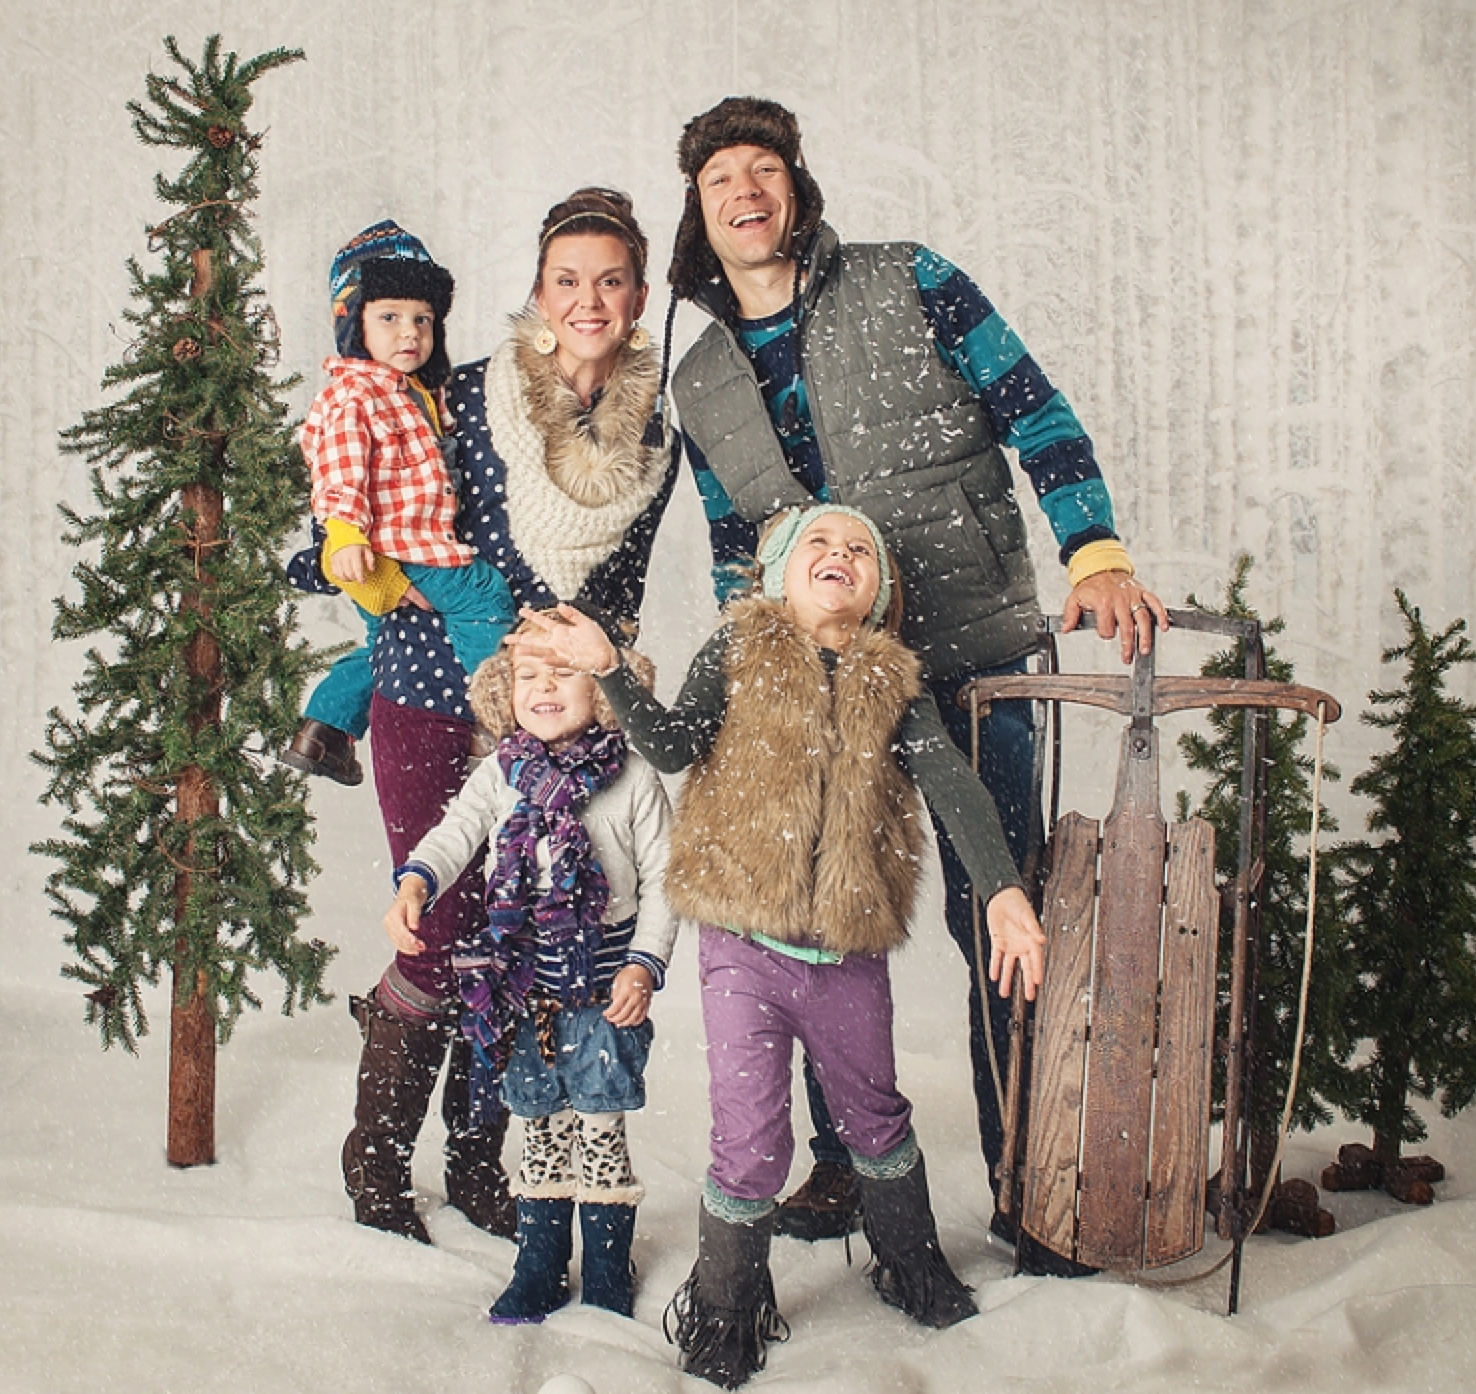
I’ll be collecting and creating more props before sessions start. I’ll have big wrapped gift boxes, a sled, faux snow, ice skates, chairs, mugs, blankets, and twinkle lights. But, you know I love creativity…so feel free to bring along something of your own.
What are you waiting for?!
Call or Text me–574-361-7268
Email me–amyallender@gmail.com
Message me via the Facebook page
Or…use the contact form here.
Thanks to all of you who had interest in holiday sessions again this year! I’m so excited to let the merriment begin!
by Amy | Oct 30, 2014 | Blog, The Art of the Moment
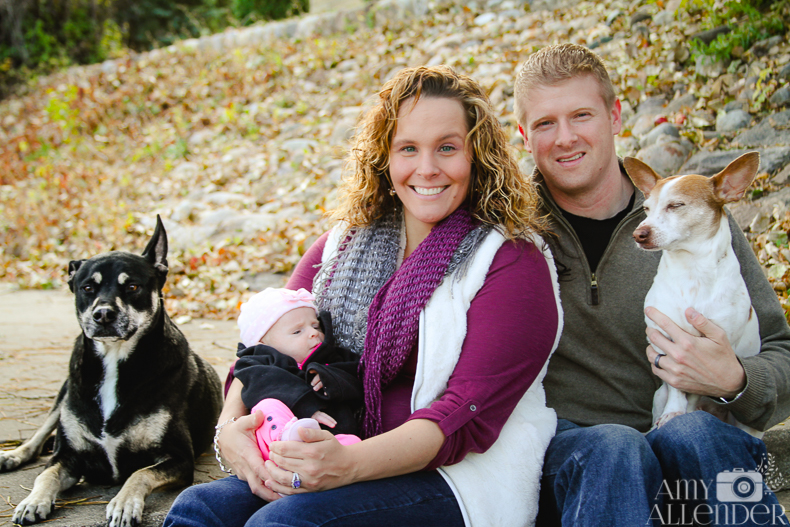
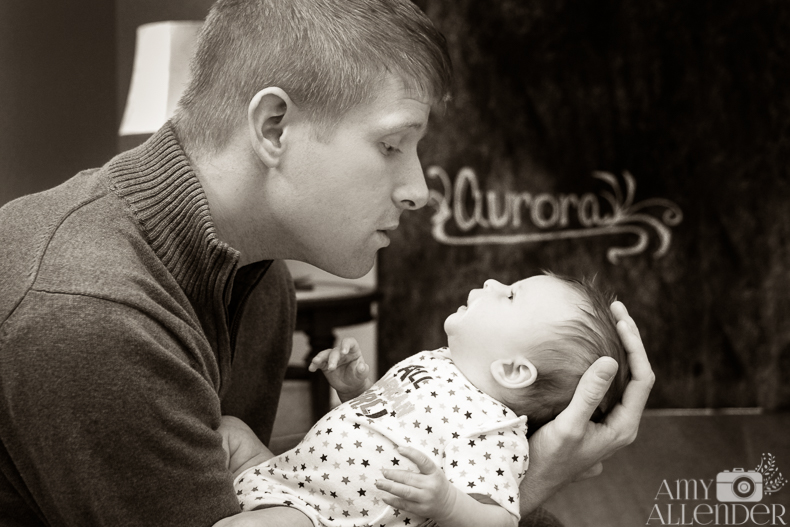
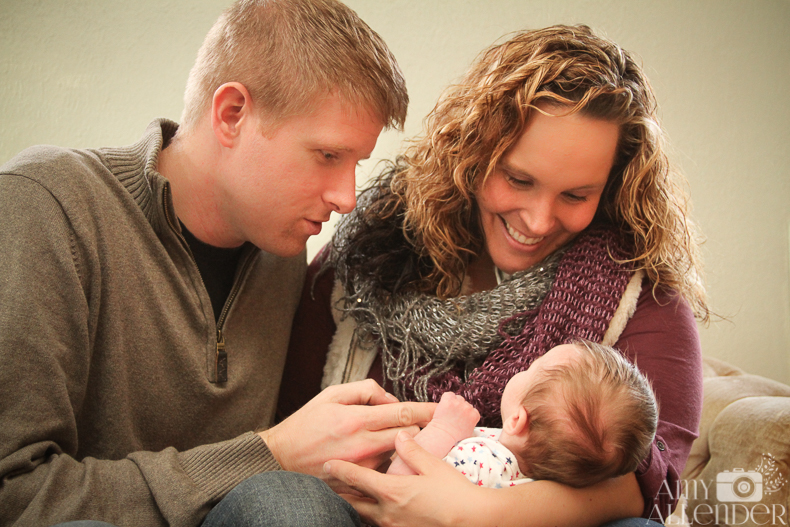
Meet the Rogers family. {No relation to this Rogers family.} As you can see, they recently welcomed a new addition into the fold. Her name is Aurora and she precious! I know you can’t tell right now, but she’s a red-headed gem. I just love that red hair! It makes me think about another soon-to-be ginger baby I am chomping at the bit to meet. {Read this if you have no idea what I’m talking about.}
The Rogers clan also has two gorgeous dogs. When they asked if the pups could come, I was over the moon with excitement. You know I love dogs. I’m glad they came. It’s nice to have portraits of the whole family–two-legged and four-legged members included.

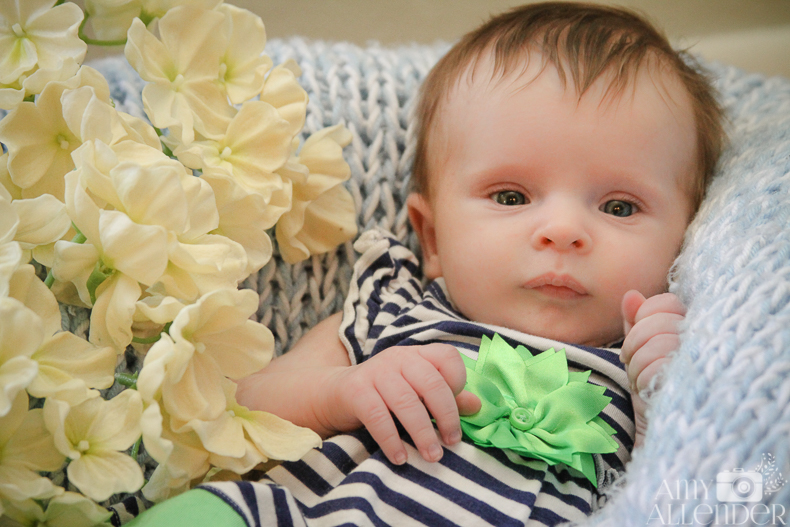
After a walk around the neighborhood we took that bundled up baby inside for her very own session. Since she was about a month old at the time, I’ll call it a not-quite-newborn session. She stayed wide awake the whole time, which is fine by me because this one has lovely deep blue eyes that will just make you melt.

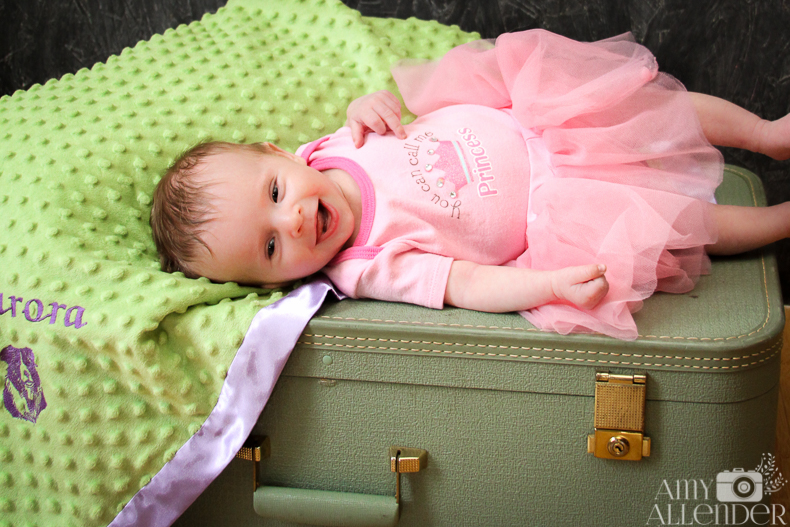
Aurora was so well behaved for a wide-awake baby having her first portraits taken. She was pretty curious about the bright lights and that click, click, click sound. And there was no fussing…until we forced her to sit in a bucket. She held out for a few shots, and I’m grateful for that. Because she looks pretty darn cute!


Eventually she’d had enough and insisted on being taken out. Mom tried to console her, but to no avail. The fussing did, however, lead to this precious candid shot of Mommy trying to convince Aurora that buckets are fun, wonderful places to sit.
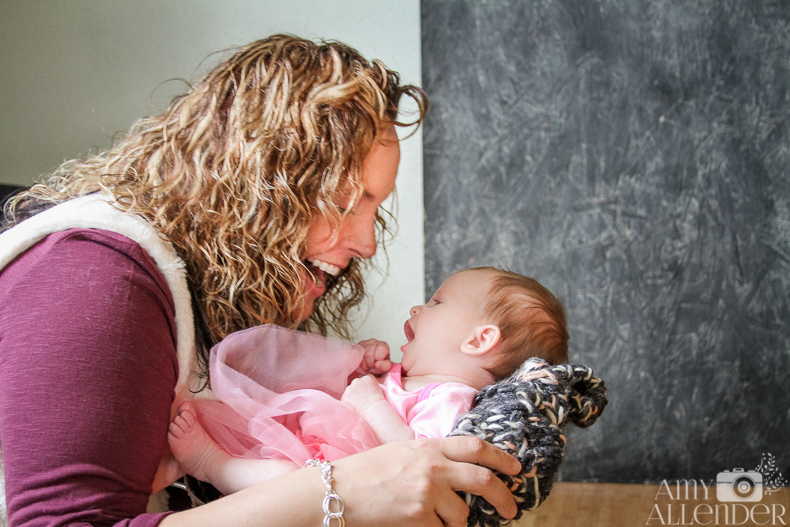
She was so much happier when we just let her be.
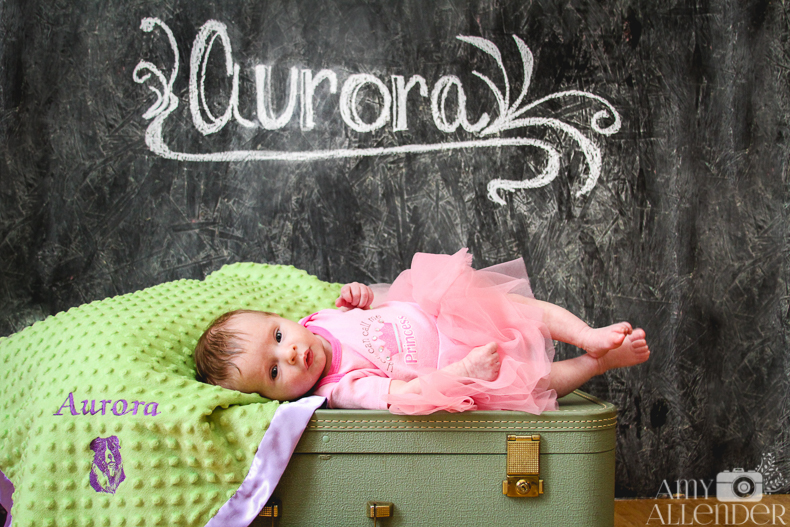


And when she was completely worn out and fed up with all this portrait stuff she was delighted to be held and fussed over my her mommy and daddy. I love these natural, real-life shots that give us a peek inside the love this family has for their precious baby girl.
Thanks for letting me hang out with your awesome family! Happy travels and best wishes as you move away from Minot to a warmer {less Practically Canadian} location!
xo
Amy
by Amy | Oct 27, 2014 | Blog, The Art of the Moment
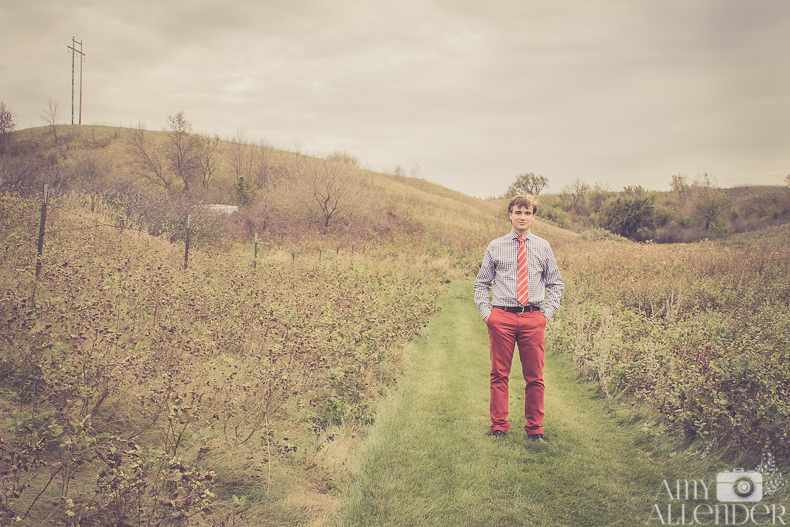
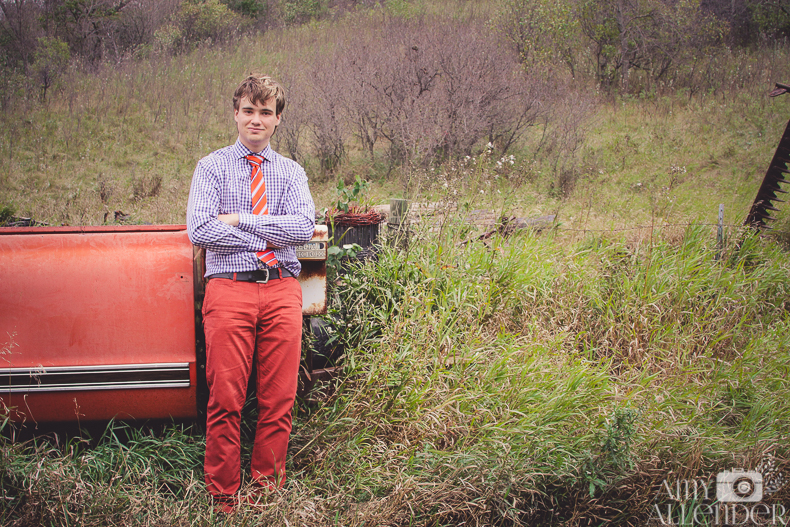
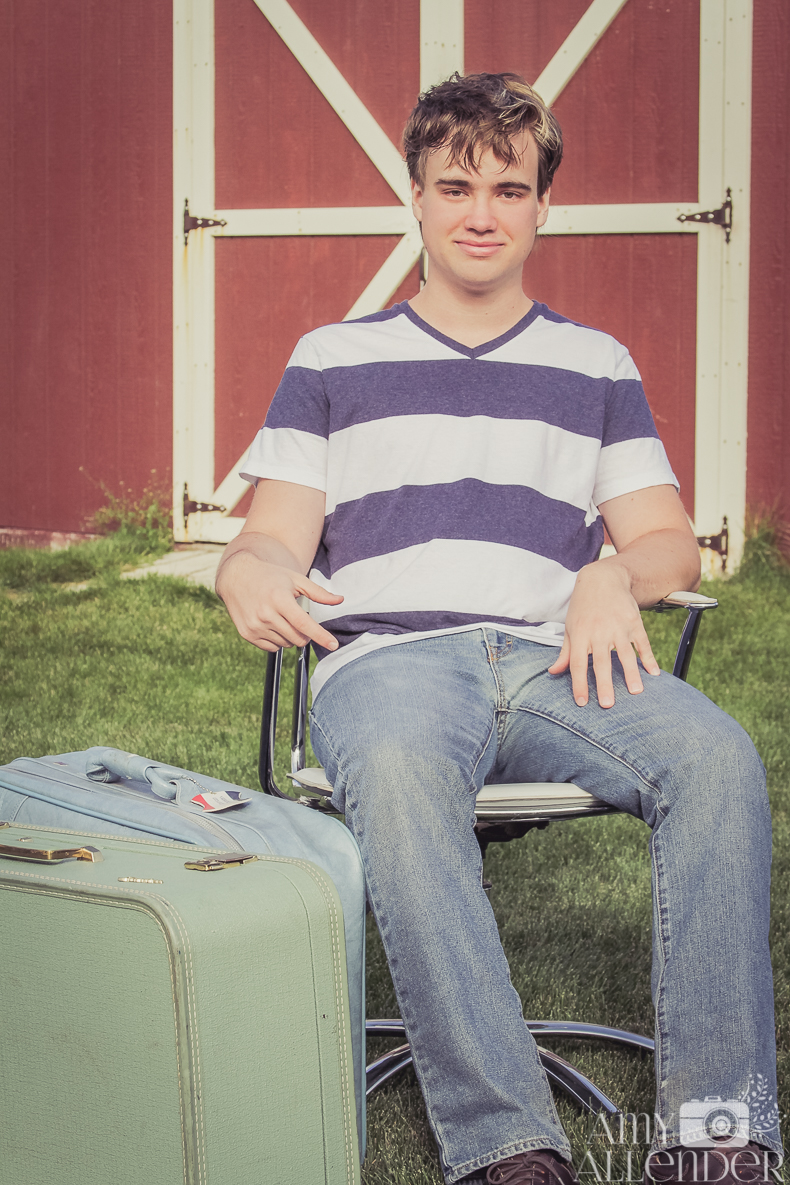
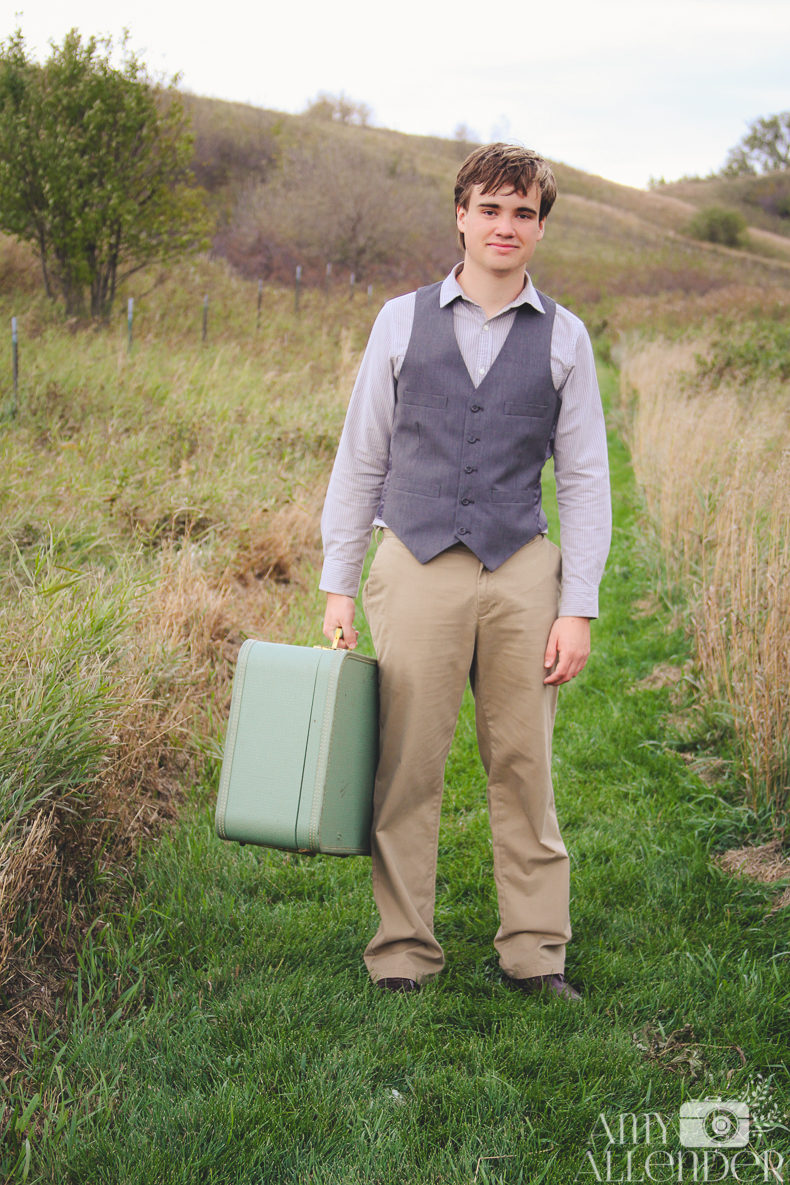
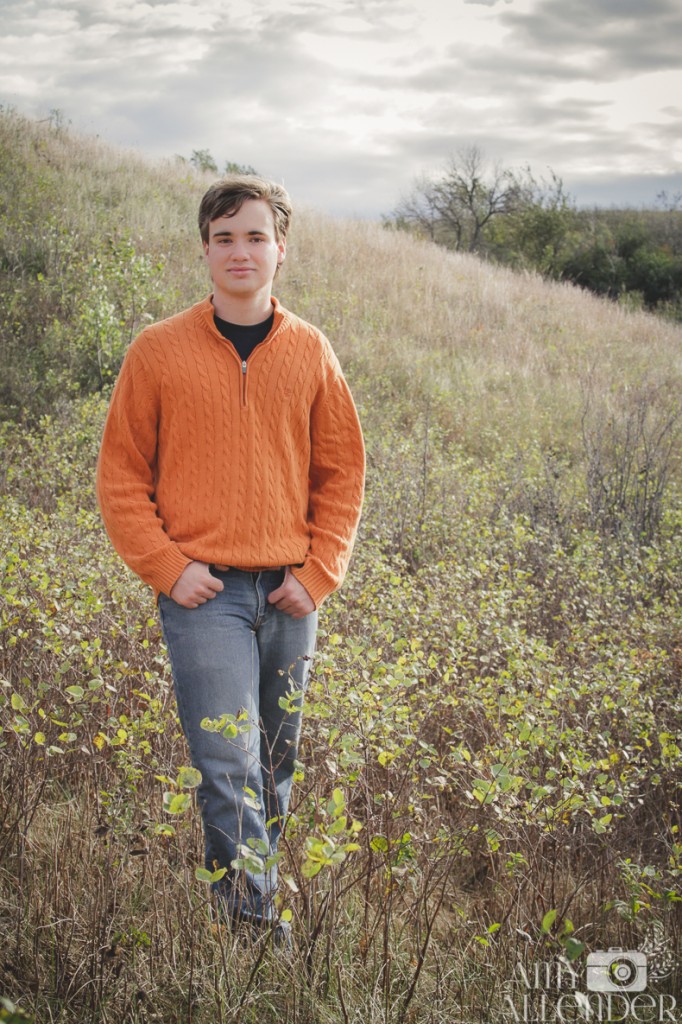
Everybody, meet Sam. He is my second-to-last senior of the season. He’s smart, and witty and was polite {and game} enough to oblige me as I had him trek from one corner of his family’s gorgeous property to the other. Those are qualities I always treasure in a senior client. I’m being very honest when I tell you that this guy is a true gem and I had an absolute blast taking these very country, outdoor senior portraits.

When Sam’s mom told me he was a big time reader, I was so excited to pull my stack-of-books stool out of hiding and into the open air. Not to mention that I really dig the jewel tones of the books next to those orange pants! Seriously, how cool are those jeans?! You might recognize the books {and a few other props} from a photo I posted to instagram {you should follow me @theartoflivingproject}. I know quite a few of you were curious when I showed you a trunk filled with oversized books, suitcases and chalkboards.


Sam comes from a big family. {One of his sisters married into the Rogers clan I showed you a couple months ago. If you like these photos, you should go check out that one too! See it here.} While we were taking his senior portraits, siblings were popping in and out of the house, an adorable dog was trotting through the yard and delightful smells were wafting out of the kitchen window. While that might be distracting to some photographers, I’m so happy Sam decided to have his portraits taken at his family’s property–it was a blast to be around such a busy, fun household. I love seeing people in their element, and at home, in this beautiful yard, he was very much at home.

Now. Let’s talk suits. You know I love suits at senior sessions…but this one just took the cake for me.
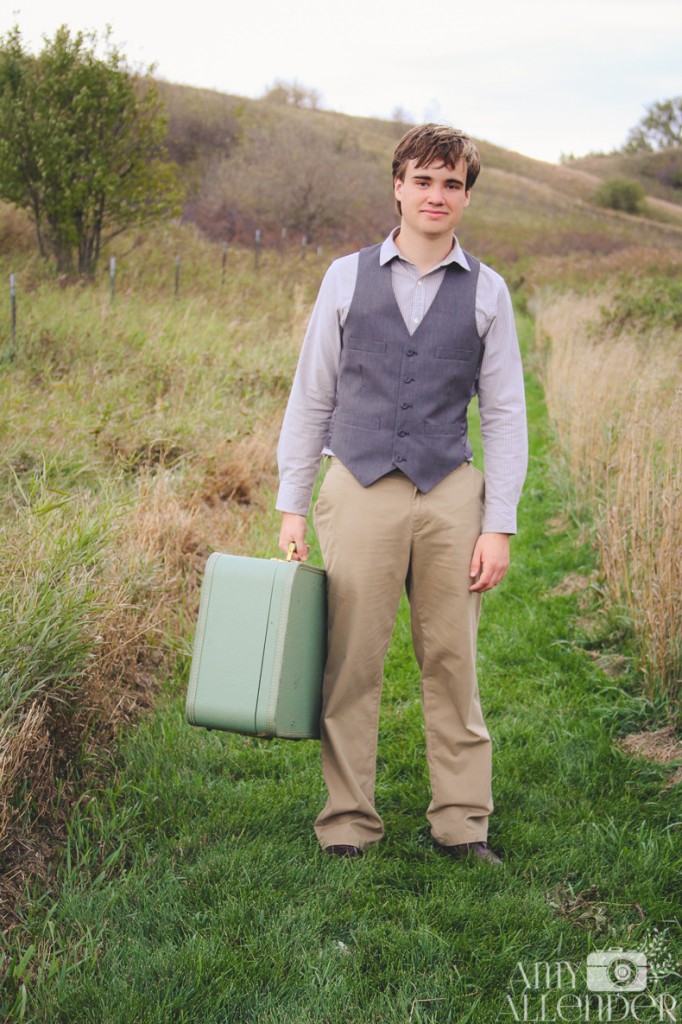
Okay, so I guess technically it’s not a suit. But, it sure is classy. Very European. These photos remind me of Ireland for some reason. Whatever it is, I love this suit and these photos are magical.
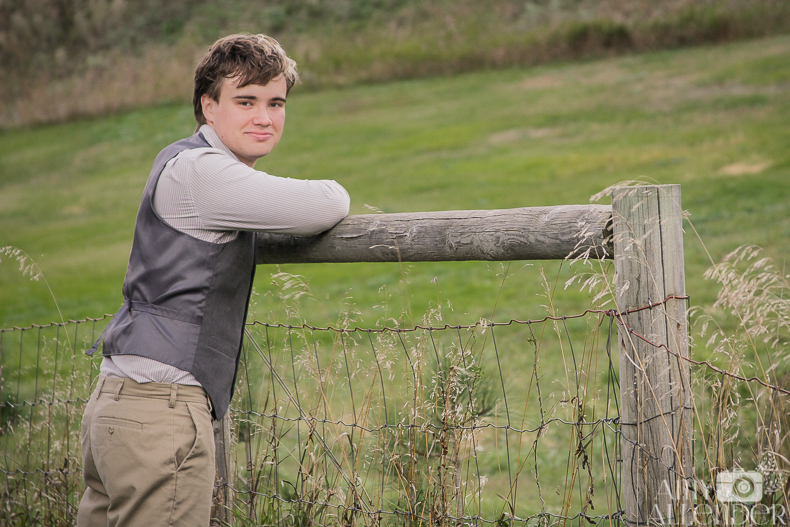
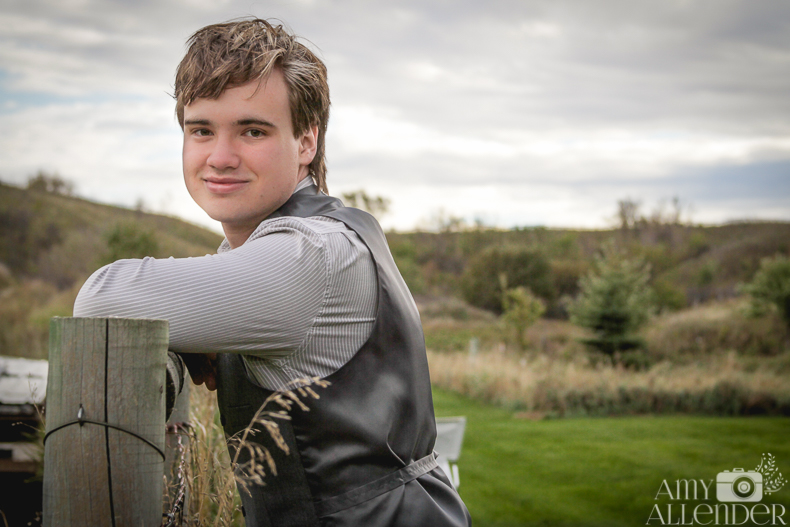
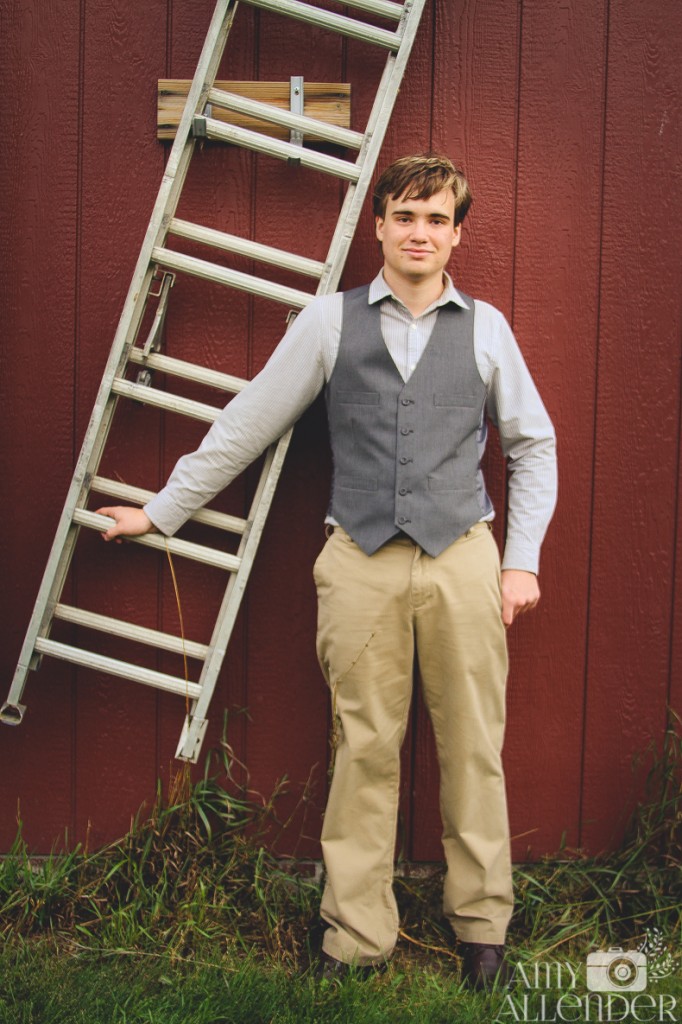
As you can tell, I had a great time with Sam! Thanks for hanging out and fighting the wind with me {did I mention we almost got blown over a few times?} I hope you love your photos, I know I do!
Remember to go over to the Art of Living Facebook page to vote B&W or Color in Sam’s photo contest. If at least 40 people chime in, he’ll win an 8×10 of the winner. And, if you like what you see here, I’d love it if you liked the page and shared it with friends so more people can start mastering the art of living.
xo
Amy