by Amy | May 18, 2015 | Blog, The Art of the Moment
I am very excited to be sharing a super special session with you this evening. Meet Jay, Anne and Ada. Aren’t they just gorgeous?! {The answer is, YES!}
Anne and Jay will be getting married in just a few short weeks. Last week we got together to take some family photos and engagement photos before the big event. I had a great time getting to know this precious family. And boy, did Ada make my job easy–she is so beautiful and smiley! {You know how I love a baby that doesn’t insist on giving me dirty looks.}
Without further ado–here are a few of my favorite image from their session.


Like I said, this was an incredible session–with perfect weather! I am so excited for these two to see the finished product…and even more excited {and honored} to be shooting their wedding next month.
Amy
by Amy | May 15, 2015 | Blog, The Art of the Moment
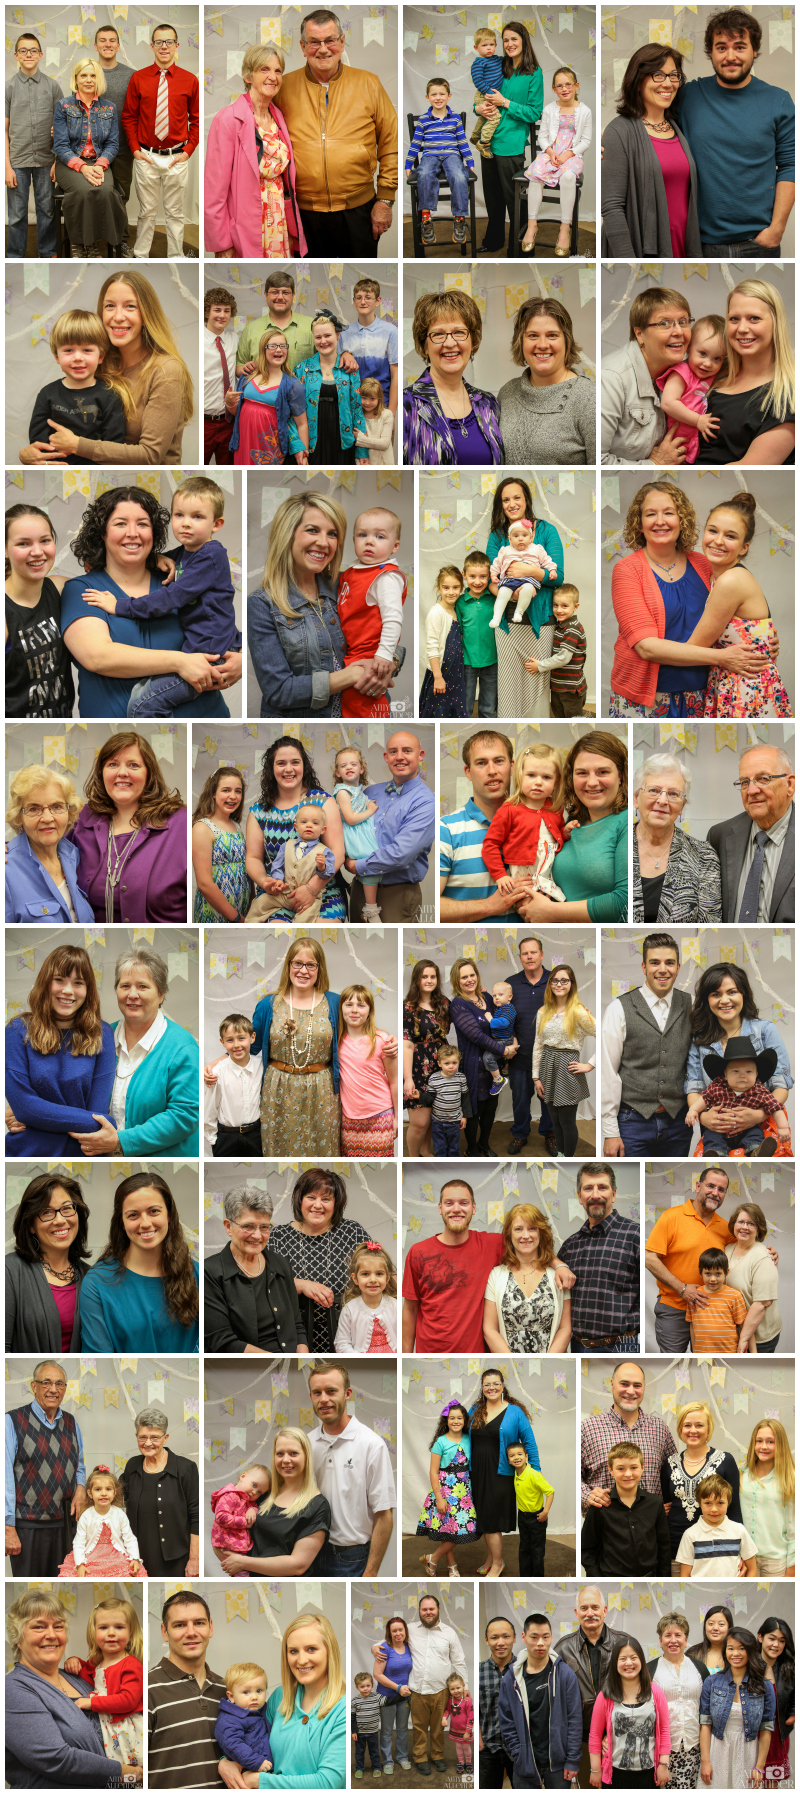
On Mother’s Day I had the fine privilege of setting up what I like to think of as a “gorilla-style” photo booth at church. There was a little advertising, but mostly the greeters just steered people into our pastor’s office, where I had a {very cute} photo booth set up. Photos were free. Anyone mother could have a photo taken with anyone she chose. As you can see from this sampling…we had quite a few takers.
I had a fabulous time with these back-to-back snap shots. Each and every mother is so very dear. Let me tell you about a few of my favorite moments.
One mother requested to, “…keep our feet out of the photo–he’s [her son] got his snow boots on…it’s been that kind of morning.”
A three-year-old girl was convinced it was someone’s birthday. She told me, “Happy birthday!” Her mother corrected her, explaining that it was a different kind of holiday. Then, when I’d gotten their photo she requested cake…still convinced it was a birthday. “We’ll work on it. She just really loves cake,” the mother said.
“It’ll only take a second. It’s Mother’s Day. Humor me.” This sort of sentiment was uttered to grown sons and husbands. And they did…humor their mother.
Appropriately, the Sunday message was about mothers and how a mother’s love is a very good earthly example of God’s unconditional, never ending, always eager, tender, compassionate, best-interest-in-mind, love for all of His creation.
Mothers are amazing. And we are lucky to have them. Period. End of story.
Thanks to everyone who took a moment to smile for the camera last week! Those of you who requested digital copies will get them tomorrow. If you requested an 8×10″ print, you can pick it up on Sunday morning.
xo
Amy
by Amy | Apr 30, 2015 | Blog, The Art of Art
I do lots of things here in Practically Canada. Lots and lots of things. Lots of varied activities that lend themselves to a never-boring {but sometimes a little too busy} lifestyle. But–of all the things I do, working with the Minot Area Council of the Arts {MACA}’s Artists in the Schools Program is definitely in my top three.
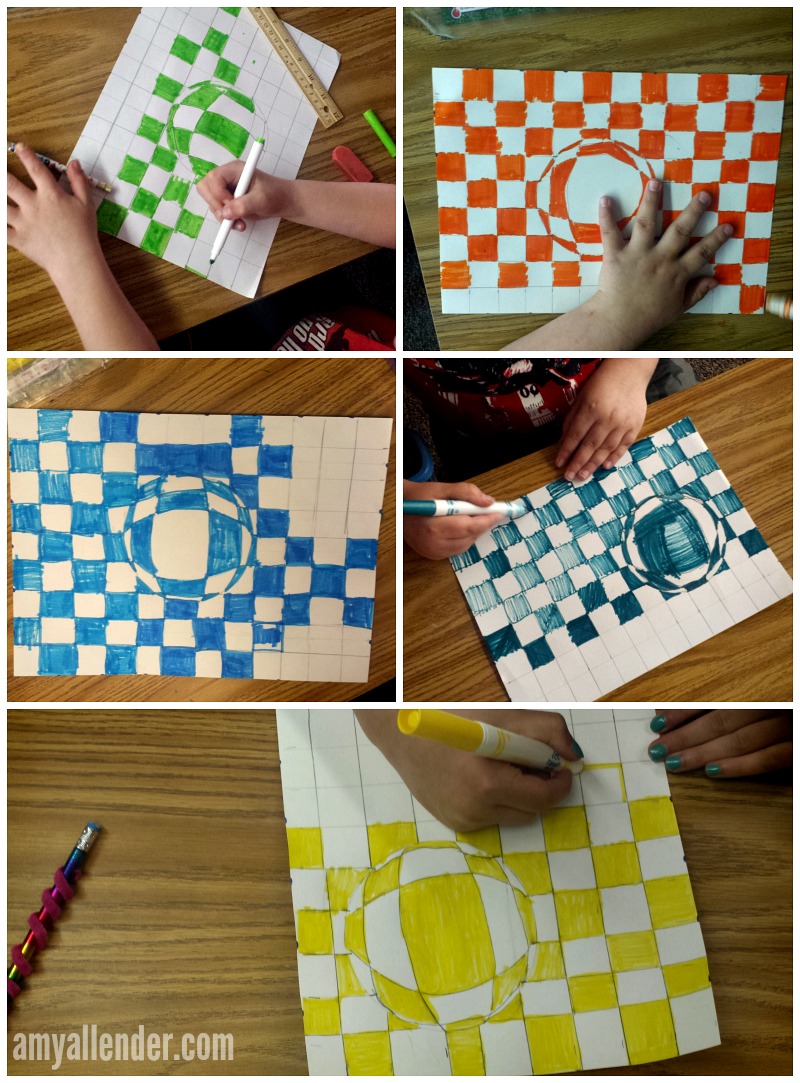
You’ve heard me talk about this before. I’ve cut snowflakes, learned the color wheel and painted many, many canvases. Last week I did another class focusing on optical illusion art for kids with an outstanding group of 3rd grade students at Bell Elementary. This project is a little tricky, so I don’t break it out unless the group is well behaved and able to tune in and follow directions. This particular class was fantastic on all fronts.
I started with the usual discussion on what an optical illusion is. How sometimes things aren’t always as they first appear {a lesson not only for art, but for many aspects of life.} The kids always love learning about optical illusions and they are so excited for the chance to make their very own version of op art.
This particular project is great because it combines artistic skill with mathematical skills such as use of a ruler, measuring, and pattern creation. It’s also cool because every kid can turn out a really cool product–even those who don’t see themselves as “artistic.” I love proving to kids that they can be artists even if they don’t have a natural aptitude for free hand drawing or painting. I believe it is vital that little ones embrace their creativity–and that adults don’t stifle it by instilling an attitude that “you aren’t artistic.” Creativity is key to problem solving…so let’s not crush their creativity! Agreed?
Okay. I’m finished ranting. I just love art. And kids. And kids doing art.
So. Now I’ll explain how we did this one. It’s pretty simple really.
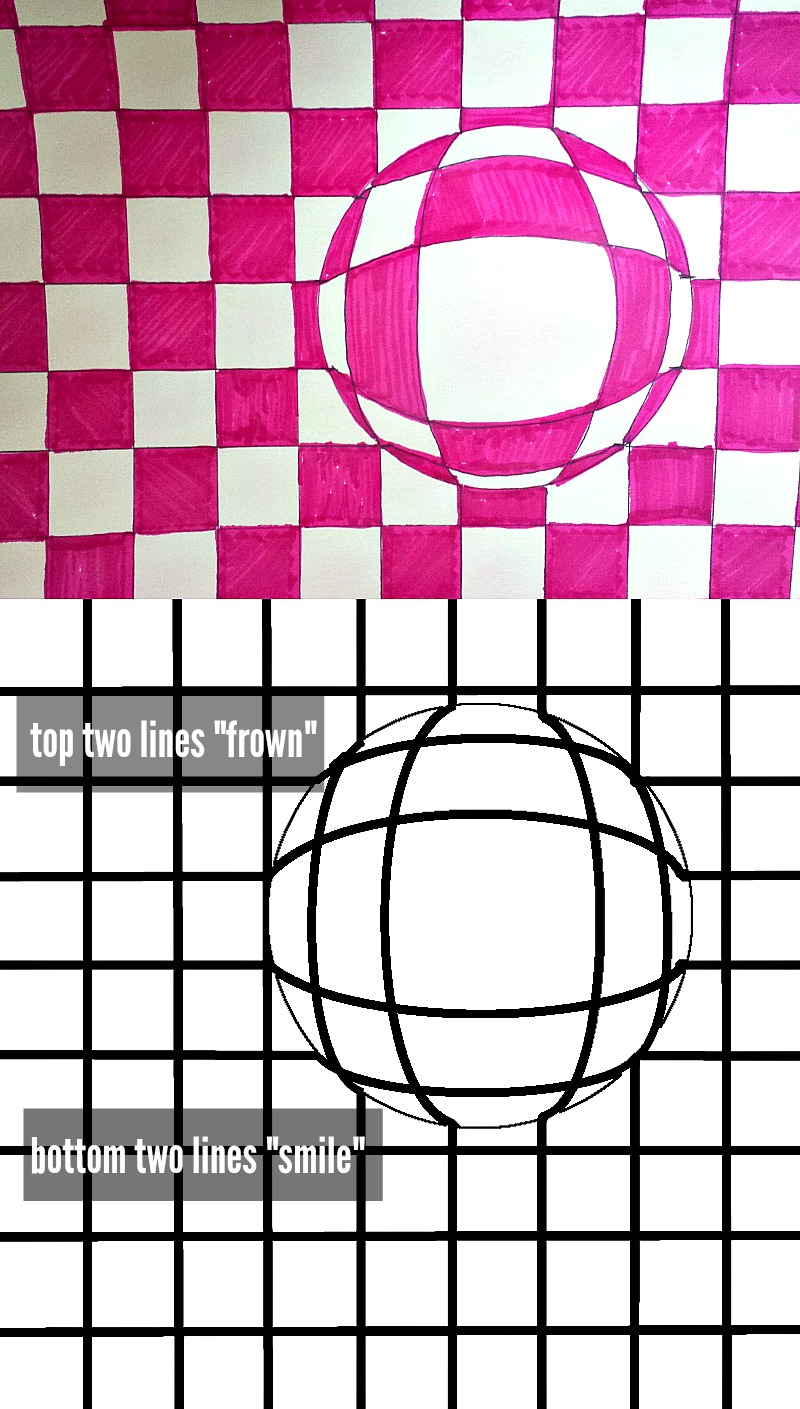
The top is my example. The bottom is how the grid looks before it’s colored.
Start kids off with their paper flat on their desk. Have everyone trace a circle on their paper. Anywhere is fine.
Have them use a ruler to mark every inch. Then, without turning the paper…have them slide the ruler to the bottom of the page and mark every inch again. Have them connect the dots–stopping at the edge of the circle so they don’t draw through it–repeat on the other two sides of their page.
Once the grid is done, have them connect the lines that but up to the edge of the circle. The top two should be connected with a line that looks like a frown–following the arc of the circle. The bottom two should “smile.” Then, turn the paper 90˚ and repeat that process. Then, it’s just a matter of creating a pattern of color.
Start with a row that runs through the circle. Color every other square. Where the circle intersects with a square it should be the opposite color. {If the square is uncolored that section of the circle will be colored; if the square is colored that part of the circle will be uncolored.} Inside the circle every other space will be colored. Then resume the pattern in the squares.
Once that first row is finished, complete the pattern within the circle. Then finish the pattern in the squares–every other should be colored, with the rows alternating like a checker board.
So that’s it. Hopefully that’s helpful to my teacher friends out there. It really is a great project for honing in on all kinds of skills. Just maybe it’ll be something fun for your classes at the end of this school year!
Amy
by Amy | Apr 27, 2015 | Blog, The Art of the Moment

Meet the Peterman family. As you can see they are adorable. Annnnd….they are expecting a baby! I can only hope that they had a fraction of the fun during their family maternity session that I had shooting it. In my opinion, any session that includes singing “Everything is Awesome” from the Lego Movie is top notch.


I am thrilled for this precious family and the excitement of new life that is coming their way shortly! Thank you so much for choosing me and trusting me to capture the art of this moment.
xo
Amy
by Amy | Apr 2, 2015 | Blog, The Art of Gathering, The Art of the Moment
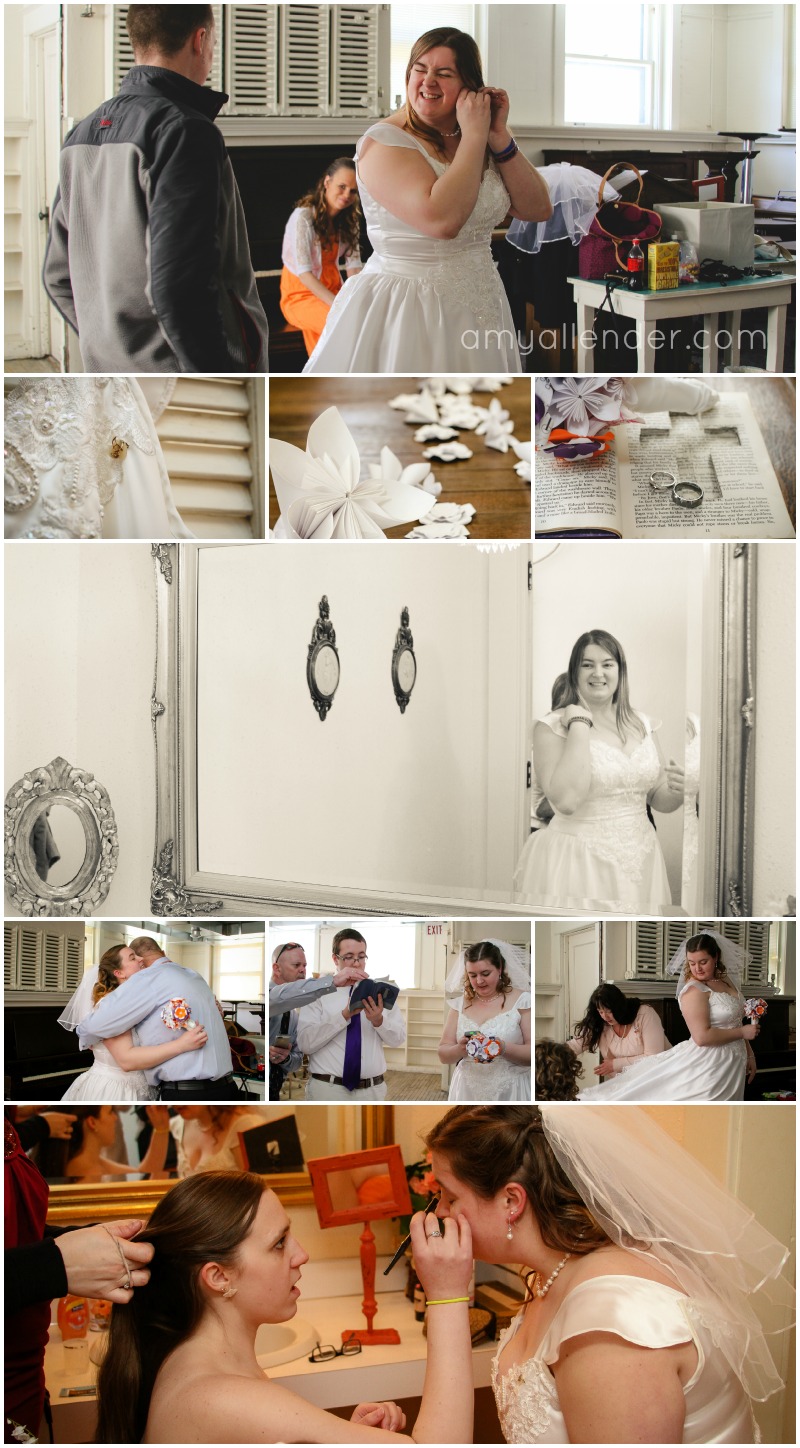
It’s wedding day!
Okay. So, technically today isn’t the day. But it is the day that I’m finally showing off some very special images from an awesome wedding. Everyone–say HELLO to Mr. & Mrs. Unruh.

I love that these two opted for an “anti-first-look.” A few photos of bride and groom before the ceremony kicked off–but they didn’t see each other, so they still had the big surprise of seeing each other at opposite ends of the aisle. So sweet! {And really, it had to have taken some major self control not to peek around the door. I don’t know if I could have done it.}
The ceremony was held at one of my favorite hidden gems of Minot–the Carnegie Center. It’s a historical, and gorgeous, and the perfect spot for this intimate ceremony.

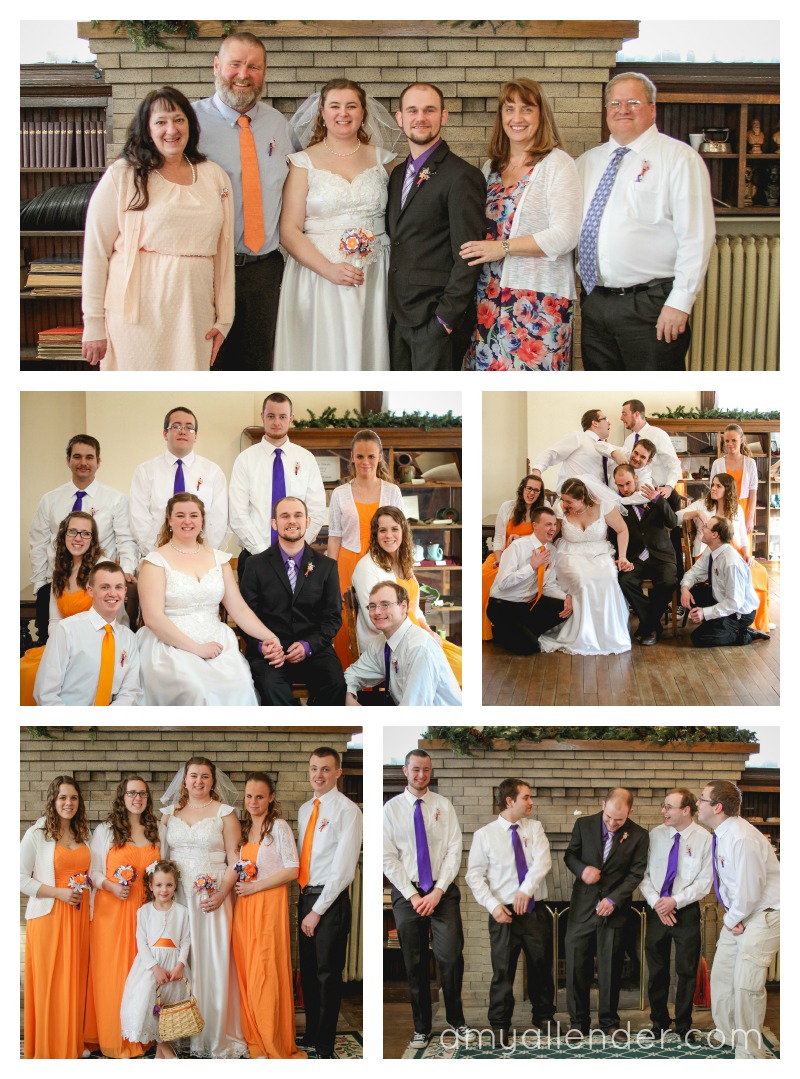
Now, let me tell you two awesome things about their reception that I personally l-o-v-e-d: The cake and the dancing. The bride’s family owns a local cake shop with my favorite cake in all of Practically Canada. {It’s Lalee Cakes–check them out here. Her frosting is out of this world.} And while the fam doesn’t own a dance company…they sure do know how to groove. {And it was contagious. I may have set the camera aside to dance to a certain One Direction song…}

This was really such a fun day spent with lots of great people. I’m so honored to have been included in this very special day. Here’s wishing the newest Mr. and Mrs. all the happiness that ever after can hold.
xo
Amy
by Amy | Mar 18, 2015 | Blog, The Art of Projects, the house
It’s been a few weeks since I told you I planned on refinishing antique tables I inherited from my grandparents. If you missed the “before” post, you can read it here. The original plan was to simply strip off the old finish {the shiny part}, that had been damaged by years of second-hand smoke exposure, multiple moves and age.

I started off by using the deglosser that came with the Rustoleum kit I used on the cabinets–when I redid the kitchen. I thought this might be enough to take off the old finish and allow me to put a new coat of glossy polyurethane on top.
The deglosser did it’s job. I was left with a mostly matte finish on the tables. This would have been perfect if I had planned to paint the tables. I have no doubt that paint would have adhered beautifully to the new, dull surface. However…there was still residual finish on the tables and there was still a good amount of damage left. {Doesn’t that sound weird? A good amount of damage?} Too much damage to proceed with a new top coat. I’d come this far…and I wanted to do it right…so {a little begrudgingly} I decided that the tables needed to be completely stripped before I could confidently add a new finish.
Completely stripping the old finish and stain required a few new tools {hooray!} I’m not the owner of this brand new orbital sander and a Dremel. Do any of you have a Dremel? Do you like it? It wasn’t nearly as handy as I had hoped. It’s like a power tool for Polly Pocket! So tiny!! But it did help a lot on some of the tricky curves. My biggest complaint is that I’ve been going through accessories like crazy. The pieces that work only last a short time. Okay, I’ll go into the exact pieces I used on another post. Long story short…I own a Dremel.

I used the orbital sander on all the flat surfaces and took it down to the bare wood. After losing my mind using just the Dremel on the table legs {and going through loads of tiny accessory sanders}, Derek went out and bought a paint stripper that attaches to the drill. It works wonders! This 3M product, lasted a long time, didn’t chew up the wood and worked efficiently.

Once everything was naked it was time to stain. If you’ve been reading the blog for a while now, you might know that I’m a color-commitment-phobic. {That’s why I didn’t want to paint them.} I stood in the stain aisle for about 20 minutes…thinking. I walked out with the perfect color. Turns out it’s nearly identical to what I started with. That’s totally fine, I thought they were pretty–they just had a rotten finish on them. The real bummer is that to you, at home, you probably won’t be able to see much difference in the before and after. You’ll just have to take my word on it. The look much better.
I put three coats of oil based polyurethane–I chose Varathane–on each table. Since the weather turned chilly again and I’m still cat sitting {any my guests tend to be on the ornery side} we had to do some of the finishing in our tiny front room…the only space that can comfortably be blocked off from all furry footprints. I could just imagine a perfect glossy finish with cat hair and paw prints embedded in it. But, the crisis was avoided and the nearly-finished products are looking stellar–if not much different.
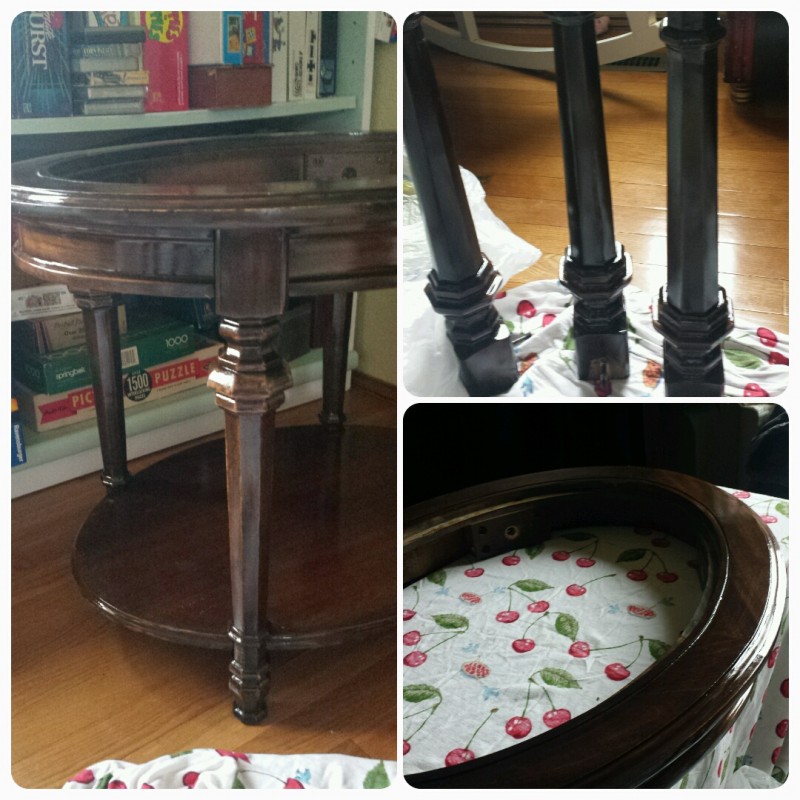
Once these are all done, we’ll be starting on the coffee table. It’s been a lot of work–lots more than I had imagined from the get-go–but I’ve learned a lot and this is by far the most professional furniture redo I’ve ever done. Color me pleased.
by Amy | Mar 16, 2015 | Uncategorized
A few weeks back my schedule was saturated with sessions. I’m finally coming to the end of processing some of those sessions and I’m so very happy with the results. You’ve already seen Jordan’s snowy senior session from that time frame. Now I proudly present…Brooks! I had so much fun on this session. Newborn boy photography is such a sweet treat–especially since I get to break out the tiny-ties!!

He was welcomed into this world by a very loving mommy, daddy, big brother and golden retriever. I was welcomed into the home to shoot these precious images by the proud parents and the big brother–who wasn’t wearing pants, but was bearing a bo-staff, a la the Ninja Turtle Donatello. He was a little apprehensive of having me in his house. His mom was apprehensive about him not wearing pants. But the tension was lifted once I proved myself a true Turtles fan–I sang the theme song and named all the turtles and their choice of weapon. {Donatello happens to be my favorite too.}
Anyway, once we were all on happy terms we had a lovely session. These two brothers are just adorable. And so photogenic! First sibling portraits are always such a treat to shoot.

Brooks was atypical in the fact that he stayed awake for nearly the entire session. Usually once a baby is snuggly warm and resting on super soft blankets and pillows they just can’t help but fall asleep. Not Brooks! He was so alert and well behaved. Just look at these big, curious eyes!


Eventually–he did dose off for a little bit. Maybe it had to do with the cozy hat on his head….

Brooks’ daddy is a hunter. So, we took a few moments to get some images of this future sure-shot with a special home-made blanket…and of course Brooks’ furry sibling.

I’m so very grateful to have been invited into this home to capture these first portraits. Thank you so very much for trusting me with these precious moments. Your flash drive will be in the mail this week!
Amy
by Amy | Mar 14, 2015 | Bible Reading, Blog, The Art of Faith

Thanks to everyone who gave positive feedback about our latest adventure: Memorizing the entire book of Colossians. I’ve had several inquiries about how we actually did it…what it looked like day-to-day. So instead of emailing each of you individually I thought I’d tell you about my experience and pull together a few resources for you as well. {Call me lazy if you must…}
If you look around online, you’ll find that most “big chunk” memorization techniques are pretty much the same. Memorize one verse on the first day. The next day review the first verse and add one more. This is basically what we did, but realistically there were a few changes. As much as I wanted to stick with a rigid plan, this is actually a more accurate picture of how we memorized the whole book.
Day One–Memorize Colossians 1:1. Read the verse aloud 10 times. Say it 10 times from memory. {Easy peasy. Took about 5 minutes.}
Day Two–Memorize Colossians 1:2, review 1:1. Review 1:1 by reciting it several times {this changed from time to time but usually about 5-10 times.} Read 1:2 aloud 10 times. Recite 1:2 from memory 10 times. Say both verses once.
Day Three–Memorize Colossians 1:3, review previous verses. Review 1:2 by saying it several times, read 1:3 ten times aloud, recite it 10 times from memory, say the whole thing once.
Okay. You get the picture. Keep doing this day after day–adding only one verse at a time.
Now–When that passage of Scripture started to get lengthy the plan changed a bit. A lot of times, we only reviewed the previous verse by reciting it once or twice, just to save time since reciting the whole thing started to take up more and more time. Once we crossed over the half way mark, there were some days we didn’t even review everything we knew up to that point every day. By the time you are to Chapter 3, verse 1, 1:1 will be almost second nature to you. In fact, the whole first chapter will seem so easy to recite you could do it in your sleep. So…sometimes we would only recite the chapter we were working on, or a chunk of verses surrounding our new verse.
We saw memorizing as a team sport. I highly recommend working with your spouse–if you have one. It’s fun. For real. We did a lot of memorizing while we road tripped. In this case, it wasn’t safe for Derek to take his eyes off the road to read the verse 10 times, so I did it for us. I’d read the verse 10 times aloud. He’d repeat it back. Then I’d recite it from memory. When we recited all that we knew we would alternate verses. When we weren’t together–we just did our memorization individually and checked in with each other…making sure neither of us fell behind.
Verse numbers? Most resources you find online will tell you to memorize the verse numbers. Lots of resources suggest that when you recite a verse you say it like this:
Colossians 1:1 I, Paul, an apostle of Christ Jesus, by the will of God and our brother Timothy. Colossians 1:2 To the holy and faithful brothers in Christ at Colosse: Grace and peace to you from God the father. Colossians 1:3 We always thank God the father of our Lord Jesus Christ when we pray for you, Colossians 1:4…..
Maybe that will work for you, but it didn’t work for me. Breaking up the text with the verse numbers ever time I recited it just broke up the meaning and caused me to lose my train of thought. Instead, I found that I could keep track of each verse in my head. About every five verses I made a point to remember which verse number I was on so I couldn’t get too far off track. And since we did recitation together {alternating verses} usually Derek would catch my mistakes and I’d catch his.
With the method outlined above it’s plausible to memorize Colossians in 95 days, as there are 95 verse in the book. It took me much longer than that. I started in July. I finished at the beginning of February. That’s about six months–nearly twice as long as the estimate. But that’s okay. Life happens. We get sick and unmotivated and family comes to town and Christmas festivities take over our brains. That’s fine. At first when my deadline came and went I was a little disappointed, but in the end I realized that it’s not how fast we were doing it, but that we were doing it at all. That we’d stayed committed and were willing to see it through to the very last verse.
So that’s my story. Here are some resources for you as you set out on your very own Scripture memorizing journey. Find a technique that works for you and go for it!
Here’s a post from someone who grew up participating in Bible Quiz. He explains how he memorized more than 500 verses in a single year.
This is an amazing PDF that explains the technique I described above as well as information about retaining memorized Scripture, how to choose the book you want to work on, and why it’s such an enriching experience.
And this is a blog post with 10 good reasons to memorize a big chunk. You can totally do this!