by Amy | Jan 8, 2013 | Blog, The Art of Projects, the house
So when we moved in to our house here in Minot I was still blogging at my old blog. Since then I’ve moved here. To this prettier, roomier site. When I posted the carpet-rip-up post yesterday I realized that maybe I should house all the house before photos here. If you are a long time reader, you probably saw this post in July when we closed. Otherwise, enjoy these befores.
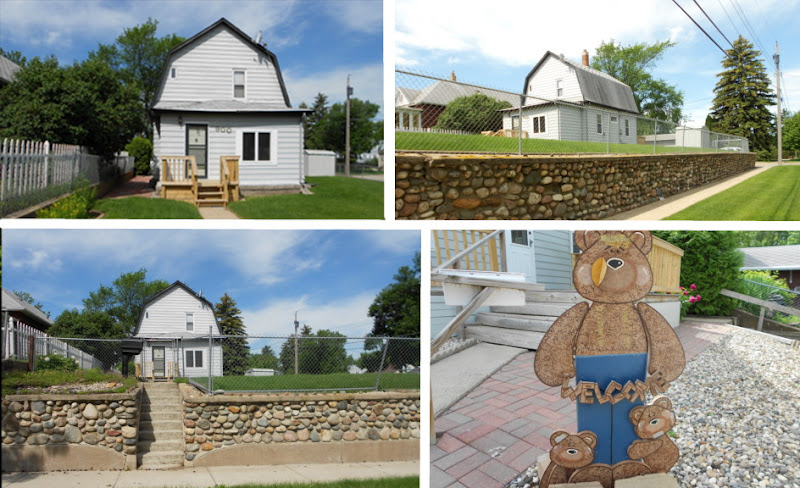
1. I was pleasantly surprised by the size of the house and yard. PS…the weather is just fantastic up here. It’s a dutch colonial revival circa 1911.
2. I love that the house sits up above the sidewalk. How cute is the stone wall?
3. I’m trying to convince Derek that we need a white picket fence. But in the mean time we’ve given the decks a
makeover.
4. I found this gem in the back. Maybe it’s thrown in with closing costs?
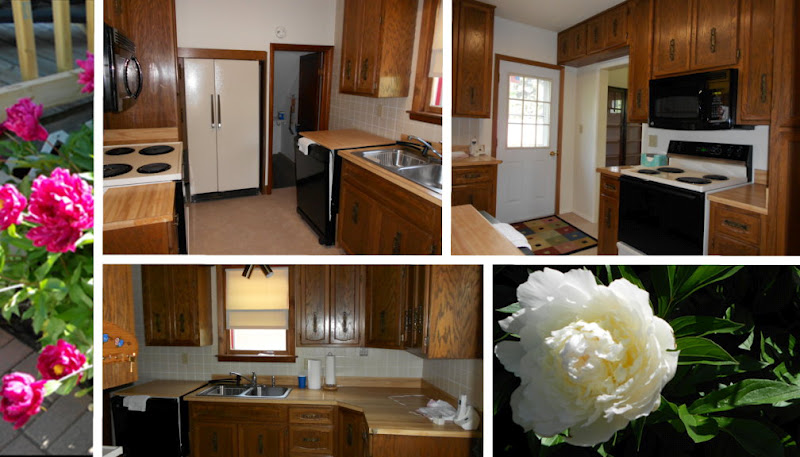
1. In the backyard peonies are in full bloom.
2. The kitchen is small but efficient. That door goes to the basement.
3. There’s the door to the back deck. I’m in love with the fact that the cupboards go all the way to the ceiling. I’ll need a ladder to get up there!
4. The kitchen has a lot of potential…but it’s so dark! We’ll have to change that.
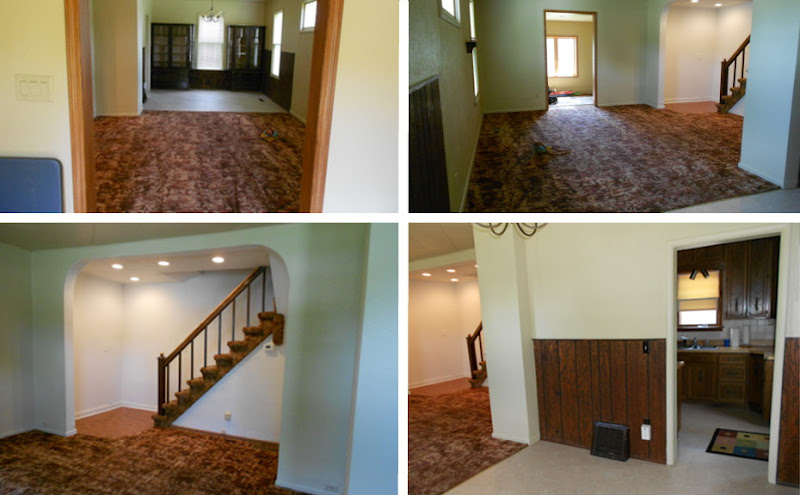
1. This is the view from the front sitting room. That’s the
living room with the
brown carpet, then the dining room beyond that.
3. LOVE the open stairway. I’ve already given that
a redo. All that can lighting is just begging for a gallery display on the wall there.
4. Looking into the kitchen from the dining room. What would a house be without some wood paneling?
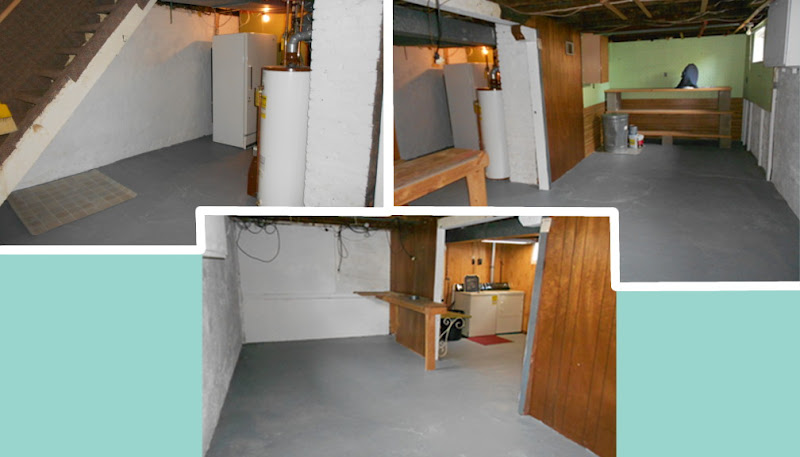
Here she is. The basement.
1. Stairs coming down to the basement from the kitchen.
2. Past a makeshift wall looking back toward the freezer from photo 1.
3. Looking toward the base of the stairs…To our “laundry room.”
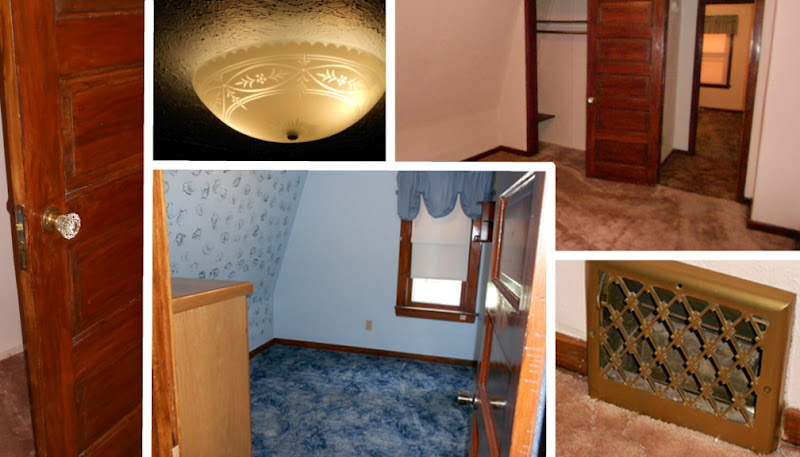
Now let’s venture upstairs. There are three bedrooms and a bathroom up here. But they were hard to photograph. I didn’t want to post just photos of empty corners of rooms. So I’ll give you a few highlights.
1. Some of the doors have the original crystal knobs!!
2. While the house needs lots of updating, there are definitely lots of charming features, like these vintage ceiling lights.
3. Looking from the master bedroom across the hall to another bedroom.
4. Vintage vent covers are beautiful.
5. Another bedroom. Don’t ask about the paint job. The plan is to tear down the wall that joins this room to the master bedroom to make one large suite. Then we’ll add a third bedroom to the basement…stay tuned!
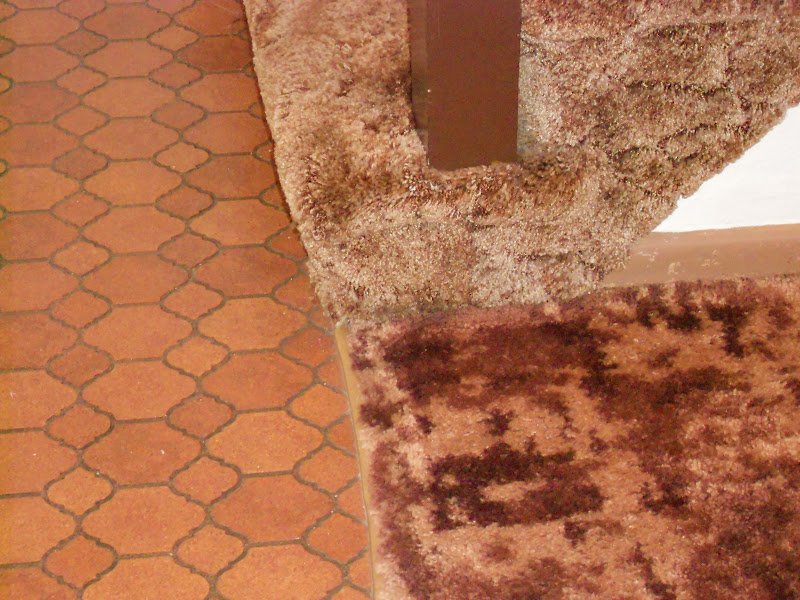
Oh, and one last thing. Did you notice the carpet? This is a classic shot of the flooring in this house. In the living room these three outdated flooring piece come together to form one nasty trifecta. As of yesterday the last of the
brown flooring on the first floor is history.
Yes…there is a different dark brown carpet running up the stairs and in the living room. And yes…that is linoleum and the landing…
More later!
Amy
by Amy | Jan 7, 2013 | Blog, The Art of Projects, the house
If you saw the Facebook post I made last night…you know I was up to something.
Here’s the thing. Derek went to a friends house to work on a project for a while. Ever since the Christmas hubbub came to an end I’ve been itching to do a project. Not a craft {I did plenty of those leading up to Christmas time} but a real, serious project. And I had my eye set on a certain, brown, shaggy, smelly prize.
I have been threatening Derek for a week now.
“I’m going to do it. Don’t test me. You’ll come home and that carpet will be gone.”
And guess what. Last night I did it.

At 5:30 I got off the couch. I had just watched the season 2 finale of Downton Abbey in preparation for the season 3 premiere last night. A friend was going to come over for Revenge at 7:30. Two hours is enough time to rip up carpet and padding, remove a few staples and drag it all to the dumpster, right? Sure. So I went for it.
Here is where the house started last night. If you really want to know why I hate this carpet…look all the way back to this post. Where I show off our many shades of nasty brown carpeting.

First I moved all the furniture out and covered things up. I have this fear of old dust. It’s rooted back to my studies of the crew who opened King Tut’s tomb. They breathed that ancient dust and got real sick-like. I realize this isn’t ancient Egypt. But caution never hurt anyone.
Then I started tearing it up. Which, honestly went very quickly.

Once the shag was up I was simply disgusted at how NASTY the padding and belly of the carpet was. No wonder it has been smelly.

Next I rolled up the padding…and took all of it to the curb for garbage pick up. Finally, I rolled the carpet as good as I could. Then I started working my way toward the door. And here is where things got tricky. Carpet is heavy. And this stuff all came up in one piece. So I was dragging it through the dining room out the kitchen door, onto the deck. I got it about a full foot through the door when it got stuck. After pulling and pushing, grunting and cursing I resigned myself to the truth that I couldn’t budge it. Either way. You just can’t make this stuff up.
I couldn’t get it back inside. Or further outside. So I sat down, all sweaty…letting the cold breeze blow through the door that wouldn’t shut. Then, miracle of miracles…Derek got home. It’s funny how much easier it was with two people.
And there you have it. The brown carpet is simply a memory. Remember when we moved into that house in Minot and it had terrible brown carpet? Ahhh…I’ve been waiting so long to use past tense when talking about that wretched stuff.
But now…present tense. My living room is covered in bubble gum pink linoleum. Woof. Gross, yes. Up I still consider it an upgrade.

The project continues. I promise, some day soon I will have flooring from this millennium.
by Amy | Jan 3, 2013 | Blog, The Art of Projects, the house
The light in our basement went out the other day. Our basement is very unfinished. The previous light was a fluorescent fixture that hung from a couple of ducts and plugged into the wall above the dryer. It’s just one of several very ghetto-rigged lights down there.
So, we need a new light. But until we get one Derek took one of our end table lamps and sat it on top of the dryer. When we flip the switch it comes on and illuminates that little dingy corner with warm soft light.

{Don’t be fooled by the paneling. It’s just those two sheets. Then concrete all around. Pretty shady.}
Derek told me to start thinking of what kind of light I’d like above the laundry station. And I will. Because in 2013 we’ll start {maybe finish?} working on the basement. The finished product might be a long, loonng way off, but each time I flip on the switch to feed Panda, or grab something out of the freezer, or fish out some craft supplies…I see the lamp, and I can see where we are moving. Our basement won’t always be dirty and dingy. Eventually it will be the kind of place where guests sleep and pretty lamps live.
It’s a reminder of where we are headed. Where I’m headed. Where things are headed. I love it. It got me thinking…what are other little changes I can make in my life and my house that will remind me of where things are going? It’s wild how sometimes a small change can shed some light and bring a little hope.
What can you do to remind yourself of the hope this year will bring?
Amy
by Amy | Dec 17, 2012 | Blog, The Art of Gathering, The Art of the Kitchen
Last night we hosted our annual Jingle Mingle holiday party. Of all the parties I have the privilege of hosting every year, the one we host at Christmas is my favorite. This year I kept things simple by setting up a hot chocolate bar {with all the fixin’s} and of course cookies and treats.

Here are my tips for a stellar hot cocoa bar.
1. Set out a canister of hot chocolate instead of packets. {So guests can make it as strong as they like.} A recipe for my mix is below.
2. Offer a variety of stir ins. Crushed peppermint, whipped cream, marshmallows, cream, and Kalua are all good options!
3. Keep the milk hot. Don’t send guests running to the microwave. Keep the moo juice warm in a crock pot.
In addition to cocoa powder I also made those cute hot-chocolate-on-a-stick’s that have been cropping up all over the Internet. Now, don’t be intimidated. They really were not as hard as you’d think. I followed this recipe for the chocolate blocks…and used this Alton Brown recipe for the marshmallows.

Word to the wise…Homemade marshmallows are the bomb. So good! And don’t freak out if you don’t have a fancy Kitchen Aid mixer. I used a little hand mixer and it worked just fine.
When I poured the fudge blocks into my pan I sprinkled crushed candy canes on top to make a rich peppermint hot chocolate block.
When just stir into a cup of hot milk. Very tasty!
To make your own hot cocoa mix follow this recipe:
Mix all these ingredients together…
1 Cup unsweetened cocoa powder | 1 Cup powdered sugar | 1 tsp cinnamon
To make flavored hot cocoa mix these ingredients together…
3/4 Cup unsweetened cocoa powder | 3/4 cup powdered sugar | 2/3 Cup of your favorite flavor dry coffee creamer {like CoffeeMate}
Stir 3 spoonfuls into a mug of hot milk. Yummm!
If nothing else…make the marshmallows. Thank you to Make & Takes for the awesome idea that has swept Pinterest this holiday season. You rock!
See you tomorrow!
Amy
by Amy | Nov 28, 2012 | Blog, Crafts, The Art of Gathering, The Art of Projects
Is there anything better than a pretty cake stand?

Not in my book.
Derek actually had to put a limit on my cake stand habit. I’ve got more stands than pans to make cakes in. But c’mon. They. Are. Awesome. Even the most aggravating icing job looks down right delectable when displayed proudly on a cake stand. Beyond their ability to display desserts {of all kinds…not just cakes, mind you} they are maybe the best decor around.
On Thanksgiving I threw together a quick centerpiece. It wasn’t anything special. It took all of 5 minutes to make…I didn’t think it was extraordinary. But my mom did. I thought I was using a trick that everyone knew…but she didn’t…and you might not either. So, I’ll tell you.
Most basic cake stands {the kind you get with a globe to match…like in the picture} are multi-tasking. Yes, that is right. Multiple uses for one beautiful piece of hostess-ware. Here’s the secret…make it do a handstand.
Yep. Take the globe off. Turn the stand upside down, so the cake plate is resting on the table. Most stands have a fluted base with a hollow center. Grab the glob, turn it upside down, and put the handle into the base.
Viola.

Now you have a truffle dish. Or in my case, the basis for a last minute centerpiece. {Recognize that paper wreath?}
For Thanksgiving I filled the dish with nuts {the kind you scoop into a bag at the grocery store} and pine cones. Now {since it was such a hit} it’s filled with Christmas bulbs {the cheap kind from Family Dollar}.

Derek uses this as an argument against me getting more hostess-ware. “Why do you need a truffle dish, when the cake stand does both?”
Um…duh…for those occasions when I’m making cake an truffle. Or when I want to use it as a centerpiece and bake a cake. I’m not budging on this. A girl can never have too many cake stands. Period. End of story.
If you don’t have one. Go buy one. You won’t regret it. It can take your blah-domestic skills to…whoa! Domestic skillz. {Yes, that’s right, the kind with a “z” at the end. That’s how cool you’ll be.} And make sure it can do double duty.
Amy
by Amy | Nov 27, 2012 | Blog, Crafts, The Art of Projects

Here’s the thing. A few years ago {about three to be exact} I found an awesome old glass cabinet door in my family’s barn. You never know what you’ll find in there. There was something so…perfectly rustic about it. I needed it.
So I asked my dad if I could have it. He obliged.
And I convinced Derek to haul it back to Florida from Indiana.

Once I had it home, suddenly I was stumped. And I stayed stumped. For years.
I moved the glass door from Florida to Oklahoma to Louisiana and finally up to North Dakota. By the time we got here Derek was less than pleased that I had dragged this piece of cast off garbage all over the country, only to let it sit in the closet. He even wanted to throw it out. Lucky for me {and the door} I tucked it behind the tool chest when he wasn’t looking.
Then a few weeks ago, I decided if I didn’t use it before Thanksgiving…it would be tossed out. It was beautifully rustic. I didn’t want to mess it up…but it was time to be bold or send it to the curb. So I made a plan and followed through.
I gave the old glass door a coat of custom chalkboard paint that I mixed up right here in my living room in a paper cup, and added a few painted flowers. I wrote a little message, and hung it up in the guest room. And I love it.
Doesn’t it feel good when you mark something off the to-do list that has made it’s home there for years??

Okay, so I bet you want to know how to make that awesome chalk board paint. It’s easy…but you may need to make a trip to the hardware store.
First prime your surface with a coat of paint. Then mix up your chalkboard paint:
Put 1 TBSP of unsanded grout into a disposable container. Add a couple drops of water and stir until you have a smooth thick substance. Then add 1/2 cup of paint. Stir again until it’s mixed up real good like. Easy, right?
Your mixture will be thick. You can double, triple, quadruple…this recipe for bigger surfaces.
Apply it with a foam brush to get a good even coating without brush strokes. After it’s all dry lightly rub a piece of chalk on its side across the surface to condition it. Wipe the slate clean and use your new board!
Happy Crafting!
Amy
PS…For those of you following along, I was doing this project when I made that tragic oopsie poopsie on my carpet…
This post is partying at Between Naps on the Porch and these other great sites.
by Amy | Nov 16, 2012 | Blog, Crafts, The Art of Projects

You know what’s pretty? Pottery Barn stuff. All of it. Every season. Every stinking item in the catalog.
You know what I can’t afford? Pottery Barn stuff. Any of it. Any stinking item in the catalog.
But I really want a pretty PB house. I’ve started a board on Pinterest of things I think I can recreate. I’ve started frequenting this amazing site called Copy Cat Crafts. It’s chock full of knock off tutorials.
That’s where I got the inspiration for this wreath. I think it just may be the prettiest wreath I’ve ever made. {And I’ve made a lot of wreaths. Two which were awarded Grand Champion at the Elkhart County 4-H Fair.} Doesn’t it look sharp on the piano? Don’t mind those roughed up keys…It adds to the primitive look.
This is the tutorial that inspired this project. I followed pretty closely, but here is the process I used.
I bought:
1 Wire floral wreath form | A tiny can of silver spray paint | A stack of silver snowflake ornaments {they came in a tube} | An assortment of pretty glittery/silver snowflake ornaments
I used about 15 ornaments total for my 14″ wreath. You may want a few more. I did all my shopping at Hobby Lobby. But Wal-Mart and the Dollar Tree are known to have good sparkly ornaments too! This is one project where a little gaudy can still look classy. The key is to stick with one color {like silver} and motif {the snowflakes.}
Here is what I did:
1. Spray paint a wire wreath form silver.
2. Snip off tags and hooks from ornaments.

3. Arrange them on the form.

4. Hot glue them in place.

Done. It is so easy…I just couldn’t even believe it. I think it’s a classy wreath. Like snowflakes each one will turn out unique. And I plan to hang it the day after Thanksgiving until January 31.


While it is super pretty, I don’t think I’d recommend hanging it outdoors. I think the elements may be a bit too harsh for this dainty project.
The best part? The PB wreath retailed at $70. Mine cost $15! Yeah baby. That’s what I like. Thank you Copy Cat Crafts for being so inspiring!
Happy crafting. And remember, friends don’t let friends craft alone.
Amy
by Amy | Nov 15, 2012 | Blog, The Art of Design
Today I’m going to give you a beginner’s lesson in design. Let me put it this way…If I can do it, you can definitely do it. So I’ll be showing you step by step how to make this:

From this:

Pretty enough to be a card, right? Well first, let me tell you that you can do this. There is nothing special about the quality of the photo or the skills you need to put it together. My mom took this photo of my family skating a year or two ago. It was snapped on a plain jane point and click camera. {Mom is not a photographer.} All you need is a little imagination, yesterday’s cute elements and this tutorial.
This is a long post…so you’ll have to click through to see the full tutorial.
(more…)