by Amy | Sep 3, 2016 | Blog, The Art of Projects, the house
**This space has been featured on Shutterfly’s interactive album “How to Decorate a Small Living Room.” Click over for more great ideas, cool spaces and inspiration from other talented designers and decorators.***
Tonight is a super special, super exciting night. And yes…it’s very much night. My day has gotten away from me, but I simply couldn’t wait one more day to write this post. I’ve had some busy days lately shuffling my suitcases and precious Panda kitten from hotel to hotel and Derek and I house hunt. Before you think I’m writing a big complainy post, hear me out. Yes, moving rooms has been a pain. But–pretty much every day I wake up and praise Jesus for the miracle of living in Rapid City. Seriously…I cannot believe I get to live here. The thrill of living in the Dakotas still hasn’t worn off and I don’t think it ever will!
Okay. But back to the super special night ahead.
Remember Sam and Katie? Their home was flooded in May after an unfortunate plumbing issue. You can read about that here. Long short version is that the house had to be nearly gutted–and they hired me to help them restore it’s charm. My job included installing baseboards and trim, creating adorable house-age-appropriate window frames, helping choose paint colors, shopping for finishes, eating Dairy Queen on the deck, soliciting help from the church youth group, refinishing furniture, and making a million trips to Menard’s.
Rooms completely refinished include two bathrooms, living room, basement living room, deck. The kitchen was only half pooped but we restored that as well.
Fine…enough of me talking your ear off. Let’s take a tour!
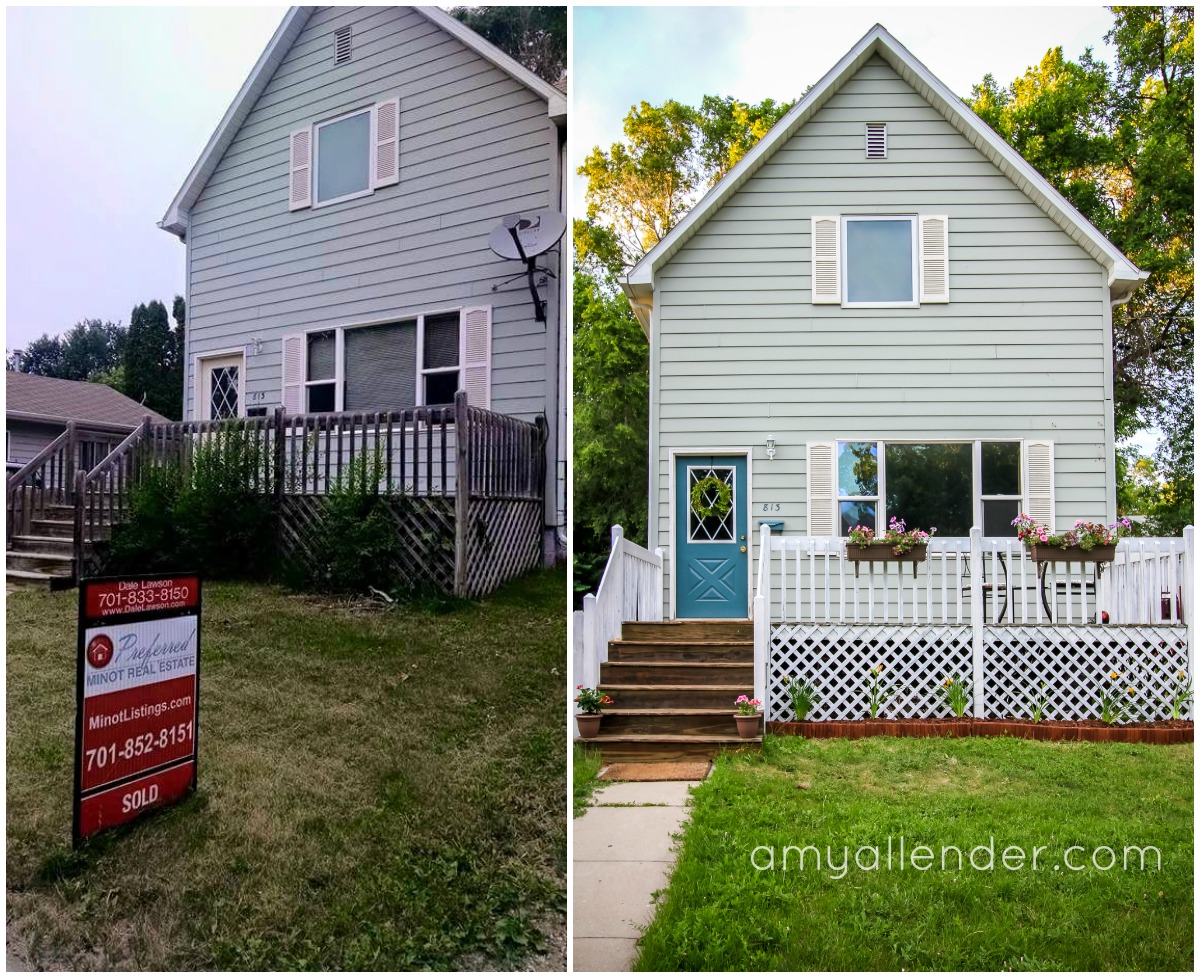
Let’s start outside. First of all, let me state that we didn’t paint the siding. The color shift is from a super cloudy night shot versus a sunny afternoon shot. What we did do–paint and restain the deck/lattice, upgrade landscaping, add window boxes to the rail, paint the door/mail box/house numbers, upcycle old kitchen furniture to deck seating.

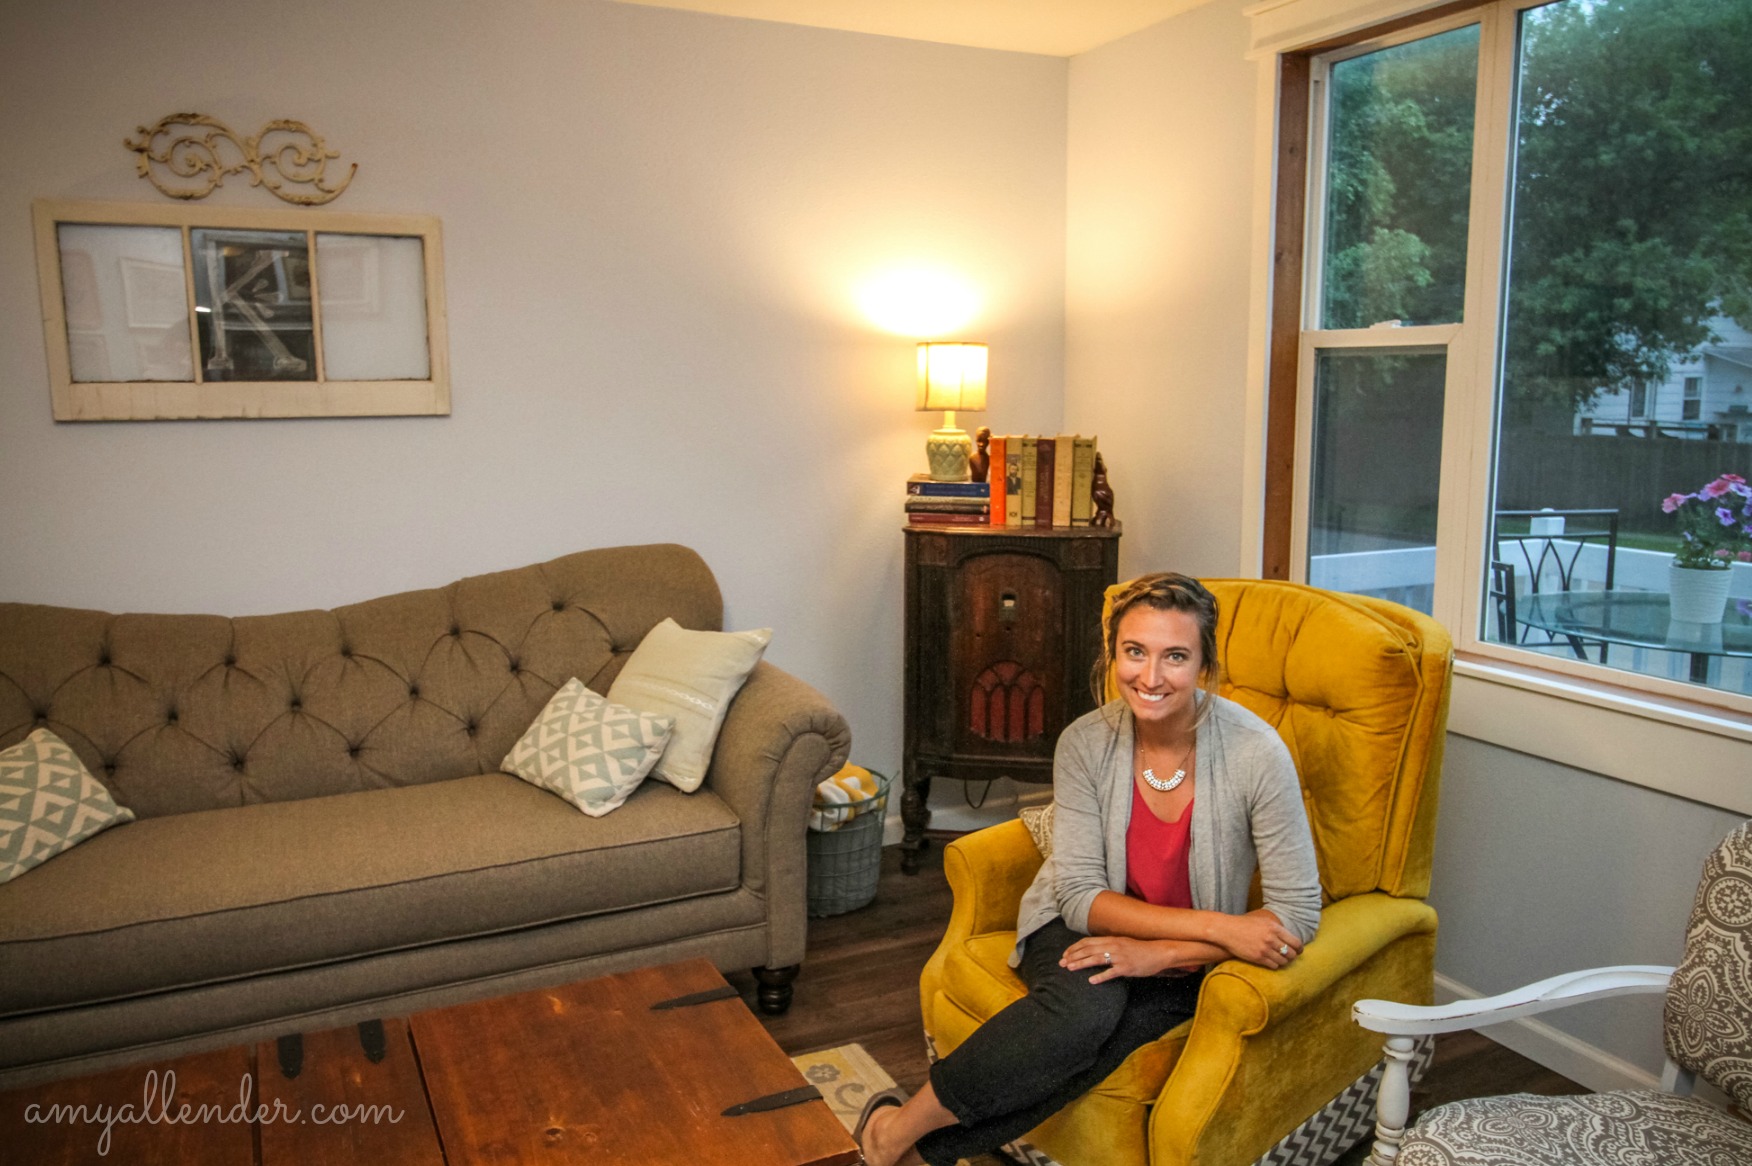
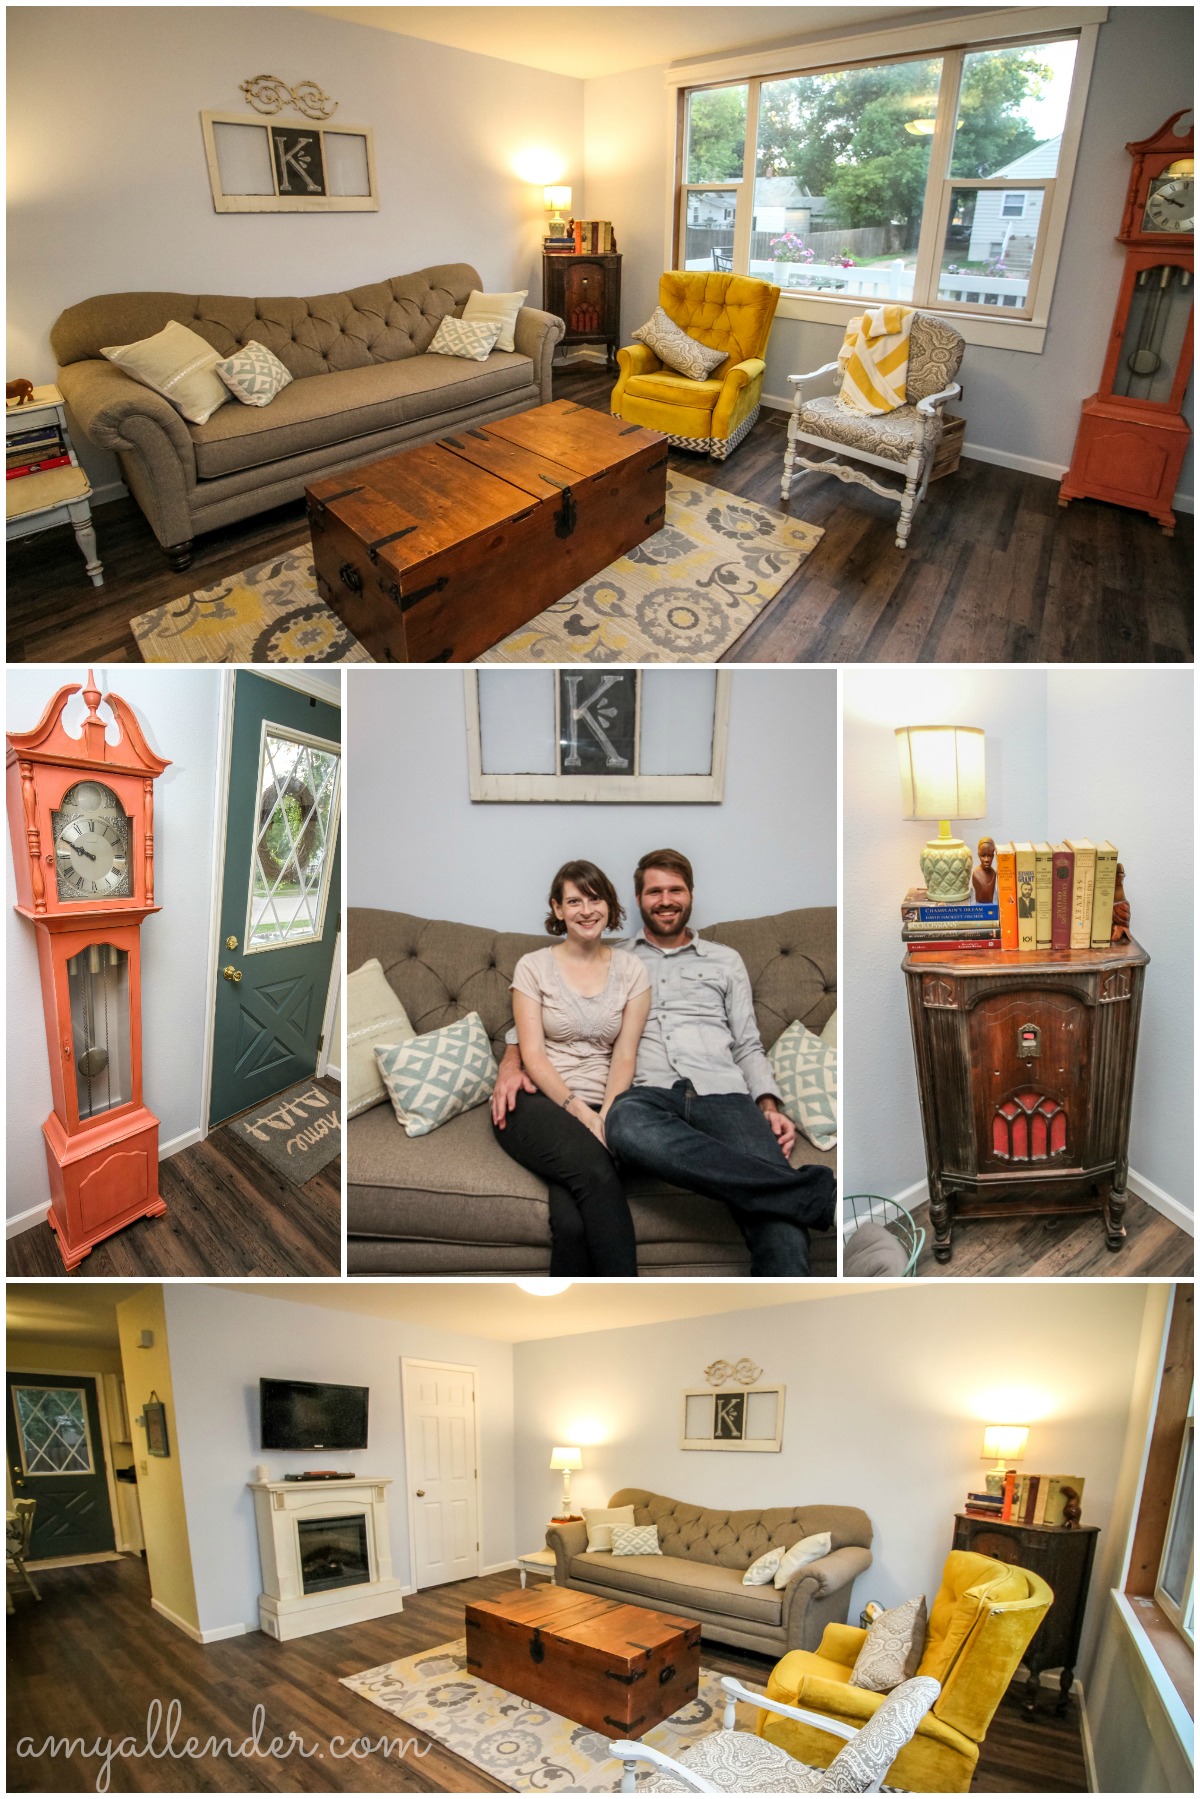
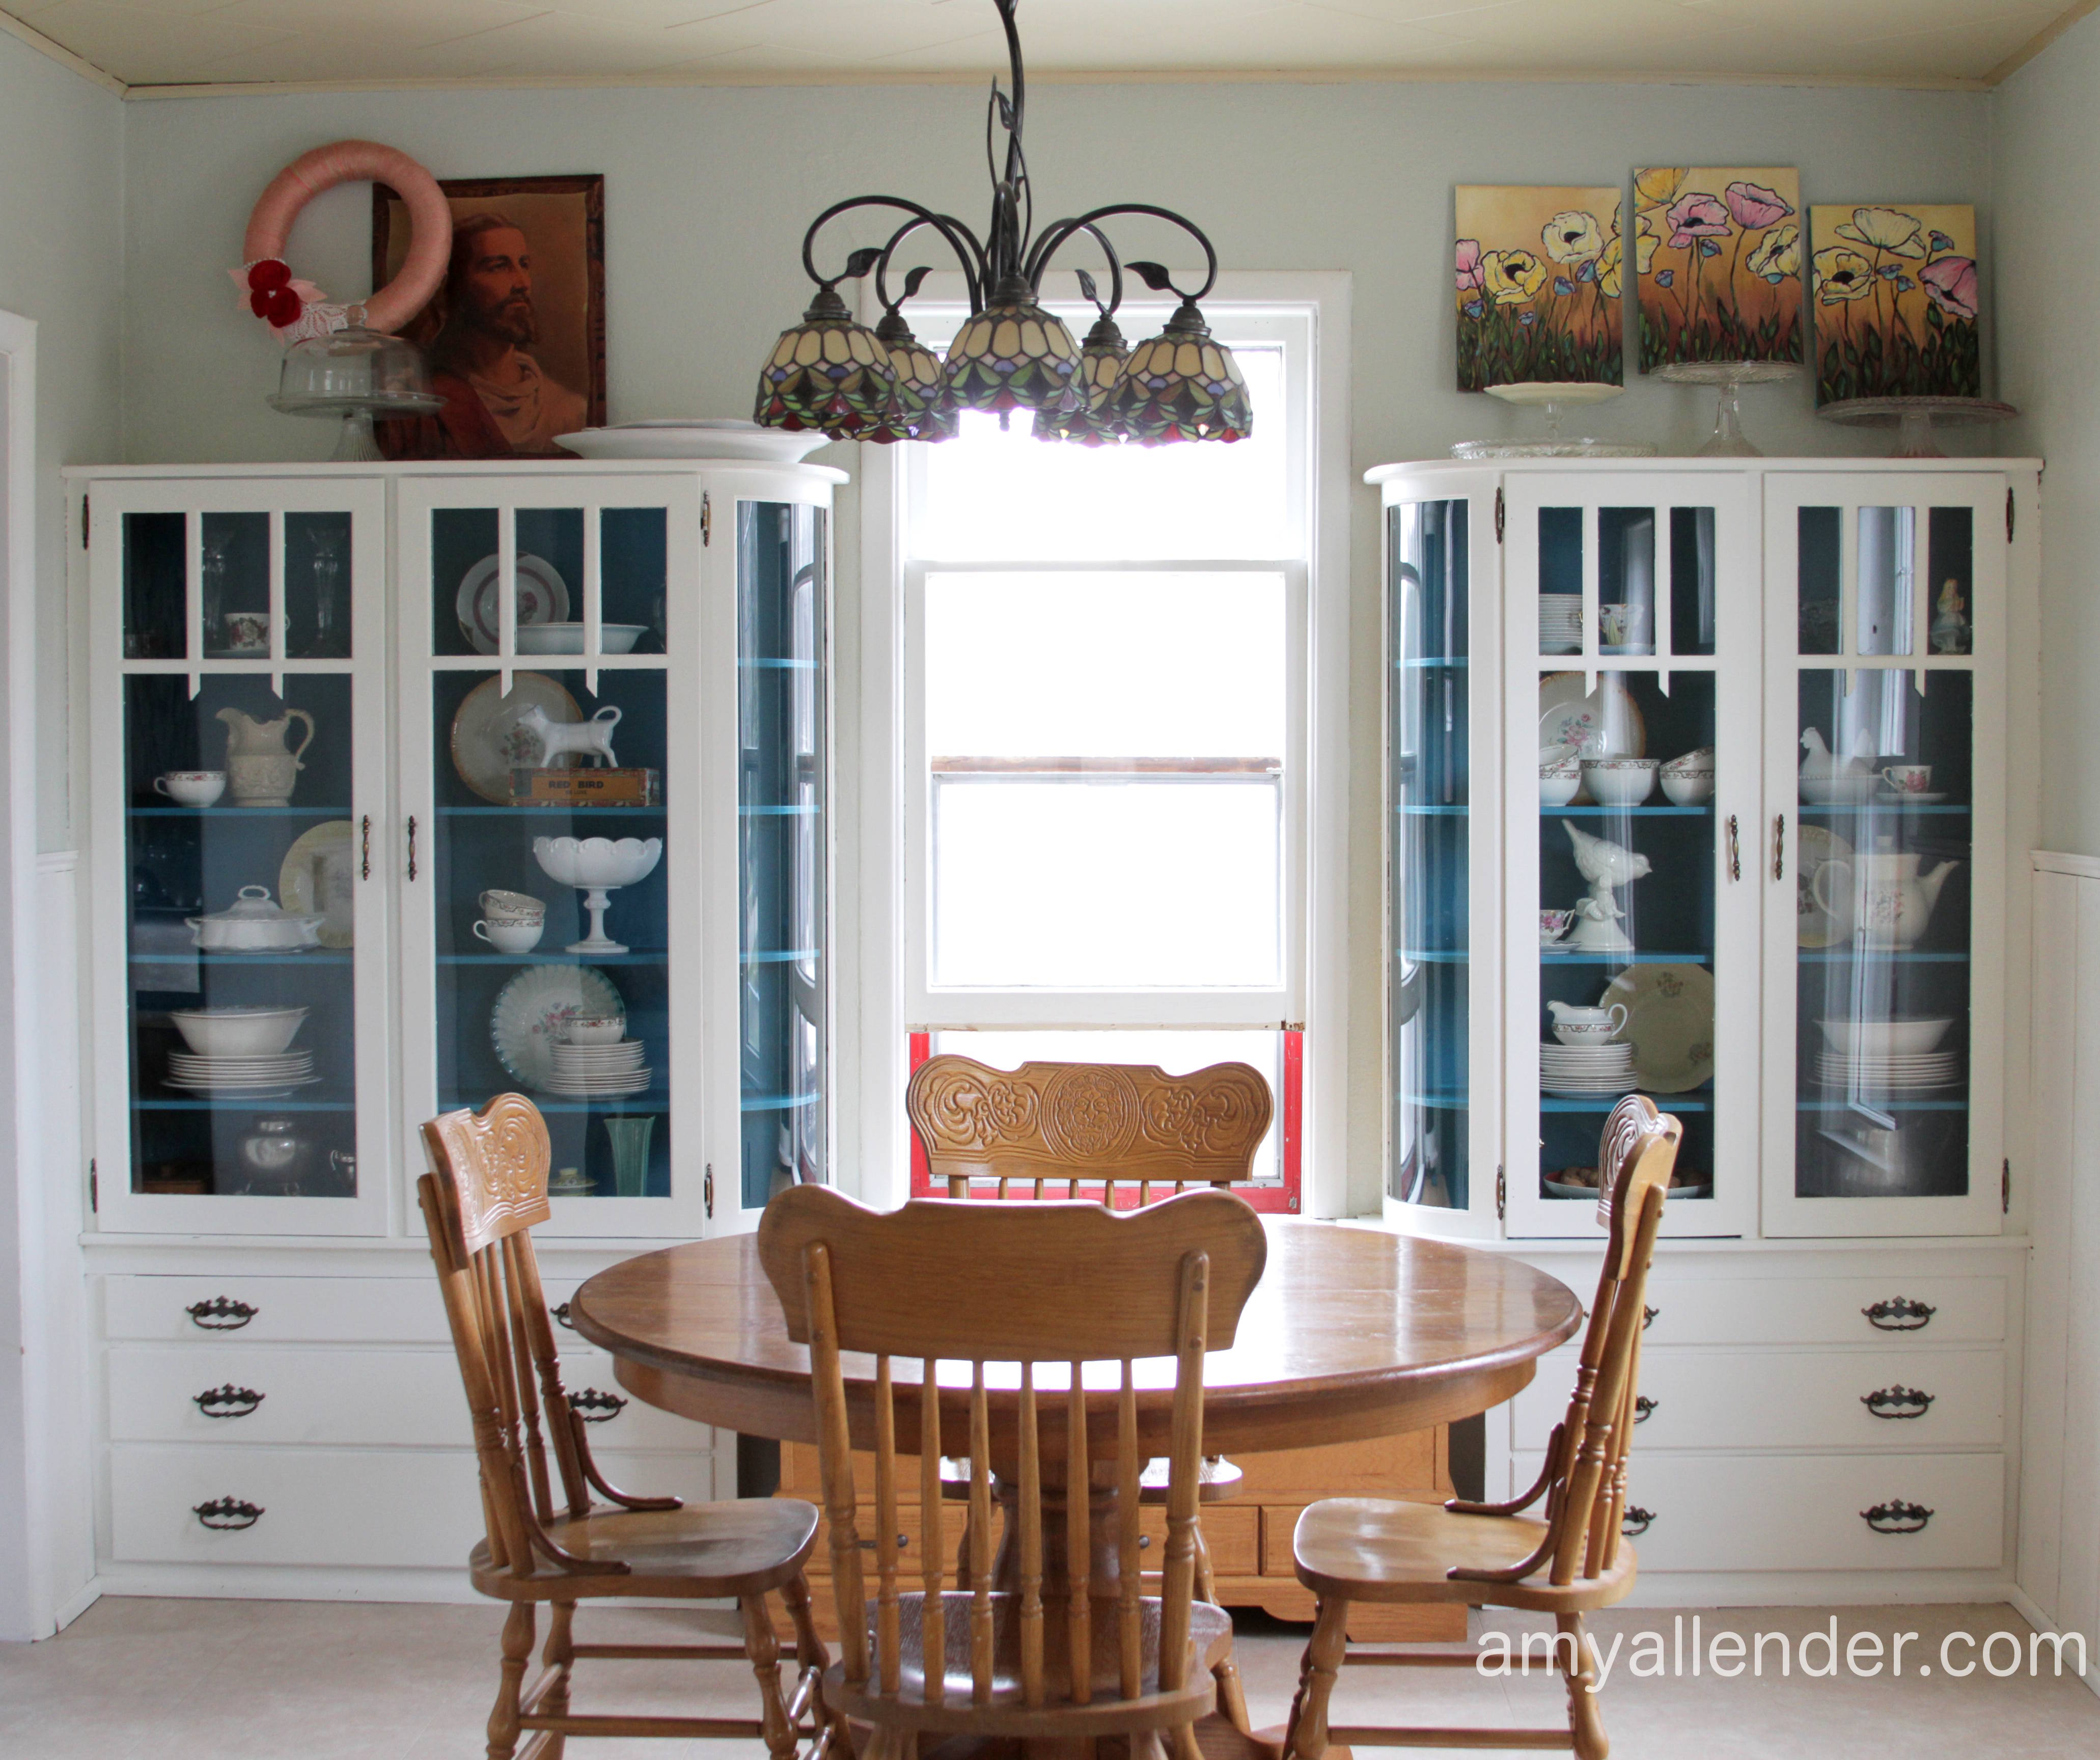
Living room? You got it! Look at this amazing transformation from gutted to completely finished! When Derek saw this photo just now he said, “Oh, is that their basement when it was gutted?” Nope. This is all photos of the living room.
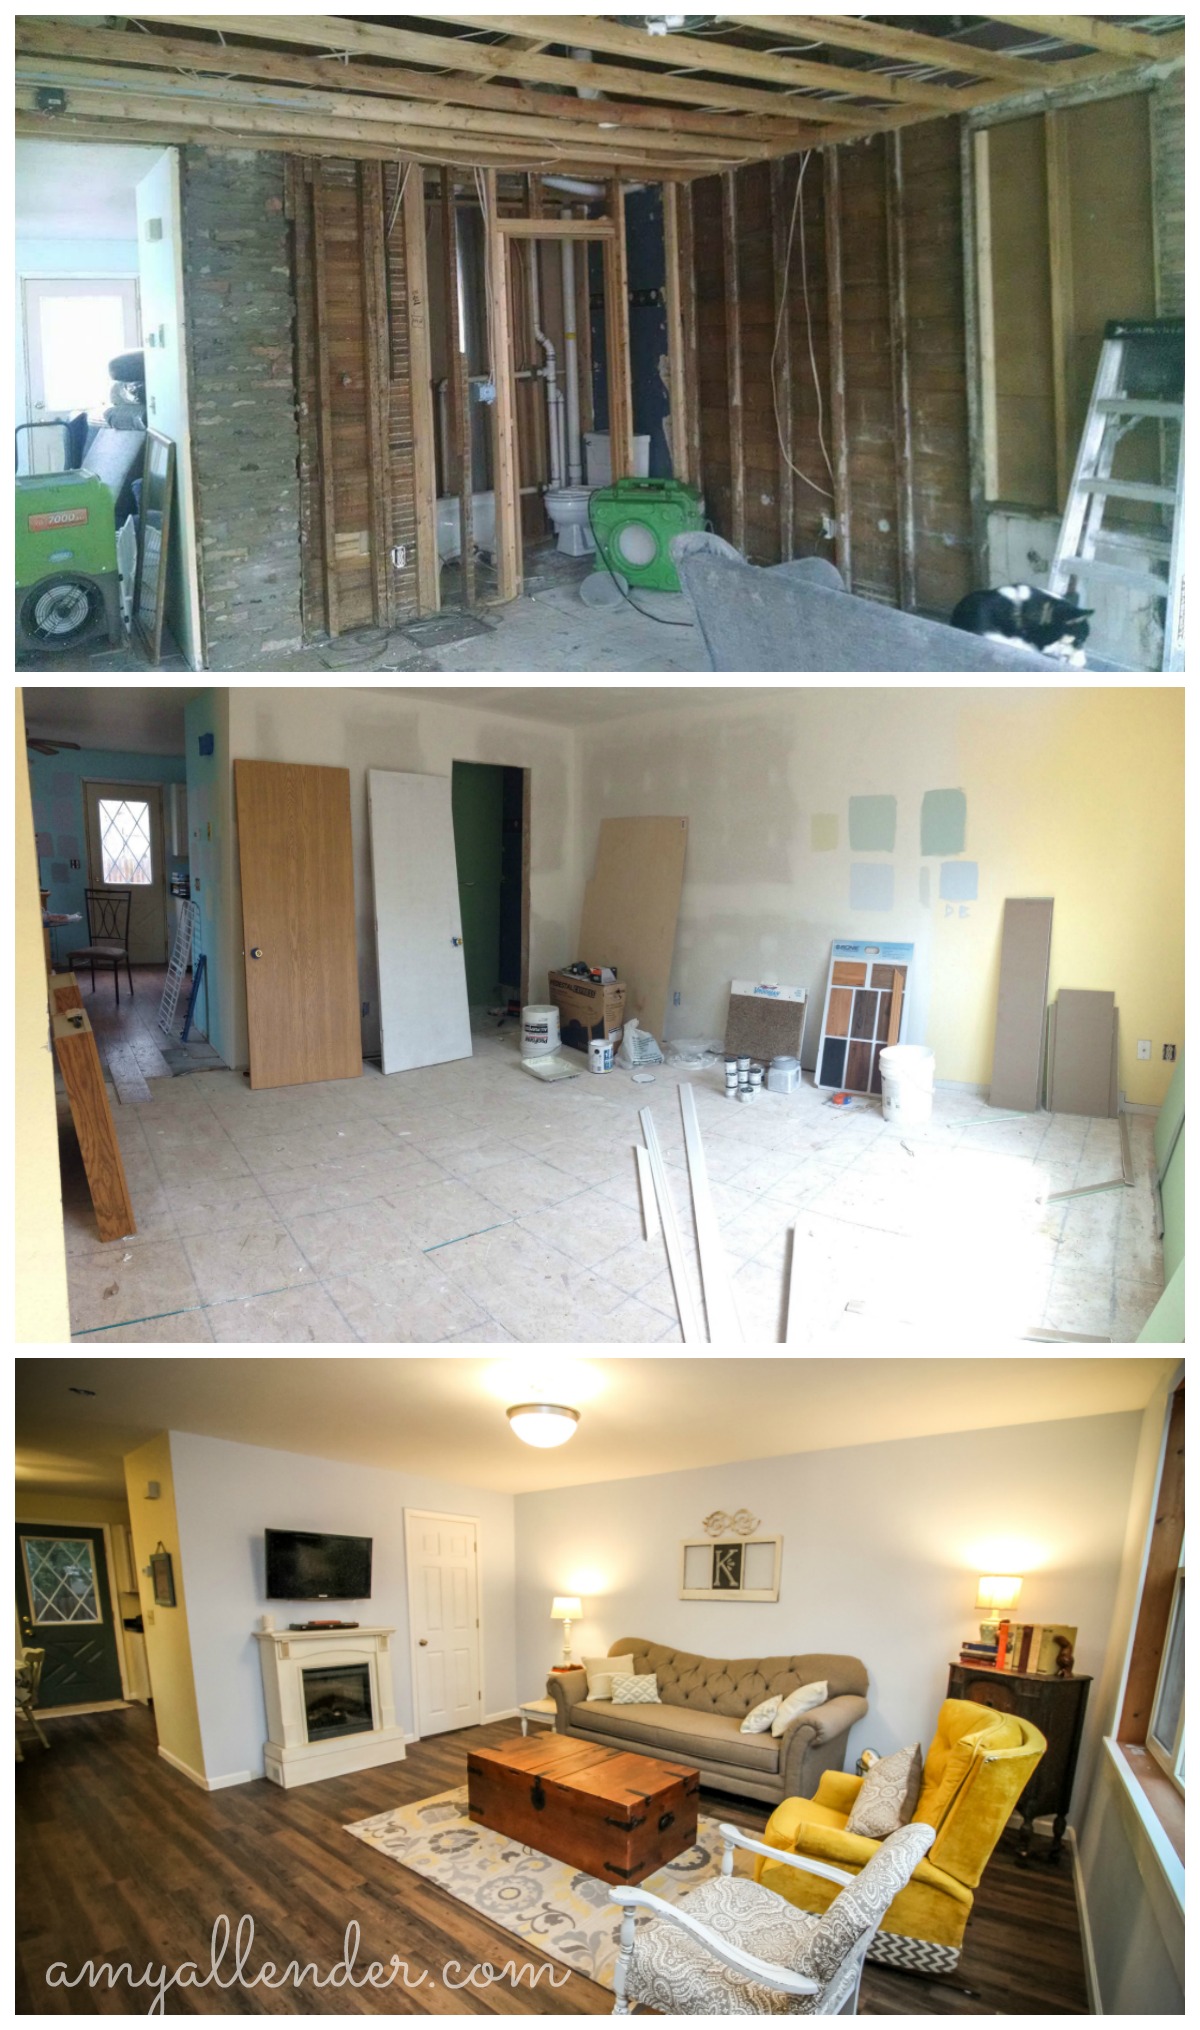
Since this is an old home, Sam, Katie and I wanted to keep it’s original charm–even though we were working with new materials {since the original finishes were a little soggy.} I think it turned out fabulous. Simple. It looks lived in. Classic.
Here’s a little list of what went down. Drywall {not by me.} Painting, new flooring {not by me}, craftsman window trim, baseboards, upcycled vintage radio to blue-tooth speaker holder {that’s like my favorite thing!! the old radio was totally gutted and Sam had the genius idea to use it to hold their speakers}, new lighting and lamps, refinished end table/fireplace/clock, reupholstered chair, cleaned up recliner, gallery wall.
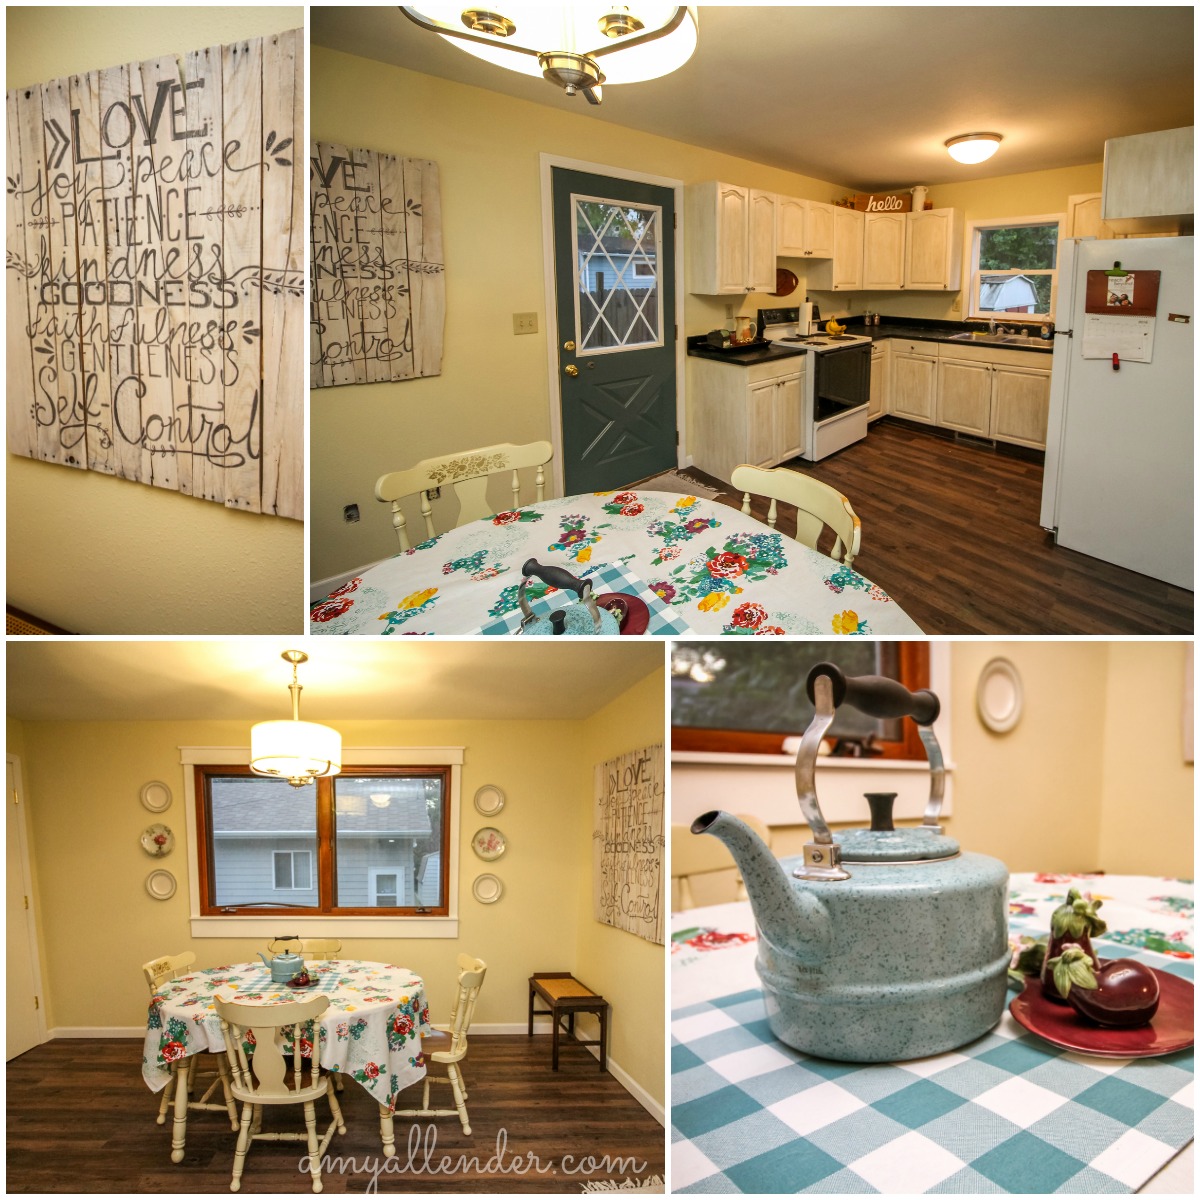
Next, take a look at the kitchen.
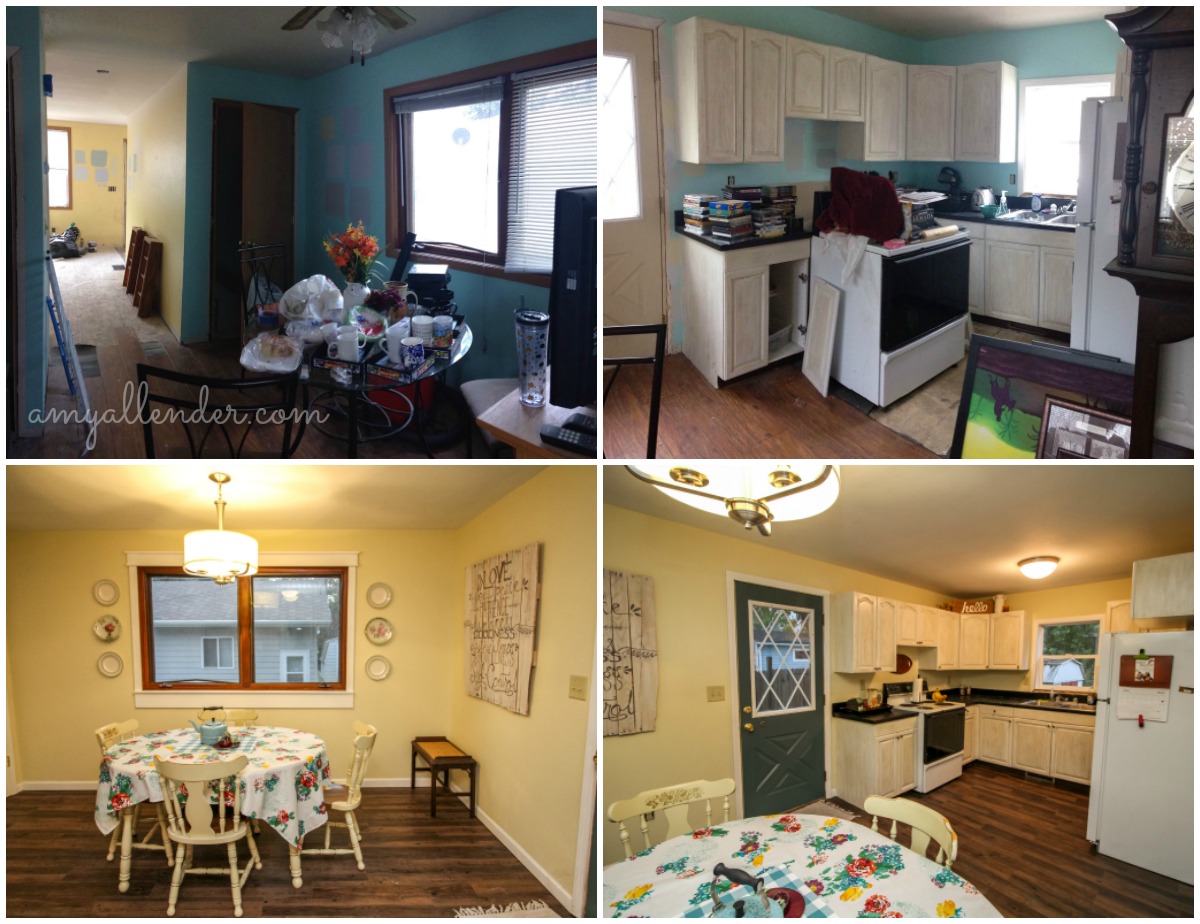
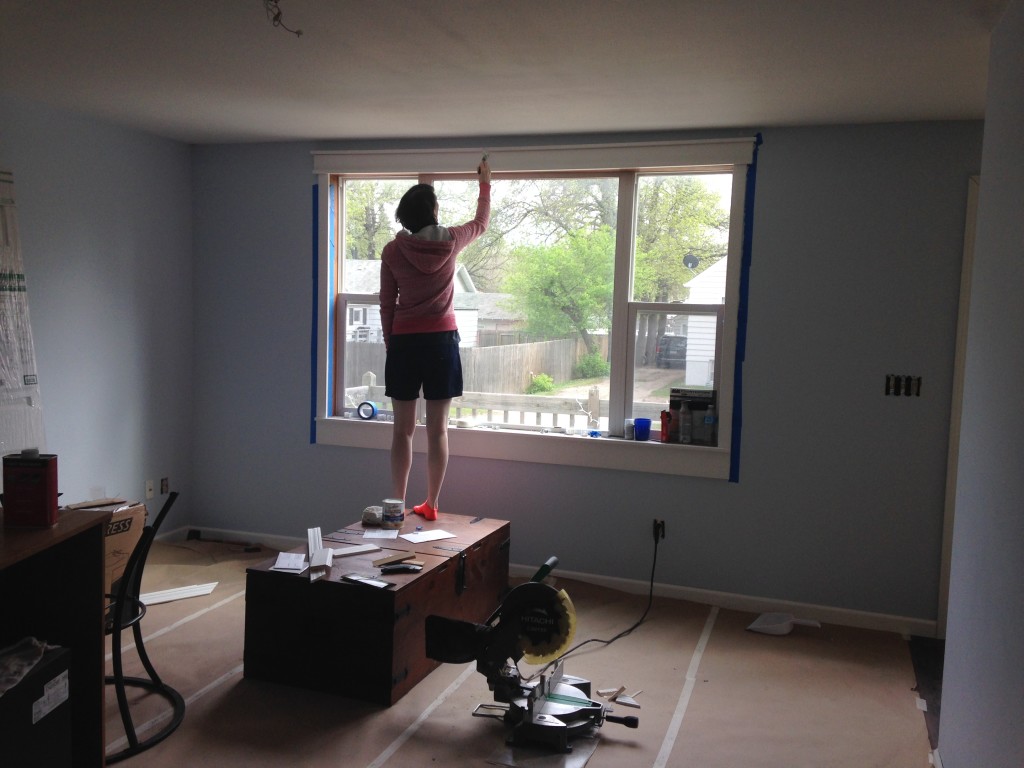
In the kitchen I added craftsman trim to the beautiful window, painted the door, hung new lighting, hung vintage plates on the wall and created a custom piece of pallet art. The room also got a fresh coat of paint and a new floor.
The bathroom where this whole project began now looks like this:

I didn’t have too much to do with this. Just a little help with the floor and paint. But it’s too pretty to leave out. Don’t you love that shower curtain?!
Last, let’s look at the basement. Again, the whole space was gutted. Unfortunately, I forgot to get a total before photo. This is an image of the old closet after the drywall was finished.
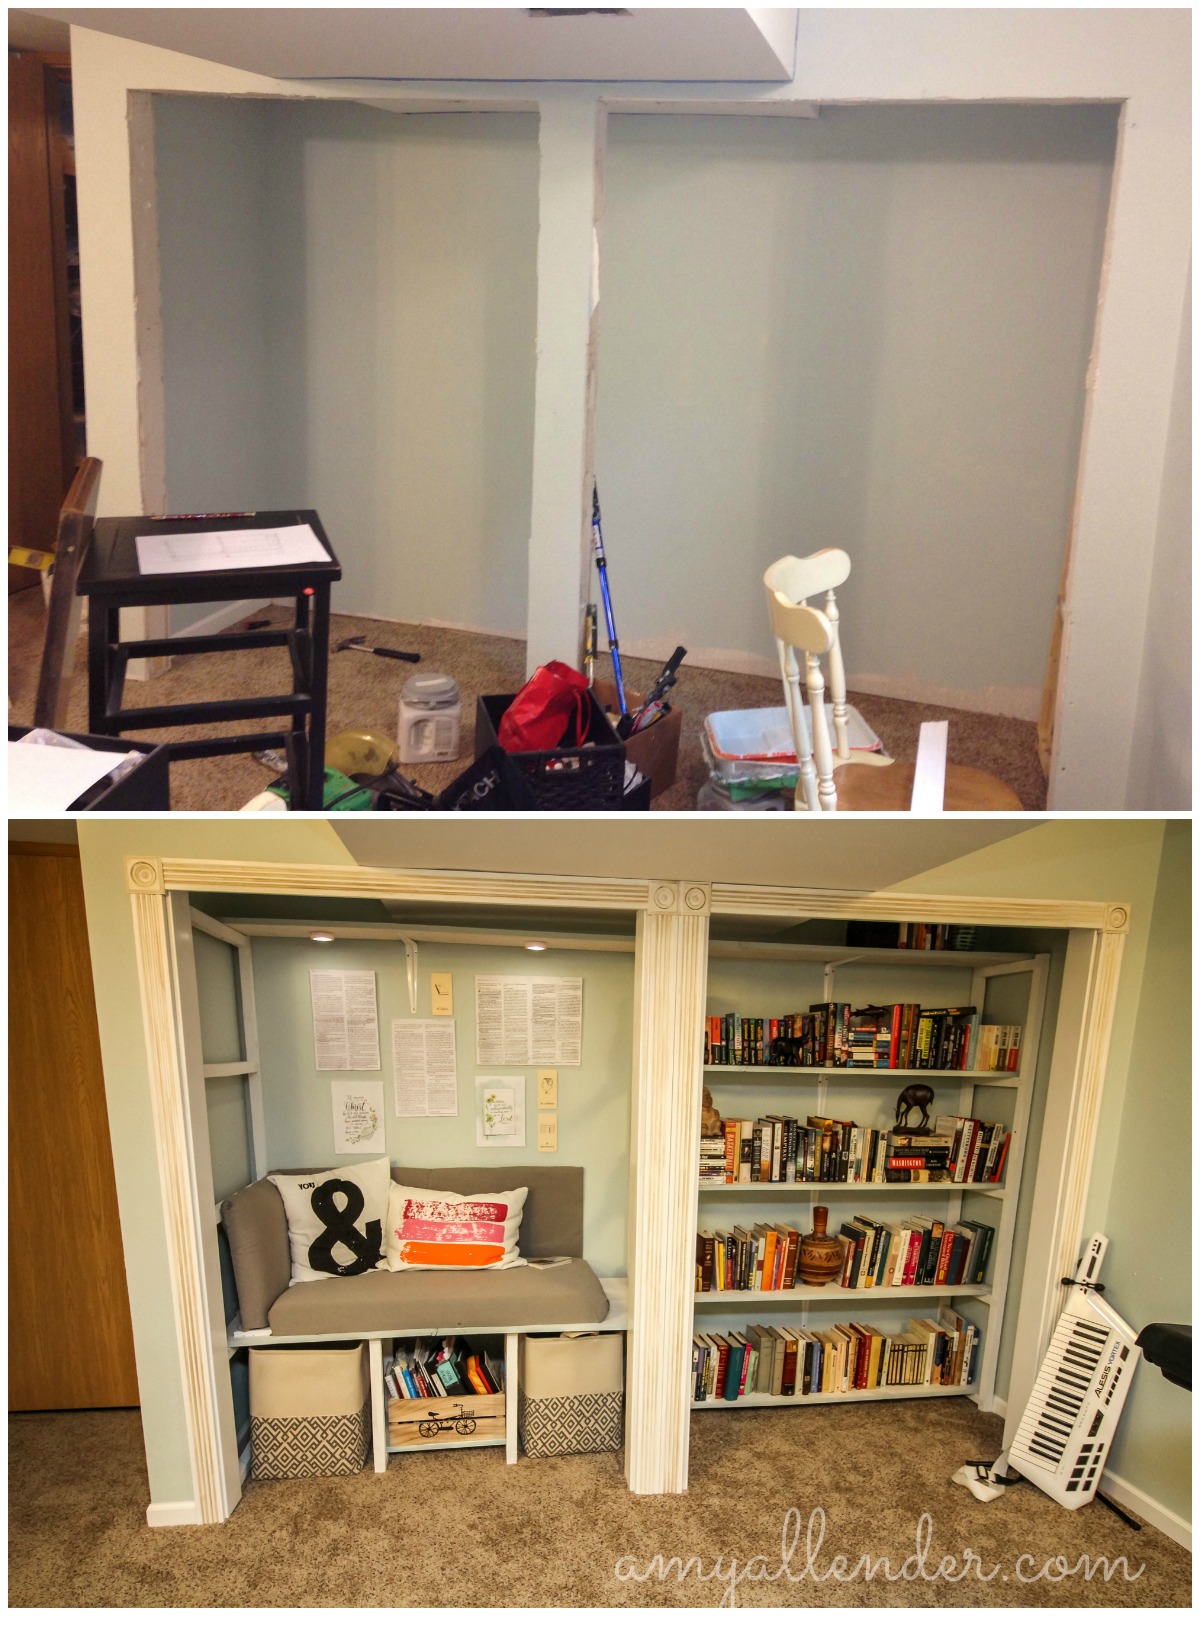
Sam and Katie like to read, so one thing they requested was space for their books. Since this space was not going to be used as a bedroom, I converted the standard closet into a book nook. This gave them space for their library, a quiet place to read, and a cool place to hang out when the youth group kids come over.
These two are also super musical–so it was also important to give them space for their instruments. So in addition to the book nook, this room acts as a space for them to practice their music and play music together. I think their basement totally delivers. It’s a perfect harmony of books, music and quirky style. All paired with lots of storage and {of course} pretty finishes.
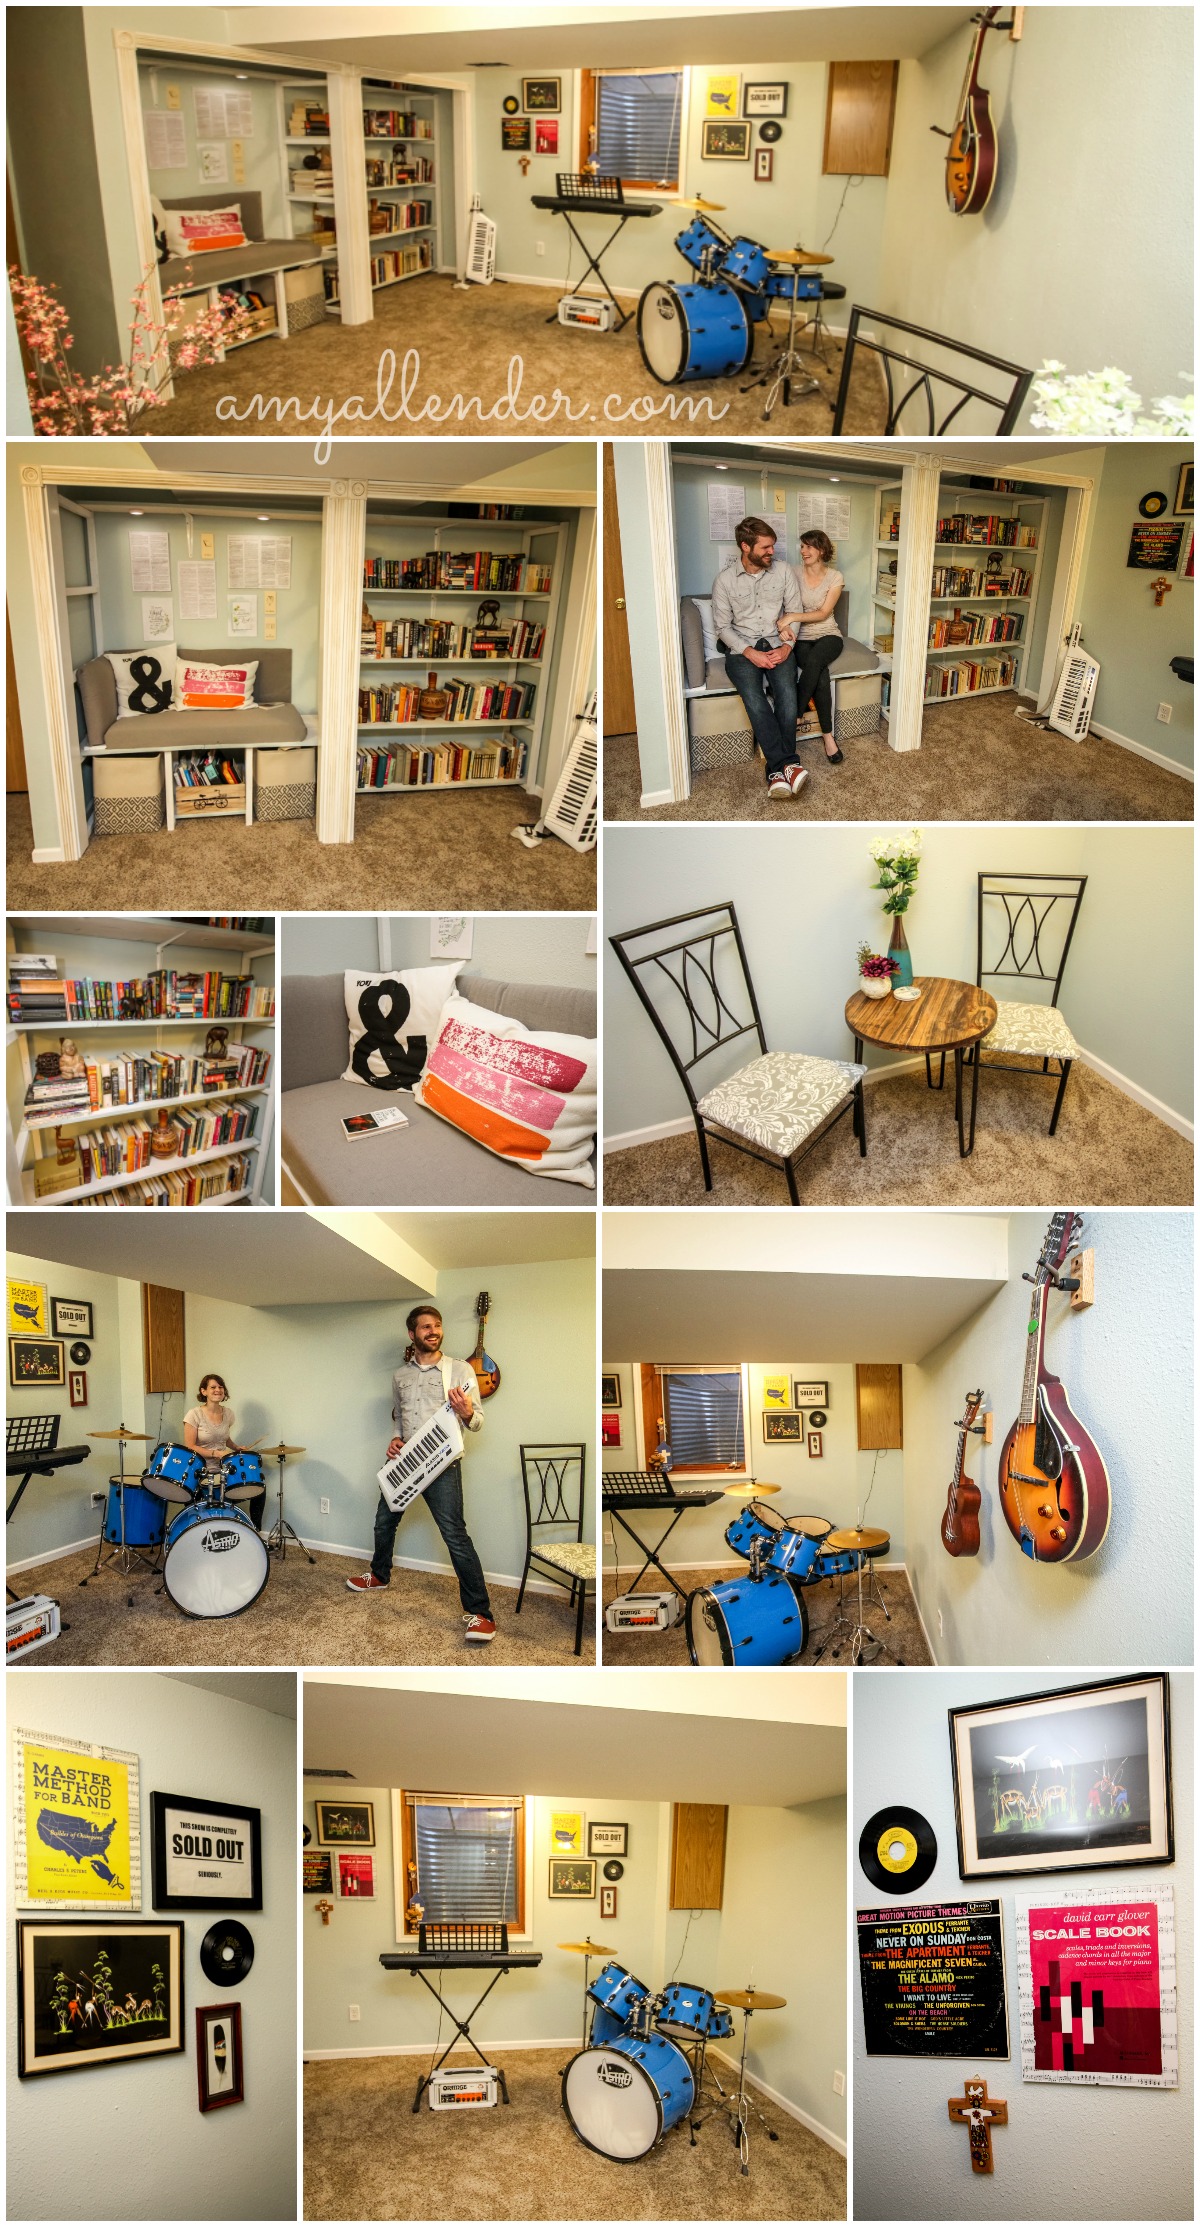
There you have it. Isn’t it just the cutest??! Every time Katie posts a photo on Facebook I just stare at it because the place is so pretty. I loved working with the homeowners to create a finished project–but I mostly loved this project because it let me work with friends!
Great work, team.
Amy
Save
by Amy | Aug 23, 2016 | Blog, The Art of Projects, the house

Tonight I’ve got more from Katie and Sam’s place. If you have a piece of furniture sitting around your house that you have been itching to paint, but are too nervous to dive in…read this post. I’ve used lots of refinishing techniques before…but tonight I’m telling you about a product I just tried that is simple to use and left me with fab results.
I really wanted their home to have a “lived in” look to it, which was kind of tricky…because on many of the rooms we were starting from scratch and building something totally brand new. One thing that really helped give their rooms some character was refinishing and repurposing pieces that they already owned {like that rad grandfather clock} and selectively buying new or new-to-them pieces that looked like they’d been around a while.
Through the process of creating that lived-in look…I refinished a lot of pieces. This was super fun and a great learning experience. I didn’t tell them at the time…but I kind of guinea pigged with their items–trying new techniques and products to see if I could unearth a new product that I loved. And I did!
I could write an absolute love story about how much I adore Zinsser and Rust-oleum products. If you read my blog, you probably know I’m in love with these product lines. So when I was at Menard’s {my home away from home} for the zillionth time that week…and a new, pretty end cap featuring a new paint line from Rust-oleum caught my eye…I was immediately itching like a kid with pox for a project to try it out on.
The product feature was a display for Rust-oleum’s “Chalked” paint line. It’s pretty, chalky colors that go on with the tenacity of chalk paint and dry to a smooth, chalky finish {something that hides flaws much better than a high gloss coating.} Paint comes in brushable cans that can be tinted to lots of colors or sprays that come in limited colors.
When Sam told me that he wanted their fire place painted {because he, like lots of us hates clashing wood tones} I knew this was the perfect opportunity to try out that Chalked line. I loved it. It was so easy to use. It turned out great. If you are thinking of refinishing your first ever piece of furniture…I highly recommend starting with this line–it was that easy to use and the results were outstanding.
Here’s what I used. If you read the post on the grandfather clock–a lot of this will look familiar. Once you’ve got the basics you’ll be set to refinish lots of pieces!
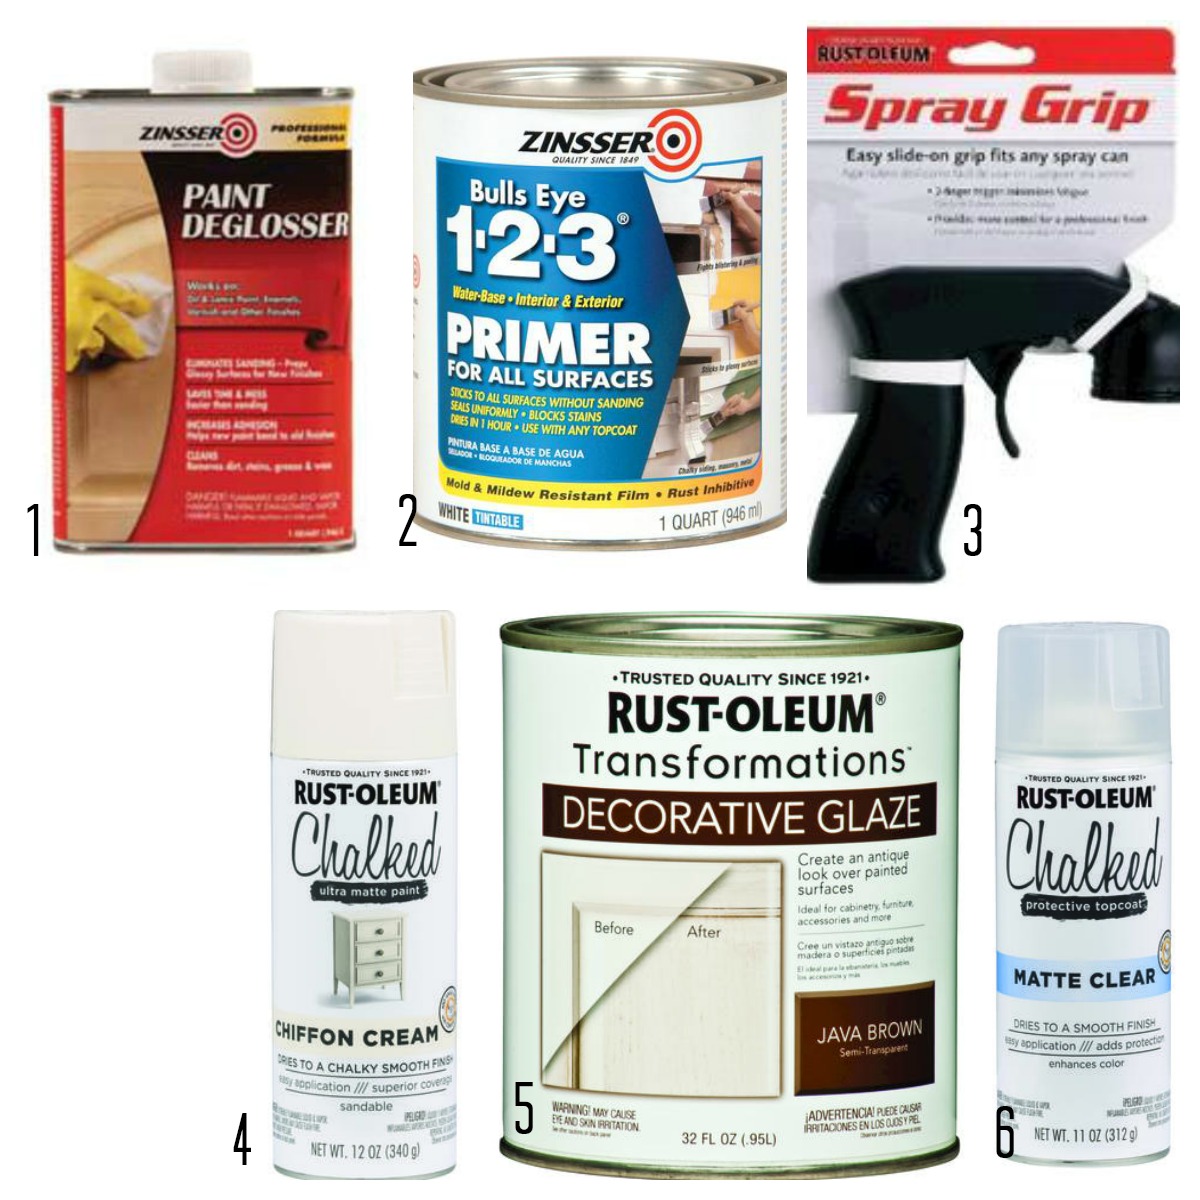
- Zinsser’s deglosser. This strips away and dulls furniture’s existing finish so you can repaint without sanding or fully stripping a piece.
- Bull’s Eye 1-2-3 Primer. Although chalk paints claim to go on smoothly without primer or any kind of surface prep–I’ve always found that laying a base coat is a good idea. Your paint will go farther and the finish will adhere better.
- Spray paint nozzle. It costs like $2 and will change your life.
- Chalked in Chiffon Cream–When painting a piece of furniture “white” I always opt for a cream or off-white option. It hides dirt and feels less stark.
- Java Brown glaze–I had this left over from my cabinet redo several years ago. A little goes a looong way. You can also use wood stain if that’s more readily available to you.
- Chalked clear top coat–to seal in your finish and protect its longevity.
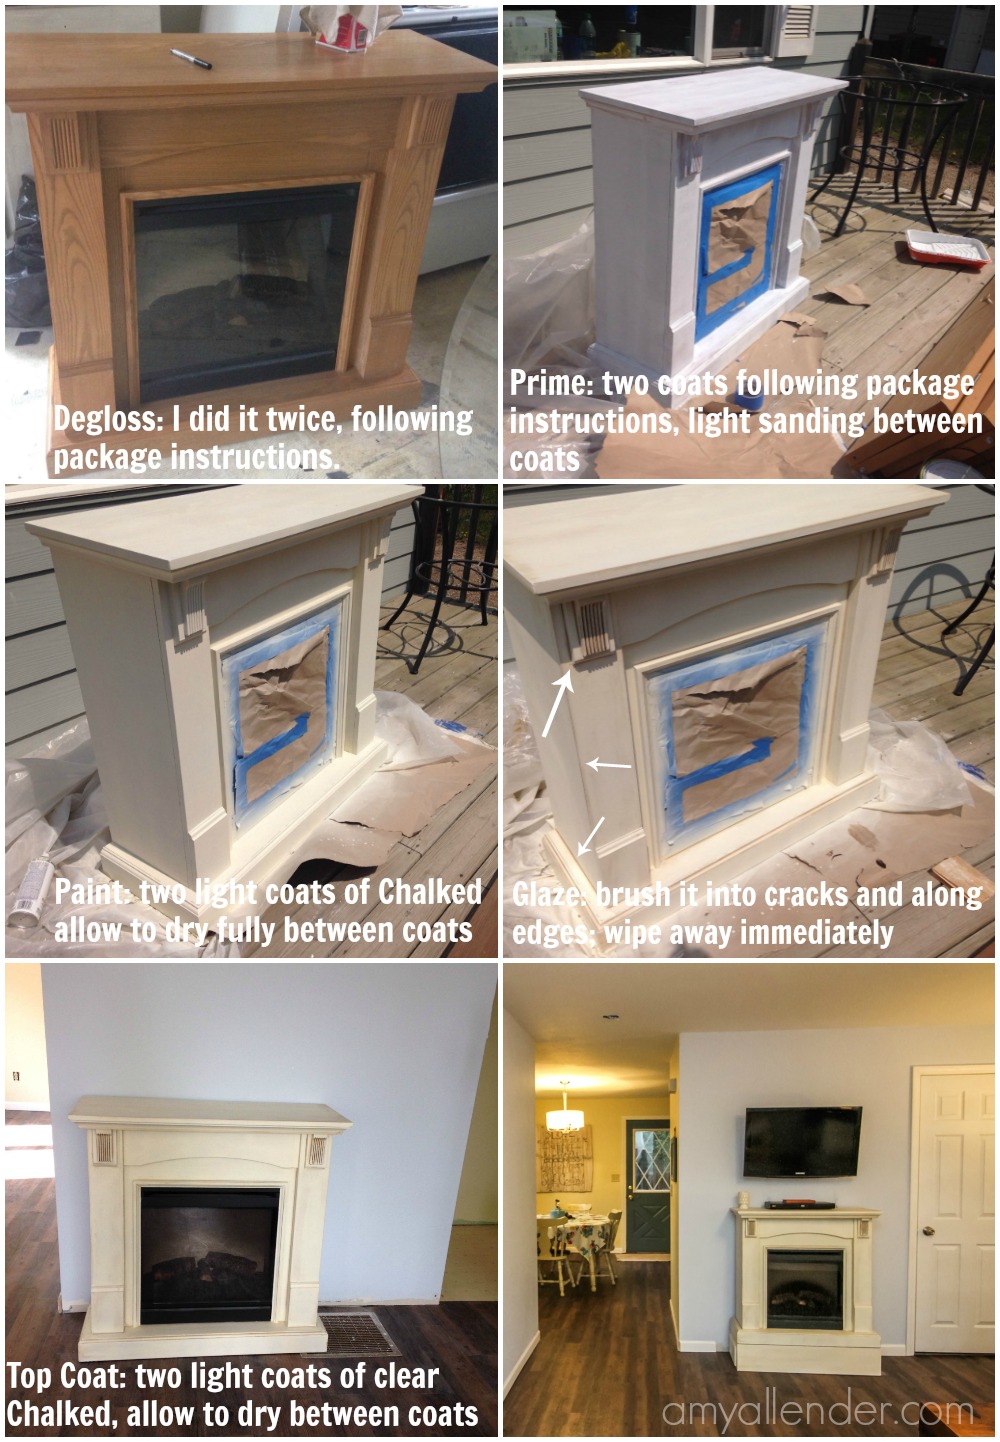
I tried something new tonight–putting the instructions right on the image. Do you like? I’m kind of torn.
At any rate…it’s just that simple. Follow all the instructions on all of the packages. Do this all in a well ventilated area–or outside on a not-windy day…it’s pretty smelly, and it’ll dry faster. I promise you. If you can follow instructions, you can do this.
The trickiest–most artistic–part is the glaze. But even that isn’t too hard. I think glazing pieces makes a huge difference. Look at the difference between the painting and glazing steps. The glaze defines all the cool detailing on the mantle. Suddenly, the ridges and grooves that were all but lost when it was naturally finished stand out like the star of the show.
If you are spray painting something with a glass front–like this–be sure to fully tape/paper it off so it doesn’t collect spray dust. Let ‘er dry and bring it inside.
Have you used Chalked? What did you think? Is there a product you’ve tried and loved? If so…I wanna hear about it! {And NO–Zinsser and Rust-oleum don’t give me any bribes for plugging their products. I just genuinely love them.}
Amy
by Amy | Aug 19, 2016 | Blog, The Art of Projects, the house

I start lots of thoughts and stories with the phrase, “Here’s the thing…” And as hard as I’ve tried to think of another way to start this post, I just can’t. So…
Here’s the thing about really gutsy accent pieces. I find them very easy to create for other people…and I’m terrified to make one for myself. Is this because I’m a safe person? I don’t know. I don’t think my mom would use “safe” as the first adjective to describe me. It’s probably that at heart I’m a big scardy cat of commitment. In my house, I stick to what I know–white, white and more white. Or–I just leave a piece untouched and spend months years mulling over what color to paint a ratty old chair.
BUT–I’m a lot more brave when it comes to other people’s things. Especially if they are confident, and bold, and hip enough to want a funky accent piece. Which is exactly the case with Sam and Katie.
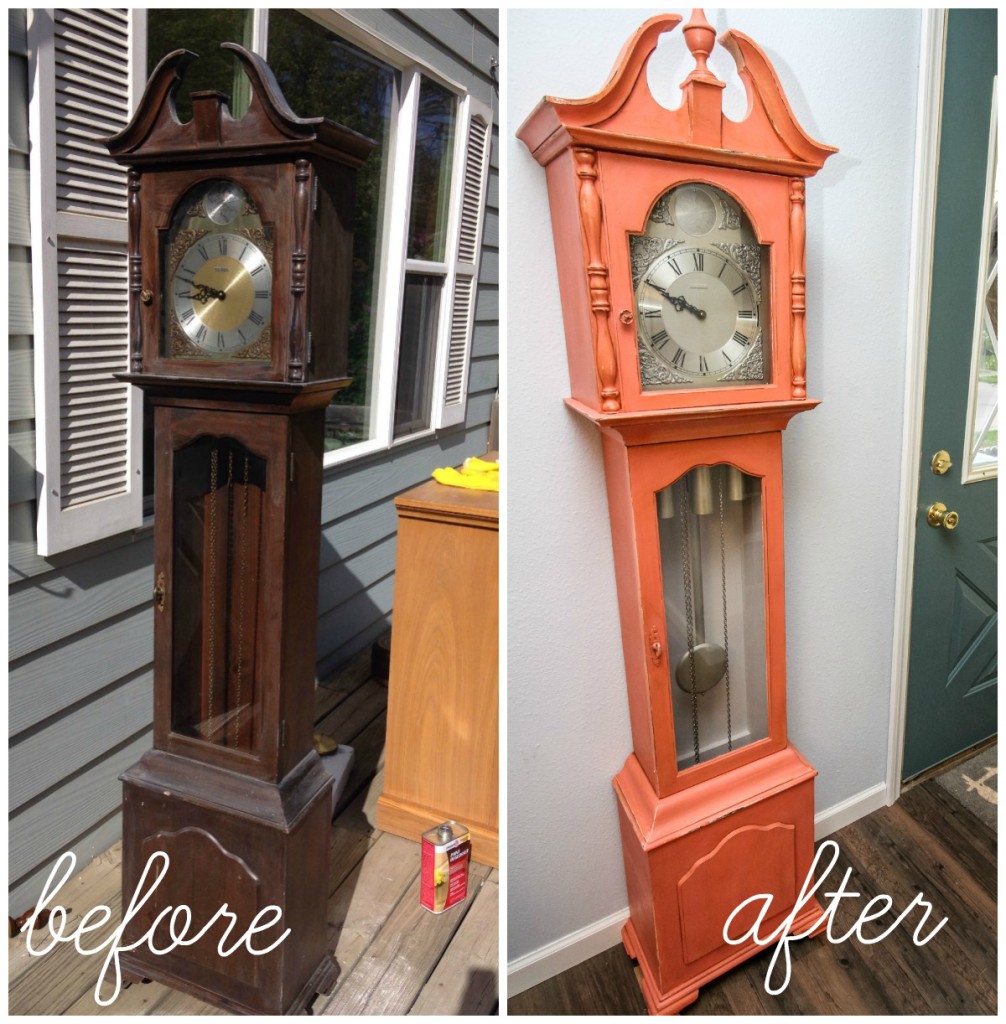
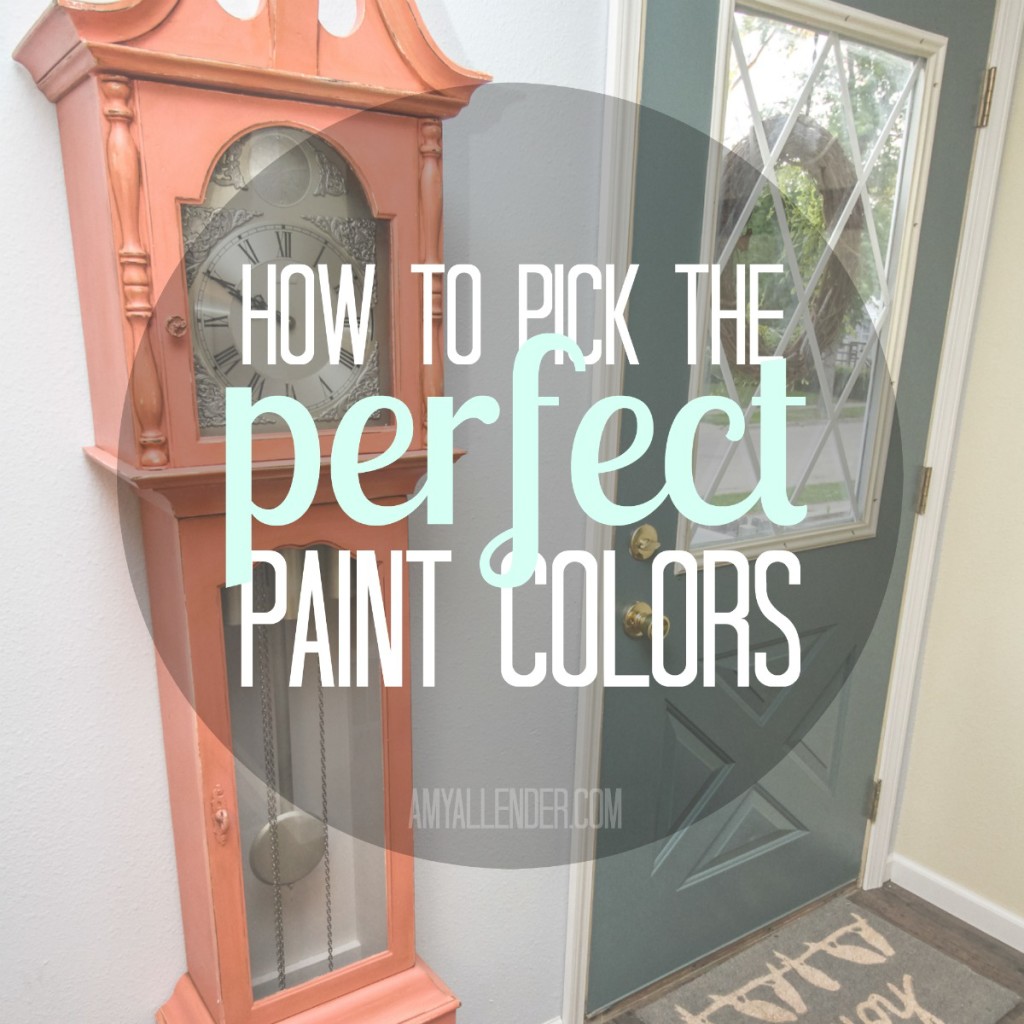
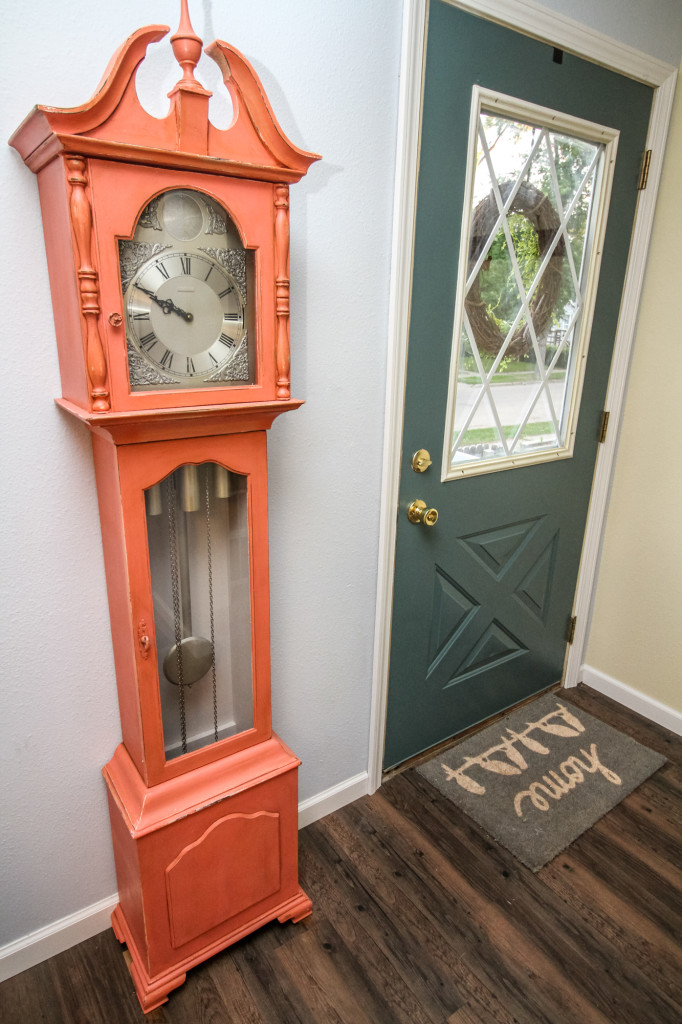
Here’s the other thing–usually it’s the wife who wants furniture painted, and the husband is all, “…that’s real wood! You can’t paint that. I like how it is…” Not in this house! In this case Sam was the big, bold, furniture-painting, color-popping machine. When he told me they had an old grandfather clock that he wanted painted in a quirky color, I knew it’d be a fun project…but never in a million years did I imagine just how fabulous it would turn out. I think the moment when the last bit of paint was dry on this bad boy and I peeled off the last scrap of tape was a momentous moment in my life: It was a moment when I shed a little color fear and my eyes were opened to just how awesome something totally bold can be.
This is one of my most favorite things ever. For real. I want to make one for myself. Or steal theirs. Luckily–it was pretty easy. Here’s how we did it.
Shopping List
Here is a handy list of all the supplies I used on this project. I got them all at Menard’s {who should really be sponsoring this blog because I love them so much and I give them a lot of free advertising.} But I’m sure you can get most of this stuff at your local store.
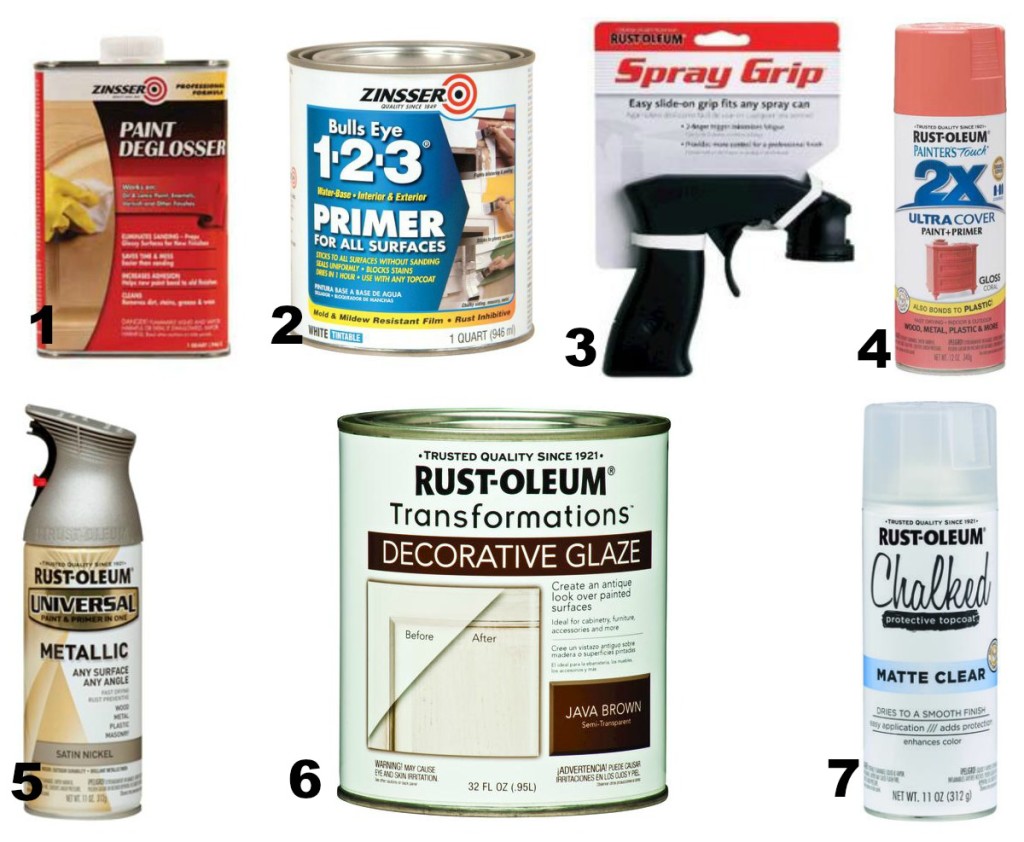
I’ve conveniently listed the supplied in the order they are used. Just use one after the other {follow all package instructions} and you’ll be good to go. Click the links and you’ll be taken to the Menard’s product page.
- Paint deglosser from Zinsser {I love their products and trust them all.}
- Bull’s Eye Primer–it’s formulated to stick to all surfaces
- Spray paint nozzle–this will change your life for $2.50
- Spray paint
- Rustoleum satin nickel finish spray paint
- Java Brown decorative glaze–I used the leftovers from my cabinet project
- Chalked clear top coat {can you guys tell I’m a huge fan of Rust-oleum?}
Find Your Piece
Step one is choosing a cool piece to accent. The clock came out especially cool because it’s a very classic and formal piece in a totally unexpected color. That kind of juxtaposition makes for a great accent. They had this clock sitting around. They didn’t love it. It wasn’t getting used or looked at. It was a little beat up. It was not a family heirloom, so if it got messed up, they wouldn’t be heart broken. All these factors add up to a good make over piece. {Especially for a beginner.}
Don’t Skip Steps
If you want your paint project to last, don’t skip steps and definitely don’t skip prep! For something that’s not going to get touched very often, or treated roughly you have a little more leeway. Since the clock probably isn’t going to endure a lot of abuse, using mid-grade products and prep will do just fine. For something that will see heavy traffic–like a dining table–you’ll want to go to extremes to make sure your finish isn’t going to chip off.
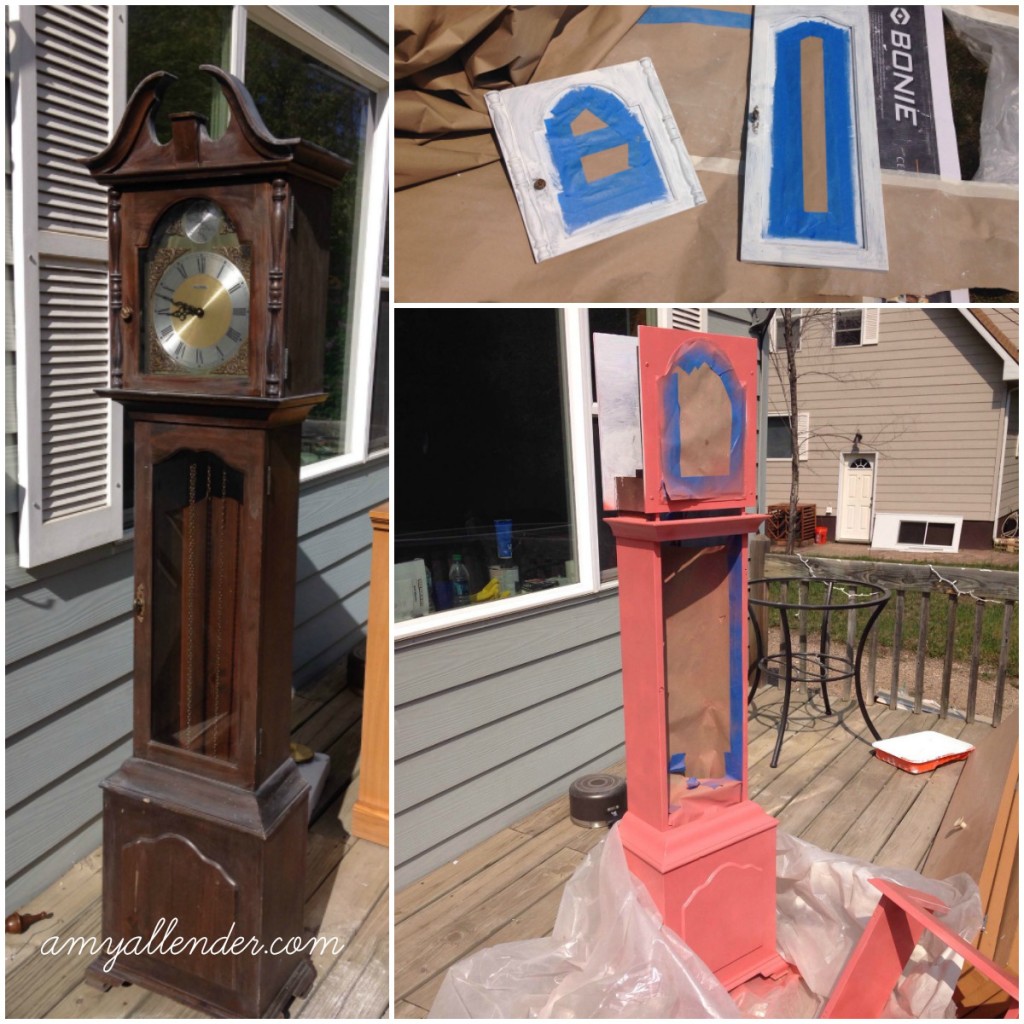
First I dissembled the clock as much as possible–be super careful with the springs and gears, though! Carefully remove the head and doors and finial. Take out the weights and protect anything that you don’t want painted with tape or paper.
Next, degloss the whole surface. Grandfather clocks are typically pretty shiny/glossy. Dulling that surface down will give you a clean surface to work with–and will help the paint adhere better.
Prime all your pieces using a brush. I did two coats of primer and a light sanding afterward to get rid of any drips or brush lines.
Now spray paint your surface. Seriously, get one of those spray nozzles if you don’t already own one. In my ideal world, I would have been able to find a matte spray paint in the color we wanted…but it didn’t happen. The end result of my spray painting left me with a very shiny, very Barbie-pink clock. To tone it down I added a few extra steps:
After the pink paint had dried {you might need two coats}, I went over the whole piece with deglosser again to get rid of the shine–just don’t rub too hard, or you’ll strip the paint. Then I sanded down the edges of the details {any curved piece, sides of doors, etc} to add a little wear to it and expose the dark wood tone below. Finally, I used the glaze to bring out the detail even further. Using a small paint brush, brush glaze {or use wood stain} into the crevices of the piece–then immediately wipe out the excess…leaving dark stain or glaze in the cracks. I also brushed and wiped glaze off of the sides of the clock to tone down the color a bit.
Then…while all that was drying, I went to work on the inside of the clock. We painted the inside using one of the paint samples that was not chosen for the living room walls {see discussion on paint samples here.} I sprayed the weights satin nickel, and carefully taped off the wood and also sprayed the face of the clock–the gold just didn’t seem to fit with the funky new color.
After it’s all dry, move it inside and bask in the glory of your clock. Awesome, right?
by Amy | Aug 19, 2016 | Blog, The Art of Projects, the house
Can you tell me how to pick paint colors for my house?
Man, oh man, oh man, oh man. This is a million dollar question that I get asked all the time. And by million dollar–I mean, if I got paid a dollar each time I’ve been asked how to go about picking paint colors without regret…I’d probably have a million by now.
Not that I get tired of fielding this question. It’s valid. And picking paint colors is super stressful! {At least for people who are afraid of commitment…like me.} If you’ve ever picked a color, and disliked it as you were rolling it on the wall, telling yourself, “Maybe I’ll like it better when it’s dry…” Or, “It’ll look better when the whole room is painted…” only to hate it even more once it’s dry and once you’ve dedicated a whole weekend to painting–you know the pain of picking poorly. If at all possible, it’s best to avoid that situation all together. So here…is my very best advice for picking colors with no regrats….I mean, no regrets.
As you may remember, I started telling you about Sam and Katie’s house. Long story short, there was an epic indoor floor and I was lucky enough to come on board {ahoy mateys!} to help with the recovery process. Since everything was ripped out {see before photos here} they had to start from scratch and pick wall colors for pretty much all their walls. Since their project is fresh in my mind, we’ll use them as an example.
How to pick paint colors | Five easy steps
1. Know Yourself.
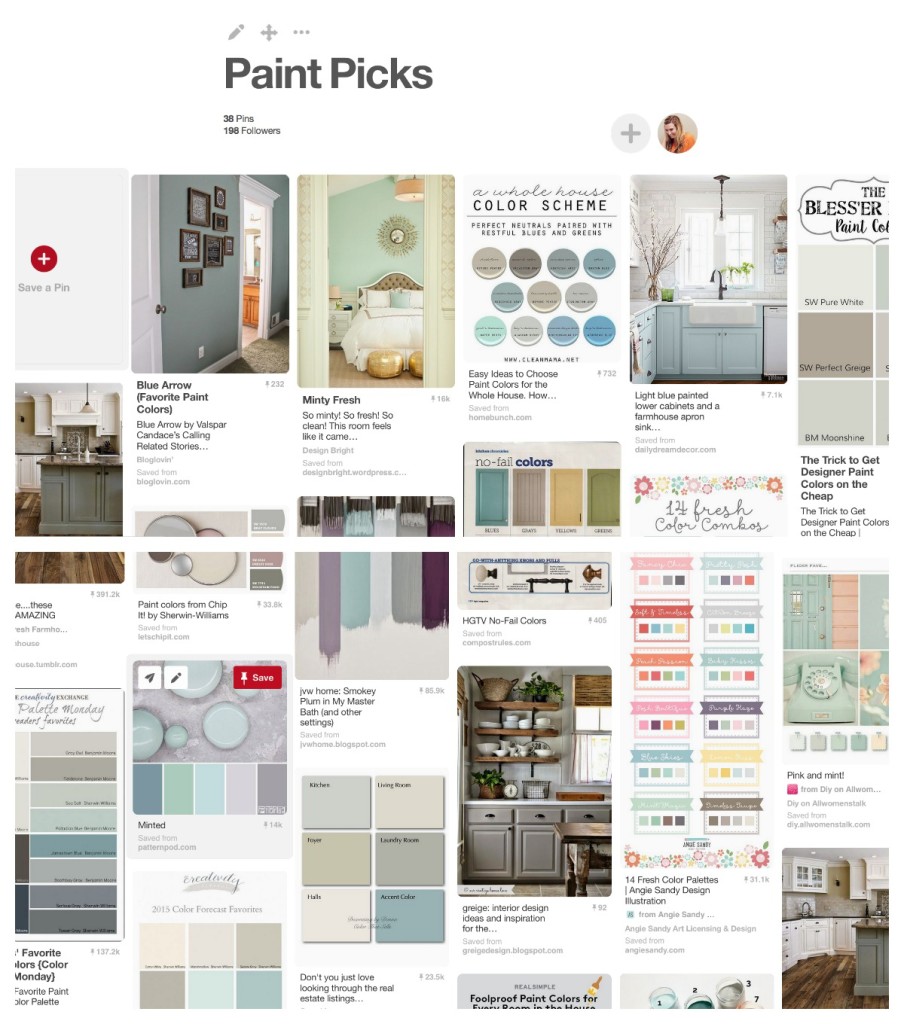
This is key when picking paint. Just know what you like. If you gravitate toward cool colors–stick to that. If you love white and cream and gray in sweaters and typeface and accessories, you probably aren’t going to love waking up to a burnt orange bedroom. If you are completely indecisive, get to know yourself. Spend time making a Pinterest board {yes, I’m giving you this assignment.} Pin any room that you think has a pretty color. Pin cabinets that you like. Pin anything painted that strikes your fancy. Don’t look back at the board until you’ve got a bunch of pins. Chances are, you’ll see a theme. Proof? Here’s mine. See a trend? And if you wanna cheat, you can just follow my board here.
2. Take Out the Guesswork
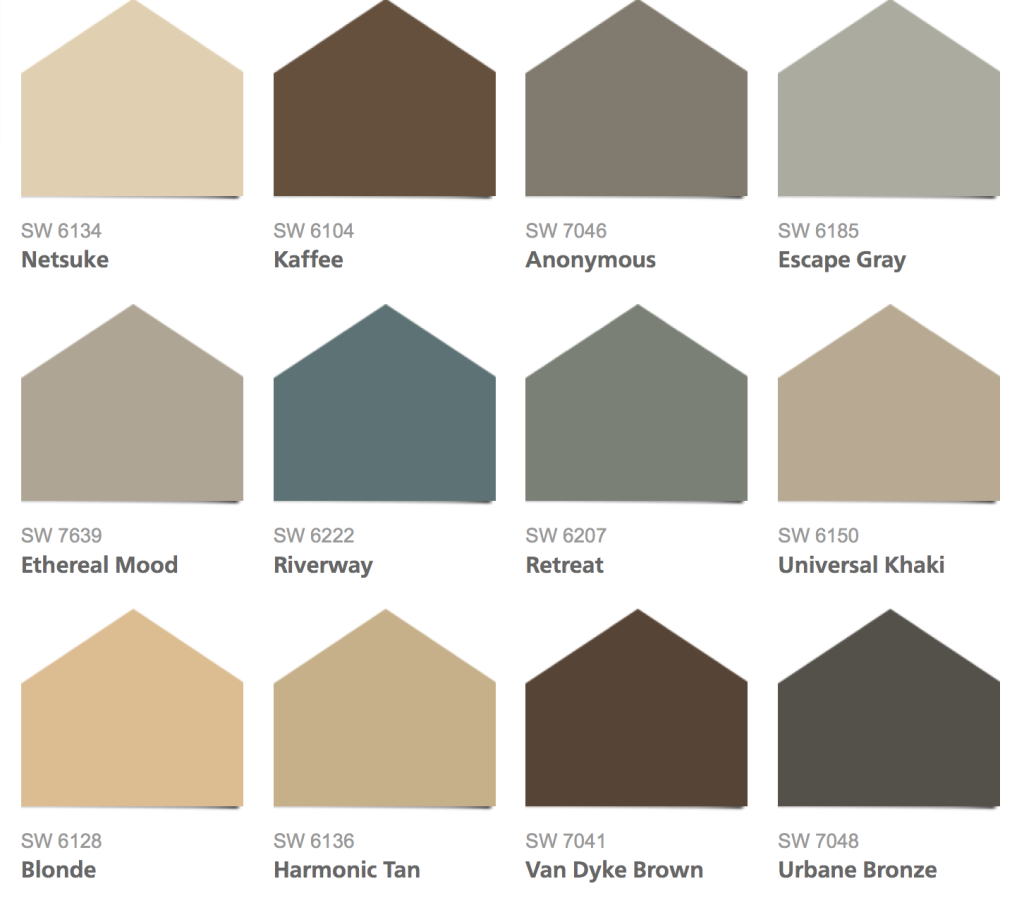
Once you kind of know what you like you need to find some paint. If you walk into a home improvement store and approach the rainbow wall of chips, you’ll soon see that liking “gray” isn’t as concrete as you once thought. Suddenly there are cool grays and warm grays. There’s sidewalk, and moonlit path, and ethereal mood. Take some of the guesswork out by going to a paint store–where the employees deal only in paint. {I love Sherwin Williams for this.} There you’ll easily find color pallets, premade, just for you. See SW’s color pallets here. Pick the one that has colors most similar to your pinterest board. Colors within the pallet are all made to look good together, now it’s just a matter of picking your favorites.
3. Don’t Trust the Pictures
Paint pallets will often come with images of the paint color used in staged rooms. These are a good starting point–but don’t trust the photos. Paint is keenly effected by light. The direction of light coming in to your windows. The placement of your lamps. The warmth of your lightbulbs. The strength of the sun in your zip code all effect how a paint color will actually look on your actual walls. It’s all very sciency and light wavy.
Photos in the professional images are made to look perfect with flash bulbs and perfectly controlled lighting. You probably don’t live on a photo set…so you’ll need to shell out a few bucks for some sample jars.
Samples cost money–true. But they could also save you bigger money on wasting a gallon of paint that you hate. So, get out the cash {they usually run about $5 each}. And don’t sweat the left overs. These are all colors you like anyway, so you can put them to use later on smaller projects. {I’ll show you how to use them next week.}
When you sample, sample right. Put up a big swatch of color on every wall in the room you’ll be painting. The color will look different on different walls. Keep track of what color you put where–I like to make a grid on the wall, and on a piece of paper. If there is a shadow {like under a kitchen cabinet} paint it there. If you can see from one room into another, paint where you can see the two colors coming together. You can see in the image above where we put samples for Katie and Sam. Once they are up–wait. Leave your swatches alone. Look at them in the morning. See how they look with your lamps on. See how you like them with over head lights on. Then decide.
4. Limit Yourself
A lot of variety is good sometimes. Like…in a workout routine or in ice cream flavors. When it comes to paint–limit yourself. Different paint colors will help define separate areas of your home–but too many colors will cause disunity and confusion, and an overall circusy feeling. And it’s a lot of work and a lot of left over paint.
I like to stick to about four colors in a home. You can go bigger if you like. But four is a pretty safe area. There is some repetition which lends continuity–but there is enough variety to keep it interesting. I like to play it safe when it comes to color commitment. Then I get gutsier with smaller, more mobile things…accessory accents.
5. Accent Colors
Once you’ve got your walls done you can think about accents. If you are aching for a pop of color, decide on where you’d like it. Do you have an old piece of furniture you’d like to paint? Perfect. This can be an accent! Wanna paint your bland, beat up door? Perfect. Paint the inside too!
Go through a similar process. Look at colors you like. Grab a paint chip {the paper with the color on it} and tape it to the furniture/door/area your accent will live. Give it a day or two before you decide.
If you don’t know where to start–start with a paint pallet…those often include accent ideas. Or make another Pin board. If in doubt, mustard yellow, peacock blue, and a toned down coral are always good “pop” pieces against a fairly neutral wall.
Happy painting! Did I miss anything? How do you pick your paint colors? Oh–and don’t you love that clock?!! I’ll show you how I made it happen tomorrow.
xo
Amy
by Amy | Aug 9, 2016 | Blog, The Art of Projects, the house
Have you ever faced a goal or wanted to start in on a big project, but were unsure of where to begin? I think most of us have been there. I know I’ve been there many times. But being unsure of how to start a big project, is no reason to avoid ambitious undertakings. I wrote a piece on tackling large goals for Start Up Mindset a while back–you can see the piece here. Today I’m going to talk about tackling a big home improvement project.
Whether your projects are big or small–when you’ve got lots of things that need to be done, it’s tricky to find a good starting point and have the tenacity to get the job done. Today, I’ve compiled a list of five tips for tackling overwhelming home projects.
Yesterday I told you about Katie and Sam’s tragic indoor flood. Since the water laid waste to most of their house, and the rest of it was already on the do-list, their home is the perfect case study for undertaking a big project.
1. Identify the most important things.

Take it from me, some parts of a project are much more fun than others. Picking out a new couch, potting plants, and hanging a gallery wall are all super fun and super rewarding. They offer instant gratification and rarely leave your mind frazzled or toes stubbed. But–these are not the most important components of your project.
Don’t get side tracked by the stuff you find fun. Keep a rational mind. Look around objectively and decide what is most important to your day to day living.
For Katie and Sam, the absolute most important thing was getting their full bathroom up and running again. The flood displaced them from their home and they were unable to move home until they had a place to shower and a toilet to use.
Take care of the necessities first. A working bathroom. A water heater. Working appliances. Proper plumbing and working sinks. Safe, working lights. Fix broken windows. Take care of leaks.
2. Know your limits.
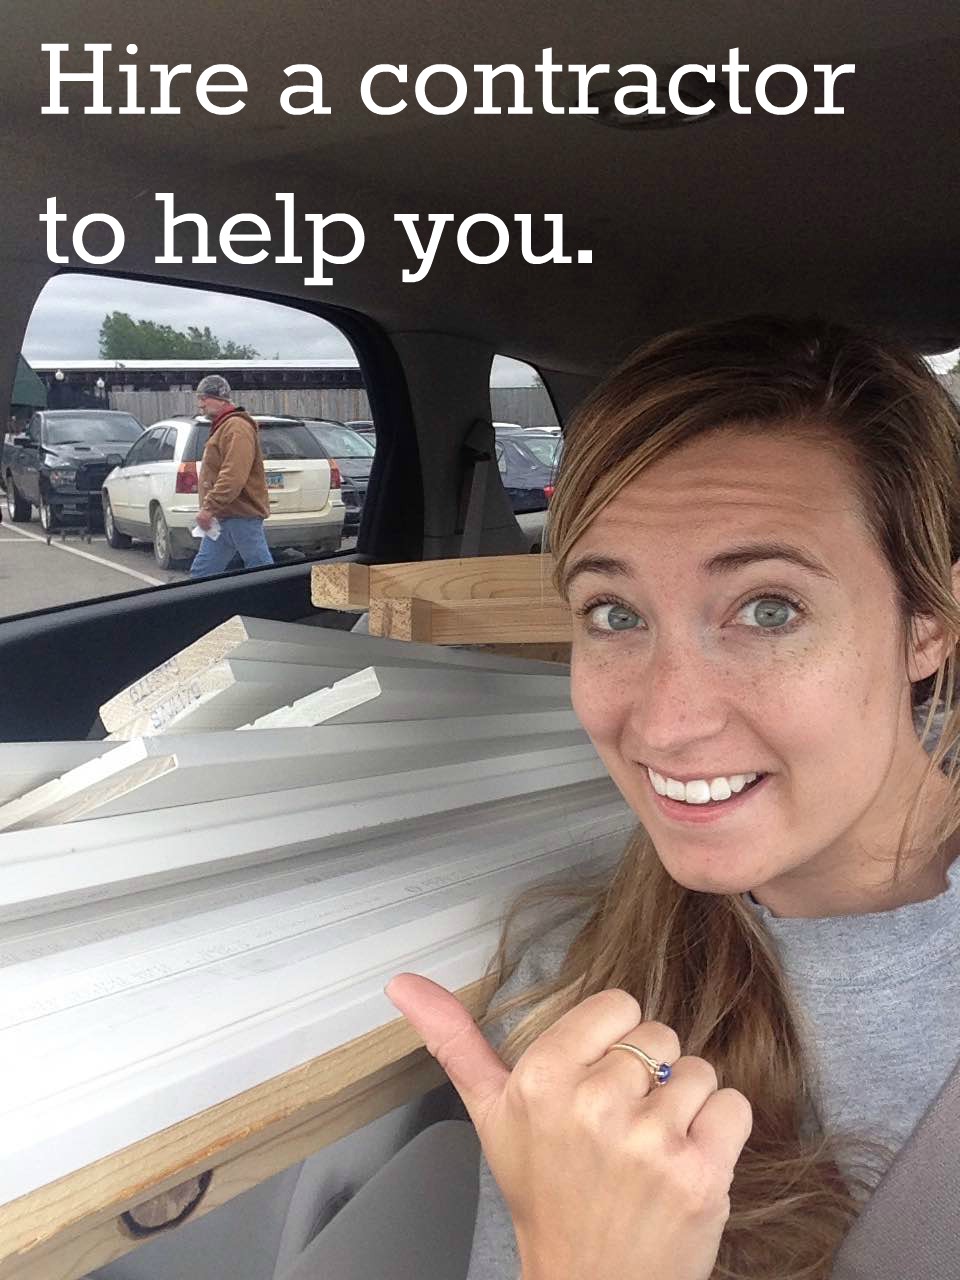
After you’ve decided on your priorities, think about your limits. Are you capable of putting in a new toilet? Do you know how to hang drywall? Can you safely and properly install new wiring? If vital parts of your project are outside of your scope–outsource them. Delegate. Years down the line when your wiring isn’t catching fire and your pipes are intact, you’ll be glad you trusted a pro–even if it did cost a little extra.
Another limit to think about is your time. Even if you can do these things–do you have the time? Can you commit to getting these things done in a timely manner, or is it worth the extra expense to have it done quickly, efficiently and professionally? Lots of folks want to be DIY-ers, but soon find out that home improvement takes a lot of time and projects can drag on much longer than expected. I believe in finishing projects–as well as starting them. It becomes cumbersome to live in a construction zone–if you don’t have the skills {or energy/ability to learn the skills needed}, or time to commit, delegate.
At Katie and Sam’s place they helped with lots of stuff and delegated lots of stuff. Proper flood clean up, plumbing, drywall/texturing, doors, trim and floor installation were delegated to contractors. They helped with painting, prep, shopping, electronic installation, etc. It was important to them that they project was done quickly and skillfully–so they outsourced the big stuff and some of the smaller things that they were capable of, but didn’t have time to commit to.
3. Make a list of wants and objectives.
Outside of the things that must work and must be done to give you a functional home–home improvement gives you a lot of creative freedom. How do you want your rooms to be used? What do you want to do in your yard? What is important to you? Do you need space for entertaining? A place to read? Peace and quiet? A durable home that can endure the wrath of teenage shenanigans? Discuss these things and come up with a “dream sheet” of sorts. My list for a living room might look like this:
Durable furniture that I won’t stress about getting dirty or dinged up, new floor, big rug, fresh window trim, wall mounted-floating TV, gallery wall, washable wall paint, cozy seating with space to add extra seating for large gatherings.
Once you know what you want out of your rooms you can get to work.
4. Work rooms from most visible to least visible.
I already covered starting with repairs that make your house safe and livable. Once your leaks have stopped and your wiring isn’t threatening a fire, start improvements from the most visible rooms in your house to the least visible.
Start by tackling the room you spend the most time in–and where guests spend the most time. For me, this is usually our living room {a kitchen is usually a close second.}. Next up it’s a common area bathroom. Then any other common space. Then outdoor entertaining space, bedrooms, and finally hidden storage spaces that only I lay eyes on.
5. Work top to bottom.
My dad taught me to work top to bottom when washing a car. My mom taught me to work top to bottom when cleaning the house–any dust that fell would be vacuumed up last. Now, I’m telling you–in your home, work top to bottom, outside in.
Take a look at what you are doing and execute it from the top down. Work from the outside–from the outermost part of your walls {for example: wiring/plumbing..things that go inside the walls–drywall–paint–trim–curtains}
First do anything that lies behind the wall–electric, plumbing, recessed shelving. Next tackle texture and painting from the top down, starting with the ceilings {if you are replacing the floor always do the painting before the new flooring is installed so you don’t need to stress about spills}. Finally hit the floor.
Once you’ve got a floor, start working inward–add trim and baseboards before any permanent fixtures are installed {like a toilet, mounted TV or fireplace} so you don’t have to work around them. After permanent pieces are in place tackle the moveable–furniture, rugs, curtains. Finally–breaking the pattern just a smidge–add the semi-permanent. I consider anything that will most likely not be moved often, but can be moved if needed–peg racks for coats, gallery walls, wall decor, etc. I put the semi-permanent up last because I like to see the furniture and rugs in the room first. And I like to have a place to sit down at the end of the day.
by Amy | Aug 8, 2016 | Blog, The Art of Design, The Art of Projects, the house
Today I’m going to tell you a tragic story. But don’t be scared. It ends well. Really well, actually. But it’s still pretty tragic.
Here goes.
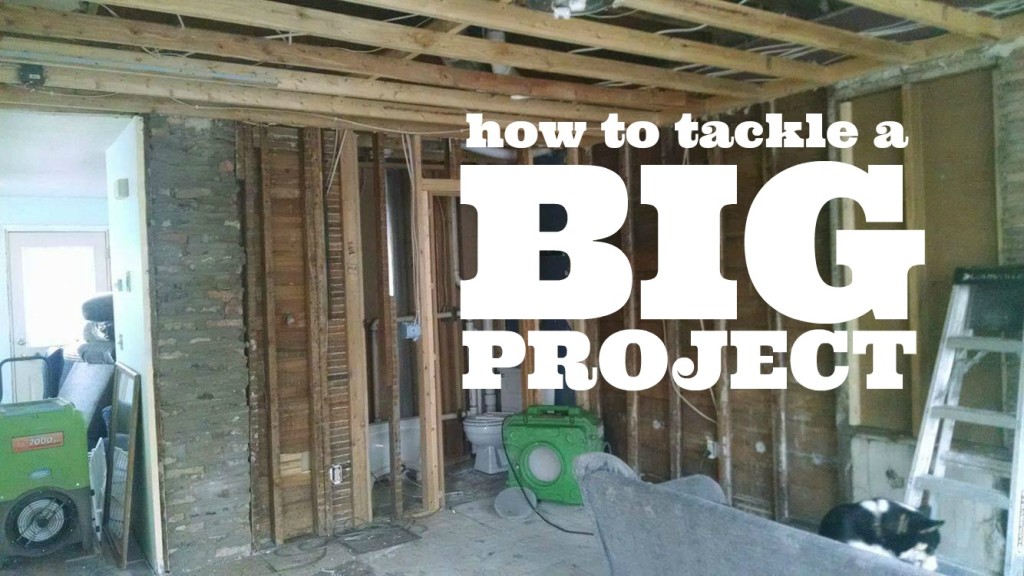
It’s the wee hours of Easter morning. The sound of water wakes you up. Weird. You get out of bed to find that your bathroom is filling with water. Downstairs on the main level, water is raining through the fire alarm hookup in the ceiling. It’s everywhere and starting to seep through the drywall. Obviously, you shut the water off–but things are already out of hand. The ceiling bows and eventually caves. Water is standing all over your new floor and the furniture. Slowly it drains through the floor vents in to the basement where it proceeds to ruin your freshly hung drywall and soak loads of things you had in storage. The damage reaches from the culprit bathroom upstairs, through the hall and carpet on the stairs…through the living room, part of the kitchen and most of the basement.
It’s crazy, but it’s true. It happened to Katie and Sam. But as I said, it ends happily and the journey from flood to finished is a great testament to the body of Christ. But first, meet Sam and Katie.

This is Sam and Katie. They are super fun and awesome. Pretty much as soon as I met these two during the incredible summer of 2013 I knew that I loved them and wanted to be friends. Maybe it was the way they eagerly consumed the bread sticks I’d made for dinner and had no qualms about carbs. Maybe it was that they are quirky in a way that I totally dig. Or their vast Biblical knowledge and passion for serving youth–hey me too! Regardless of what initially told me deep inside that we’d be friends…I was right. We did become friends. And I’m so glad. I’m so glad for these two and the hours we’ve spent serving together, playing games, carving pumpkin carving, and making gingerbread houses. I always say…”It’s fun to have fun, but you’ve gotta know how.” And these two definitely know how. {As you can see from the images above.}
Okay…here’s a more professional image. And a couple more facts. Sam is our church‘s youth pastor. Katie has a day job that I don’t understand…and also owns a WAY COOL singing telegram business. {Told you they are awesome.}

And just to prove that we really are friends…here’s some photographic evidence. This is Katie and me–in the dorkiest helmets we could find–going horseback riding; and Derek with them at the annual pumpkin carve.

Just weeks before the big indoor flood {the root cause was traced back to an issue with the toilet–but I don’t have all the details, since I was home asleep at the time of the crime} Katie and Sam took me out for Applebee’s half-price-apps to discuss hiring me to finish up a few projects and do some decorating at their home.
Since they’d moved in {about a year ago now} they’d done some home improvement, but were looking for a savvy DIY-er with time on her hands to finish the job. They’d painted and installed some cute paneling and put in new flooring. They asked if I’d finish up the odds and ends of previous projects and spend some time pretty-ing and homey-ing it up for them.
At the time Derek was gone, already living on the Surface of the Sun {NM} and I was still in Practically Canada waiting for our house sale to close. I was fresh out of projects, no longer working, and going a little stir crazy. It was a match made in heaven.
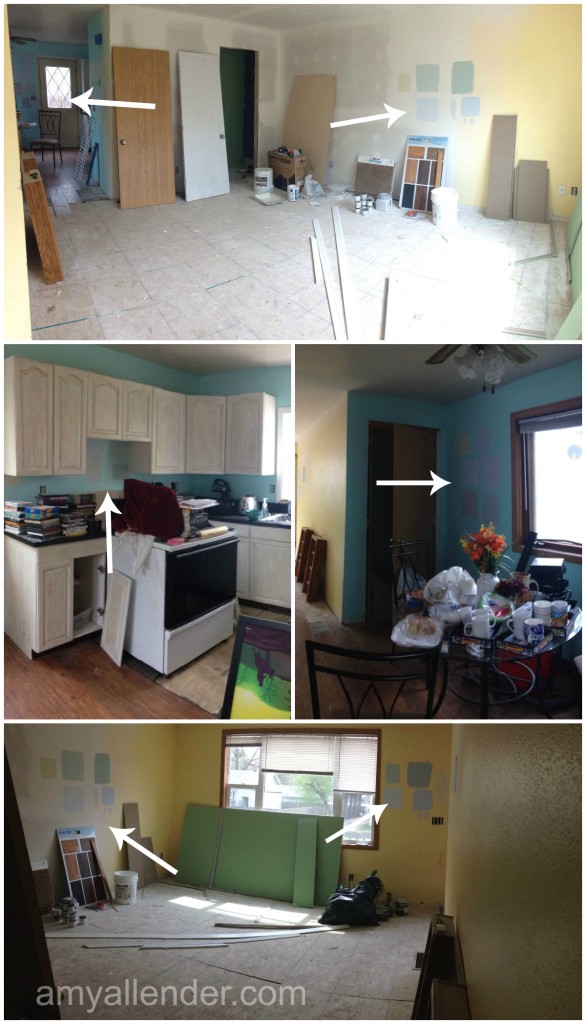
After the flood, I was still up to help…but the project was now on a much larger scale. {Which was so fun for me–but a huge bummer for them.} Here’s a few photos from the house.

The photos above are from the living room on the main level of the home and a couple of the basement {because I was confused when I made the collage.} The bathroom that caused the flood is directly above the half bath on this floor. As you can see, the drywall had to be torn out from the ceiling and some walls.
The walls that were only cut away half way up the floor are in the basement. The yellow walls are in the living room {looking toward the front of the house and away from the half bath.}
The house was cleaned up and sanitized by Servpro. And as the Lord would have it, a friend and fellow youth group volunteer works there. The drywall was installed by our church’s tech director, Brandon {who does drywall professionally–and about a million other things on the side. Seriously, he’s amazingly talented in everything from sound boards to woodworking and plumbing.}
See? I told you. The family of Christ working together.
When I arrived on the scene the drywall was up and our fist order of business was getting the upstairs bathroom back to working order so Katie and Sam could start living at home again. Second order of business? Picking paint colors {see the swatches?}
But we’ll get to all that later. For now I think that’s enough. I’m so very sorry that this happened, but I’m so very grateful that I had something so in depth to fill my final months in Minot…not to mention that I saw Sam and Katie just about every day, since I was at their house every day.
I learned a few new skills {you know I love that} and I sharpened a few others. And {my favorite} I had the honor of turning a house into something better than a building. It’s cliche to say that I love turning houses in to homes. But it’s true. There is nothing I love more than creating a space where people can feel totally comfortable and secure. A place they love spending time and love coming back to. A place that they like taking photos in and are proud to invite others in to. A place that is lived in and tells a story about the people who reside there. I love it. And I’m so happy to have been able to work a little magic {okay, a lot of magic} for people who are so very dear to me.
Spoiler. You won’t believe how amazing it turned out. I won’t show you the whole thing…but here is one more photo–to prove that this really, really does end happily, beautifully, and cozily. {This is in the living room!! Who is wanting to steal that couch?!}

by Amy | Jul 22, 2016 | Blog, The Art of Projects, the house
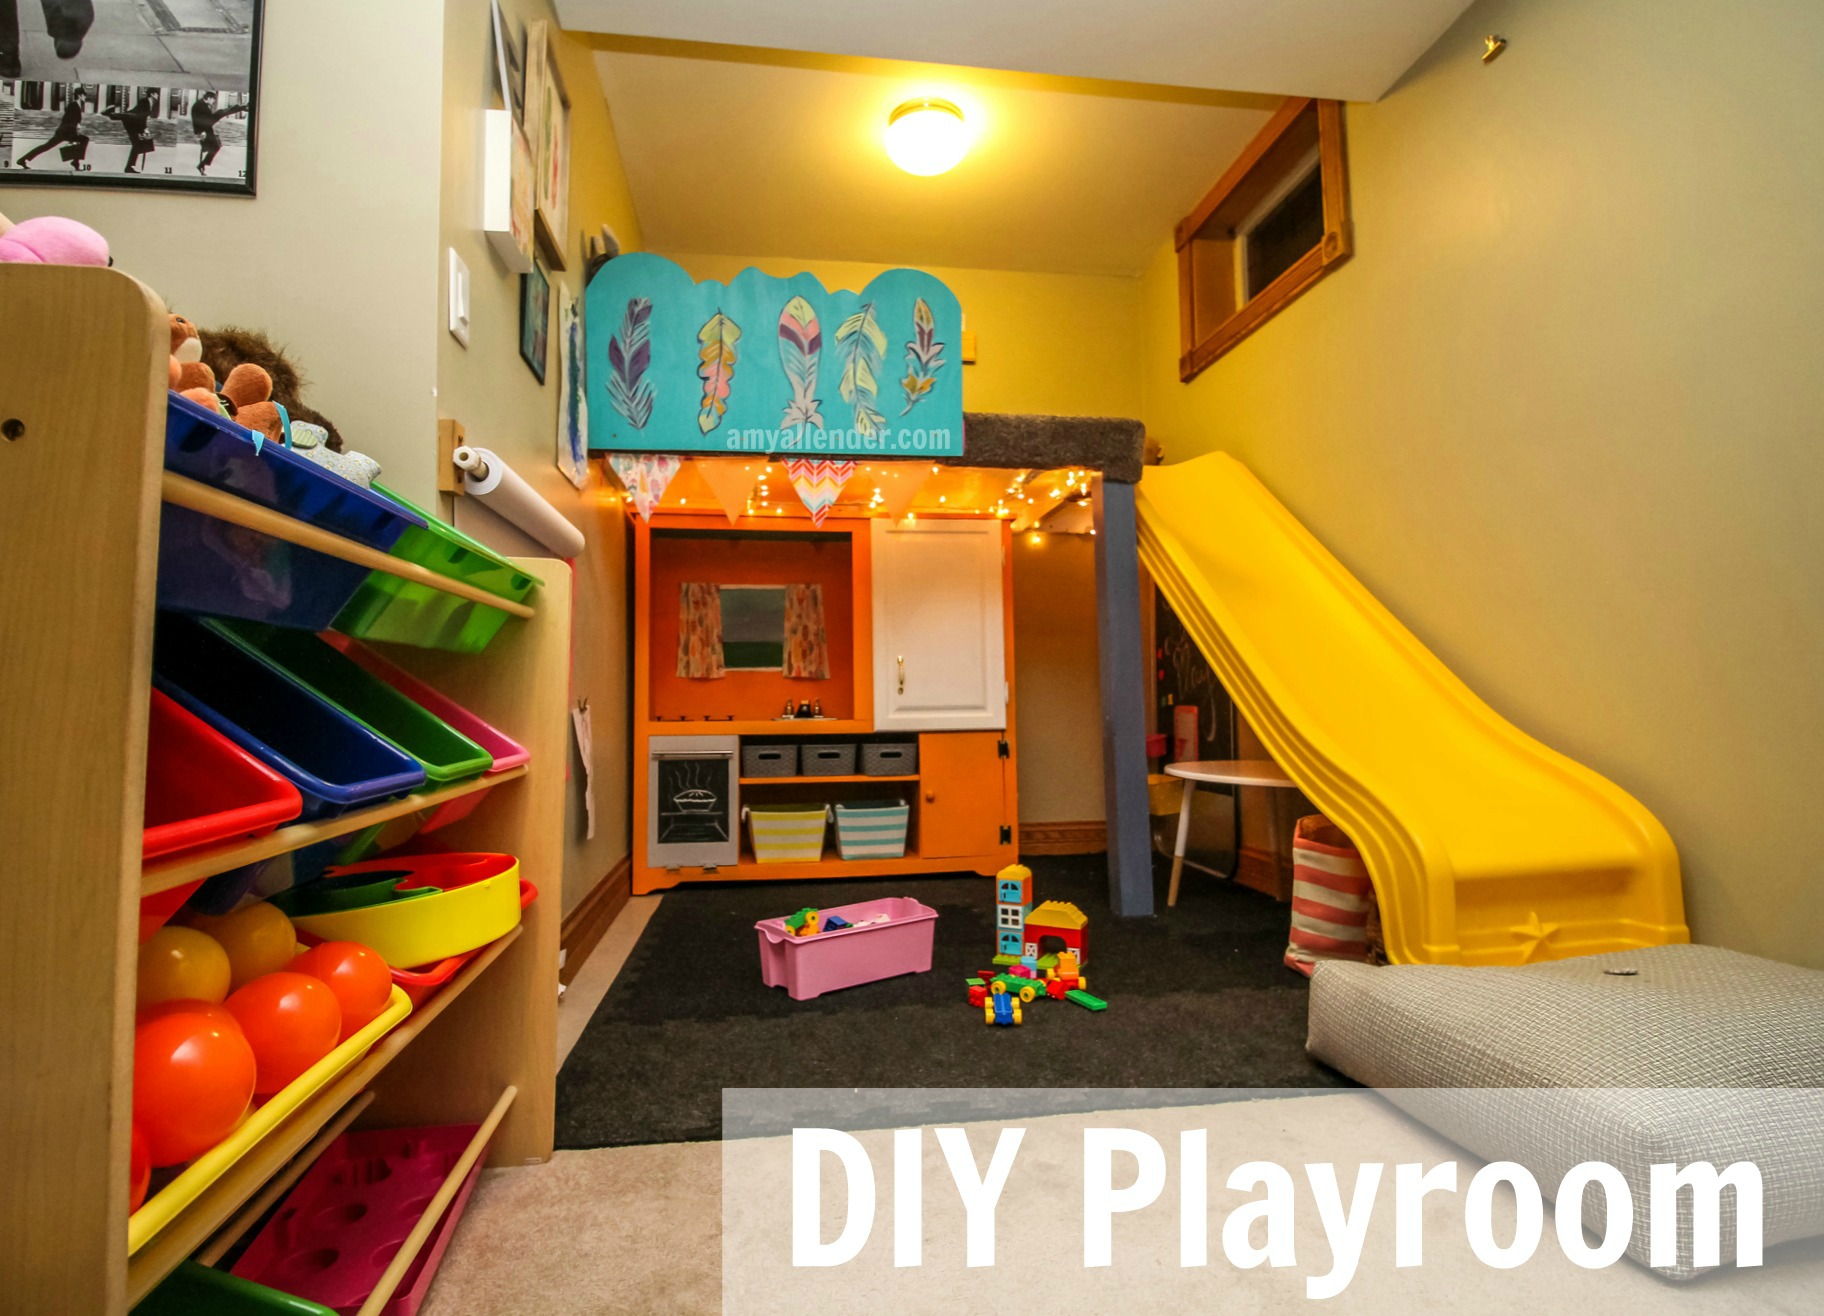
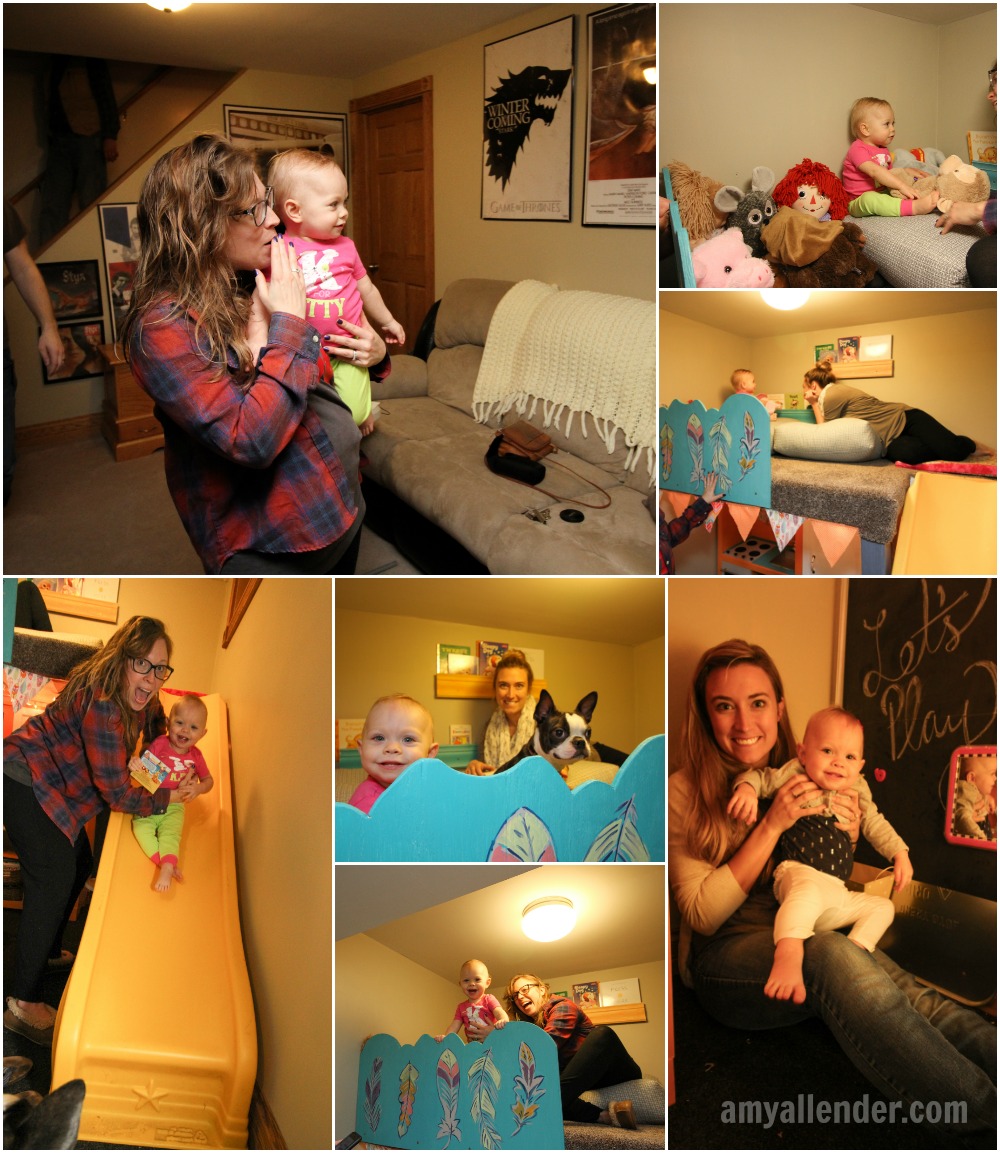
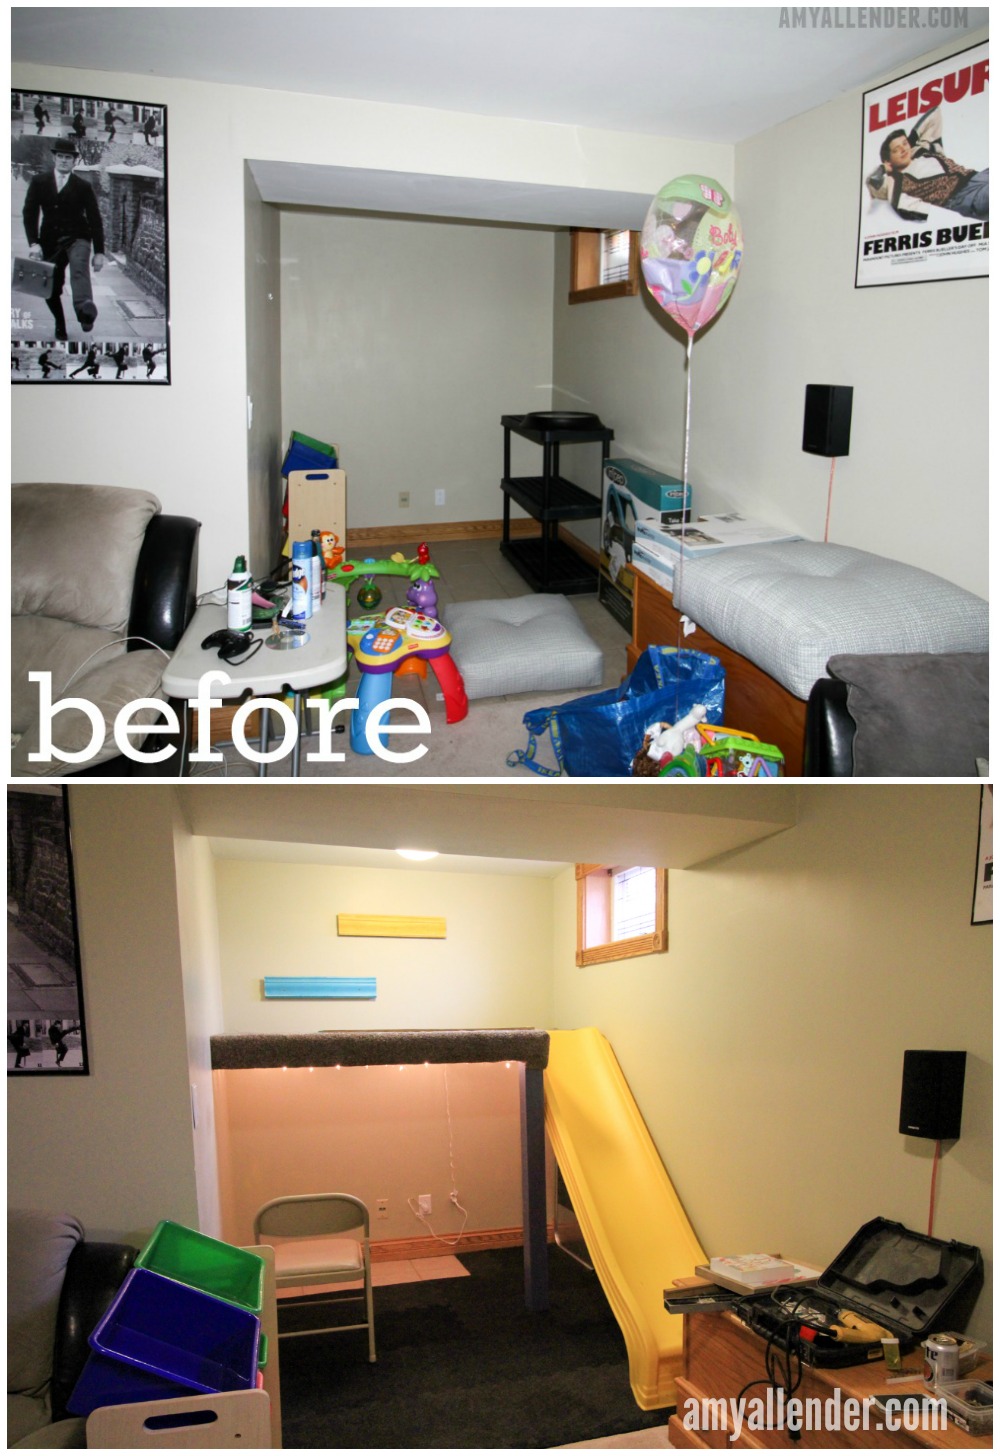
DIY Playroom
“Ellie and I were just playing downstairs. I heard something run down the steps and I figured it was one of the dogs. Then a small person flung themselves on to my back. ‘Up. UP. UP,’ she said. Haven. She was talking about the loft. There isn’t a ladder, and she wanted up in that loft so bad. She was barefoot and her hair was wet.
” ‘Do your parents know you’re here?’ I asked her.
” ‘Yep.’ I put her in the loft. A minute later Caleb, her dad, came down. She had sneaked out of their house after bath time. They had no idea…but the first place they looked was the play room. When he called her she just hid up there in the loft.”
My sister Erin called to tell me that story shortly after I’d the playroom for her daughter Ellie. Haven is their neighbor. She’s four. I’d like to tell you that was the only time she snuck {yes–snuck–I know it’s not a word…but it should be} over, but it wasn’t. After laying eyes on this sweet space she had playroom fever. Over the next week or so I was getting reports of a sneaky kiddo sliding silently through the back door–unseen, pounding on the locked door begging to come in, and being taken home very upset when she’d get caught. Eventually the newness wore off, but Erin still assures me that whenever Haven comes over to play she wants to be downstairs–in the loft.
I take that as a win. It means they space will keep Ellie occupied for years to come. And that’s a good thing. The photo above shows just how cute it ended up…but let’s take a look at the side-by-side.
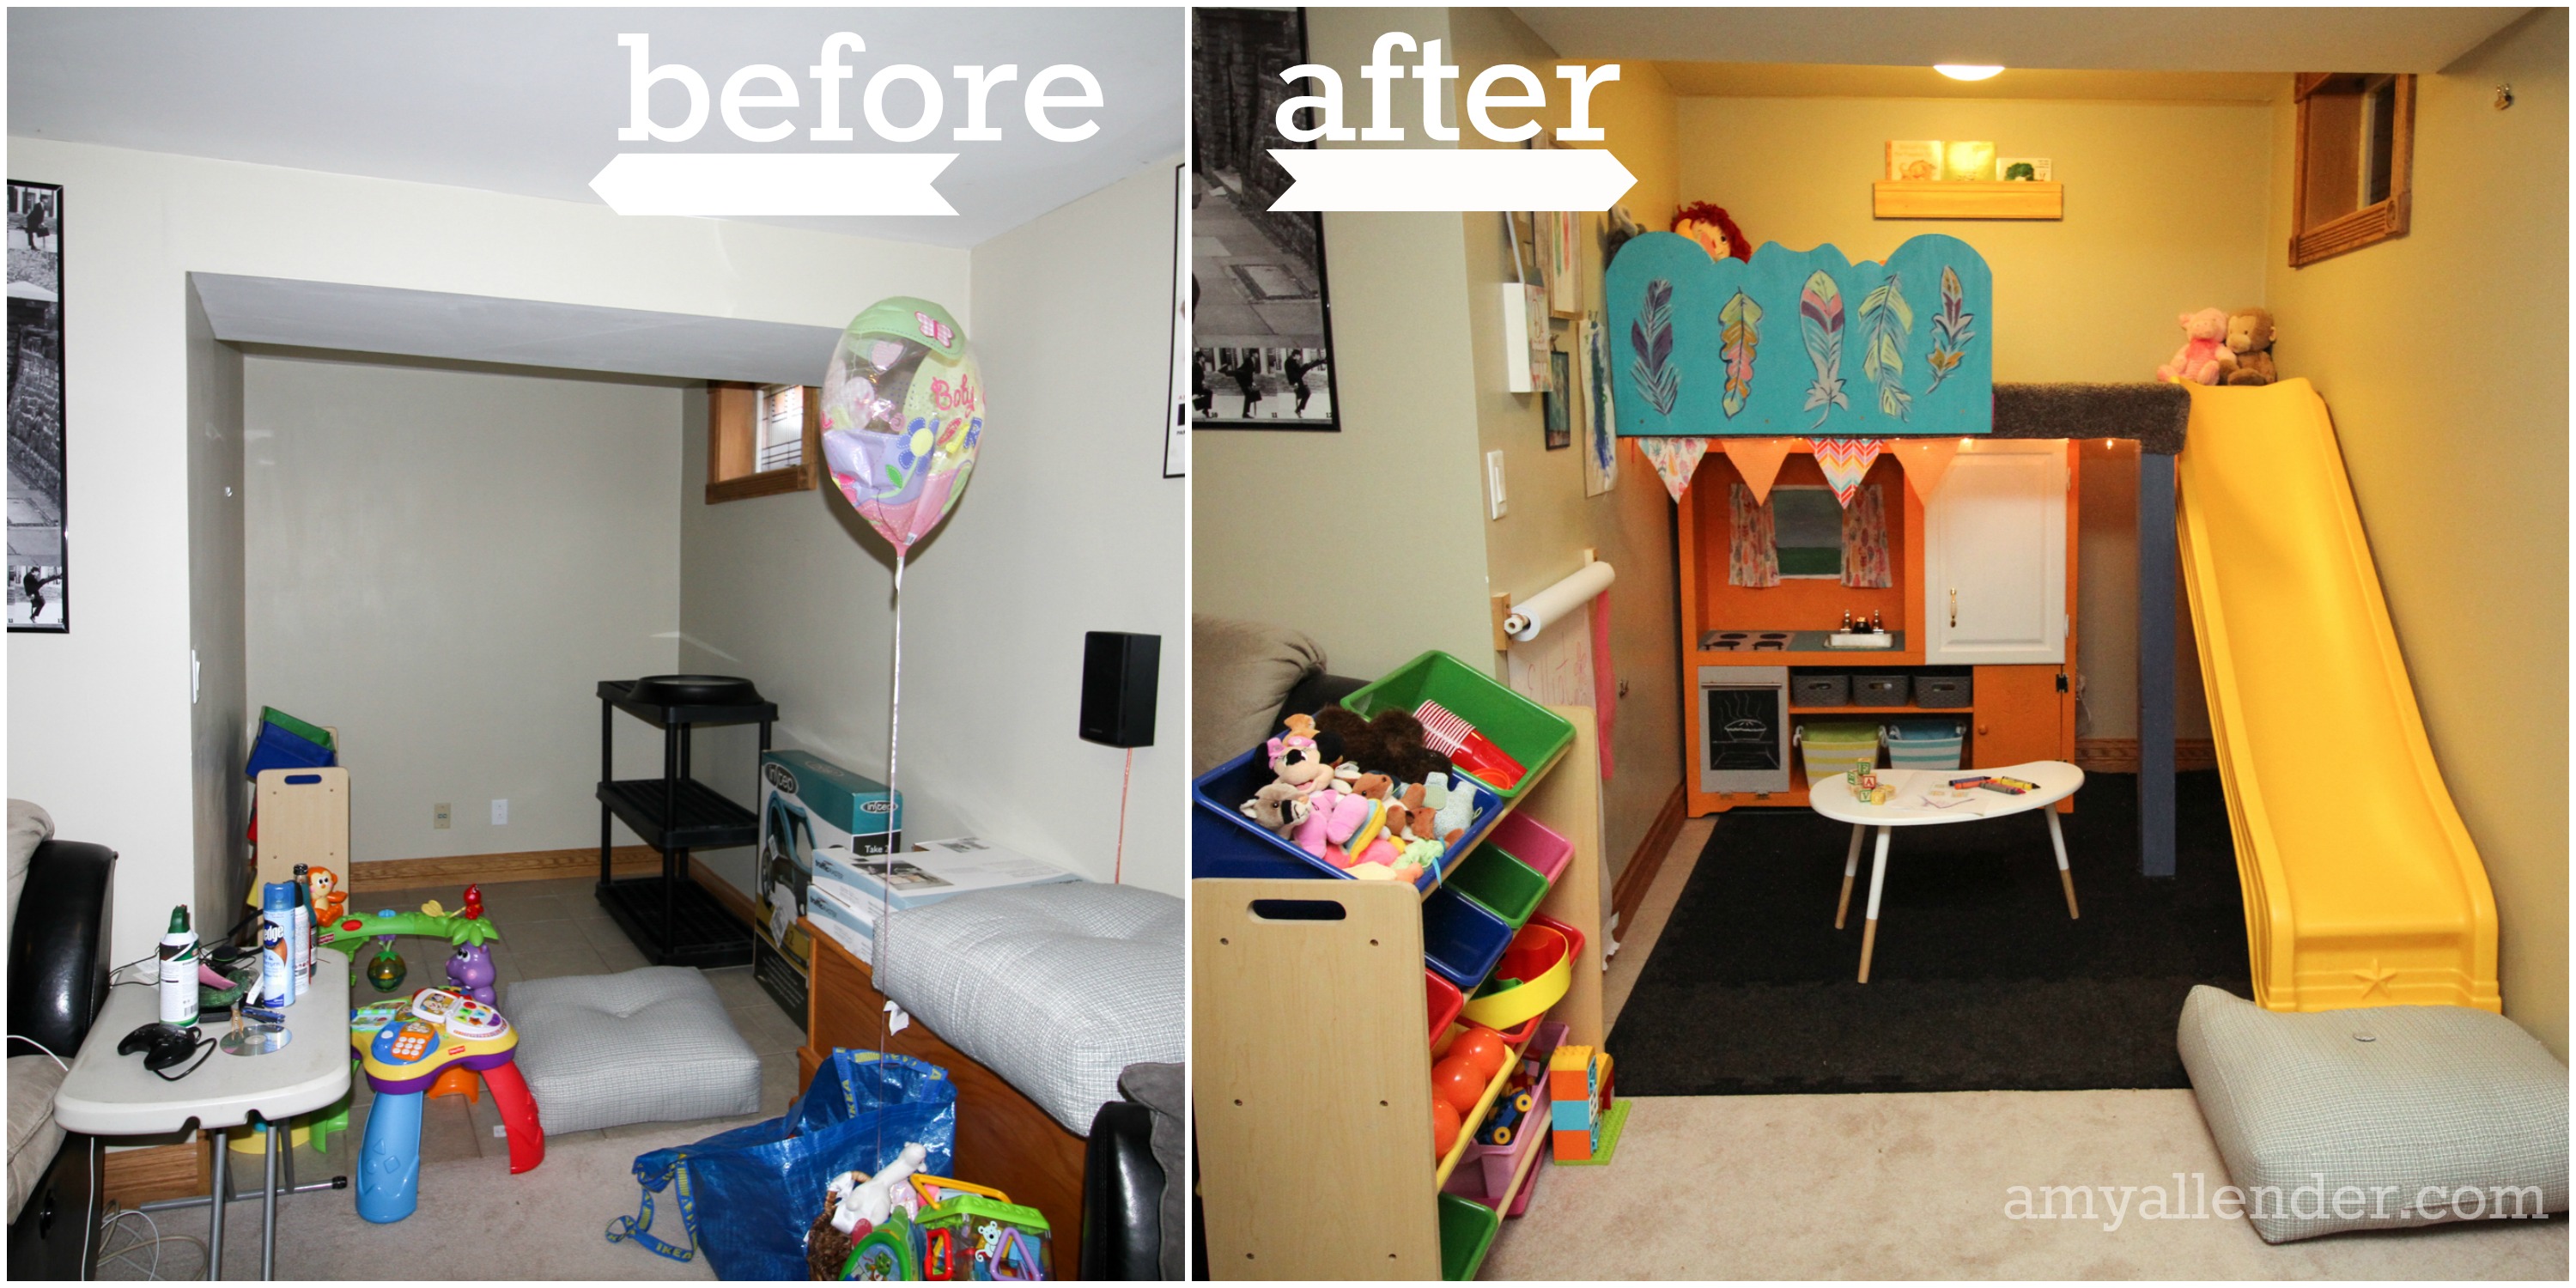
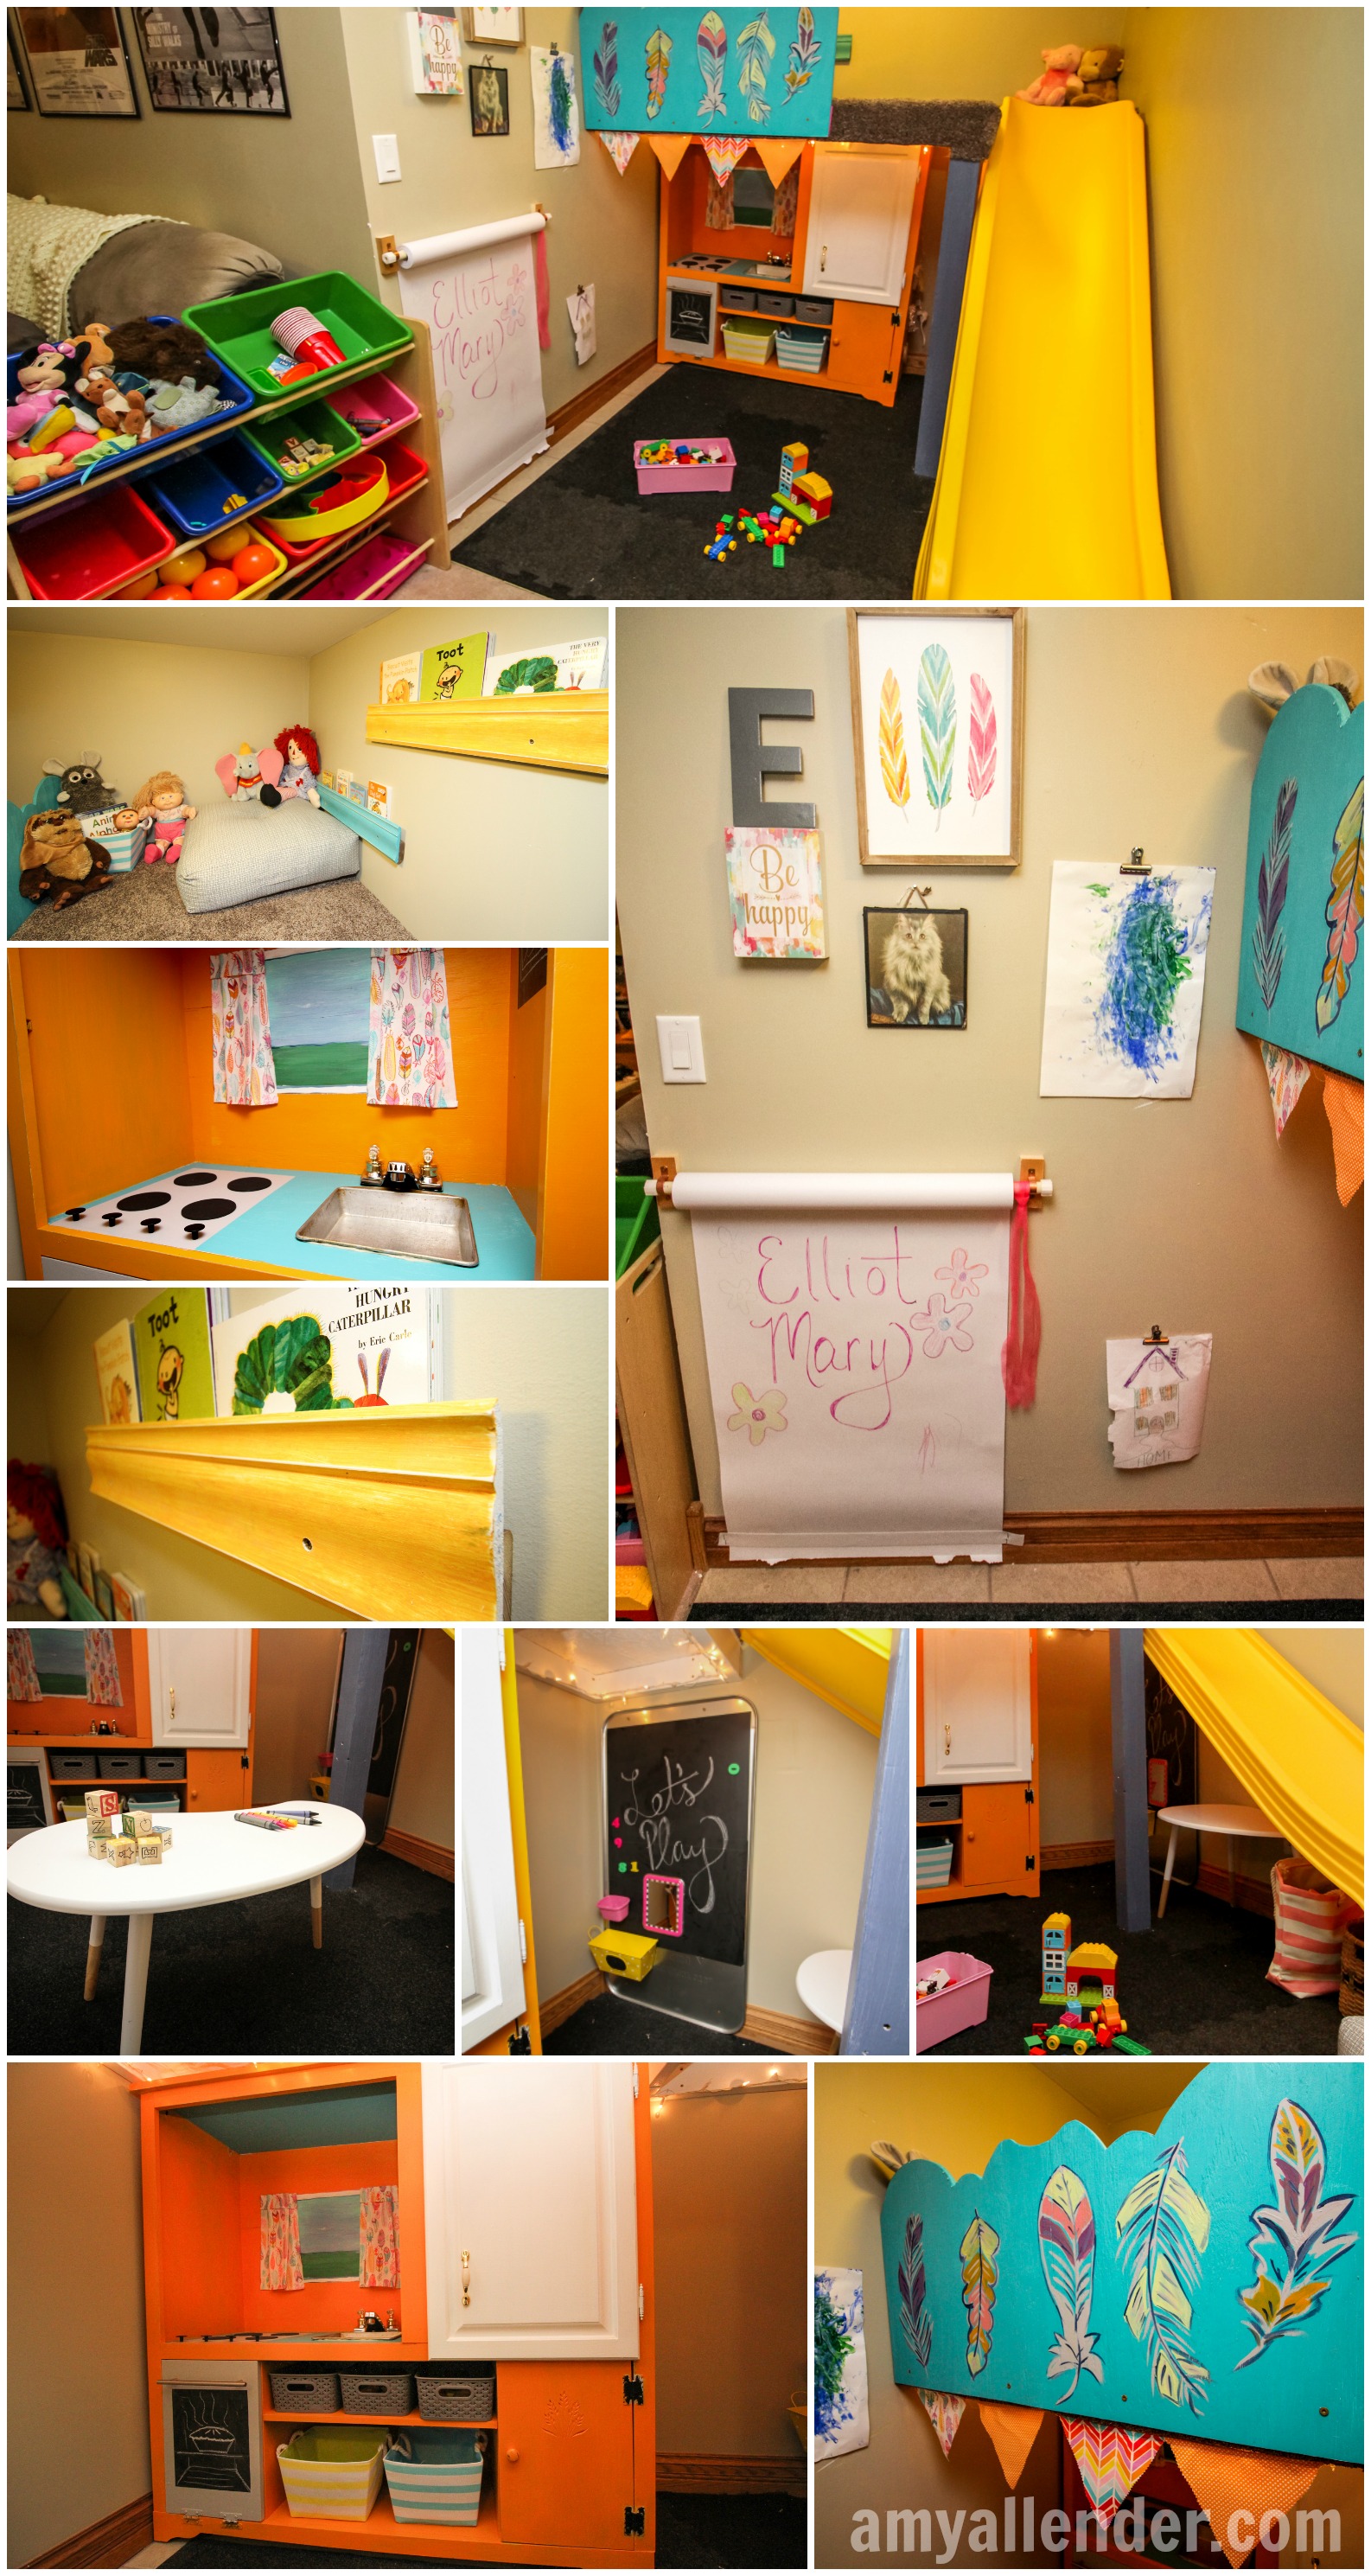
This super fun playroom packs a reading nook, soft space, playground, play kitchen, sensory board, two art spaces, floor play area and toy storage into a 6’x7′ space. The extra toy shelf and landing cushion take the playroom out just a bit past the tiled nook for a grand total of 9’x7′. That’s still pretty darn good. This project illustrates that good planning and creative solutions can turn an awkward, unusable area into something really useful. Even if your house didn’t come with an awkward nook, lots of these ideas can be implemented into a corner or even an awkward closet.
To refresh you all–I designed and implemented this make over as a birthday gift for Erin and Ellie. Because I’m a firm believer that big reveals are about 90% of the fun when doing a project in someone else’s home–Dad and I worked on the playroom while Erin and her husband, Adam were working. They were quarantined to the upper levels of the home until reveal night. {Except for when Adam had to help Dad unstick the play kitchen from the stairway…}
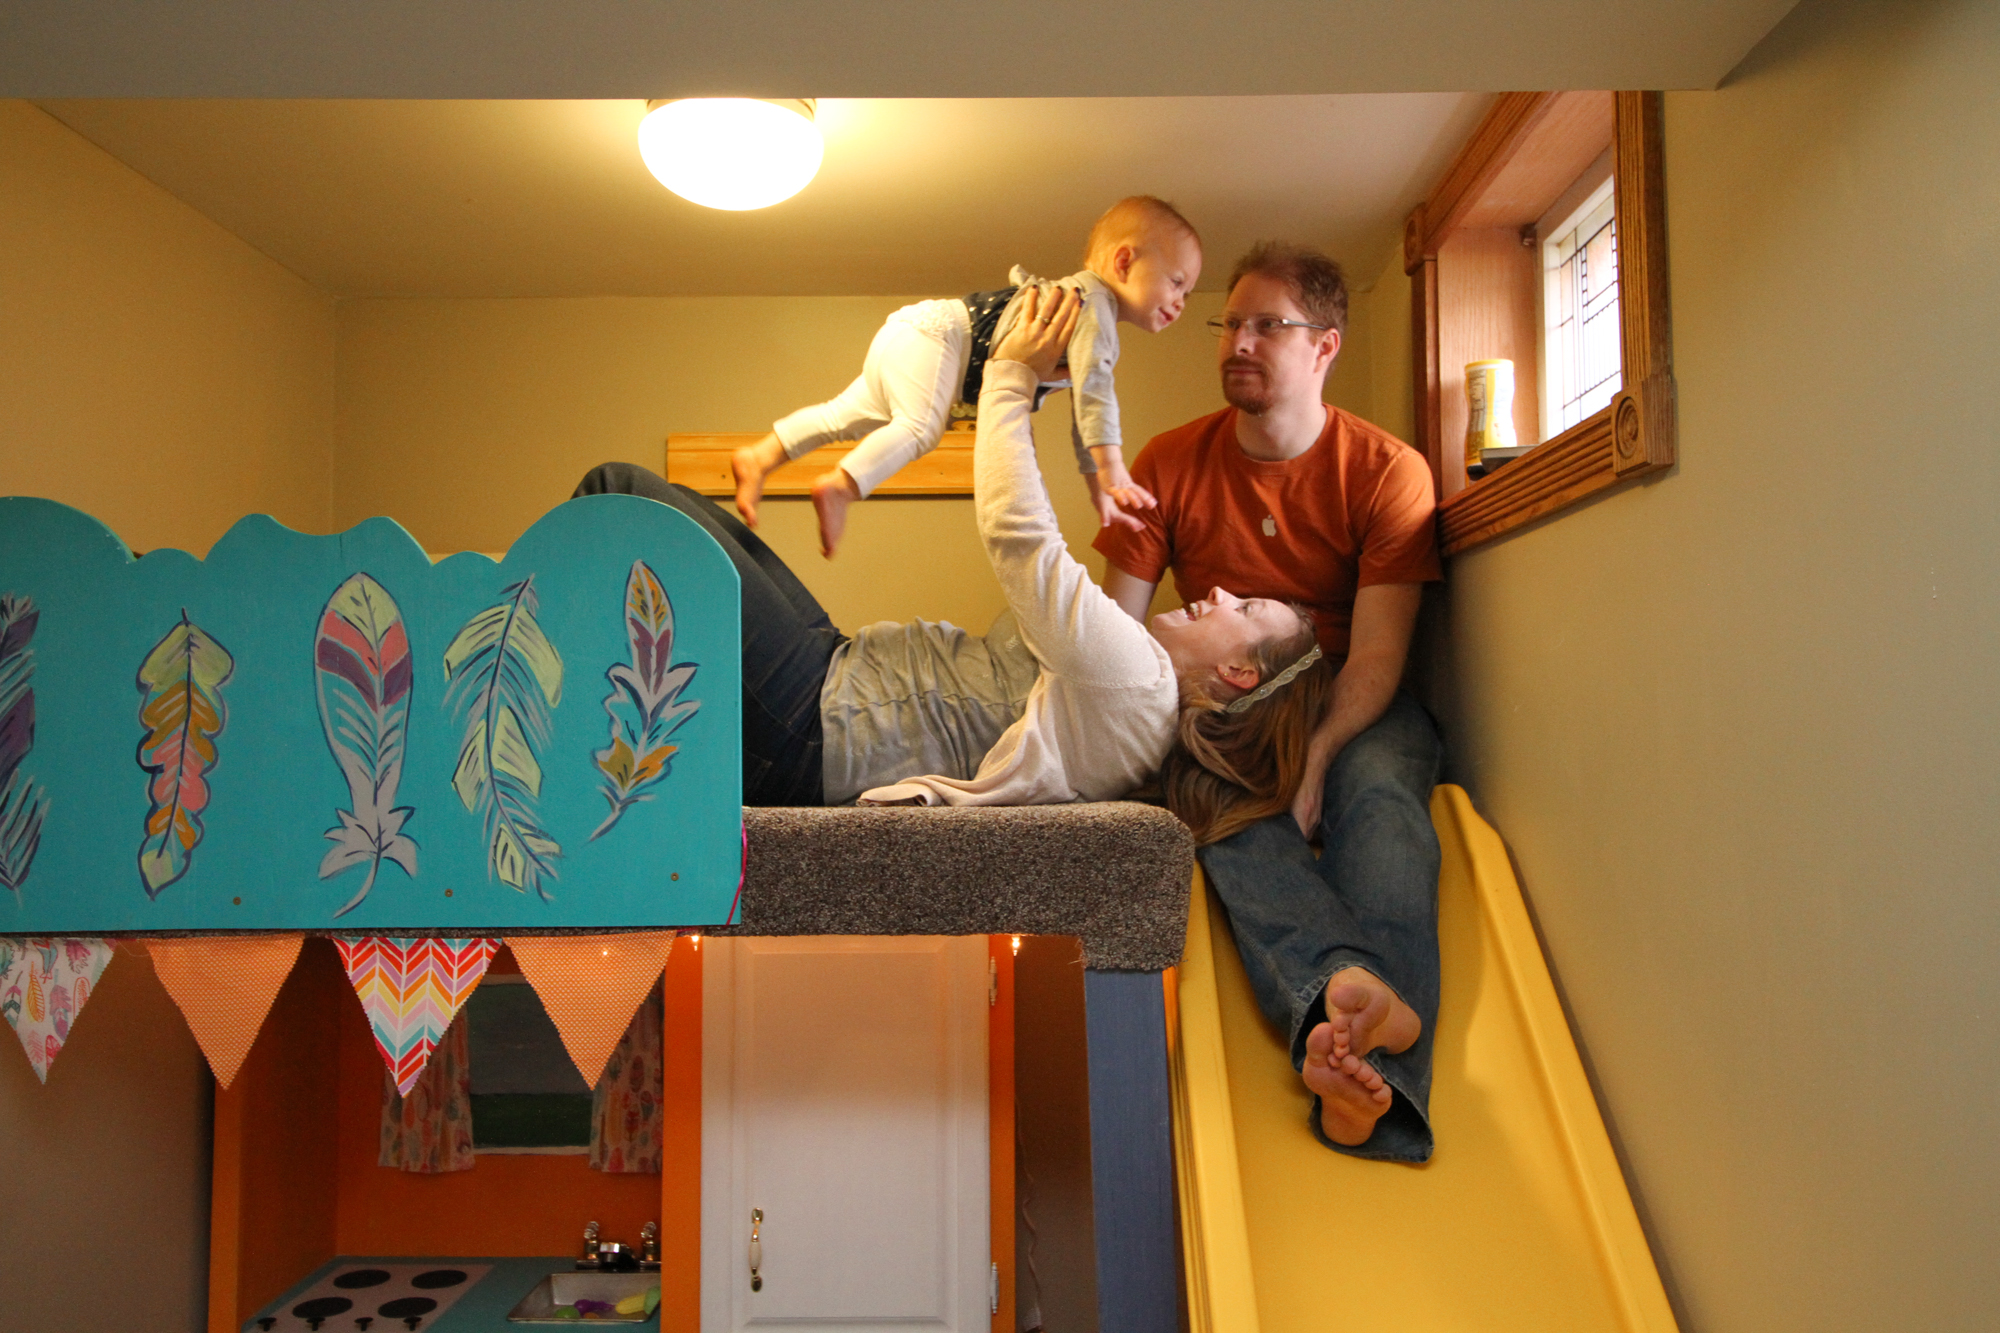
The big reveal happened close to bed time, after I’d installed the last bit of bunting and put in the play table. Ellie liked it–but let’s be honest…at 1 she really lacks the life experience to understand that most houses don’t have slides in the basement. Erin, on the other hand loved it. At least it seemed like she did. I honestly think it was all more than she expected. Even silly Penny, the Boston Terrier liked it. Except for when Adam sent her down the slide.
Since finishing this space I’ve been thrilled to hear how much use it’s getting. Erin says Elliot and Haven read books up in the loft and have a blast sending all of Ellie’s “babies” and balls down the slide. I’ve talked to Erin late at night when Ellie has been unable to sleep because of a fever, or cutting a new tooth and they’ll be in the playroom “cooking” or coloring. A pretty space isn’t worth much if it’s not serving a purpose.
Here’s a look at key spaces, ideas and tips involved in making your own DIY playroom.
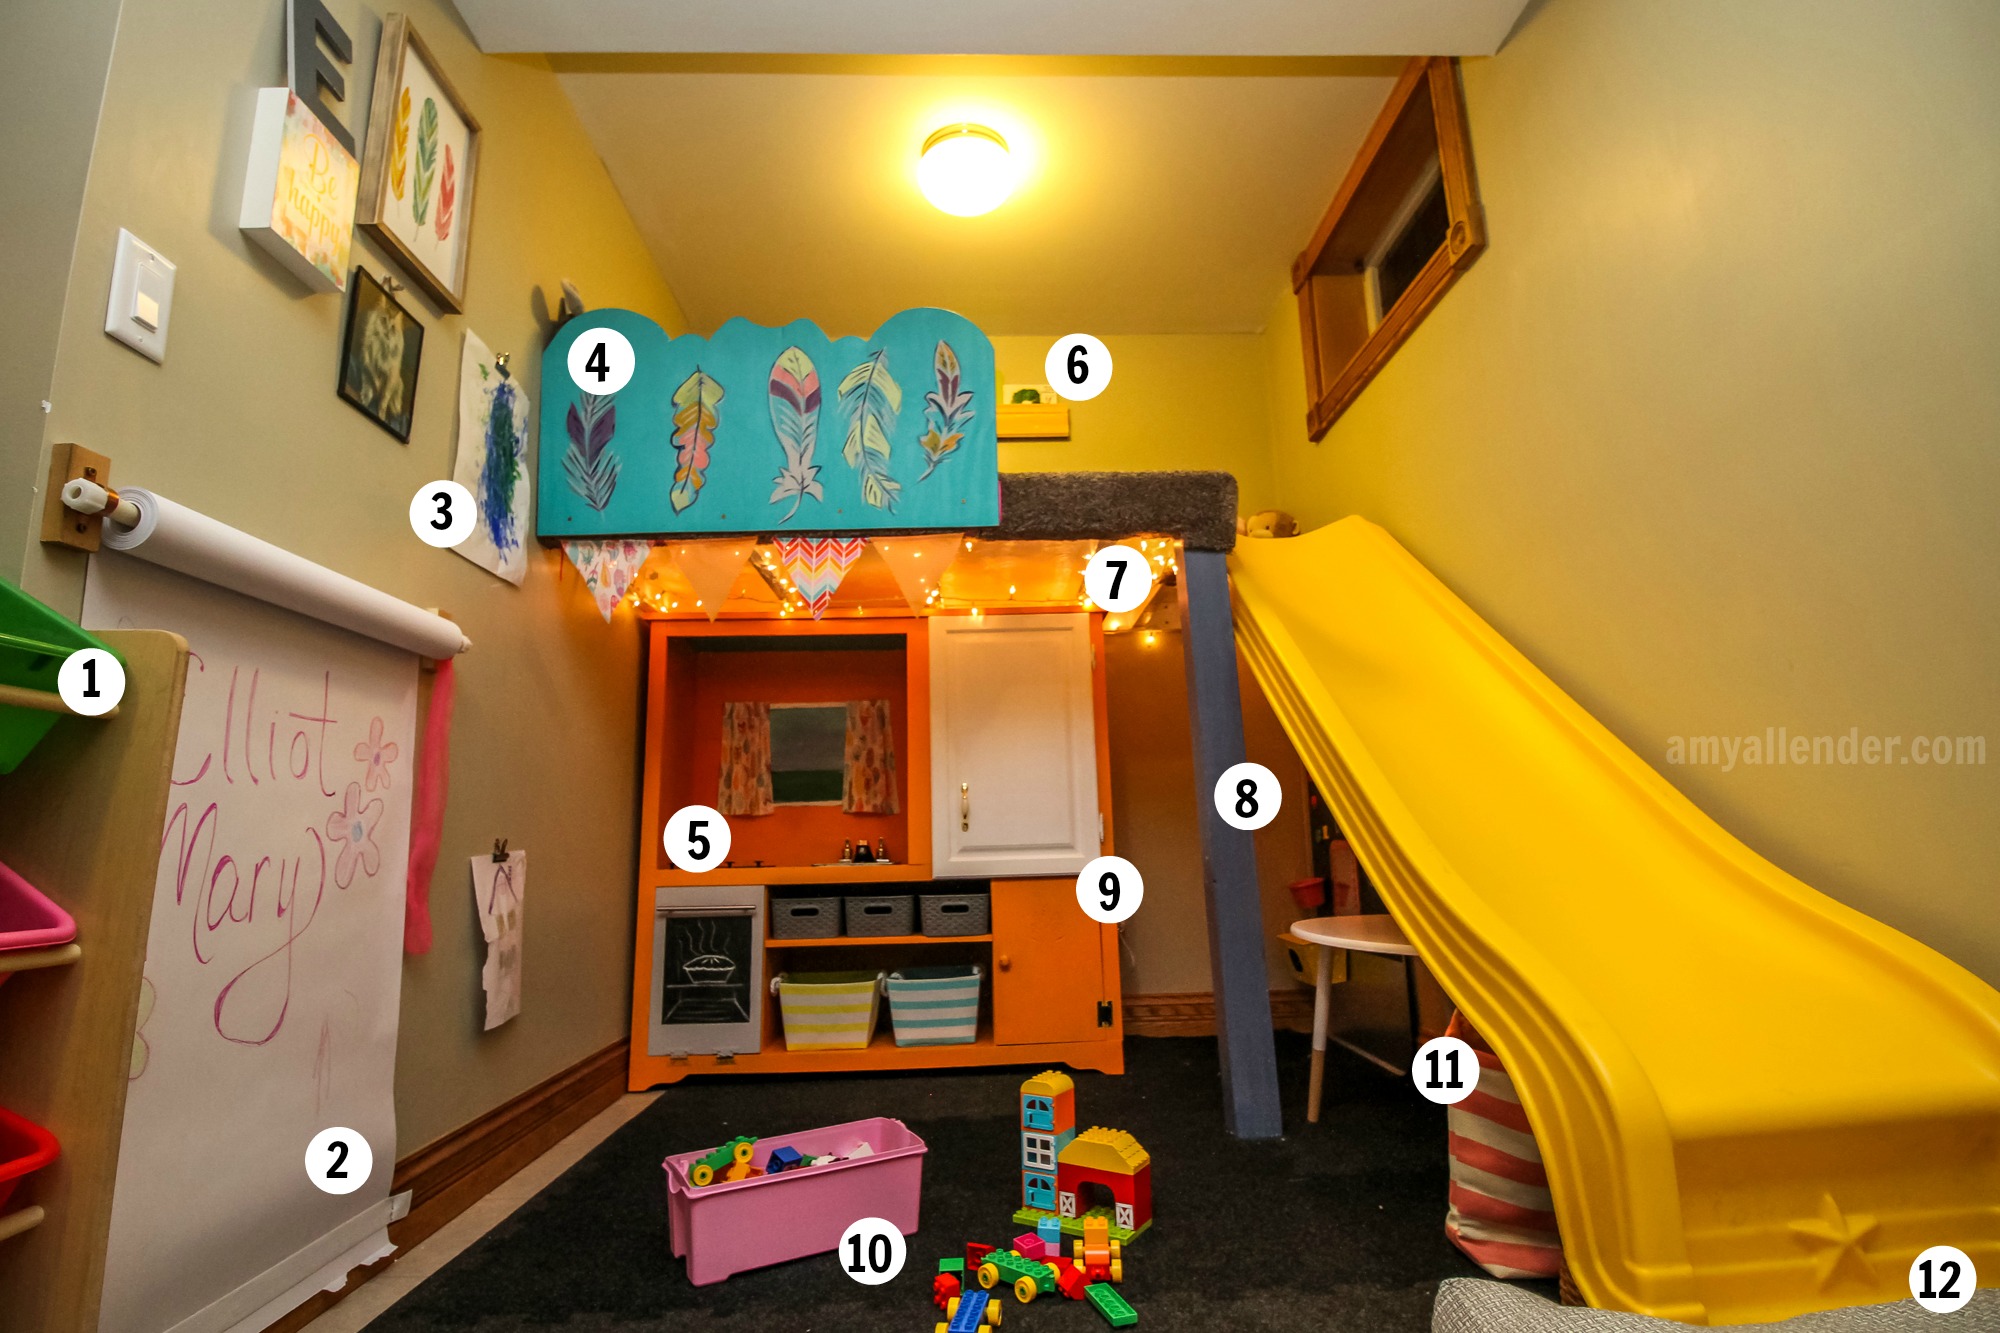
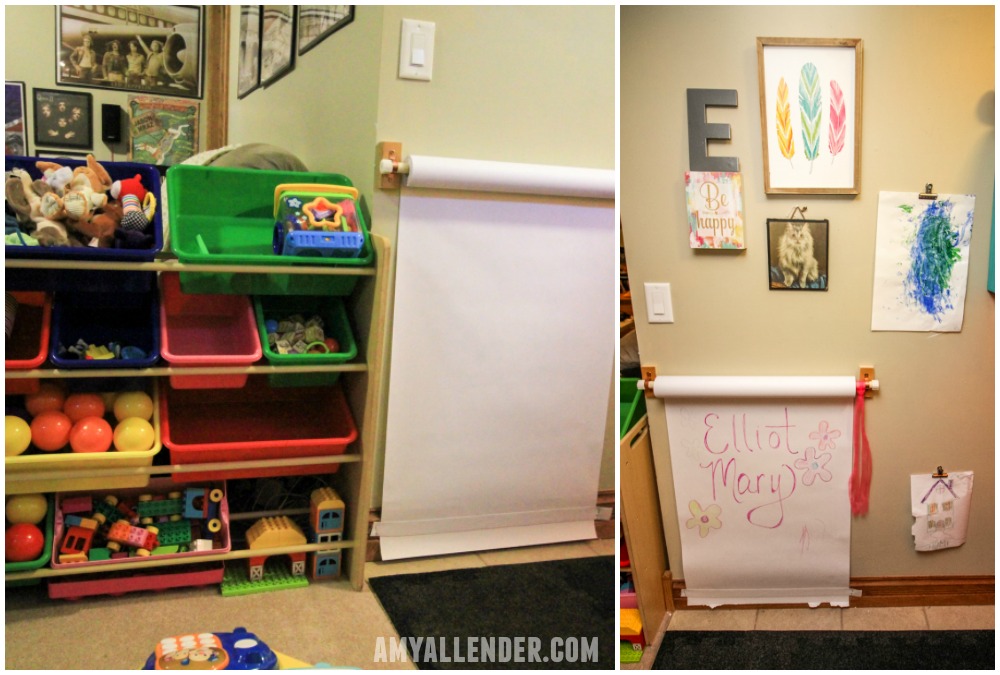
- Erin bought this standard toy shelf from a friend. It fits perfectly next to the arm of the couch {the rest of the basement is a TV/living room} and adds an easy-to-organize space for all of Ellie’s loose pieces and toys.
2. A roll of paper mounted to the wall and secured with pipe straps gives Elliot a place to draw with crayons and pencils. A piece of wide elastic holds the paper in place and prevents it from curling.
3. Office clips hung on the wall {and space for a few more in the future} provide space to display Ellie’s latest artwork
4. A piece of plywood painted with feathers to match the fabric accents acts as a guard rail in the loft. Since Elliot is so young, no ladder was installed–to prevent her from sneaking up unsupervised. As she grows, the barrier will be unscrewed and shifted to the right {next to the slide.} Wall mounted ladder rungs will be installed on the wall as a ladder into the loft without taking up valuable floor space.
5. In addition to being super fun, the play kitchen {upcycled from an old entertainment center} offers lots of toy storage…well hidden in pretty bins.
6. The loft houses large floor cushions from Costco, stuffed animals and books. Scrap molding was used to make a cheap effective book rack. It’s a perfect place for reading, napping, and watching Curious George from across the room. Oh yeah, and it’s great place to throw toys down the slide and launch yourself onto the slide.
7. White lights stapled to the loft frame brighten up the dim space underneath.
8. An oil drip pan covered in chalkboard contact paper {next time I’d use chalkboard paint} is mounted under the slide for a second drawing space and place to play with magnetic letters and numbers
9. An easily changeable and updateable sensory board in mounted on the side of the play kitchen. {See my inspiration here}
10. Rubber backed floor tiles fit together like puzzle pieces and soften up the floor–making it more comfortable to sit on and safer to fall on. It’s easy to vacuum and easy to replace a tile if needed, making it a great place to play Legos.
11. Dead space under the slide houses even more toy storage bins and a play table. It’s easy to slide out and use for finger painting or snack time, but stores neatly under the slide and out of the way to free up space for playing on the floor. {See table in details collage above.}
12. To soften up fast landings, a floor cushion sits under then end of the slide.
Jealous yet? I know I am. And I don’t blame Haven one bit for sneaking over all the time. Wouldn’t you?
Before I go…I owe some big thank yous: to my dad–Warren “the machine” Allender for all of his construction help; to my mom–for doing all of the sewing and for taking over babysitting duty while Dad and I worked; to Erin and Adam for trusting me with their house, and for giving birth to the cutest baby on record {in my biased opinion}; and to Ellie for melting my heart and giving me an excuse to design the funnest space I’ve ever taken on.
xo
Amy
PS–in case you missed a post this week, here’s the introduction to this project, the post about building the loft, and how to make a play kitchen and art spaces.
by Amy | Jul 21, 2016 | Blog, The Art of Projects, the house
DIY Play Kitchen & DIY Art Spaces
This week I’m show casing a super cute-cool-awesome playroom I designed {and executed with help from my dad} for my niece. If you missed the introductory post, you can see it here. Yesterday I showed you how we installed a loft to add additional floor surface into the tight space. You can see that post here.
We left off here….Loft, slide, flooring, book rack and twinkle lights installed. Today I’ll show you how I upcycled an old entertainment center into a DIY play kitchen and created some creative space. {Aunt Amy is a big advocate of encouraging little ones to draw, paint and color.}
Now, onto the kitchen. Ellie loves to play cook, so I really wanted to give her a space to be a chef–and give my sister a place to store the quickly growing collection of play food she is amassing. Here’s the B&A.
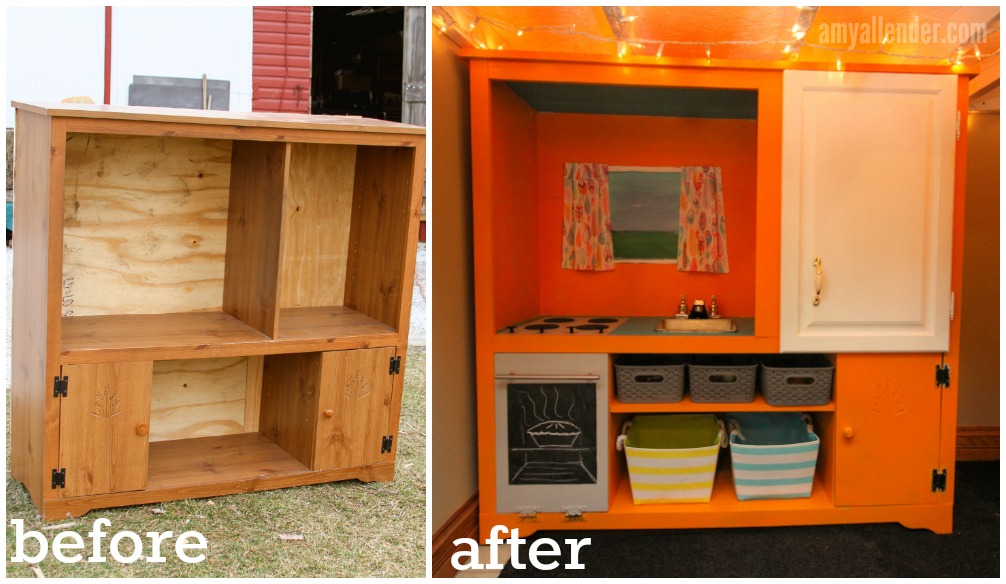
The beauty of this DIY play kitchen is that it can be made for next to nothing–and it’s super easy to execute. So even if you aren’t making a loft and a full play room–this is an easy piece to make for your home, or a friend. It’s sturdy and in also offers lots of storage space. I’m a big fan of pieces with doors and room for bins–better for corralling and hiding a mess. A lot of the process is pretty straight forward, but for the sake of an infographic…here’s a breakdown.
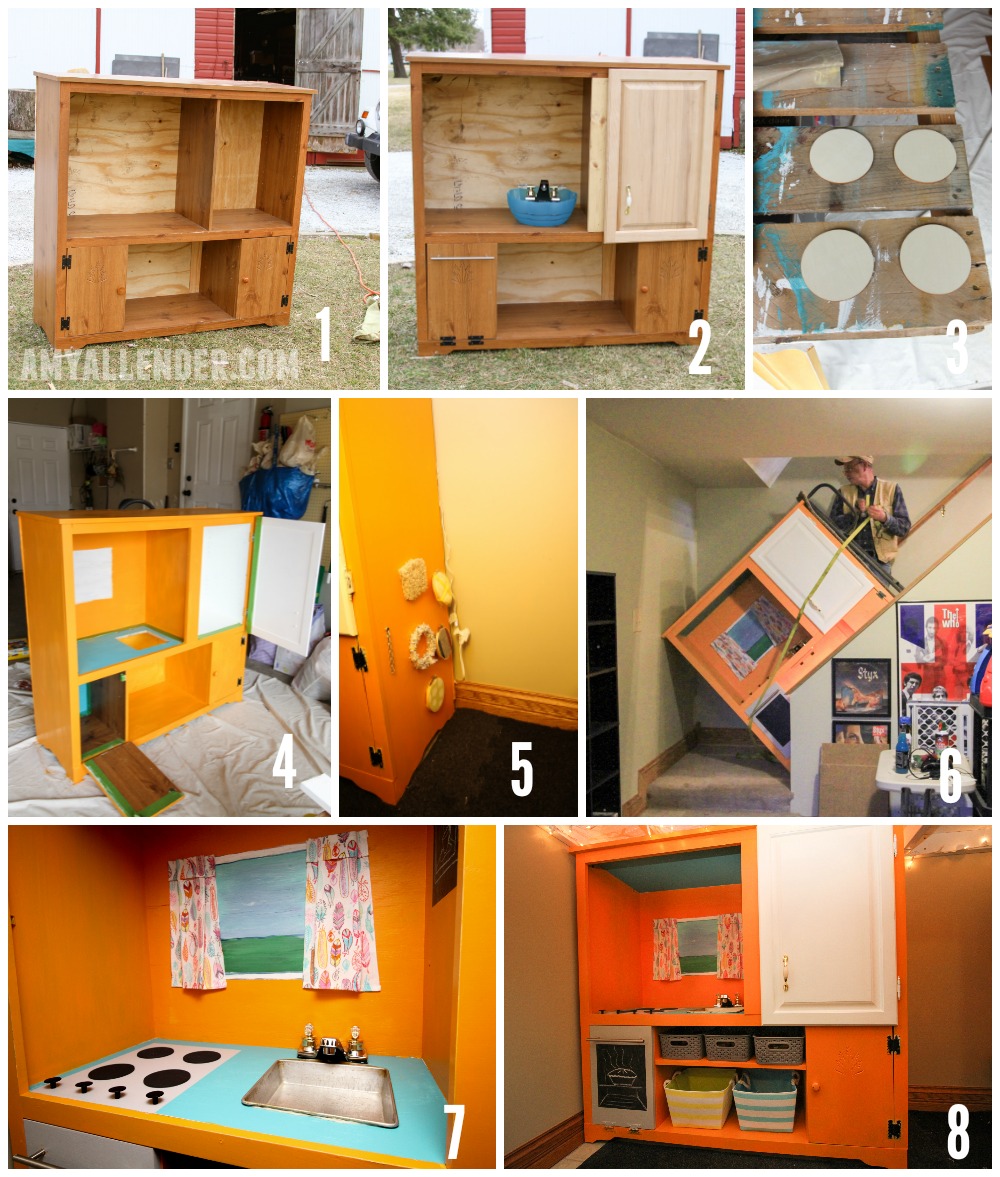
- I started with my parent’s old entertainment center. If you don’t happen to have one lying around, check out a thrift store…or better yet a Habitat ReStore {if you are lucky enough to have one in your community.} At the ReStore there were loads of them for about $15 each–probably since TV’s are no longer made in this shape….
2. A quick visit to the Habitat ReStore {or your local hardware store} gave me a cupboard door, a door handle, and “oven” handle. I attached the cabinet door to cover the shelves and added a scrap of wood to hide the gap left because the door wasn’t quite wide enough to cover the space. Next, I removed the hinges from the lower left cupboard and moved them to the bottom so this door would open like an oven. To finish the oven, I added a nice, long handle.
I also picked up a faucet to use with the sink. I planned to recess that blue bowl in to the “counter”, but it ended up being a little too deep.
3. A package of four, small wooden discs from Hobby Lobby were painted black and secured to the counter with wood glue to serve as “burners.”
4. Because the surface of the entertainment center was somewhat glossy I primed it with {my fave!!} Zinsser Bulls Eye 1-2-3. It’s made to cover over any surface and ready if for a top coat. In hind sight, I wish I would have spray painted this piece. I highly recommend doing that–at least on the outside–to cover brush strokes. It also would have been a bit cheaper than buying paint {the job was a little too big to use a sample sized container…but a quart left me a lot leftover.}
5. On the side of the entertainment center we made a small sensory wall. Since Ellie was only one when we did this project, I started with different textures held inside small embroidery hoops. As she gets older these can be swapped out and locks, chains and switches can be added. My inspiration came from this awesome DIY sensory wall.
6. Actually getting the kitchen into the basement was our biggest challenge. We pretty much lodged it in the stairway. That’s what we Allenders refer to as an oopsie poopsie. This left the happy homeowners with some slight drywall damage and me with a thrown back. But it was well worth it.
7. Dad helped me install the faucet…which is super fun because the handles actually turn. And we used a jigsaw to recess an old 8×8 baking pan for a sink. I really love that it looks like a stainless steel kitchen sink. The oven knobs are just cheap, black cabinet knobs. A window breaks up the orange on the back wall, and a piece of chalk board contact paper gives some “menu” space on the right wall.
8. I used more chalkboard contact paper to cover the front of the oven. Tip for future DIYers–I’d use chalk board paint instead. In the months since this project was completed, I’ve been told it hasn’t held up well. Some well placed bins make the deep shelves more useful for toy storage and organization.
Once the kitchen was done, it was time to add in creative spaces. This is another super simple project that can fit into any home. This is an oil pan {I found it in the automotive section of Wal-Mart}. I covered it with chalkboard contact paper for drawing space. I bought a few bins from Hobby Lobby to store chalk and magnetic shapes and letters, then attached magnets to the bins with hot glue to keep them in place. **Again–if I did this all over again, I’d use chalk board paint instead of the contact paper because Erin has said it’s not holding up well.
For those non-chalky times I also added a paper roll and some space for displaying future works of art.
Dad put the paper rod up by running a rod through the center of a roll of paper and attaching that to the wall with pipe straps. To hold the bottom of the page in place and from curling, we stapled a wide piece of elastic to the baseboard.
Erin already had the toy bins you see in the right image above. This just happened to fit perfectly next to the arm of the couch. This does bring the playroom out a few feet past the nook we were building in, but I think it’s a nice way to section off this portion of the basement for playing. And it only required swapping an end table to the opposite end of the couch.
Okay–well, that’s pretty much all the pieces. Tomorrow I’ll show you how it all fits together–and some adorable photos of Ellie playing in her space. Come back for the big reveal!
xo
Amy

