by Amy | Jun 10, 2013 | Blog, The Art of the Kitchen
Today I’m revisiting a post that I ran over a year ago. Now, I wouldn’t rerun unless I really thought you should see it. This is the best salad you’ll eat all summer. It’s so amazing, so fresh, so summer.
The beauty of this salad is that it comes together quickly and can be made big enough to serve as a main dish. And you can use with lots of different fruits {peaches are photographed, but I love it with strawberries and Mandarin oranges too.} It makes a beautiful lunch paired with a soup or turkey sandwich…or a dinner with grilled chicken. Layer up all the following in a salad bowl. I just listed out the ingredients. You know how much of each you like! (And how many you are serving.)

- Spinach
- Onion (I used 1/4 of a white onion for the two of us)
- Peach–pitted and cut into small pieces (I cut up one for our salad)
- You can also sub in strawberries, mandarin oranges or mango!
- Pecans
- Feta Cheese (Not pictured because Derek doesn’t like it…I put it on my bowl and really, that’s how it should be served)
Next mix up your dressing. Making a homemade dressing is a sure fire way to impress your friends and look like some kind of award winning homemaker. So, if you are into the glory of being awesome you should definitely start making your own dressings. And once you see how easy it is–I bet you’ll start doing it.
Pour the following ingredients into a bowl OR a standard (not jelly) canning jar.
- 1/3 C Sugar
- 1/3 C Vinegar
- 1/3 C Olive Oil
- 1 t Ginger
- 1/2 t Garlic Powder
- 1/2 t Lemon Juice
- 1/2 t Chicken Bullion or Seasoned Salt
Give it a good stir until the sugar is somewhat dissolved. If you are using a jar, just cap it off and shake it up.
Pour over your salad when you are ready to serve, or over individual salads. One recipe for the dressing will cover a large pack of spinach and all the fixings.
I have made the rookie mistake of pouring is over the whole salad before, then driving to a party. Do not, I repeat, do not do this. Ever. It was all soggy and the sugar caused the fruit to juice out. It was a mess and I lost a lot of friends because of it…okay not really. But seriously, don’t dress it until you are ready to serve.
This’ll turn into one of your favorites. I just know it. I eat it multiple times a week and my friends constantly request it. Take it to a potluck this summer. I guarantee it’ll be a hit.
Enjoy!
Amy
by Amy | Jun 7, 2013 | Blog, The Art of Projects, the house

Can you believe this is my room? I can’t either. I also can’t believe it’s finished. {Minus one vent cover}. So take a look. Next week I’ll break down exactly how I did it.
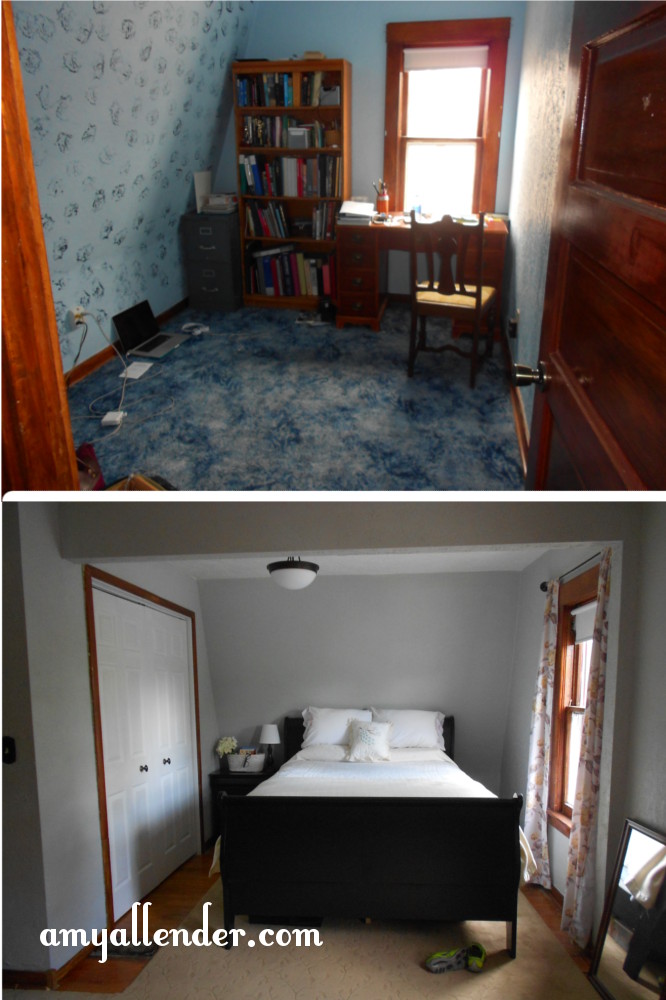
Where the bed now sits where that cramped office used to be. Upgrade.
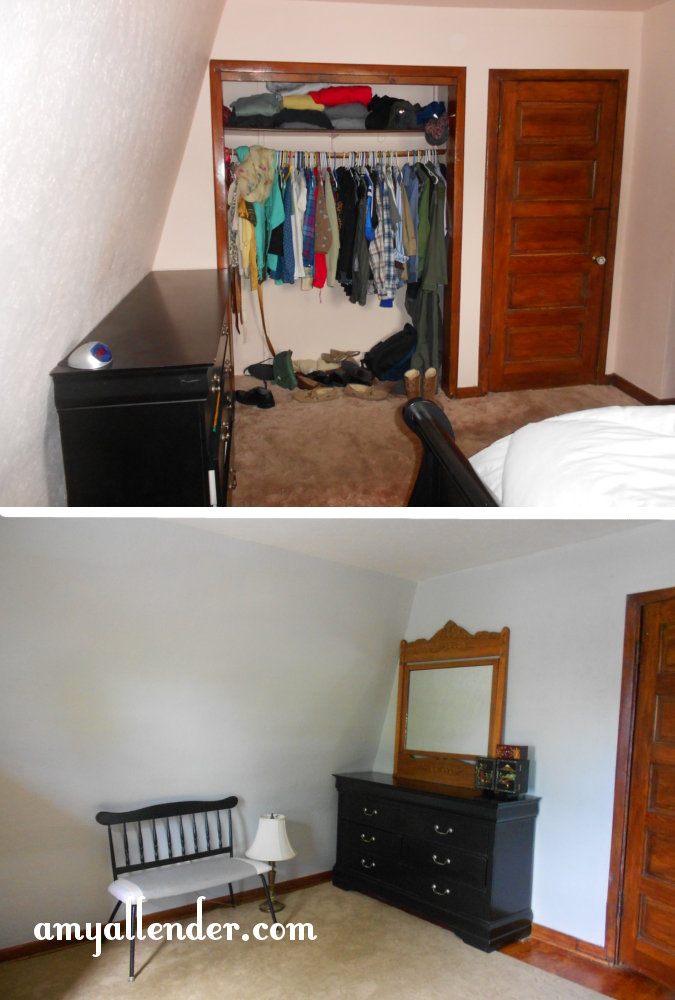
I walled off the old closet and now it’s a place for our dresser. {There is still a bit of electrical trouble, which is why that extra lamp is on the floor back there.} And take a good look at that old, unorganized closet…
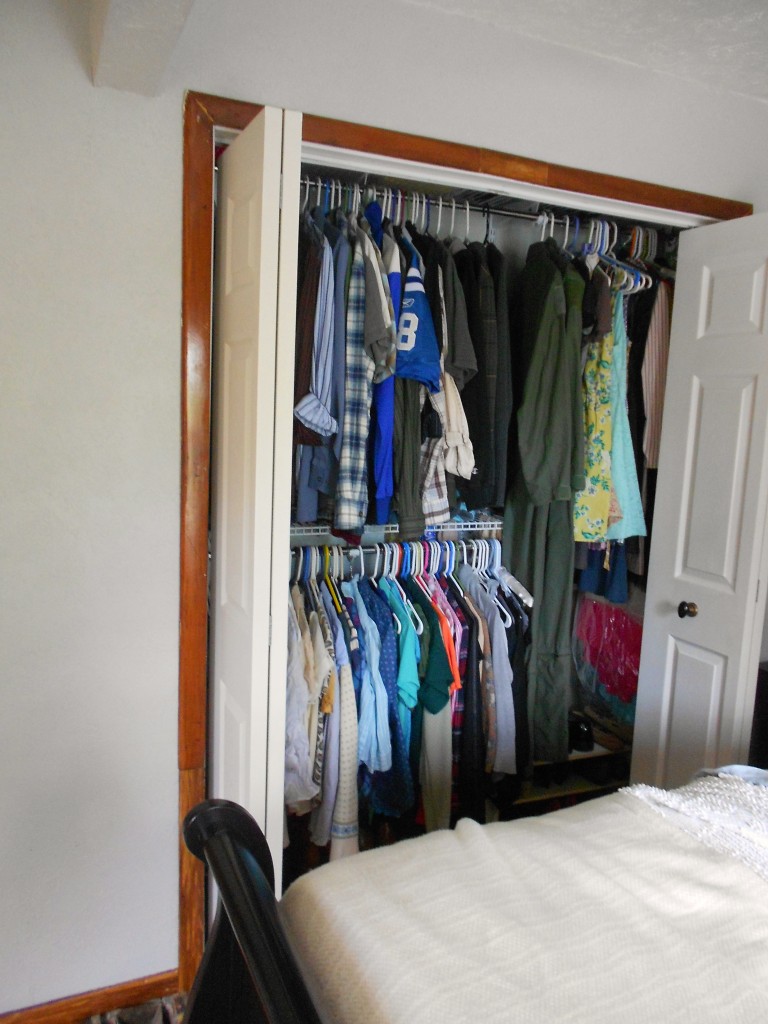
BAM! New and improved. I have more space than I’ve had in years!
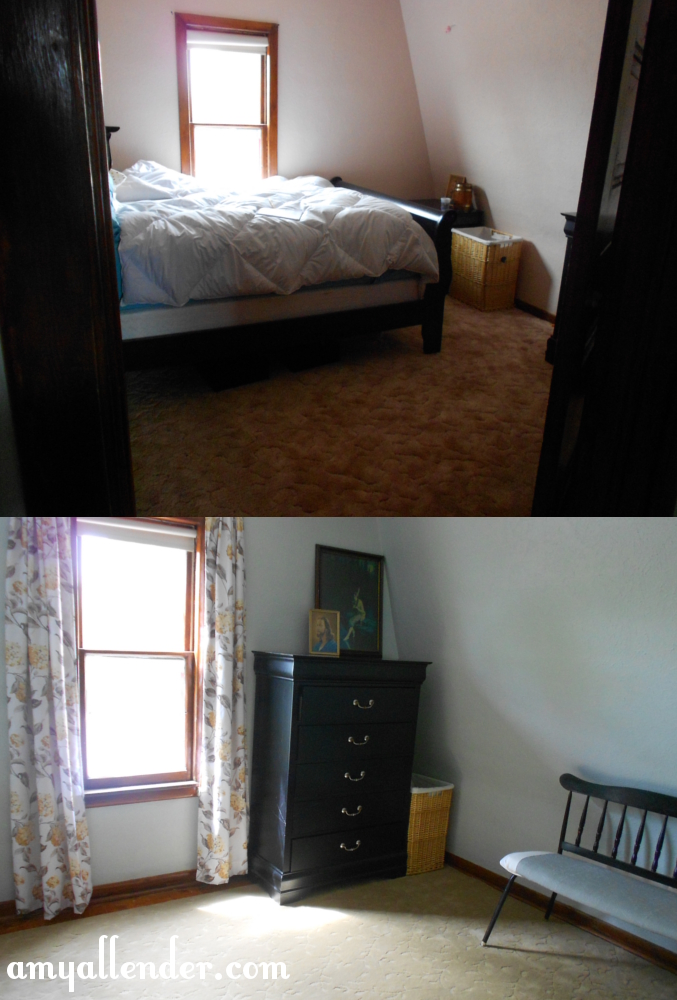
It’s hard to believe it’s the same space. The only problem now is that I don’t want to get up in the morning. Well, that was a problem before…but it has really escalated.
Have a great weekend.
xo Amy
by Amy | Jun 7, 2013 | Blog, The Art of Projects

This is a wooden shipping pallet.
And this is what creative people are doing with them.

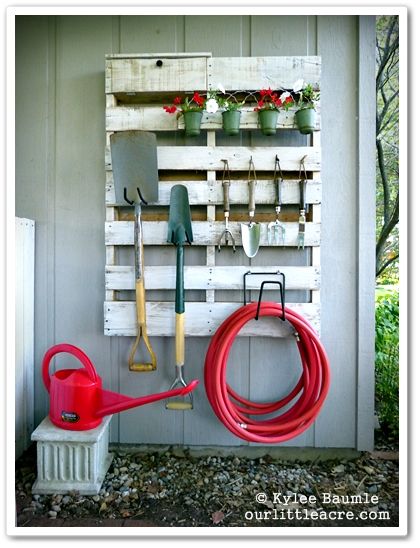

A quick search on Pinterest for the word “pallet” will pull up all kinds of awesome project you…yes, YOU can make from a shipping pallet. There are whole boards committed to pallet projects.
Now…if you are anything like me you love these projects, but you don’t own a Wal-Mart. So you probably don’t have a lot of shipping pallets hanging around. The dilemma then becomes,where to find these cast off gems.
Here’s the skinny on where to get your very own pallets. Let’s start basic. Pretty much every business that receives products, receives those products on pallets. Also, construction sites usually have them. Then they burn them at the end of the project. Which brings me to my list of tippy tips for scoring your very own free pallets.
1. Think small. A little research showed me that most big businesses are contracted with shipping companies to return their pallets and recycle them. Your best bet is to call local companies and ask them if they have pallets that they dispose of.
2. Good businesses to contact are hardware stores, garden shops, lumber yards, etc.
3. Small construction companies are good too. You can call their office and they may tell you sites that would have some you can pick up. If you are driving past a new development and you see a stack you can also stop {without obstructing their work} and ask for them. Chances are, they’ll be burning them at the end of the job.
4. If you see a stack near a business, don’t just assume you can take them. Even some small businesses recycle their pallets, so if you take them you might hurt their business or cause them to incur a fine.
5. Wear gloves when you go collecting. Pallets are not perfect and they are kind of splintery!
6. Be nice. Thank the business that give you free stuff. Maybe even shoot them an email with a photo of what you upcycled from their dumpster. I know you are awesome…so they’ll probably love you and you’ll make lots of new friends.
I called 5 businesses here in Minot. Four of the five had pallets that they dispose of free for the taking. I scoped them out and found that not all pallets are created equally. Since they are destined for the dumpster, some are pretty beat up. Some are more sturdy than others, some are longer, some are shorter. It’s all about being willing to go out and dig around until you find something worth using. A little elbow grease and a little calling around will pay off big time with free wood and free building blocks for lots of DIY projects.
by Amy | Jun 6, 2013 | Blog, The Art of Projects, the house
The bedroom is pretty much done.
I know, can you believe it? I can’t. I did it. And I will even have a few days to spare before my family arrives from out of town. I pinky swear I’ll show you the {nearly} finished project on Friday. I just want to get a few things prettied up in there, and the guest room {aka temporary tool shed} cleaned up before I take you on a tour.
In the meantime I’m looking ahead to my next project{s}. Now that the weather has warmed up a bit I’ll be taking this project train outdoors. Coming up first…window boxes.
I’ve spent time combing the Internet for DIY window boxes and good things to plant in them. Here’s what I found.
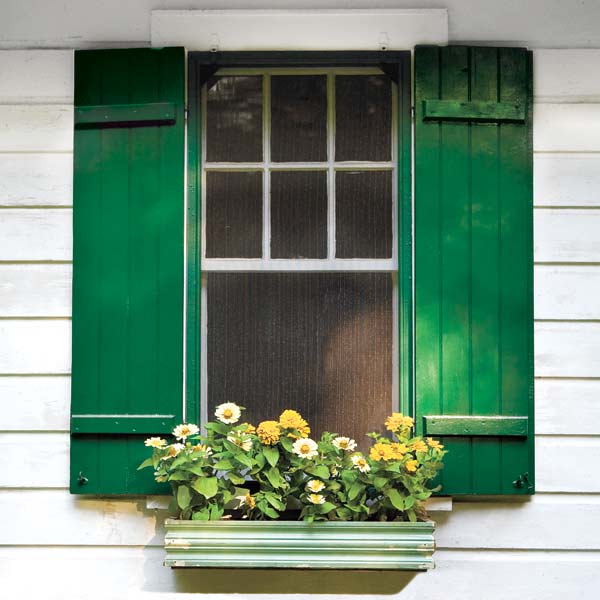
Let’s start with one from one of my favorite sites: This Old House {fitting, right?} I love that this is a salvaged project. They used vintage base trim…but it could easily be created with new trim from the hardware store.

This next one is from Lowe’s. I love the texture on the front…and that it’s classified as an “beginner” project. Video instructions don’t hurt either.

Isn’t this box from How Does She just scream fresh and clean? Better yet, she made two of these bad boys in 30 minutes! Best yet, each one cost less than $5!

I showed you these dresser drawer planters a while back when I did a round up of things to do with dresser drawers. Kammy’s Korner did a great job!

I love this last one from Just So Lovely. It’s simple and so pretty. The tutorial here also goes into detail on hanging the box…which is helpful!
Speaking of hanging your boxes, take a peek at this step-by-step guide for putting your beautiful box on display.

Apartment Therapy has a great list of 10 low maintenance window box plants. Drought resistant, shade lovers, sun lovers, they are all there.

Even more exciting is this planting guide from Better Homes. They’ve laid 17 planting recipes for your new window containers.
Lastly, the Impatient Gardener gives a great list of tips and tricks for planting the perfect window garden.

Here’s the thing. Googling and Pinning are one thing…but building and planting are a different creature. I’ll keep you posted on how things go. Because if I can do it, so can you. Be sure to come back tomorrow. I scored some free pallets for a couple projects and I’ll be tipping you off on how I did it!
Amy
by Amy | Jun 3, 2013 | Blog, The Art of the Moment

Isobel’s Newborn Session
Isn’t this precious? Remember the sneak peek from this adorable Mother’s Day session? Well here’s a full look. In case you missed it…this is Isobel. She was less than a week old at the time of our newborn session together. Isobel is so sweet {not to mention beautiful}. Although she was pretty sleepy throughout our session, she did wake up several times for a quick snack. {I’m happiest and sleepiest when I’m well fed too.}


All of these images were created in Isobel’s living room. I love packing up my mobile studio and taking it to my clients’ homes. While we were downstairs snapping photos, Isobel’s older sister was upstairs napping. Parenting is a challenge, capturing these first moments shouldn’t be. If you loved Isobel’s session…go on over and like the Amy Allender page. And be on the lookout for the full session album over there tomorrow!
Amy
by Amy | May 30, 2013 | Blog, The Art of Adventure, The Art of the Moment
There are few places that I’d visited are sweeter than Seaside, FL. It’s so quaint it’s nearly surreal. Have you seen that Jim Carey movie, The Truman Show? You know that precious too-cute-to-be-real town Truman grows up in? Well, that’s Seaside, FL.


Seaside is like no other place I’ve ever been. It’s got the atmosphere of a dream. I guess, because that’s what Seaside is: a dream. The settlement that we know today was the vision of J.S. Smolian. After his passing, his grandson carried out their shared vision. They dreamed of a place where everything you needed {including the beach} was within walking distance. A place where people biked, lingered on porches and relaxation reigned. Mission accomplished. More than 30 years later Seaside still exemplifies this attitude. (more…)
by Amy | May 22, 2013 | Blog, The Art of Projects, the house
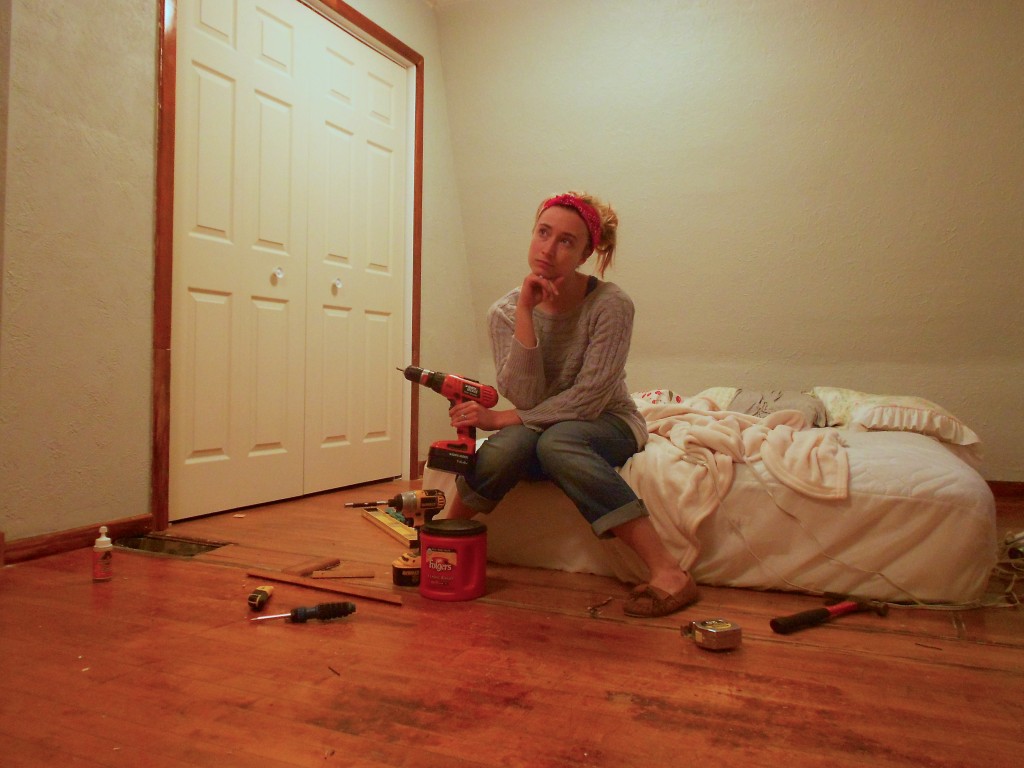
Things are coming along quite well in the project department. As you can see, I’m not sleeping on the couch any more. As you may also be able to see…there are cords coming from my blanket. That’s because at night it’s only been around 40 degrees and it’s an electric blanket. In May.
Anyway. I found myself dreaming tonight about what it’ll be like when this is all done. And about how I’ve come this far. Let’s take a look back at the last few days.
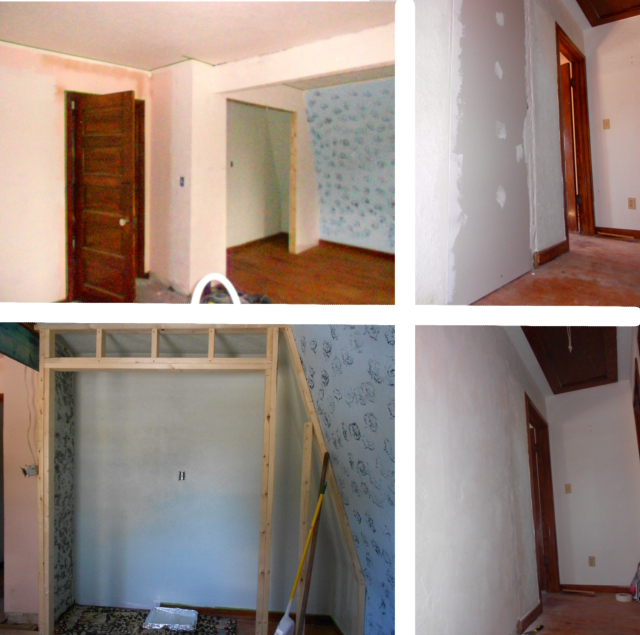
Okay, so here is our new closet and the hallway. On the right side you can see where the door to the office once way. The photo on the bottom right is the finished product after it had been all textured and painted.
The left column is upside down and I apologize. The bottom left photo is of the new closet going in. That’s the chimney on the left side of it. The door to the hall used to be there. The upper photo is after all the drywall went up.
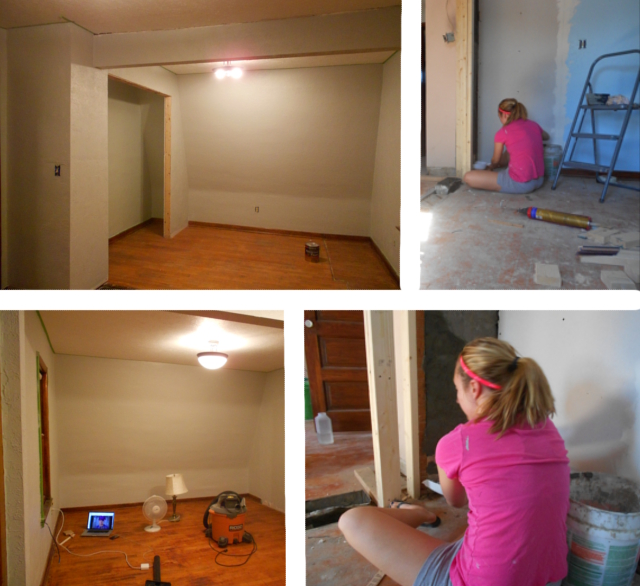
Again with the backwards layout. On the right you will see the mortar process. Because the chimney is old and crumbly I needed to coat the whole thing with mortar to keep all the nasty inside. Once all the drywall was up, the joint compound put on, walls textured and floor cleaned up the painting began.
The worst part of this whole process was the dusty, disgusting floor. You can see just how gross it was in the mortar photos. I really don’t like sitting around in piles of dirt, but there was nothing I could do about it. After all the drywall had been cut I was free to sweep and mop. {Thank goodness.}
I painted Saturday. If you follow along on Facebook you probably know that I had quite an afternoon. The whole thing took lots longer than it should have. I fell off a step ladder, I knocked over a gallon of paint, and a shocked myself on hot {mislabeled} wires. But by midnight all the walls were painted and the floor had been polyurethaned.

I put together this final image to show the before and after of my traumatic day. The top image is my very first roll of paint onto the walls. Only 45 minutes later I fell onto my love handle and ended up with this shiner. Gross!
All in all it’s coming along very nicely. Today I {spent more time than it should have taken} cutting and putting baseboards and trim in place. I’m terrible at math, so measuring and cutting and visualizing angles is a nightmare for me. But now they are all in place. And tonight/tomorrow installing my closet system!! I cannot even begin to express how excited I am to access my clothes again.
xo
Amy
by Amy | May 17, 2013 | Blog, The Art of the Moment
If you follow along on the Facebook page you probably saw this gorgeous photo.

It’s from a newborn session I did on Mother’s Day. Isn’t little Isobel precious? The answer, of course, is YES. So hang on and have a big dose of cuteness.


Stay tuned the full session will be featured on the Facebook page next week!


