by Amy | May 1, 2014 | Blog, The Art of Living, The Art of the Kitchen

Recently I helped out with a funeral at church. I have to say, it was quite a privilege. I mean, I spent all of my growing up years watching at the “church ladies” serving our congregation…making Swiss steak dinners, doing dishes after the pancake breakfast {naturally using those adorable church dish towels that all church kitchens seem to have}, working concession stands at the fair. As much as I dislike admitting that I’m a grown up, it’s very exciting to finally be one of those “church ladies” who is serving. I think is suits me.
This story is not, however, about church lady nostalgia. It’s the latest edition of Practically Canada Culture Shock.
Okay, I’ll admit…I’ve never written specifically about the PraCan culture shock. But I should have started a long time ago. Over the last year {almost 2!} I’ve alluded to how drastically different things are up here in the great, white north. It’s different like I didn’t know different can be. And the most charming thing about it is that the folks up here don’t even realize it’s quirky or offbeat.
They don’t realize that “normal” 80-something year old women don’t typically make social calls without complaint in -60 degree wind chills. It never crosses their mind to think that skirts and cropped pants aren’t usually worn in the “heat wave” of a 40 degree day. They poke fun at Wisconsin accents…but insist that rag is pronounced “reg” and bag is properly said “beg.” A casserole is a “hot dish” and the correct response to hearing about a friend’s weekend away is “Oh, for fun.”
It’s a different world up here.
I’ve seen a lot and been surprised by a ton. But nothing has taken me aback as much as the funeral food I prepared from behind the counter of First Baptist Church Minot.
I was put on sandwich duty. When I was shown buns, ham, and chicken I thought everything looked pretty regular. I should have known better. This isn’t Indiana, Florida, Oklahoma or anywhere else. This is PraCan…so there’s always a twist.
Sandwich instructions:
One bun split open. Spread margarine liberally one the upper half. Add one piece of lunch meat. Close bun. Place on tray.
Just meat and fake butter?!
Yep. And we made trays of them.
Next up, I was taught to make open faced sandwiches. Now, where I come from this means a bun split open with hot roast beef or turkey, topped off with mashed potatoes and covered in gravy. Or something vaguely similar.
Now, hang on tight. What I’m about to describe is not for the weak stomached. In Practically Canada, an open faced sandwich is made like this:
One half of a sandwich bun. Add a thick spread of Cheese Whiz. Top with sliced green olives from a jar. Eaten cold.

Folks, I cannot make this stuff up. And we made trays of them. And get this…they were the first to be eaten. When the mourners came down from the funeral service to the luncheon I saw folks stacking two or three of these bad boys on their plate. The ladies in the kitchen with me reminisced about how much they love open face sandwiches, and it’s such a bummer that they are only eaten at funerals.
What?!
It’s a funeral food. What I can surmise is that this delicacy is something quite special. While to the average PraCan outsider it may look like a disgusting sodium trove, to the natives its ceremony. Like the Matzah Ball on Passover. Like mulled wine at Christmas.
A friend who happens to be about my age, and not a native, came through the food line. I was busy on the other side of the counter pouring lemonade from one of those class church-kitchen-pitchers.
“Did they make you eat one of the open-faced sandwiches?”
“No one could ever make me to that. That is straight up nasty. Why do they eat that?”
“I don’t know. It’s funeral food. Maybe it’s like the bitter herbs of Passover. It reminds them of bad times and makes them feel sad inside.”
That’s a theory. And I think it’s pretty viable. It made me sad just to make them. I guess there are some things that separate the wanna be Practically Canadians from the natives.
xo
Amy
by Amy | Apr 29, 2014 | Blog, The Art of Living

Something I get asked a lot is “How do you get so much done on your own?” As in, how do I stay so self motivated and self disciplined to get all the things done that I heap on top of my life. I’ve always been a busy bee. It’s just kind of how I roll. But lately I’ve thought about the things that really help me stay self motivated and the things that drag me down. {Especially after my lent promise.}
Tonight I’ve put together five things that help me remain motivated and push me to get lots of stuff accomplished. {Not just thought about.}
1. Set parameters
It’s easy to think that you are more disciplined than you really are. If you are anything like me you may start the day thinking “Oh, I’ll just leave the TV on as background noise…” Next thing you know you are working at half speed, and convincing yourself that you can wait until the end of “one more episode” before moving on to your next task. Understand yourself and set up parameters so that you don’t fall into those traps.
Make your work parameters reasonable. Find a way to hold yourself accountable to it.
2. Pick out some healthy rewards
I’m a huge fan of healthy rewards. Everyone knows the concept of a reward system. But if you are giving your self a junky prize after a job well done, you are setting yourself up for failure. I have found that self discipline grows fastest when we extend it even to our indulgences. Now, I’m not saying you should never treat yourself. You should! But–I think those treats should happen when you’ve given it some thought and are responsibly treating yourself.
You shouldn’t hinge your productivity and progress on unhealthy indulgences…and your unhealthy habits should hinge on your productivity. Eventually, you’ll find that a bowl of ice cream after every much accomplished day is making you feel fat, lethargic and not at your best. From there, you’ll find that your reward isn’t as desirable…and your productivity will wane.
Instead of rewarding yourself with unhealthy treats, think about some good-for-you prizes that you enjoy. This method got me all the way through college with a consistant spot on the Dean’s List and I never put on the dreaded freshman 15. For example, I love being outside and going to the gym. Most days I’d set a homework or reading goal. When I’d reached it I would go to the gym or for a walk outside…or better yet, play sand volley ball with friends. If I didn’t reach the goal, I stayed in and finished.
Now I use other things {especially since my back gave out last month.} When I get my daily work done I spend some time playing the piano, playing a board game with Derek {you know how I love those} or working on a DIY project {which, to me is much more fun than working on a computer.}
Consistently rewarding yourself with good things will keep you motivated and train you to view healthy payoffs as things worth working for.
3. Create realistic goals
To me, there is nothing more frustrating than failing. Wait…there is: failing regularly. Seriously, I can’t think of a worse feeling that spending day, after day, after day feeling like you’ve failed. I’ve been in that situation and it is no fun. None at all.
I used to look out upon my day and imagine all the things I could get done. The looong list of everything I needed to do and a whole 24 hours to do it. So I’d start whittling away the task list. Then life would get in the way. Derek would come home from work early and want to go for a walk {why would I turn that down?}, a gal from the high school youth group would call me with a broken heart in need of a cookie and some conversation and prayer, my computer pooped out, something that should have only taken an hour ended up taking several…
What I’m saying is, I spent a long time making a list of “daily tasks” and I failed. Every. Single. Day. It stunted my productivity. It made me crabby. I’d get mad because when things came up that were actually more important than any to-do list I would wind up feeling guilty for doing them instead of tackling another item on the list.
I’m not advocating that you should put playful whims before work. That’s not going to make you productive either.
Goals are great. They are vital to a productive lifestyle. I recommend making a list of tomorrow’s tasks at the end of every work day. Create your goals, but the key is to be realistic. Don’t set yourself up to fail. Make a list that you can reasonably get through in the course of a day, week, month, or whatever increment you choose. Leave room for error. Leave room for life. Take it from a person who has been there: You’ll be happier, healthier and more productive when you are riding the high of goals accomplished instead of the lows of a list left incomplete.
4. Start and end with something you get excited about
This is a big one.
I do not like getting out of bed in the morning. Which is weird, because almost all the people I am closest to love the morning. When the alarm goes of, I’d rather hit snooze six times, then lay in bed playing my Boggle app for 20 minutes before rolling out and starting the day. That–however–is not a productive habit.
To combat this, I always try to start my day out with something I’m looking forward to. This means I usually try to book fun meetings over morning coffee {it gets me up and looking decent first thing in the morning}, or I just book regular appointments that I have to show up to first thing…also, so I have to get out of bed early. If I don’t have anything scheduled, I make the first thing on my realistic to-do list something I actually want to get out of bed to do.
The same principle applies to the end of the day. We all know that draggy 2pm feeling. Sometimes I just want to curl up on the couch with Panda Cat and watch some reruns of Call the Midwife. But alas…things must progress. So I schedule something fun, or plan to finish my day with another task I look forward to. It’s like sandwiching the day’s mundane tasks between things you really enjoy.
5. Tell someone
My final secret to a motivated existence is accountability. Tell someone. Tell them your dreams, your goals, your parameters. Tell them what you hope to accomplish tomorrow, invite them to join in on your healthy reward. Once you tell someone what you are going to get done it becomes a lot harder to be lazy.
Your person should be someone you talk to pretty much every day. So whether that’s a spouse, a bestie, or a sibling…it doesn’t matter. It just needs to be someone you trust and someone who will be consistent. Tell them to check in on you. Make a point of sharing your progress with them. Swap stories of self motivation and productivity. I pinky swear, getting it out verbally will keep you motivated.
Did I miss anything? I’d love to hear your tips and tricks for self motivating! Leave me a comment…I read them all!
xo
Amy
by Amy | Apr 23, 2014 | Blog, The Art of the Moment

This is Ariel.
Isn’t that just the best name? I’ve never known an Ariel. But boy am I glad I met this one. She called me up…looking for a senior portrait session. You see, she’s graduating this spring. Yeah, a little late in the game.
She even told me she wasn’t going to have senior portraits taken. Get this–she told me she didn’t think she’s very photogenic. I think you’ll agree with me when I tell you that that notion is a big, fat laugh. Ariel is beautiful, charming, incredibly polite {she was raise in the South, after all}, and just lovely in front of the camera.


Not only is Ariel completely gorgeous…with hair more beautiful than a Disney princess…she’s also super smart. She is tied for valedictorian at her high school. Their class motto–which will be mentioned in her graduation speech?
Daring Greatly.
I love that.


Now, you may be wondering…Was it cold in PraCan on April 13th? Answer: Yep.
Cold enough that it was snowing. Cold enough that we scurried from car to location and back to the heat-blasting car again. Ariel was a real trooper, though. No complaints, no crazy looks when I drove down back alleys and asked her to sit on a fire escape. I love a girl who can smile through snow.

In the fall, she’ll be headed to Minnesota to study nutrition. I’m so happy to have had a chance to get to know her!

by Amy | Apr 21, 2014 | Blog, The Art of Living

I hope you all had a lovely Easter. We did. A last minute change of plans meant Derek and I found ourselves, leisurely with no plans. We did church, lunch out {got seated right away} with friends, then dinner and games with a family kind enough to take us in for the afternoon. Have you ever had pear pie? I hadn’t until yesterday…and boy is it good.
Easter is a time of life and renewal. And this year up here in PraCan, I think it will mark the start of spring. I really feel like we are finally out of the woods of winter. It’s sunny, the air–even if cool at times–has a warmth behind it. Best of all, things are growing.
Weeds mostly. But that can only mean that actual plants and flowers can’t be far behind.
So we peeled off the plastic that had been dutifully applied to keep the nasty, sub-zero wind from whipping through our second story windows. Things seem so much brighter. I cranked open the front window and Panda cat has been watching birds and children scoot across her view all afternoon. The patio furniture has come out of hiding, and at long last…I get to wear something besides boots! Cuffed jeans and clearance rack tennies to be exact.
Spring in the great Practically Canadian north is a lot like an Easter egg hunt. At first you really have to look hard to find that first sign. Once you do, you notice more and more. I, for one…am glad to put winter behind me and step into a season of life and renewal.
Bring on the sun.
xo
Amy
by Amy | Apr 16, 2014 | Blog, The Art of Art
I feel like you can put just about anything on your walls and call it art. Growing up we had a couple paintings in our home. I don’t remember all of them, but I do recall that one was a kind of creepy sea captain. I don’t even know what became of him.
One day I asked my mom where that stuff had come from. She told me that when she and my dad were first married they went to some kind of art show to buy some things for their walls.
My how things have changed. Now you can take a stroll through Hobby Lobby, troll around on Pinterest for something to DIY, or grab something from a junk market–nail it up and call it art. Not that there’s anything wrong with that. I actually like it. I mean, you are speaking to a girl who currently has a couple vintage pennants, a moss covered “S,” and a pair of ice skates {yes, I know it’s spring now…} hanging on her walls.
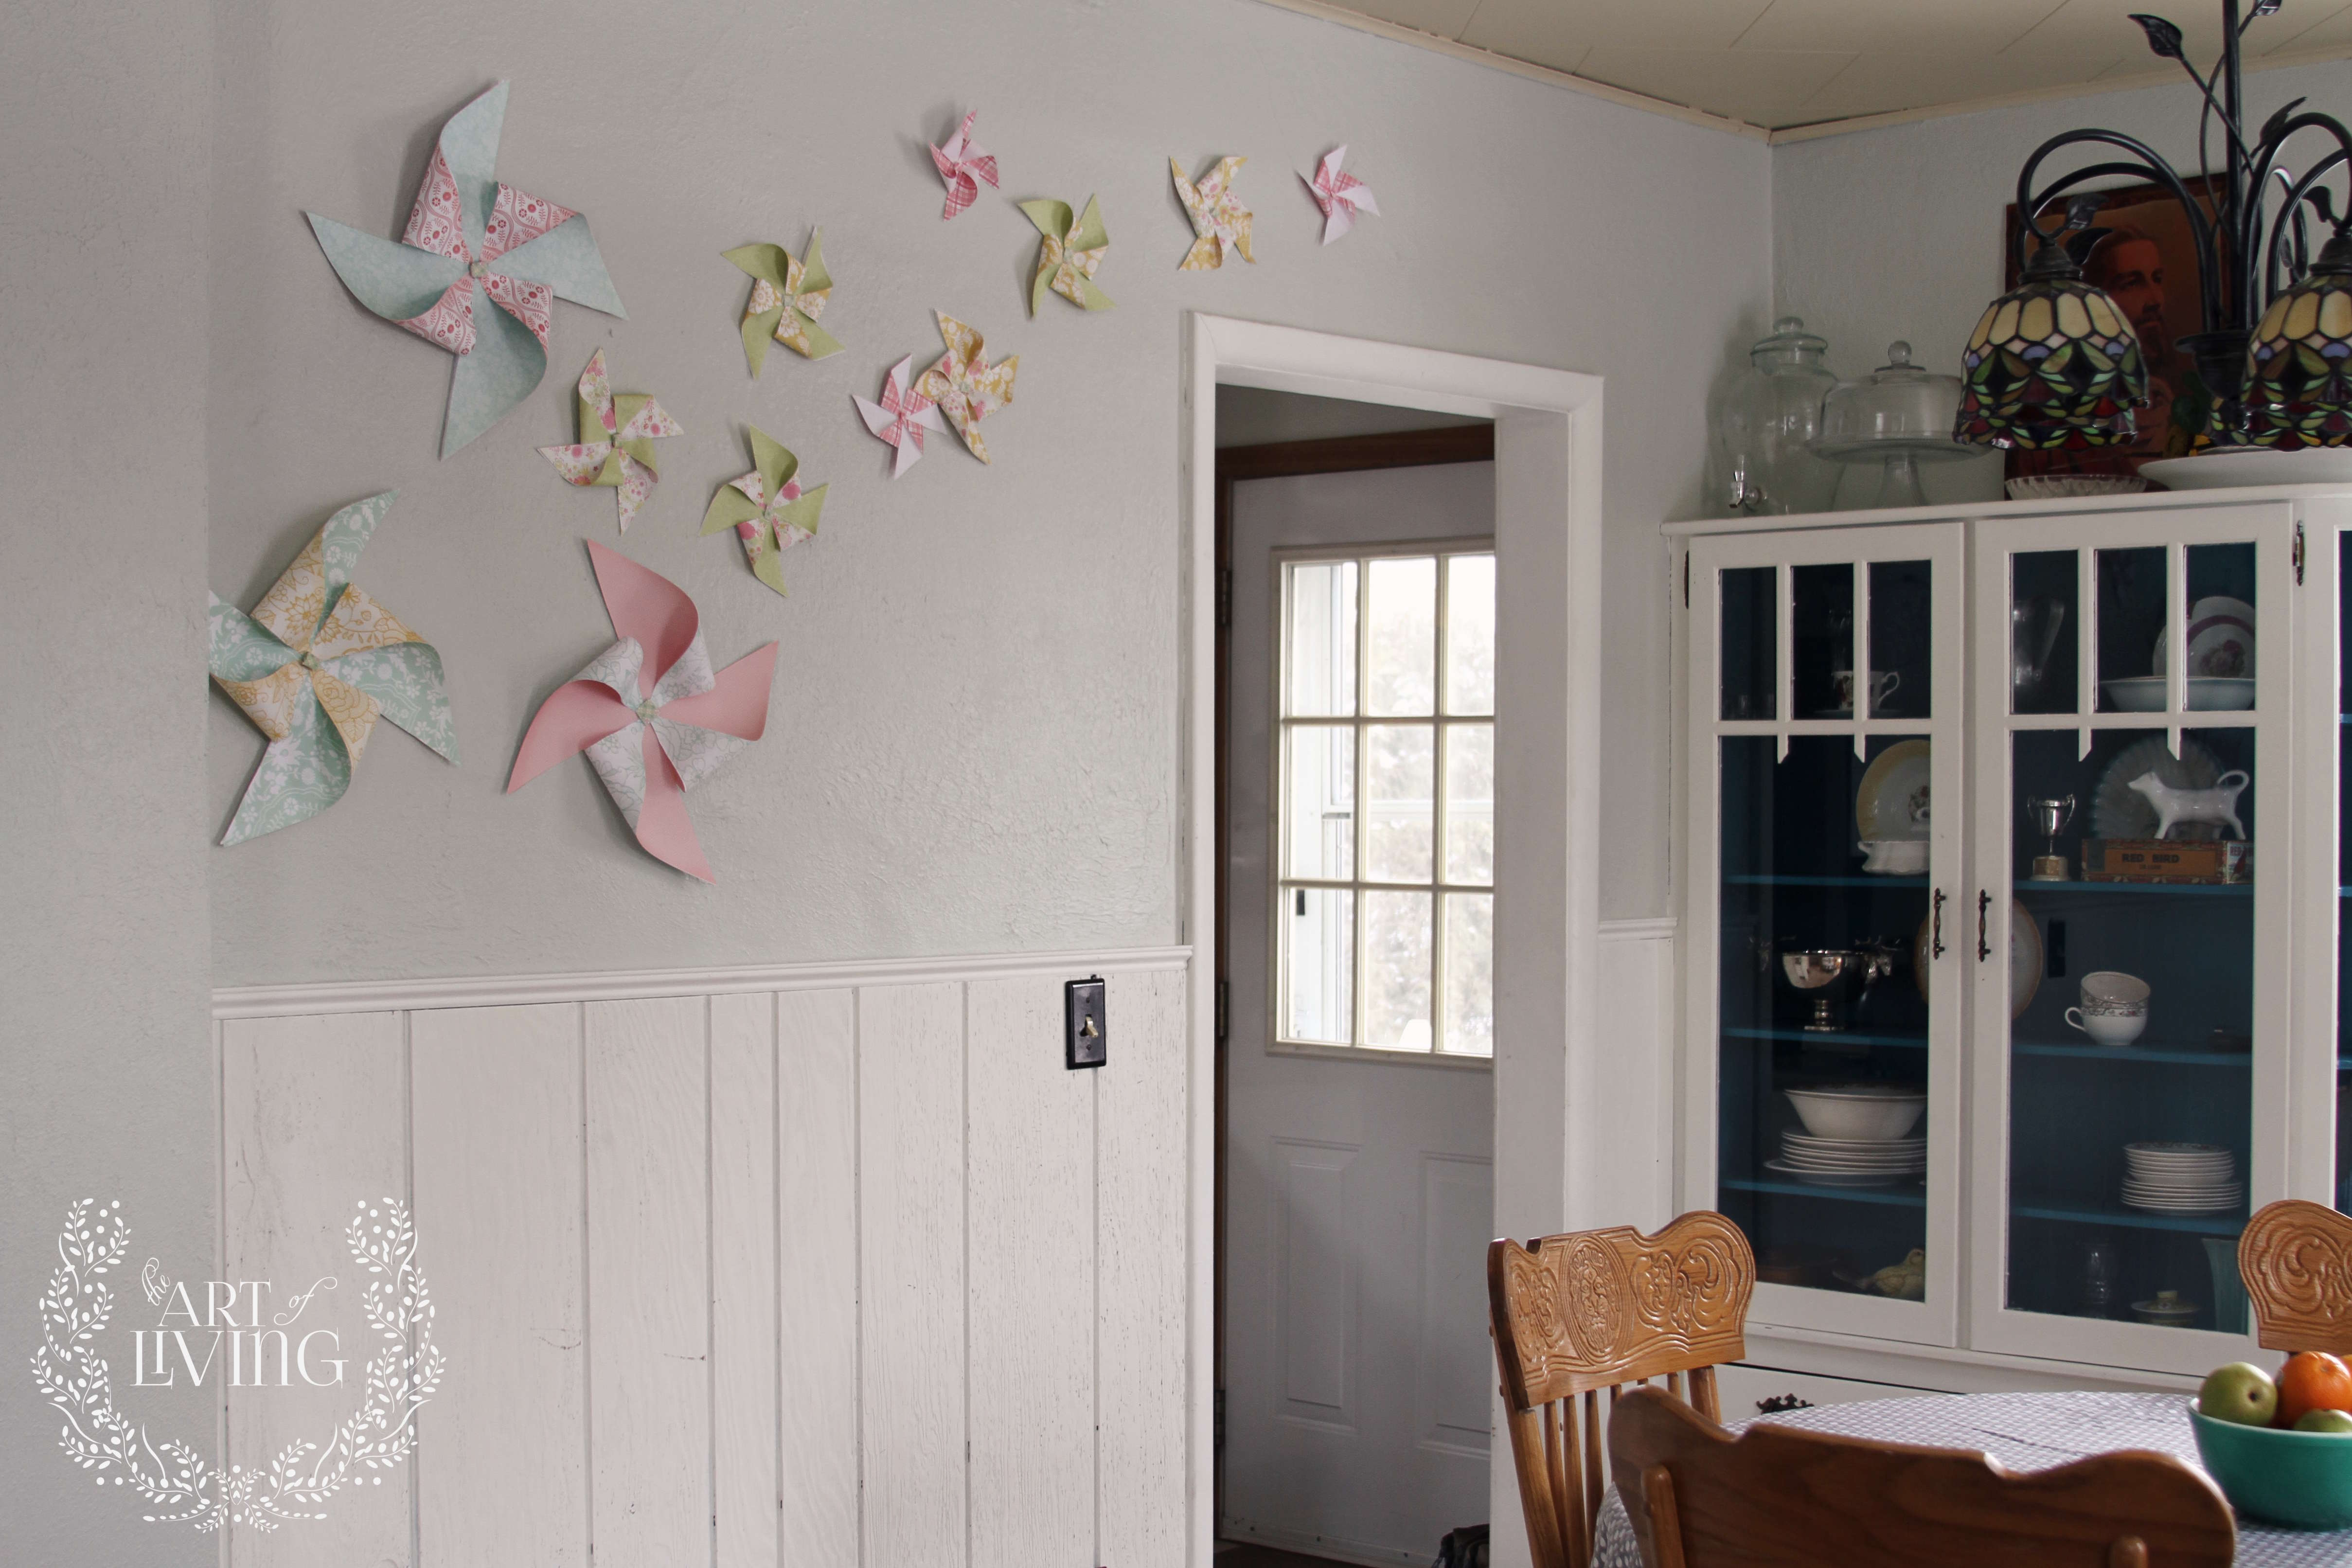
I like easy. I like cheap. I like non-permanent. I would even go far enough to say that I like whimsical. So the other night while Derek was busy working late and the image of a wall full of spring-toned windmills floated to my brain…I went ahead and made them. It’s springy. It makes me think of warmer days and a warm breeze.

These cost me zero dollars, since I already had hot glue and scrapbook paper on hand.
I used this tutorial for making them…but I didn’t waste time with spray adhesive. Mostly since I’m not accurate enough to line the pages up right. Instead, I just folded them together and used a dot of hot glue on the tips that would be folded into the center.
For each big windmill I used two full 12″x 12″ sheets of paper. The medium sized windmills were made four to a sheet and the smallest were made by clipping a couple inches off of a 6″x 6″ {medium} square.
To hide the central point, I used a scrap of paper rolled up and glued over the overlapping points.
To be sure that when I want these off of my walls they don’t take the paint with them, I hung them all up with 3m adhesive strips that are supposed to go with wall hooks. I had extras, so I used those. Honestly, I haven’t seen the hooks that they go with in years, so it’s about time they got put to use.
The whole thing took about two reruns of the Office. {Not watched during the day, of course. My lenten fast is progressing quite nicely.} So this is quick, easy, and I know you can do it.

I’ve also thought a whole wall would make a great photo back drop. Thoughts??
Well, let me know if you like my whimsical, windmill wall {or my alliteration} in the comments or over on Facebook.
by Amy | Apr 15, 2014 | Blog, Devotional, The Art of Faith
I know you remember Lindsay from Friday’s Art of Living post. If you missed it, you should read that first, here. In addition to being a wonderful woman of God with a heart built for service and an attitude that waits upon the Lord…she is also a very gifted writer. {Which may be due, in part, to that Baylor English degree.}

After chatting with her on the phone to record her story for you, she shared a journal entry that she wrote after looking back on her long journey in Shreveport…through the broken-hearted moments of struggling to find contentment in the Lord and the trials of finding her calling. She kindly allowed me to share it with you here. I think you’ll agree that these words are beautifully crafted and soothing to a weary soul. Enjoy! {And a big thanks to Lindsay for opening her heart, soul and talents to us. You really are the best.}
When Pharaoh let the people go, God did not lead them on the road through the Philistine country, though that was shorter. For God said, “If they face war, they might change their minds and return to Egypt.” So God led the people around by the desert road toward the Red Sea. The Israelites went up out of Egypt ready for battle. Exodus 13:17-18 NIV
This verse was written for me today. There are an infinite number of people and reasons God had in mind when He penned it, I have no doubt, but today, it reached out and grabbed my hand to guide me into deeper intimacy with my Lord. To remind me, in a season of wilderness, that He firmly has my best in mind, and from His compassion and guardianship, He leads! Though it was shorter – if ever there was a balm for my aching heart. There was a quicker way for the Israelites to get to their destination. God knew it, but because He knew them well, as well as He knew the map, He didn’t choose it. They needed the sea. God didn’t need the sea; I have no doubt He could have conquered the battle on the short road, but the Israelites hearts weren’t ready for that battle. They needed the long road. They needed the sea.
The rest of verse 18 says, “The Israelites went up out of Egypt ready for battle.” I have no way of knowing, but for a minute, I want to pretend they knew about the shorter road and the possibility of war. And they were ready – at least they thought they were.
I graduated college armed for battle in my own way. I was ready to fight the injustices of this world, ready to make a difference for the Kingdom, ready for the short (yet hard) road through law school and to a career of significance. Then God chose the long road through Shreveport.
And I have not understood.
And I have identified the many different routes I could have taken.
And I have pointed to the routes others are on.
And I have complained.
And I have cried.
And I have waited, for answers and explanations and change.
But have I waited for deliverance?
Maybe the answers are in the deliverance. Not from Shreveport – but through Shreveport – from the bondage of perfectionism and significance and self-worth. From the chariots and skilled riders that have chased me for years, refusing to fully release me to worship. Telling me I can go worship as long as I leave a part of my sacrifice behind (Ex. 10:24-25).
“But God, there is a quicker route. Let me carry my own armor and show you. But God…”
Oh Israel, Oh my children, Oh my Lindsay…I can almost hear His voice of compassion audibly. I have a better plan.
They may have left armed for battle, but soon their boldness (Ex 14:8) turned to fear (Ex 14:10) with one pursuit. I definitely wonder what an all-out war would have caused. They needed the long road. They needed the ocean. They didn’t need to see their armor or skill outlast that of their enemy. They didn’t need another medal or accolade. They needed to see an ALL POWERFUL GOD fully destroy their pursuer. They needed to walk a long road, through a parted Red Sea, where not one of their pursuers could follow. It may have been longer, but it was better. And they worshiped. My feet may hurt from the journey and my eyes may be tired, but if the long road is what I need, I am thankful. There were some easier roads, but the long road leads to the greatest victory. And I will worship.
And when the Israelites saw the mighty hand of the Lord displayed against the Egyptians, the people feared the Lord and put their trust in him and in Moses his servant. Exodus 14:31
by Amy | Apr 11, 2014 | Blog, Devotional
When I think about someone living well, I can’t help but think of my dear friend Lindsay Smith. Now, she might not always feel like she’s mastered the art of living, but in the years I’ve known her I have drawn buckets of inspiration from the proverbial well of her life. Hers is a story that shows the hand of God, so clearly in hindsight I can’t help but feel encouraged.
We met several years ago. At the time we were both living in Shreveport, LA, both attending the same Bible study. It’s safe to say that I had a bit of a girl crush on her. She’s adorable, full of wisdom, and holy-smokes…I’d love to get my hands on her wardrobe. But, being me…I get shy around people like that. So I was thrilled when she asked me out to lunch.
You see, at the time I was at a breaking point. I felt overwhelmed by my lack of direction, “real” employment, and desire to contribute to the world around me. I shared that at Bible study and to my surprise, Lindsay was having the same heart struggle. We easily bonded over lunch and through the years I have had the great pleasure of watching her take that desire and turn it into a work of art, masterfully colored by submission to the Lord.
When Lindsay was in second grade, she proudly declared that she would grow up, attend Baylor University, and study English. I guess, you could call her a Type-A-Planner…When she did grow up, she did find herself studying English at Baylor, on course for pre-law. The “plan” was to graduate, go to law school and work for an international adoption organization. In her mind, this would be her way of “caring for widows and orphans.” Life is so dear to her heart, there is no question in that.
But, to the frustration of many Type-A’s, life rarely adheres to our plans. While studying for the LSAT she met her future husband. After lots of heavy prayer, she knew the Lord was calling her to set her law dreams aside, and step into the role of wife.
That’s how she found herself in Shreveport.
Away from family. Away from friends. Away from her dreams.
She spent days asking, “Why?” Although she had affirmation that marriage was the right decision, she couldn’t help but plead for understanding through her confusion. During this painful season she was faced with painful notions: What to do with her time? The admission that she was “just” a stay at home wife. Hesitation to return to her hometown…where family and friends knew of the dreams she’d put on hold.
In hindsight, she told me, she can see that during this hard chapter of her story, her identity was wrapped up in law school. In her dreams. In the desire to have a title. Feeling that earning the title of “lawyer” would give her purpose, security, and fulfillment. It took a while. Nearly a year. But she allowed God to soften her heart. Slowly, gently, He untangled her identity from titles and degrees and anchored it instead, in Christ. He gave her the strength to move forward. She began relying on God, knowing that He could use her passions, even without a degree.
God has all the qualifications–we don’t need to equip ourselves. He will equip us as needed to do His work.
Armed with new confidence in the Lord’s guidance, she stepped out of the house and began volunteering with Heart of Hope, a residential maternity home for teenagers. Heart of Hope offers stability to young women in a time of uncertainty. They provide family-style living, education on parenting and adoption, as well as schooling–so women can return to their studies after having their child.
For months Lindsay volunteered. She worked closely with the executive director and eventually, a volunteer position was created just for her skill set. She began to find satisfaction in her work, but part of her still felt that work without pay is just “pretend.” {I’ve been there before…}
To supplement the family income Lindsay took a job at a Christian founded boutique called Altar’d State. Again, God went to work. Softening and soothing her heart when questions would arise.
I would ask, “Why?” I had a college degree, and I was working part time in retail. I couldn’t understand why.
Again, God was faithful in answering. During her short term of employment {only four months} her volunteer work with Heart of Hope was brought up on many occasions with customers. Some were so inspired by the work of the ministry they wrote her donation checks on the spot. Through her employment Heart of Hope and Altar’d State cultivated an ongoing ministry relationship.
As time wore on, she felt led through prayer that it was time to leave Altar’d State. She had applied for an internship with the Family Research Council, but hadn’t heard back. As she sat in her car, nervous about putting in her notice, wondering if she was making the right choice…she got a call. She was accepted as an intern and would soon be putting her English degree to use, as she was assigned the task of blogging and writing research papers on {none other than} the topic of teen pregnancy.
Isn’t it amazing how, when we submit plans to the Lord he makes them make sense?
From there Lindsay returned to her work at Heart of Hope, where eventually her position became a paid gig. She has taken on leadership within the ministry, intimately understands how the organization works, and has played a key role in bringing peace to girls in crisis. Recently she was a key player in organizing Shreveport’s first ever “Pro Life March” which attracted more support and attention than expected.
I’ve seen a big change in the city. People are caring about and supporting the positive choices–brave choices–these young girls are making [pro-life decisions.]

Heart of Hope has allowed her to care for those in need. Those in unrest. She told me that “love compels us to action.” Through her actions young women, young mothers, future mothers are equipped with the love of Christ. It’s a love that will change generations as it is passed down from mother to child.
We can meet others in crisis with hope and peace because we know there is a God who cares. A God who can bring love and peace, no matter the circumstance.
Lindsay’s time in Shreveport is now at a close. Her husband’s contract with the Air Force is up and they are relocating back to Texas. She says she is more confident moving forward. Now she looks back on her time in Shreveport, even the hard times, and sees that they have transformed her. She is confident in Christ’s leading and her identity rests in Him.
Her advice for all of us? How can we replicate her story of turning brokenness to trust? How can we create a life evident of God’s plans and grace? She tells us:
1. See the Lord first in everything. Take rest knowing that it isn’t what you do…it’s what you allow the Lord to do through you.
2. Don’t be afraid to share your struggle. Seek council. Let your heart be open and comforted through hard seasons.
3. Get over the fear that if life doesn’t look like X, Y, or Z…your life isn’t right or doesn’t matter. Your life can have an impact.
I hope you find as much encouragement in this story as I have. It takes work. And time. But if we really allow God to lead, if we honestly pursue His interests for us…we will see that His had never left us.
xoxo
Amy
by Amy | Apr 10, 2014 | Blog, The Art of Projects

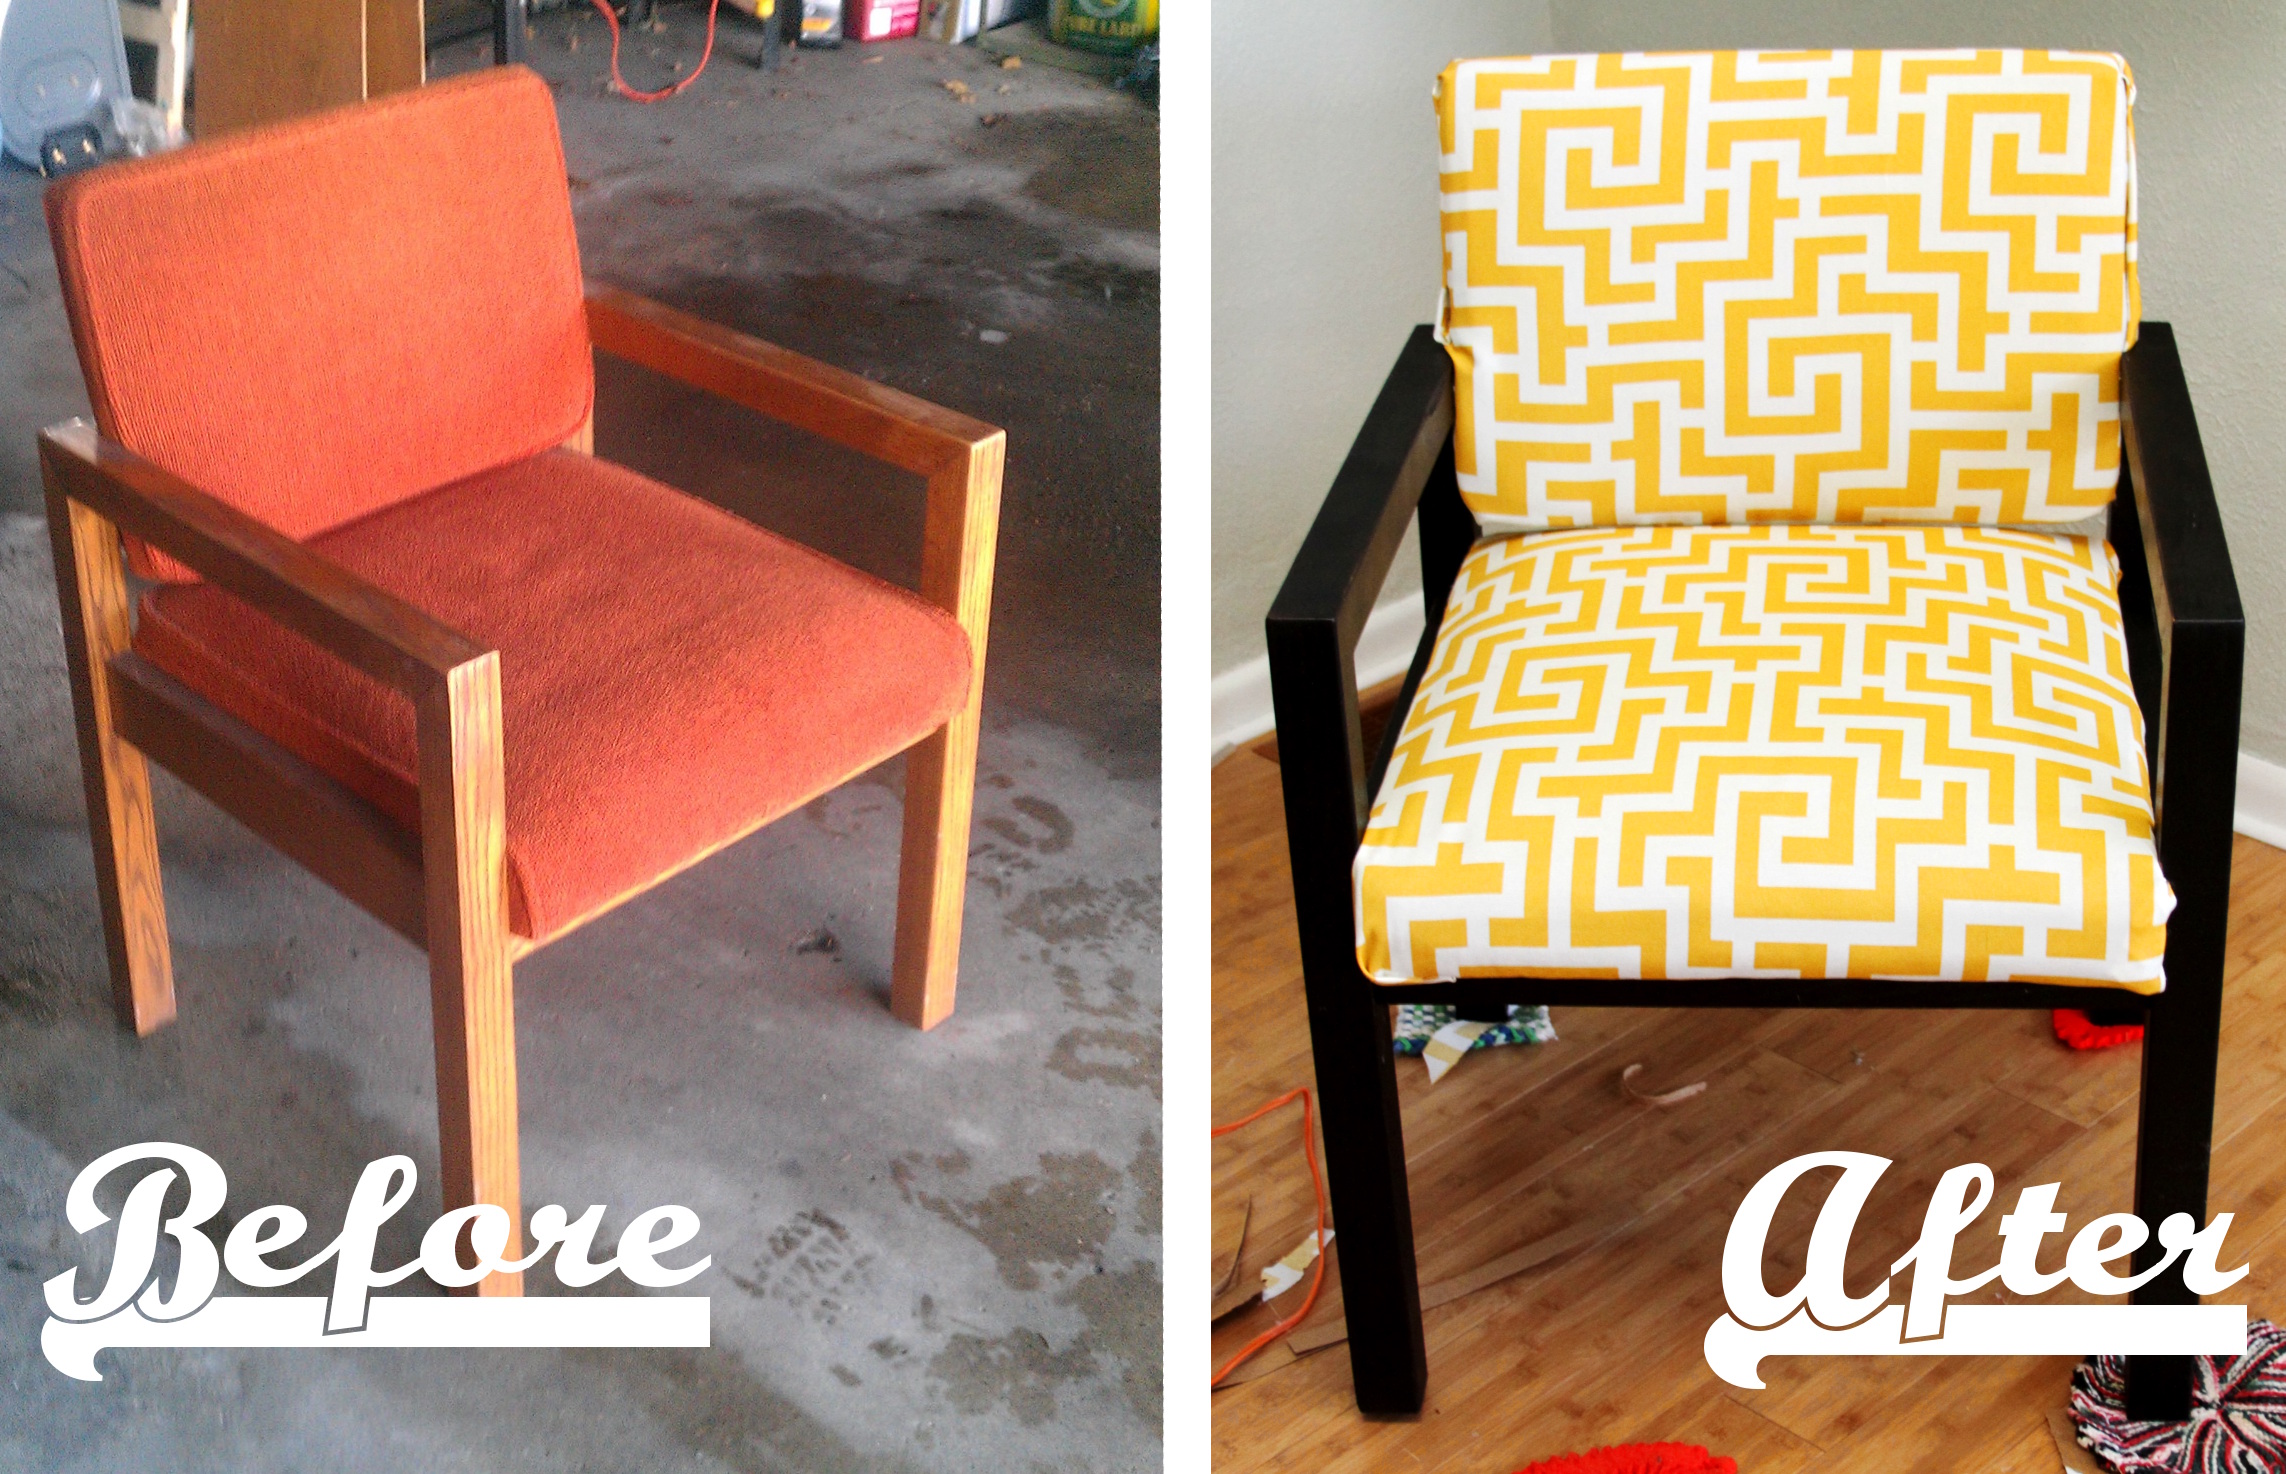
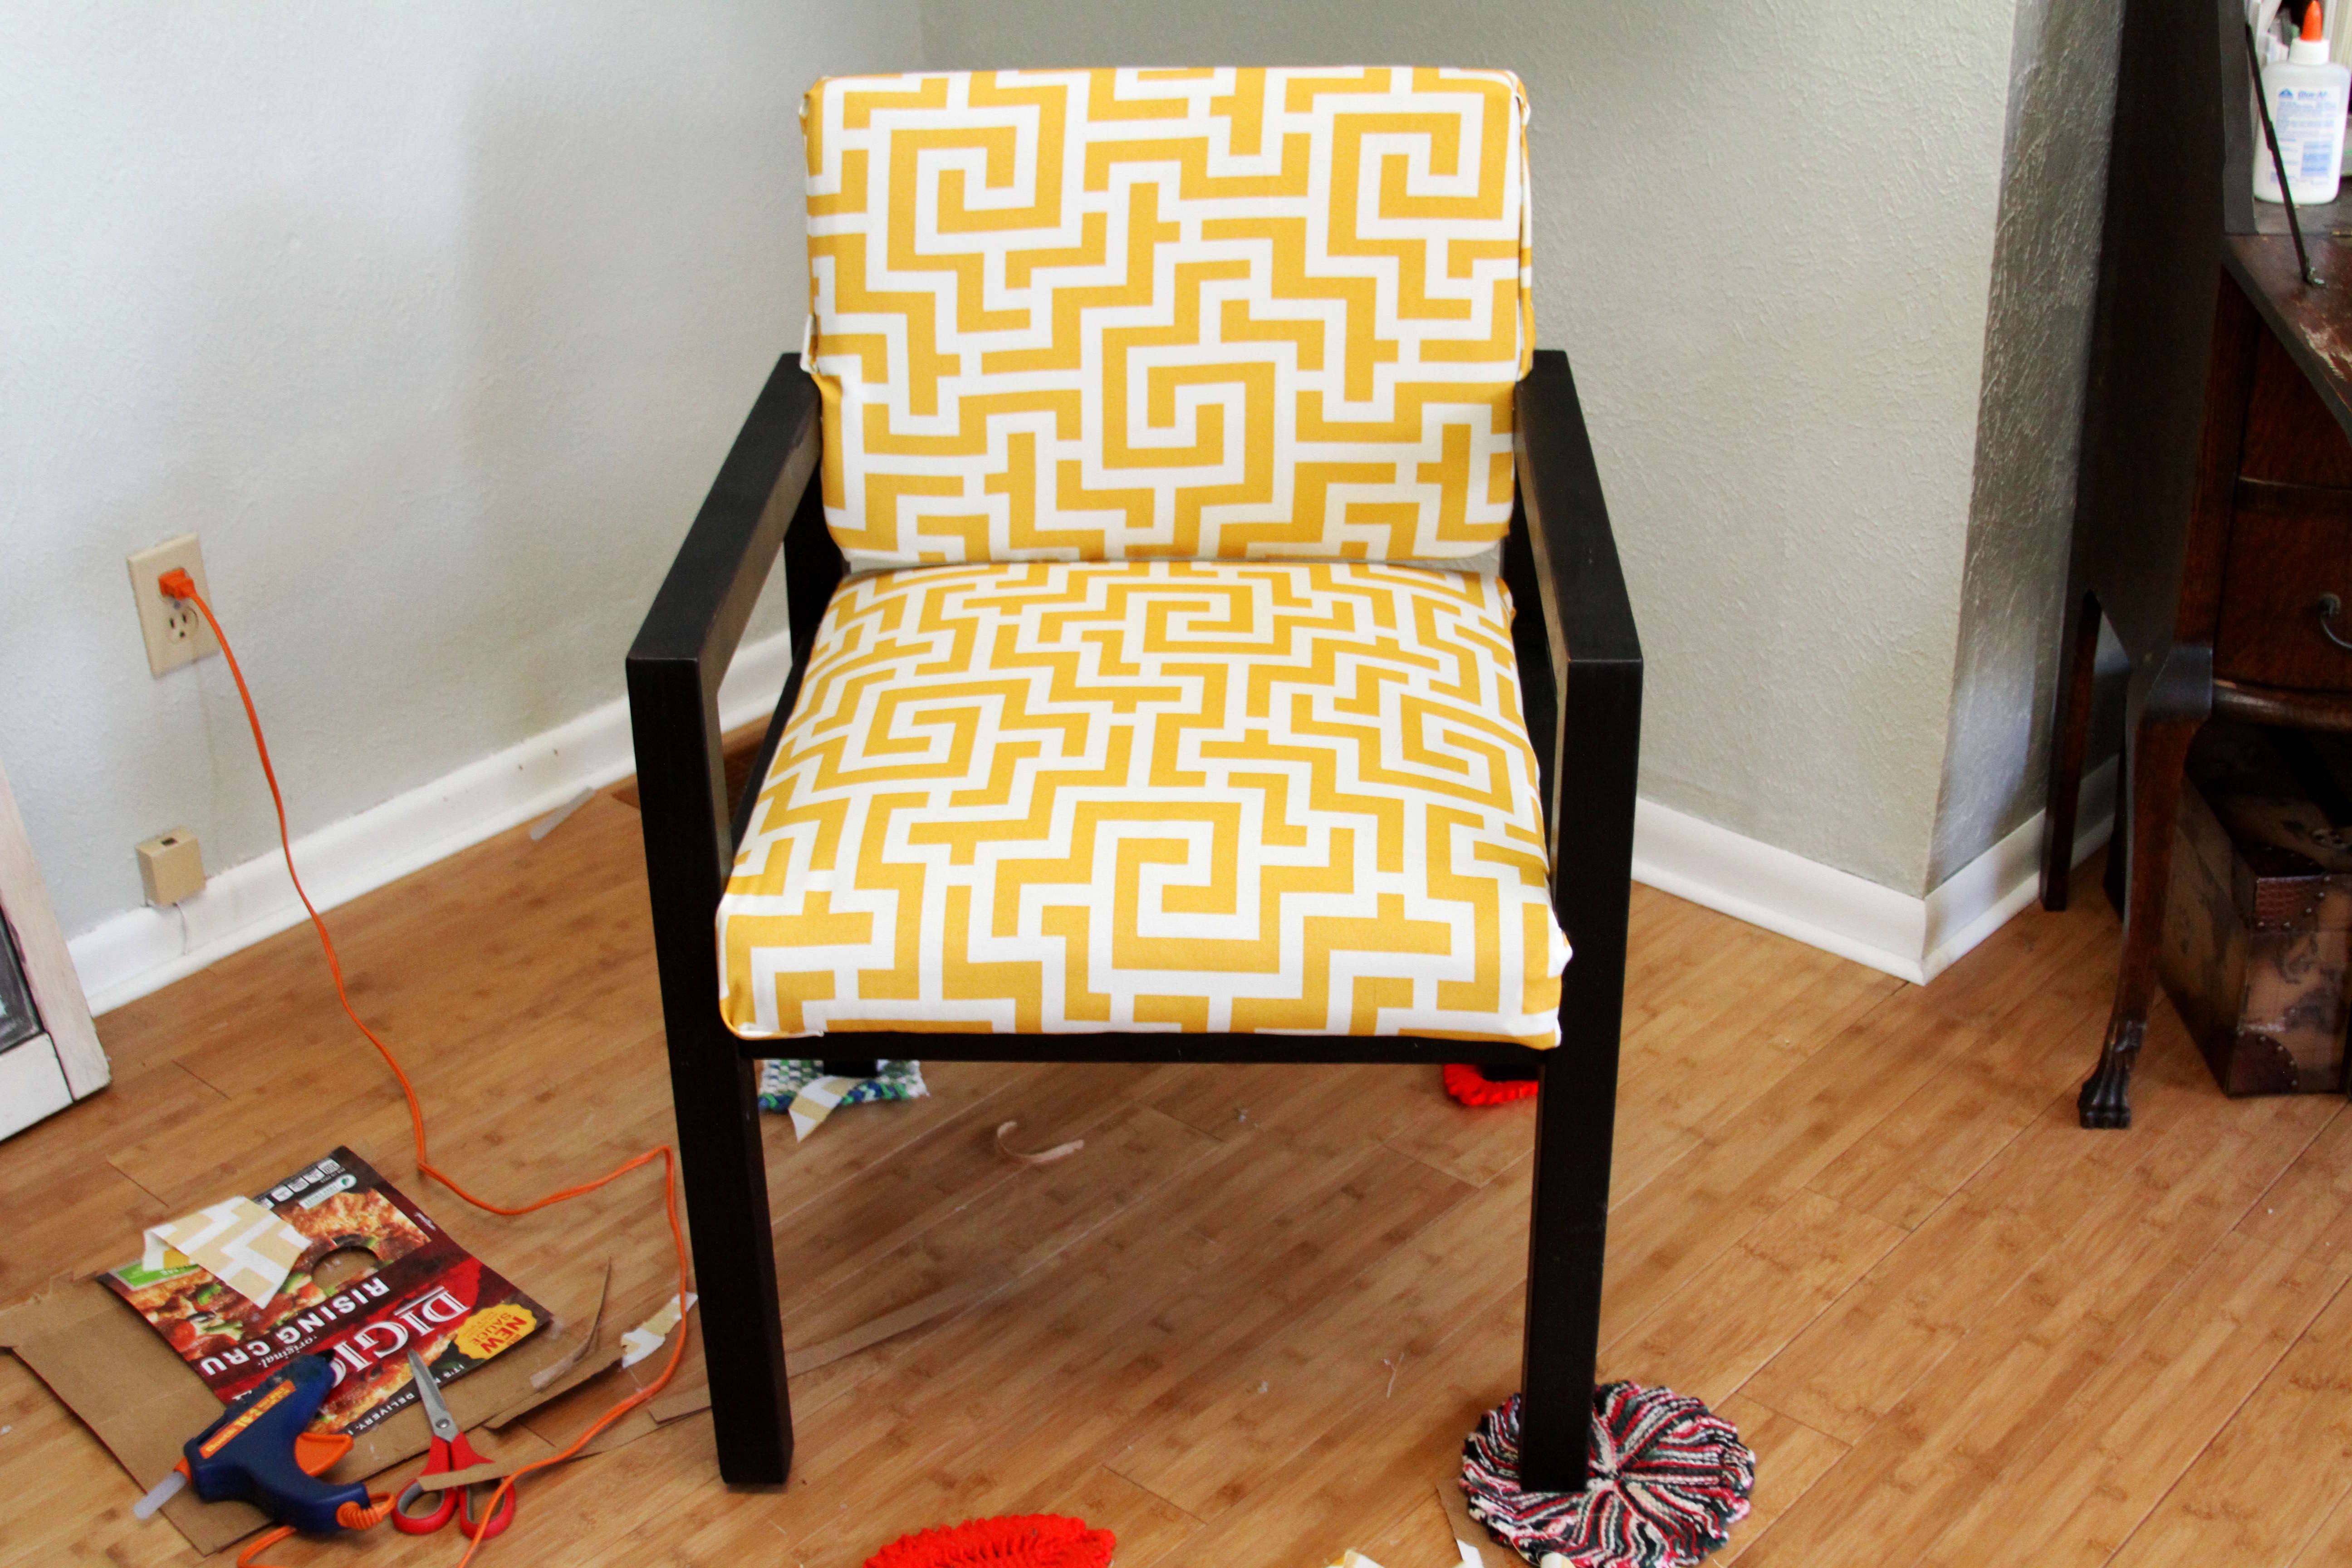
If you follow along on Facebook {which I hope you do…} you may remember a while back when I posted a photo of this chair on the left. Well, tonight on our very first “Art of Projects” post, I’ll be showing you how I did it.
And let me add this. When it was all done and moved into the office I created it for, a youth pastor’s work space…one of our church’s teens came in and said, “You got that at Target, didn’t you?”
Nope.
See, he works at Target, and could have sworn he saw a chair just like it in stock. Jokes on him. I bought a pair of matching {ugly} orange office chairs and gave them a giant-botox-apporoved facelift. The chairs cost $15 each from a second hand furniture shop {Sean’s Used Furniture, for those of you up here in Practically Canada.} The fabric is outdoor grade {read: durable and wipeable} that I picked up at JoAnn’s. The whole makeover took about an hour per chair, not including dry time for the paint.
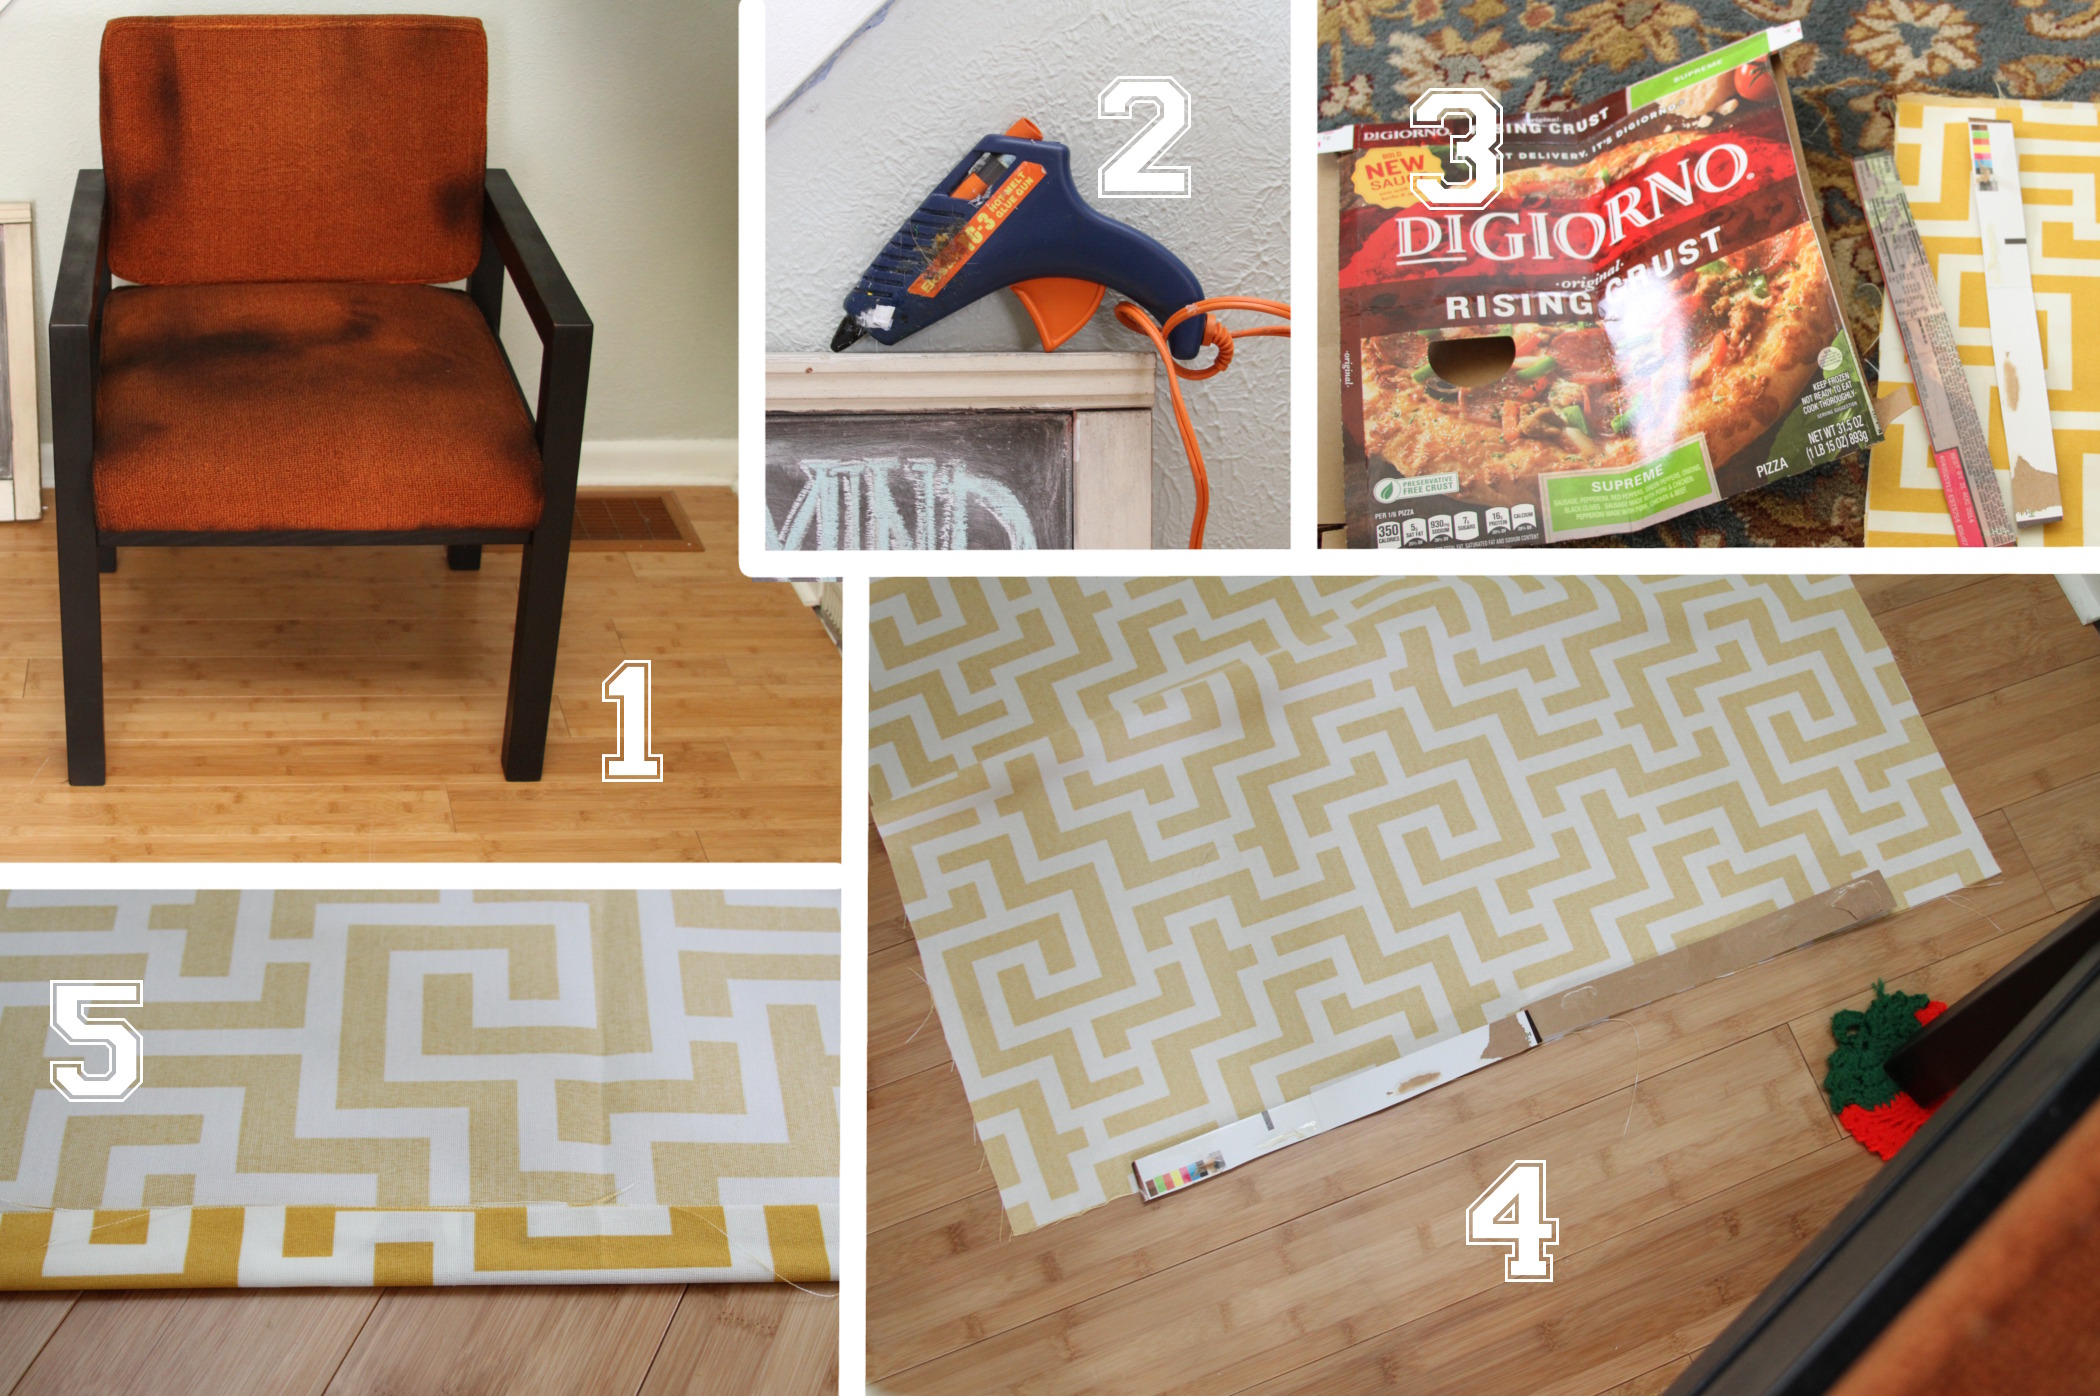
Now, before I show you how I did it, let me say that I get asked all the time, “How do you do it?” Or, “How do you learn to do those things?” The answer is simple. I try them. What’s the worst that will happen? I’ll end up with a chair uglier than what I started with? Not likely. So just try. Start with something easy, like this chair. It’s an easy recover because it has a nice boxy shape and a sturdy frame. Something similar will be a great first project for you. And really, at the root of it all…recovering furniture is no more difficult than wrapping a gift. But you get to use nails and glue, so it can look a lot neater. Okay, so let’s get started:
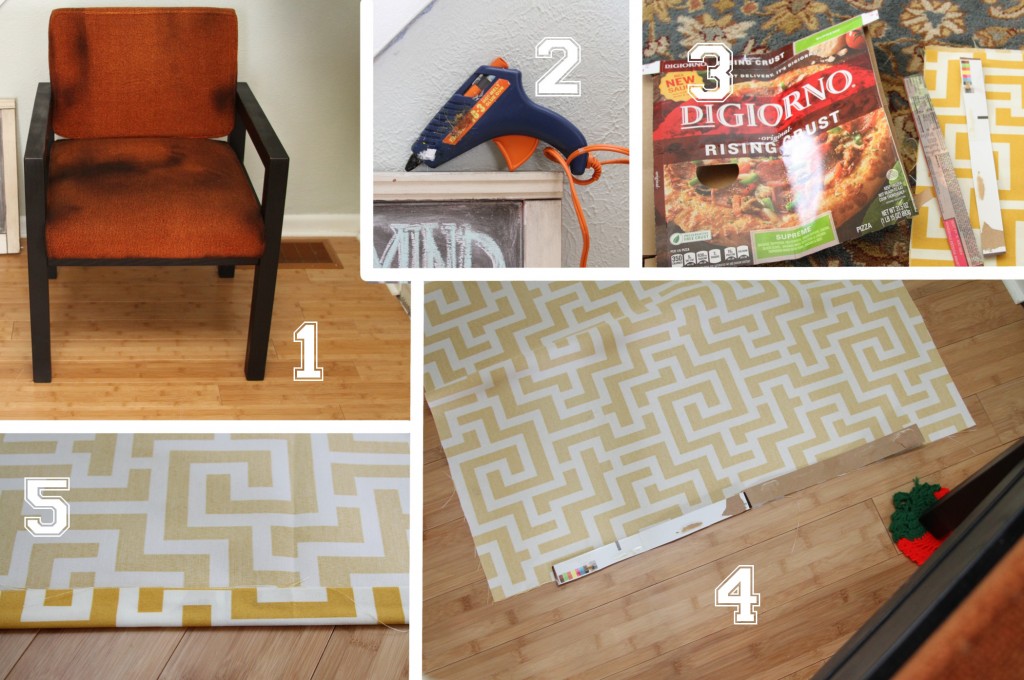
1. I spray painted the arms and legs of the chair black. I used a matte finish paint that was created to be pretty durable.
2. Get your glue gun out. This one is a “high heat” gun for heavy duty projects. If you have more of a “craft” glue gun, you should also invest in some upholstery tacks. Nail a few in in addition to adding the glue. It’ll ensure your hard work lasts.
3. In the fancy world you might buy what’s called “tacking strip” for this next part. At my house, I cut up an old frozen pizza box. Really any thin cardstock/cardboard will do. Cut a few strips, about 1/2″ thick.
4. Next I draped the fabric over the top half of my chair and cut enough that it would wrap around. Lay your fabric out on the floor, and glue a couple of your cardboard strips in place. You want the strips to be the width of the chair, but not the sides. You’ll get the idea in a minute.
5. Then, fold the strip up, so fabric is completely covering it and glue that in place.

1. Once your “tacking strip” is set up, drape the fabric over the top of the chair. Glue/tack the straight, hard edge of the fabric in place, right along the frame.
2. Pull the fabric through, under the backrest of the chair. Pull it really, really tight. Glue/tack that edge to the wooden frame.
3. Now the sides. Trim any excess fabric from the sides. You need enough to cover the edges, plus about 1.5″.
4. Trimmed up!
5. Now it’s pretty much like gift wrapping. Pull the front fabric toward the back of the chair. Glue/tack it in place below the armrest first.
6. Repeat above the arm rest.
7. Put a tacking strip in place at the edge of what is left sticking out from the back side of the chair.
8. Fold the top down {like when you wrap a box.}
9. Fold the fabric in around the tacking strip and glue/tack in place.
If you mess up, or it’s not looking neat, just try again. The key is to pull everything super tight. The tighter it is, the neater it’ll look.

1. Now the bottom. Cut a piece big enough to cover the chair seat. Lay the chair on its back. Tuck one end between the seat and back rest.
2. Make a tack strip the width of the chair seat, just like you did for the back rest.
3. Glue/tack it in place under the seat, right to the chair frame.
4. Repeat in the back. Remember…get it tight! Then fold the fabric near the back rest forward and glue it to the frame.
5. Fold the raw edge of the fabric under, back up against the original covering.
6. Glue the folded edge to the chair frame.
7. Now you’ll probably have a weird little piece left over.
8. Trim it down, and glue/tack it anywhere that’s hidden and out of the way. Because, that’s how not-legit your upholstery skills have to be.
Okay, fans. One more look. In the near future, I’ll show you a full before and after of the youth office that these chairs now call home. But for now, we are still waiting on new carpet, so we’ll have to wait on the full reveal.


xoxo Amy