Happy Minot Monday! This is a very exciting post for me to write for a two major reasons. First of all, today I’m talking about places that offer craft classes in Minot–one of my favorite things. Annnnd…I’ve got something really cool to announce.
Amy Allender is Partnering With BeLocal Minot
I’ve partnered with BeLocal Minot to continue bringing you super-fun Minot Monday content!
You know I have a heart for changing negative attitudes toward living in or moving to Minot. I’ve made it my personal mission to proclaim the quirky awesomeness that is Minot, ND. BeLocal is a newly launched publication that shares that heart and mission.
BeLocal Minot is like a visitor’s guide, except it’s made for locals. It’s a guide to living like a local. It’s a comprehensive catalog of all the things that make Minot a great place to live–things that took me several years to discover the first time we lived here. I cannot tell you what a valuable resource this is for anyone new to our area, prospectively moving in, or people who have lived here a long time but haven’t found their groove yet. It’s a welcome mat inviting everyone to enjoy their life here–not just muddle through.
You can access the entire catalog online. Also be sure to follow along on Instagram and Facebook to join the BeLocal community. You’ll see me around there, too!
Craft Classes in Minot
Now, big announcement aside, let’s get to today’s topic. Craft classes in Minot.
The Foundry
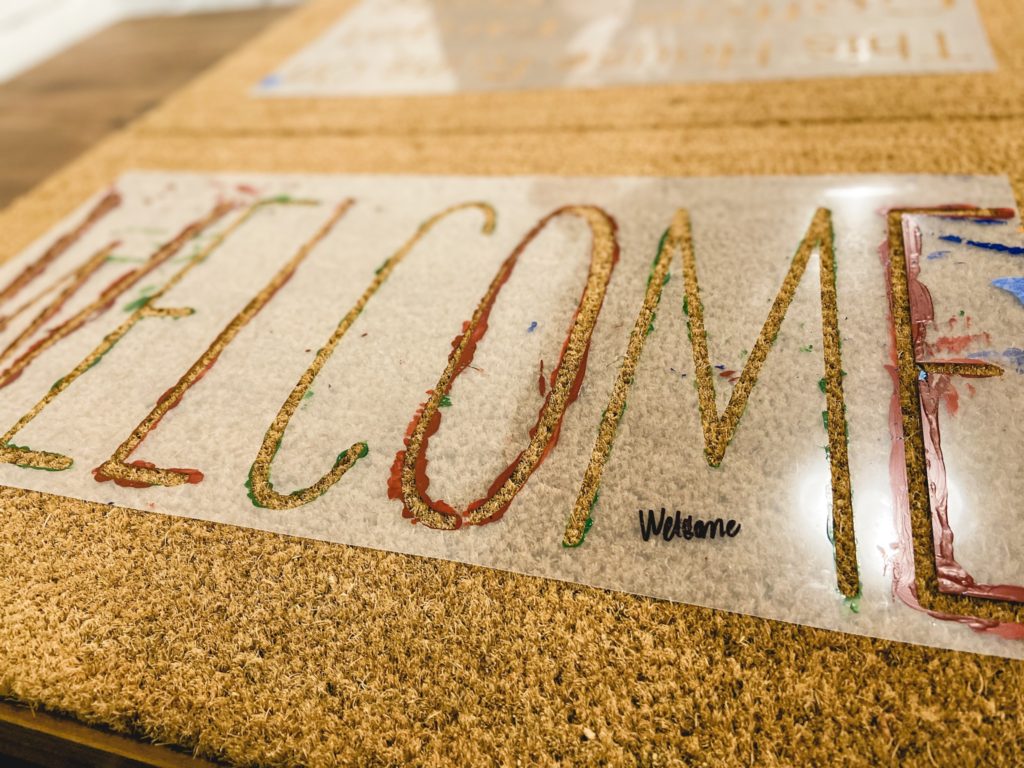
On Friday, I went to a Christmas party at the Foundry’s classroom, the Makery. This was one of the best Christmas gatherings I’ve ever been to. Our group brought snacks to share and spent time visiting at the beginning. Then we all made a welcome mat. Our instructor, Sarah had loads of fun stencils for us to choose from. (Being a noncommittal, plain Jane–I opted to simply stencil the word “Welcome” on mine. But trust me, other people who are more fun came home with mats with colorful says painted in colorful tones.)
(Colorful or plain…the mat takes the edge off of the construction mess currently in the entryway of Acorn House.)
It was such a nice way to spend an evening. And I love my finished product! After we finished we had the Foundry to ourselves for shopping. If you haven’t been, I describe the Foundry as “Etsy in real life.” It’s an adorable shop that offers hand made items from North Dakota makers, found vintage pieces and other unique gifts, home goods and clothing.
The Foundry is one of many places offering craft classes in Minot. Check their Facebook page for upcoming classes. (They range from arranging succulents to welcome mats, signs and gnomes!)
Other Places Offering Craft Classes in Minot
There are tons of classes and meet ups happening for Minot makers. Seriously, our town is saturated with creative types who are willing to share their skills with anyone willing to learn. Every week when I do my weekly round up of events happening (you can see this in my Instagram or Facebook stories) I am blown away by the number of great craft classes in Minot.
The classes offered vary widely. You can learn to paint, arrange fresh wreaths, fuse glass, quill paper, knit, sew, quilt, and just about anything else you can imagine. In my opinion, one of the best features of Minot is that if there is interest and enthusiasm, anything can happen. Chances are, if there is a class you’d like offered (or a class you’d like to offer) you’re only a couple coffee dates away from making it happen.
Here are more places in town that offer craft classes in Minot. I hope you find one that speaks to you!
Market on 4th
The Market on 4th sells locally designed/made home decor, gifts and goods. They’ve got a classroom that regularly hosts workshops. Check their website or Facebook page for a calendar of events.
Creative Dimensions
Creative Dimensions is a quilt academy and supplier. They offer sewing classes that help students make take-home projects as well as quilting workshops. Check their website and Facebook page for more.
Margie’s Art Glass
Margie’s offers paint your own pottery–but they also offer lots of fun glass classes. Workshops teach participants to fuse, blow and work with stained glass. Additionally they offer classes in painting, ceramics and jewelry making. They offer “no experience needed” classes as well as classes for more advanced participants. Check facebook or their website for a schedule.
The Fiber Basket
The Fiber Basket sells yarn and knitting/crochet supplies. Their classes range from “no experience needed” beginner’s courses to classes for more advanced students. They offer workshops in knitting, crochet, and basically anything that is made with yarn. Check Facebook or their website for a schedule.
Nature’s Nook
Nature’s Nook is a children’s toy and book boutique, but they offer classs (for both kids and grown ups) on a regular basis. They offer lots of painting classes and craft classes for littles. Check their Facebook or website for a full list.
Taube Museum of Art
The Taube is right downtown on Main Street. They offer lots of classes–some for adults, some for kids, some for parents to create with their kids. They also offer a program for pre-school aged kiddos called a Start in Art which combines story time or a visit from a zoo friend with a craft. Check Facebook or their website for all events.
Adult Learning Center
The Adult Learning Center offers lots more than just craft classes. However there are lots of good offerings for makers through their community ed programs. I really want to learn the art of rosemaling, so I’m planning on signing up in 2020.
The Libraries
Both the Ward County and Minot Public library offer craft courses and meet ups. A wide range of crafts are offered and there are programs for all ages.
The Spot
You might not think of a pool hall as a place to take in a maker’s class…but the Spot regularly hosts classes in painting, sign making and other crafts as well as the occasional vendor market. See their Facebook for upcoming events.
The Flower Box
The Flower Box offers lots of seasonal workshops in garlands, wreaths, pots and pot gardens. If you’re looking to hone your green thumb skills check out their Facebook for upcoming events.
Souris River Brewing
Souris River Brewing offers occasional acrylic paint-along classes. Some are adult-only and others are family friendly. Check their Facebook page for upcoming events.
There you have it! Did I miss anything? If you know of someplace else that offers regular (or semi-regular) craft classes in Minot for makers I’d love to hear from you! Have a great week here in the Magic City.
Today I’m excited to be sharing how to make a DIY busy board along with 50 busy board ideas!
I really like making toys for kids. Before Gideon was born I had a little more disposable time and was able to make some super cool things for the little in my life. Now, I’m a little more pressed for time, but I still really like making things for my guy to enjoy.
Hopefully in the near future I’ll sit down and make him something really fun and elaborate. But that hasn’t happened quite yet.
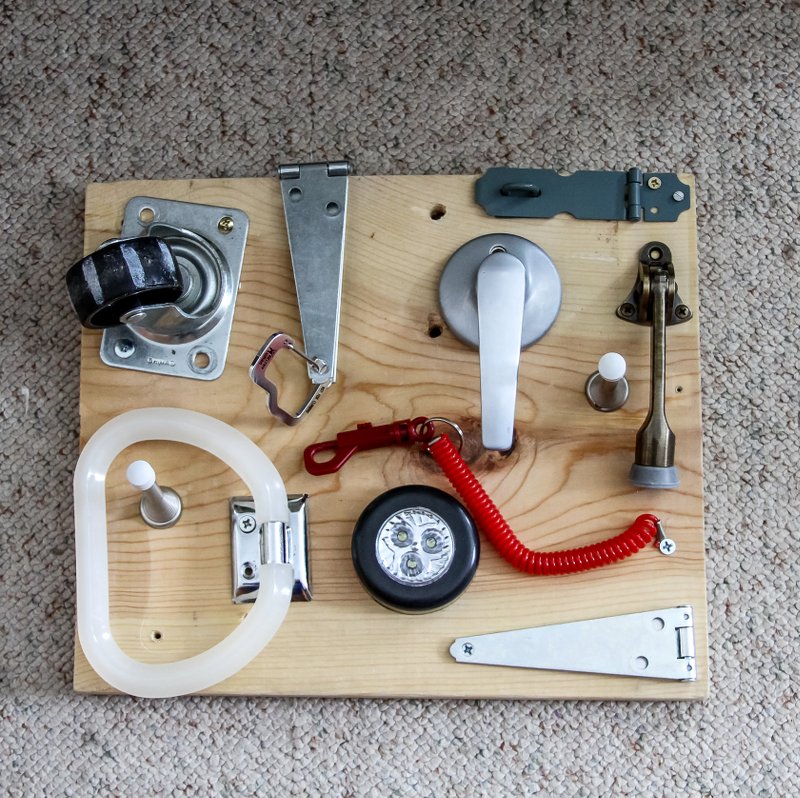
One of the most-used and most-loved homemade toys I’ve created for him has been his busy board. It’s really nothing too exciting to look at, but I’m sharing it here because it is ever-evolving (it has grown with him), cheap, fun to make, and super fast to put together.
I started this busy board for Gideon when he was about 4 months old. At that time we were working on tummy time. This was something he could look at and play with on the floor, or could be in front of him while propped up on the Boppy. He loved it then. He loves it now. And a friend’s 3-year-old was recently here and she exclaimed, “I want one of these for my birthday.” It’s truly a gem for all ages, and it’s easy to make and update!
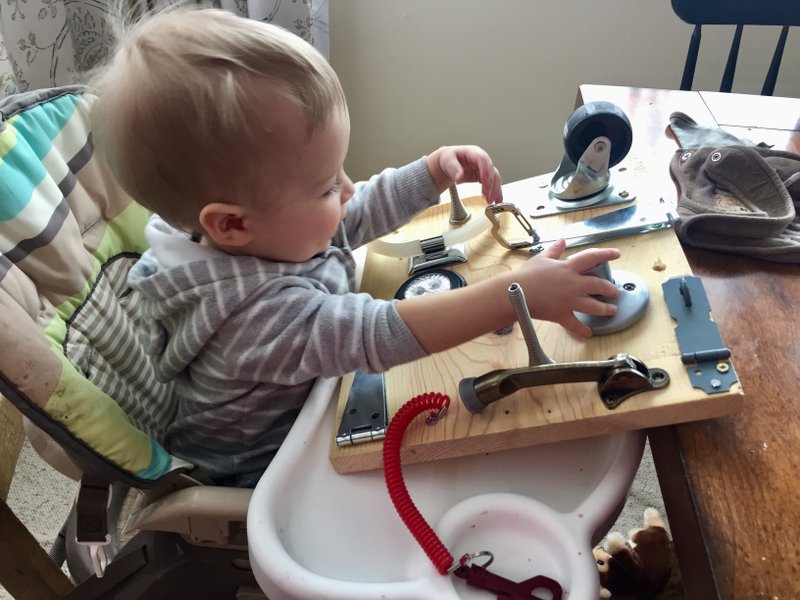
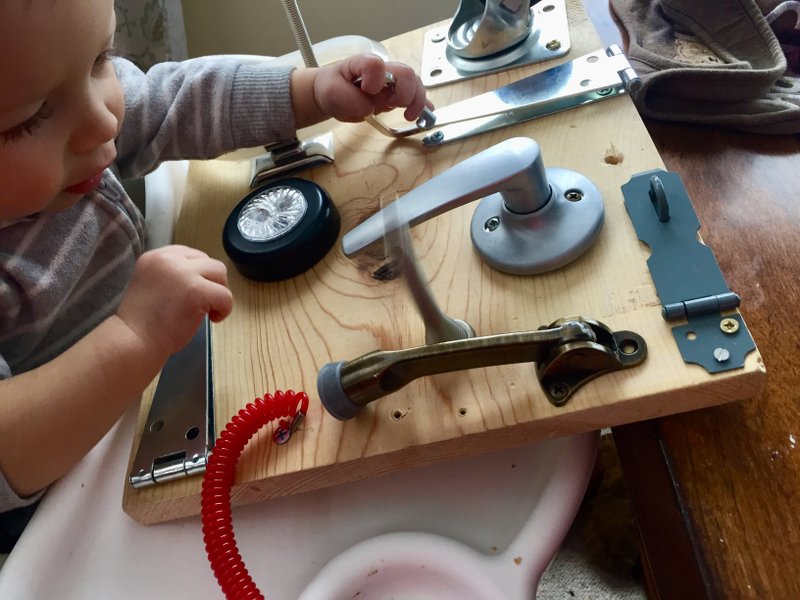
I often put the board on his high chair tray while I’m getting his meal prepped. This gives him something to do and buys me a couple extra minutes.
Build A DIY Busy Board
Here’s what you’ll need to create a busy board of your own.
Scrap of wood
Hardware knick knacks
That’s it! Honestly, you probably have everything you need already laying around the house.
I used a scrap of 1″ pine we had in the basement left over from our Master Bedroom Remodel. A quick sanding and wipe with a damp rag made it clean and clear of any splinters.
Then I gathered up mismatched hardware pieces and screwed them in. For the very first version of the board I attached several cabinet handles with interesting shapes, a piece of sandpaper, a chain, etc. Mostly just things to feel and see since his motor skills were very basic. Bang! Done.
Now, if you look at Pinterest you can easily become overwhelmed by elaborate busy boards. Those are great and super cute–but your baby isn’t going to care much about the boards aesthetics. At least, not when they are still learning to hold their head up, crawl, and walk.
Here is the most beautiful part of a very simple board like this: you can easily change and modify it as frequently as you like! Since it is just a scrap piece of wood, you can take things off and make new holes and have no regrets.
How To Update A DIY Busy Board
Here is my busy board “work flow.”
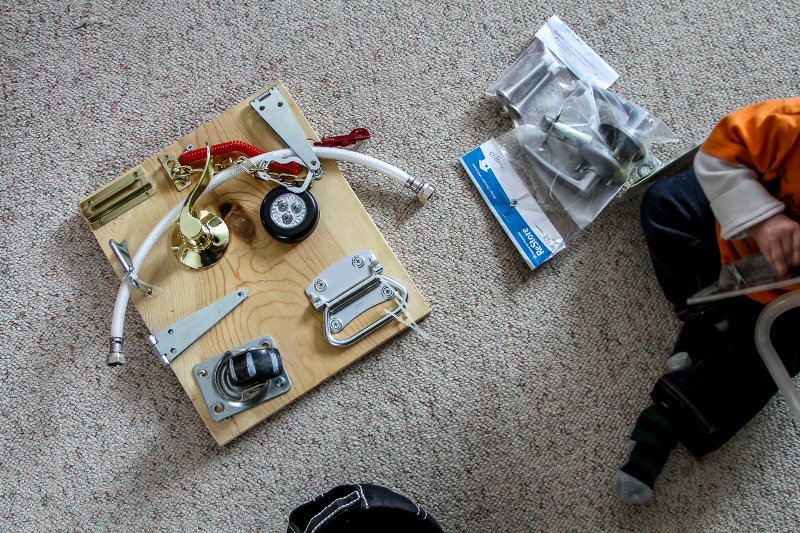
After a couple months your child will make it pretty obvious which items he is still loving and which items he is over. I remove items that have lost their luster and replace them with new things we’ve picked up at Menard’s or the Habitat ReStore. I try to reuse screw holes if I can. If not, I try to place the new item over the existing hole just to cover it up. If that doesn’t work, I simply give the old hole a quick sand to smooth out splinters and drill a new hole.
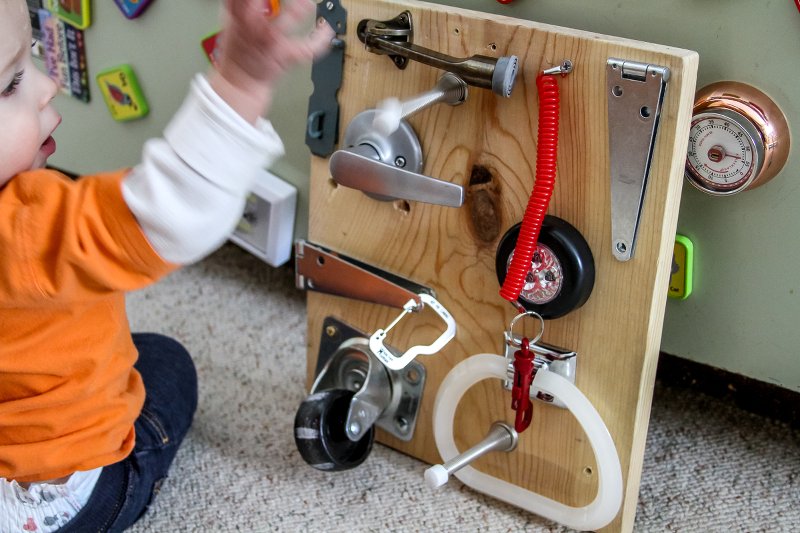
To give you an idea of how gradually I change the board, here is a photo prior to our most recent update. The board included a slide lock, stretchy key chain, strap hinges, a static door handle, press light, handle, caster, and u-bolt with a faucet line zip-tied to it. (It looks weird, but he really liked it.)
And here is our current board. I left the caster wheel, hinges, light and red key-chain. (That is one of his FAVORITES and has been on here since I first made the board.) I added a hinged lock, hinged door stop, towel ring and two door stop springs. (These are the new favorite…boiiinnnngggg!) I’ve got carabiners that I clip on to various parts of the board. In this photo it’s hooked onto one of the strap hinges.
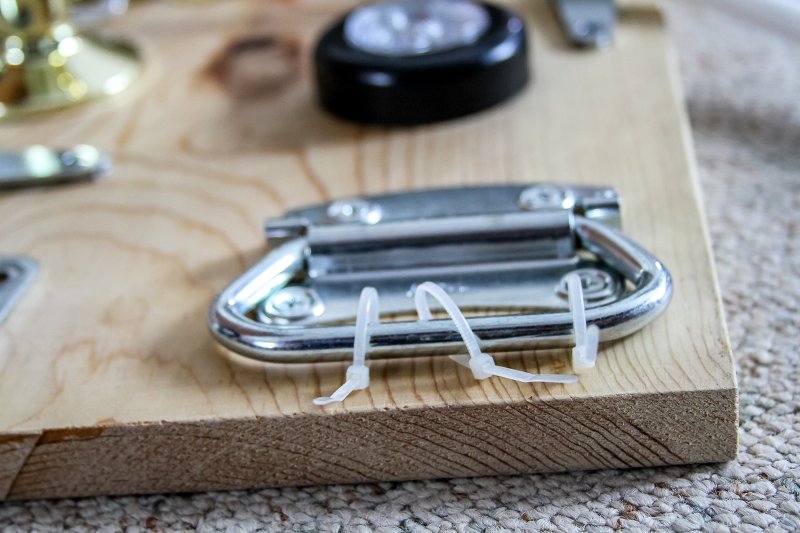
I’ve also found that adding zip-ties to existing hardware is a super quick way to add a little extra interest. Adding a few to this handle gave it more texture and things to spin.
It’s so fun and picking out new items is something I look forward to doing with Gideon. We wander the hardware aisles and I let him hold things and see what sparks his interest–then buy a few and add them. This is a great project for an overwhelmed mom…or would be a great gift for an overwhelmed mom!
50 Ideas For Your Busy Board
The possibilities are endless, but here is a big ol’ list of 50 ideas of simple things to put on your DIY busy board to get started. Keep in mind that not all items are appropriate for all ages and kids should always be supervised while playing with a board…just in case a small piece should come off.
drawer handles
hinged handles
door knocker
knobs of all shapes and sizes
hose spigot knob
static door knobs and handles
turnable door knobs and handles
door hinges
cabinet hinges
strap hinges
piano hinges
slide locks
chain locks
combination locks of all kinds
lock with a key (I would attach the key with a string so it doesn’t get lost)
coiled key chain (like mine above)
retractable name tag
sand paper or textured fabrics/ribbons
closet push light
battery operated light switches
battery operated door bell
toggle switches
dimmer dials
bike safety light
chain
pulley
wheels or casters (I painted white stripes on mine to help Gideon see it move)
latches of all kinds
velcro
toilet paper holder
towel ring
bungee cords (without the metal hook ends)
U-bolts (these are fun to put extra pieces on, like nuts, washers, curtain rings, etc)
mirror
zippers
use carabiners to attach measuring spoons, keys, bells, paintbrushes, etc
sponges
M-F pill box
a land line phone
reflectors
pet collar
belt buckle
toys that squeak
house numbers
Gears
silicone hot pads
an old thermostat dial
faucets and handles
pieces of hose, water line or other flexible tubing
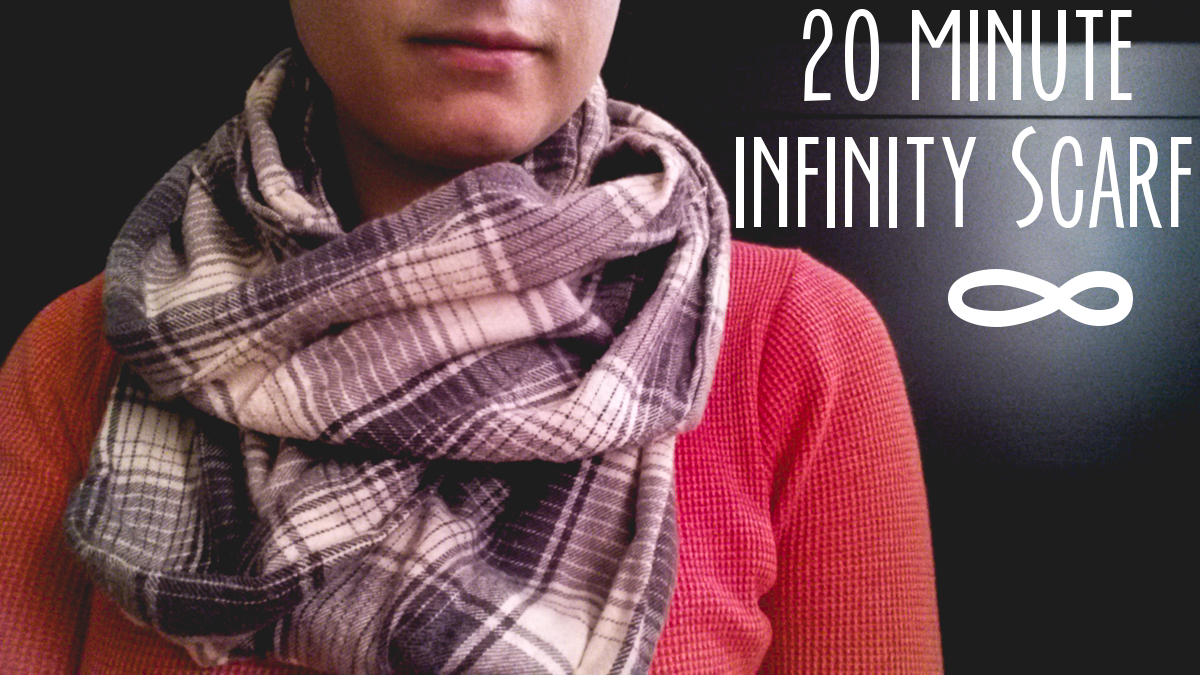
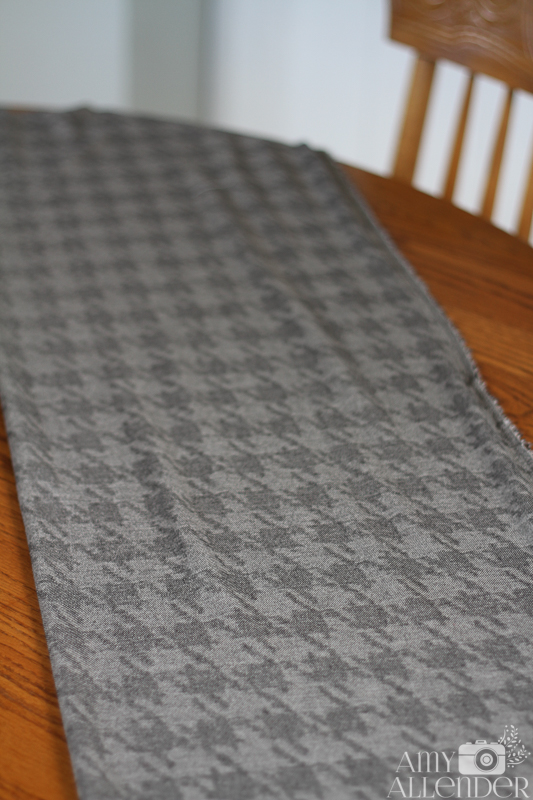
Last Christmas, I made a few infinity scarves. They went over really well with the friends and fam. I found a few tutorials online, I combined a few steps. I’m sure you could find other tutorials out there too. But this is my version, and I’m glad you’re taking a look.
The first thing you need to know is that this is easy. It’s quick. And you don’t have to be a pro with a sewing machine to make it happen. Just a couple straight lines. Really, it’s easy.
Here’s what you’ll need:
1.5 or 1.75 yards of fabric–Flannel works great, but I’ve also used some thick, slightly stretchy knits that have worked nicely too
Pinking shears
Pins
Sewing machine
Thread
The length of fabric really depends on how you like your scarf. I like them tight to my neck, so I tend to favor a 1.5 yard cut. If you like it looser, go with a little more length. That cut of fabric will yield two complete scarves, so this is a perfect crafternoon project. You and a friend can each buy a cut of fabric and swap patterns. Or–since it is the gifting season–you can make one and gift one. Anyway…
Step One:
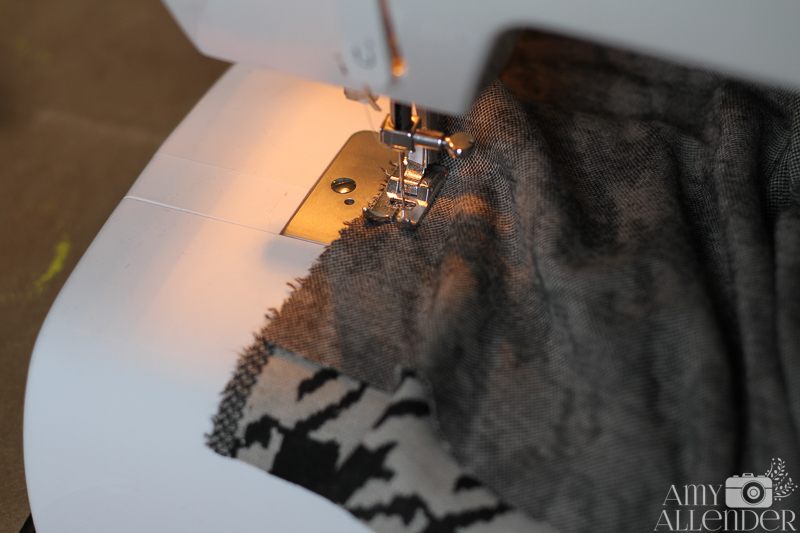
Lay your fabric out on a flat surface. Unfold it and cut down the middle length-wise {so you have two pieces about 27″ across} Use the pinking shears to prevent it from fraying loose from the seams you’ll be putting in in a minute.
Step Two:
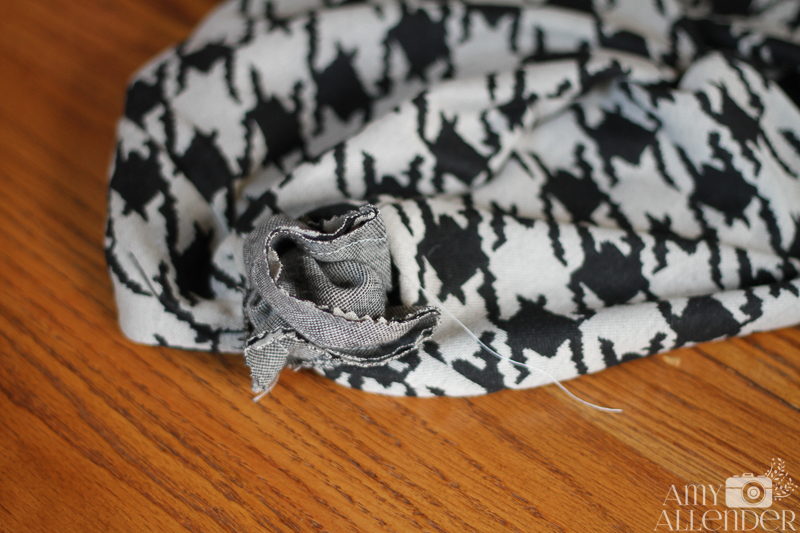
Fold the “right sides” of the fabric together, and pin the open edge. {Side note…the tutorial is a demo of a different scarf than the one in the intro image}
Step Three:
Leave a 2″ gap at the end of the fabric, then sew all along the open edge. Remove the pins as you go, stop about 2″ from the other end. Back stitch at both ends.
Step Four:
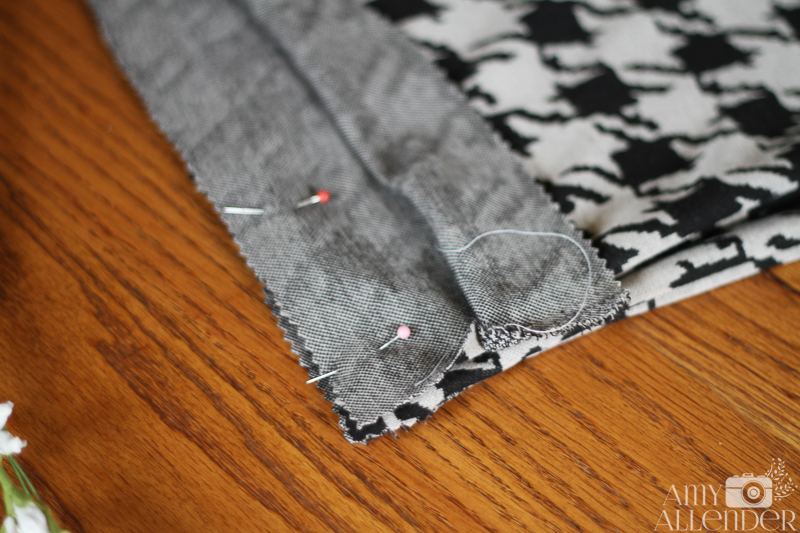
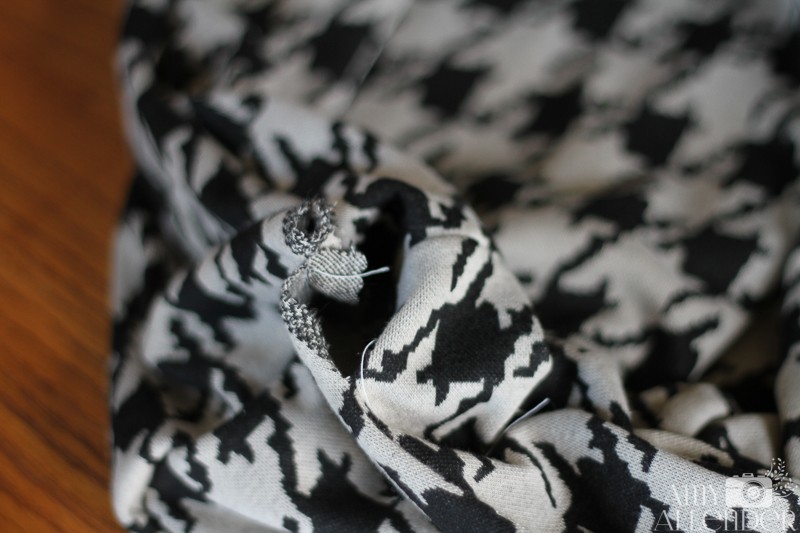
Turn it, so the right sides are out again and you have a tube of fabric. Fold that tube in half and line up the open ends. Follow me here…You’ll have four layers of fabric stacked on top of one another. Take the middle two and pin them together.
Step Five:
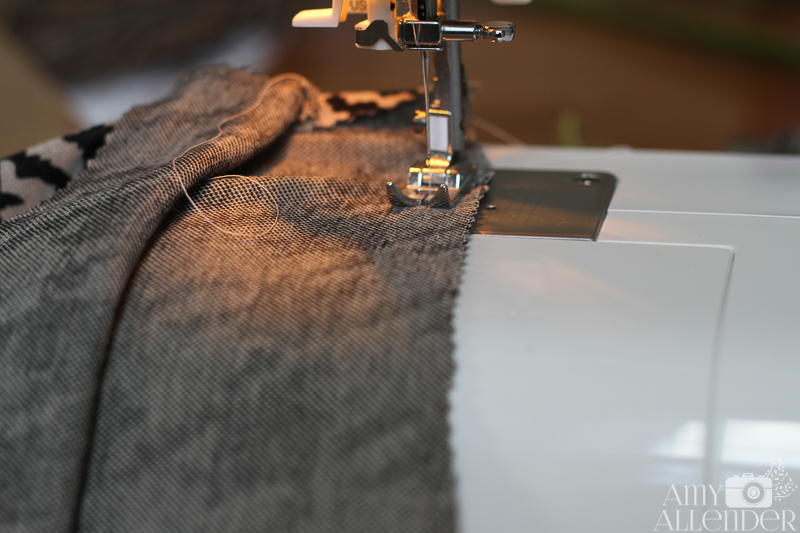
This is where it gets a little tricky. But not too tricky. Get the outer two layers out of the way and start to sew the layers you’ve pinned together. Start at the very end. Back stitch. Keep going all the way around. Just try it. It makes more sense once you’ve done it.
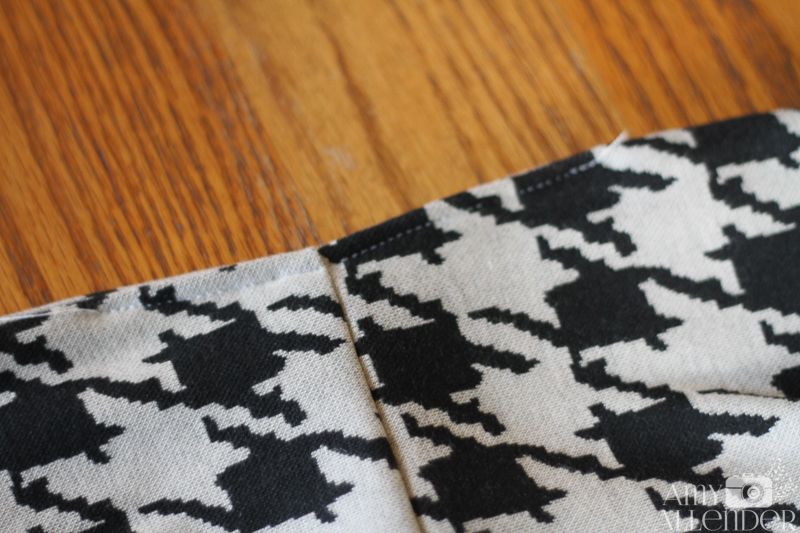
Step Six:
When you are done, you’ll have a circular tube of fabric with just a little hole. {That’s the 2″ gap we left earlier.} Tuck the fabric that is sticking out back inside. Now, you can hand sew the gap…or, if you are lazy like me, fold the seam together and use the machine to sew really close to the edge.
After that you are done! It really is super easy. I wear the ones I’ve made all the time. Here’s me at Eddie Bauer last Christmas. They were making balloon hats for some reason…but who am I to say no to that?
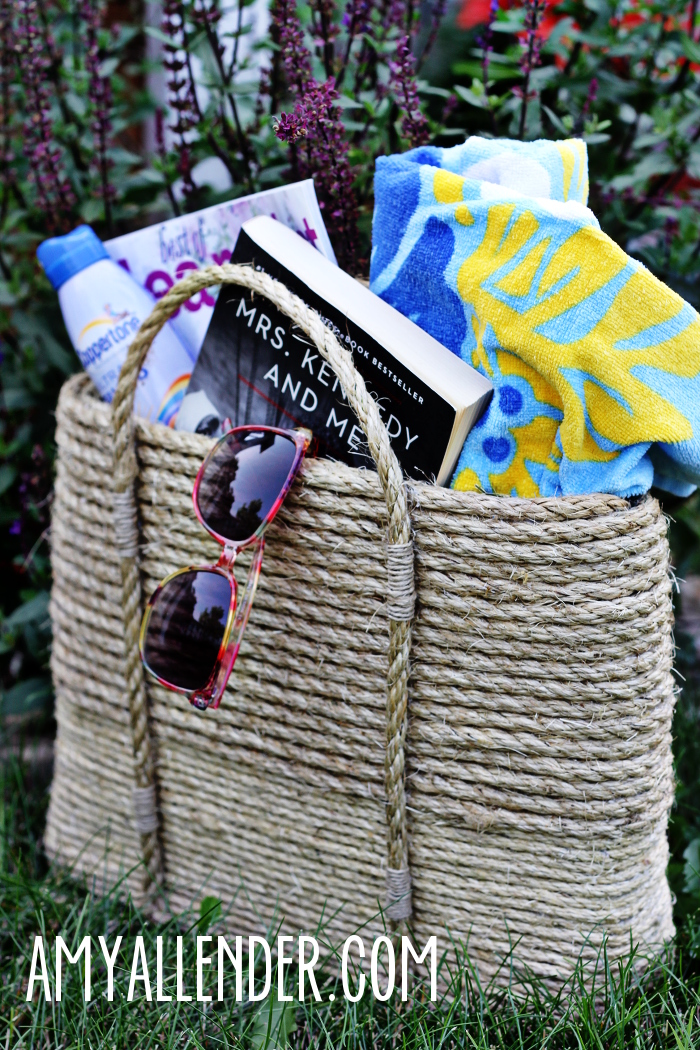
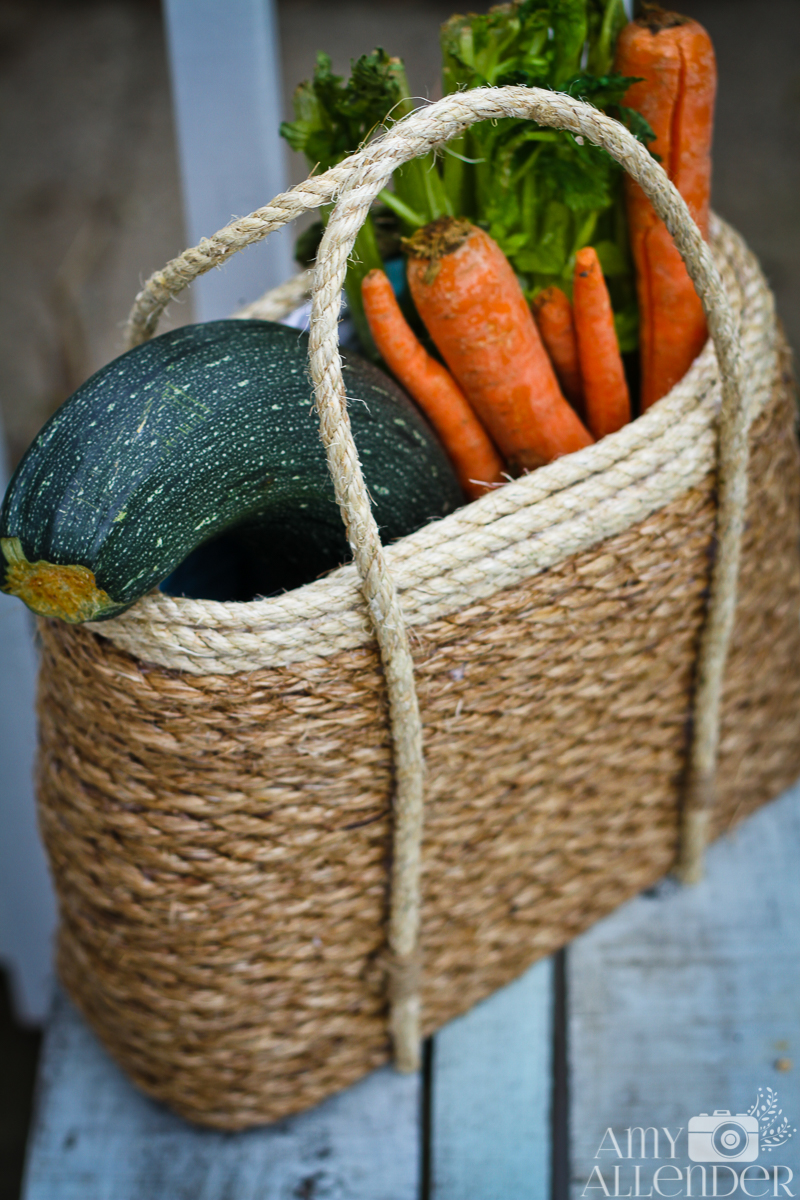
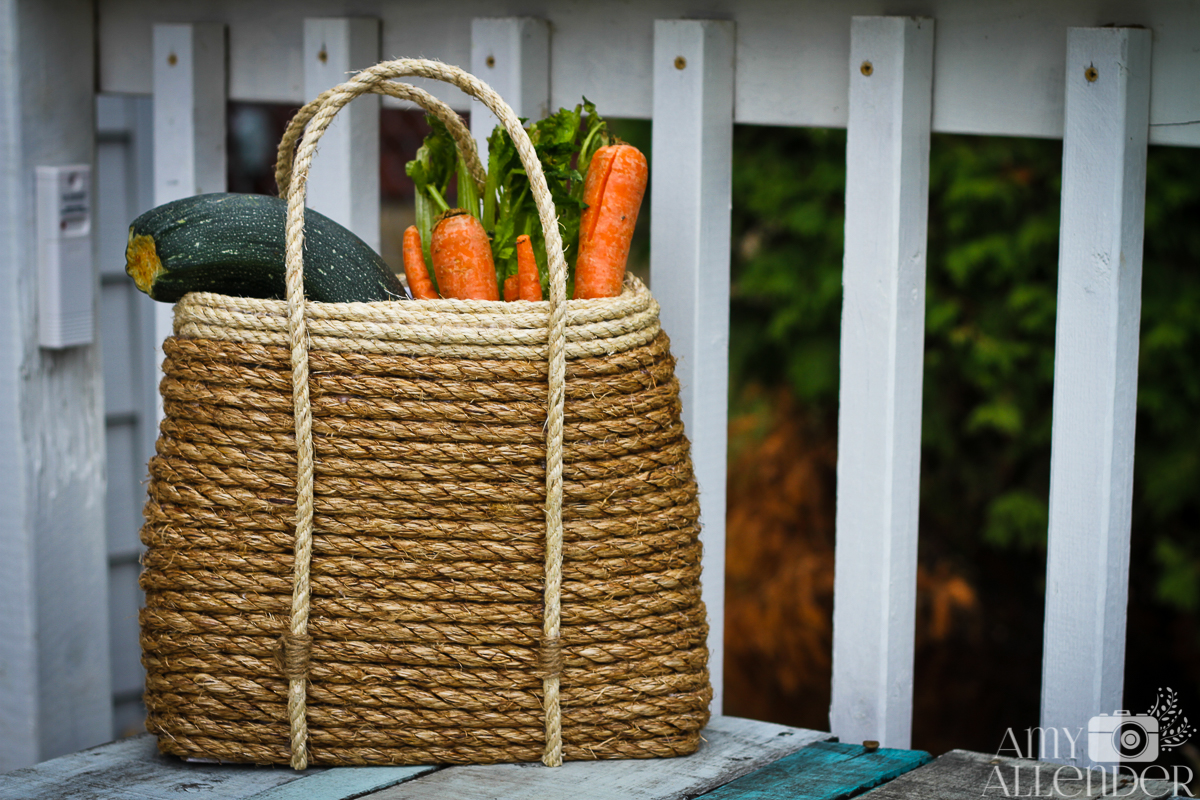
A long time ago….way back when there wasn’t frost on the ground and it stayed light until 11 o’clock at night, and I’d just had back surgery and wasn’t allowed to do much…I got glue gun happy and made this adorable DIY sisal tote bag.
That first one was a bit of an experiment so I didn’t document the process. But it came out lovely. I gave it away as a gift to my cousin and she just couldn’t believe that I’d made it from rope, a pillow case and a flat-rate mailing box. In my efforts to craft early for Christmas, I’ve made another, and this time I’ve got photos and instructions.
First gather your supplies:
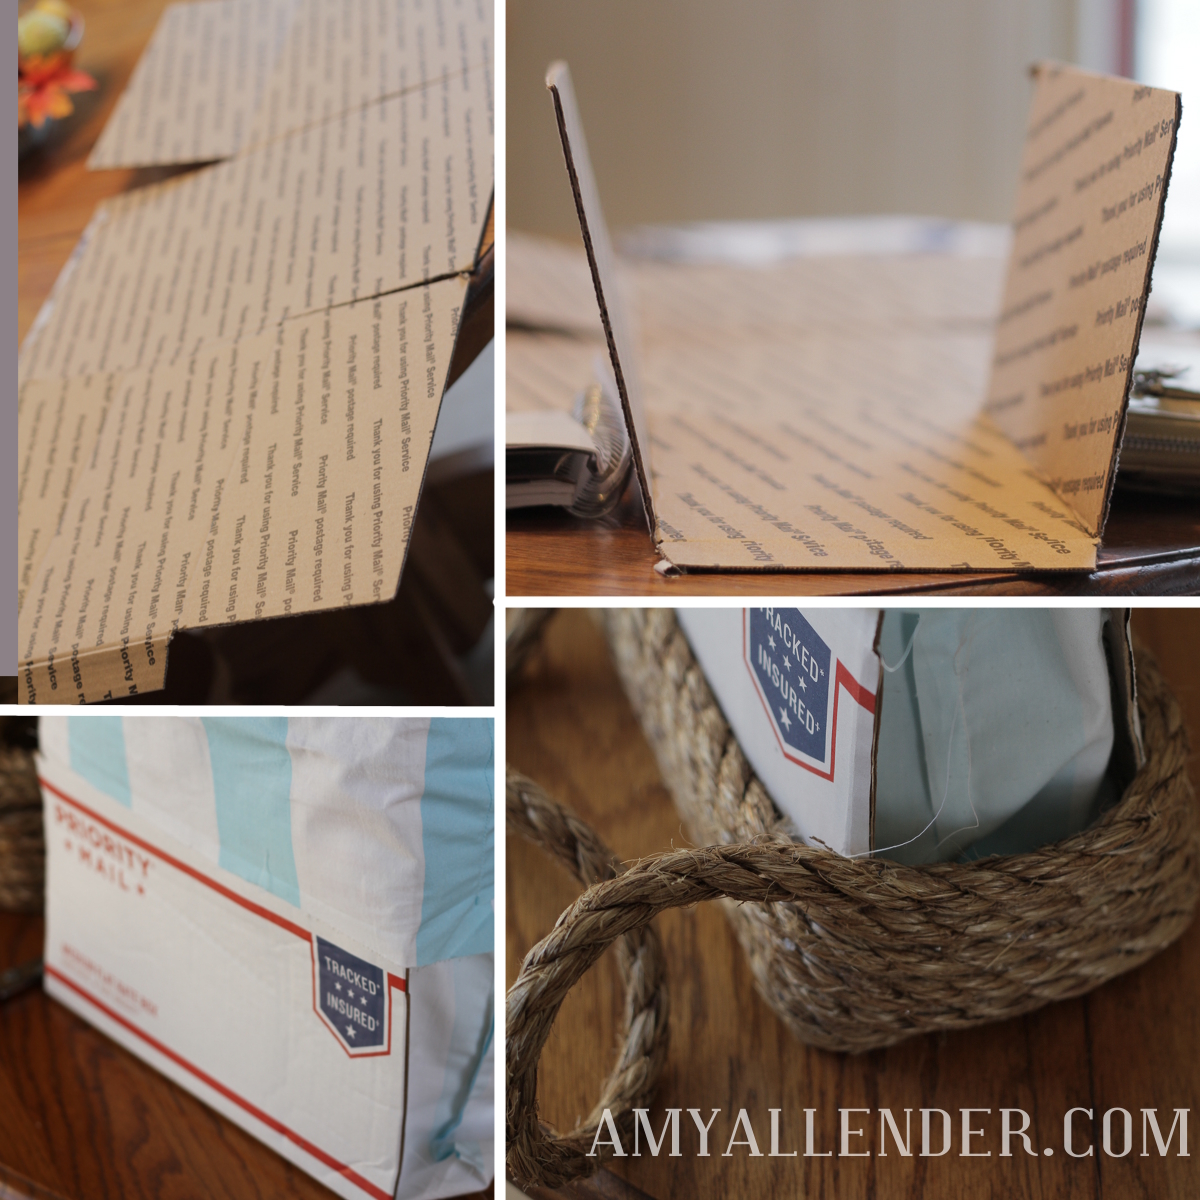
A flat rate mailing box–or another cardboard box. Any size will do, but it’ll affect the finished shape of your tote.
Glue gun and lots of sticks.
A pillow case.
Sisal rope in a couple sizes.
Start with your box. Lay out flat, like the fist image. Here you can play around with folding up different sides to form the shape of your tote. The first one I made used a large flat rate box…the skinny kind. This one is a medium, more boxy box.
Fit your old pillowcase inside as a lining. Use some glue to adhere it to the bottom then fold the sides over the top. Cut away and excess you have, then glue the top of the pillowcase to the box. It doesn’t really matter how it looks right at this point, since it’s going to get covered up.
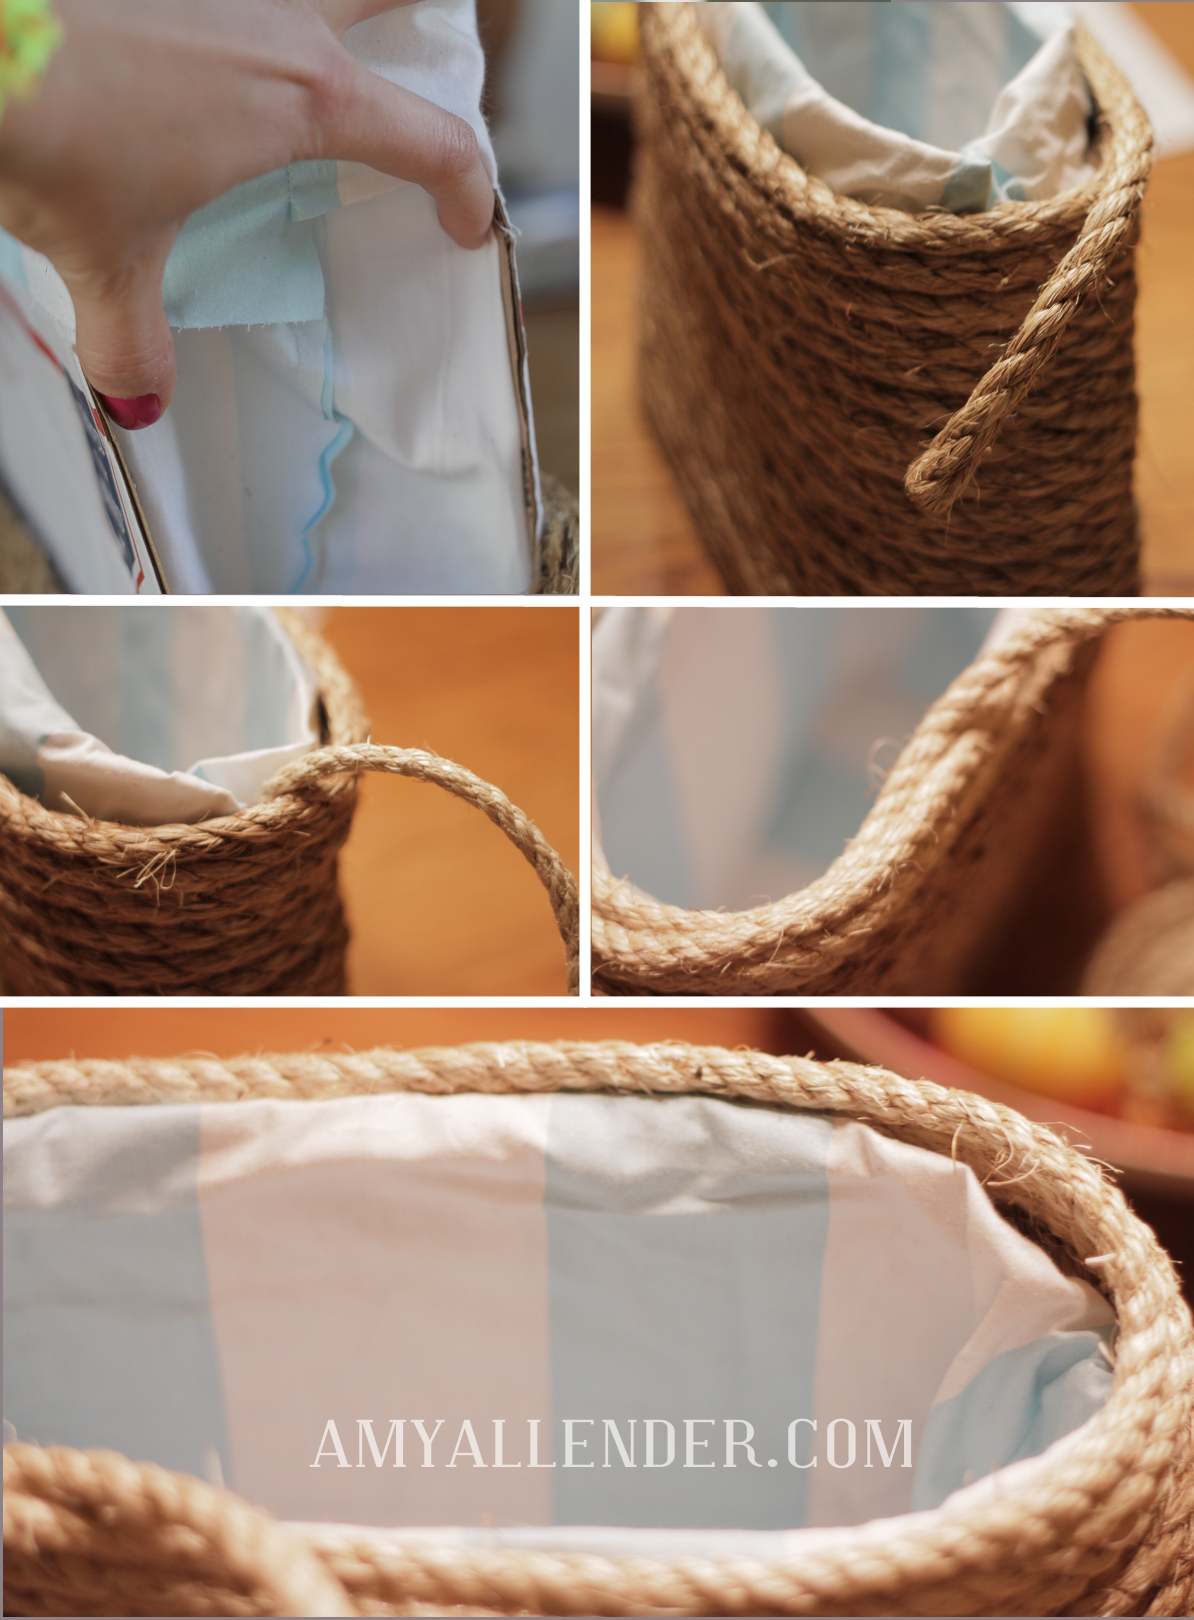
Then, start wrapping. Use a bead of glue to secure the rope to the box. When you get to the skinny sides with no cardboard, gently wrap it around and secure it well on either side.
This next part is pretty important. So listen to me and take my advice. As you continue wrapping, use your hand to keep consistent space on the sides as you wrap the rope around. Naturally, the box will want to become narrower toward the top. Every time you wrap around the side, use those polished fingers of yours to keep the space…so you don’t have a tote with a wide base and a really skinny opening at the top.
It’s kind of basic after that. Just keep wrapping. Switch rope sizes if you like. But keep going, around and around and around.
When you want to switch sizes, wrap to the side of your box, then tuck the end down the size {the lining will hide it} and glue it in place. Then take the end of your new rope, tuck it inside the side of the box as well, glue it in place and start wrapping where you left off.
Once you get to the top, wrap all the way up and over the rim, and do a row or two on the inside of the lining. You can see that part in this image of the first one I made.
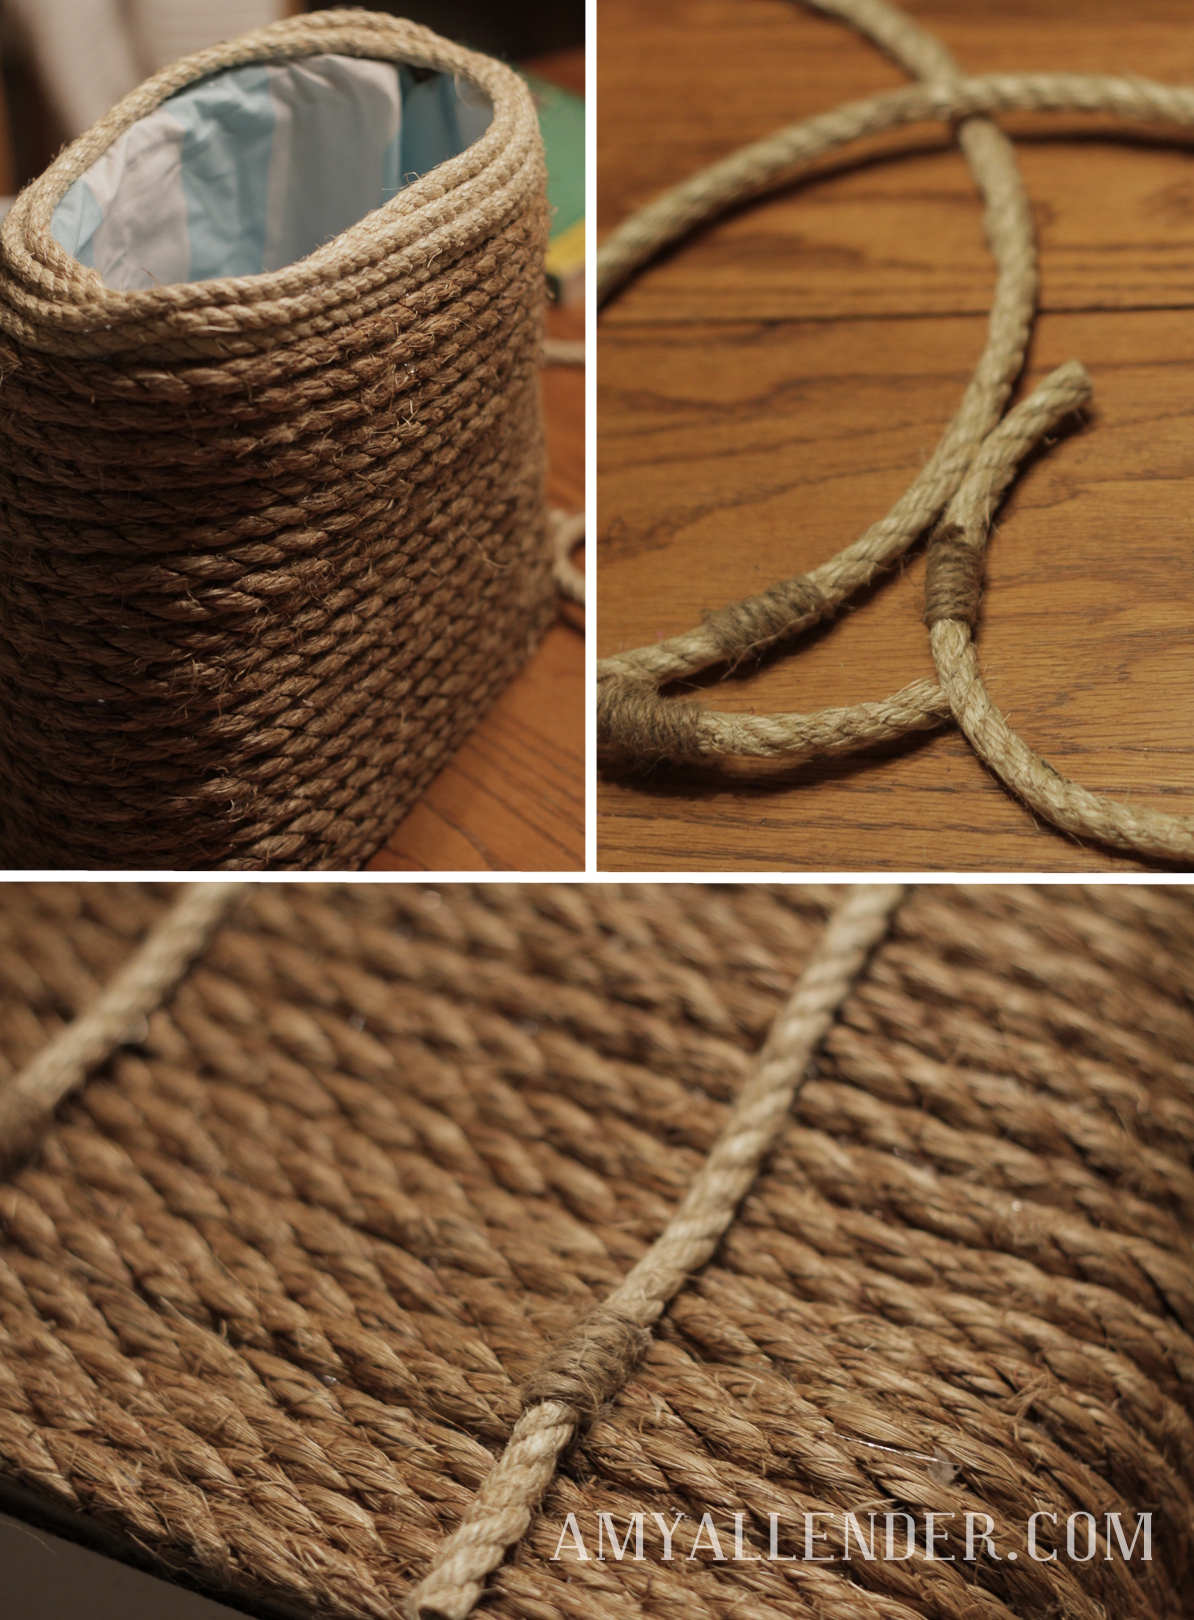
Coil and glue rope on the bottom…and you’re almost done.
The last step is making handles.
Cut two pieces of rope for handles. If you want to embellish them a little bit, you can wrap skinny cord around them. Just be sure to space the details consistently so they are symmetrical once the handles are attached.
Attach the handles with hot glue or a combination of hot glue and super glue. If you are planning to use your tote mostly for decor, hot glue will be fine. But if you are planning to haul anything heavy in it, I’d recommend using super glue to be sure it can hold up.
Let everything dry and you’re done.
I really love the way these turn out…even it it does take some time, some glue burns and maybe a hint of crafter’s rage to produce one. They get easier and easier the more you make…so don’t be afraid. I’m totally confident in your ability to make a DIY sisal tote. They really do make awesome gifts. And they are super fun to fill with goodies and give away. You don’t even need to wrap it, just slap a bow on it and put it under the tree.
I haven’t decided what direction I’ll go with this one. {I won’t be giving it away filled with produce…} Two bottles of wine or sparkling cider and two pretty glasses fit nicely inside. Or, a couple magazines, a throw blanket and a subscription notice could be good filler. Or maybe I’ll pack it with picnic supplies. The options are endless.
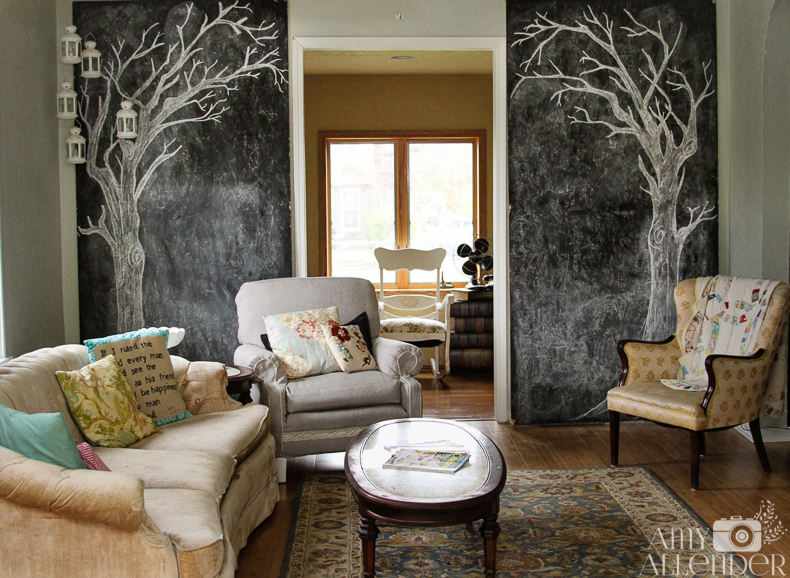
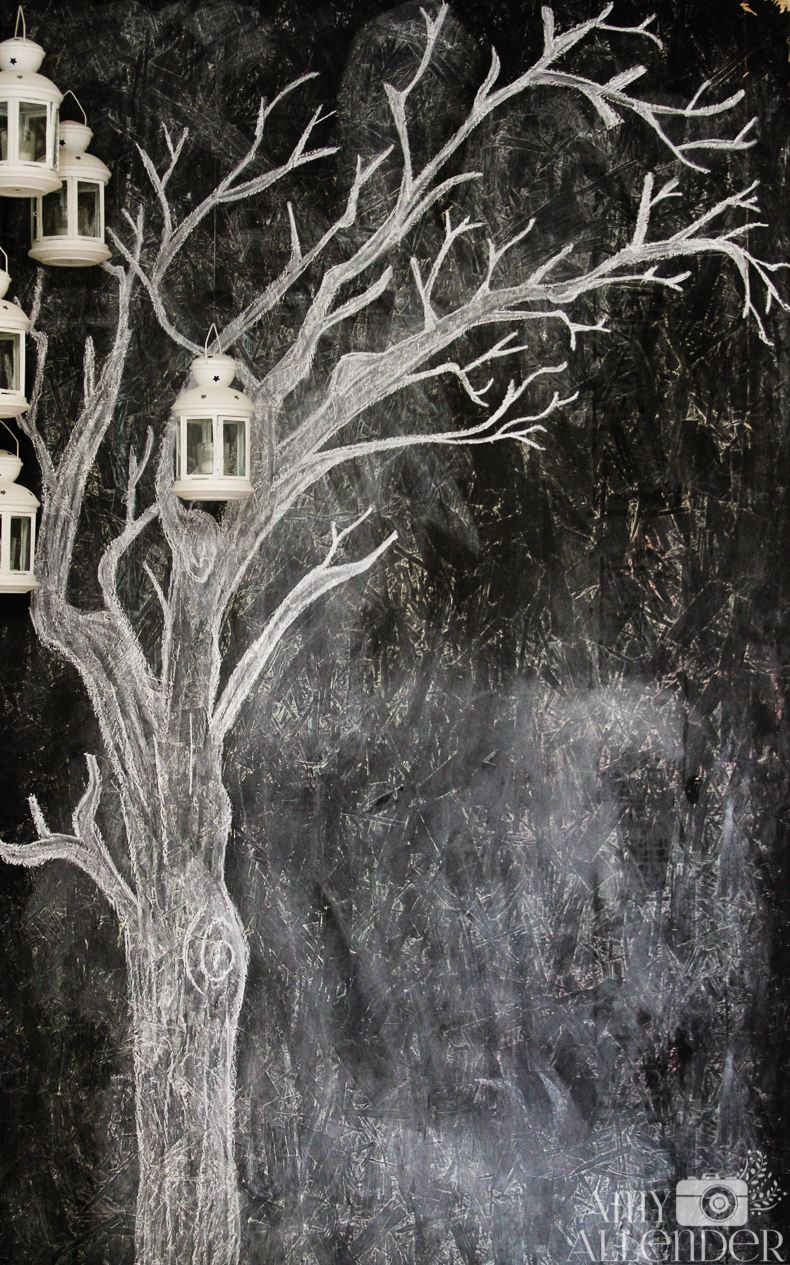
Check out my spooky fall trees! Usually the chalkboard panels only live inside when I’m expecting or shooting photos…but a few weeks ago a client asked if I ever decorate them and leave them up. You can imagine how silly I felt when I told her “No.”
So, one night, while Derek was working late I drew up these spooky trees. I love them. They really put me in a festive, fall mood. Since we’ve had to clear everything out of the basement as we start to make progress on that project all my decor is being stored in the attic and is inaccessible. For the first year I can ever remember, my house was stark naked of fall decor. No leaves, no wreaths, no paper bats, no Halloween candy dishes, no 60’s plastic pumpkin lamp. Nada. I’m still jonesing for that pumpkin lamp, but the chalk trees are doing a good job of holding of a real hate rage.
My question, for you is…if you were me, would you leave these up all the time? Should I leave them through Christmas? Let me know. Comment here {really hoping the glitch is gone from the comment system…} or tell me on Facebook tonight.
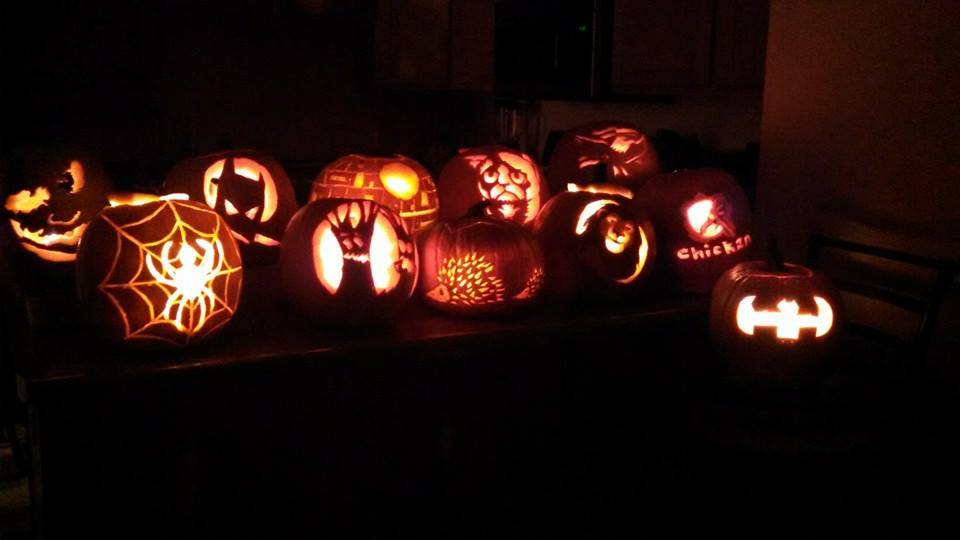
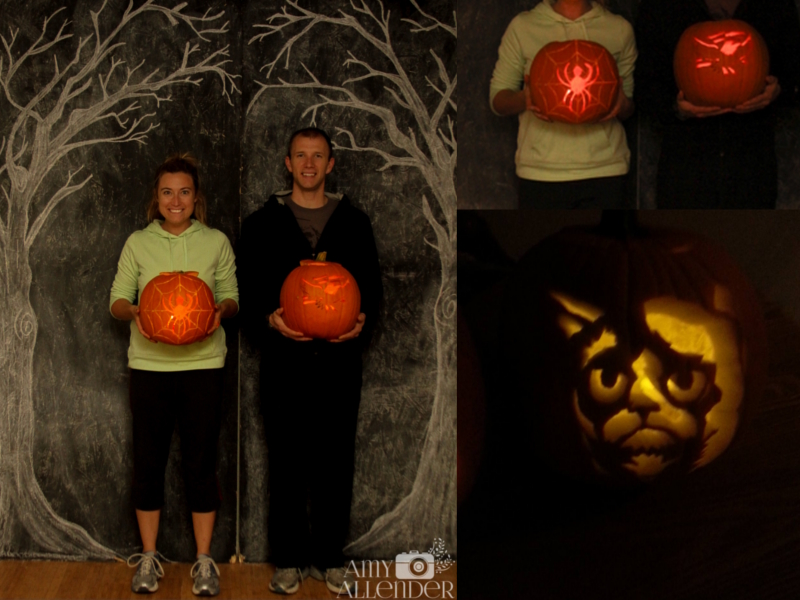
On a side note, a couple nights ago some friends of ours hosted a pumpkin carving party. I cannot even start to describe the genius of these people I’m lucky enough to call friends. Look at this spread! Not a triangle-eyed face among them.
Please take special note of Mufassa, the adorable hedge hogs!! Oh, and Grumpy Cat! I’m so stinking impressed with every single one. I carved the spider. Probably my best yet. Even better than last year’s. Derek made the eagle in back. He’s so American.
Obviously, when we got home we snapped one of our self-timed pics we are so notorious for. Again, the trees look awesome.
Oh, and for good measure I nabbed a close up of the Grumpy Cat pumpkin our friend Danica made. Hope she’s okay with me stealing it from her Facebook page…I included it here because it’s so amazing and you all deserved to see a close up.
Be sure to come back tomorrow for more fall fun when I show off my first Artists in the Schools piece that I did today with a group of first graders!
I’m still trying to get some Christmas crafts in the works. One thing that I want to make for a few friends are canvas/sign art. I really didn’t know what route I wanted to go…so I started looking into the bowels of the Internet for inspiration. Without further ado…
20 tutorials, resources and ideas for creating your very own DIY Canvas Art
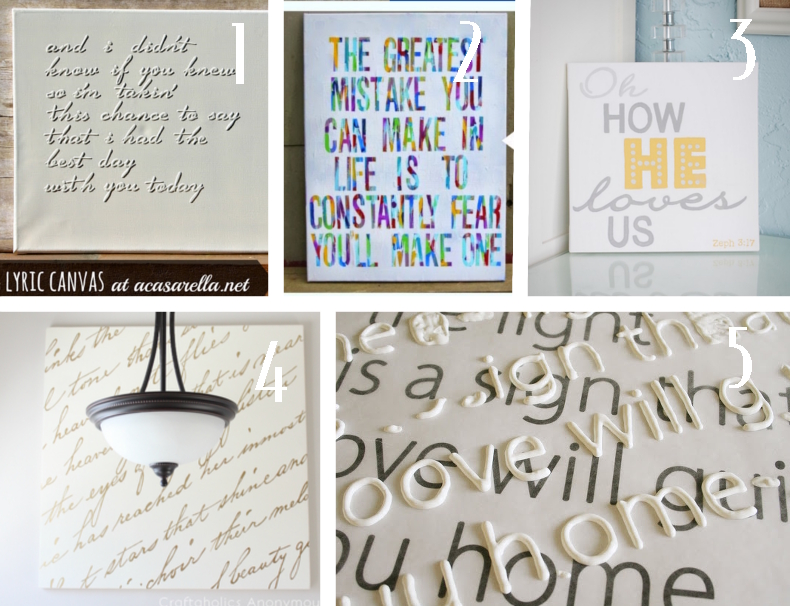
1. This technique from ‘A Casarella is fool proof. You don’t even make the letters yourself, and it looks super classy.
2. Great tutorial on making this colorful canvas, from Kallie at But First, Coffee.
3. I use this technique for all kinds of projects…including my statement stairs! Leana, at A Small Snippet did a great job of making an easy to follow tutorial.
4. This one requires a projector…but the results are simply amazing! Craftaholics Anonymous has a fab tutorial for using liquid leaf to make this statement piece.
5. This is another technique I love. Only basic supplies needed to transfer any font you can think of to canvas! See the how-to at Virginia & Charlie.
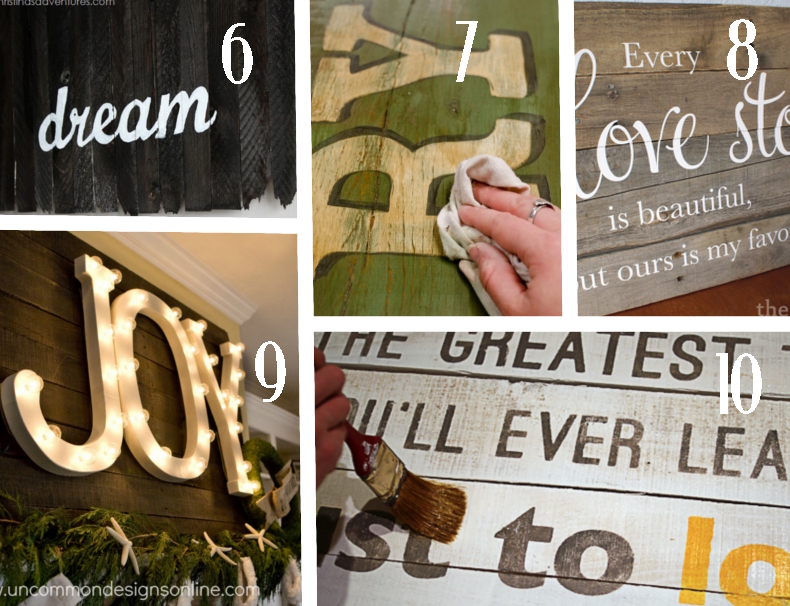
6. Christa’s Adventures offers an easy to follow tutorial for making an upcycled sign and adding lettering to it.
7. When it comes to making a distressed sign, I haven’t found a tutorial I like better than this one from Miss Mustard Seed.
8. The Thinking Closet made this sign with vinyl lettering. But even if you don’t have a vinyl cutter you should still pin this one simply for the sake of the pallet-sign tutorial.
9. This one doesn’t require any lettering at all. Just buy the letters and light them up. Another great tutorial from Uncommon Designs.
10. This tutorial from Saved By Love Creations does an awesome job of breaking down this pallet sign and how she got it perfectly lettered.
For those of you feeling a little more adventurous, here are five awesome tutorials on hand lettering and sign painting.
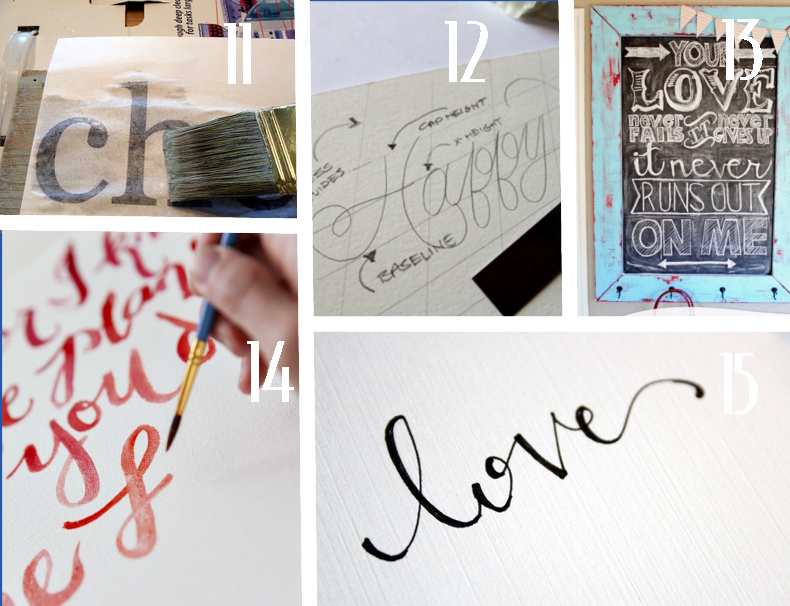
11. Diddle Dumpling used her printer and water to make a perfect transfer onto wood. Then she painted over the top.
12. This is a great look at how to create a hand lettered design from start to finish. Head over to A Pair & A Spare to see the tutorial.
14. For those confident in free handing, here’s a handy tip from Oh, So Very Pretty. I love that the tutorial covers the lovely gradient effect she achieved on the canvas!
15. Emily at Jones Design Company offers a great how-to on turning your own hand writing into something fancy-schmancy.
Now, just to make sure you are ready to create, here are five more resources for getting your quote art under way!
16. Get letting inspiration and great fonts from DaFont.com
17. Bible Gateway put out a list of it’s 100 most-read verses. It’s a great place to find the perfect quote.
18. Oh, and this is the page for A-Z Lyrics. I’ve got this linked to all the Switchfoot songs right now…a great place to find good quotes, since they are one of the greatest bands of all time. {But you can search any artist you like.}
19. Brainy Quotes has a great data base of all kinds of quotes. You can search by author or genre.
20. And finally a link to Rifle Paper Co. If you can’t glean inspiration from her, you won’t get it anywhere.
I know it’s only October–not even Halloween yet–but I’m already trying to line up some Christmas craftiness. Every year I tell myself that I want to make home-made gifts…and every year it comes to crunch time. I stress over getting things made, which completely zaps the joy out of crafting. This year, I’m determined to be different. I’m determined to start making a few things here and there–and hopefully by December I’ll have a good stash of hand-made creations to gift.
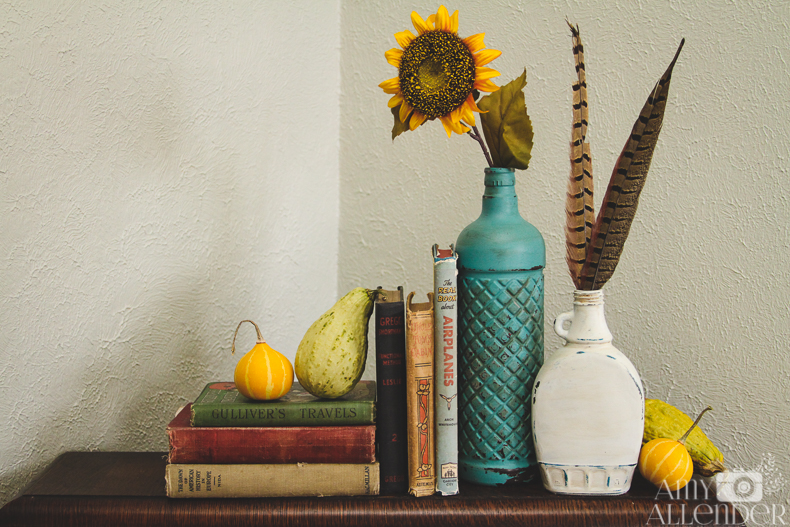
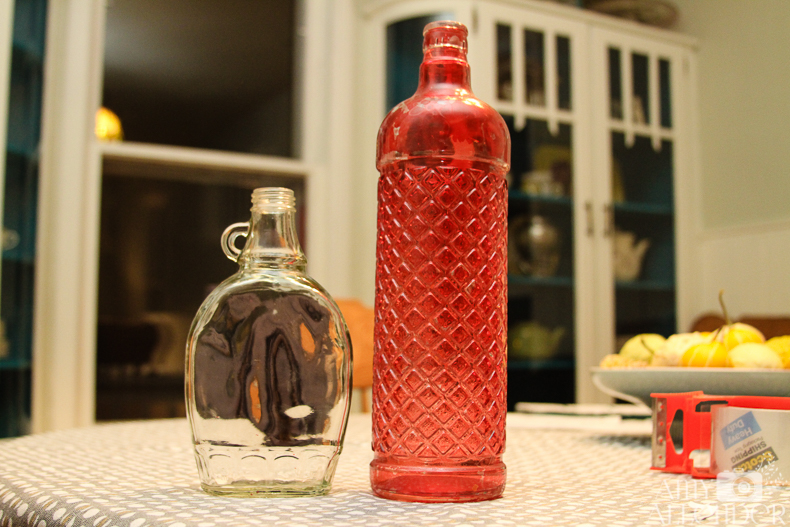
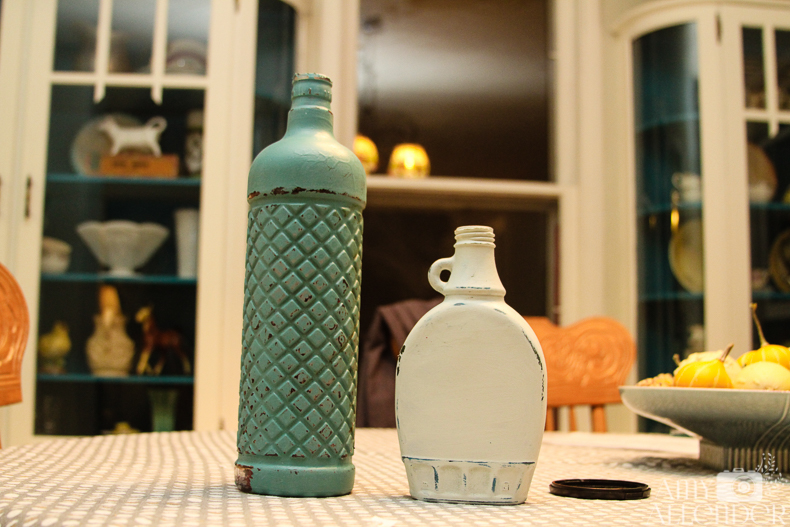
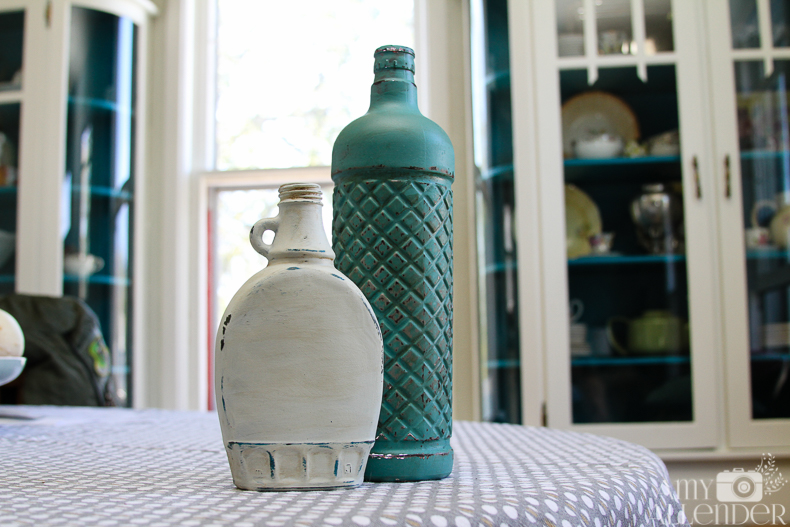
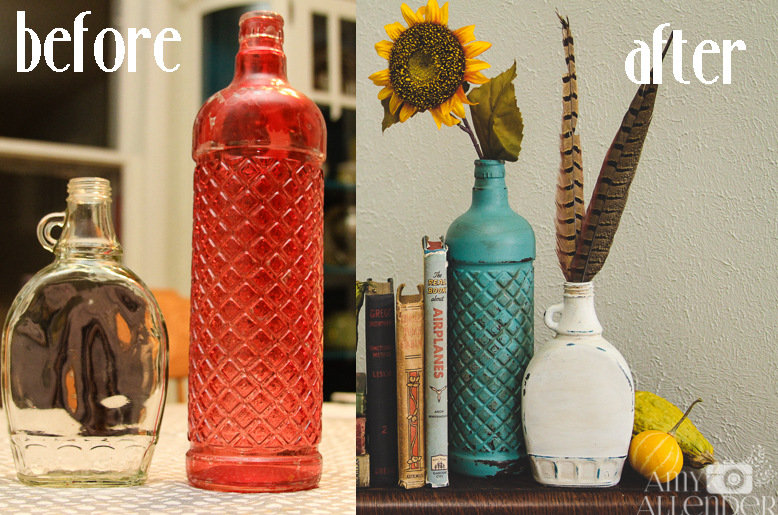
I started this week with these distressed glass bottles. These were kind of a trial run, but I am totally head over heels with the result.
They were so easy to make. They took a couple hours, but only due to drying time. This project started with my love for a maple syrup bottle that Derek and I emptied out over some loaded {shredded coconut, almonds, cashews and chocolate chips} pancakes. I loved it’s shape, I didn’t want it to be tossed to the bin. I started there and added a well-beaten red bottle I got in a “lot” at an auction.
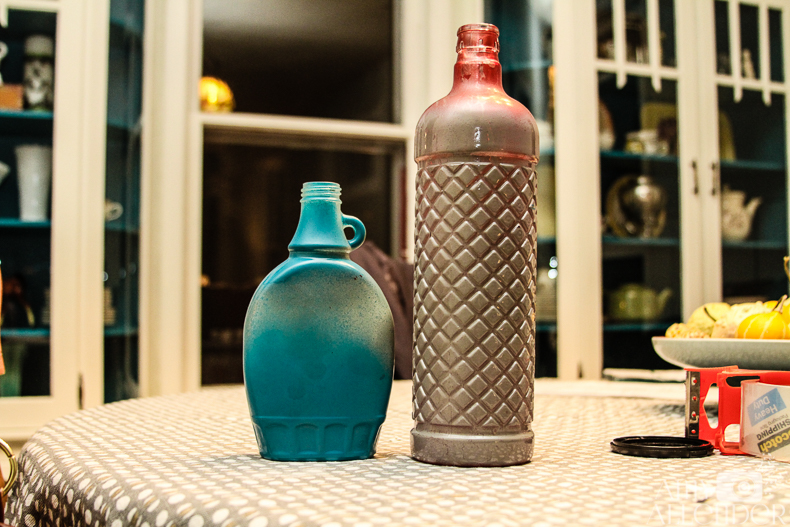
Step one was giving each bottle an undercoat of spray paint. I experimented with two different colors. Hoping that the end product would allow a little of the color to peek through the distressed paint on the bottles.
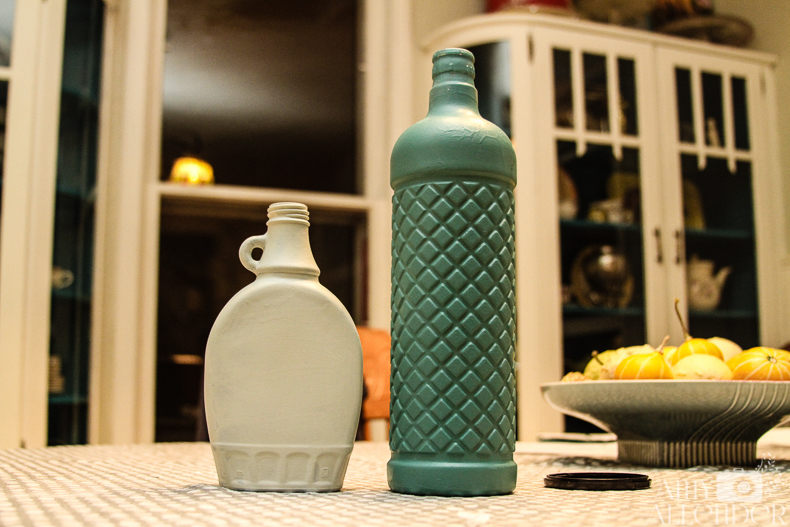
I’ve been hearing word of the wonders of chalk paint and found this handy recipe to make my own {I used the plaster of paris recipe}. It you don’t know what chalk paint is, visit the link, it explains it all. But for the sake of this project, just know that it is well covering, opaque and will adhere to nearly any surface. I mixed some up in soup bins from the recycle bin and brushed an even coat on each bottle. Once that dried, I repeated the process.
Once that dried, I used a fine-grain sand paper and gently rubbed away some of the paint. In some places I took it down to the glass, in other places, I only took off the chalk paint to expose the spray paint underneath.
As a subtle finishing touch I rubbed a little glaze {left over from my cabinet redo} into textured places on the bottle. As soon as it was on, I wiped it away and into the cracks with a paper towel.
Once everything dried completely, I gave each finished bottle a spray coat of clear acrylic finish. I used this matte finish from Tree House Studio.
Pretty cute, right? Now you can make your own…or gamble on your chances of receiving this set from me for Christmas!
I love Halloween. That’s no secret at all. One of my all time greatest dreams is to go to or host an epic Halloween party, just like the one in Hocus Pocus. Skeleton-clad musicians included.
Even though I’ve never been to a party that great–yet–I’ve still had my fair share of awesome costumes. Mostly because I have an awesome costume partner. And, although most of our costumes were thrown together in the last minute, we still pulled them off. It’s been a few years since we were costume clad for Halloween…one year I was hospitalized, the next Derek was working, and the years after that we had moved to Minot where our house was too small to host a party and none of our friends did either.
But. But, but, but…that doesn’t mean that our most amazing {and infamous} costume has been forgotten. Quite the opposite. I do my fair share of Pinning, but 90% of the time when I’m notified that one of my Pins has been repinned…I see this.
Me, Derek, Spartan Cheerleader costumes.
Yes, it’s amazing, I know.
So I thought today, being October 1st–I’d revisit this costume. The one that gets me so much buzz.
A friend recently told me that she found it on the top search results on Pinterest. Last year a friend saw it featured on a blog…and today I was contacted by the associate editor of Huffington Post Weddings. She wanted to run it in a feature about couple’s costumes. You can read it here. It’s called “18 Awesome Halloween Costumes for Couples Who Don’t Suck.” So, I guess it’s official. If you think we suck, you’re wrong. The Huffington Post says otherwise.
Crazy, I know.
The craziest part is that we literally threw that costume together the day of Halloween for a party we’d just found out about. We walked into the thrift store with a few basic ideas, and when we laid eyes on those atrocious, red, men’s pants, we knew we’d struck gold. The white bands are cut up white T-shirts destined for the rag bin. I cut the letters out of felt, and the whole ensemble is hot glued together. Who know, way back then in Enid, OK we’d be making costume history?
We even quickly memorized one of the Spartan cheers, just in case. But that never got performed in public, since the party turned out to be pretty lame. {Especially for the types who don’t consume adult beverages…us.}
After all the moves, we still have the sweaters somewhere. Just last year, I made Derek get rid of the pants. He wore them curling. I told him we could afford a pair that is new, and not bright red, or part of a gag. I only hope they have found their way into the heart of another cheerleader…
If you are looking for costume inspiration this month, check out my Killer Costumes board on Pinterest, or the HuffPost article there are some seriously clever things in there {uhhh Butter and Paula Dean?!}
Renew your zeal for the Bible with three days of exclusive devotionals! Interesting and relevant writings and reflection questions will remind you why the Word of God is so awesome. You'll learn a lot and you'll leave excited to know God more and grow deeper in your faith.
Your kick-start is on the way!
You've always dreamed of reading the Bible in chronological order. Now you can!
Getting my printable PDF plan is easy. It's not fancy, but it does fold easily into a bookmark, so you can keep it close by and easily see what's coming next. I hope you find it as useful as I do.
**Remember to check your PROMOTIONS FOLDER. Even if your confirmation comes to your normal inbox, the actual download may come to that pesky promotions folder instead!**