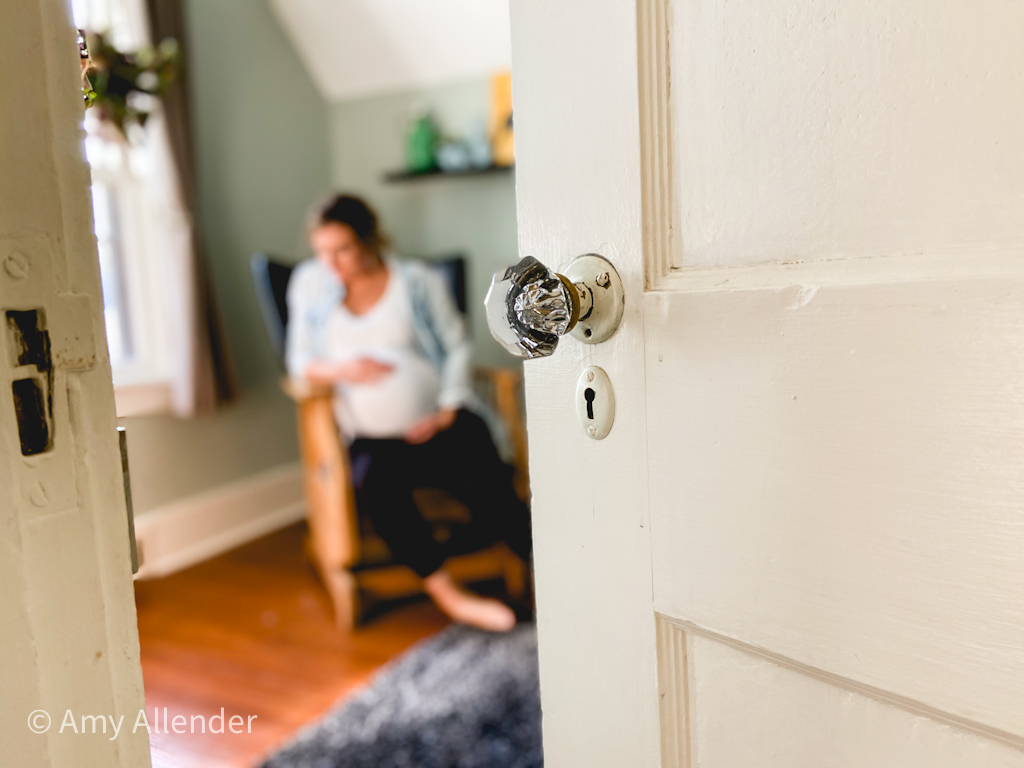
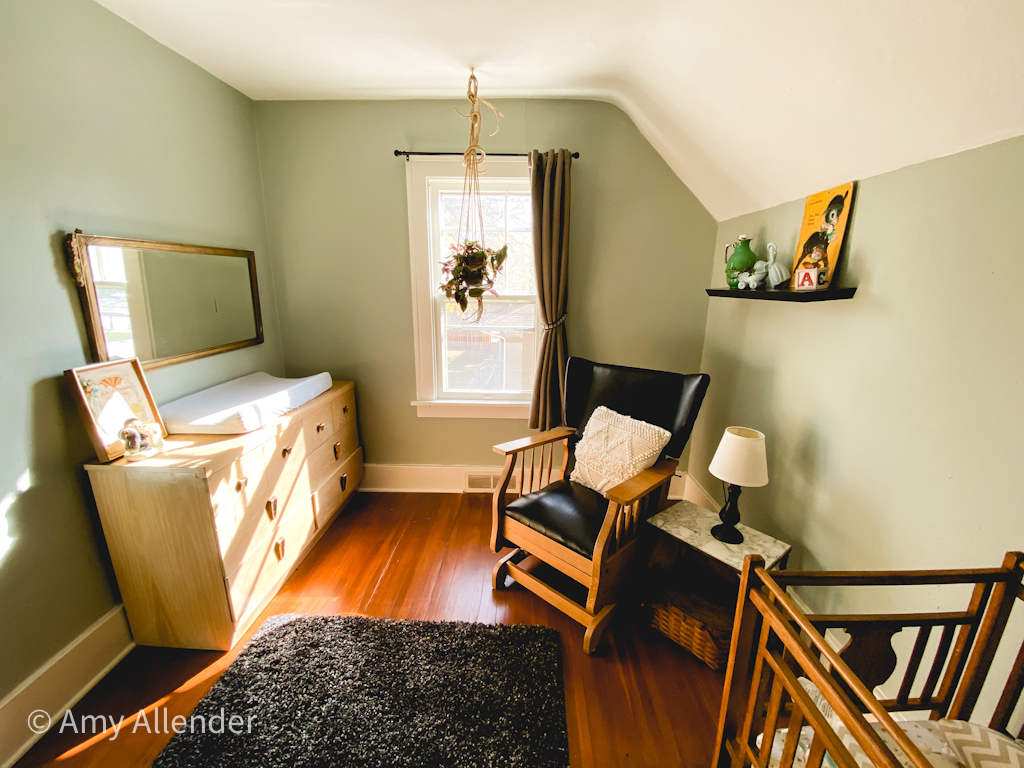
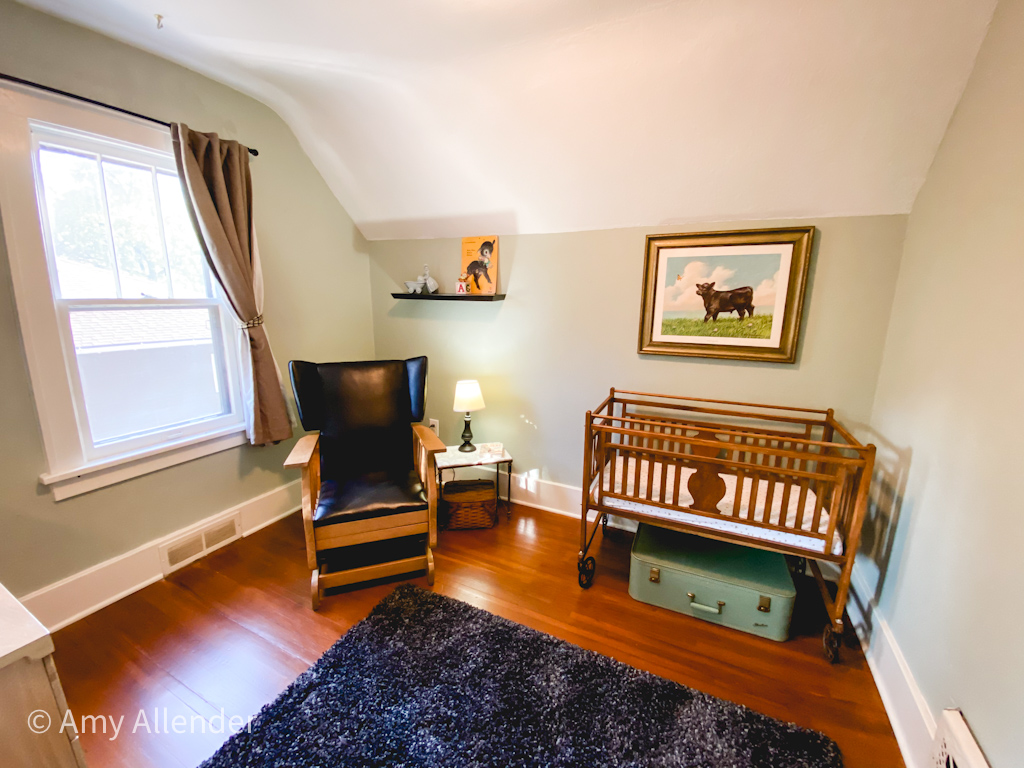
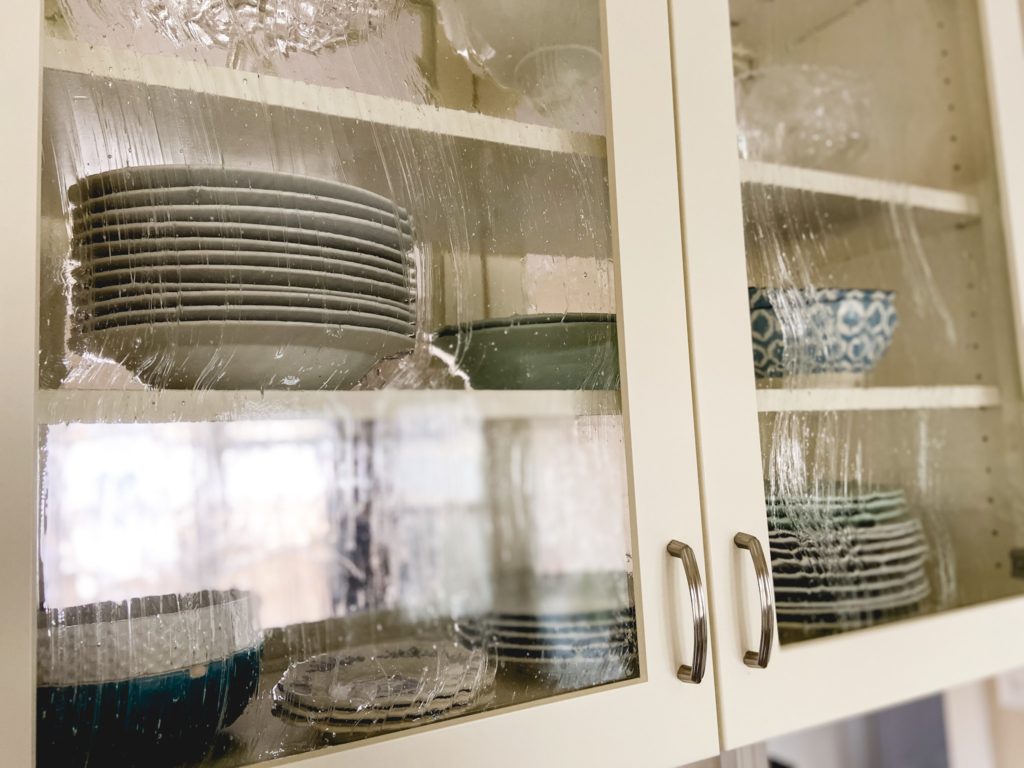
There were several moments in recent history, when I never thought this day would come. And, no, I’m not talking about being so close to delivery. I’m talking about being able to show you our fully stocked (minus a monitor), completed nursery.
Maybe in days to come we’ll look at the process of getting here, but for today, let’s just bask in the glow of these “after” photos. And I’ll tell you our resources and how we created an eclectic neutral nursery filled with second hand and vintage bargain pieces. Everything is practical and useful. Everything was budget friendly.
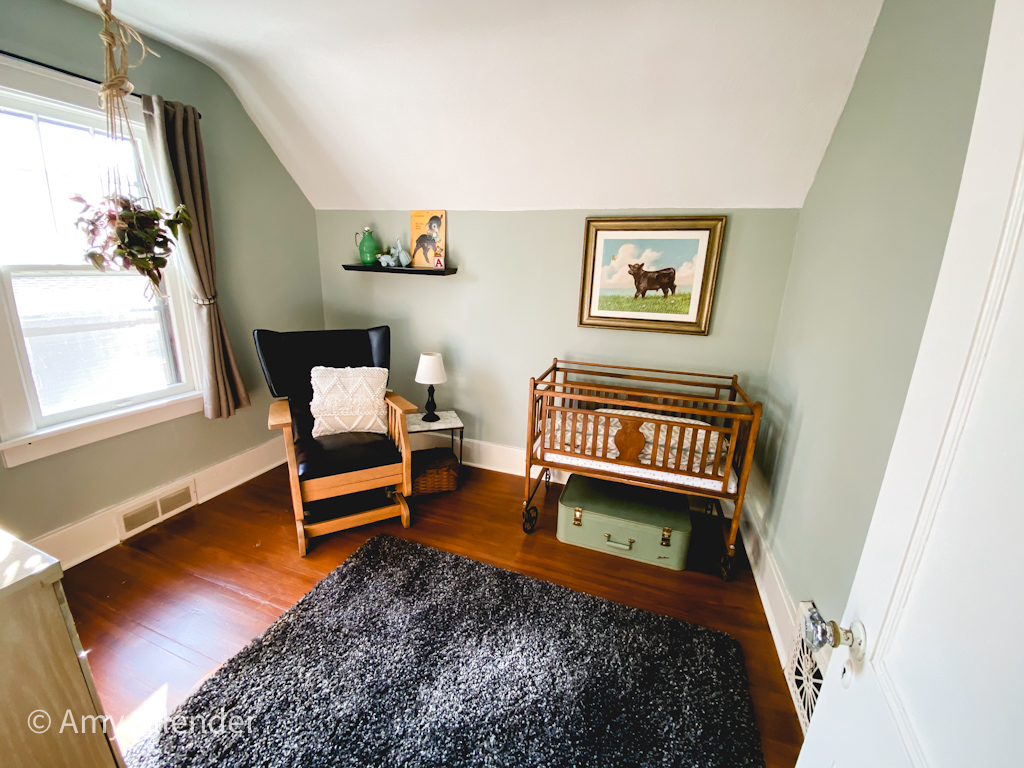
Since we don’t know if we’ll be welcoming a boy or girl, it has been important to keep things classy, but fitting for either a son or daughter. The first piece I bought for the nursery was this vintage calf print. I saw it at a local thrift store (it was $1.) There was just something about it. I needed it. And everything fell in place from there.
I refinished a previously loved frame ($2.50) to make it blend with the other colors and textures in the room and our house. I’m not a fan of pre-packaged “nursery themes,” and would rather curate a space myself. In every room of my home, I aim to create a space that looks like “us.” A place that looks nice, inviting and lived in. Not a place that specifically says “grown up,” “baby,” “kid,” or “off limits.”
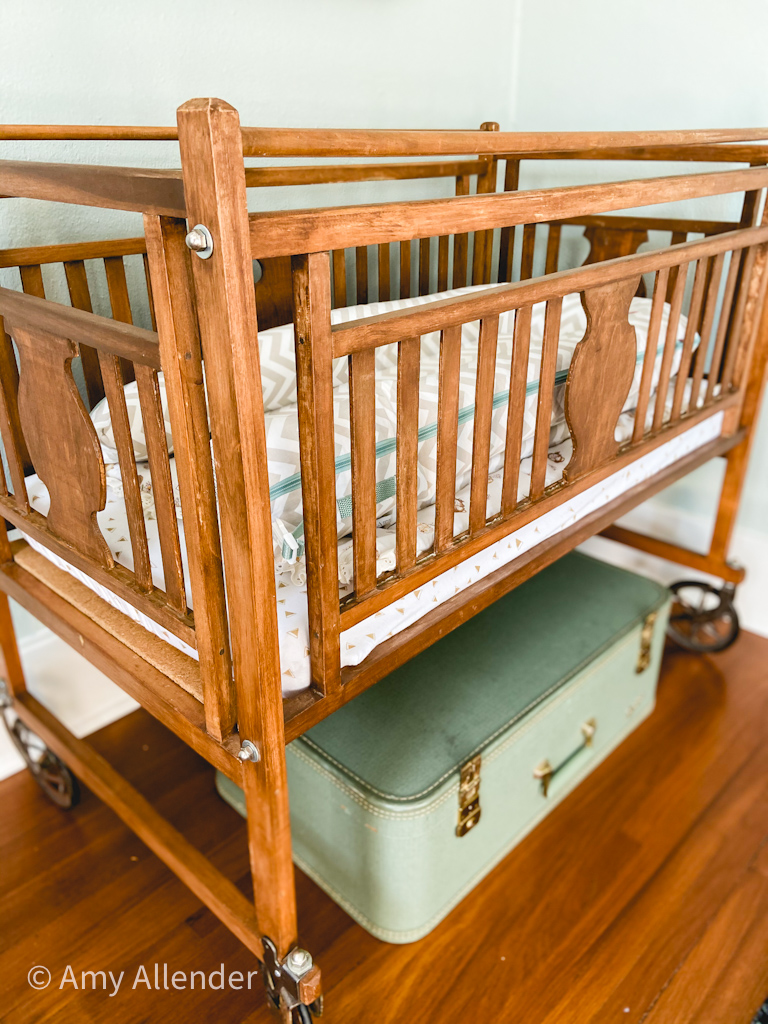
Most items in the room are functional as well as pretty. The vintage trunk under the cradle used to house my newborn photography props. Now it’s an easy place to store baby toys, teethers and rattles.
The smaller basket under the marble toped table (something left in the house when we bought it) is an heirloom pie basket from Derek’s great grandmother. Right now it keeps burp cloths and bibs handy next to the rocking chair.
The cradle we are using was in storage in my grandparents’ basement for years…then stored in my parents’ barn for years after that. It’s the cradle that my grandfather slept in when he was born.
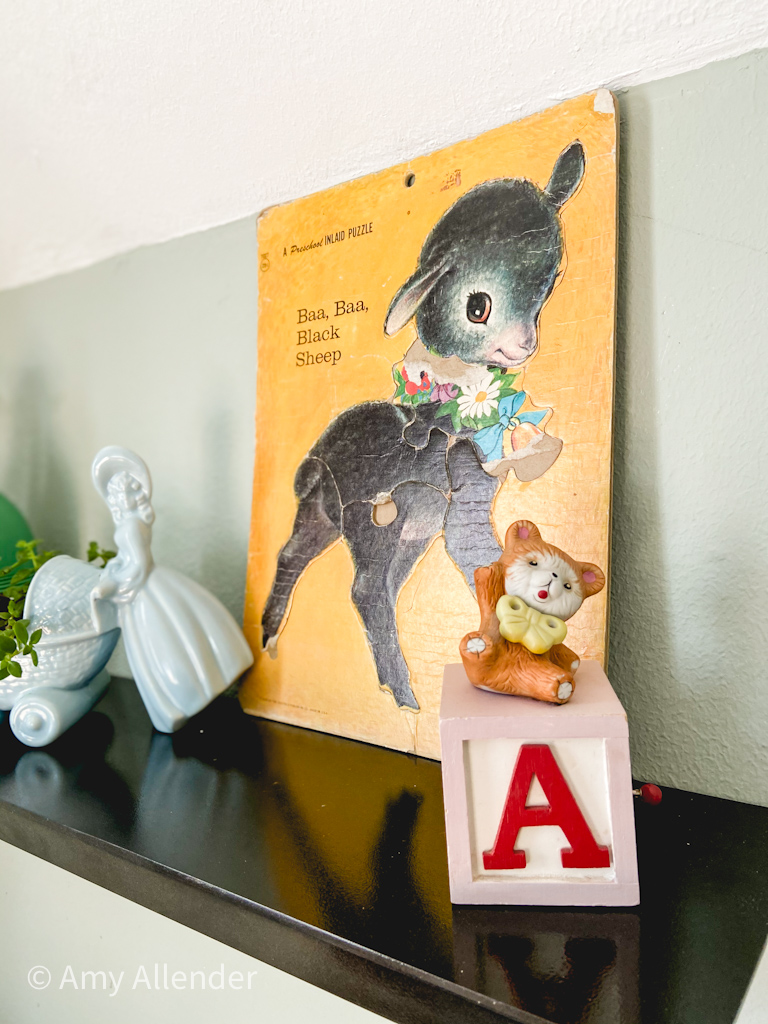
The same thrift store that scored the cow print and frame also led me to this antique puzzle ($1) and shelf ($2.00). I painted the shelf with Rustoleum’s hammered spray paint.
Also on the shelf, a planter given to my grandmother in the hospital when my dad was born. And a music box that was mine as a child.
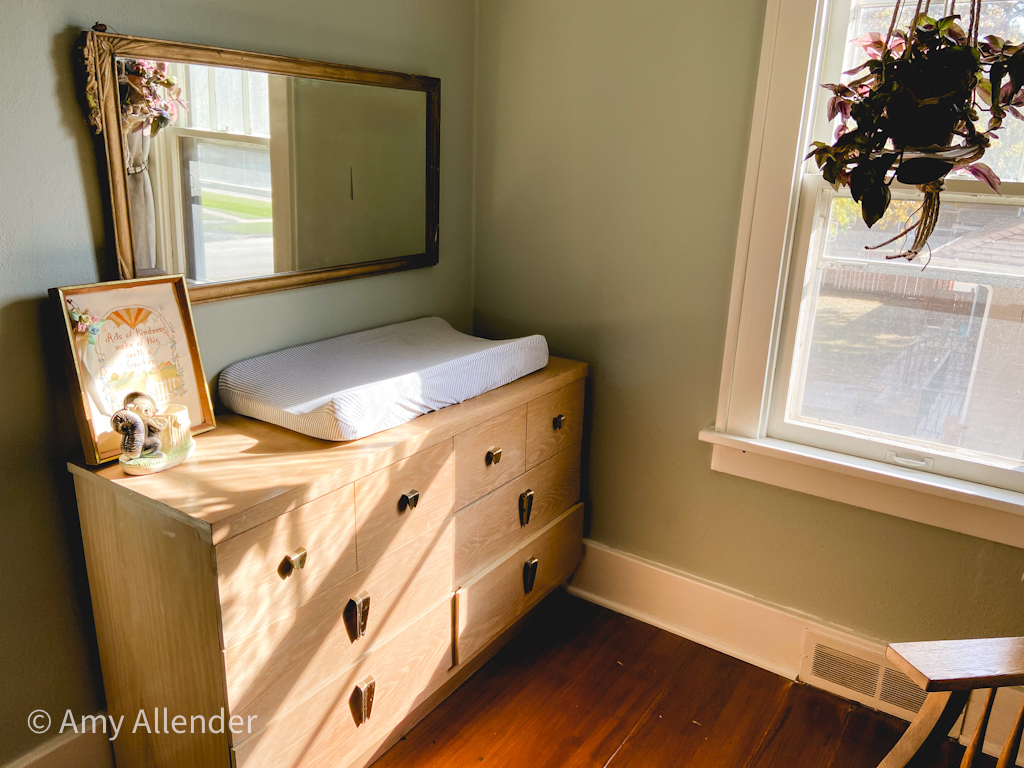
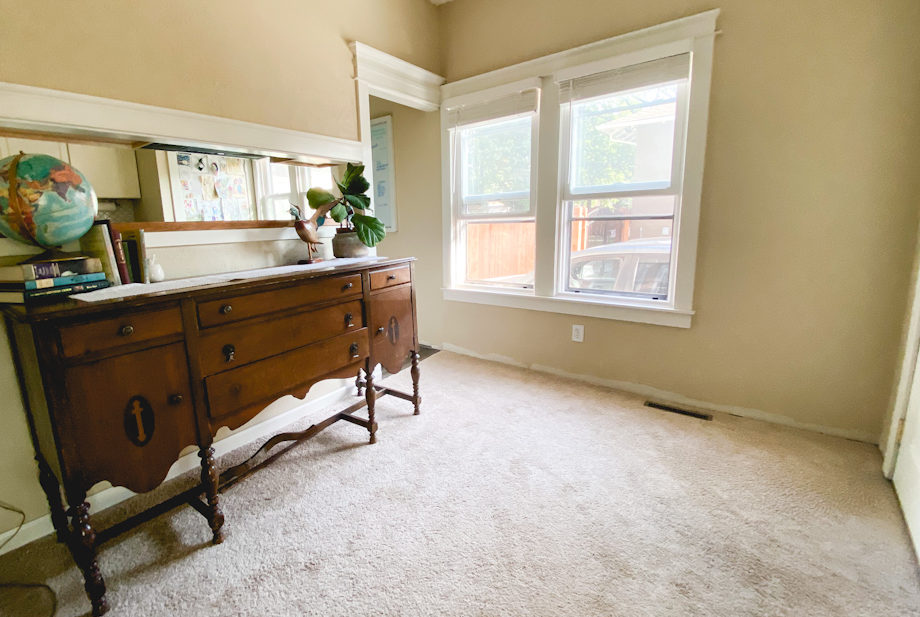
The midcentury dresser and mirror (probably 1940’s-50’s) were also left in the house when we bought it.
I found the Morris-style rocker/recliner on Facebook Marketplace. It was our saltiest purchase ($150–a real splurge for me). I’ve had the black table lamp since college (a Walmart special).
The rug is new, from Home Goods. It’s the perfect size, color and texture. ($40)
I found the black out curtain at another local thrift store. ($4–tags still on from Target.) I made the tie back from a scrap of plaid wool in my scrap pile.
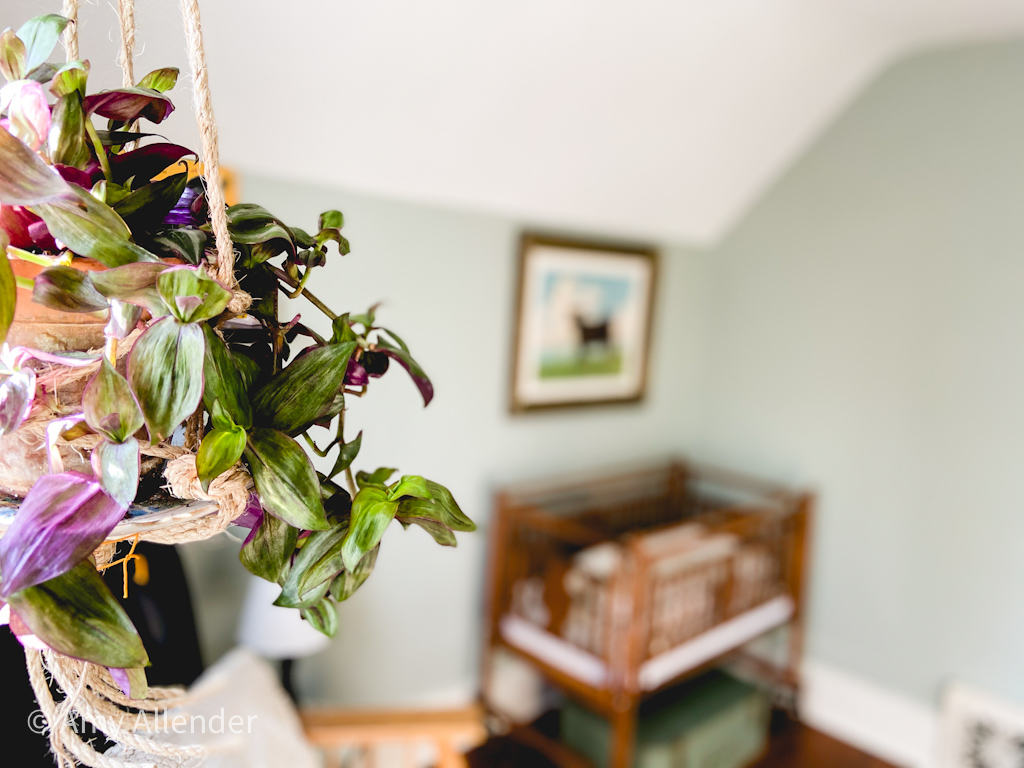
I’m trying my very hardest to keep a plant alive in here. There’s something special about something living in a room.
I love incorporating secret details into rooms. This tiny mouse surprised me one day while I was cleaning out what used to be the apartment pantry (now it’s a linen closet).
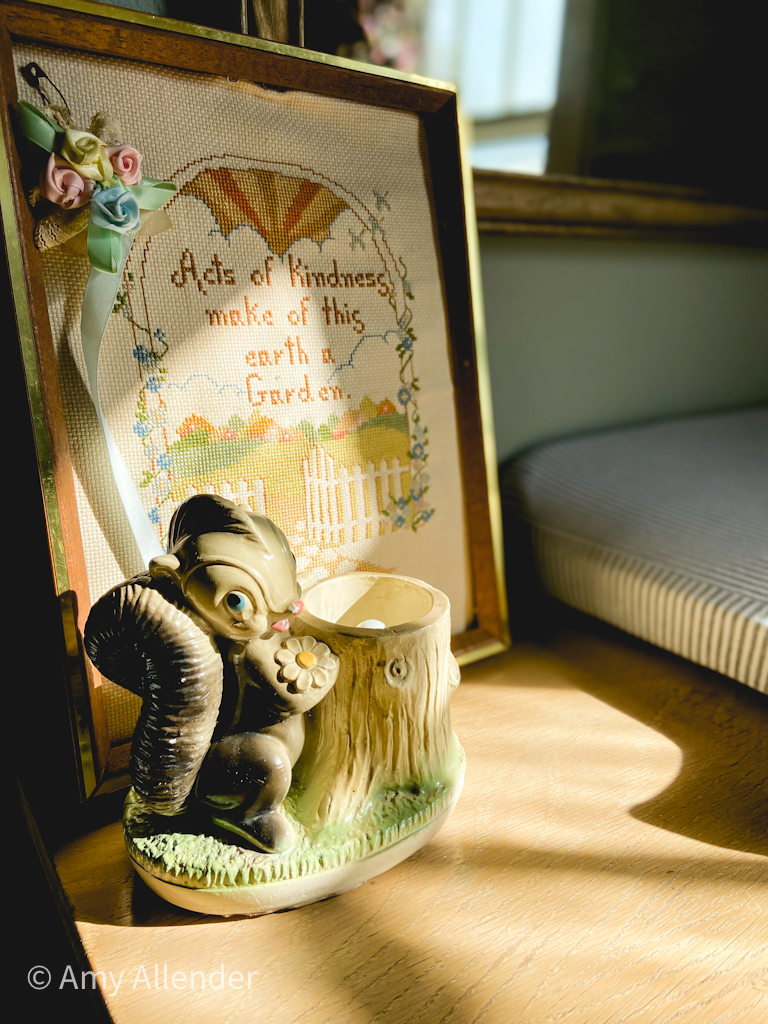
I’ve always loved this sampler my mom made in 1981. It’ll be a perfect reminder next to the changing station.
This sweet nightlight was my mom’s growing up. We used it in Gideon’s room and are excited to pass it down to our newest little one.
My best advice for creating a neutral, not too baby-ish space is to shop what you already have. For me, that meant lots of family heirlooms and hand-me-downs. They’re not all from the same era, or even the same style…but because they’re all loved and treasured, they fit together harmoniously in this space.
Don’t be afraid to bring “grown up” items into a nursery space. A grown up chair, antique baskets, etc. The space will fill up with items for little hands soon enough.
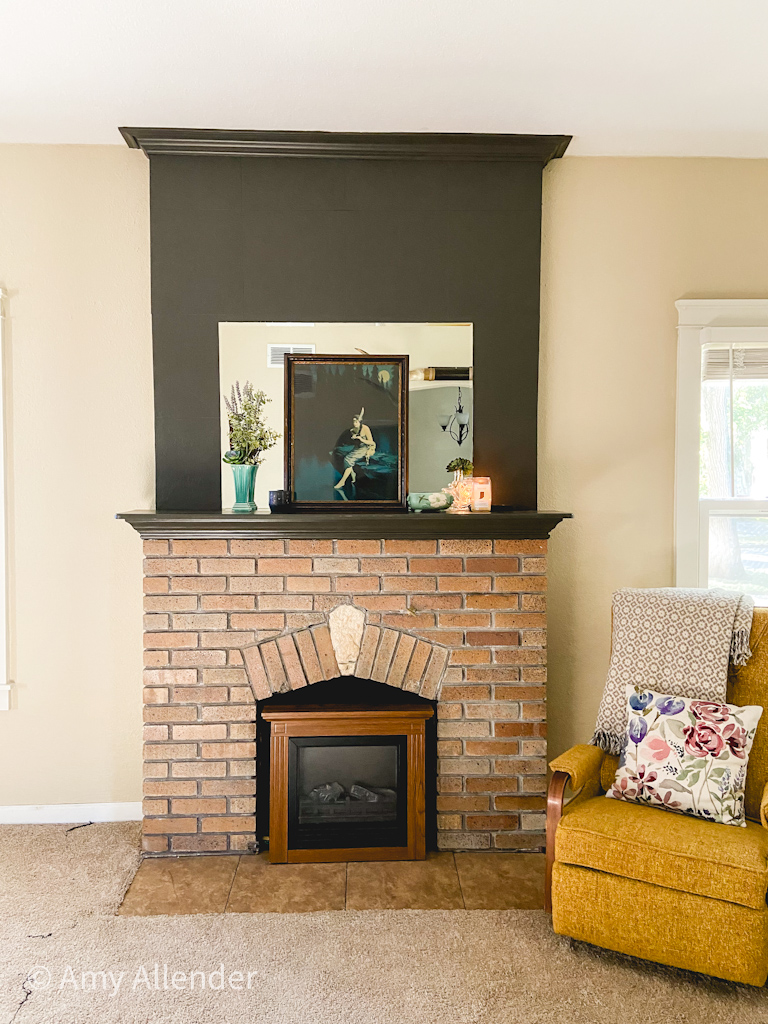
Boy or girl, a neutral pallet (and neutral doesn’t just mean gray, tan or white) will grow with them better than pink or blue. Our wall color is Gray Wisp from Benjamin Moore, anchored with lots of charcoal accents.
And most importantly…make a space you like. You’ll be spending lots of time in here!
It’s been a year since we closed on Acorn House and started on a crazy adventure. There’s still a long way to go, but things have definitely improved.
As always, these photos are basically unstaged. This is house my house looked when the photos were taken (including the afters.) As time goes on, I’ll share a full “after” of each completed room. But there are very few of those right now. Thanks for coming along on the trip. Be sure to follow along on Instagram (I’ll be sharing lots of Acorn House, the early days video content this weekend.)
For now, I’ll let the photos speak for themselves.
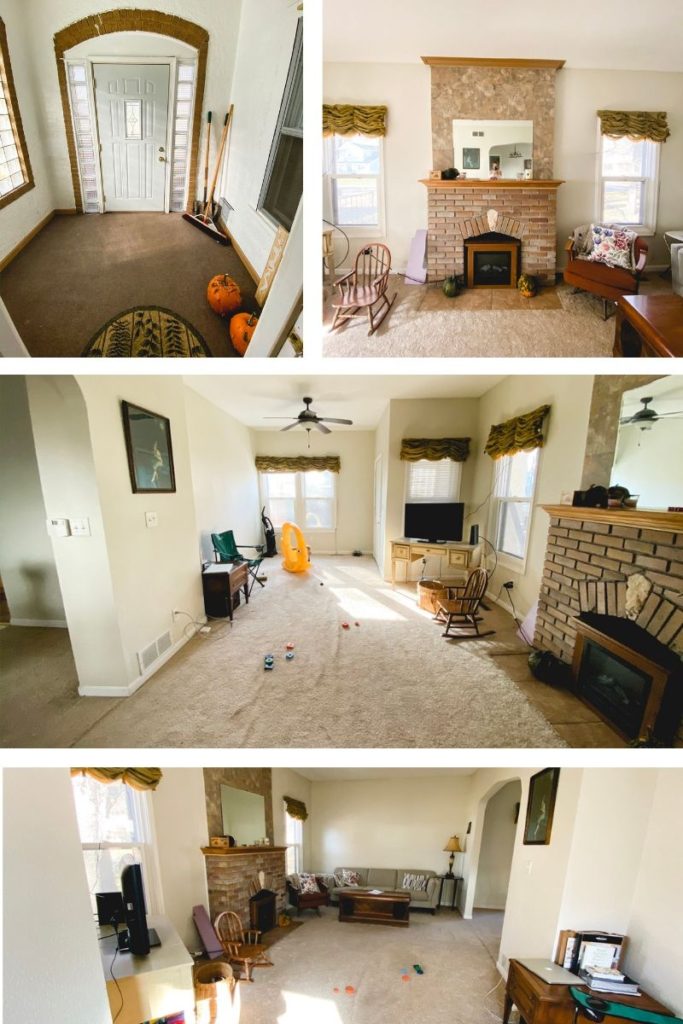
Okay. So I forgot to get a photo of the hall now. This is pretty close to finished. But it’s fully painted and there are no ladders up there now.
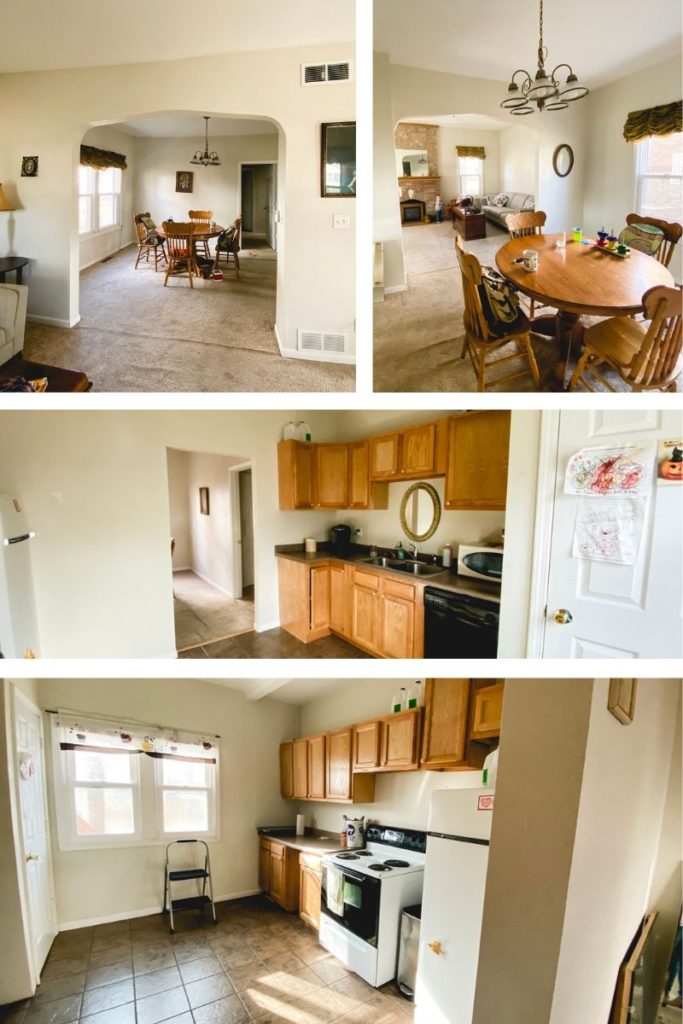
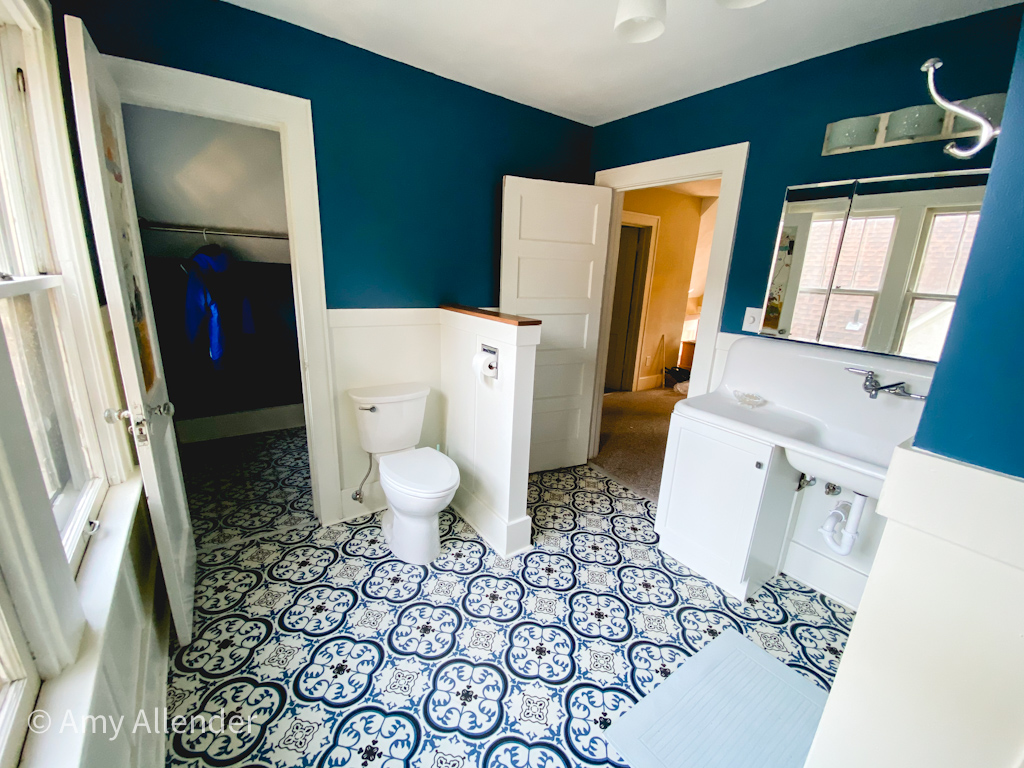
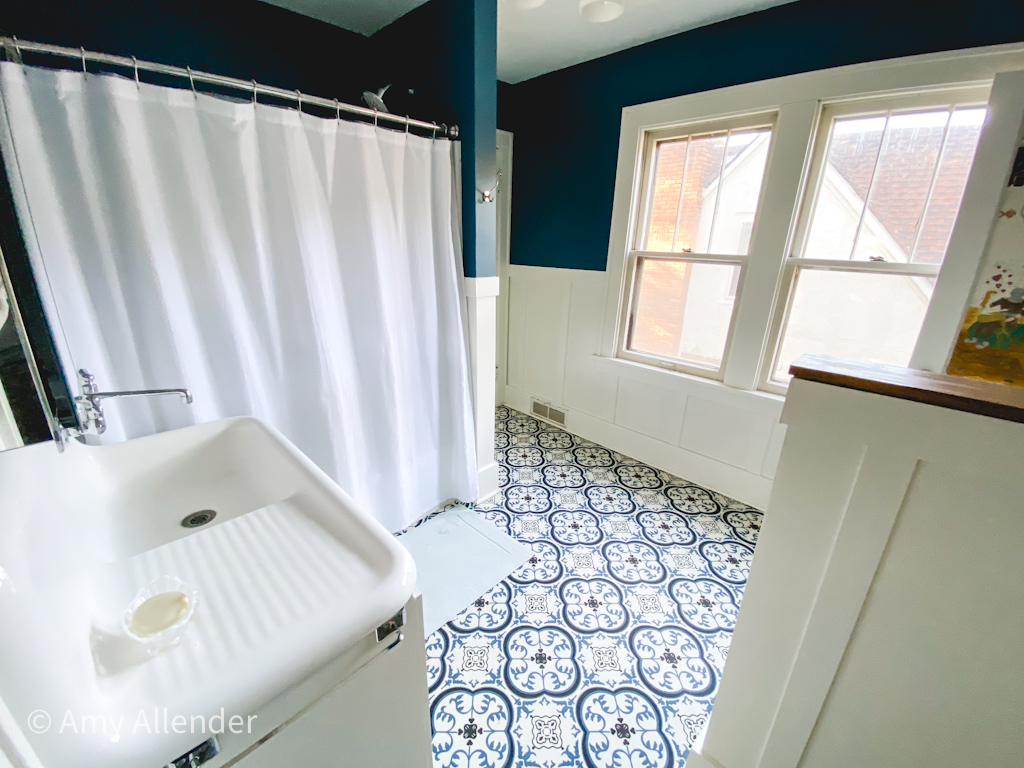
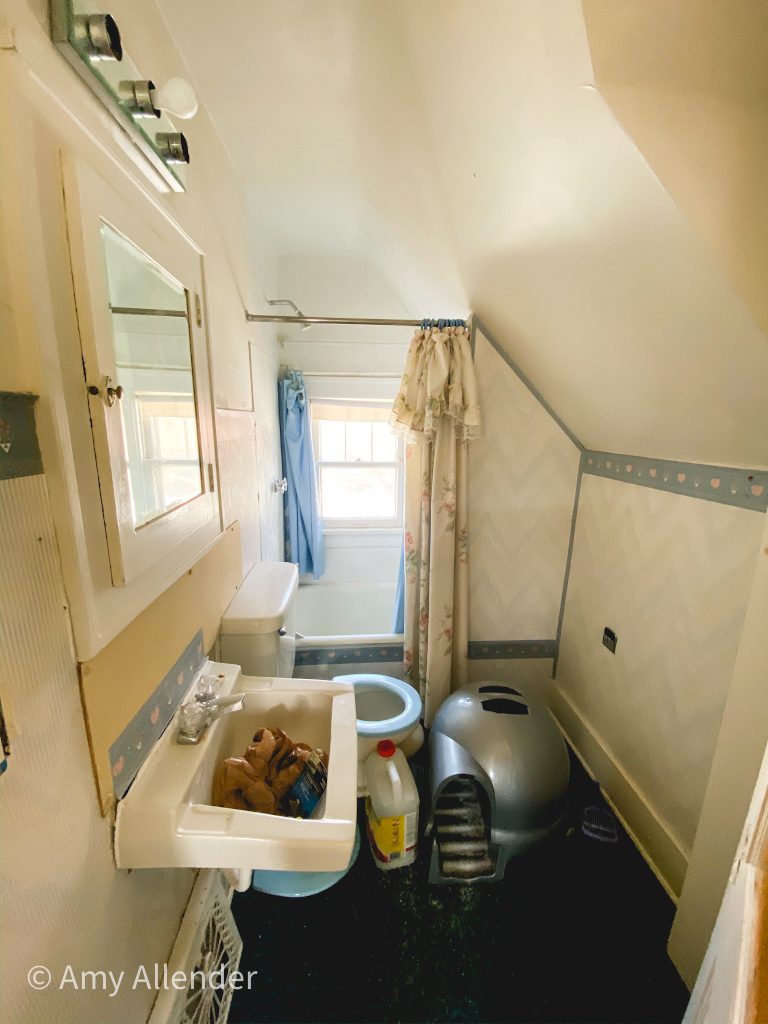
Second Floor Bathroom: Before
Second Floor Bathroom: After
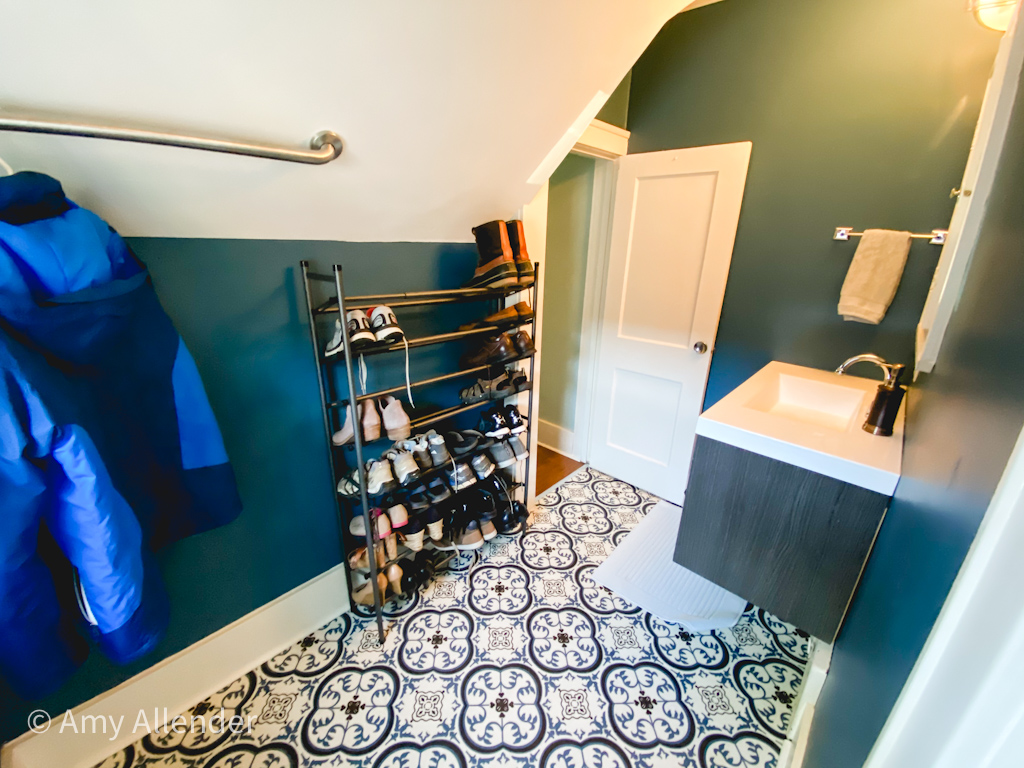
Master Powder Room: Before
Okay. So this was the actual second floor bathroom. And it didn’t connect to the master bedroom. But–it did have an ash tray reachable from the toilet and a toilet paper dispenser that had a built in radio.
Now this space houses our shoes, a clothing rack, sink and medicine cabinet. It offers a walk through to the full bathroom without needing to go into the hall. We have been pleasantly surprised by how much use we are getting out of this space.
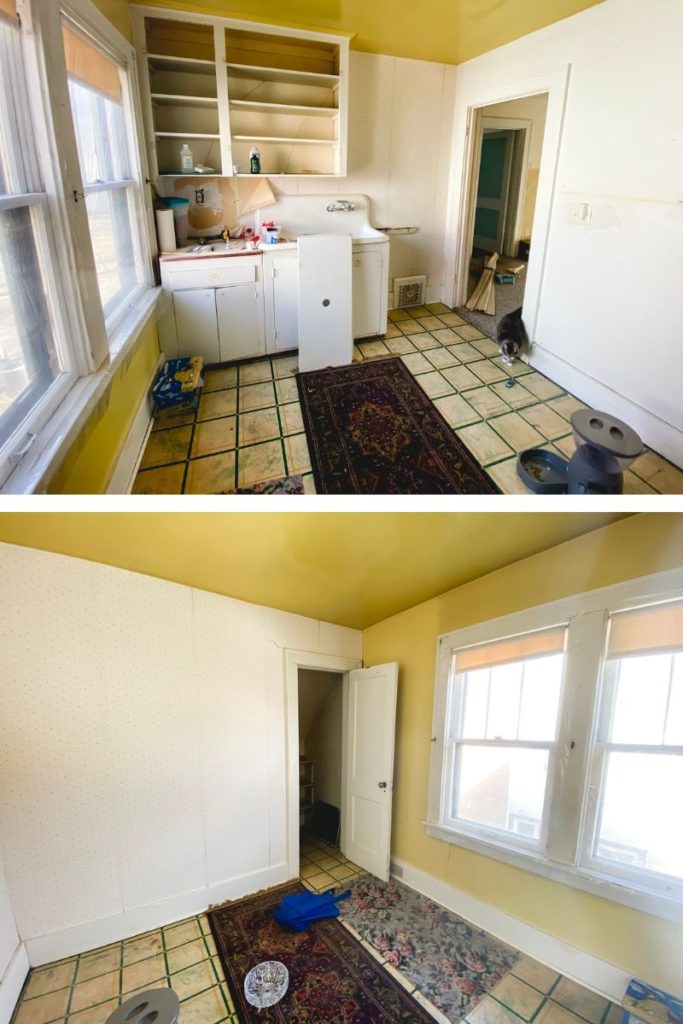
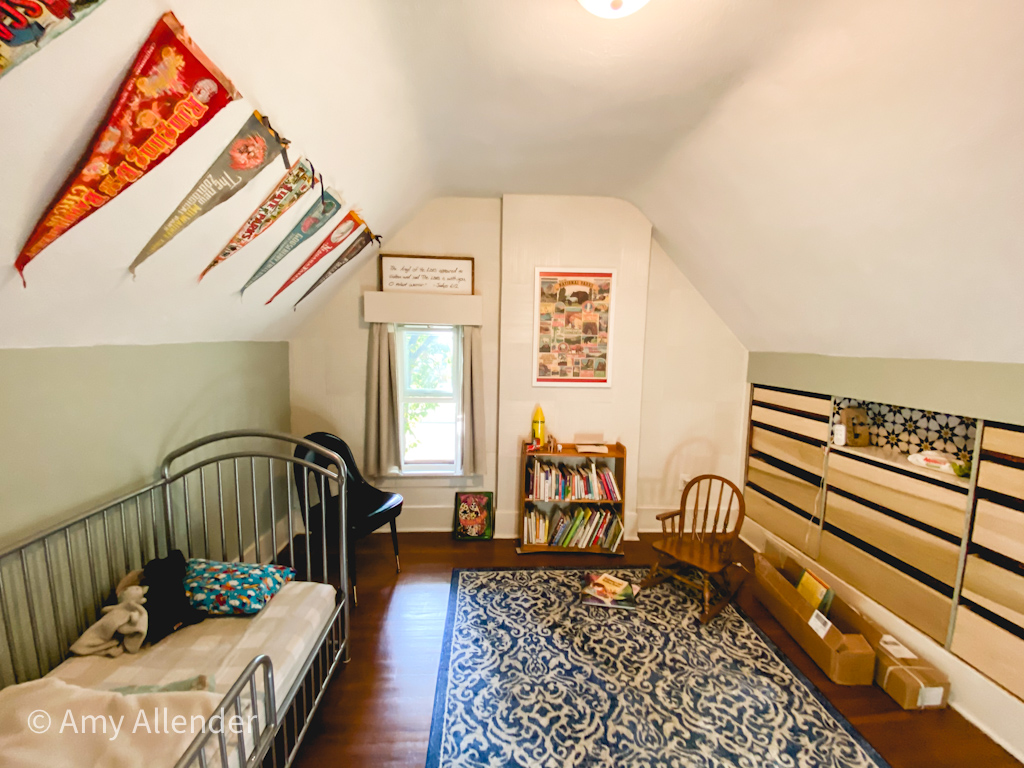
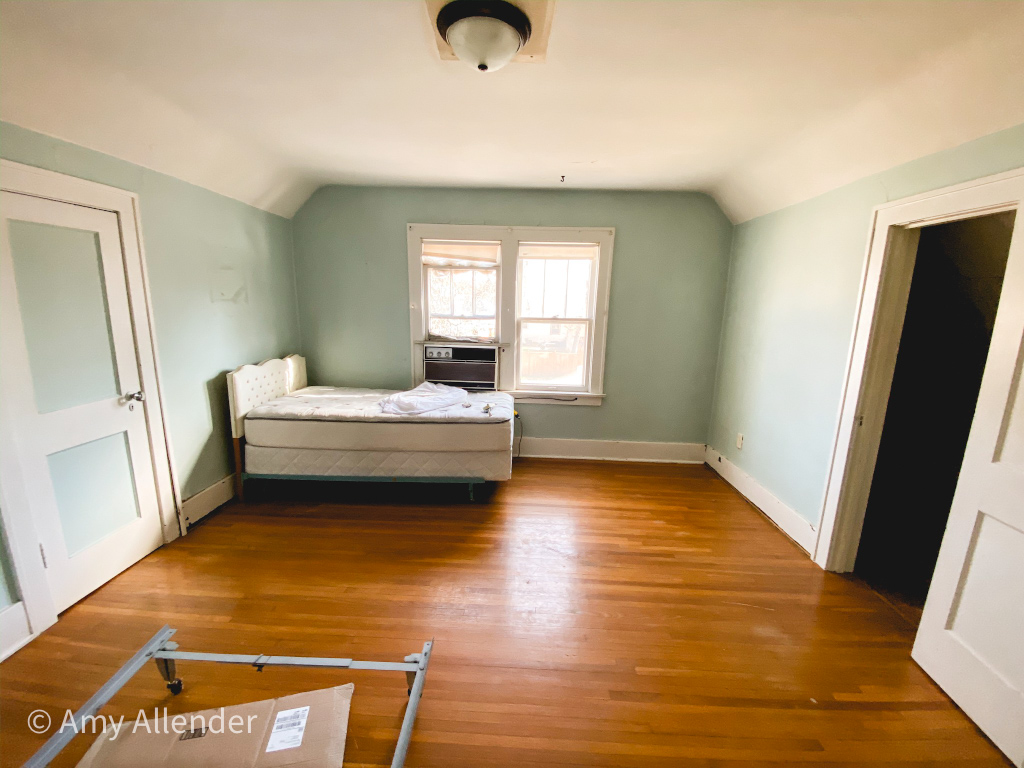
Second Floor Bedroom: Before
Second Floor Bedroom: After
Nearly done, just waiting on the drawers to get finished up!
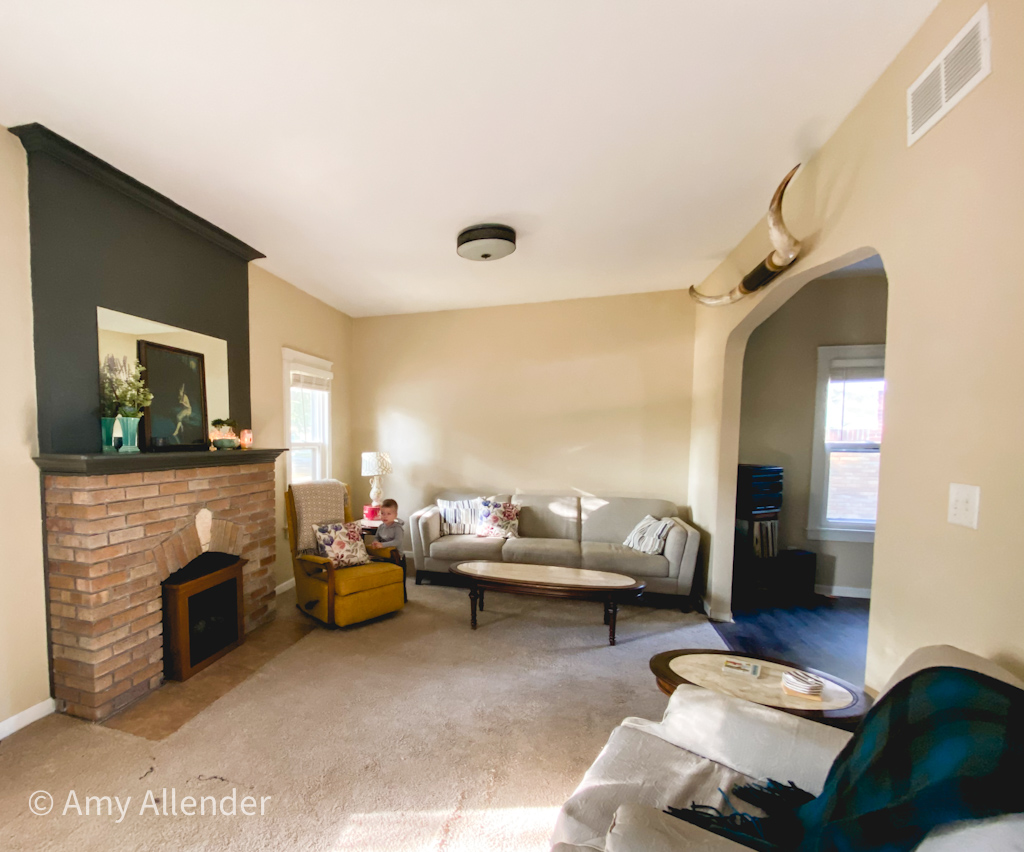
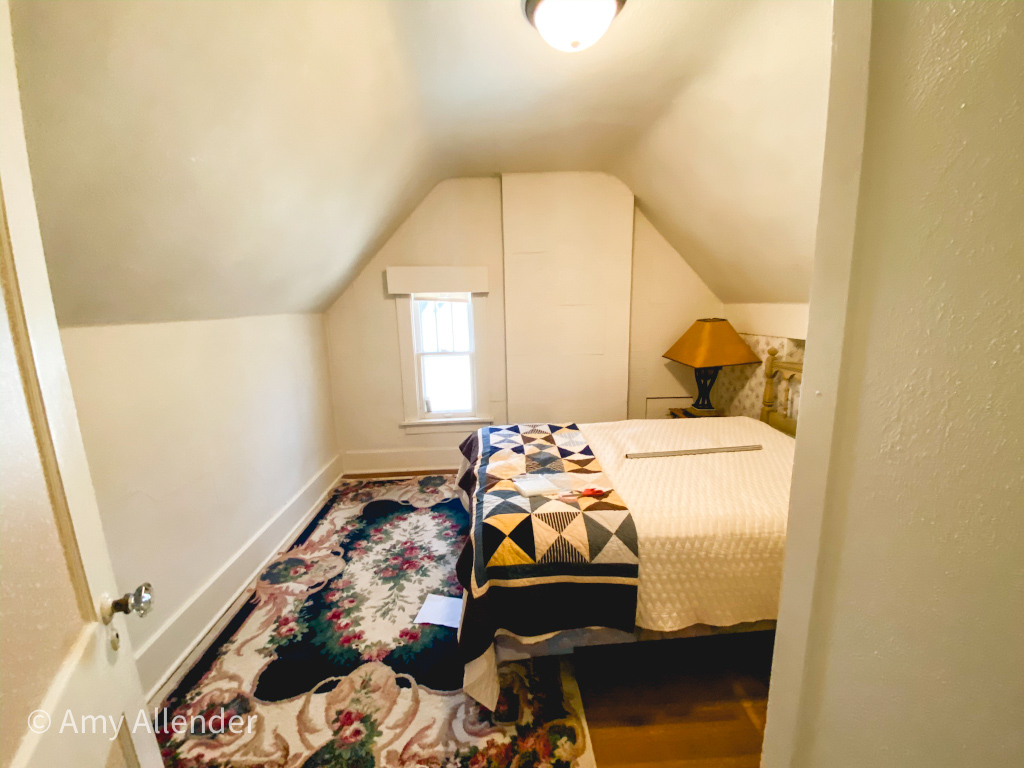
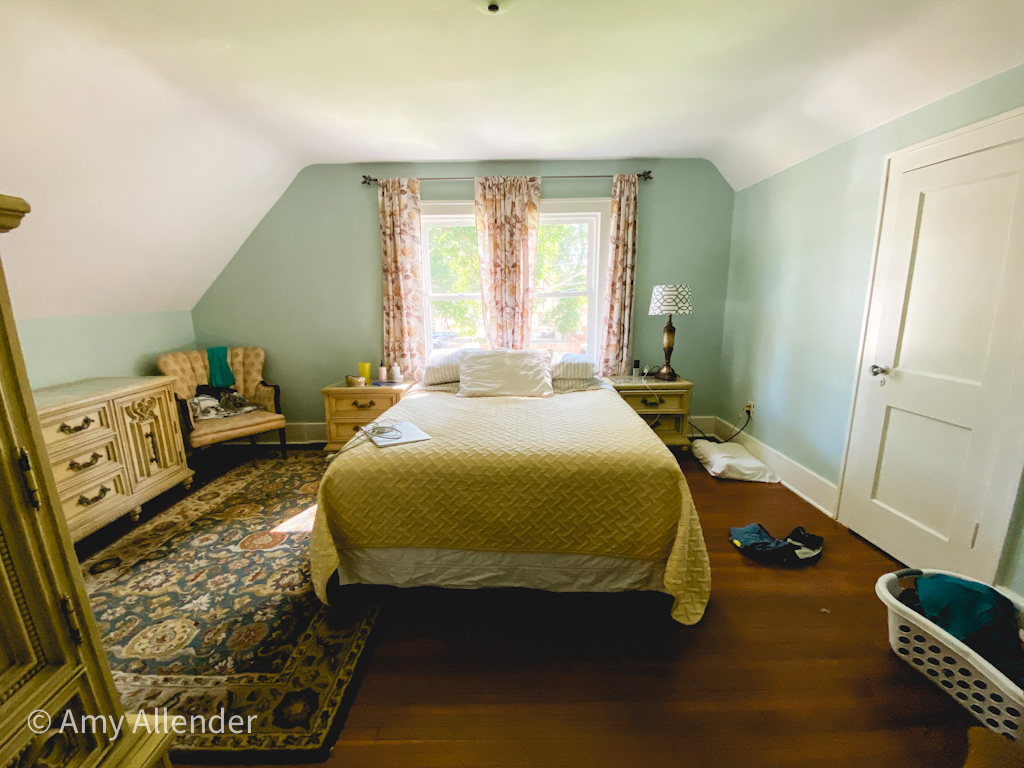
Master Bedroom: Before
Master Bedroom: After(ish)
Yes, there is laundry strewn about. But this is my real life. I snapped this photo a couple days after we finally moved into the master bedroom. Usually the laundry isn’t running amok. I’m almost ready to do a full post on this one.
Rooftop Patio: Before
This is a screenshot from an Instagram Story when we first moved in. Trash and saplings were everywhere. The roof was literally caving in over the garage.
Unstaged, but still very pleasant. This is one of our favorite places. We eat loads of meals out here and we love to sit and read books on the couch. Like I said, there’s still a long way to go, but we’ve also come a long way too.
More Projects and Life at Acorn House
Want more projects and to see behind the scenes progress? Follow along on Instagram and Facebook. There you’ll join a community of people striving to live intentionally and see life through a Christ-centered lens. I share tips and inspiration for living daily for God, intentionally seeing the positive, and fully understanding Scripture.
Or–sign up for my emails and you’ll get all my posts directly to your inbox!
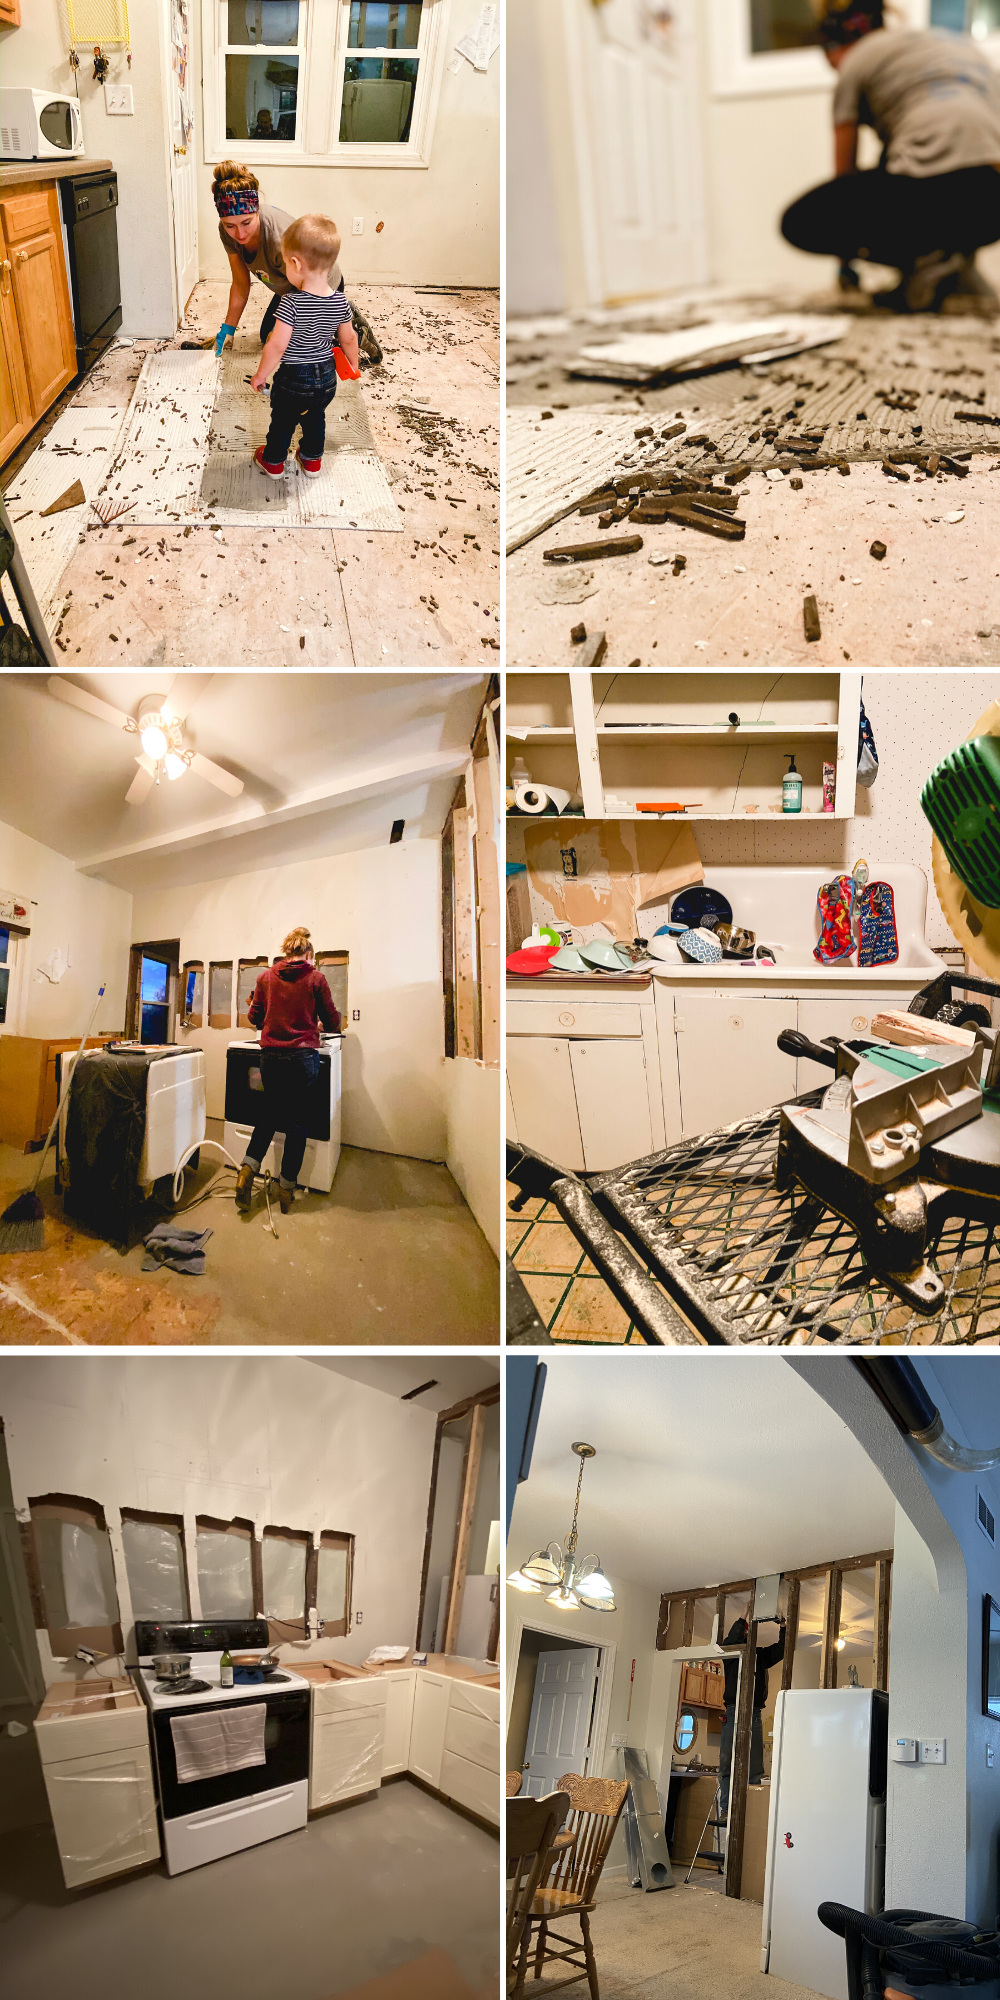
Last week I asked if you’d be interested in seeing the messy middle of our kitchen remodel–instead of just the pretty before and afters. The response was overwhelmingly positive. So today I’ve got all the dirty details for you. I’ll try not to be too wordy and let the photos speak for themselves.
Before We Even Started
Sept 13-Oct 25, 2019
When we bought Acorn House, we knew a kitchen remodel was in our future. However, the “plan” was to wait to remodel until after we’d renovated the second floor (which had been turned into apartments in the 1950’s.) The idea was that the kitchen was functional–if not practical and using the space well. The bedrooms, and entire second floor were unlivable. We would address that first–and get our bedroom moved out of the laundry room.
Then, one October day I heard a crash in the kitchen during nap time and all our plans changed. The cabinets had fallen off the wall. (Read all about it here.) Now a kitchen redo (which would also touch the living room and dining room) was priority.
During this time God showed me how to loosen my grip on “my plans.” He taught me to be flexible and hopeful, even when things get toppled upside down.
Planning A Better Kitchen
Oct 30-Dec 1, 2019
We hadn’t anticipated renovating the kitchen so soon, so we didn’t have plans drawn up or ready. And, in all the years we’ve worked on old houses, we’ve never created a kitchen from scratch.
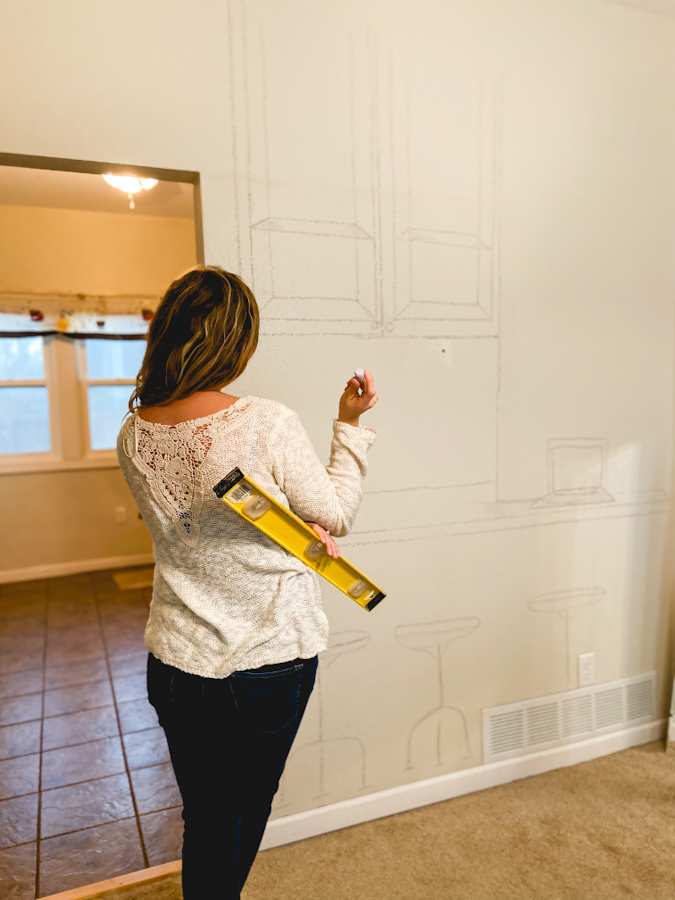
Even though we were anxious to get a better, functional, safer, intact kitchen built–we didn’t want to rush it. We looked at all (and I do mean all) of our cabinet options. We sat down with lots of reps. I looked at books and drew our plan to scale on the walls. Derek ran numbers. We discussed and prayed over how we could best steward our time, money and skills–while balancing work and family. You can read all about our cabinet buying options and process here. (Our cabinets are from Medallion, ordered from Minot Lumber & Hardware.)
During this time, God showed to live, thrive and be joyful without excess. What we had in the kitchen was sparse, but we ate dinner as a family and had peace that we weren’t rushing the process.
Demolition
Dec 19-Dec 20, 2019
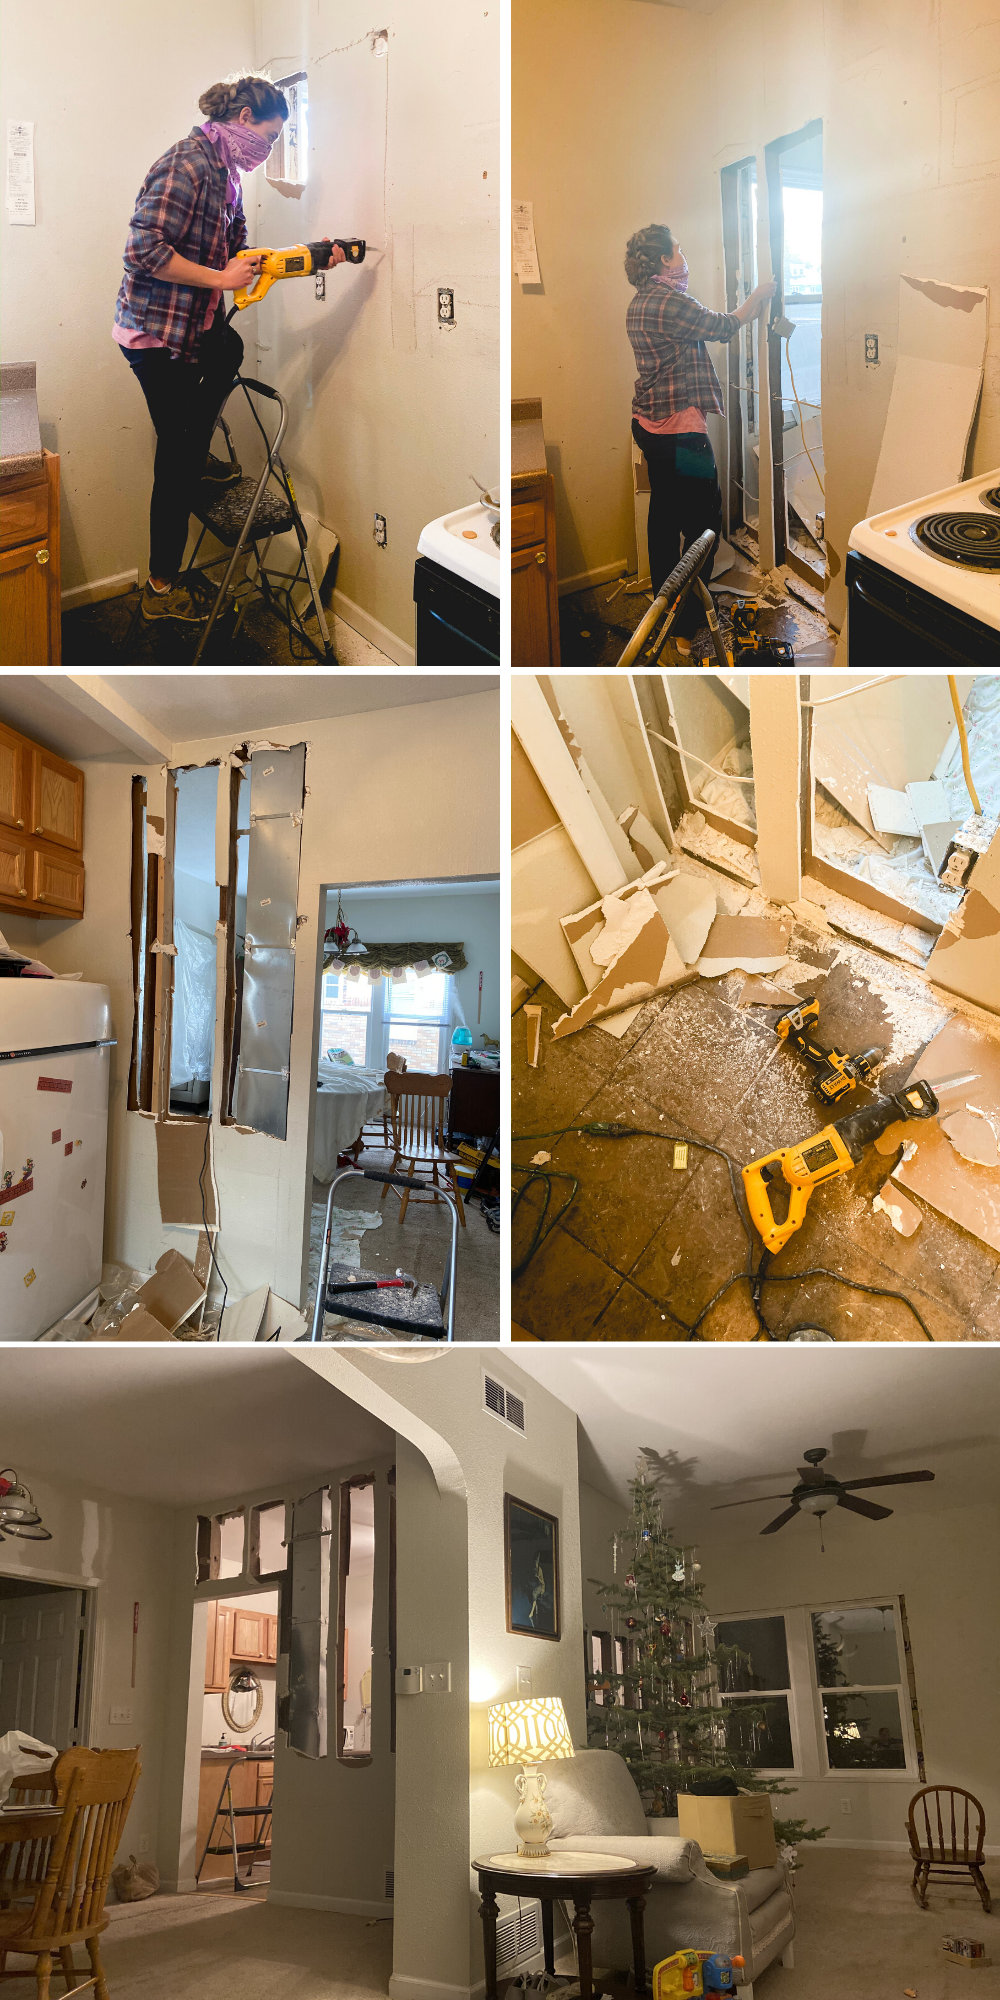
By the time we actually started cutting into walls and tearing things apart it was Christmas time. (We waited to start demo until closer to the time cabinets would arrive.)
I cut rough openings in the drywall one afternoon while Gideon’s favorite babysitter was at the house with us. (We could never have completed this project without her help to supervise Gideon while I did big, messy work.) I’ll never forget how excited he was to see me peek through the walls as the pieces fell away.
Removing the walls exposed an unexpected duct running through a section of wall we had planned to open. That would need to be moved.
This ushered in a very dirty portion of the project. Drywall dust was everywhere. No matter how much I swept and moped and wiped, things were chronically dusty.
During this time, God showed me that decor and glitz is not what makes Christmas special. Christmas 2019 didn’t look how I had imagined, but it was plenty sweet and special. We made cookies. Friends came for dinner. We put up decorations and soaked in the season. Without the pressure of having a “perfect” home for the holiday, our hearts were more fully aligned with the True Reason to celebrate.
Floors and Ducting
Jan 6-Jan 15, 2020
Next there was a bit of waiting to do. Waiting for cabinets to arrive. Waiting for an HVAC contractor to come move the duct. But that was okay, because we were busy enjoying Christmas.
As soon as we returned from holiday travel we got back to work. I took out the tile flooring. Although it was in good shape, we knew it was wise to extend hard flooring into the carpeted dining room while we remodeled.
Once the flooring was out, we needed to level some very uneven spaces. Derek and I did this during nap time one day. This season of the project was really hard. There was a week or two when we had nothing in the kitchen. I used the uprooted dishwasher as my old counter space. The water was turned off. So to clean up, I did dishes upstairs in the old apartment kitchen–which also doubled as our workshop.
During this time, God taught me about perseverance. He taught me to be joyful, even happy while the heart of our home was in chaos. I learned about teamwork in marriage and taking things step by step.
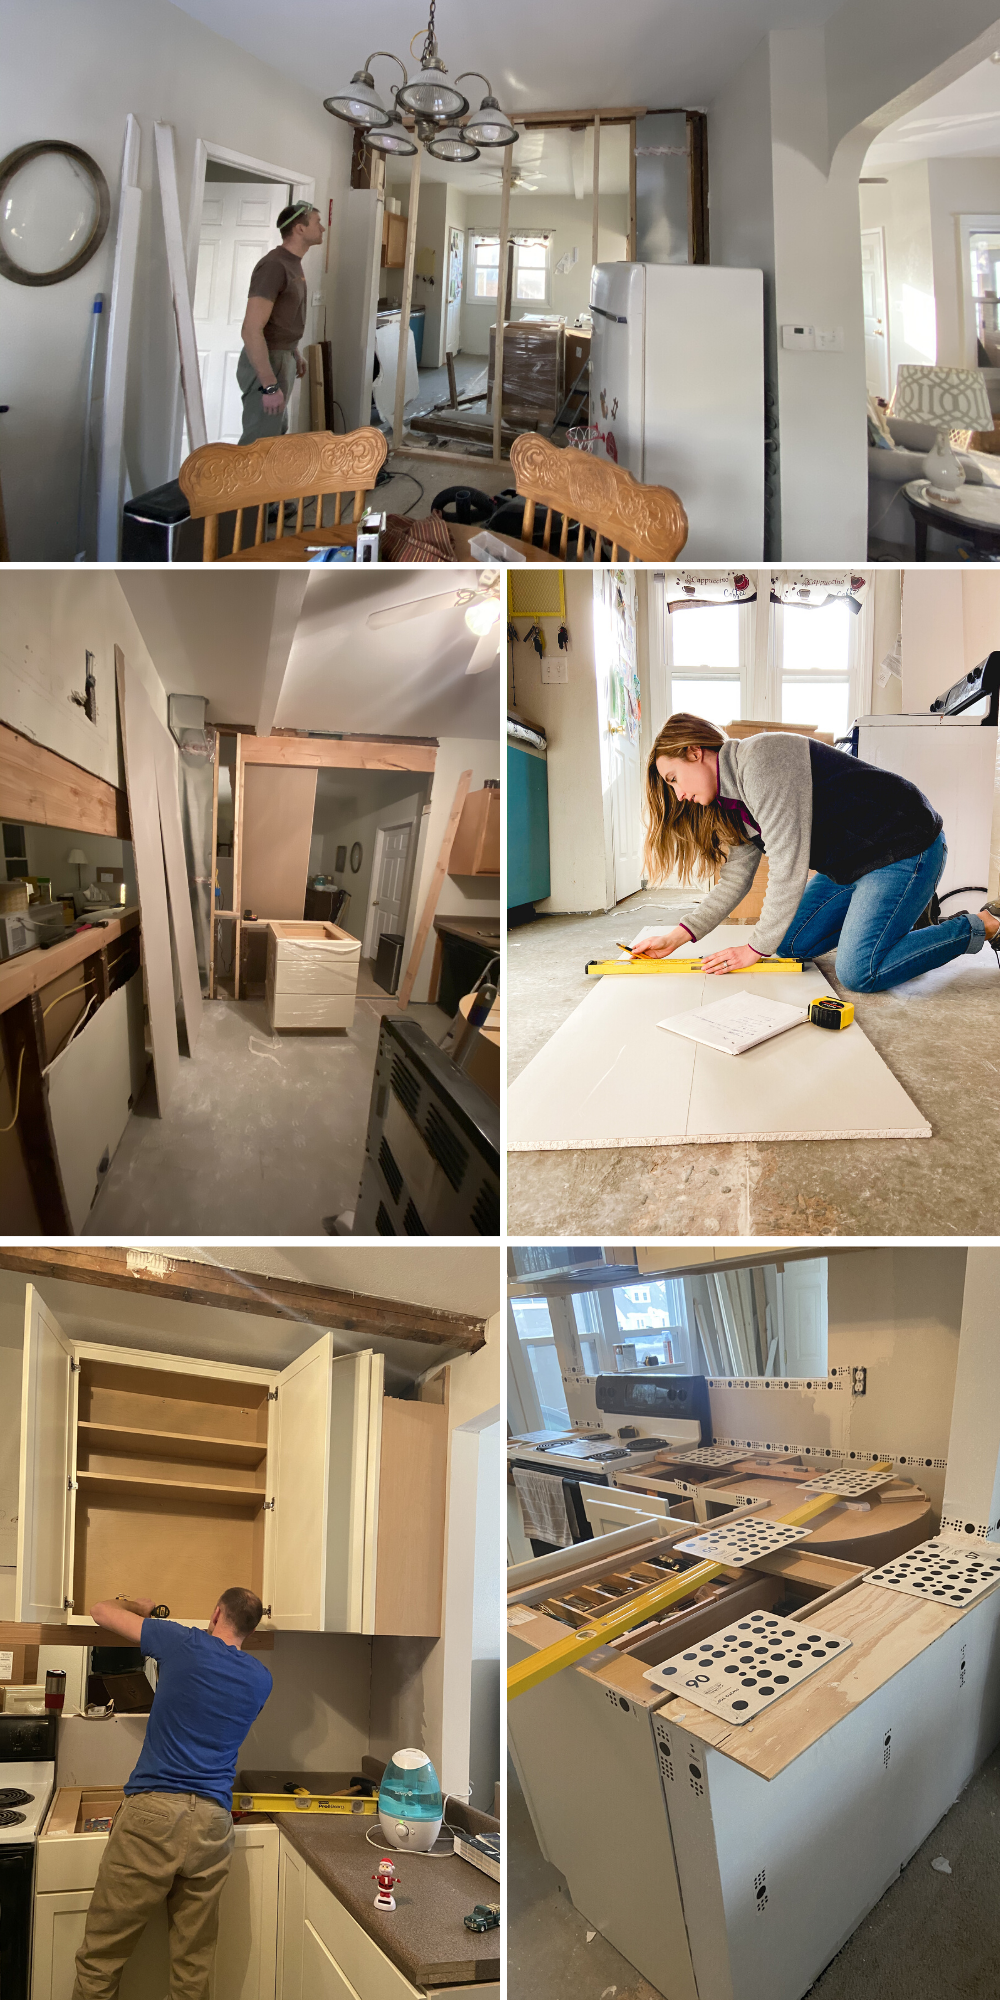
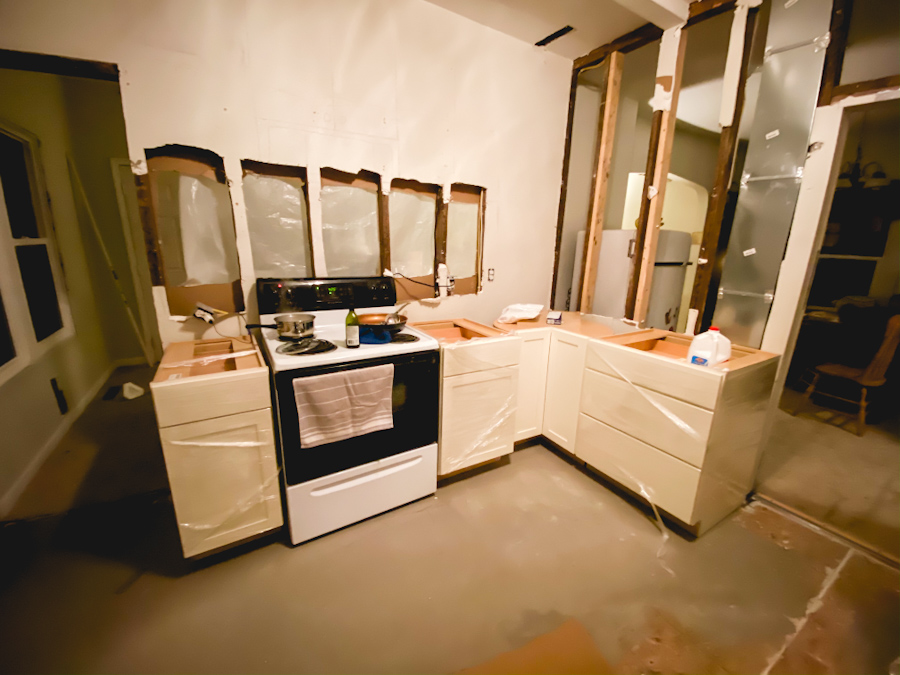
Header, Drywall, and Cabinets
Jan 18-Jan 29, 2020
There was a weird time when our new cabinets were in, but we hadn’t yet removed the wall that would open up a peninsula. This was nice because we could use some of the cabinets. But once the duct was moved, we had to move the cabinets to finish opening the wall.
Derek and I took Gideon to his babysitter’s house and spent an afternoon building a header to support the load bearing wall between the kitchen and dining room. After the wall was open, we tackled hanging drywall. Then I took over taping, texturing and painting.
Once lower cabinets were all in place, Derek started hanging the uppers, and the countertops were fitted.
During this section of the project we found out Derek would be leaving the country with little notice. We worked hard to get as much done before he left as possible.
During this time, God taught me to keep moving, ask for help and savor time together.
Floors
Feb 7-Feb 12
With Derek gone, I was a bit overwhelmed with what still needed to be done. I started by laying part of the kitchen floor. Then I leveled the dining room floor (which included a lot of prep work). Once the floor was leveled, I continued laying flooring.
Gideon enjoyed all the time I spent on the floor. This was a fun project to work on together. But I do distinctly remember talking to Derek on the phone and bursting into tears while laying flooring. I was overwhelmed and bitter that he needed to be gone.
During this time, God taught me to let go of bitterness and instead, focus on the task at hand. I was caught up in the “poor me’s”, but God wanted me to live in joy–despite the circumstances.
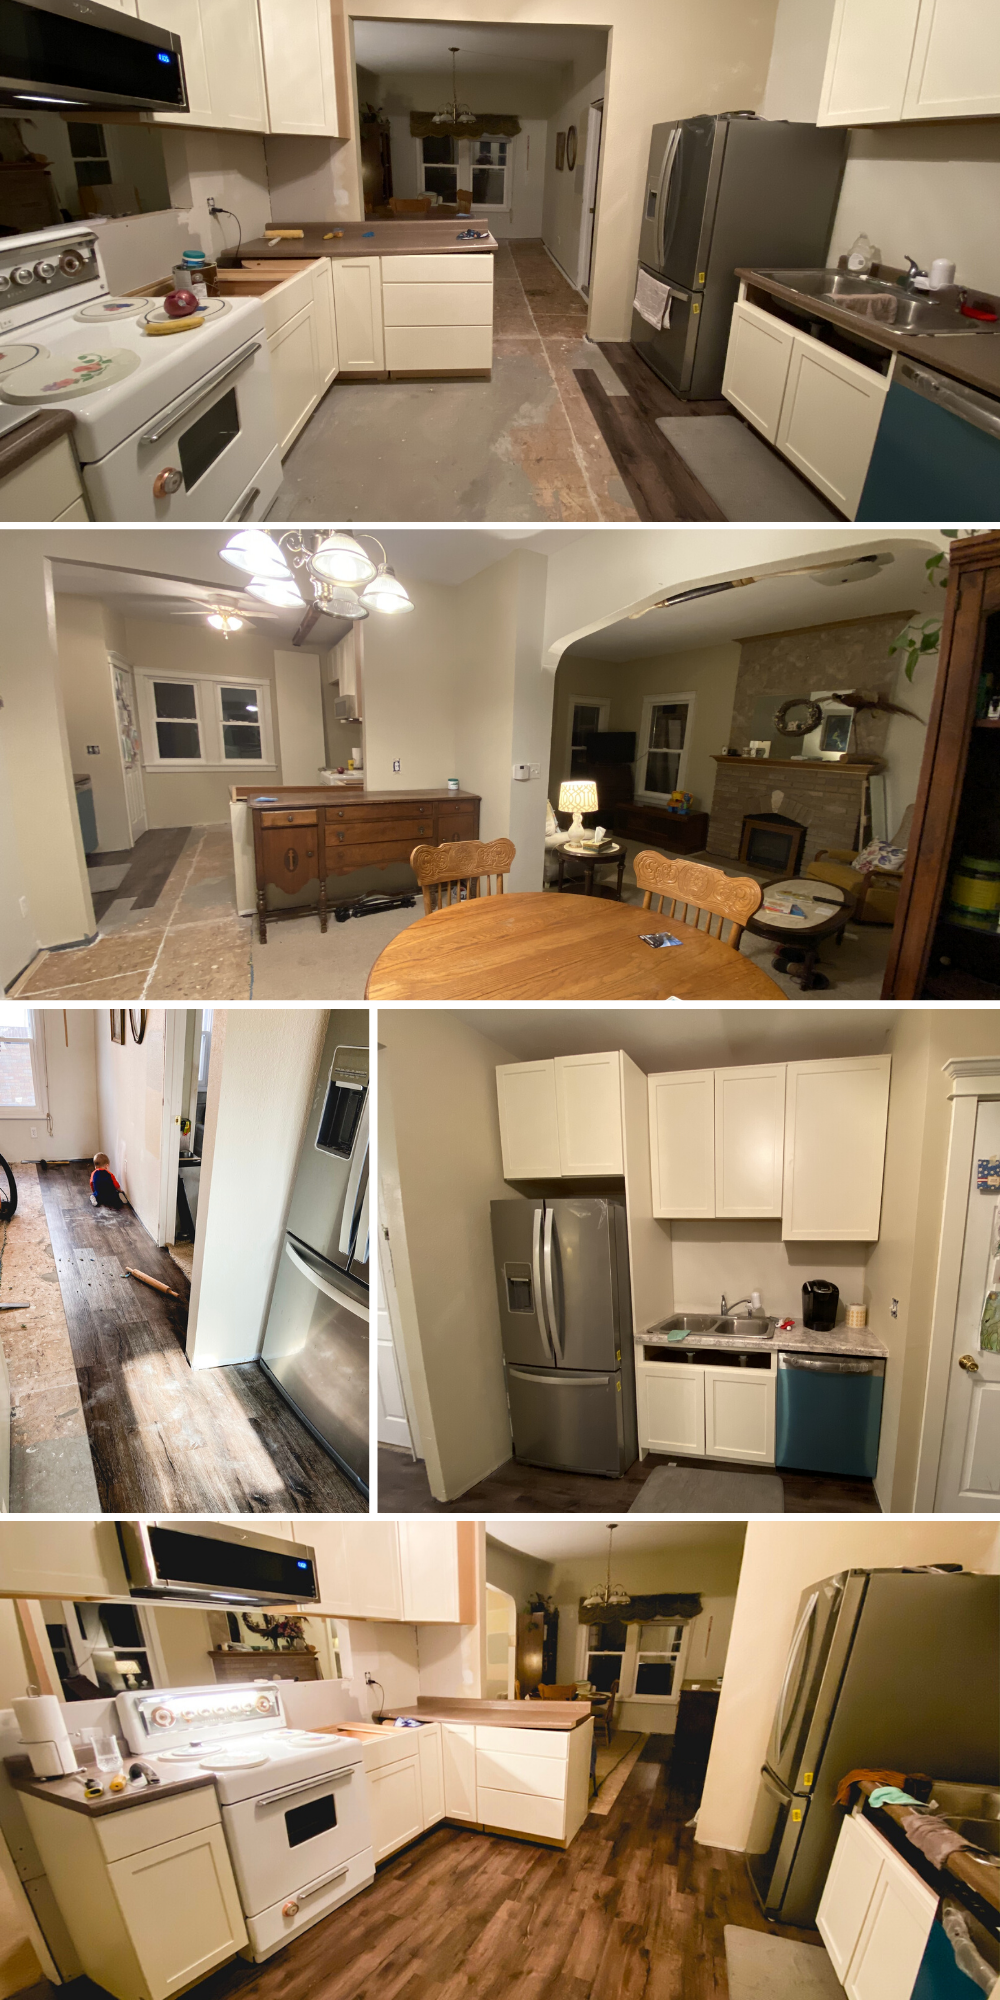
Counters and Finishes
Feb 14-Mar 12
Why did these finishes take so long? Well, shortly after the countertops arrived, I discovered I was pregnant.
This was one more overwhelming news. Exciting, but also overwhelming. I’m not at expert at carrying babies, but with my first pregnancy I had about a week between a positive test and feeling completely sick.
A friend helped (read: did it all) hang the pass through cabinet above the peninsula and crown molding.
With things mostly put back together I hosted a 2nd birthday party for Gideon. My parents arrived shortly after and helped with finishing touches. While I rested and tried to keep my food down, my dad installed handles, a new sink and molding. My mom watched Gideon and spent every evening helping me unload boxes of kitchen supplies I hadn’t seen since leaving our last home in June 2019.
Having my kitchen finally unpacked felt so luxurious. During this time, God taught me to move forward during difficult seasons and appreciate friends and family more deeply. He taught me all things are in His hands, and all gifts are from Him.
Finished {pretty much}
March 15, 2020
Even after the “finishing touches” were in place, there was still some waiting to do. The appliance garage arrived the wrong size, so it took weeks to get a new one. Once it did arrive, it didn’t have finished, white sides. We waited again.
Eventually it all came together. And by the time Derek returned the kitchen remodel chapter was closed.
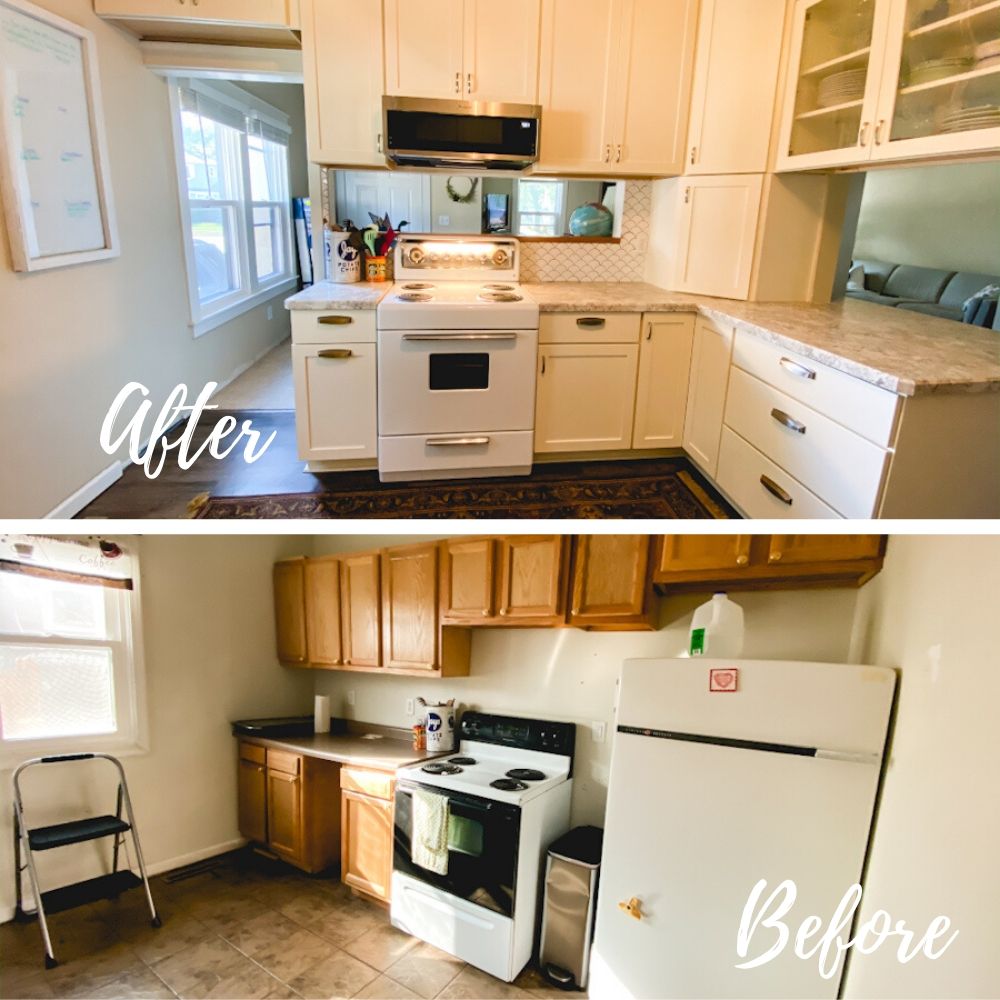
This wasn’t a quick turn around. From the start, it was well thought out. And time consuming. Tackling projects this way isn’t for everyone. I get it. But for us, it works. (For side by side before and after photos see here.)
Derek and I both work. I care for our son during the day. We cherish time with friends and are dedicated to prioritizing ministry, fellowship and connection above projects. It was so hard living with the heart of our home torn up for so long. But this really was a sweet season, spent working together, learning together and growing closer to God through the process.
Today is the day. I’ve been putting this off because in my mind, the perfect time to share a big before and after post is once everything is done, complete, decorated and looking perfect.
But that’s not going to happen for a while yet. And I’ve already been sitting on a nearly finished project for months now. Eventually, they will be art on the walls. Someday, the ceiling fan will get an upgrade. Once things slow down (maybe never), I’ll have a prettier shelving unit in the dining room.
It’s time to show you.
But first, an Oscar-style thank you speech to everyone who made this day possible:
So many of you cheered me on through this major project. I cannot thank you enough. And I know a lot of you feel invested–because you kept up with the progress daily through my Instagram stories. The virtual hugs and pats on the back kept me going. Especially when Derek was out of country for months and I needed to continue work with only a toddler in tow. Especially once I found out I was pregnant and felt nauseous around the clock, but still had lots to do.
I also owe a big thanks to Derek (obviously). He sets us up for success in any project we take on. He makes sure I can move forward when he’s gone. Thank you’s to friends in Minot who watched Gideon while I worked, and helped with heavy lifting and installation. Thank you to my parents for getting me through the finishing touches (and unpacking all my kitchen goods into the new space). And thanks to Gideon, for being the world’s best subcontractor.
Okay. Enough of that. Let’s get going.
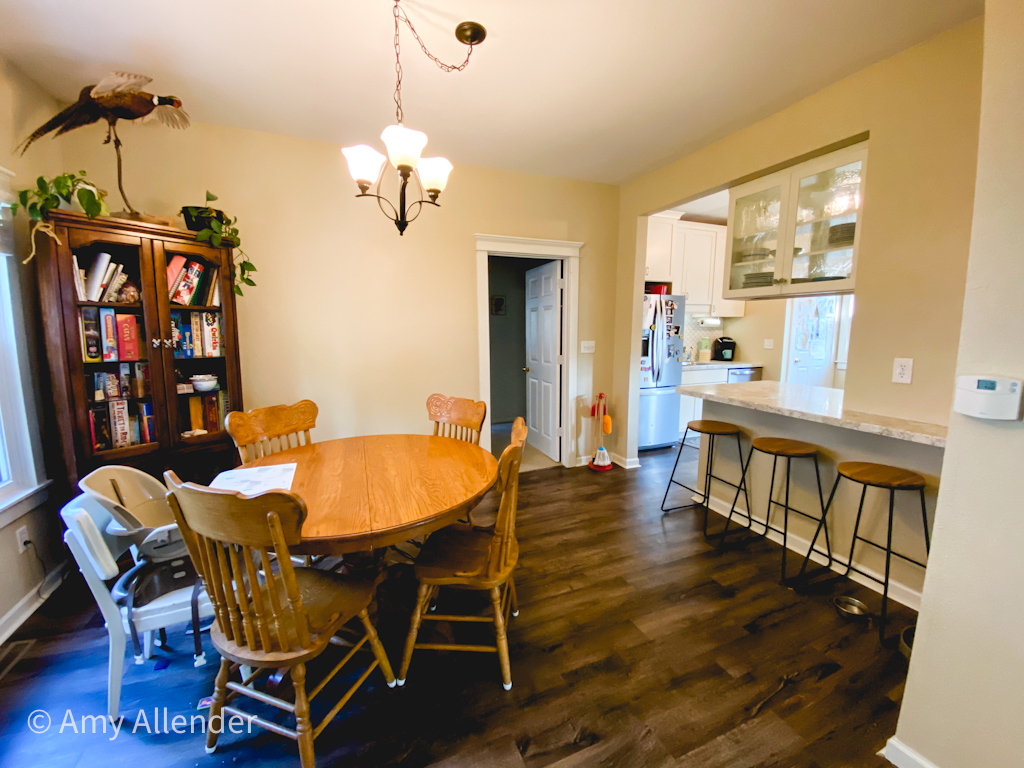
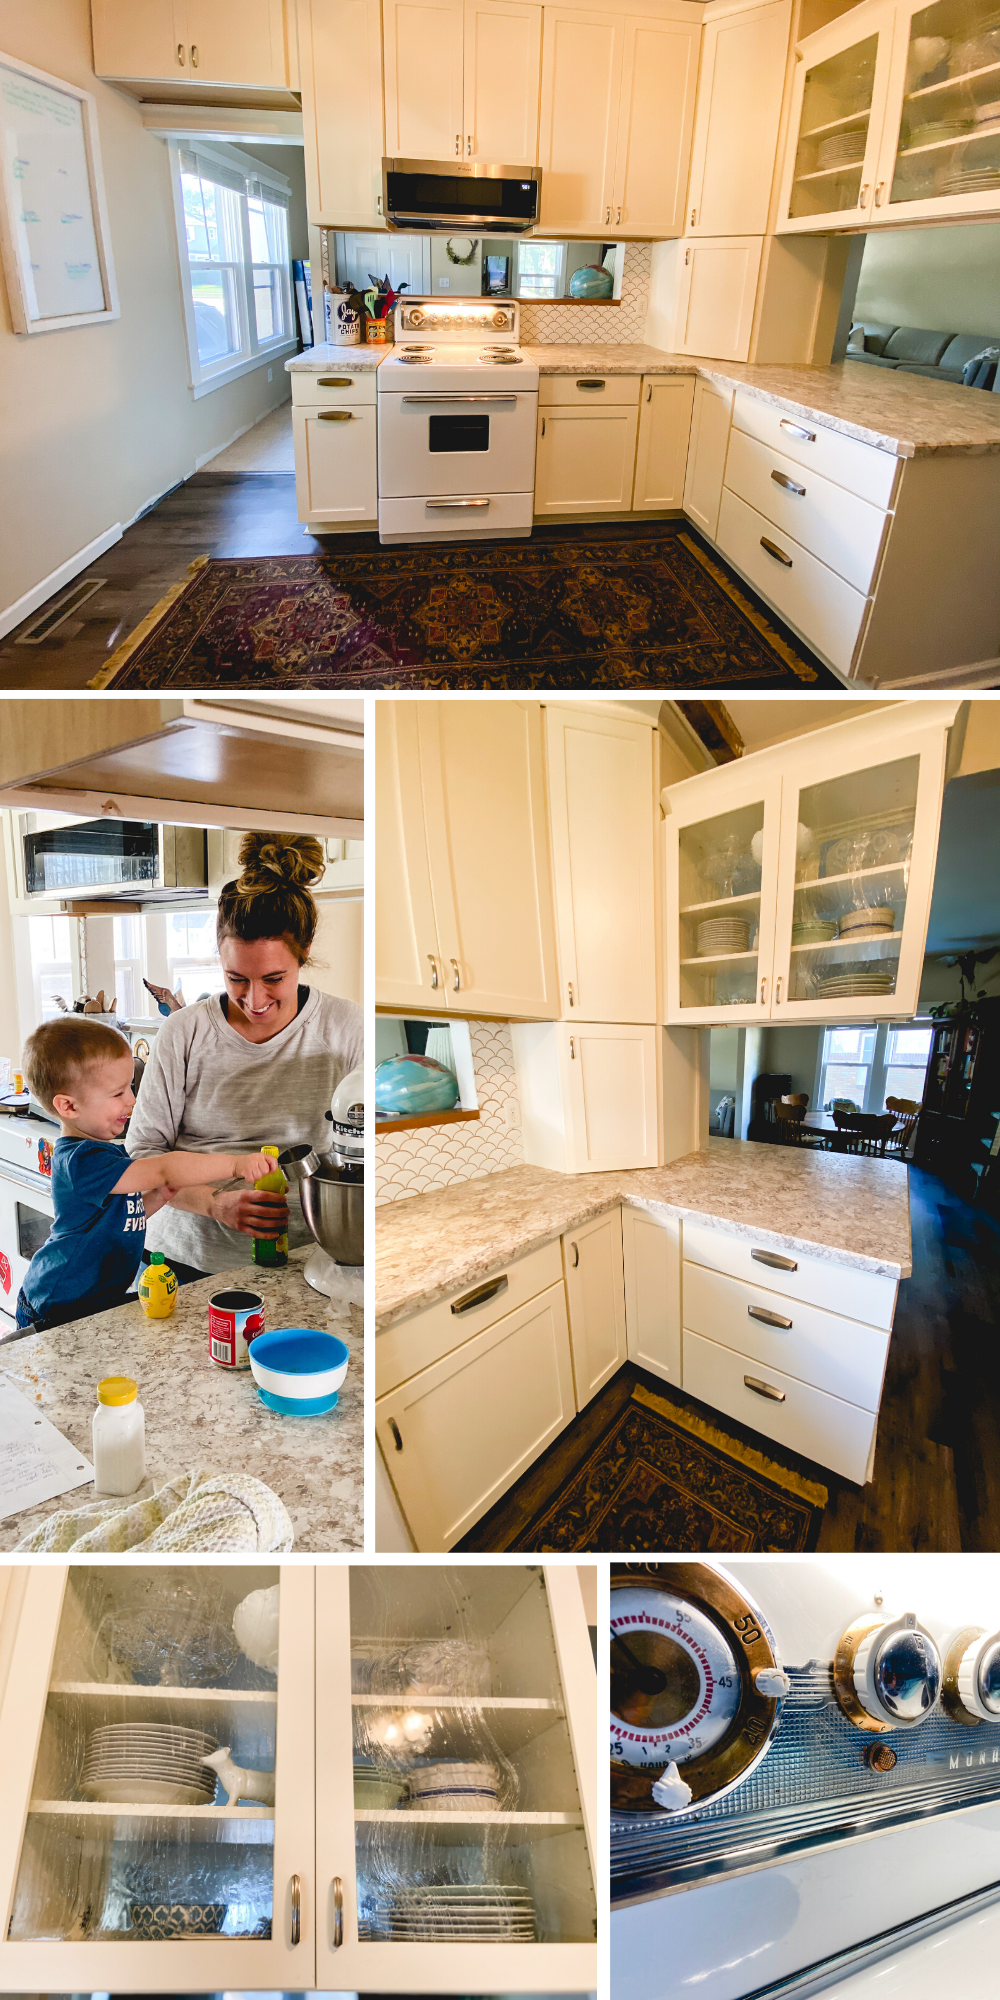
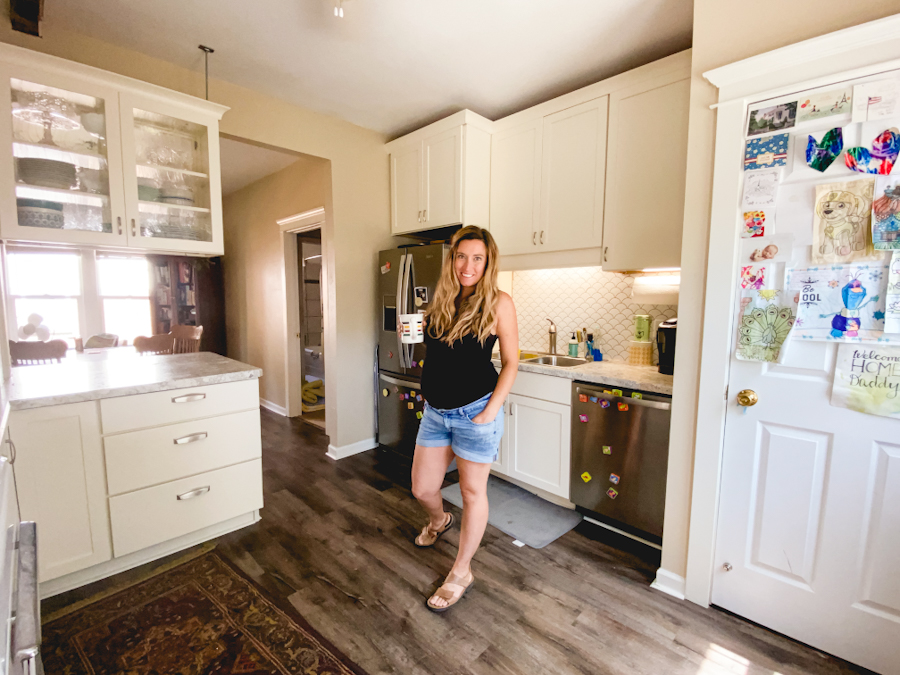
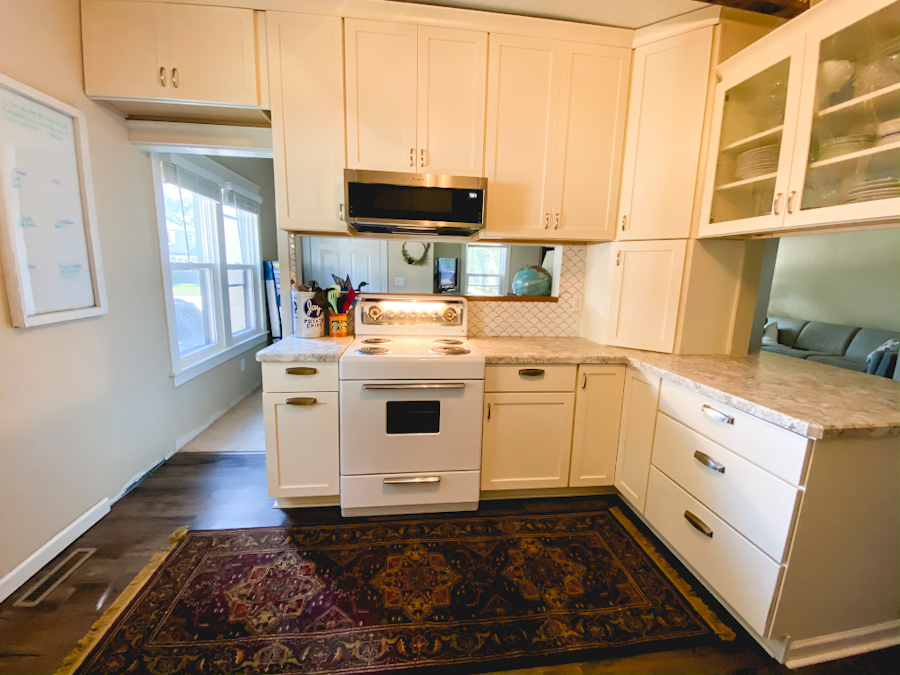
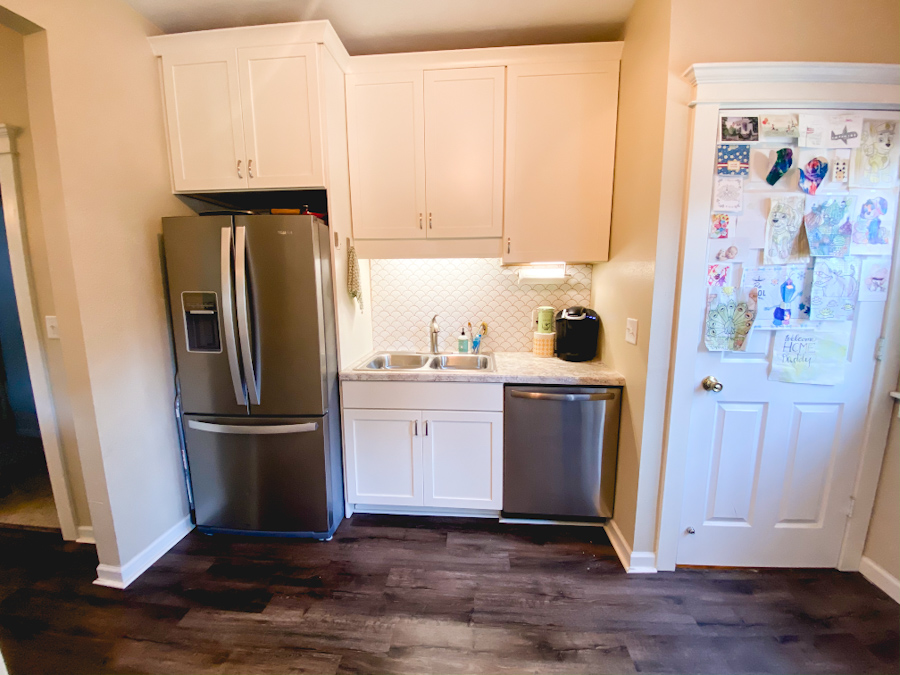
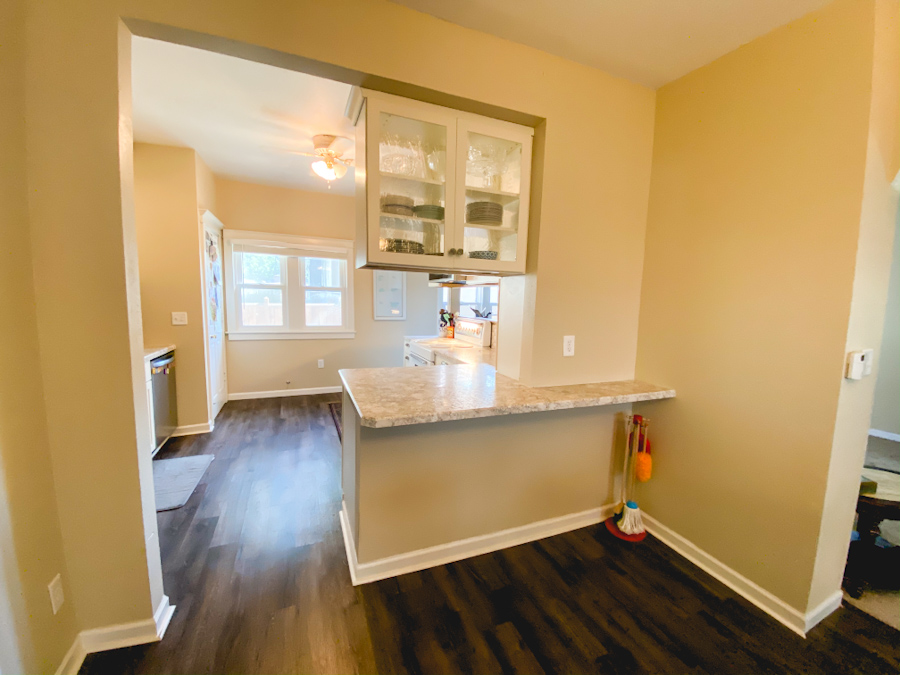
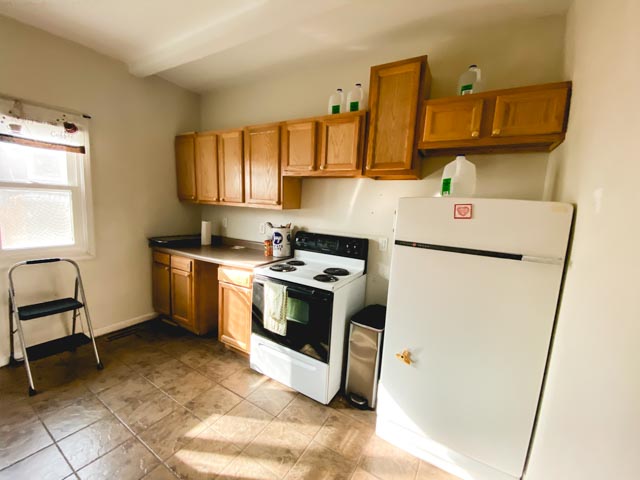
Acorn House Kitchen Remodel
When we first moved in to Acorn House (you can see the full “before” tour here), the kitchen was completely closed off from the rest of the house. Although we are not advocates of creating totally open floor plans in old homes, this one needed better flow. The living room and dining rooms are modest in size, but opening up the kitchen a bit has made all the rooms feel bigger.
Acorn House has five bedrooms. It’s ideal for a family. Opening up walls to give better sight lines to where littles might be playing was particularly important to us. This way, a parent in the kitchen can easily see the shenanigans happening in the living room. All without needing to leave the stove.
The whole process for the kitchen remodel was jump-started after the great cabinet crash of 2019. The bank of cabinets on this side of the kitchen fell off the wall. The second photo shows how we regrouped after the fall. (All about the crash here.)
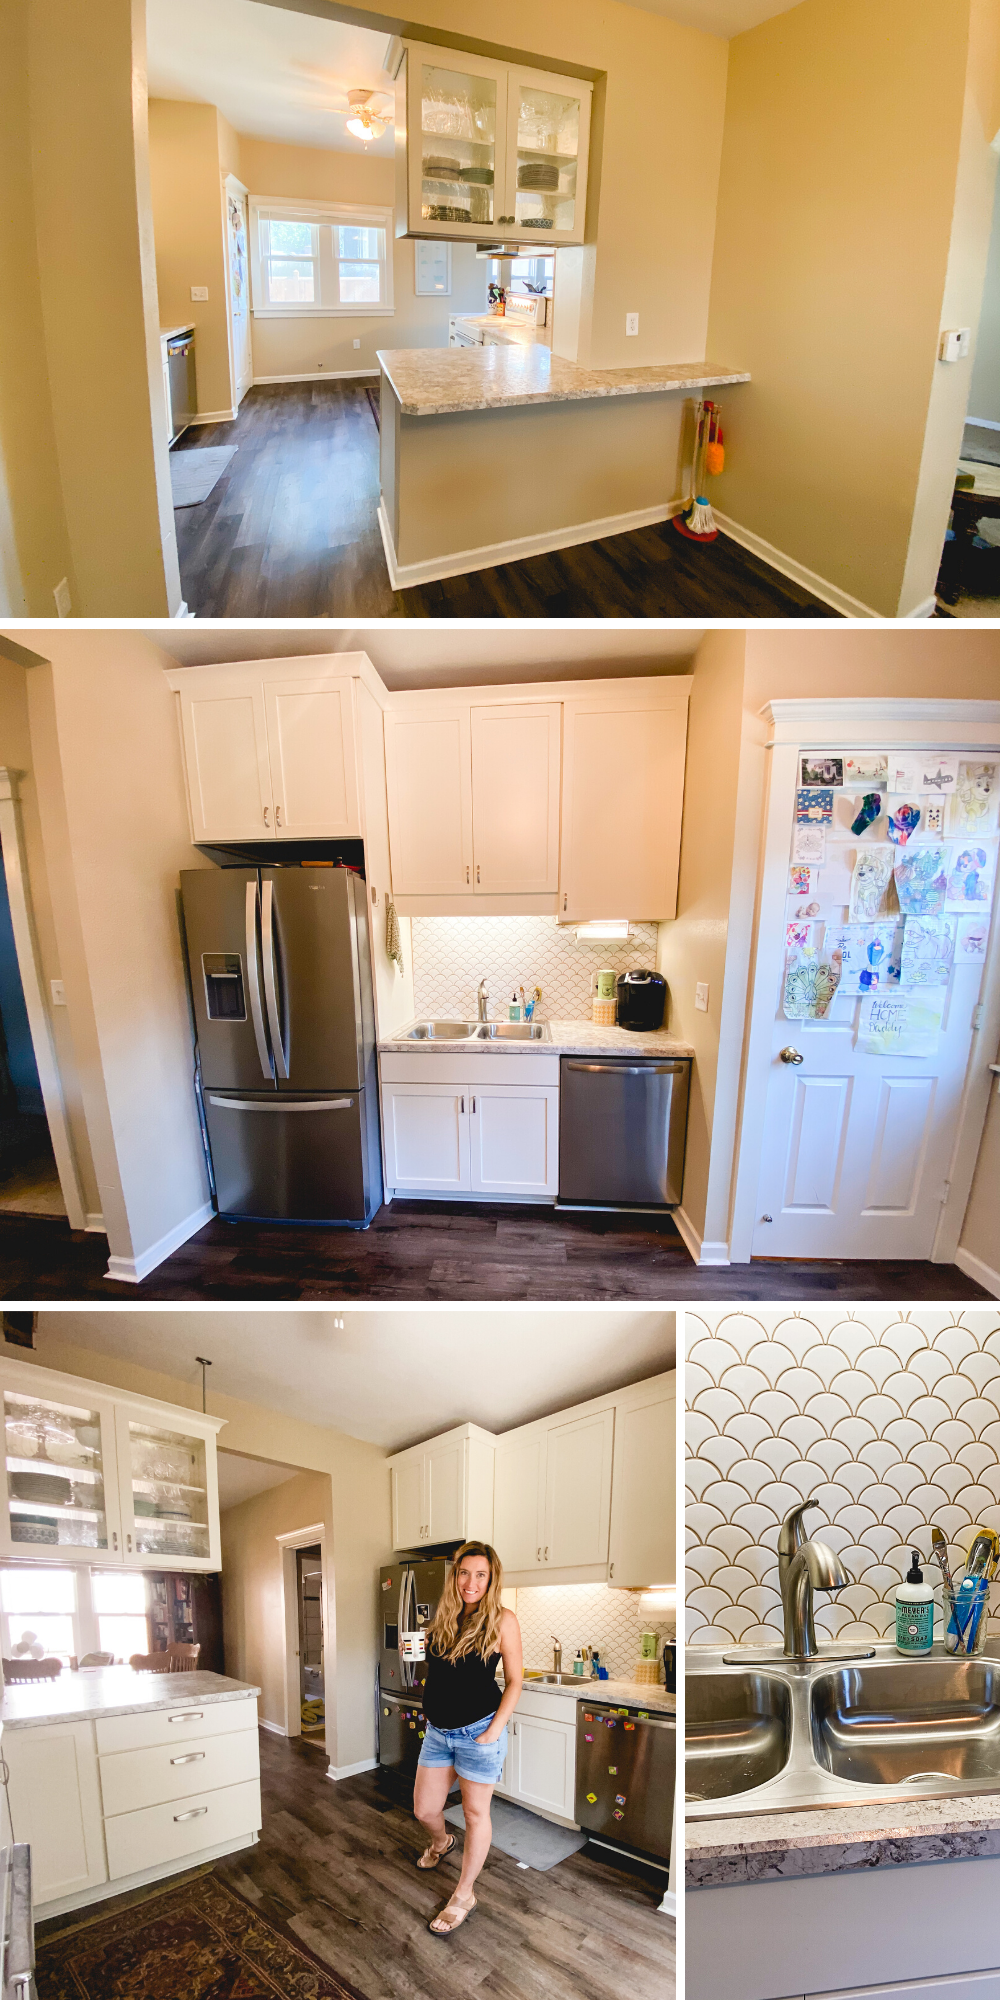
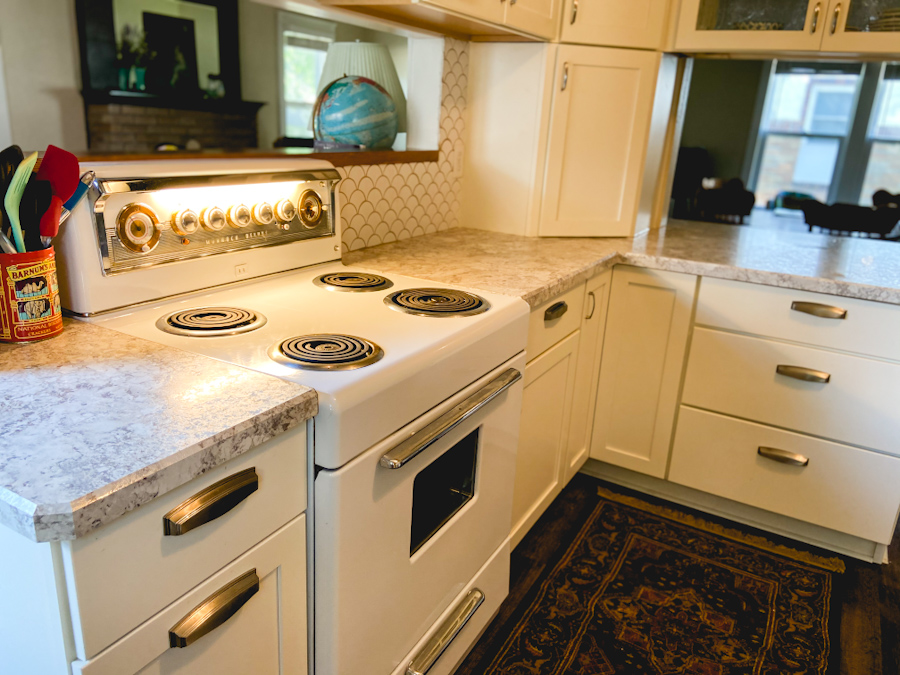
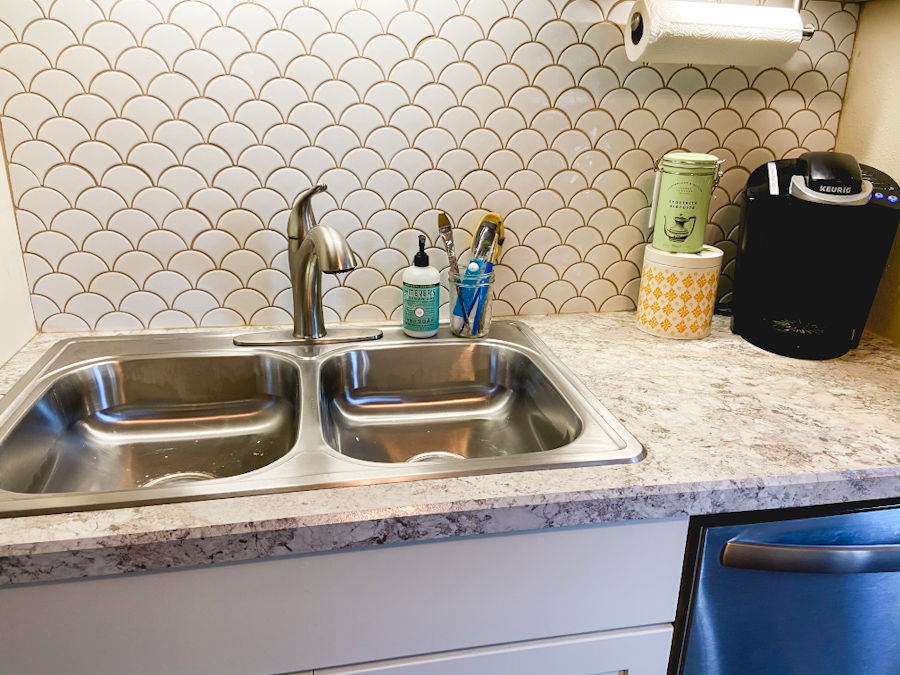
Sink and Fridge
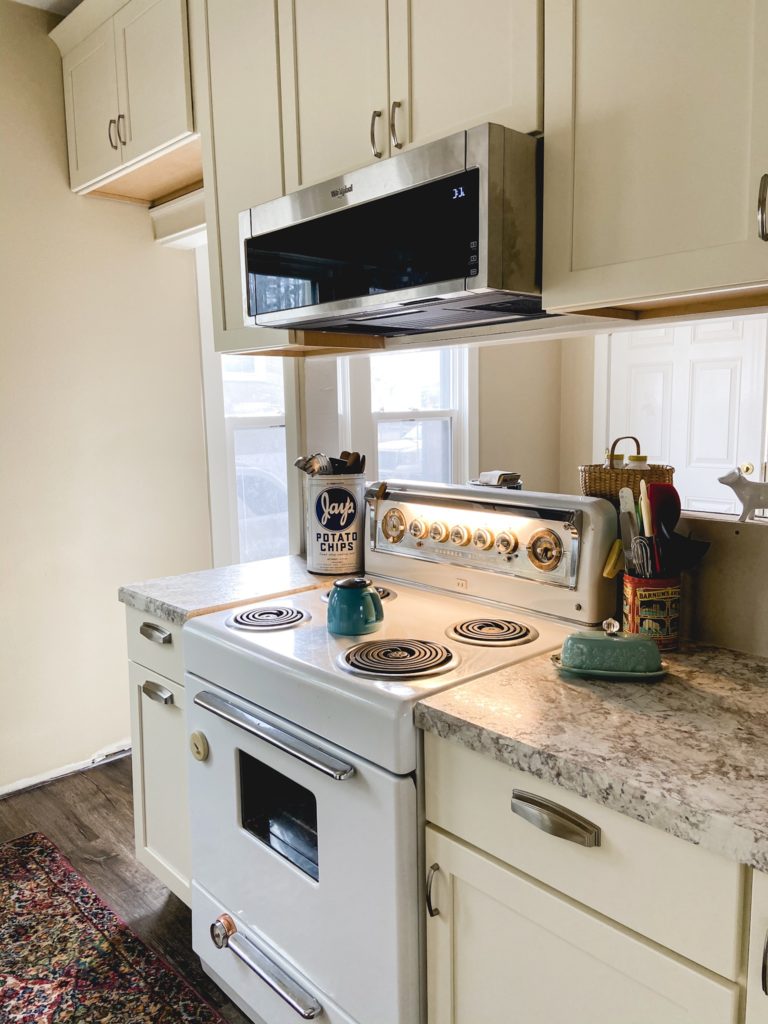
We were able to keep the sink and dishwasher in their original locations. The refrigerator was also moved to this wall. This gave us space for a corner cabinet and peninsula work space. I was originally concerned about the lack of counter space over here, but it’s proven to be plenty.
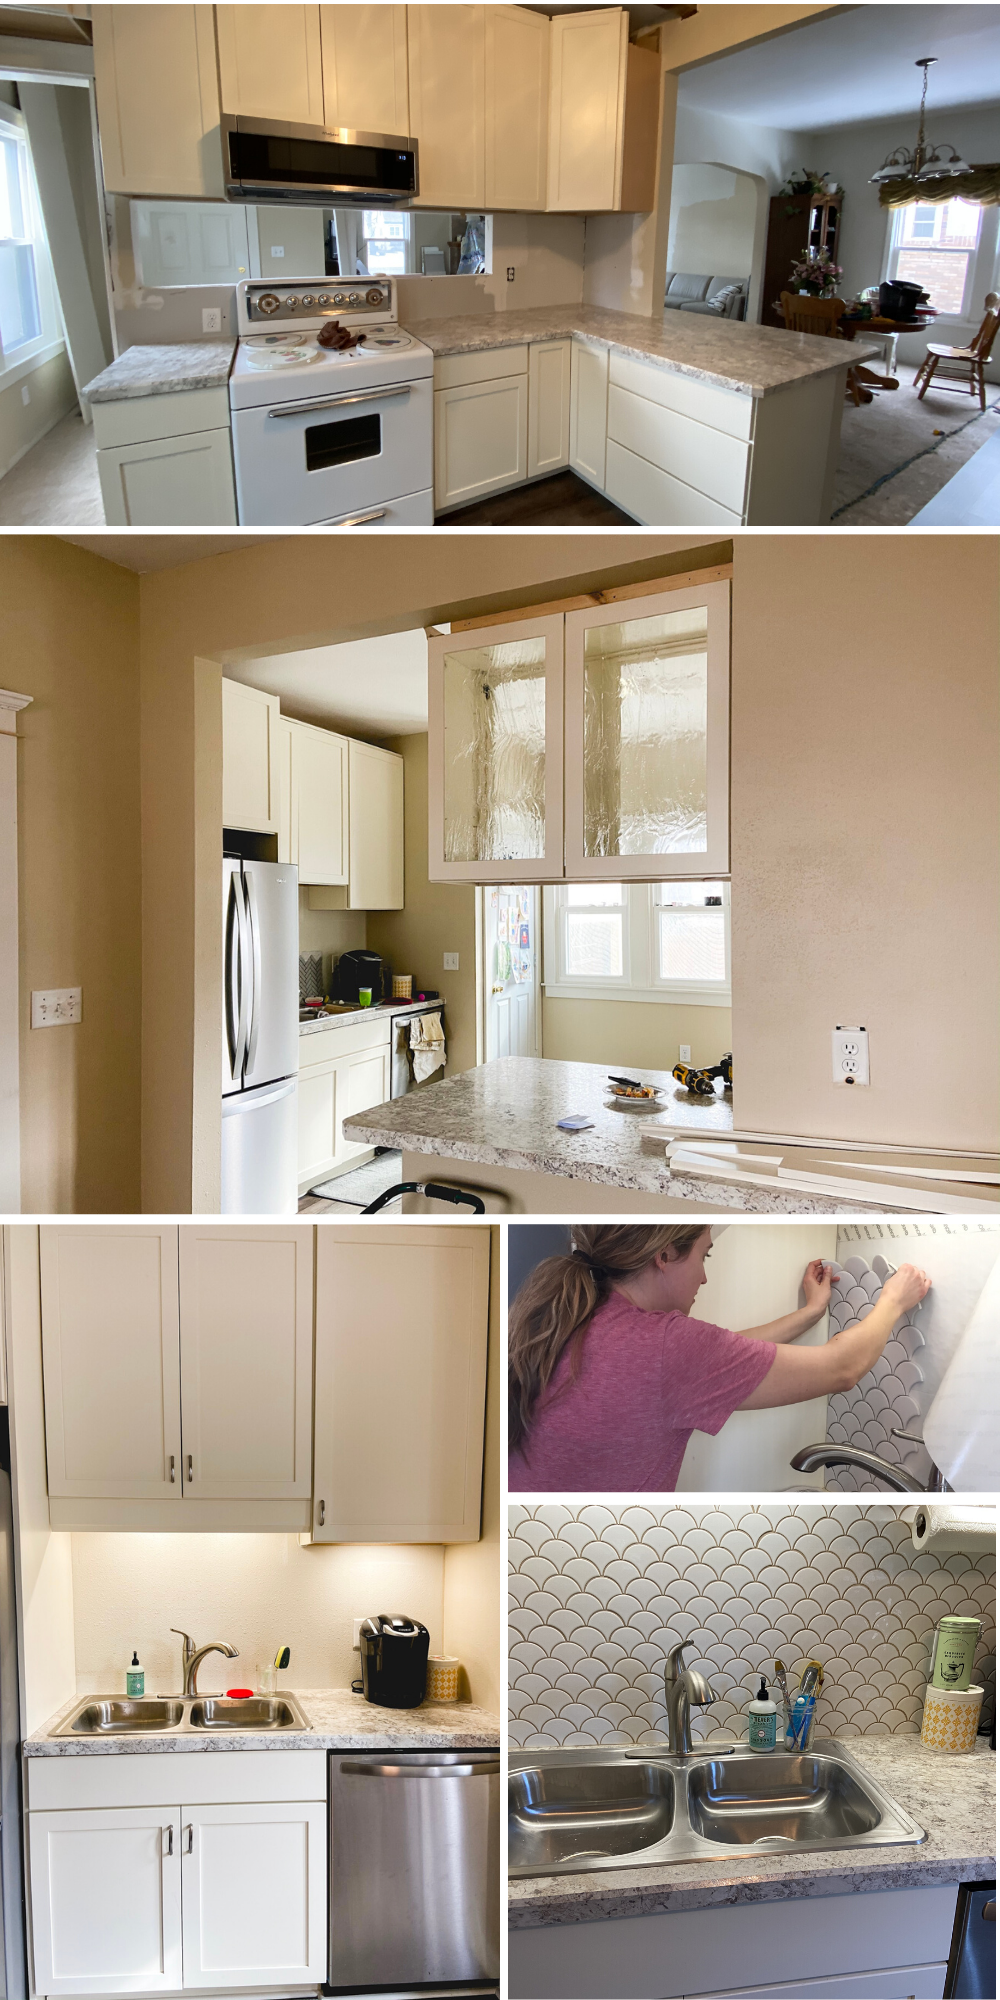
We’re in love (and so is everyone else) with the scalloped backsplash. I try to keep the counters clear–but the coffee and coffee maker are always in use, and always at the ready.
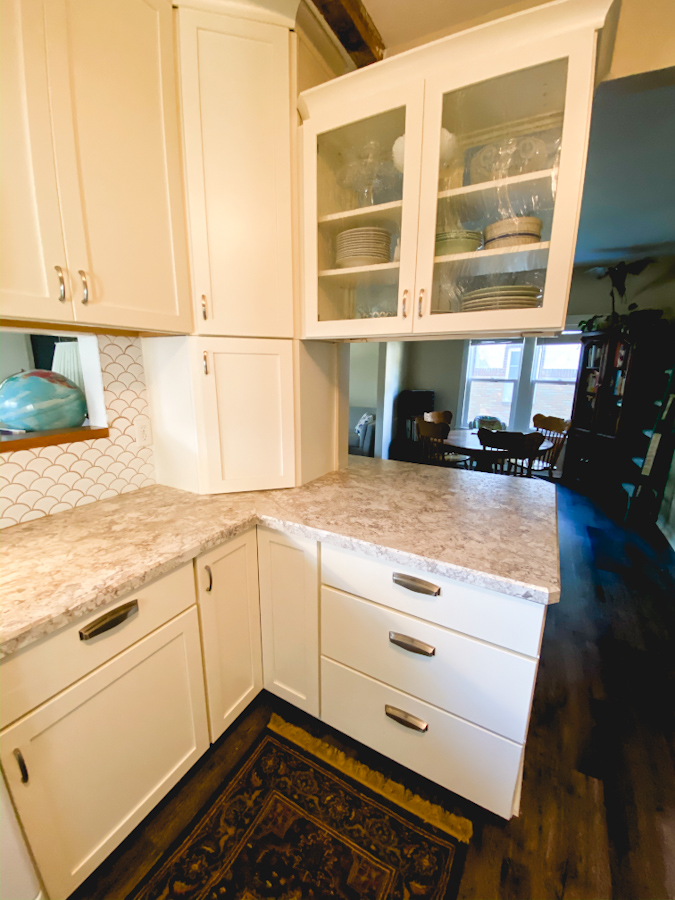
The Peninsula
When we started, the doorway to the kitchen was 32″ wide. We raised the opening height. Then opened the wall to accommodate a peninsula and “pass through” cabinet to the dining room.
I am so happy with how this space turned out. It’s a dream to have a large area for prep. Especially since it can be accessed from both sides.
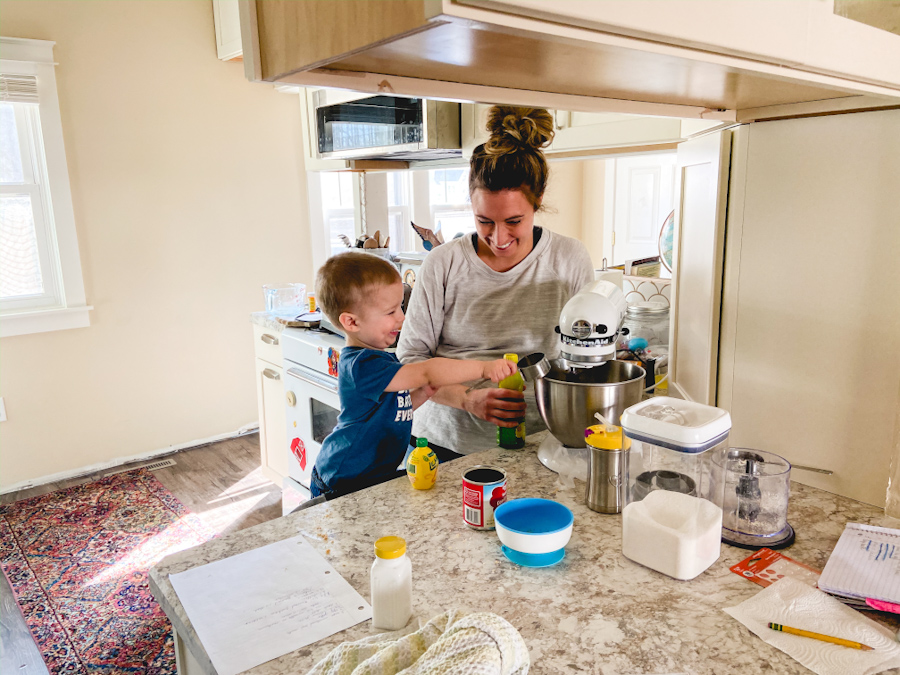
The mixer is stored in the countertop appliance garage and the peninsula is the perfect space for baking. Gideon likes to help with that. Or play play-doh while I cook and unload the dishwasher. This little space brings us all together.
Our Realistic Remodel Approach
Whenever we take on a remodel or renovation, we approach it with a “preservation mindset.” I ask questions. What was fitting for this style of architecture when it was built? How can we make this space work for modern life, while respecting it’s past? Without making this space a time-capsule, how can we stay true to it’s roots?
Not every house is meant to have a farm house kitchen. Or a boho living room. And that’s okay.
We also approach projects from a realistic perspective. What can we take on? How can we best steward the gifts God has given us? (Time, money, skills, relationships, etc are all taken into account.) We are realistic about what we can afford, what is practical and what the house can sustain.
There are a few things left to do. Like art on those blank dining room walls and that missing piece of baseboard (which will come after living room carpet is installed.) But the space has been totally transform and God has inspired my heart in great ways through this process.
Thanks again for being part of the journey. I love you all dearly.
For more projects, intentional + positive living, and the daily practice of seeing the world through a Christ-centered lens–join me on Instagram and Facebook. If you were inspired, or just loved this post–please remember to share it!
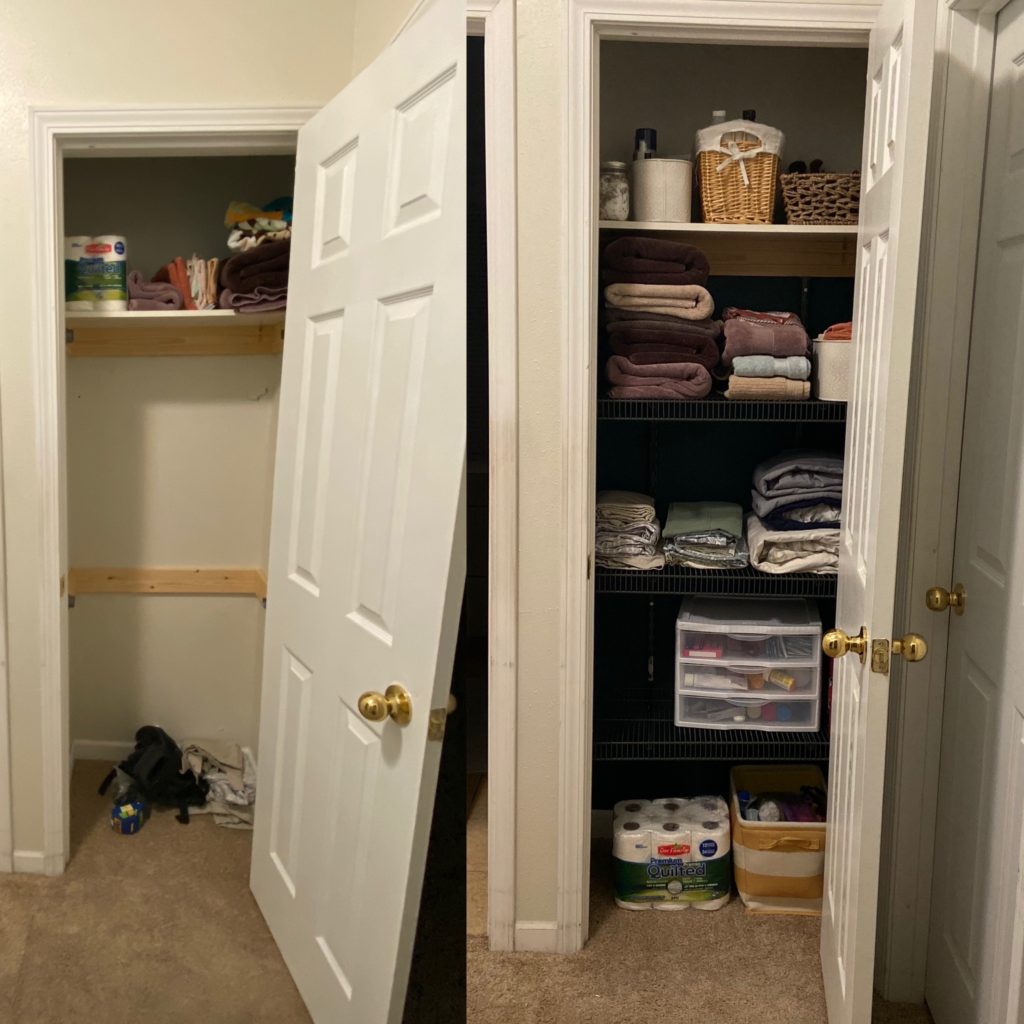
I’ve talked a lot about progress at Acorn House on Instagram. However, I haven’t posted any progress here on the blog. If you follow on Instagram or Facebook (which you totally should so we can be friends) you’ve seen images of progress and lots and lots of story clips about what’s been going on. Today I’m sharing the first piece of the remodel I completed: our linen closet. It might sound lame, but I think I can sell you on the idea. Read on for my easy, real-life, linen closet organization ideas.
When I moved into Acorn House Derek was away for months on work. I was tasked with settling into a major project house with an 18 month in tow. The house had been vacant for several years. Before that, it had been flooded and haphazardly repaired. Before that, the second floor had been converted to an apartment–virtually untouched since the 1960s.
I found myself in a tricky and overwhelming situation. Our personal belongings (read: all our worldly possessions and furniture and comforts of home) were still at our previous home in South Dakota. I had moved a load of “essentials” up to North Dakota. A list that included a dining table, beds, the couch, linens, meager kitchen supplies and a TV.
Overwhelming Disorganization
As I looked around my heart sank. I had a growing knot in my stomach. Here I was alone, with a dirty house in complete disrepair. It seemed like a good idea when we bought it, but the reality was completely overwhelming. Nearly every inch of the house needed some kind of attention. Whether a complete overhaul, or just basic repair–no matter where my eyes settled I saw work to be done.
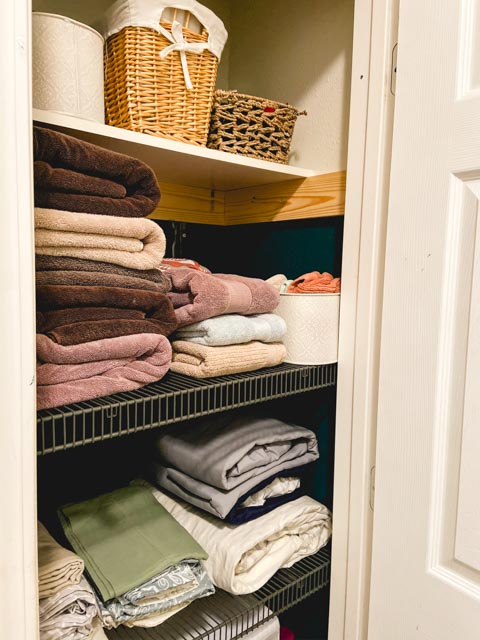
The biggest, most pressing struggle for me at first was the house’s tremendous lack of storage space. There is one small linen closet on the main floor. When I moved in, it the space was nearly unusable. For me, disorganization makes an overwhelming situation much worse.
My parents came to help me get settled. While in town, my dad and I put together a simple, but oh-so-effective linen closet. It’s hard for me to describe the impact this very quick project has had on me.
Having a place that could supply me with clean towels, fresh sheets and easy-to-find first aid supplies was a true gift. On my dirtiest, messiest days I could open the door and glimpse something pretty and finished. As bigger project started (and mishaps occurred) I found solace being able to look into my single, organized space.
The Linen Closet Points Me to Jesus, Seriously.
I tend to see everything as an anecdote of spiritual matters. So let’s go on a quick tangent. My small, peaceful closet bring the old hymn Turn Your Eyes Upon Jesus to mind.
Therefore, since we are surrounded by such a great cloud of witnesses, let us throw off everything that hinders and the sin that so easily entangles. And let us run with perseverance the race marked out for us, fixing our eyes on Jesus, the pioneer and perfecter of faith.
Heb 12:1-2a
See, in the midst of the chaos, overwhelming tasks and unforeseen obstacles–I can still come back to this one, completed space. Opening the door and breathing in the smell of clean linens and essential oils calms me and reminds me to be positive and intentional. Progress is being made. Projects will get done. We prayed over the decision to buy this house and God led us through the front door.
In the same way, no matter what is happening around us, God has given us the strength we need to persevere in the race set before us. We can fix our eyes on Christ and be refocused on what matters. The chaos, overwhelming tasks, obstacles and unhappiness all grow dim in light of His grace.
Easy, Realistic Linen Closet Organization Ideas
My linen closet isn’t going to go viral on Pinterest. For how much I love it, you’d think it might be prettier. Honestly, in person–it is prettier than in photographs. But it still won’t compare to the perfectly staged types you’ll see online or in home magazines. My closet might not be cover-photo-worthy–but it’s easy, realistic to maintain and doable for everyone.
I love this space because it is finished, polished and perfectly utilitarian. It houses lots of items and I know where each and every one lives. My closet is small, but I believe use of space is much more important than square footage.
Here are my seven best tips for creating a linen closet you love.
1. Eliminate
First, only organize the things you actually need and use. Eliminate unneeded and unnecessary items. How many towels do you really use? Washcloths? Bottles of lotion? Sheet sets?
Toss, donate, recycle or upcycle items that you are hanging on to but never use. Keep things you use and need. You’ll be surprised at the facelift this simple step will give your space.
2. Find a Fold That Fits Your Space
Next, it’s time to make sure the items you are keeping fit in your space. Find the folding style that best fits your space. In our previous Minot house I had a very deep, but very small linen closet. Rolling towels instead of folding them was best for that space.
In most of my other linen closets, this fold style has been best–it only takes a couple seconds. Here are other options for finding your best fold.
3. Fold Sheet Sets Together
This is a game changer. Learn to fold sheets well and fold entire sets together. You’ll never be looking for misplaced pillowcases again. Better yet, you’ll never have a pile of wadded up fitted sheets clogging up your closet.
This video from Marie Kondo shows my preferred method for storing sheet sets. But Martha also has great ideas here.
4. Create a Simple Storage Plan
Originally, in my closet there was only one shelf positioned too high to easily access sheets and towels. My dad and I installed a simple shelving unit to solve the problem. My solution uses hang rails and wire shelves. Be sure to secure shelves to studs to be sure they can hold enough weight.
No matter what solution you come up with, plan it out so you’ll be able to reach the things you need. If your space is deep, consider installing drawers to prevent items from being lost in the back of the closet. If it’s shallow, shelves will be your best friend.
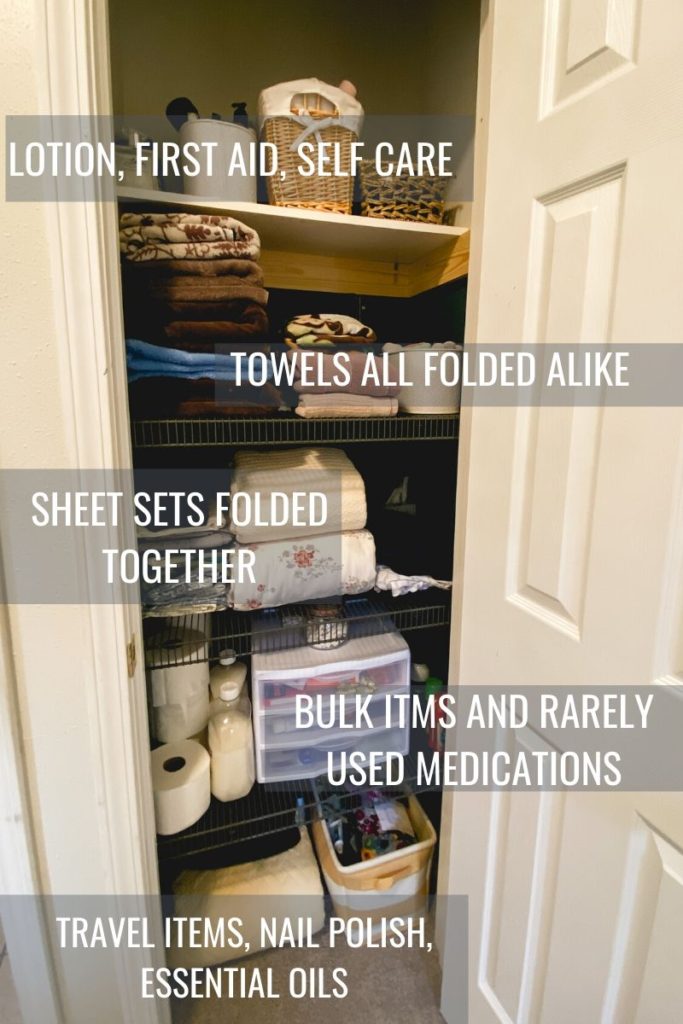
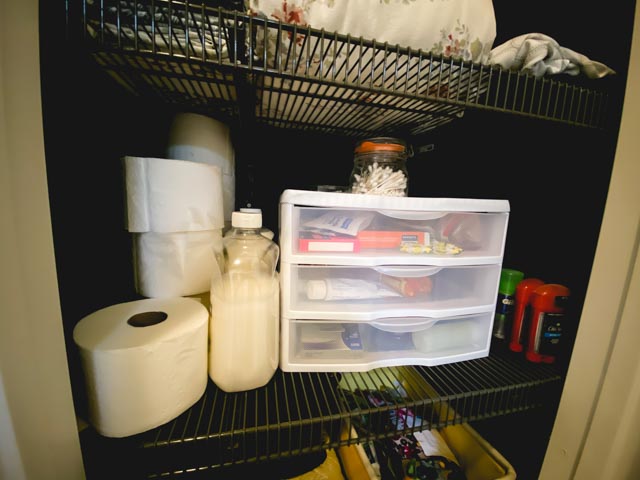
5. Use a Storage Tower
There is almost always space for a storage tower. It doesn’t need to be huge, but it will help you. This is the best way I’ve found to keep medications and first aid supplies organized.
6. Make Things Look Neat With Storage Bins
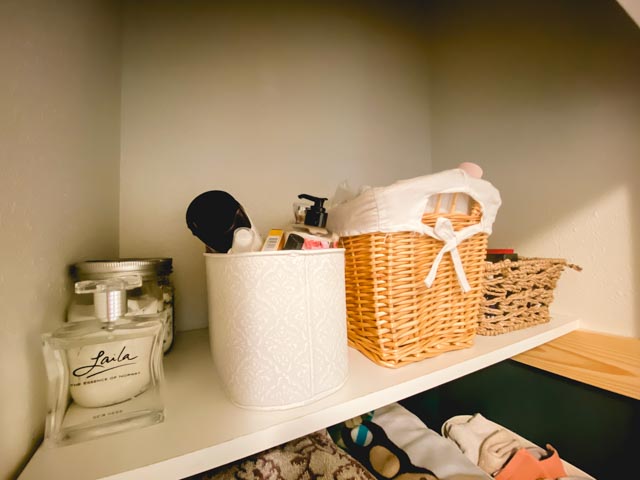
Keep like items together in bins. Usually, these are things that are small and get lost, or aren’t often needed. In my closet, I use bins to organize lotion/hair products, first aid supplies, wash cloths, travel toiletries, essential oils and nail polish.
Within some of the bins, I use zippered pouches to store subcategories of items. I hold travel toiletries, guest toiletries and essential oils in the yellow striped bin, but each is in it’s own pouch to keep things neat. I hate sifting through lots of loose items to find a particular thing.
Putting items together keeps them at hand when you need them, but decreases visual clutter.
7. Pretty Extras
You’ll be more apt to keep your closet neat if its also pretty. I painted the walls a dark teal (it looks almost black in photos). The dark color makes the space feel more fresh than the dingy white.
Treat yourself to pretty storage containers. Get towels and sheets you love. Use items you already have on hand to make your space pleasant to look at.
Easy Linen Closet Organization Ideas : Conclusion
I hope this gives you some ideas–and some hope for your own space. When many things feel out of control and overwhelming, claiming and taming a small space can be empowering. How do you organize your storage spaces?
Most importantly, I hope you’ll remember that Jesus, more than an organized closet, will bring calm to the storms going on around you. And maybe, next time you see a happy, finished space in your home you’ll remember me and my silly linen closet anecdote.
Last, remember to join me on Instagram. I’ll be saving my linen closet details to highlights so you can see how I fold my towels and sheets. If I can do it, so can you.
Minot Monday is made possible through a partnership with BeLOCAL Minot. BeLOCAL is a guide to living like a local and your should totally check it out.
Happy Minot Monday! Today’s post is all about resources for kitchen cabinets in Minot. If you’re in the market for cabinets or a kitchen remodel is on your horizon, this is going to be a good post to bookmark. Even if you aren’t, it’s still a good post because you’ll get a sneak peek at my {nearly} finished kitchen remodel.
If you follow along with me on Instagram (which you should, because we have lots of fun over there), you know I’ve been busy remodeling my kitchen. Things got a jump start in there after most of the upper cabinets fell off the wall in the fall (read about that ordeal here.) After that, we put our second floor remodel on hold and tackled the first floor living spaces instead. The kitchen, dining room and living room are all intertwined, so it’s been chaotic and messy in our most lived-in rooms. Needless to say, I’ll be happy to put this one behind me.
Finding Our Kitchen Cabinets in Minot
Working on an old house presents lots of challenges. Derek and I take a “restoration-without-making-a-time-capsule” mindset when it comes to changing things in an old home. We aren’t out to create a museum piece–perfectly authentic to the time period of the house. However, we do try to be respectful of the original design. When all is said and done, we hope the house looks like it’s “always been that way.”
A major challenge for us during the kitchen remodel was finding cabinets that we loved and also stayed within our budget. We spent about a month visiting with different retailers and designers around Minot until we finally put in an order.
All in all, I have nothing negative to say about any of the places we visited. At the end of the day though, we had to decide which retailer best fit our vision, budget and personality.
The following list is not totally comprehensive, but it contains many of the places in town that provide kitchen cabinets in Minot. Like I said, if you’re in the market, this is a good list to bookmark. Hopefully it’ll help you as you start your search.
Minot Lumber & Hardware
I’ll start with Minot Lumber. Ultimately, this is where we purchased our cabinets. Minot Lumber came to our attention as a cabinet dealer late in our search, but I’m so glad we checked them out. Here are some of the things that we love about working with them:
Super nice staff
FREE design consultation and renderings (we were sent 3D renderings of our layout before placing an order). The designer I worked with was so knowledgeable and tweaked our design several times to get it just right.
Multiple cabinet lines available (at different price points)
They also deal countertops (we purchased those too), hardware and accessories.
Helped us stay within budget. This is what really sold me on buying from Minot Lumber. Our designer took lots of time to work with me on small ways to trim the cost of our cabinet order. (For example, ordering a stock color, getting cabinets in common sizes–even though everything “can” be customized, doing our own install, etc.)
No overselling. I’ve never been pressured to buy something more extravagant than what I needed. Our designer listened to me and respected my vision–never pressuring me to buy something fancier than what I wanted.
We have had a great experience with Minot Lumber. There were a couple hiccups with our order–but those were on the distributor’s end. The staff at Minot Lumber has been quick to help and get things right.
Scherr’s Cabinets & Doors
We were so impressed by the staff at Scherr’s. Everyone was so kind and helpful. To us, the most impressive part about Scherr’s business is that everything is custom made and created right here in Minot! This is truly a business of craftsmanship. The biggest set back for us ordering from Scherr’s was timeline. Because everything is made-to-order there’s a bit of a wait. Here are some great things about Scherr’s.
Locally made
Completely custom
All their cabinets are frameless–which gives you the most access and space to the inside of the cabinet boxes
Loads of door options
Staff will help you design your layout
Staff will help trim your budget (for example, you do painting/finish, they explain install, etc)
See more on their FAQ page to learn about their offerings.
Souris River Designs
Souris River Designs is my recommendation for anyone wanting a fairly hands-off approach to a remodel. While the other retailers also offer installation resources and design resources–Souris River offers especially high quality design services. Their show room is gorgeous, and full of options and accessories. If you don’t consider yourself a semi-savvy DIYer or designer this is my recommendation for you. Here are some perks we liked:
Huge, inspiring showroom
Beautiful 3D renderings of your project
Designers on hand to help with every step
Offer counters, tile, backsplash, hardware, sinks, accessories, contractors, etc all in house
It’s a one-stop-shop for a remodel if you want to outsource your project
Big Box Stores
We have two “big box stores” for kitchen cabinets in Minot. Both have cabinets in stock that you can buy and take home today. Both have custom order cabinets available. Our experience with both places was positive. Here’s a little more about what we likes about each regarding custom cabinet orders.
Free design consultation and layout help (the design center is usually pretty quiet when I’m there, so you can get in and out quickly.)
Printed designs with basic 3D rendering
Several cabinet lines and lots of colors/door styles available
Sometimes they have sales on cabinets (note the store’s military discount does NOT apply to cabinet purchases)
Sinks, hardware and everything else you need is in the same store.
I hope this helps! Starting a remodel (especially a remodel of the heart of your home) can be intimidating and overwhelming. Hopefully, having a few recommendations from a friend who has already done some leg-work will take the edge off. For more recommendations that feel like they came from a friend, remember to check out BeLOCAL! Have you ordered kitchen cabinets in Minot? Where’d you get them? Do you have other businesses to recommend?
Happy Minot Monday! This is a very exciting post for me to write for a two major reasons. First of all, today I’m talking about places that offer craft classes in Minot–one of my favorite things. Annnnd…I’ve got something really cool to announce.
Amy Allender is Partnering With BeLocal Minot
I’ve partnered with BeLocal Minot to continue bringing you super-fun Minot Monday content!
You know I have a heart for changing negative attitudes toward living in or moving to Minot. I’ve made it my personal mission to proclaim the quirky awesomeness that is Minot, ND. BeLocal is a newly launched publication that shares that heart and mission.
BeLocal Minot is like a visitor’s guide, except it’s made for locals. It’s a guide to living like a local. It’s a comprehensive catalog of all the things that make Minot a great place to live–things that took me several years to discover the first time we lived here. I cannot tell you what a valuable resource this is for anyone new to our area, prospectively moving in, or people who have lived here a long time but haven’t found their groove yet. It’s a welcome mat inviting everyone to enjoy their life here–not just muddle through.
You can access the entire catalog online. Also be sure to follow along on Instagram and Facebook to join the BeLocal community. You’ll see me around there, too!
Craft Classes in Minot
Now, big announcement aside, let’s get to today’s topic. Craft classes in Minot.
The Foundry
On Friday, I went to a Christmas party at the Foundry’s classroom, the Makery. This was one of the best Christmas gatherings I’ve ever been to. Our group brought snacks to share and spent time visiting at the beginning. Then we all made a welcome mat. Our instructor, Sarah had loads of fun stencils for us to choose from. (Being a noncommittal, plain Jane–I opted to simply stencil the word “Welcome” on mine. But trust me, other people who are more fun came home with mats with colorful says painted in colorful tones.)
(Colorful or plain…the mat takes the edge off of the construction mess currently in the entryway of Acorn House.)
It was such a nice way to spend an evening. And I love my finished product! After we finished we had the Foundry to ourselves for shopping. If you haven’t been, I describe the Foundry as “Etsy in real life.” It’s an adorable shop that offers hand made items from North Dakota makers, found vintage pieces and other unique gifts, home goods and clothing.
The Foundry is one of many places offering craft classes in Minot. Check their Facebook page for upcoming classes. (They range from arranging succulents to welcome mats, signs and gnomes!)
Other Places Offering Craft Classes in Minot
There are tons of classes and meet ups happening for Minot makers. Seriously, our town is saturated with creative types who are willing to share their skills with anyone willing to learn. Every week when I do my weekly round up of events happening (you can see this in my Instagram or Facebook stories) I am blown away by the number of great craft classes in Minot.
The classes offered vary widely. You can learn to paint, arrange fresh wreaths, fuse glass, quill paper, knit, sew, quilt, and just about anything else you can imagine. In my opinion, one of the best features of Minot is that if there is interest and enthusiasm, anything can happen. Chances are, if there is a class you’d like offered (or a class you’d like to offer) you’re only a couple coffee dates away from making it happen.
Here are more places in town that offer craft classes in Minot. I hope you find one that speaks to you!
Market on 4th
The Market on 4th sells locally designed/made home decor, gifts and goods. They’ve got a classroom that regularly hosts workshops. Check their website or Facebook page for a calendar of events.
Creative Dimensions
Creative Dimensions is a quilt academy and supplier. They offer sewing classes that help students make take-home projects as well as quilting workshops. Check their website and Facebook page for more.
Margie’s Art Glass
Margie’s offers paint your own pottery–but they also offer lots of fun glass classes. Workshops teach participants to fuse, blow and work with stained glass. Additionally they offer classes in painting, ceramics and jewelry making. They offer “no experience needed” classes as well as classes for more advanced participants. Check facebook or their website for a schedule.
The Fiber Basket
The Fiber Basket sells yarn and knitting/crochet supplies. Their classes range from “no experience needed” beginner’s courses to classes for more advanced students. They offer workshops in knitting, crochet, and basically anything that is made with yarn. Check Facebook or their website for a schedule.
Nature’s Nook
Nature’s Nook is a children’s toy and book boutique, but they offer classs (for both kids and grown ups) on a regular basis. They offer lots of painting classes and craft classes for littles. Check their Facebook or website for a full list.
Taube Museum of Art
The Taube is right downtown on Main Street. They offer lots of classes–some for adults, some for kids, some for parents to create with their kids. They also offer a program for pre-school aged kiddos called a Start in Art which combines story time or a visit from a zoo friend with a craft. Check Facebook or their website for all events.
Adult Learning Center
The Adult Learning Center offers lots more than just craft classes. However there are lots of good offerings for makers through their community ed programs. I really want to learn the art of rosemaling, so I’m planning on signing up in 2020.
The Libraries
Both the Ward County and Minot Public library offer craft courses and meet ups. A wide range of crafts are offered and there are programs for all ages.
The Spot
You might not think of a pool hall as a place to take in a maker’s class…but the Spot regularly hosts classes in painting, sign making and other crafts as well as the occasional vendor market. See their Facebook for upcoming events.
The Flower Box
The Flower Box offers lots of seasonal workshops in garlands, wreaths, pots and pot gardens. If you’re looking to hone your green thumb skills check out their Facebook for upcoming events.
Souris River Brewing
Souris River Brewing offers occasional acrylic paint-along classes. Some are adult-only and others are family friendly. Check their Facebook page for upcoming events.
There you have it! Did I miss anything? If you know of someplace else that offers regular (or semi-regular) craft classes in Minot for makers I’d love to hear from you! Have a great week here in the Magic City.
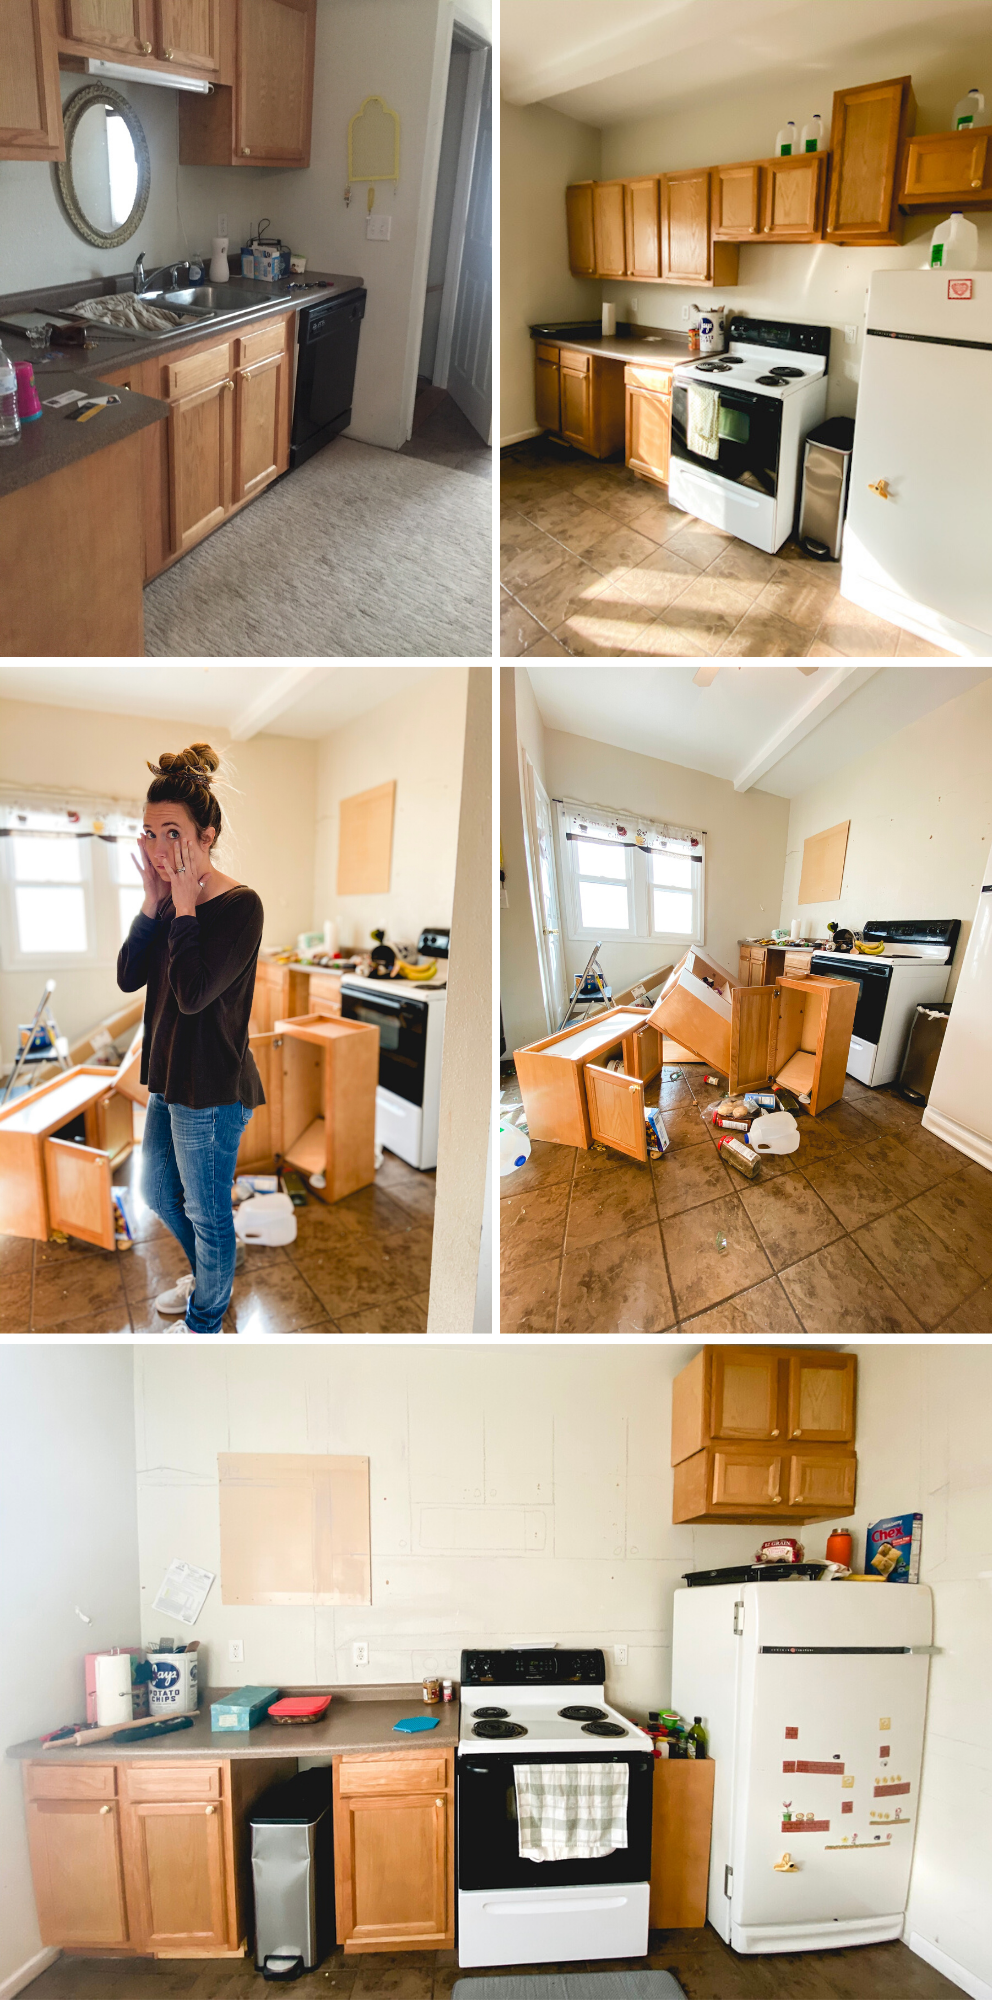
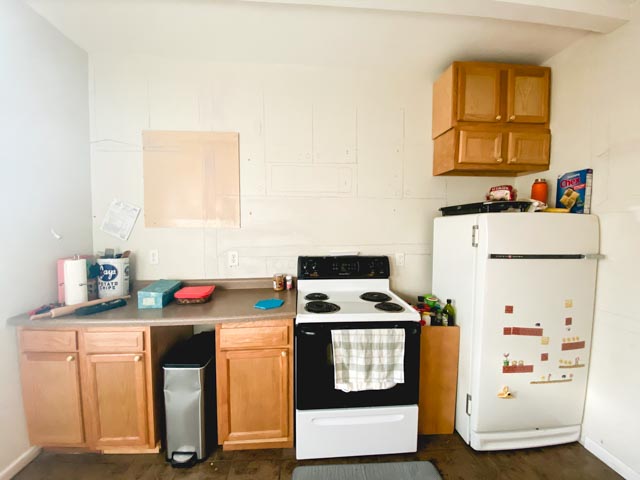
It’s been more than a month since the cabinets fell off the wall. However, the Great Cabinet Crash of 2019 is still the bazaar happening I get asked about most often.
So I thought I’d better sit down and write the whole thing out. That way it doesn’t turn into a “fish tale.” And the details don’t get too blurry.
Just a normal day.
October 25 was like any other day. Derek had just gotten back from a 3-month training in Louisiana and was at work. Gideon and I had spent the morning running errands and attending Baby Play at the Library. We came home and ate lunch, then we set to work in the kitchen. The roofer was working when we left, but gone when we returned.
While cleaning Acorn House (which was a MASSIVE undertaking) I found a multitude of keys. I dumped them all out on the counter to sort. Gideon likes to stand on a step ladder to be at counter height when we work in the kitchen, so he was standing next to me. Together we sorted through the keys, labeling the ones that matched and trying others in doors. It was all pretty mundane.
The Crash
At 1pm we went to Gideon’s room. We read a few books then he laid down to nap.
I went back to the kitchen and made a cup of coffee. Then, I sat on the couch and started scrolling Pinterest. Around 1:30, just as I was telling myself I shouldn’t be wasting nap time I heard a crash.
The crash happened suddenly, without warning. My first thought was that the roofer had returned and dropped something outside. My second thought was that Gideon would soon be crying.
I paused to listen.
Nothing happened.
No hammering. Silence from the roof. No crying.
I got up to investigate. From where I sat on the couch, I only needed to take a few steps to see into the kitchen. The first thing I saw was a glare off of something on the floor. Now I was thinking that our fridge had fallen over.
Only a few nights before Derek and a friend had moved a vintage refrigerator from the upstairs apartment kitchen (see the house tour here) into the kitchen on the main floor (there was no fridge there when we moved in.) I figured it wasn’t level and it had tipped.
In hindsight that’s totally implausible, but cabinets falling is also unlikely, so don’t judge me.
As I fully entered the kitchen I could see what had actually happened.
A wall’s worth of cabinets were on the floor. My cabinets fell off the wall.
Pure Shock
The cabinets were mostly intact. Only one had a significant crack. Doors were open, food was everywhere, glass was glittering across the floor, the terrible smell that is jams + salsa saturated the air. Gideon’s stool had been hit and was pushed across the room. Some of the keys we had sorted still sat on the counter.
Now I was completely in shock. Never in my wildest dreams would I have thought this is what I was going to find in the kitchen. I didn’t know where to begin. So I walked out. I turned and left the mess where I couldn’t see it.
I tried to call Derek. He had just given me his work number. I hate to call him at work. But this was an emergency. I tried several times, but there was no answer. Thanks for the help.
I sat down in a collapsable camping chair (it had been left at the house and my furniture wasn’t all here yet) and sipped my coffee. After all, the damage was already done. Things weren’t getting worse.
I posted the story to Instagram. Then after a few minutes I called my parents to talk things through. They helped me form a game plan. We all agreed that I should put the baby gate up to keep Gideon and Panda-Cat out of the mess.
Shortly after hanging up with my parents, I got a message from a friend who saw my post on Instagram. She offered to come hang out with Gideon after he woke up so I could clean up the mess. That was a huge relief since I didn’t know how late Derek would be.
The Damage
Now that I had vented my shock, I set to work. Five cabinets fell off the wall. Luckily, we keep our dishes in the cabinets on the opposite wall. Clean up was like a giant, nasty game of pick up sticks. I needed to pick up items that wouldn’t disturb others that would cause the rubble to crash again. Gideon still hadn’t made a sound, and I wanted to keep it that way. I began tiptoeing around to pick up glass and stack spice jars out of the way. It wasn’t a silent process, but the cabinets (in a precarious position) didn’t fall over again, and Gideon didn’t wake up.
Around 2:30 Derek came home. By this time the mess was mostly cleared up. Really all that was left was to move the cabinets to the basement, mop up the sticky food mess and vacuum. I honestly don’t remember what his reaction was like. He offered to do clean up, but by this time I had a system. I told him it would be more helpful if he would take care of Gideon when he woke up.
While Derek changed his clothes Gideon woke up. Derek got him dressed and our friend Naomi came over to take him to the park. Derek moved cabinets to the basement. I started mopping up the mess left behind from three jars of homemade jam and two jars of salsa. The smell of this combination still haunts me.
Together we got the cabinets all out and the floor thoroughly clean.
But, why??
So that’s the story. But the burning question everyone has is WHY? Why did they fall off of the wall?
The most common assumption is that the cabinets weren’t screwed into the studs. Good guess, but wrong.
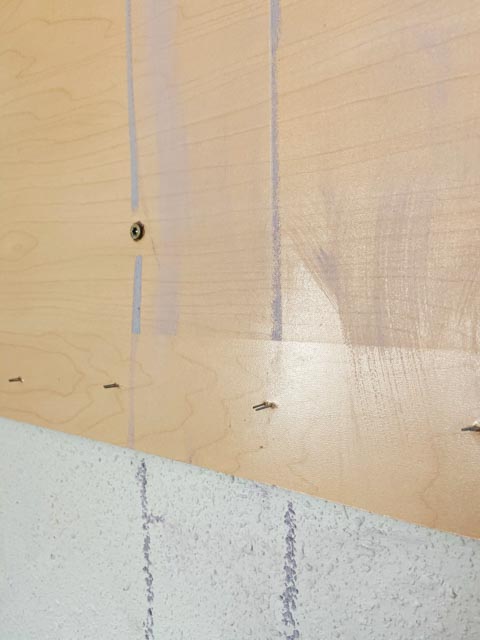
The screws that once held up the cabinets are still screwed into the studs in my kitchen. Here’s what happened.
Whoever installed the cabinets screwed them into the studs through the back of the cabinets. If you’ve ever looked at an uninstalled cabinet you probably noticed that the back wall is just thin MDF. This is okay because no one sees it. It’s only there to protect the wall and enclose the cabinet.
The MDF adheres to the frame of the cabinet with glue and staples. It’s flimsy. Not meant to bear weight.
Properly installed cabinets attach to the studs through the framing piece at the top (and sometimes bottom too) of the cabinet. This is a piece of real wood and part of the structure of the cabinet. Our cabinets were screwed into the studs through the MDF backing, not the frame. The photo above shows the MDF backing, still hanging on our wall. Screws are in the studs, the staples are sticking out.
Properly installed cabinets attach to the cabinet next to it through the stile (the face of the cabinet) via a screw. This part of installation was correct.
The weight of the cabinets pulled the backing off of the largest cabinet on the wall. That cabinet fell. Since they are all attached to one another, the large cabinet pulled them all down together. The back of the largest cabinet is still on the wall. The other cabinets kept their backs, but the screws pulled through the MDF. This left holes in the backs of the cabinets and screws still securely in our walls.
What happened next?
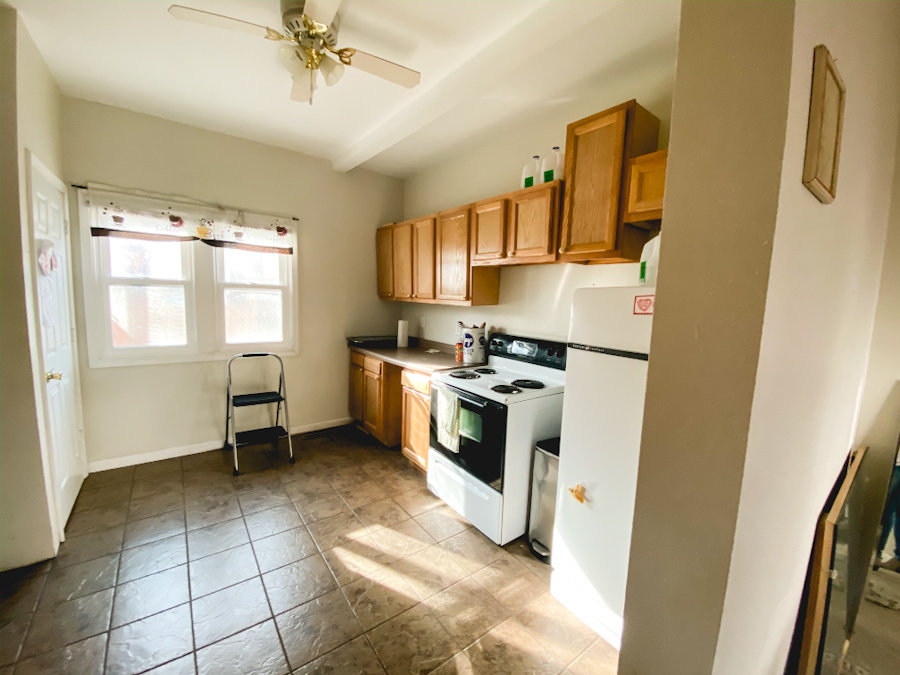
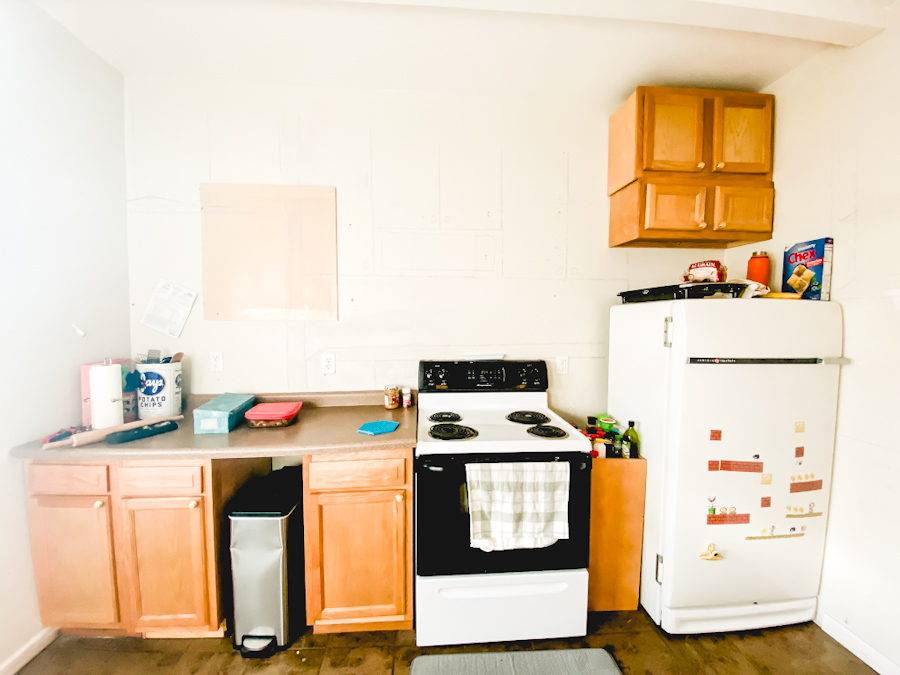
This is our kitchen before the crash. Better, but not great. We were planning a kitchen remodel anyway. I hate to do work twice. So instead of rehanging cabinets destined for the garage or basement anyway, we chose to make do until we redo the kitchen.
Eventually I’d like them to live in a basement laundry room or kitchenette, but that’s a long way off.
We mounted a small cabinet on top of another over the fridge. The one above the fridge didn’t fall because we had already remounted it ourselves when we put the apartment fridge in the kitchen. We slid another one next to the range to use as a spice rack. It’s all very rigged and trashy. Living and cooking in this space has definitely taught me what I can do without. And it’s teaching me daily to appreciate well thought out spaces.
I’m looking forward to completing this remodel. I think what I miss most is counter space. Since we are short on cabinets, lots of things clutter up the already sparse counter.
A remodel is in the works. (You can see faint chalk lines on the walls where new cabinets will soon hang.) New cabinets are due to arrive in January. We’ve got appliances standing by. We know what walls are coming down and what walls are moving. The new flooring is already in the basement just waiting to go in.
It took a lot of planning, but we are finally ready to start. (Just as soon as we install our new front door…because it’s about to get really cold and I really want to keep the drafts out.)
One more thing. This was a really stressful situation. But it’s not hard to find the silver lining. I’m so grateful the cabinets fell off the wall when Gideon and I were out of the room. I’m grateful we are safe. It’s five fewer cabinets I need to remove. It gave us a definite direction on where to start on this house.
Renew your zeal for the Bible with three days of exclusive devotionals! Interesting and relevant writings and reflection questions will remind you why the Word of God is so awesome. You'll learn a lot and you'll leave excited to know God more and grow deeper in your faith.
Your kick-start is on the way!
You've always dreamed of reading the Bible in chronological order. Now you can!
Getting my printable PDF plan is easy. It's not fancy, but it does fold easily into a bookmark, so you can keep it close by and easily see what's coming next. I hope you find it as useful as I do.
**Remember to check your PROMOTIONS FOLDER. Even if your confirmation comes to your normal inbox, the actual download may come to that pesky promotions folder instead!**