Happy Minot Monday! Today’s post is all about Scandinavian holiday foods. Read on to see why that qualifies for a Minot Monday post. And remember, these posts about life in Minot are made possible through a partnership with BeLOCAL Minot–a guide to living like a local. It’s full of local favorites and gems, and their Instagram page (and stories) are a great source for local happenings and living tips. Be sure to check them out and give them a follow.
The “big food” holidays are nearly upon us. Gatherings may be different this year, but that’s no reason to skimp out on preparing and sharing good food. If you are a transplant to Minot, this is a golden opportunity for you.
Your friends and family may give you a hard time about living in a place with subzero wind chills, or tease you about your town being “the worst assignment in the Air Force…” But you know better. You know Minot is a gem. You know this place is weird in the best way and that deep down, everyone else is jealous that you’re on such a great adventure.
When it comes time to gather round the table with your family (of no more than 10, of course) or to pack up holiday treats to mail off to friends, take this moment to wow them with one of these Scandinavian holiday foods that regularly grace a Minot table in the coldest months of the year.
I’ve rounded up 10 recipes for Scandinavian holiday foods that are also uniquely Minot. I hadn’t heard of any of these until I moved to Minot, now I’ve eaten *most* of them and even cooked a few in my own kitchen. Embracing local culture and heritage has deepened my love for our town, and made our time here even sweeter.
Between now and New Year’s I’ll be baking through as many (but not lutefisk) on this as I can. Follow along on Instagram to see how they turn out!
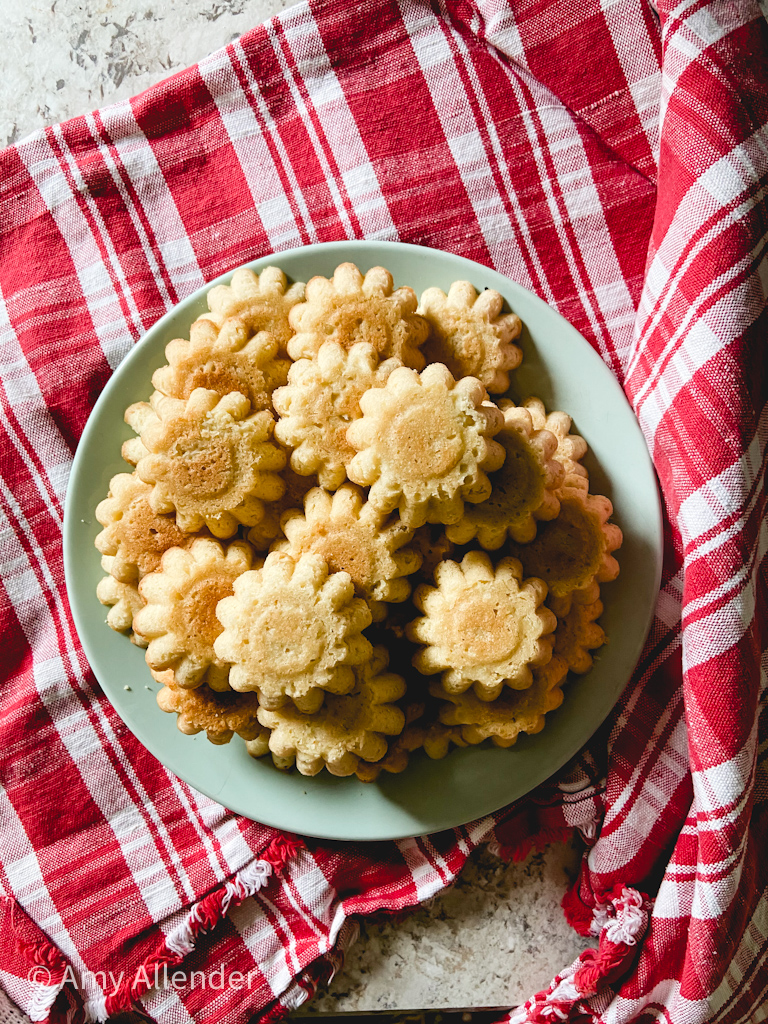
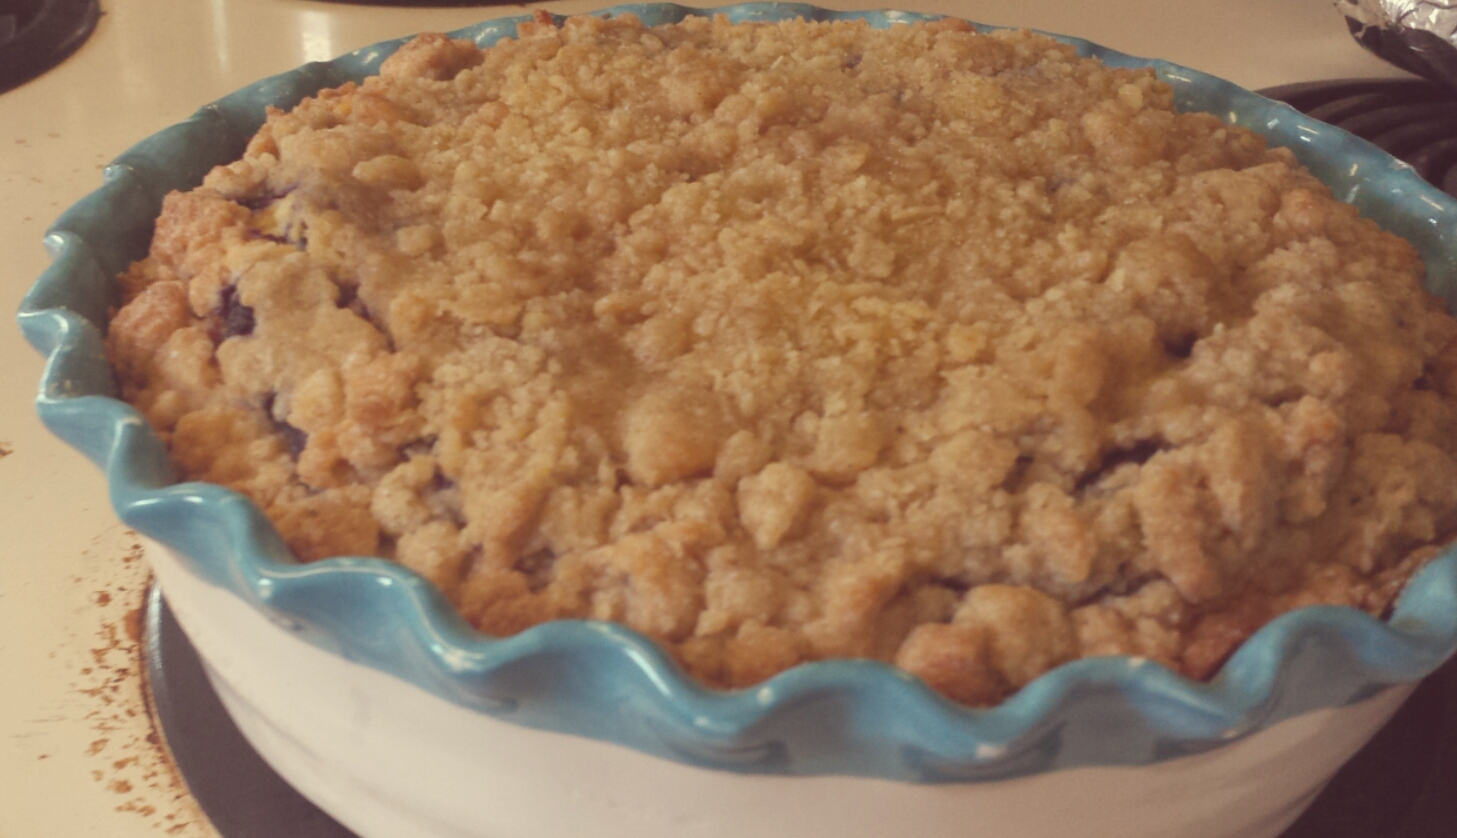
Sandbakkels
“Sandbakkels’ (meaning sand tarts) are a Norwegian sugar cookie. They are a Christmas tradition in many families.”
Sandbakkels are the first Scandi-treat I baked this season. A few years ago I was gifted sandbakkel molds, but I still haven’t perfected them. They are easy to make and taste delightful, but I have a knack for over filling the molds and making them a little too thick. If you are looking for something simple to try, this is a good place to start.
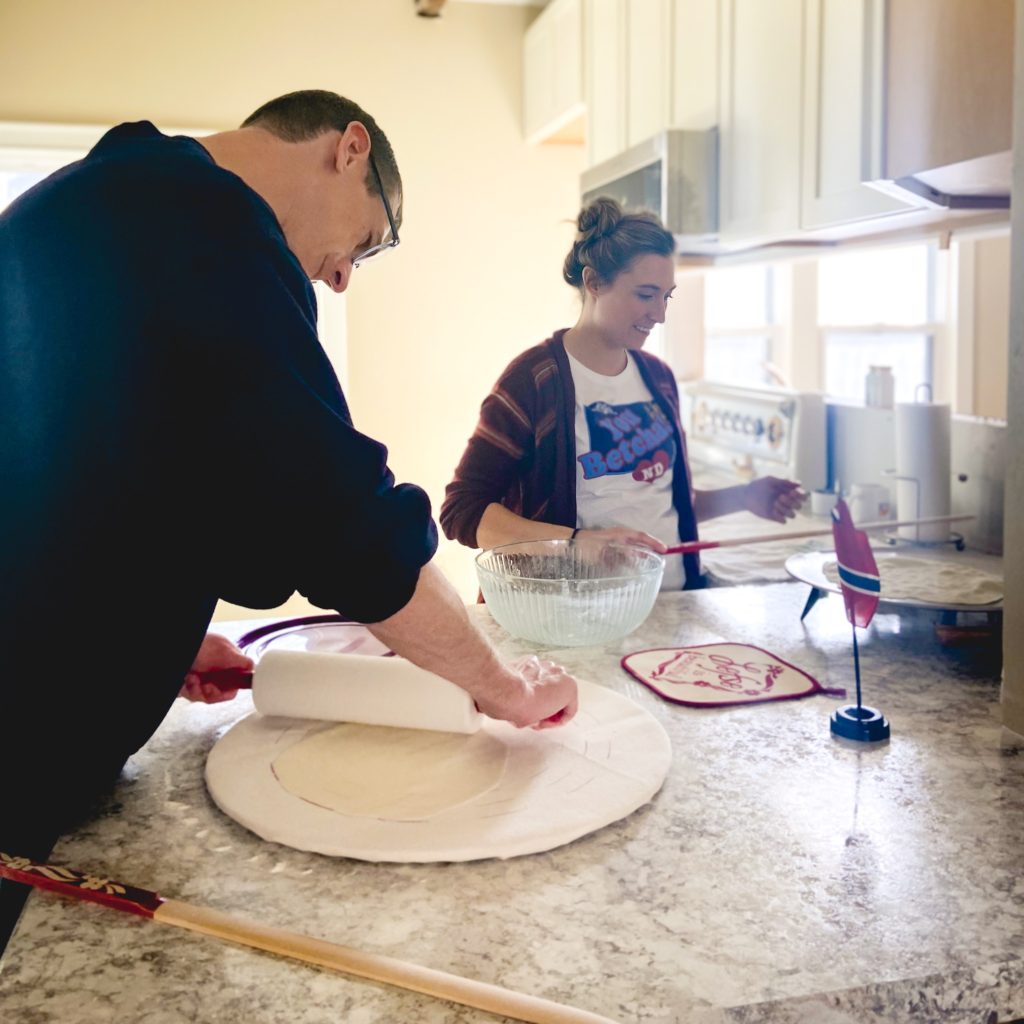
“Lefse is a traditional soft Norwegian flatbread. It is made with potatoes, flour, butter, and milk or cream. It is cooked on a large, flat griddle. Special tools are used to prepare lefse, including long wooden turning sticks and special rolling pins with deep grooves.”
Lefse is a big deal around here. So big, I dedicated an entire Minot Monday post to it last winter. This recipe has great photos and instructions. You do need a few special tools to prepare it, so my best advice is to make friends with a local who has the supplies and can guide you through the process.
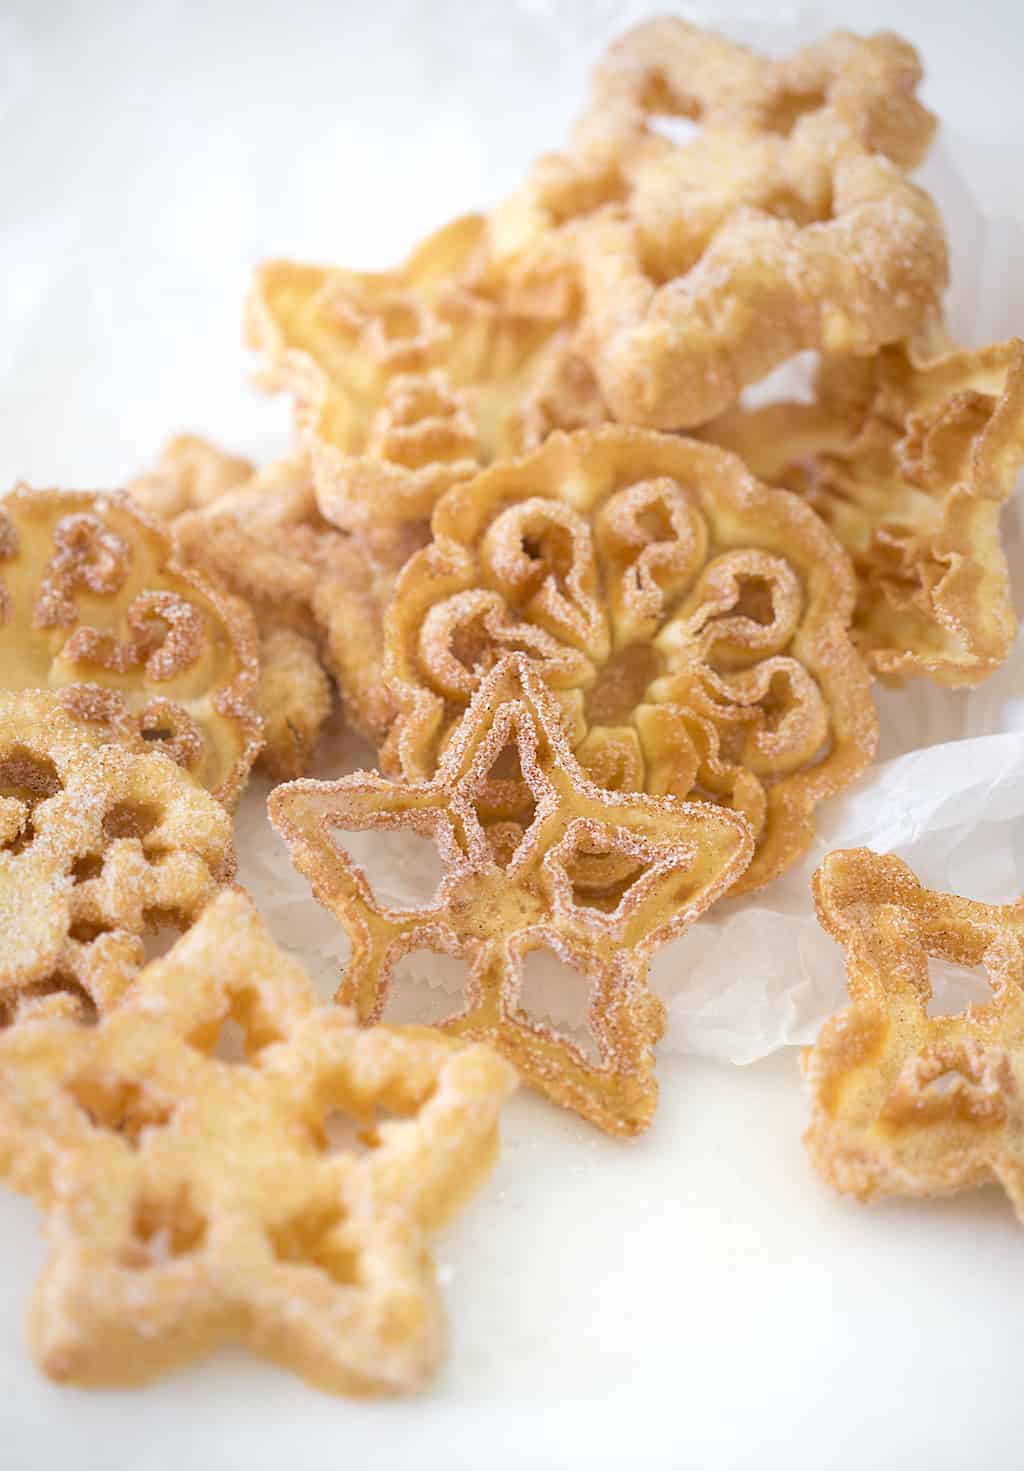
Rosettes are thin, cookie-like deep-fried pastry of Scandinavian origin. Rosettes are crispy and typified by their lacy pattern. They are traditionally made during Christmas time…They are made using intricately designed rosette irons.
To many, fattigmann–which can be translated as “poor men”–are an essential part of Christmas, a requisite member of the syv slags kaker, or seven sorts of Norwegian Christmas cookies. These represent an important element of the baking tradition in that they’re fried.
Fattigmann is definitely on my list of “to-bakes” this season. I LOVE this article from Outside Oslo. She clearly explains the nostalgia behind fattigmann and the different types of Norwegian Christmas cookies.
Krumkake is a Norwegian waffle cookie made of flour, butter, eggs, sugar, and cream…a special decorative two-sided iron…is traditionally used to bake the thin round cakes.
Skolebrød or Skolebolle is the Norwegian name for a type of sweet roll made from yeasted dough filled with custard and decorated with icing dipped in grated coconut. It was usually put in school lunches as a dessert or sold at bake sales, hence the name.
Pulla is a type of dessert or pastry flavored with cardamom. It’s served as coffee table treat with coffee or tea…Usually pulla is baked as a small brioche style or as a braided loaf.
Pulla bread is not strictly a Scandinavian holiday food. However, because it can be highly decorative, it makes a great addition to a holiday table. Here is a classic recipe with lots of successful reviews.
If you want something more strictly Christmas, try this recipe for Julekaka (Christmas Bread) from Outside Oslo.
These twisted sugar cookies don’t require any special tools, which makes them a great option if this is your first crack at making Minot holiday favorites. Here’s an easy recipe from Pillsbury.
We’ll wrap up our list with a couple non-sweet Scandinavian holiday foods. The holidays in Minot won’t be complete until you’ve had a couple Swedish meatballs. A friend recommends this recipe–but her mom makes this note: “I have always rolled the meatballs and baked them in the oven instead of frying them. I always seem to break the meatballs trying to turn them while frying.”
Lutefisk is dried whitefish. It is made from aged stockfish, or dried and salted cod, pickled in lye. It is gelatinous in texture after being rehydrated for days prior to eating.
Lutefisk and meatball dinners are typically plentiful in Minot from October through January. (This year may be different due to the pandemic.) Making lutefisk is an intense process, so you probably won’t cook it yourself. However, you can take a look at this article describing the process. If you simply must taste it, you can buy some at local grocery stores.
Enjoy Minot with Scandinavian Holiday Foods
Try one or try them all. No matter what your holidays look like this year, make the most of your days in Minot by diving into the quirky culture you’ll find here.
For more on Minot life and intentional living inspiration be sure to join me on Instagram and Facebook. (Or join my email list below, so you never miss a post!) And be sure to follow BeLOCAL to and watch their stories for lots of good, local tips.
Minot Monday is made possible through a partnership with BeLOCAL Minot. BeLOCAL is a guide to living like a local and your should totally check it out.
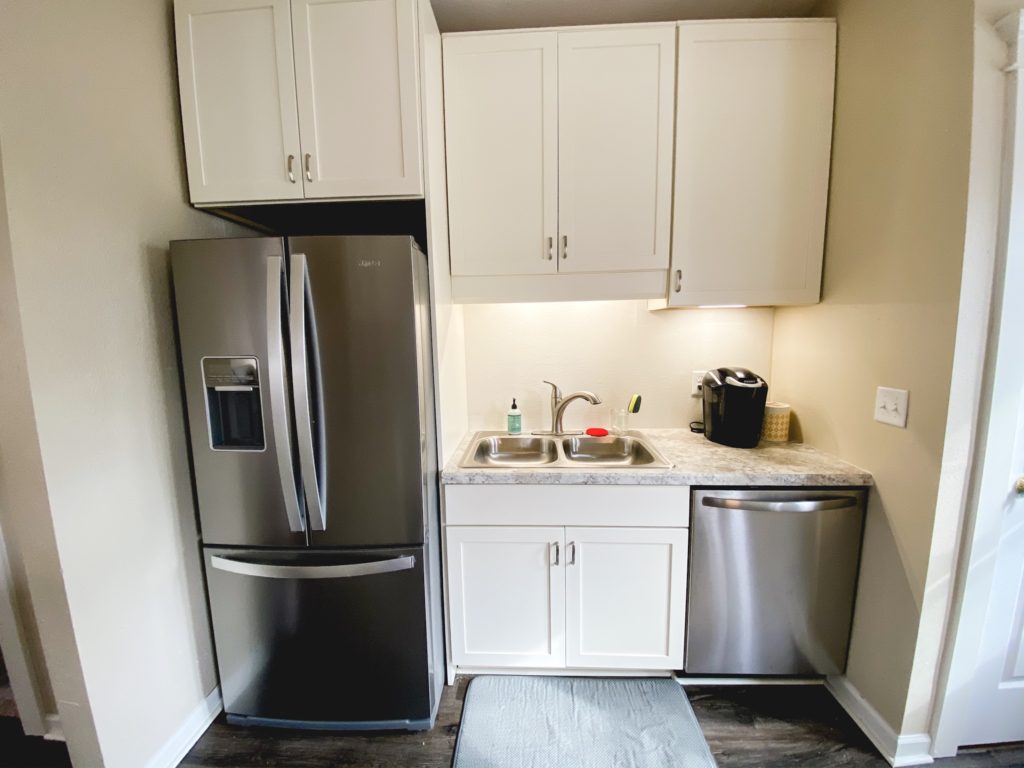
Happy Minot Monday! Today’s post is all about resources for kitchen cabinets in Minot. If you’re in the market for cabinets or a kitchen remodel is on your horizon, this is going to be a good post to bookmark. Even if you aren’t, it’s still a good post because you’ll get a sneak peek at my {nearly} finished kitchen remodel.
If you follow along with me on Instagram (which you should, because we have lots of fun over there), you know I’ve been busy remodeling my kitchen. Things got a jump start in there after most of the upper cabinets fell off the wall in the fall (read about that ordeal here.) After that, we put our second floor remodel on hold and tackled the first floor living spaces instead. The kitchen, dining room and living room are all intertwined, so it’s been chaotic and messy in our most lived-in rooms. Needless to say, I’ll be happy to put this one behind me.
Finding Our Kitchen Cabinets in Minot
Working on an old house presents lots of challenges. Derek and I take a “restoration-without-making-a-time-capsule” mindset when it comes to changing things in an old home. We aren’t out to create a museum piece–perfectly authentic to the time period of the house. However, we do try to be respectful of the original design. When all is said and done, we hope the house looks like it’s “always been that way.”
A major challenge for us during the kitchen remodel was finding cabinets that we loved and also stayed within our budget. We spent about a month visiting with different retailers and designers around Minot until we finally put in an order.
All in all, I have nothing negative to say about any of the places we visited. At the end of the day though, we had to decide which retailer best fit our vision, budget and personality.
The following list is not totally comprehensive, but it contains many of the places in town that provide kitchen cabinets in Minot. Like I said, if you’re in the market, this is a good list to bookmark. Hopefully it’ll help you as you start your search.
Minot Lumber & Hardware
I’ll start with Minot Lumber. Ultimately, this is where we purchased our cabinets. Minot Lumber came to our attention as a cabinet dealer late in our search, but I’m so glad we checked them out. Here are some of the things that we love about working with them:
Super nice staff
FREE design consultation and renderings (we were sent 3D renderings of our layout before placing an order). The designer I worked with was so knowledgeable and tweaked our design several times to get it just right.
Multiple cabinet lines available (at different price points)
They also deal countertops (we purchased those too), hardware and accessories.
Helped us stay within budget. This is what really sold me on buying from Minot Lumber. Our designer took lots of time to work with me on small ways to trim the cost of our cabinet order. (For example, ordering a stock color, getting cabinets in common sizes–even though everything “can” be customized, doing our own install, etc.)
No overselling. I’ve never been pressured to buy something more extravagant than what I needed. Our designer listened to me and respected my vision–never pressuring me to buy something fancier than what I wanted.
We have had a great experience with Minot Lumber. There were a couple hiccups with our order–but those were on the distributor’s end. The staff at Minot Lumber has been quick to help and get things right.
Scherr’s Cabinets & Doors
We were so impressed by the staff at Scherr’s. Everyone was so kind and helpful. To us, the most impressive part about Scherr’s business is that everything is custom made and created right here in Minot! This is truly a business of craftsmanship. The biggest set back for us ordering from Scherr’s was timeline. Because everything is made-to-order there’s a bit of a wait. Here are some great things about Scherr’s.
Locally made
Completely custom
All their cabinets are frameless–which gives you the most access and space to the inside of the cabinet boxes
Loads of door options
Staff will help you design your layout
Staff will help trim your budget (for example, you do painting/finish, they explain install, etc)
See more on their FAQ page to learn about their offerings.
Souris River Designs
Souris River Designs is my recommendation for anyone wanting a fairly hands-off approach to a remodel. While the other retailers also offer installation resources and design resources–Souris River offers especially high quality design services. Their show room is gorgeous, and full of options and accessories. If you don’t consider yourself a semi-savvy DIYer or designer this is my recommendation for you. Here are some perks we liked:
Huge, inspiring showroom
Beautiful 3D renderings of your project
Designers on hand to help with every step
Offer counters, tile, backsplash, hardware, sinks, accessories, contractors, etc all in house
It’s a one-stop-shop for a remodel if you want to outsource your project
Big Box Stores
We have two “big box stores” for kitchen cabinets in Minot. Both have cabinets in stock that you can buy and take home today. Both have custom order cabinets available. Our experience with both places was positive. Here’s a little more about what we likes about each regarding custom cabinet orders.
Free design consultation and layout help (the design center is usually pretty quiet when I’m there, so you can get in and out quickly.)
Printed designs with basic 3D rendering
Several cabinet lines and lots of colors/door styles available
Sometimes they have sales on cabinets (note the store’s military discount does NOT apply to cabinet purchases)
Sinks, hardware and everything else you need is in the same store.
I hope this helps! Starting a remodel (especially a remodel of the heart of your home) can be intimidating and overwhelming. Hopefully, having a few recommendations from a friend who has already done some leg-work will take the edge off. For more recommendations that feel like they came from a friend, remember to check out BeLOCAL! Have you ordered kitchen cabinets in Minot? Where’d you get them? Do you have other businesses to recommend?
We have very few, true holiday traditions. Easter is always iffy since weather in the Dakotas is highly unpredictable. Somewhat frequent summer burn-bans make 4th of July sparklers hit and miss. Our Thanksgiving table is always set for company–but we never really know who will be dining with us. Christmas and New Years are usually spent traveling–and those plans never seem to materialize until a week or so before December 25.
Valentine’s Day is different.
We don’t do anything elaborate for Valentine’s Day. Sometimes we go on a date. Sometimes we don’t. We might eat dinner out. Or maybe we just eat at home. I guess it’s really as unpredictable as the rest of the holidays. But we do have one tradition, and it might be my favorite of the whole year.
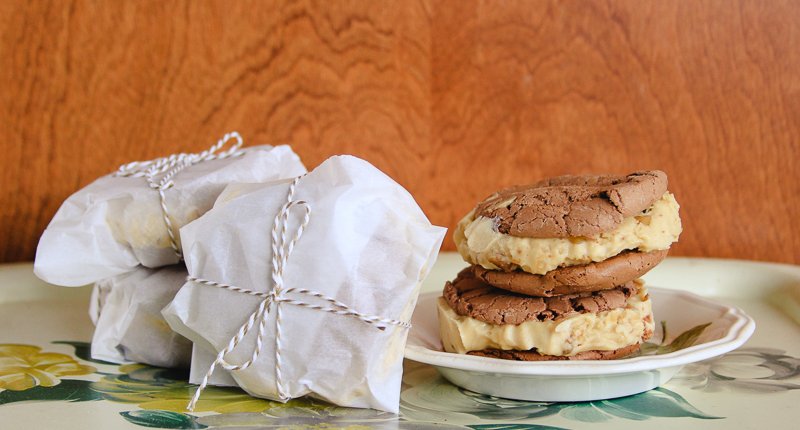
I don’t know how it started. I think I happened across this photo of beautiful, homemade ice cream sandwiches in an issue of Martha Stewart Living. And since V-Day falls right smack-dab in the middle of the coldest part of winter (for those of us in the midwest) I thought I’d give it a try. (Here is her recipe. The cookies are a lot like the traditional ice cream sandwich cookies you can buy in the store. I made these a few times, but I had a knack for over baking them.)
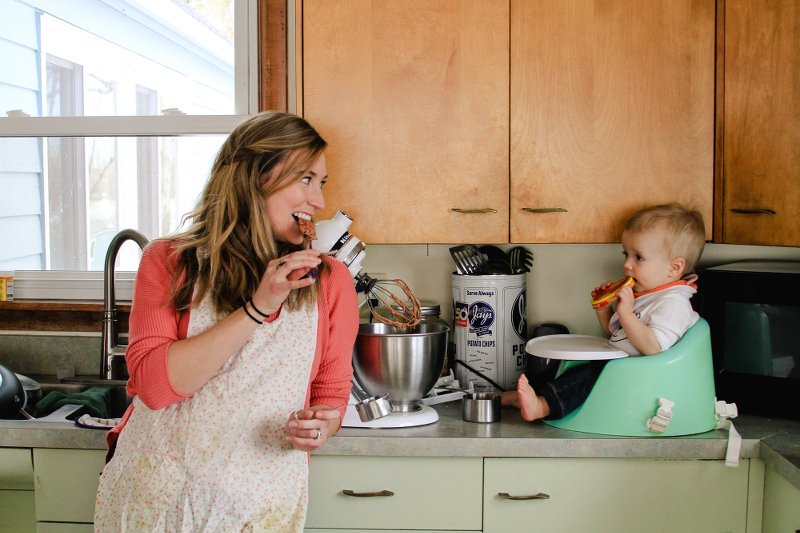
I’ve been making homemade ice cream sandwiches for about 6 years now. Every year they get a little better. This year our treat was sweeter than ever because I shared my favorite edible Valentines with not one handsome boy–but two!
Maybe now that Gideon has joined our household we’ll create more traditions. Even if that doesn’t happen, hopefully he’ll always look forward to ice cream sandwiches in February. Perhaps he’ll want to help me make them even when he’s too big to be confined to a Bumbo seat on the counter.
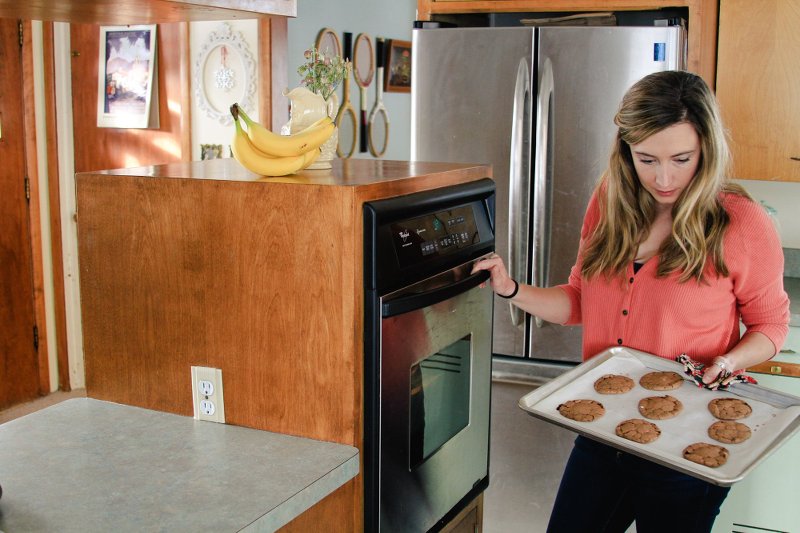
Because I love this tradition so much I want to pass on my recipes to you. I’m a big fan of the traditional chocolate cookie sandwiches. (Like Martha’s above.) I’ve tried several cookie recipes, but this recipe from Handle the Heat is the best one I’ve found yet.
The cookies are soft and chewy–even when they’re frozen. They’re easy to make. The ingredients are usually already in my kitchen and the recipe is well-written and easy to follow. (The only down side is that they can’t be cut with a cookie cutter.) I’ve never made the cookie butter ice cream mentioned in her recipe, but I can only imagine it is di-vine!
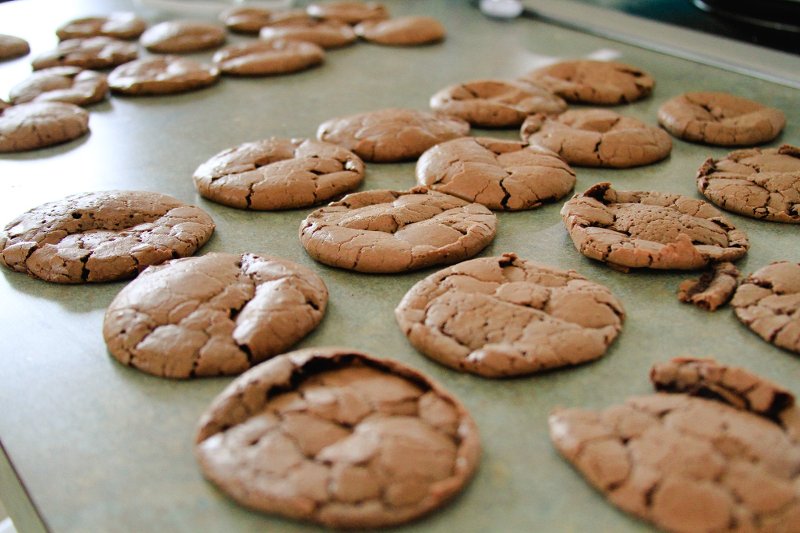
I scoop the batter with a medium cookie scoop. Don’t be alarmed that the cookie dough looks thin. It’s more like a batter than a dough. I find that the cookies don’t spread too much and they come out light, airy and a little puffed up at first. Just don’t let their delicate look trick you in to over-baking them. They’re meant to be a little gooey.
As they cool they flatten out a bit. (Oh, and I should mention that they are delightful to eat on their own. Or topped with peanut butter. Just saying.)
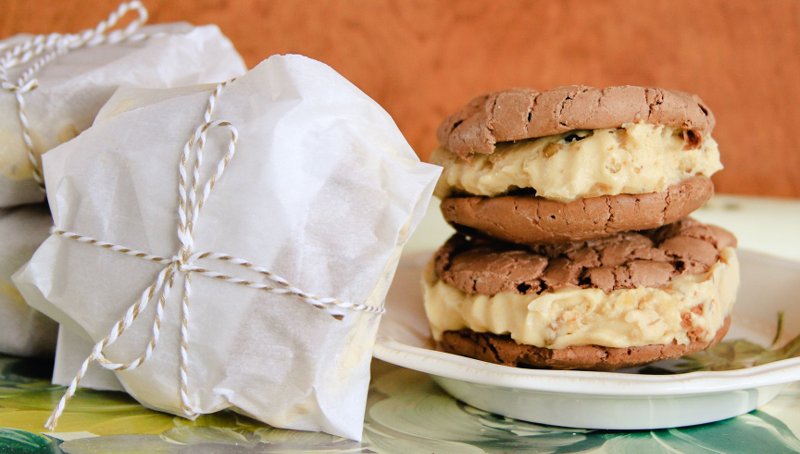
I’ve used lots of different fillings over the years too. The first year I did store-bought strawberry ice cream–just like Martha. Later I did vanilla. Then two years ago I got an ice cream maker for Christmas.
Best. Gift. Ever.
Well–one of the best gifts ever. Especially for an ice cream lover like me.
This is the one I have and if you have a KitchenAid, I highly recommend it. It’s easy to use, affordable, and makes a perfect sized batch of ice cream.
This year we filled our sandwiches with this Maple Nut ice cream from The Cookie Writer. It. Is. So. Good. I’ll definitely be making it again. It pairs perfectly with the chewy-gooey brownie cookies!
If you are going to try your hand at making your own ice cream sandwiches here are my top three tips. (Here’s a quick FYI. I don’t do elaborate staging for photos, as evidenced by the pile of used bottles waiting to be washed behind me.)
Freeze everything before assembly. They are much easier to put together if everything is solid.
Uniformity is key. Use a cookie scoop to size out cookie dough. I also use a round biscuit or cookie cutter sitting on top of a cookie as a guide for filling it with ice cream. It gives a nice clean edge and consistent filling.
Do it in two days. While this is easy, it’s also a tad time consuming. I find that making cookies and ice cream on day one and doing assemble on day two helps fit this treat into my lifestyle. Doing it that way also keeps it fun, instead of leaving me cranky that I’ve been in the kitchen all day.
For pretty presentation I wrap mine in parchment paper and tie them with baker’s twine. However, if you aren’t giving them away you can just store them in an air tight container. I’ve been told they’ll keep a couple weeks…but we eat them too quickly to know if that’s true.
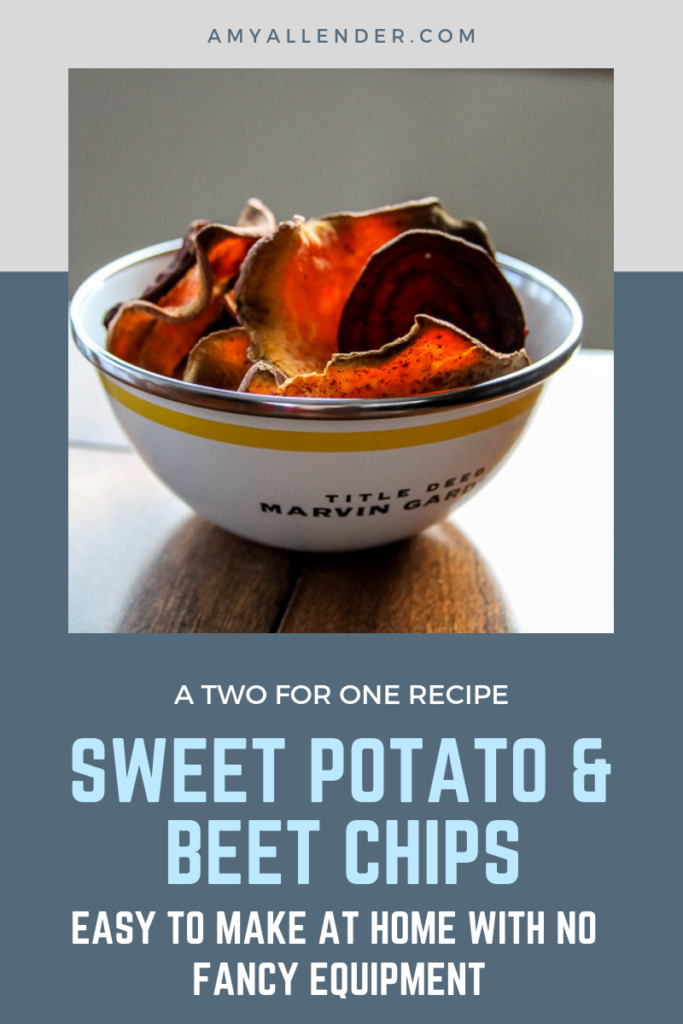
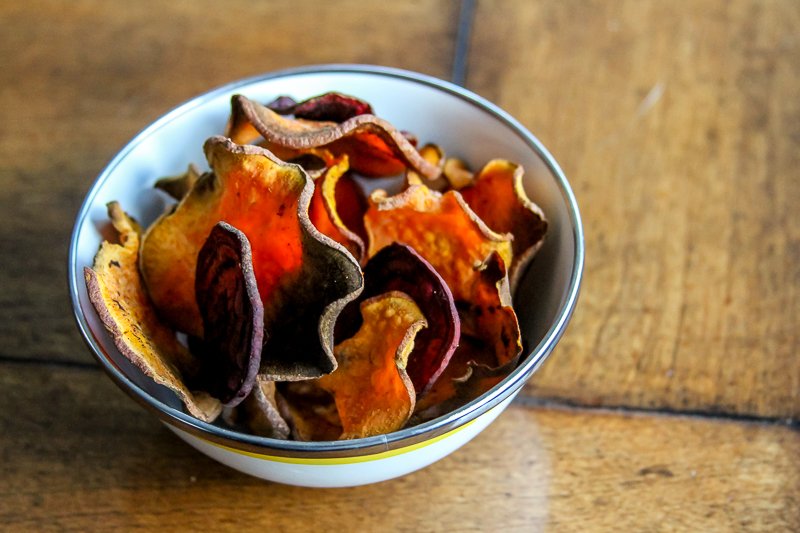
Homemade | Oven Baked |Sweet Potato and Beet Chips
Today we’ve got a two for one. Two recipes. One easy to follow post. Homemade Sweet Potato and Beet Chips here we come! I loooove this recipe so I am super excited to share it with you!
Recently I made a big ol batch of one of my go-to homemade snacks for a friend who is in the midst of a Whole 30 month. Sweet potato and Beet Chips! Her very positive response to them inspired me to finally sit down and share my technique. It’s something I’ve honed with loads of trial and error.
I have looked at and tried lots of chip recipes. I’ve made chips from all kinds of veggies–but sweet potatoes and beets are by far my favorite. A lot of recipes are out there, and they are all very similar. So my recipe might not be too unique as far as ingredients go, but what will make it unique is that I’ll tell you all my tricks for getting chips to turn out crispy–not bitter and blackened.
Warning. This post is long, but don’t be intimidated. The process is lengthy to write out, but much like the board game Seven Wonders it’s a lot quicker to do than explain the rules. It takes me about 10 minutes from pulling a sweet potato out of the pantry and getting the first batch of chips in the oven.
Oh, and you might be wondering: Why sweet potato and beets? The answer is purely opinion. Because I like the combination. Truly I prefer the beets. And I think they are easier to make. But it takes a lot of beets to make a decent amount of chips. So I always make a combo pack.
Okay. Let’s get cooking.
Tip #1: Do a trial batch.
I’ve learned is that making chips can be tempramental. So much depends on how thick your slices are, and how hot your oven runs. This post is a guideline to what works for me in my kitchen. But–it might be different in your house.
I recommend doing a trial run. Test a small, not full sheet. Peek in about 5 minutes before your timer is set to go off. Or just set it for 5 minutes less than what the recipe says. If things are looking brown and crispy, pull them out and move to the next step. If they still look soggy, you may need to add some oven time. Either way, make note than proceed with the rest of your chips. This will save you from burning a big chunk of your batch! (Which is very frustrating–I’ve done it.)
Tip #2: Start with sweet potatoes
Why? Because sweet potatoes cook at a hotter temp. Then when its time for beets you can just let the oven cool a bit and keep crisping.
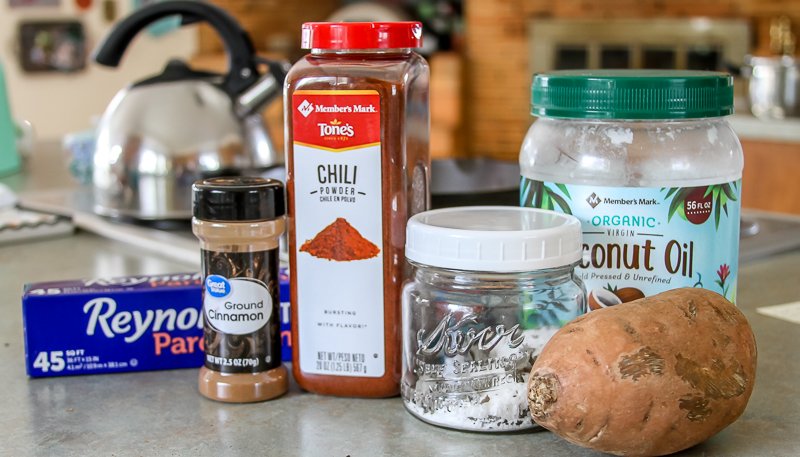
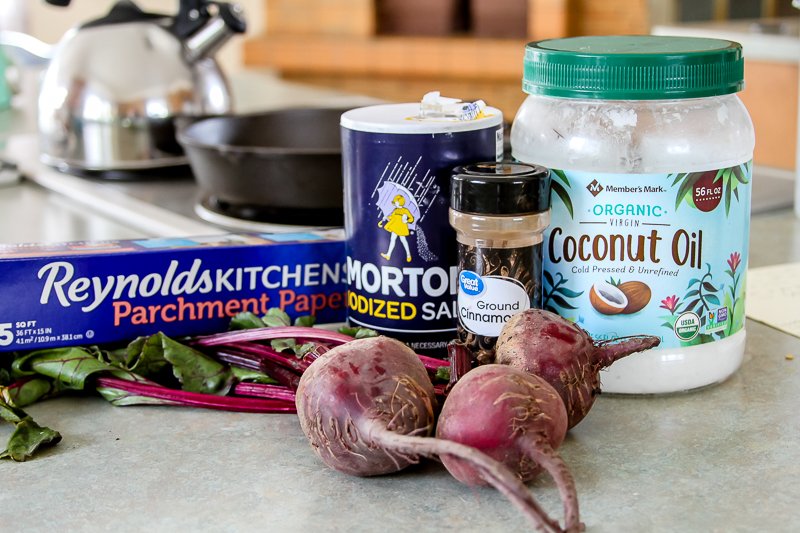
For sweet potato chips these are the ingredients you’ll need:
Sweet Potatoes–the amount is totally up to you. 3 mid sized potatoes will give you a good yield. (One mid-sized sweet potato usually gets me 2-2.5 full cookie sheets of chips.)
Oil–I like to use coconut oil because it adds a little sweetness, but anything will do. Olive, canola, heck just run of the mill vegetable oil will be fine.
Salt–I like coarse salt in my cooking, so that’s what I usually have on hand, but you can use whatever is in your cabinet.
Optional: cinnamon and chili powder–your chips will be fine without it, but I like these flavors on my chips.
Here’s the equipment you’ll need:
Cutting board
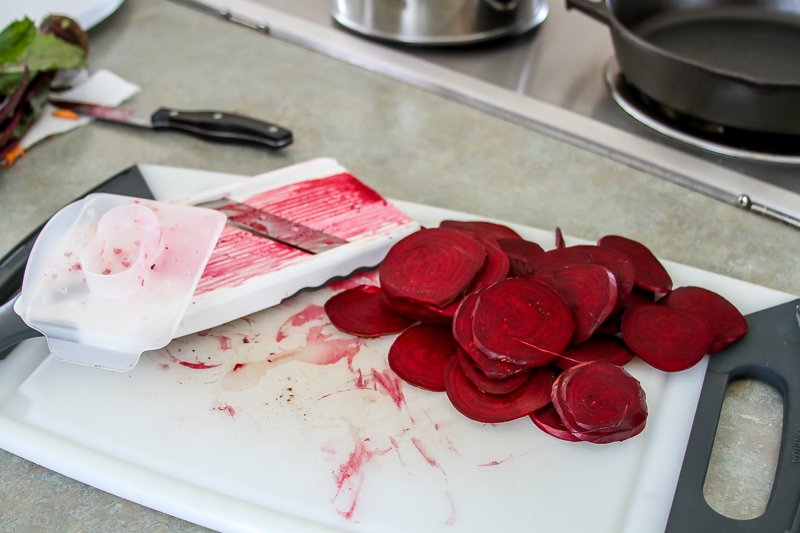
Mandolin slicer–I linked one similar to mine. I super highly recommend if you are going to attempt chips even once to invest in a mandolin. You can get a super cheap one and upgrade later. While you can use a sharp knife to cut slices, it is VERY HARD to get them thin enough or equal in width.
Oven safe casserole dish (metal or glass is fine, I like to use a 9×13)
Tip #3: Work with smaller potatoes
Do you ever notice that sweet potatoes can be GIANT? While that seems like it would produce the best, biggest chips–it’s not the case. Potatoes with a smaller diameter will slice more evenly. Even slices bake more evenly and will crisp better without getting burned edges.
Now here’s the process.
First assemble your ingredients and start heating your oven to 400˚ F.
Tip #4: Always use parchment paper.
I’ve tried doing this without. It’s a stuck-to-the-pan mess. Line two cookie sheets with parchment paper. If you don’t keep parchment paper in your kitchen, you should. It’s the best.
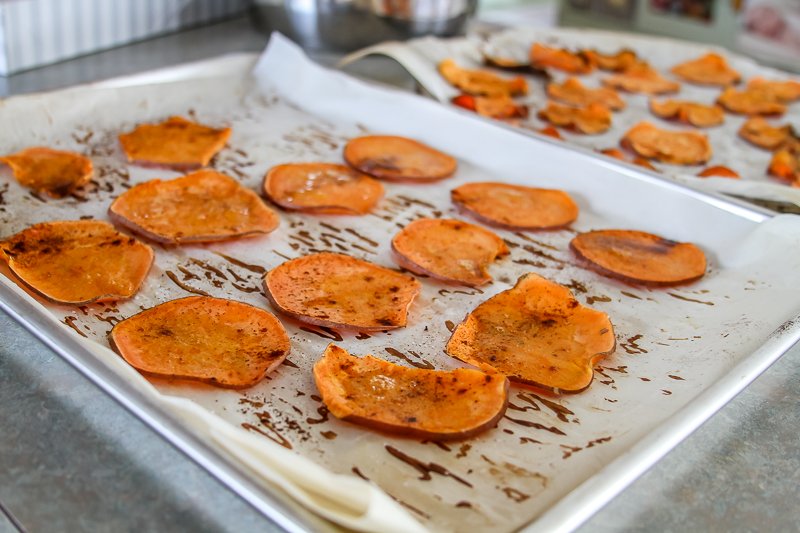
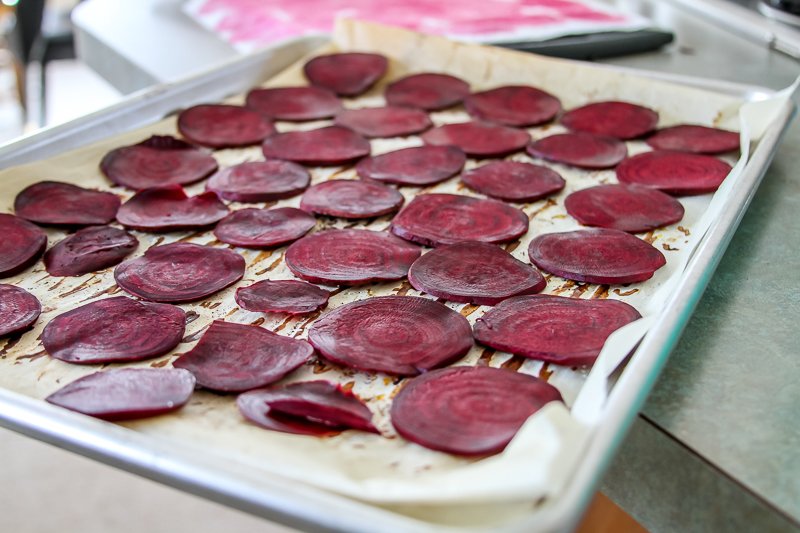
Next, slice up your potatoes as thin as you can. Put as many as you can on each cookie sheet without overlapping them.
Melt your oil–if you are using something that isn’t liquid at room temperature. Brush a little onto each slice. Then sprinkle with salt, cinnamon and chili powder.
Tip #5: Put both sheets in the oven at once.
Bake them for 15 minutes at 400˚. Take them out. Then, flip each slice and return them to the oven on opposite racks. (So the sheet that was on top is now lower and visa versa.)
This is how my chips look after the first 15 minutes. Sometimes super thin slices will be finished at this point.
If you have chips that seem done, (see notes below) pull them off the sheet and put them aside. I like to put them in a 9×13 glass casserole dish. Then flip the others over and return them to the oven.
Tip #6: As you remove chips, condense them onto one sheet.
As you remove done chips to your dish, condense the not-quite-done chips onto one sheet. Then you can start another sheet of completely raw chips and start your next batch.
Return the sheet of chips that needs to keep cooking to the oven for 10 minutes.
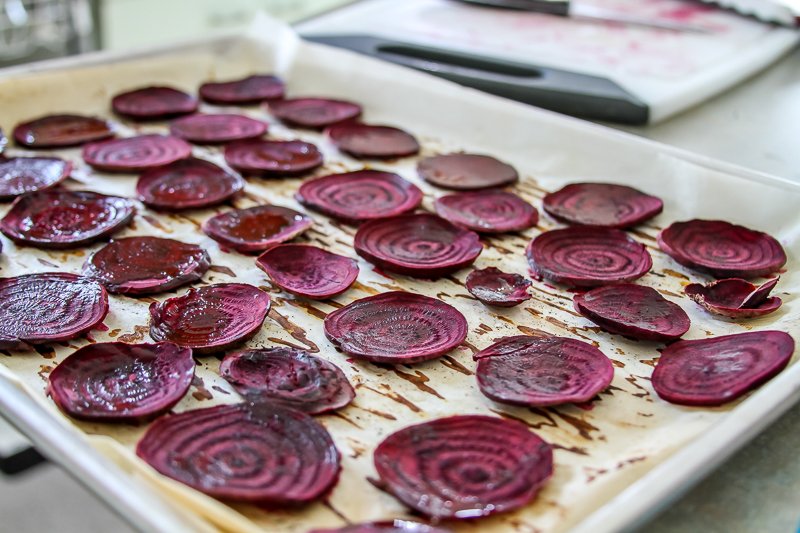
Here’s what my chips look like after 10 more minutes in the oven.
Tip #7: It’s okay if your chips aren’t perfectly crispy yet.
Now here’s where things can vary. At this point, most chips will probably be done. Others maybe not. Heck, depending on your oven, your whole batch might not be done yet and that’s okay. Condense them down, then put them back in the oven. At this point I check in about every 5 minutes. Sweet potato chips can be finicky and can start to burn quickly.
Most of your potato discs might have crispy edges, but the center might still be a little soggy. That’s okay. Don’t be tempted to keep putting them in the oven until the whole chip is dry–that will leave you with bitter burned edges. If the chip looks mostly done and crispy, remove it from the baking sheet.
Tip #8: How do I know they’re done?
They should have changed color a bit–to a lighter orange
They should be mostly dry
The edges should be wavy and a little brown
They should feel a bit rigid.
Tip #9: They’ll get crispier as they cool.
It’s true. Annnnd…you’ll do a Final Crisping.
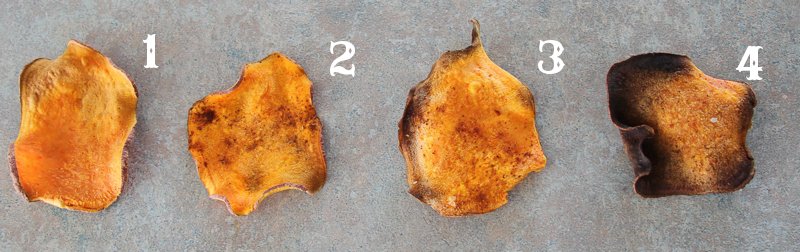
Here is a quick guide to sweet potato chip doneness.
This one is a little under done. you can see that there is a dark orange spot on the left side. It’s still raw.
This chip is just about perfect. Edges are brown but not burned.
This one is edging in on over done–look at the dark edges.
This chip is burned.
Repeat until all are done according to the guidelines below. Then proceed to the Final Crisping. If you are making beet chips too, keep reading. If you are stopping with just sweet potatoes, scroll down to the Final Crisping section.
Okay. Now beets.
For beet chips here are the ingredients you need:
Beets
Salt
Oil–I use coconut, but just like sweet potato chips, you can use any kind.
Optional–cinnamon
You need the same equipment as for sweet potatoes + a mixing bowl and paper towels
Here’s the beet chip making process:
If I’m making both types of chips, I start the beet process while the sweet potatoes are starting to bake.
Assemble your ingredients. Reduce the oven temp to 300˚F.
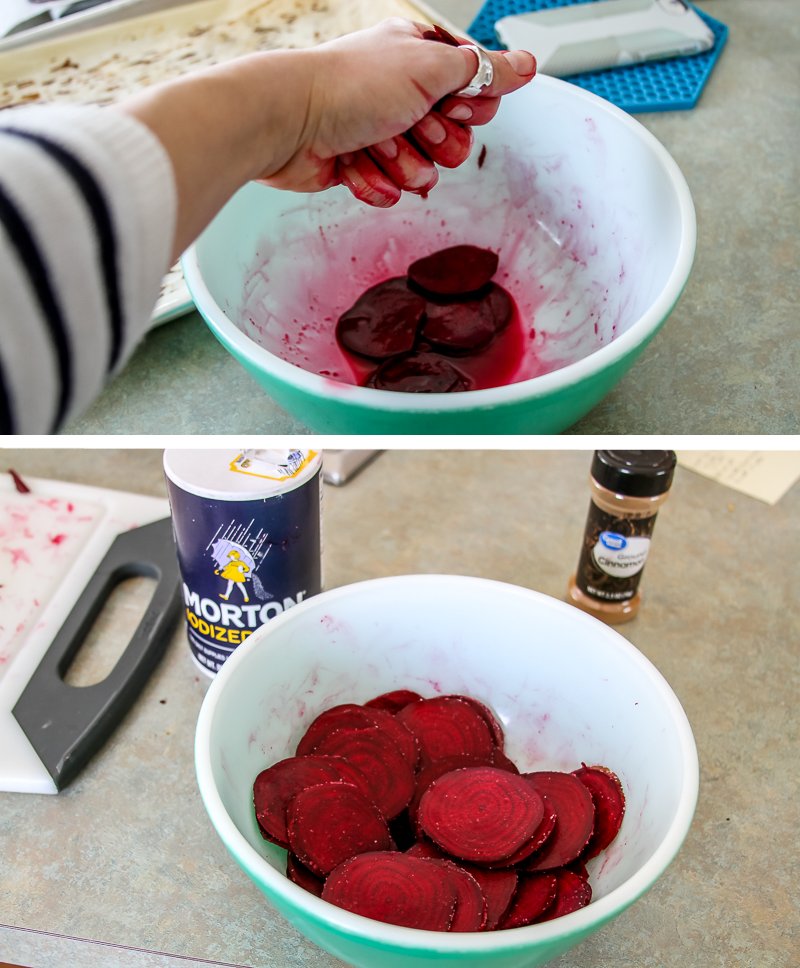
Slice your beets as thin as you can and put them in a bowl.
Tip #1: Always sweat your beets.
Beets are very juicy. Letting them sweat out some liquid will help them cook and crisp.
Once in the bowl, sprinkle them liberally with salt. If you like specifics, I’d say use 2 TBSP for 3-4 beets. But really it doesn’t matter. Salt them, then mix them with your hands a bit to evenly distribute the salt. Let them sweat (stand) for at least 15 minutes. A longer sweat will not hurt them.
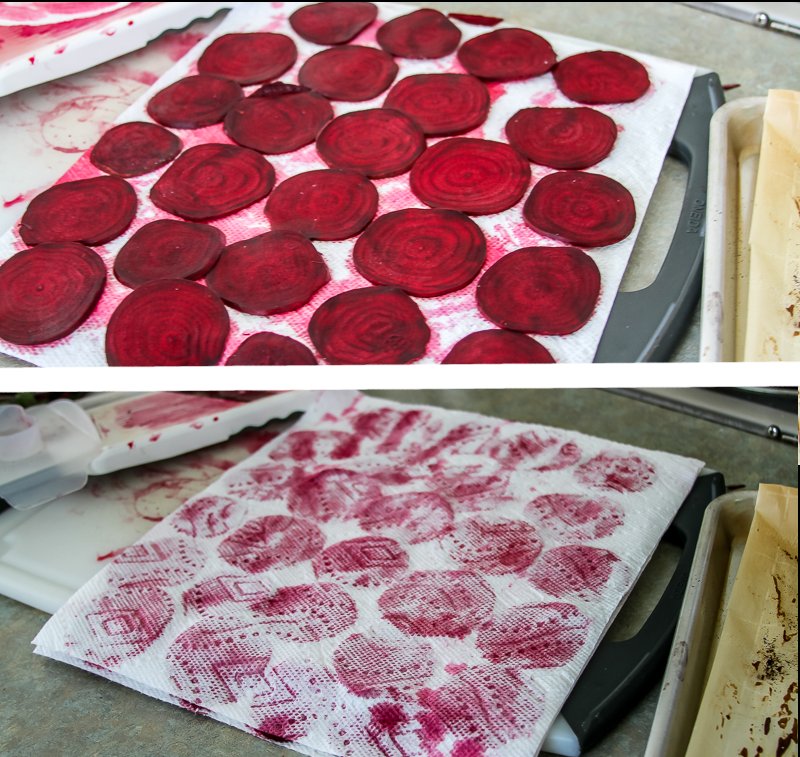
After at least 15 minutes, put a paper towel on your cutting board. Squeeze the beets out and lay them in a single layer on the board. (This may mean you do this part in batches.)
Lay another paper towel over the beets and pat them dry. Once dry, transfer them to parchment lined cookie sheets.
Brush them with oil and sprinkle with cinnamon. You can add a little salt too, but I find that they already have good flavor from the sweat.
Bake these at 300˚ for 30 minutes. Take them out, flip them and switch racks, just like for sweet potatoes.
Let them bake another 15 minutes. Pull any finished chips off the sheet. Put the rest back in and bake them in 10 minute intervals (or shorter if you are nervous) until they are done. (See guidelines below.)
As chips come out done, condense them onto a single sheet. Then start another batch. Repeat until all are done according to the guidelines below.
Tip #2: How can I tell if they’re done?
I didn’t make a side-by-side for these because it’s much easier to tell. Your chips are done when:
They have changed color. They’ll be lighter, but not tan. Burned chips are tan.
The slices do not look wet
The edges have curled a bit and the chip has shrunken
They feel rigid and not meaty
Remember they’ll continue crisping after they come out of the oven. Don’t be tempted to over bake them.
When all the chips are done, move on to the final crisping.
The FINAL CRISPING is key!
Now, reduce the oven temp to 200˚. Place the casserole dish with all the chips in it in the oven. This will finish drying them out without burning them. I give them a little stir about every 30 minutes or so. Leave them in for several hours. You can even turn your oven down to 175˚ and only check in ever hour.
The final crisping makes all the difference in the world. I’m not even joking.
Once they feel dry and crispy take them out and let them cool completely before covering them or putting them in any kind of air tight container.
It is a time consuming process, but its not hard. It’s easy to make these and be a multitasking machine. Do laundry. Watch your baby. Binge watch the British Baking Show. Clean. Whatever.
I hope this has been helpful. Let me know if you give it a try or have tips of your own that I left out!
xo
Amy
PS–Here is a condensed version, if you don’t like reading.
Sweet potato chips:
Sweet potatoes
Oil
Salt
Cinnamon
Chili powder
Slice sweet potatoes and place them in a single layer on a cookie sheet lined with parchment paper. Brush with oil then sprinkle with spices. Bake at 400˚ for 20 minutes. Take them out, flip them and bake for additional 10 minutes. Keep repeating the process until they are done. *See notes on doneness above.
Beet Chips
Beets
Oil
Salt
Cinnamon
Slice your beets and place in a bowl. Sprinkle liberally with salt and let stand for minimum of 15 minutes. Squeeze out and pat dry with paper towel. Place in a single layer on parchment paper lines cookie sheets. Bake 30 minutes at 300˚. Take out, flip and return to oven for 15 minutes. Repeat until done. **see notes on doneness above.
In this post I’m sharing my recipe for Chocolate Zucchini Bread. It’s gluten free and dairy free. But you can also make it using traditional baking flour. If you’d like to read about my adventures in elimination dieting read on. If not, just scroll to the bottom.
When Gideon was born I expected to be tired. I expected night wakings and night feedings and night cryings. I expected to need to try to nap during the day and ride out the months until his fresh little body got days and nights and eating figured out. I even expected nursing hardships until he and I got that figured out.
What I didn’t anticipate was a baby who would be awake thrashing around, grunting and obviously uncomfortable. I didn’t anticipate a baby who would cry while trying to nurse, need to be fed every 2ish hours for months and months. I didn’t anticipate the pained look on my perfect baby angel’s face after eating…or the lakes of spit up that came up every day. Sometimes multiple times in a day.
It was all very yucky. I went to the doctor. I called the nurses line. I switched him from military health care to the private sector (a choice I’ll maybe tell you about some other time.) I knew in my heart of hearts something was amiss. And maybe the saddest part of the whole thing was how happy Giddy was when he wasn’t dealing with an angry belly. He wanted to be happy. He was just chronically uncomfortable during certain times of day. (more…)
For a long time I hated chicken salad. I think it was mostly because I’m not a mayo fan. Then, when I got older and more health conscious, I was glad I didn’t like chicken salad, because it turns out mayonnaise isn’t very good for you. But, as it is a staple baby shower, bridal shower and casual lunch food, I decided years ago to make my own recipe. A recipe that was both healthy and mayo free.
Without further ado, here is my very own recipe for great chicken salad without mayo.
Tonight, I’m sharing that recipe with you. It’s so good. Here’s what you’ll need:
Chicken {I typically use left over chicken breasts from dinner the night before. The amounts in this recipe use about 1.5-2 chicken breasts.}
1/3 cup Low Fat or No Fat Greek Yogurt
1/4 cup Low Fat or Fat Free Ranch
1/4 tsp of: black pepper, garlic powder, and basil
1/2 tsp dill
3 T Dark Mustard
1/2 cup Raisins or Craisins
1/4 cup Almond Slivers
3 Stalks of Celery
Keep in mind that you can alter the amount of celery, raisins/Craisins, and almonds. It’s your lunch, make it how you like it. As a variation you can leave out the dried fruit and sub in 1/2 cup of halved grapes.
Here’s what you do.
I prefer to shred my chicken by pulsing it in my Ninja. But you can shred it with forks or your Kitchen Aide. Whatever you prefer.
In a bowl mix together the yogurt, ranch, mustard, and spices. Add in chicken, celery and fruit. If it looks dry add a little more yogurt or ranch.
It’s that easy and it’s so good. Enjoy! {And don’t forget to Pin it, for easy access.}
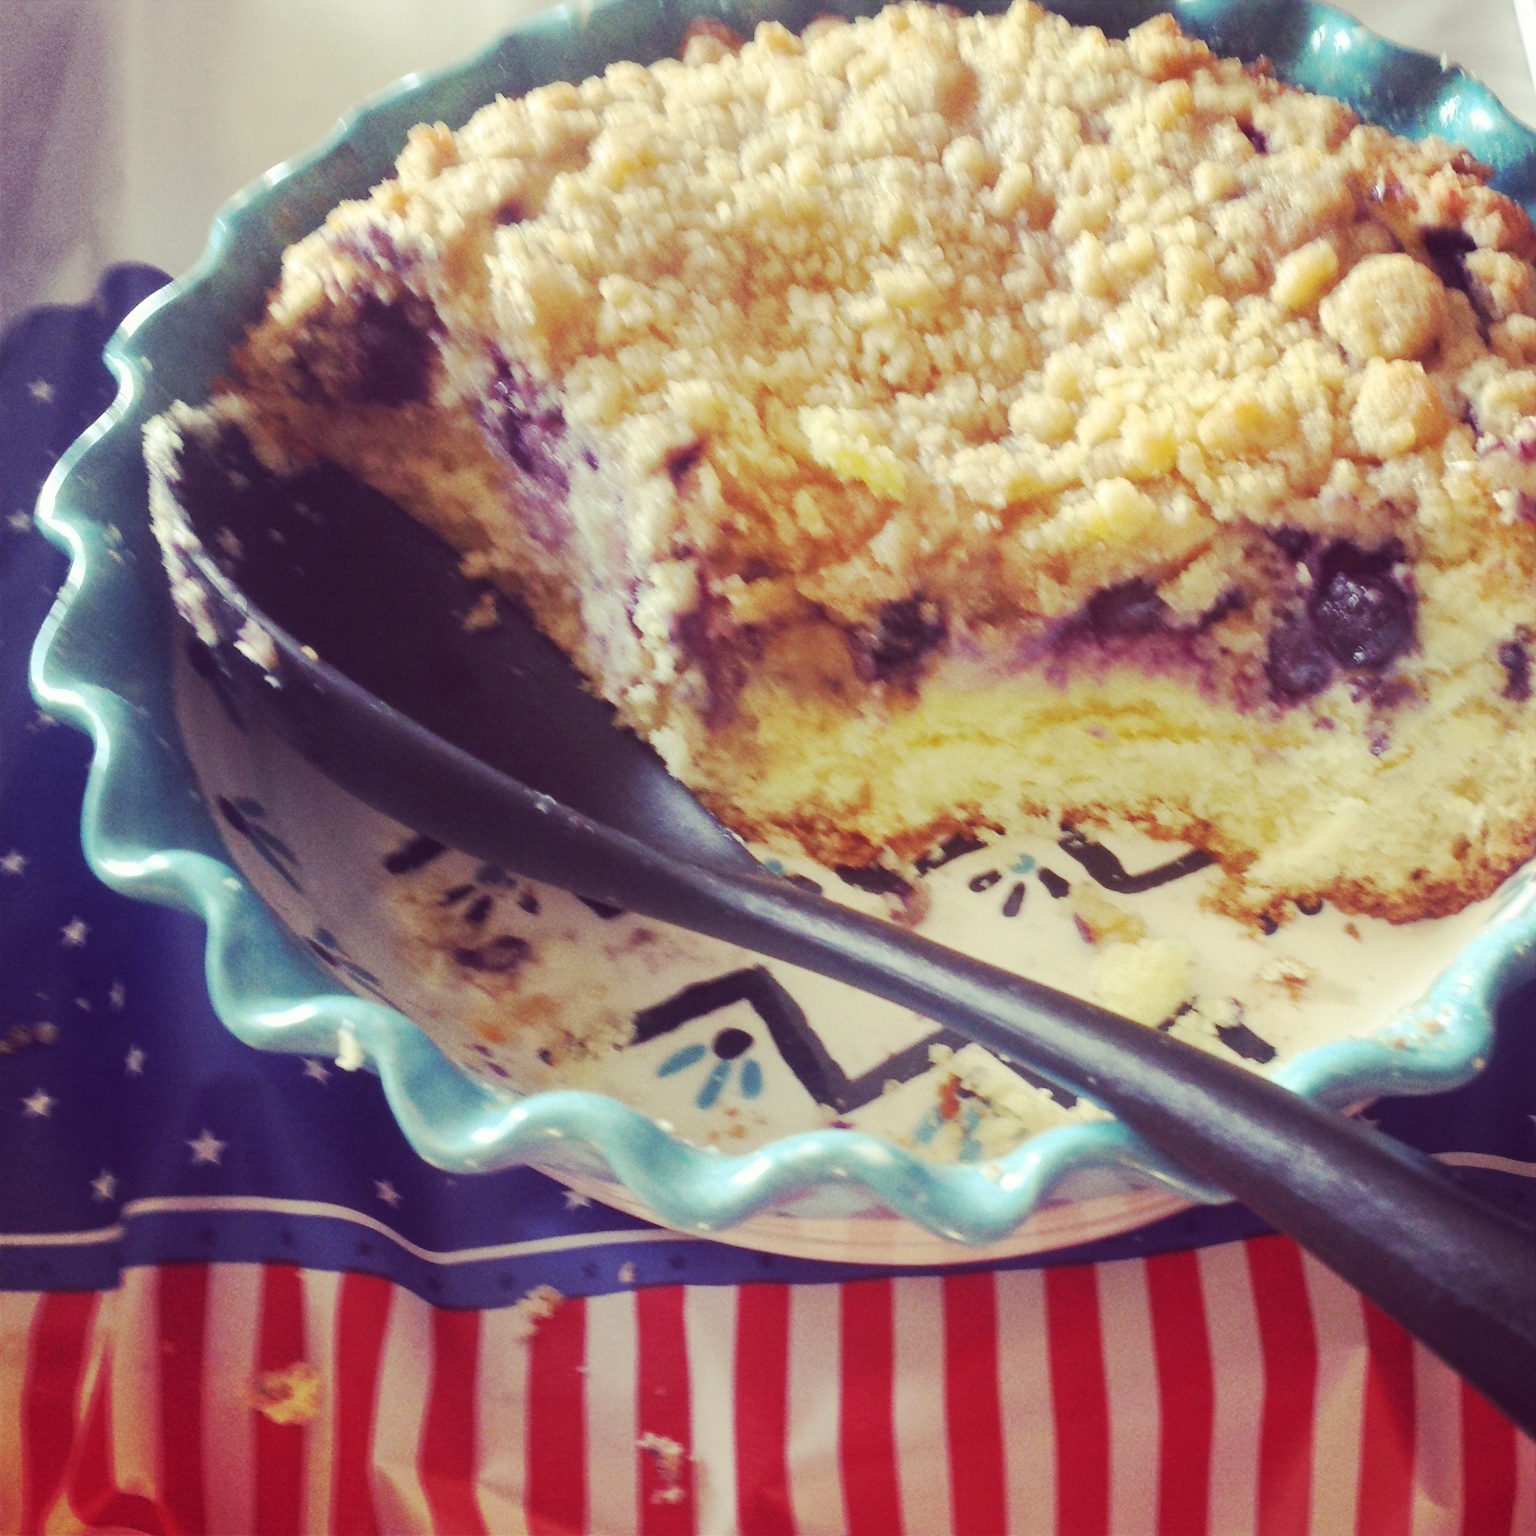
If you follow along on Facebook {which you totally should} or Instagram {I’m @theartoflivingproject} you probably saw that I made one of my favorite summer desserts for a 4th of July get-together yesterday. Today I’m sharing the recipe.
And here’s the big secret. It’s not some family secret, it’s not complicated, it’s not even a recipe I wrote myself. It’s just a recipe, from my all-time favorite, go-to cookbook. The Better Homes & Gardens cookbook. It’s simply the best. If you don’t own a copy, you should invest in one.
Enough of that. Please allow me to move to a different tangent. I hate recipe format. My memory is so short term when it comes to reading and recipes are really a challenge. How they list the ingredients at the start, then they just reference them through the instructions. Like I memorized each ingredient amount? Nah. Maybe they are designed for people who measure everything out before hand, then just dump it in and the instructions call for it. But I’ve never known anyone {except hosts of cooking shows} to bake like that.
So I type my recipes up a little different. They way I’d like all recipes to be. And here’s one for the Blueberry Buckle that I simply love to make in the summer. {One last side note. I actually didn’t actually do much of the baking yesterday. Since I’m still very deep in recovery mode, Derek did most of the bowl lifting, ingredient getting and putting the pan in and out of the oven. I was more of a mixer-supervisor.}
This is a two bowl recipe. Right off the bat, get out two big/medium bowls.
Next get out a pan to bake it in. You can use an 8×8, 9×9…or a deep quiche dish {that’s what mine was in yesterday…but the baking time will be a little longer.} Spray your pan with cooking oil.
Preheat your oven to 350˚
In one bowl mix together:
2 cups of flour
2.5 tsp baking powder
1/4 tsp salt
In the other bowl mix together:
1/2 cup shortening {I use a liquid oil}
3/4 cup sugar
Mix those two things for a few minutes. Until the oil has some air in it and it starts to thicken up. Then add:
1 egg…mix it for about two minutes until the mixture is pretty thick
Now grab your bowl of flour, a 1/3 cup measuring cup and 1/2 cup of milk.
Alternate mixing 1/3 cup of flour into the eggy bowl…and a little bit of the milk. Go back and forth until both are all used up. Then pour the batter into your pan.
Sprinkle 2 cups of blueberries {frozen or fresh} on top.
Now make the topping. This is where I vary from the original recipe. Get your empty flour bowl and add the following things:
1/2 cup of butter, sliced up
3/4 cup sugar
3/4 cup flour
1/2 tsp cinnamon
Use a pastry blender {highly recommended} or two knives to cut the butter into the flour and sugar until it’s crumbly. Then pour it on top of the blueberries.
Bake it uncovered for 50-60 minutes. Test the center with a knife to be sure it is cooked all the way through.
The cookbook also has an alternate option for a raspberry buckle. If that’s more your game just sub in 2 cups of raspberries for the blueberries.
Recently I helped out with a funeral at church. I have to say, it was quite a privilege. I mean, I spent all of my growing up years watching at the “church ladies” serving our congregation…making Swiss steak dinners, doing dishes after the pancake breakfast {naturally using those adorable church dish towels that all church kitchens seem to have}, working concession stands at the fair. As much as I dislike admitting that I’m a grown up, it’s very exciting to finally be one of those “church ladies” who is serving. I think is suits me.
This story is not, however, about church lady nostalgia. It’s the latest edition of Practically Canada Culture Shock.
Okay, I’ll admit…I’ve never written specifically about the PraCan culture shock. But I should have started a long time ago. Over the last year {almost 2!} I’ve alluded to how drastically different things are up here in the great, white north. It’s different like I didn’t know different can be. And the most charming thing about it is that the folks up here don’t even realize it’s quirky or offbeat.
They don’t realize that “normal” 80-something year old women don’t typically make social calls without complaint in -60 degree wind chills. It never crosses their mind to think that skirts and cropped pants aren’t usually worn in the “heat wave” of a 40 degree day. They poke fun at Wisconsin accents…but insist that rag is pronounced “reg” and bag is properly said “beg.” A casserole is a “hot dish” and the correct response to hearing about a friend’s weekend away is “Oh, for fun.”
It’s a different world up here.
I’ve seen a lot and been surprised by a ton. But nothing has taken me aback as much as the funeral food I prepared from behind the counter of First Baptist Church Minot.
I was put on sandwich duty. When I was shown buns, ham, and chicken I thought everything looked pretty regular. I should have known better. This isn’t Indiana, Florida, Oklahoma or anywhere else. This is PraCan…so there’s always a twist.
Sandwich instructions:
One bun split open. Spread margarine liberally one the upper half. Add one piece of lunch meat. Close bun. Place on tray.
Just meat and fake butter?!
Yep. And we made trays of them.
Next up, I was taught to make open faced sandwiches. Now, where I come from this means a bun split open with hot roast beef or turkey, topped off with mashed potatoes and covered in gravy. Or something vaguely similar.
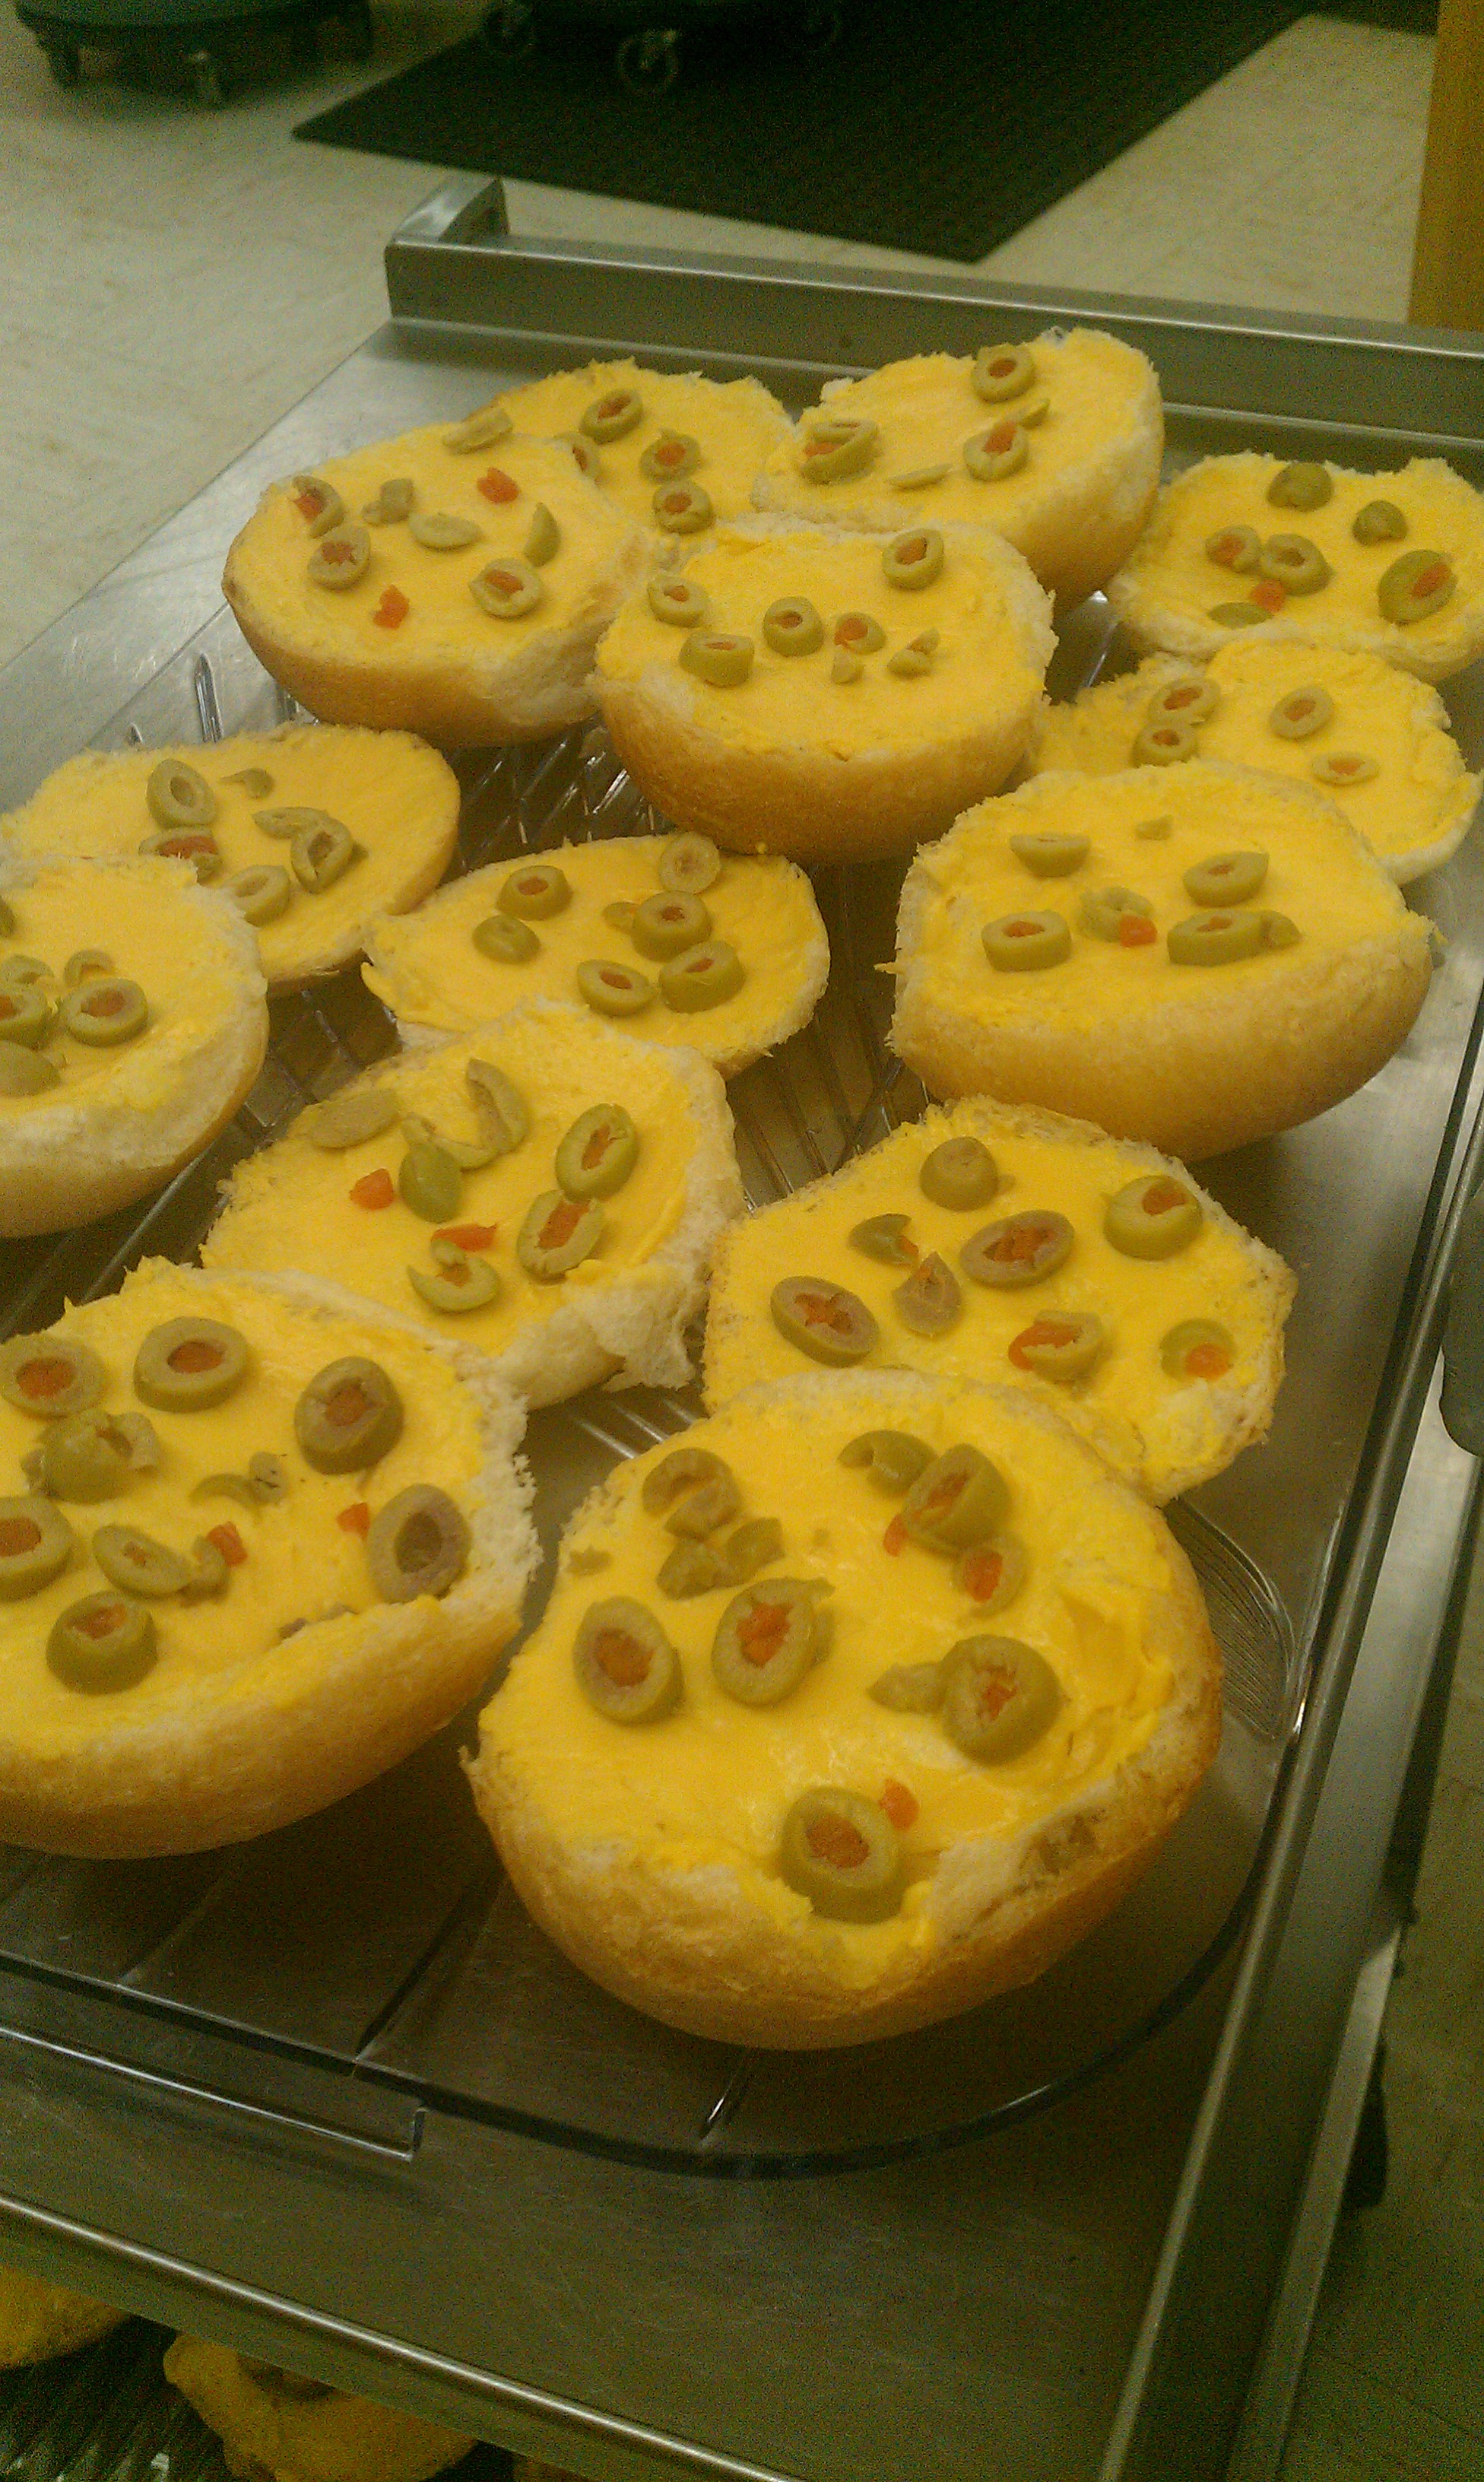
Now, hang on tight. What I’m about to describe is not for the weak stomached. In Practically Canada, an open faced sandwich is made like this:
One half of a sandwich bun. Add a thick spread of Cheese Whiz. Top with sliced green olives from a jar. Eaten cold.
Folks, I cannot make this stuff up. And we made trays of them. And get this…they were the first to be eaten. When the mourners came down from the funeral service to the luncheon I saw folks stacking two or three of these bad boys on their plate. The ladies in the kitchen with me reminisced about how much they love open face sandwiches, and it’s such a bummer that they are only eaten at funerals.
What?!
It’s a funeral food. What I can surmise is that this delicacy is something quite special. While to the average PraCan outsider it may look like a disgusting sodium trove, to the natives its ceremony. Like the Matzah Ball on Passover. Like mulled wine at Christmas.
A friend who happens to be about my age, and not a native, came through the food line. I was busy on the other side of the counter pouring lemonade from one of those class church-kitchen-pitchers.
“Did they make you eat one of the open-faced sandwiches?”
“No one could ever make me to that. That is straight up nasty. Why do they eat that?”
“I don’t know. It’s funeral food. Maybe it’s like the bitter herbs of Passover. It reminds them of bad times and makes them feel sad inside.”
That’s a theory. And I think it’s pretty viable. It made me sad just to make them. I guess there are some things that separate the wanna be Practically Canadians from the natives.
Renew your zeal for the Bible with three days of exclusive devotionals! Interesting and relevant writings and reflection questions will remind you why the Word of God is so awesome. You'll learn a lot and you'll leave excited to know God more and grow deeper in your faith.
Your kick-start is on the way!
You've always dreamed of reading the Bible in chronological order. Now you can!
Getting my printable PDF plan is easy. It's not fancy, but it does fold easily into a bookmark, so you can keep it close by and easily see what's coming next. I hope you find it as useful as I do.
**Remember to check your PROMOTIONS FOLDER. Even if your confirmation comes to your normal inbox, the actual download may come to that pesky promotions folder instead!**